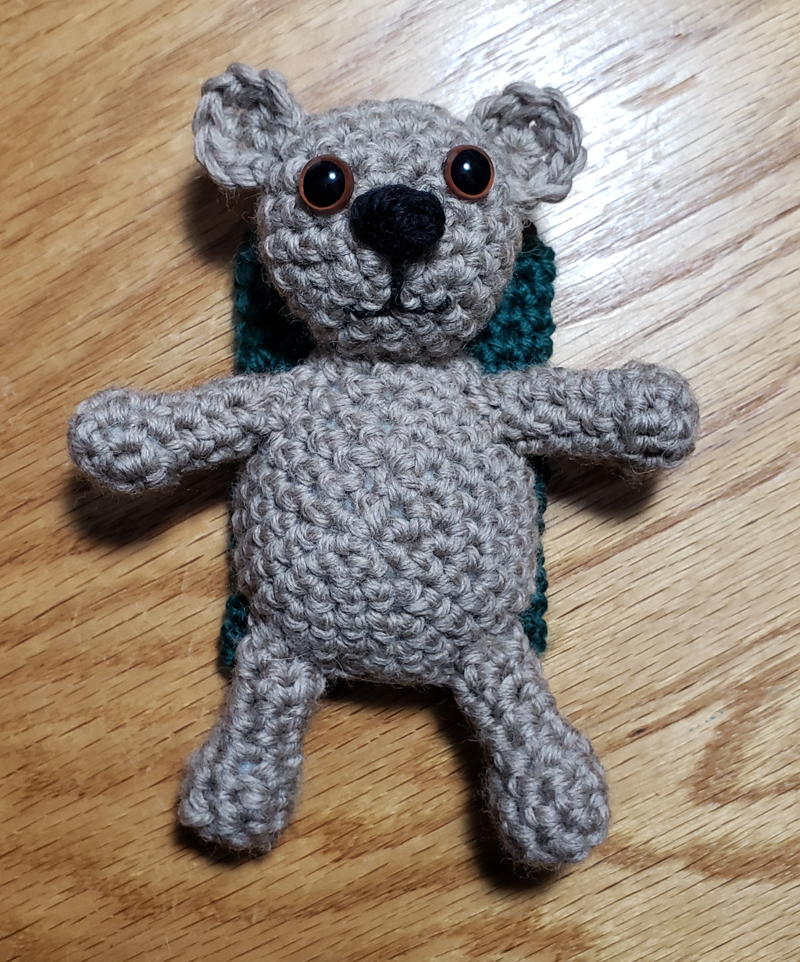
I hope you are all enjoying the festive season. It seems like December gets here faster every year. But to start off my December I have a fun little pattern to share with you, this little bear can be an ornament on your tree or stocking stuffer. They have a pouch to hold a standard gift card on their back.
This pattern is part of the 2022 Holiday Stashdown CAL you can find all the details on following along or catching up by clicking on the Stashdown link above. The Holiday Stashdown CAL is the fifth and final crochet along of 2022 hosted in the CAL Central Facebook and Ravelry groups. This call includes 22 free crochet patterns for winter holiday gifts, decorations, gift wrap, and more! Join us to make wonderful projects, chat with other crocheters, and enter for your chance to win a prize!
I chose this little bear gift card holder because you can make them with bits of yarn left over in your stash from other projects. The entire project takes less than 65 yards to crochet.
A Very Beary Christmas (Gift Card holder)
Designed by Andee Graves
Skill Level: Intermediate
Description: Slide a gift card into the pouch of this sweet little teddy bear as a fun way to celebrate the holidays with your family or friends. Make them for stocking stuffers or add a hanging loop to add to your holiday tree.
Finished Size: 6.25” (15.6 cm) – 5.5” (13.75 cm) inches tall
Materials:
Yarn Worsted Weight Acrylic yarn: Pouch takes about 15 yards, Bear takes less than 50 yards, nose 1 yard and bowtie 2 yards.
Sample 1: Red Heart “With Love”, #4 medium , 100% Acrylic, 7 oz/198 g, 370yards/338 m.
Sample 2: Berroco “Ultra Wool”, #4 Medium, 100% superwash wool, 3.5 oz/100 g, 219 yds/200 m.
Notions: Safety Eyes (9-10 mm) or buttons for Bears eyes (if making for a child under 5 years embroider eyes with black yarn), black pearl cotton for embroidering mouth, appropriate yarn and embroidery needles for finishing, a handful of polyfill for stuffing.
Hooks H-8/5mm
Gauge: 4 rounds for Head Back = 2”/5 cm diameter in “With Love”; 1 7/8”/4.7 cm diameter in “Ultra Wool”.
Pattern notes: All rounds for bear are worked in spirals unless otherwise noted. Use an adjustable slip knot to make tightening center of rounds easier. Weave in beginning tails as you finish each piece or when instructed in pattern. Leave long tails at ends of pieces to use to sew bear together. Pouch is made in joined rounds without turning. You may find it helpful to use a stitch marker in the last stitch of the round to help you keep track of rounds.
The RS of fabric for all the bear pieces is the back side of your fabric, the WS is the front of stitches.
Instructions:
Head (Back) Bear Color
Rnd 1: ch 2, 6 sc in 2nd ch from hook. (6 sc)
Rnd 2: (2 sc in next st) 6 times. (12 sc)
Rnd 3: (sc in next st, 2 sc in next st) 6 times.(18 sc)
Rnd 4: (sc in each of next 2 sts, 2 sc in next st) 6 times, fasten off with 6 inch tail. (24 sc)
Head (Front) Bear Color with Nose Color
Rnd 1: With main color, ch 2, (3 sc, {switch to nose color} 3dcCL {switch back to main color}, 3 sc) in 2nd ch from hook. (6 sc, 1 CL)
Rnd 2: 2 sc in each of next 3 sts, sc in CL, 2 sc in each of next 3 sts. (13 sc)
Rnd 3: (*sc in next st, 2 sc in next st*) 3 times, sc in each of next 3 sts, Rep from * to * 2 times. (18 sc)
Rnd 4: (sc in each of next 2 sts, 2 sc in next st) 6 times. (24 sc)
Rnd 5: Sc in each st around, fasten off with a 10 inch long tail.
Ears (make 2) Bear Color
Rnd 1: ch 2, 6 sc in 2nd ch from hook.
Rnd 2: 2 sc in next 3 sts, sl st next 2 sts, fasten off with 8 inch long tail.
Arms (make 2) Bear Color
Rnd 1: ch 2, 6 sc in 2nd ch from hook.
Rnd 2: (1 sc in next st, 2 sc in next st) 3 times, weave in beginning tail.
Rnd 3: (1 sc in next st, sc2tog next st) 3 times.
Rnd 4 – 7: sc in each st around, fasten off with an 8 inch long tail.
After Rnd 4 lightly stuff hand end with poly fill.
Legs (make 2) Bear Color
Rnd 1: Ch 2, 6 sc in 2nd ch from hook.
Rnd 2: (1 sc in next st, 2 sc in next st) 3 times, weave in beginning tail.
Rnd 3: Sc in each st around.
Rnd 4: (1 sc in next st, sc2tog over next 2 sts) 3 times.
Rnd 5 – 8: Sc in each st around, fasten off with an 8 inch long tail.
After Rnd 5 lightly stuff foot end with poly fill.
Body (make 1) Bear Color
Rnd 1: Ch 2, 3 sc in 2nd ch from hook, ch 2, sc in back bar of 2nd ch from hook, 3 sc in sam place as first 3 sc. (7 sc)
Rnd 2: 2 sc in each of next 2 sts, sc in each of next 2 sts, 4 sc in next st, sc in next st, 2 sc in each of next 2 sts. (15 sc)
Rnd 3: *(Sc in next st, 2 sc in next st) 2 times*, sc in each of next 3 sts, 3 sc in next st, sc in each of next 3 sts, Repeat from * to * once. (21 sc)
Rnd 4: *(Sc in each of next 2 sts, 2 sc in next st) 2 times*, sc in each of next 4 sts, 3 sc in next st, sc in each of next 4 sts, Repeat from * to * once. (27 sc)
Rnd 5: *(Sc in each of next 3 sts, 2 sc in next st) 2 times*, sc in each of next 5 sts, 3 st in next st, sc in each of next 5 sts, Repeat from * to * once. (33 sc)
Rnd 6: *Sc in each of next 16 sts*, 3 st in next st, Repeat from * to * once, sl st in next 2 sts, fasten off with a 10 inch long tail. (35 sc)
Card Pouch (make 1) Pouch color
Rnd 1: With Color B, ch 11, sc in back bar of 2nd ch from hook, sc in back bar of each rem ch to end, turn to work along the opposite side of chain, sc in each 10 sts, sl st to first sc to join. (20 sc)
Rnd 2: Ch 1, sc in each st around, sl st to first sc to join. (20 sc)
Rnds 3 – 16: Repeat Rnd 2. Fasten off.
Bowtie (make 1) Bow Color
Ch 15, sl st tightly in 10th ch from hook, ch 9, sl st tightly in 10th ch from hook, ch 5, fasten off. Pull on beginning and ending tails to tighten knots. Trim short.
Cut an additional 10 inch length of same color, wrap around center of bow 2 or 3 times and tie in back, use loose ends to sew in place on bear following finishing directions.
Finishing
Embroider mouth on RS of Front Head. Sew buttons or place safety eyes on Front of Head.
Sew front and back of head together using a whip stitch joining last rounds. Leave a small opening and stuff with fiberfill, after stuffing sew opening closed.
Sew body of bear to front layer of card pouch using photo for reference as to placement. It is helpful to have a card in pouch while sewing. Sew to front layer of pouch using a whip stitch, leaving a small opening and stuff with fiberfill, after stuffing sew opening closed.
Sew ears, with tops pointed outward and WS facing forward, to either side of top half of bear’s head.
Sew Head to top of body and front layer of pouch
Using long ending tail sew Arms and Legs to body spaced as in photo.
Place bow in front under head on body, sew in place.
Weave in any remaining tails. Add your favorite method for ornament hanging to top of Bear’s head.