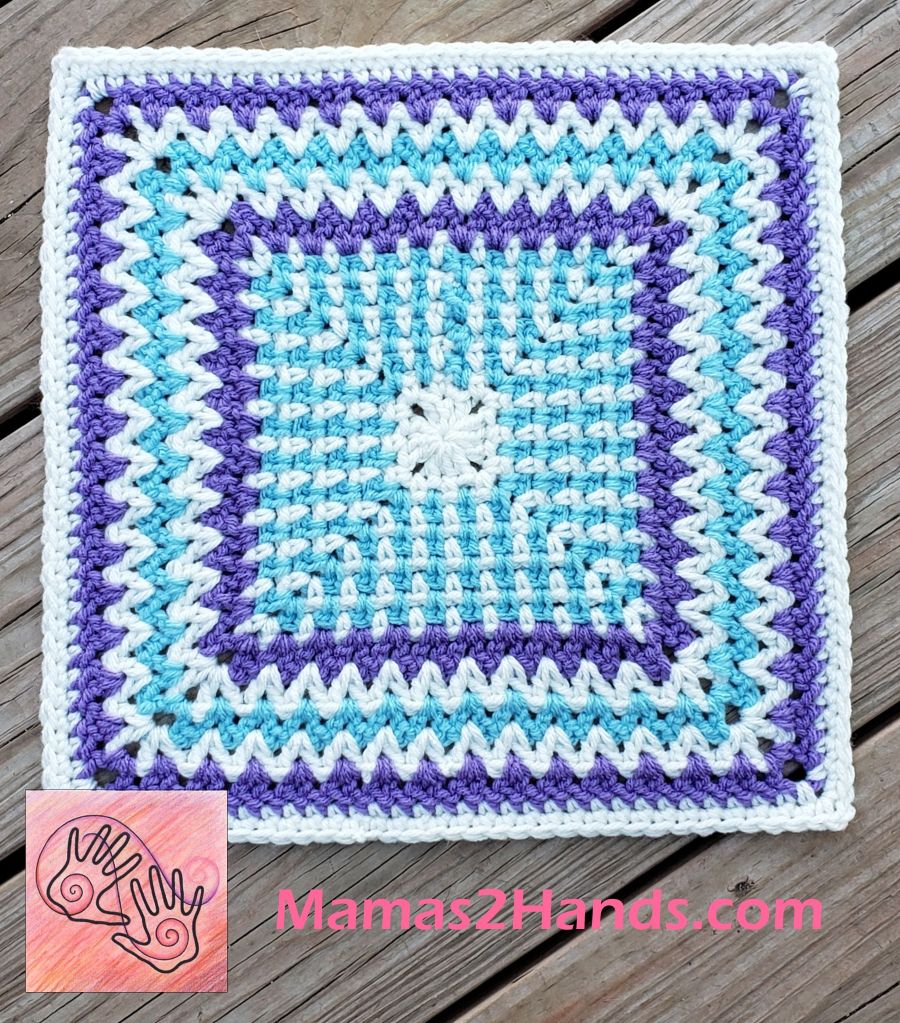
Another trip around the sun and another Afghan Square pattern for my readers. Once again I wanted to create a square that is a little easier than some of my other squares. This square has a bit of a Retro vibe with skinny V-stitches creating the fun Ric Rac border. The square starts off with a classic granny square for round 1, then alternating colors for each round worked in Linen Stitch to create a fun striped effect.
This square is Block #21 in the 2025 Moogly CAL. You can see Tamara’s notes on her square here at MooglyBlog.com as well as finding the links to the other CAL blocks.

Retro Ric Rac Afghan Square
Designed by Andee Graves
Skill level: Easy Intermediate
Finished Size: 12” square
Materials:
Yarn – Worsted weight yarn in 3 colors – Sample uses Red Heart “With Love” 100% Acrylic (7 oz/198 g, 370 yds/338 m),
Color A: #1101 Eggshell {aprox 31 g, 58 yds/53 m}
Color B: #1502 Iced Aqua {aprox 40 g, 74 yds/68 m}
Color C: #1538 Lilac {aprox 14 g, 26 yds/24 m}
Hook – J / 6mm or size needed to meet gauge
Notions – Yarn/tapestry needle, Locking stitch markers (4)
Gauge – First 6 rounds of pattern = 4” across square
Abbreviations/Special Stitches
(RS) Right Side: The side that will be the primary/public side of the fabric.
(WS) Wrong Side: The side that will be the back side of the fabric.
(PM) Place Marker
(sl st) Joining slip st: Insert hook in indicated place, YO, pull up a loop through indciated place and loop on hook, continue to pull up on working loop until original loop is tight. Where instructed for color changes, pull a loop of old color and new color through loop on hook.
(Standing dc) Standing Double Crochet: Make slip knot and place loop snugly on shaft of hook, yo and insert hook into indicated place, yo, pull up a loop, (yo, pull through 2 loops on hook) twice.
(SkV-st) Skinny V-stitch: 2 dc in indicated st or sp, next row or round 2 dc are worked between the 2 dc on previous row or round.
Pattern Notes:
Start square with an adjustable slip knot. Beginning tail tightens the loop on the hook.
Keep tails on wrong side of square as you work to help track which is wrong side and right side.
Stitch counts at the end of each round and row are shown in italicized brackets at end of each round.
Center will be started with granny shells then worked in linen stitch, switching between 2 colors each round {without cutting yarn} to create vertical stripes, then 5 rounds of Stacked Skinny V sts to create zig-zags changing colors each round. Final 2 rounds of single crochet are both worked as RS rounds.
Rounds are not turned for every round, check if Round is listed as RS or WS.
Instructions
Rnd 1 (RS) Color A: Begin with Color A. Starting with adjustable slip knot, ch 4 {counts as center and first dc},
(dc, ch 2, {3 dc, ch 2} 3 times, dc) in 4th chain from hook, sl st to join to top of beginning ch, PM in each ch-2 sp. [4 Shl, 4 ch-2 sp]
Rnd 2 (RS) Color A: Ch 1, sc in same st as join, [ch 1, skip next st (sc, ch 2, sc) in marked ch-2 sp, move marker to ch-2 sp just made, ch 1, skip next st, sc in next st] 4 times, ch 1, sl st to join to first sc of Rnd pulling up a loop of Color B through sl st {you will have a loop both colors on hook} Do Not Fasten off Color A, pull up longer working loop of Color A and move to WS of square along with working yarn of Color A. [12 sc, 8 ch-1 sp, 4 ch-2 sp]
Rnd 3 (WS) Color B: With Color B, ch 1, turn, [sc in next ch-1 sp, ch 1, skip next st (sc, ch 2, sc) in marked ch-2 sp, move st marker to ch-2 sp just made, ch 1, skip next st, sc in next ch-1 sp, ch 1] 4 times, sl st to join to first sc of Rnd pulling up previous loop of Color A through sl st. Do Not Fasten off Color B, pull up longer working loop of Color B and move to WS of square along with working yarn of Color B. [16 sc, 12 ch-1 sp, 4 ch-2 sp]
Rnd 4 (RS) Color A: With Color A, ch 1, turn, [sc in next ch-1 sp, ch 1, skip next st] 2 times, [*(sc, ch 2, sc) in marked ch-2 sp, move st marker to ch-2 sp just made, {ch 1, skip next st, sc in next ch-1 sp*} 3 times, ch 1] 3 times, Repeat from * to * once, ch 1, sl st to join to first sc of Rnd pulling up previous loop of Color B through sl st. Do Not Fasten off Color A, pull up longer working loop of Color A and move to WS of square along with working yarn of Color A. [20 sc, 16 ch-1 sp, 4 ch-2 sp]
Rnd 5 (WS) Color B: With Color B, ch 1, turn, [*sc in next ch-1 sp, ch 1, skip next st*, Repeat from * to * until reach marked ch-2 sp, (sc, ch 2, sc) in marked ch-2 sp, move st marker to ch-2 sp just made, ch 1] 4 times, Repeat from * to * until reach beginning of Rnd, join with sl st first sc of Rnd pulling up previous loop of Color A through sl st. Do Not Fasten off Color B, pull up longer working loop of Color B and move to WS of square along with working yarn of Color B. [24 sc, 20 ch-1 sp, 4 ch-2 sp]
Rnd 6 (RS) A: With Color A, ch 1, turn, [*sc in next ch-1 sp, ch 1, skip next st*, Rep from * to * until reach marked ch-2 sp, (sc, ch 2, sc) in marked ch-2 sp, move st marker to ch-2 sp just made, ch 1] 4 times, Rep from * to * until reach beginning of Rnd, join with sl st first sc of Rnd pulling up previous loop of Color B through sl st. Do Not Fasten off Color A, pull up longer working loop of Color A and move to WS of square along with working yarn of Color A. [28 sc, 24 ch-1 sp, 4 ch-2 sp]
Rnd 7 (WS) B: Repeat Rnd 5. [32 sc, 28 ch-1 sp, 4 ch-2 sp]
Rnd 8 (RS) A: Repeat Rnd 6. [36 sc, 32 ch-1 sp, 4 ch-2 sp]
Rnd 9 (WS) B: Repeat Rnd 5. Fasten off Color B. [40 sc, 36 ch-1 sp, 4 ch-2 sp]
Rnd 10 (RS) A: Repeat Rnd 6. Fasten off Color A. [44 sc, 40 ch-1 sp, 4 ch-2 sp]
Rnd 11 (WS): With Color C and wrong side facing, begin with Standing dc in any ch-1 sp along a side, dc in same sp as first st {counts as first SkV-st of Round}, skip next st, [SkV-st in each ch-1 sp until reach marked ch-2 sp at corner, (dc, ch 2, dc) in ch-2 sp, move st marker up to ch-2 sp just made] 4 times, 2 dc in each ch-1 sp until reach start of Rnd, join with sl st to Standing dc at start. Fasten off Color C. [40 SkV-st, 8 dc, 4 ch-2 sp]
Rnd 12 (RS): With Color A and RS facing, begin with Standing dc between 2 dc of any SkV-st along a side, dc in same place as first st {counts as first SkV-st of Round}, skip next 2 sts, [SkV-st in between the 2 dc of each SkV-st until reach marked ch-2 sp at corner, (SkV-st, ch 2, SkV-st) in ch-2 sp, move st marker up to ch-2 sp just made] 4 times, SkV-st in between the 2 dc of each SkV-st until reach start of Rnd, join with sl st to Standing dc at start. Fasten off Color A. [48 SkV-st, 4 ch-2 sp]
Rnd 13 (WS): With Color B and WS facing, begin with Standing dc between 2 dc of any SkV-st along a side, dc in same place as first st {counts as first SkV-st of Round}, skip next 2 sts, [SkV-st in between the 2 dc of each SkV-st until reach marked ch-2 sp at corner, (dc, ch 2, dc) in ch-2 sp, move st marker up to ch-2 sp just made] 4 times, SkV-st in between the 2 dc of each SkV-st until reach start of Rnd, join with sl st to Standing dc at start.
Fasten off Color B. [48 SkV-st, 8 dc, 4 ch-2 sp]
Rnd 14 (RS): Repeat Rnd 12. [56 SkV-st, 4 ch-2 sp]
Rnd 15 (WS): With Color C, repeat Rnd 13. [56 SkV-st, 8 dc, 4 ch-2 sp]
Rnd 16 (RS): With Color A and RS facing, attach with sl st to any st along the side, ch 1, [sc in each st until reach marked ch-2 sp, (sc, ch 2, sc) in marked ch-2 sp, move st marker up to ch-2 sp just made] 4 times, sc in each st until reach start of Rnd, join with sl st to first sc of Rnd. [128 sc, 4 ch-2 sp]
Rnd 17 (RS): Ch 1, [sc in each st until reach marked ch-2 sp, (sc, ch 2, sc) in marked ch-2 sp, move st marker up to ch-2 sp just made] 4 times, sc in each st until reach start of Rnd, join with sl st to first sc of Rnd. [136 sc, 4 ch-2 sp]
Finishing
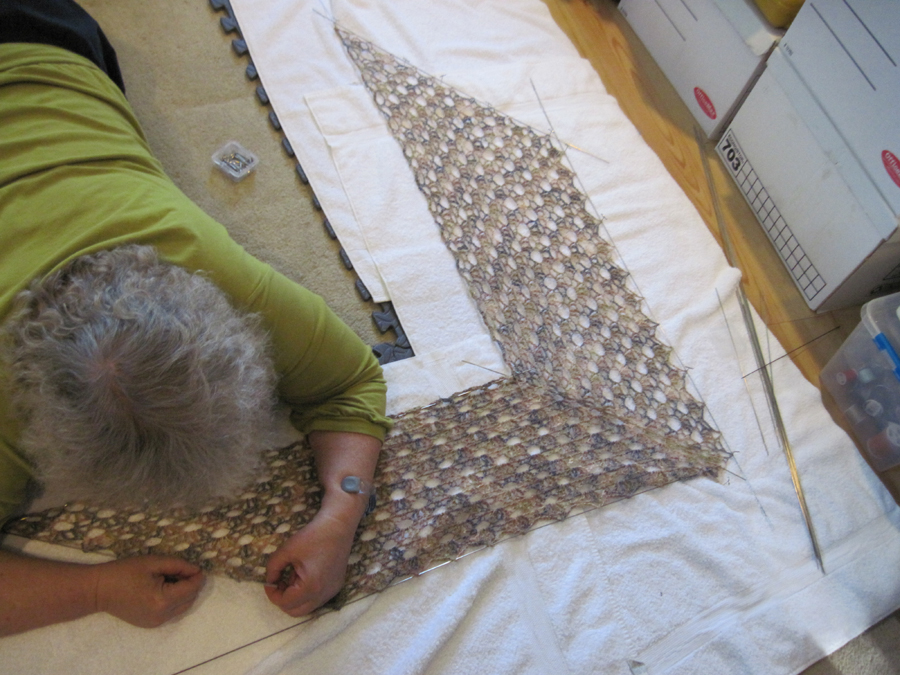
Weave in tails and block.