I love March. It is National Crochet Month, National Crafting Month and it has my favorite geeky day…Pi Day.
March 14 is written as 3/14 for most of us here in the US and 3.14 is the short form for Pi. For those of you uncertain what Pi is…it is a mathematical constant that is the ratio of a circle’s circumference to its diameter, approximately equal to 3.14159. It also appears in many formulae across mathematics and physics.
For my crochet design work I tend to use the short form of 3.14. That is more than enough accuracy for creating circles for hats, bags and rugs.
This month I’ve been busy with fun crochet projects at the Longmont Yarn Shoppe. We yarn bombed the tree in front of the shop. My friend Margie in the Casual Crochet group also has us all participating in “Random Acts of Crochet Kindness”. My favorites are the ones made using Googly Eye Finger Puppets.
Like this snuggly “Pocket Hug”. If you would like to make your own Pocket Hug I’ve included the pattern here today. I had fun coming up with the basic circle that I used for this pattern. I had to get a little creative with how I worked the center of the circle, since it is worked around the ring of the Googly Eye Finger Puppet.
CL (2 double crochet Cluster Stitch) – (yo, insert hook in indicated place, yo, pull up a loop, yo, pull thru 2 loops) 2 times, yo, pull thru remaining 4 loops on hook.
Pattern Notes:
Round 1 of stitches is worked into the finger ring of the googly eye puppet.
Instructions
Circle with Arms
Rnd 1: With googly eyes of puppet facing, attach yarn with a slip st in the puppet finger ring, ch 1, 10 sc in ring, ch 2, bring hook behind googly eyes, sl st to join to first sc worked in ring. (10 sc, 1 ch-2 sp)
Rnd 2: (Ch 3 {counts as first dc}, dc) in same st as join, 2 dc in each of next 9 sts, 4 dc in ch-2 sp, join with sl st to top of beginning ch-3. (24 dc)
Rnd 3: Ch 2 {counts as first hdc}, hdc in next st, 2 hdc next st, hdc in next st, ^ ch 6, CL in 3rd st from hook, sc in back bar of each of next 3 chs, sl st thru front loop and side loop of previous hdc,^ hdc in next st, 2 hdc in next st, *(hdc in each of next 2 sts, 2 hdc in next st)3 times,* Rep from ^ to ^ once, Rep from * to * once, sl st to join to top of beginning ch-2. (32 hdc, 6 sc, 2 CL)
Heart
This is my Simple Sweetheart pattern from February 2012
Rnd 1: Starting with adjustable slip knot, ch 2, 7 sc in 2nd ch from hook, join with sl st to first sc of Rnd. (7 sc)
Rnd 2: Skip 1 st, 5 dc in next st, 1 dc in next st, (dc, picot, dc) in next st, dc in next st, 5 dc in next st, skip next st, join with sl st to first sc of Rnd 1. Fasten off. (14 dc, 1 picot)
Finishing
Use tails for sewing pieces together. Sew Heart to front of Circle below eyes. Fold arms of circle so they are hugging the heart, sew in place. Weave in any remaining tails.
National Crochet Month is zipping by, and I am honored to be celebrating by participating again in the Crochetville NaCroMo 2015 Blog Tour. Amy Shelton and Donna Hulka are terrific supporters of the crochet community and designers.
Amy and I in Reno at the Knit & Crochet Show (yes, she is wearing a tiara)
I’ve met both of them in person thru the Crochet Guild of America (CGOA) and have spent many fun and often inspiring hours in their company.
One of my favorite things about being a member of the CGOA is how it has put me in touch with lots of other crocheters. I’ve met many wonderful crochet friends thru my involvement in CGOA, like Amy and Donna. It’s great fun to be with your “people”, folks that understand this love of playing with yarn. If you haven’t joined CGOA you may want to consider doing so, the annual conference is great fun to attend, but there is even more. Opportunities to meet up locally with other crocheters and to meet online on the CGOA website. The website is: Crochet.org.
As the owners and creators of the Crochetville community and dedicated CGOA members themselves, Amy and Donna are always aware of the importance of supporting others thru charitable work. This year’s blog tour charity project is making hats (or making a monetary donation) for Halos of Hope.
Halos of Hope is a 501(c)3 not-for-profit organization committed to providing volunteer-crafted hats to cancer centers across the country. You can make and send in hats to Crochetville in Alabama or donate money to help Halos of Hope pay for shipping hats to the centers. You can find the mailing address and read more about this project on the Crochetville blog.
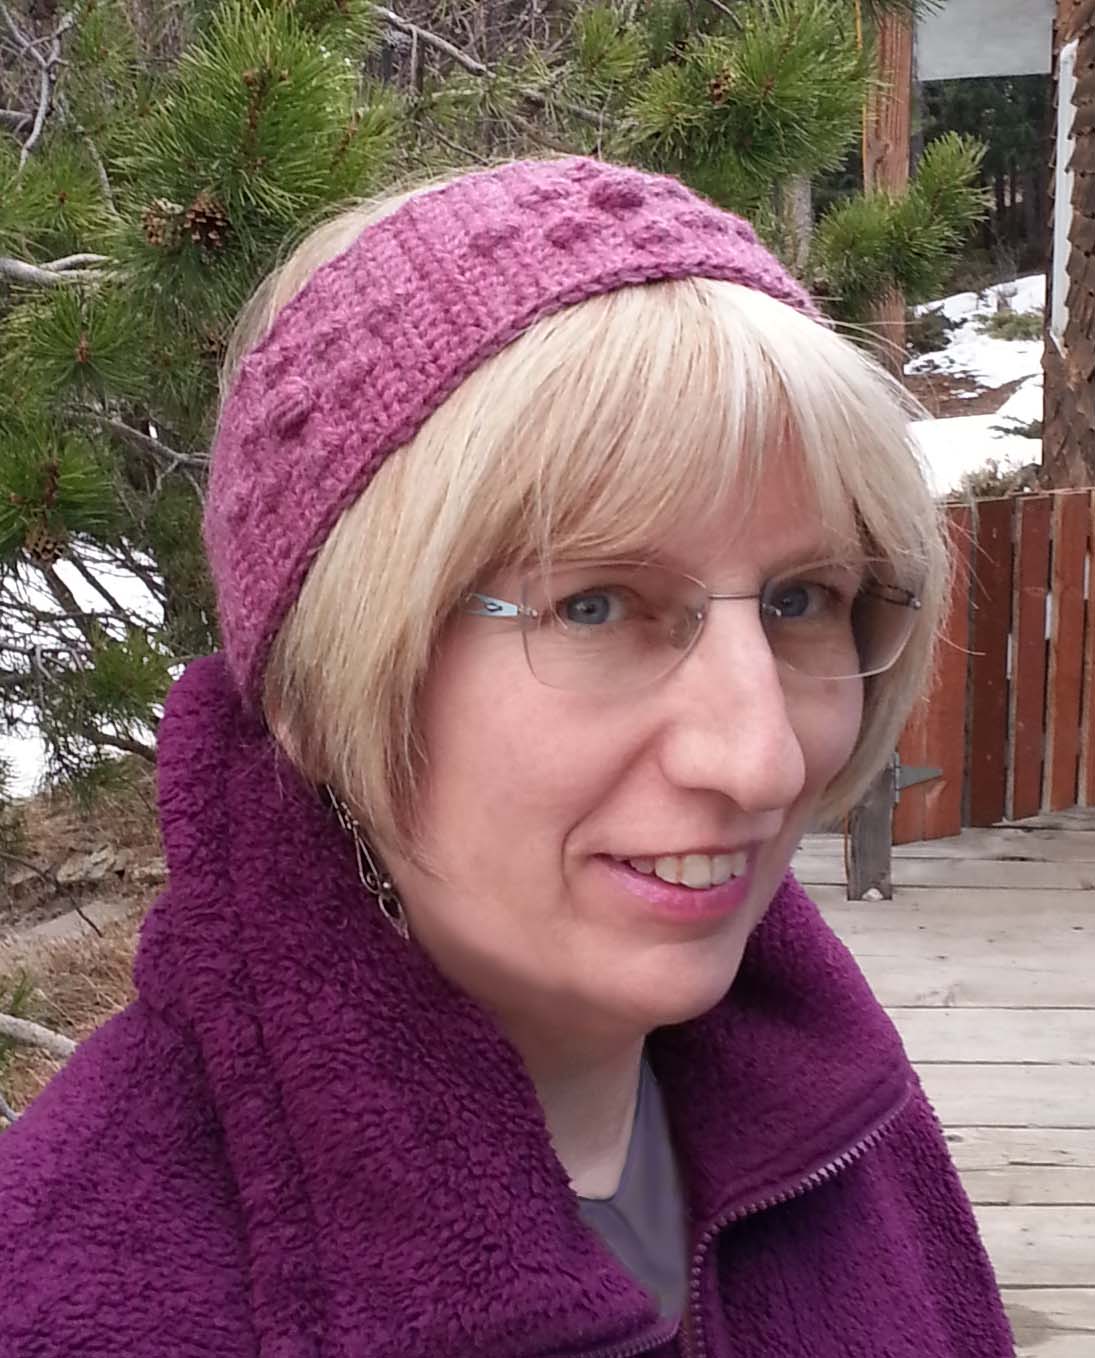
Hats are one of my favorite projects to work on but with this recent spring like weather I’m looking at transitional pieces. Headband/Headwrap/Earwarmers (I’m never 100% sure what to call them) are a great choice. I love them during the transitional seasons because they easily fit in a pocket and are a great way to keep my ears warm if the weather gets chilly. They also help keep my hair under control when the wind gets too blustery.
I tend to have light weight gloves and a headband tucked into the pockets of every jacket. Since I recently got my hair cut into a very short 1920’s style bob, headbands can also look quite stylish. In celebration of NatCroMo I’m offering this fun textured headband pattern to my visitors. I’ve used a lot of textured stitches in this project which helps make the fabric even warmer.
This is an intermediate level pattern, but it’s a great project to expand your skills with. I’m including a tutorial on making cluster and puff stitches here for those of you feeling like tackling a new crochet skill. For those of you that already have some experience with cluster and puff stitches the “Special Stitches” section in the pattern should be sufficient to get you started.
Cluster Stitch Tutorial
The cluster stitch for our headband has more texture to it because it is framed on either side by a shorter stitch, the half double crochet. If cluster stitches are worked with spaces and/or taller stitches on either side they are a bit flatter and more of a decorative grouping that doesn’t rise as far above the surface of the work.
The textured “bump” of a cluster stitch as used in this headband sits on the back side of your row, for a single sided project you want to work them only on alternate rows in the project.
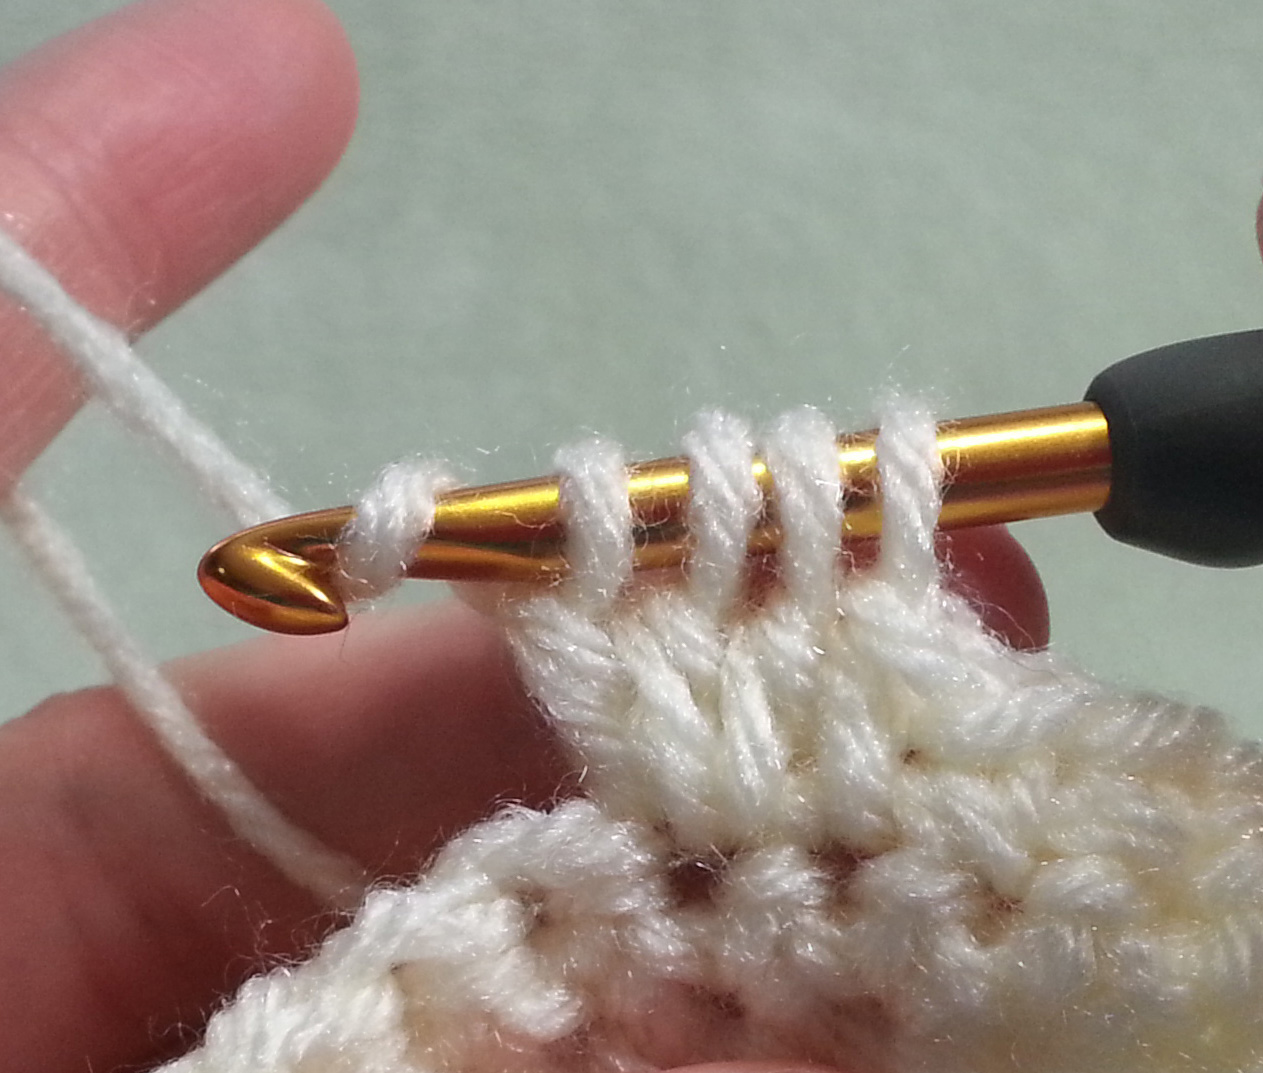
In this headband project we are using a 3 dc cluster stitch to create our textured stitches. In a cluster stitch you make the base of the 3 dcs being used, then work the final dc step for all 3 in one go.
Photo A
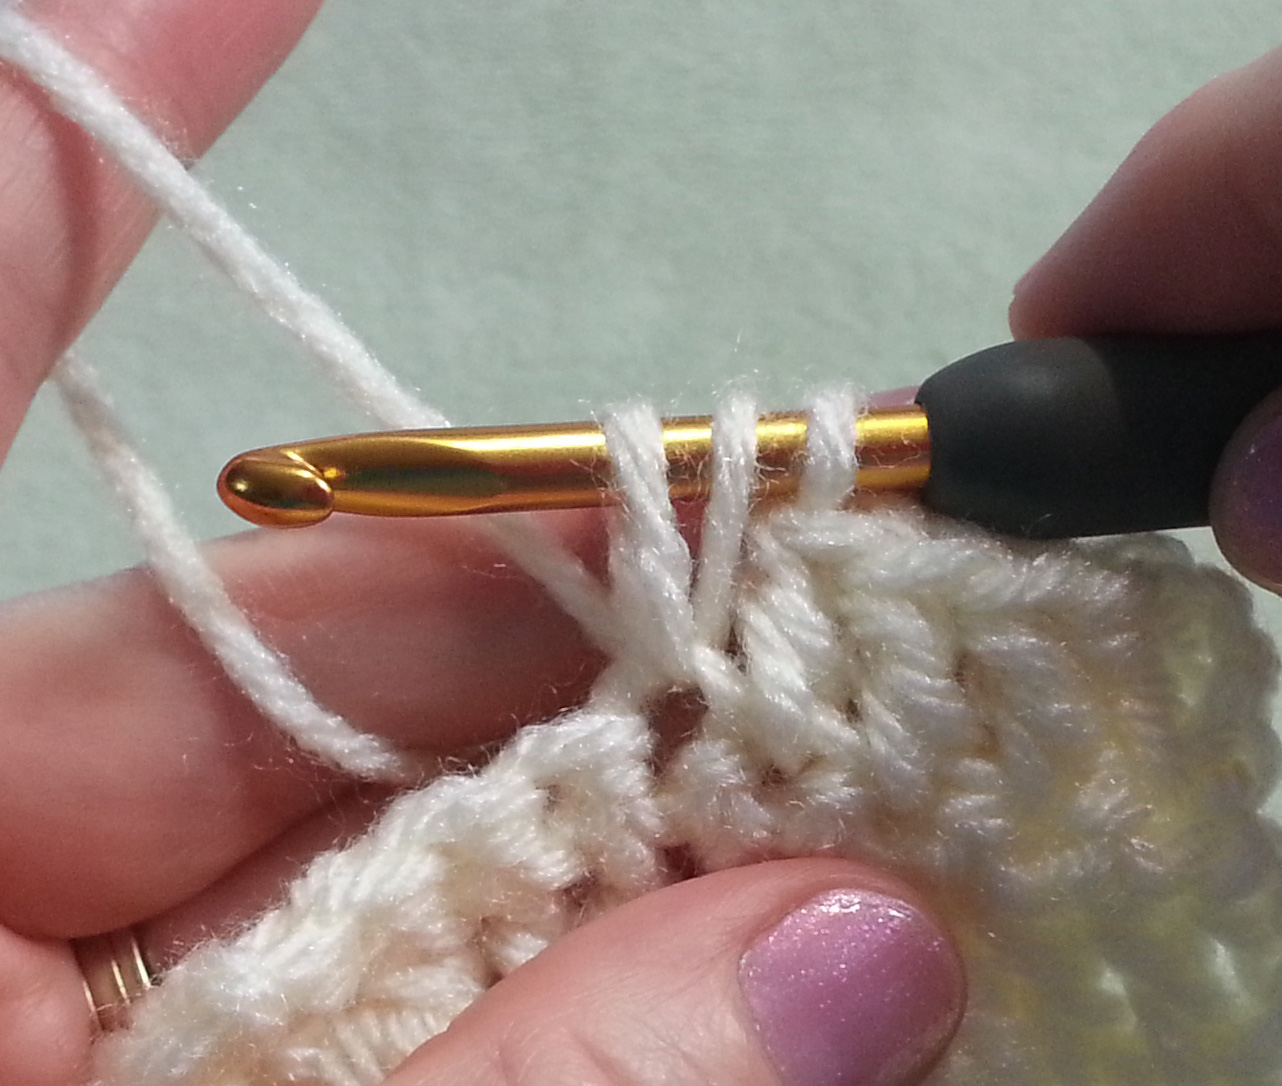
To make a 3 dc cluster st, yarn over (yo) like making a dc and insert in st or sp, yo, pull up a loop (3 loops on hook), yo {Photo A},
Photo B
pull thru 2 loops on hook (2 loops remaining on hook, 1st base made), yo, insert in same st or sp, yo, pull up a loop (4 loops on hook), yo {Photo B},
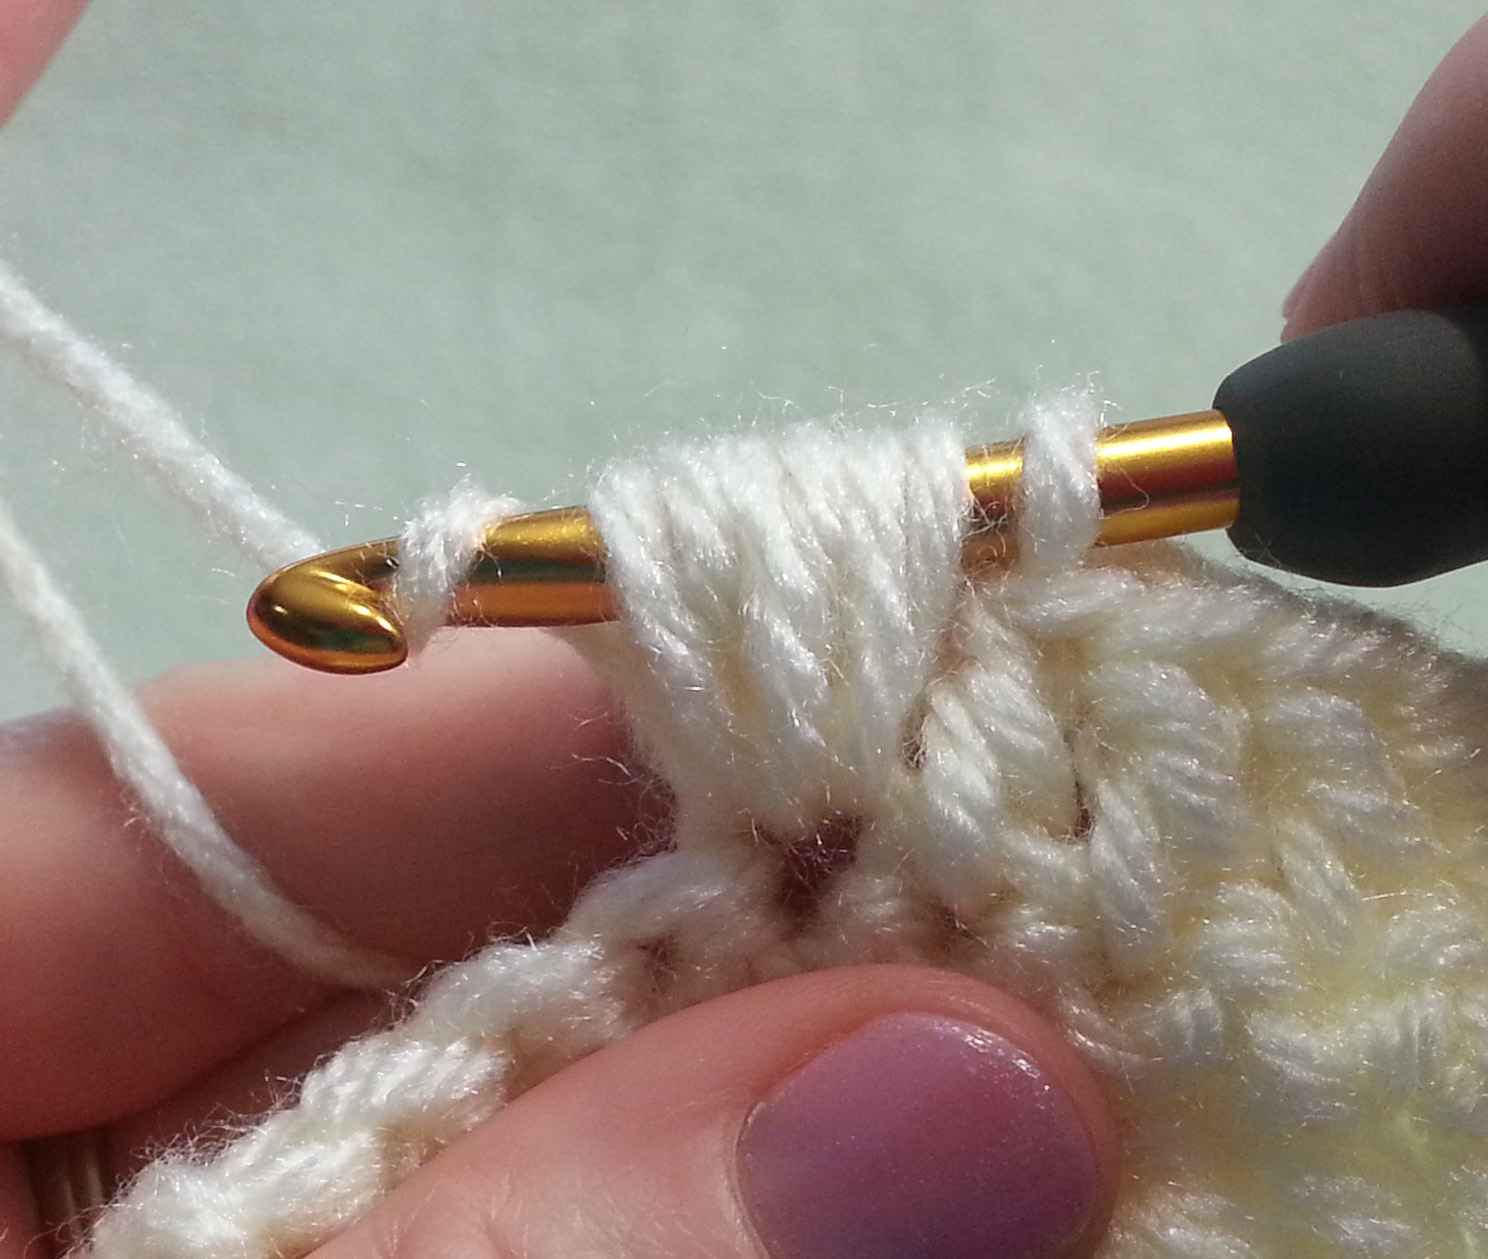
Photo C
pull thru 2 loops (3 loops remaining on hook, 2nd base made), yo, insert in same st or sp, yo, pull up a loop (5 loops on hook), yo, pull thru 2 loops (4 loops remaining on hook, 3rd base made), yo {Photo C}, pull thru all 4 loops on hook.
Puff Stitch Tutorial
This stitch is often a challenge to get right. The primary trick is getting all of your loops to the same length. That can be particularly challenging if you crochet tightly, so remember to keep your work loose.
Puff stitches tend to sit centered in the fabric, which makes them a great stitch to use in scarves, since the texture is visible on both sides of your fabric. In the case of this headband project we are framing the puff stitches with hdc stitches. Like with our cluster stitches this “framing” helps the stitch sit on the backside of the row and creates a 3D effect on the finished project.
There are a number of ways to make a puff stitch, the version I use in this project is secured at the top similar to making a single crochet (I think of these as “locked” puff stitches). For this project you will be making 5 “wraps” for the puff part. Each time you do a “wrap” you get 2 more loops on your hook.
Photo D
Yarn over (yo) and insert your hook in the indicated st or sp, yo, pull up the 2 loops to above the top of your previous st {Photo D},(yo, insert hook in the same st or sp, yo, and pull up the 2 new loops to the same height of the previous loops) 4 times.
Photo E
You will have 11 loops on your hook*, 10 tall loops for the “puff” and the original working loop. Yo {Photo E} and pull thru the 10 tall loops,
Photo F
you will have only 2 loops on your hook, yo {Photo F}, pull thru the last 2 loops, your puff stitch is complete.
* A peek into the design process: For the eagle-eyed amongst my visitors, you may have noticed in the photos for this tutorial I have only 7 loops on my hook at this point. This is because I made a change in the pattern after I shot the photos. Originally I thought I would like the 3 wraps for my puff stitches, but they weren’t dramatic enough for me in the sample. So I changed it for the final sample and pattern.
SPRINGTIME HEADBAND
designed by Andee Graves
SKILL LEVEL: Intermediate
FINISHED MEASUREMENTS
Headband is approximately 3.25”/8.125cm wide x 22”/55cm long.
#139 Dark Rose Heather sample used 31g/aprx 72 yards = approximately 2 Headbands from 1 skein
CROCHET HOOKS
Size US 7 / (4.5mm)
ADDITIONAL MATERIALS
Stitch markers
Yarn needle
GAUGE
6 rows & 9 sts in hdc = 2”
SPECIAL STITCHES
3 DC Cluster Stitch (Cl): (Yo, insert hook into indicated st or sp, yo, pull up a loop, yo, pull thru 2 loops on hook) 3 times, yo, pull thru 4 loops remaining on hook.
Puff Stitch (Puff): (Yo, insert hook into indicated st or sp, yo, pull up a loop to desired height) 5 times, 11 loops on hook, yo, pull thru 10 loops on hook, 2 loops left on hook, yo, pull thru remaining 2 loops on hook.
Half Double Crochet 2 Together (hdc2tog): Yo, insert hook into indicated st or sp, yo pull up a loop, insert hook in next st, yo pull up a loop, yo pull thru all 4 loops on hook.
NOTES
The Cluster stitches and Puff stitches in this project have more texture because they are “squished” between 2 shorter stitches. The texture is created on the back of the rows. The finished project will have the textured side as the right side of the fabric.
Once the first 65 rows of the headband are crocheted, edging is worked along one edge, then ends of headband are seamed together using slip stitches to reach 2nd side, then 2nd side edging is worked.
INSTRUCTIONS
Row 1: Ch 11, turn, working in back bumps, hdc in 3rd ch from hook and each ch back to beginning. [9 hdcc]
Row 2 (RS): Ch 2 {turning ch only, does not count as st here and thru-out the pattern}, turn, hdc in each st across. PM on front of row to mark right side. [9 dc]
Rows 3- 7: Repeat Row 2.
Row 8: Ch 2, turn, hdc next st, 2 hdc next st, hdc next 5 sts, 2 hdc next st, hdc last st. [11 hdc]
Row 9: Repeat Row 2. [11 hdc]
Row 10: Ch 2, turn, hdc next st, 2 hdc next st, hdc next 7 sts, 2 hdc next st, hdc last st. [13 hdc]
Rows 11 – 16: Repeat Row 2. [13 hdc]
Row 17: Ch 2, turn, hdc next 6 sts, Cl next st, hdc next 6 sts. [12 hdc, 1 Cl]
Row 18: Repeat Row 2.
Row 19: Ch 2, turn, hdc next 4 sts, Cl next st, hdc next 3 sts, Cl next st, hdc next 4 sts. [11 hdc, 2 Cl]
Row 20: Repeat Row 2.
Row 21: Ch 2, turn, hdc next 2 sts, Cl next st, hdc next 3 sts, Puff next st, hdc next 3 sts, Cl next st, hdc next 2 sts. [10 hdc, 2 Cl, 1 Puff]
Row 22: Repeat Row 2.
Row 23: Repeat Row 19.
Row 24: Repeat Row 2.
Row 25: Repeat Row 17.
Rows 26 – 28: Repeat Row 2.
Rows 29 – 52: Repeat Rows 17 – 28, twice.
Rows 53 – 55: Repeat Row 2.
Row 56: Ch 2, turn, hdc next st, hdc2tog next st, hdc next 7 sts, hdc2tog next st, hdc last st. [11 hdc]
Row 57: Repeat Row 2.
Row 58: Ch 2, turn, hdc next st, hdc2tog next st, hdc next 5 sts, hdc2tog next st, hdc last st. [9 hdc]
Rows 59-65: Repeat Row 2. Do not fasten off, Secure working loop so work doesn’t come unraveled.
EDGING
Side 1: Ch 1, with RS facing turn band to work along first edge, work sc in side of Row 1, then work 98 sc spaced evenly along edge in ends of rows (3 sc in the ends of the every 2 rows), sl st to first sc in round.
Align ends of band, RS together sl st loosely working thru both the top of sts in Row 65 and bottom of sts in Row 1 across to second edge.
Side 2: Turn work with RS facing and work along edge, ch 1, work 99 sc spaced evenly along edge in ends of rows, sl st to first sc in round. Fasten off.
FINISHING
Weave in ends. Block lightly, if desired.
Now you are ready to make a bunch of these headbands to be ready for those cooler spring days. Have a great time crocheting and keep celebrating crochet everyday.
As part of National Crochet Month I thought it would be very appropriate to talk about something very dear to my heart as an active member of the CGOA: The CGOA Design Competition.
Last year was the first year that I played a major role in the Design Competition. Shari White and I were asked by Doris Chan at the 2011 Greensboro, NC show to step in as Co-chairs for 2012 with an eye toward Doris reducing her involvement (or more rightly, maintaining her sanity, Shari and I are still scratching our heads about how much Doris had been doing on her own).
It has been a wonderful experience as well as very educational. One of the things that I have learnt is how hard we can all be on ourselves. Lots of folks seem to be afraid to enter the Design Competition because they feel they can’t compete with professional designers.
Well, I’m here to set the record straight. You can do it! If you want to enter the Design Competition do it. Even if you don’t win your entry will be on display with all the other entries at the Charlotte, NC Knit & Crochet Show this October.
One thing to keep in mind, many of our winners are not professional designers. In fact most of them just love crochet. And even the professionals enjoy entering the competition because it gives them a chance to design something without the limitations that are often in place when designing for publication.
The main point of the Design Competition is to show the public the incredible things that can be made with crochet. And that leaves room for non-professionals to shine right beside professionals.
In some ways the amateurs have an advantage. Most of us full-time professional designers have a pretty crowded schedule as far as crochet time goes. Amateurs can put all their attention on that stellar piece they plan to enter in the competition.
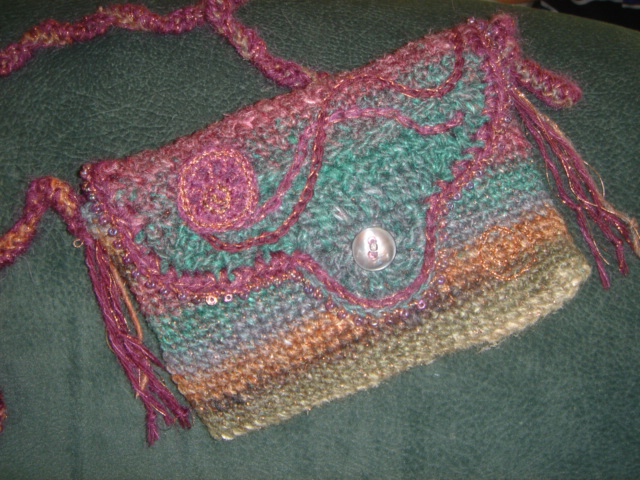
Time to Dance Evening Bag My 2009 Entry
Speaking as a professional I can tell you that we are nothing extra special. I know I put my pants on one leg at a time like everyone else. I may have talent, but that isn’t because I’m a professional designer, that is just the luck of the draw. But talent isn’t everything, determination to see a project thru to completion is most important.
Some of our winners became professionals by entering the Design Competition. Before their first time in the competition they hadn’t sold any designs, maybe hadn’t even thought to try. But entering a piece that was their original work got the attention of an editor or creative director. Heck, some of the folks that became designers because of entering the competition didn’t even win a prize.
Alpaca Hug Neck Cozy My 2010 Entry
Even if you aren’t interested in being a professional designer you still have a good chance of winning one of our many cash prizes. You don’t need to write a pattern for your entry. You just need to be a current member of the CGOA, your entry must be your original design and primarily crocheted. The deadline for entries is September 6, 2013.
We have 6 judging categories this year:
Fashion: garments fitted to the body, including sweaters, tops, jackets, skirts, gowns and dresses.
Accessories: larger fashion accessories not fitted to the body, including wraps, shawls, and capes.
Small Accessories: anything small scale, socks, scarves, cowls, hats, bags, belts and jewelry.
Afghans and Home Decor: any and all afghans, throws, blankets and bed or sofa covers and any décor items not in thread.
Thread Crochet: anything made with crochet thread or lace/fine weight yarns, including doilies, baby items, garments and accessories.
Artistic Expressions: designs more artistic rather than functional in nature, including free-form and mixed media pieces, hangings, sculpture, wearable art, amigurumi and novelty items.


![halosofhope[1]](https://mamas2hands.com/wp-content/uploads/2015/03/halosofhope1.jpg)