This is the perfect way to wrap up my Spiraling October on the last day of the month! I’m so excited to be able to share with all my readers about this new project with Furls Crochet. This is my “Spiraling Blocks Blanket” that is available as a kit on the Furls Website. This lovely blanket is a fun way to work with spirals in blocks that are then sewn together for a cozy layer that is perfect for decoration and warmth.
The kit comes with an intermediate level pattern and has instructions for making the blanket in 2 sizes. The Small Throw Kit – 6 blocks x 8 blocks; 40” x 53” {100 cm x 132.5 cm} is $95. The Regular Throw Kit – 8 blocks x 10 blocks; 53” x 66” {132.5 cm x 165 cm} is $145. That price includes your pattern, all the yarn for the size selected and a beautiful size I/5.5 mm Furls Streamline Hook.
For just this week my readers can get this kit for 15% off by using the coupon code ANDEE15 before November 3rd at 11 p.m. EDT, so go grab yours quick!
The kit is available in 4 color palettes at the Furls website: CLICK HERE TO GET YOURS! My blanket used the Vortex color pallette. Colors A – H (the first 7) are the arms of the spirals. For my blanket I picked the “Tundra” color as my Color A. Color I (the 8th Color) is your overall border color. It is used to border each spiral and for the finishing border of the blanket. You can see more details about the colors in each palette on the Furls website.
My Hawaiian inspired colors that I used.
The 8 Colors I selected for my blanket were colors that reminded me of my trip to Hawaii a couple years ago. A variety of blues and greens for the amazing changing shades of the ocean and some earthy tones for the gorgeous shoreline. If those colors aren’t appealing to you there are 3 other color combinations selected by the folks at Furls for you.
I designed this so my color A gives a pinwheel effect, yes it was the inspiration for my Block #21 for the Moogly blog that you saw earlier this month. You don’t have to fuss too much for this design as long as you have 1 arm of your spiral made with color A, it’s just all about how you orient the squares when you join them together.
The really great thing about this project is that it is very portable way of making a blanket. Each bordered spiral square is about 6.5 inches square, so they are super portable. I worked the individual spiral blocks carrying around the 4 colors I needed. Then had a bag of 10 spiral squares that I used while working on the outside border whenever I had a moment.
The photo above shows my pile of blocks as I was working on the block borders. I had a lot of fun taking this project along when I was running errands, especially when I was waiting in line.
Once I finished the blocks I laid them all out on my bed to decide on the order to join them. In the pattern I have provided a joining map and list of the number of blocks with the combinations of colors. I was going for a shore to sea feeling with my layout. You can mix and match colors and placement however you like it best though. That is part of the fun.
I hope you have as much fun making your Spiraling Blocks Blanket as I did. I was nice and cozy under it as I finished sewing together my blocks and then crocheting a final border around the outside. Be sure to grab your kit before November 3rd to get the 15% discount.
Thanks for going on this fun journey of spirals with me during the month of October. Next month is going to be all about Hats and the Holidays. If you are interested in taking my class on Zoom for the Linked Stitches Hat this coming Sunday, be sure to register online at the Longmont Yarn Shoppe.
October is almost done and I’m winding down my spiral blog posts. I wanted to share a different sort of spiral with you all today. As you know I love crocheting in the round, it is a great way to create amazing borders on a project as well as a fun way to create shaping. Today I want to talk about continuous rounds in crochet.
Working a continuous round in crochet is often a spiral style. Especially when you are crocheting top down hats or amigurumi. When you work concentric rounds in crochet you join the first stitch to the last stitch of the round, but for continuous rounds you are working the rounds without joins and step-up to the first stitch of the next round after the last stitch of the previous round. Continuous rounds also eliminate those pesky seams. When working an increasing circle, like for the crown of a hat, your rounds look like a classic spiral.
My flat fuzzy friend is an example of a classic double crochet spiral worked as a continuous round, then surface crochet is worked to emphasize the spiral.
I used the classic double crochet spiral as a continuous round for my Simple Double Crochet Hat design as well. But I don’t really like how open the stitches are for a hat made with double crochet stitches. That open stitch work is great for a warm climate hat, but on my mountain I need something a little less breezy. This inspired me to start playing around with how to work a double crochet hat that didn’t have all the open spaces.
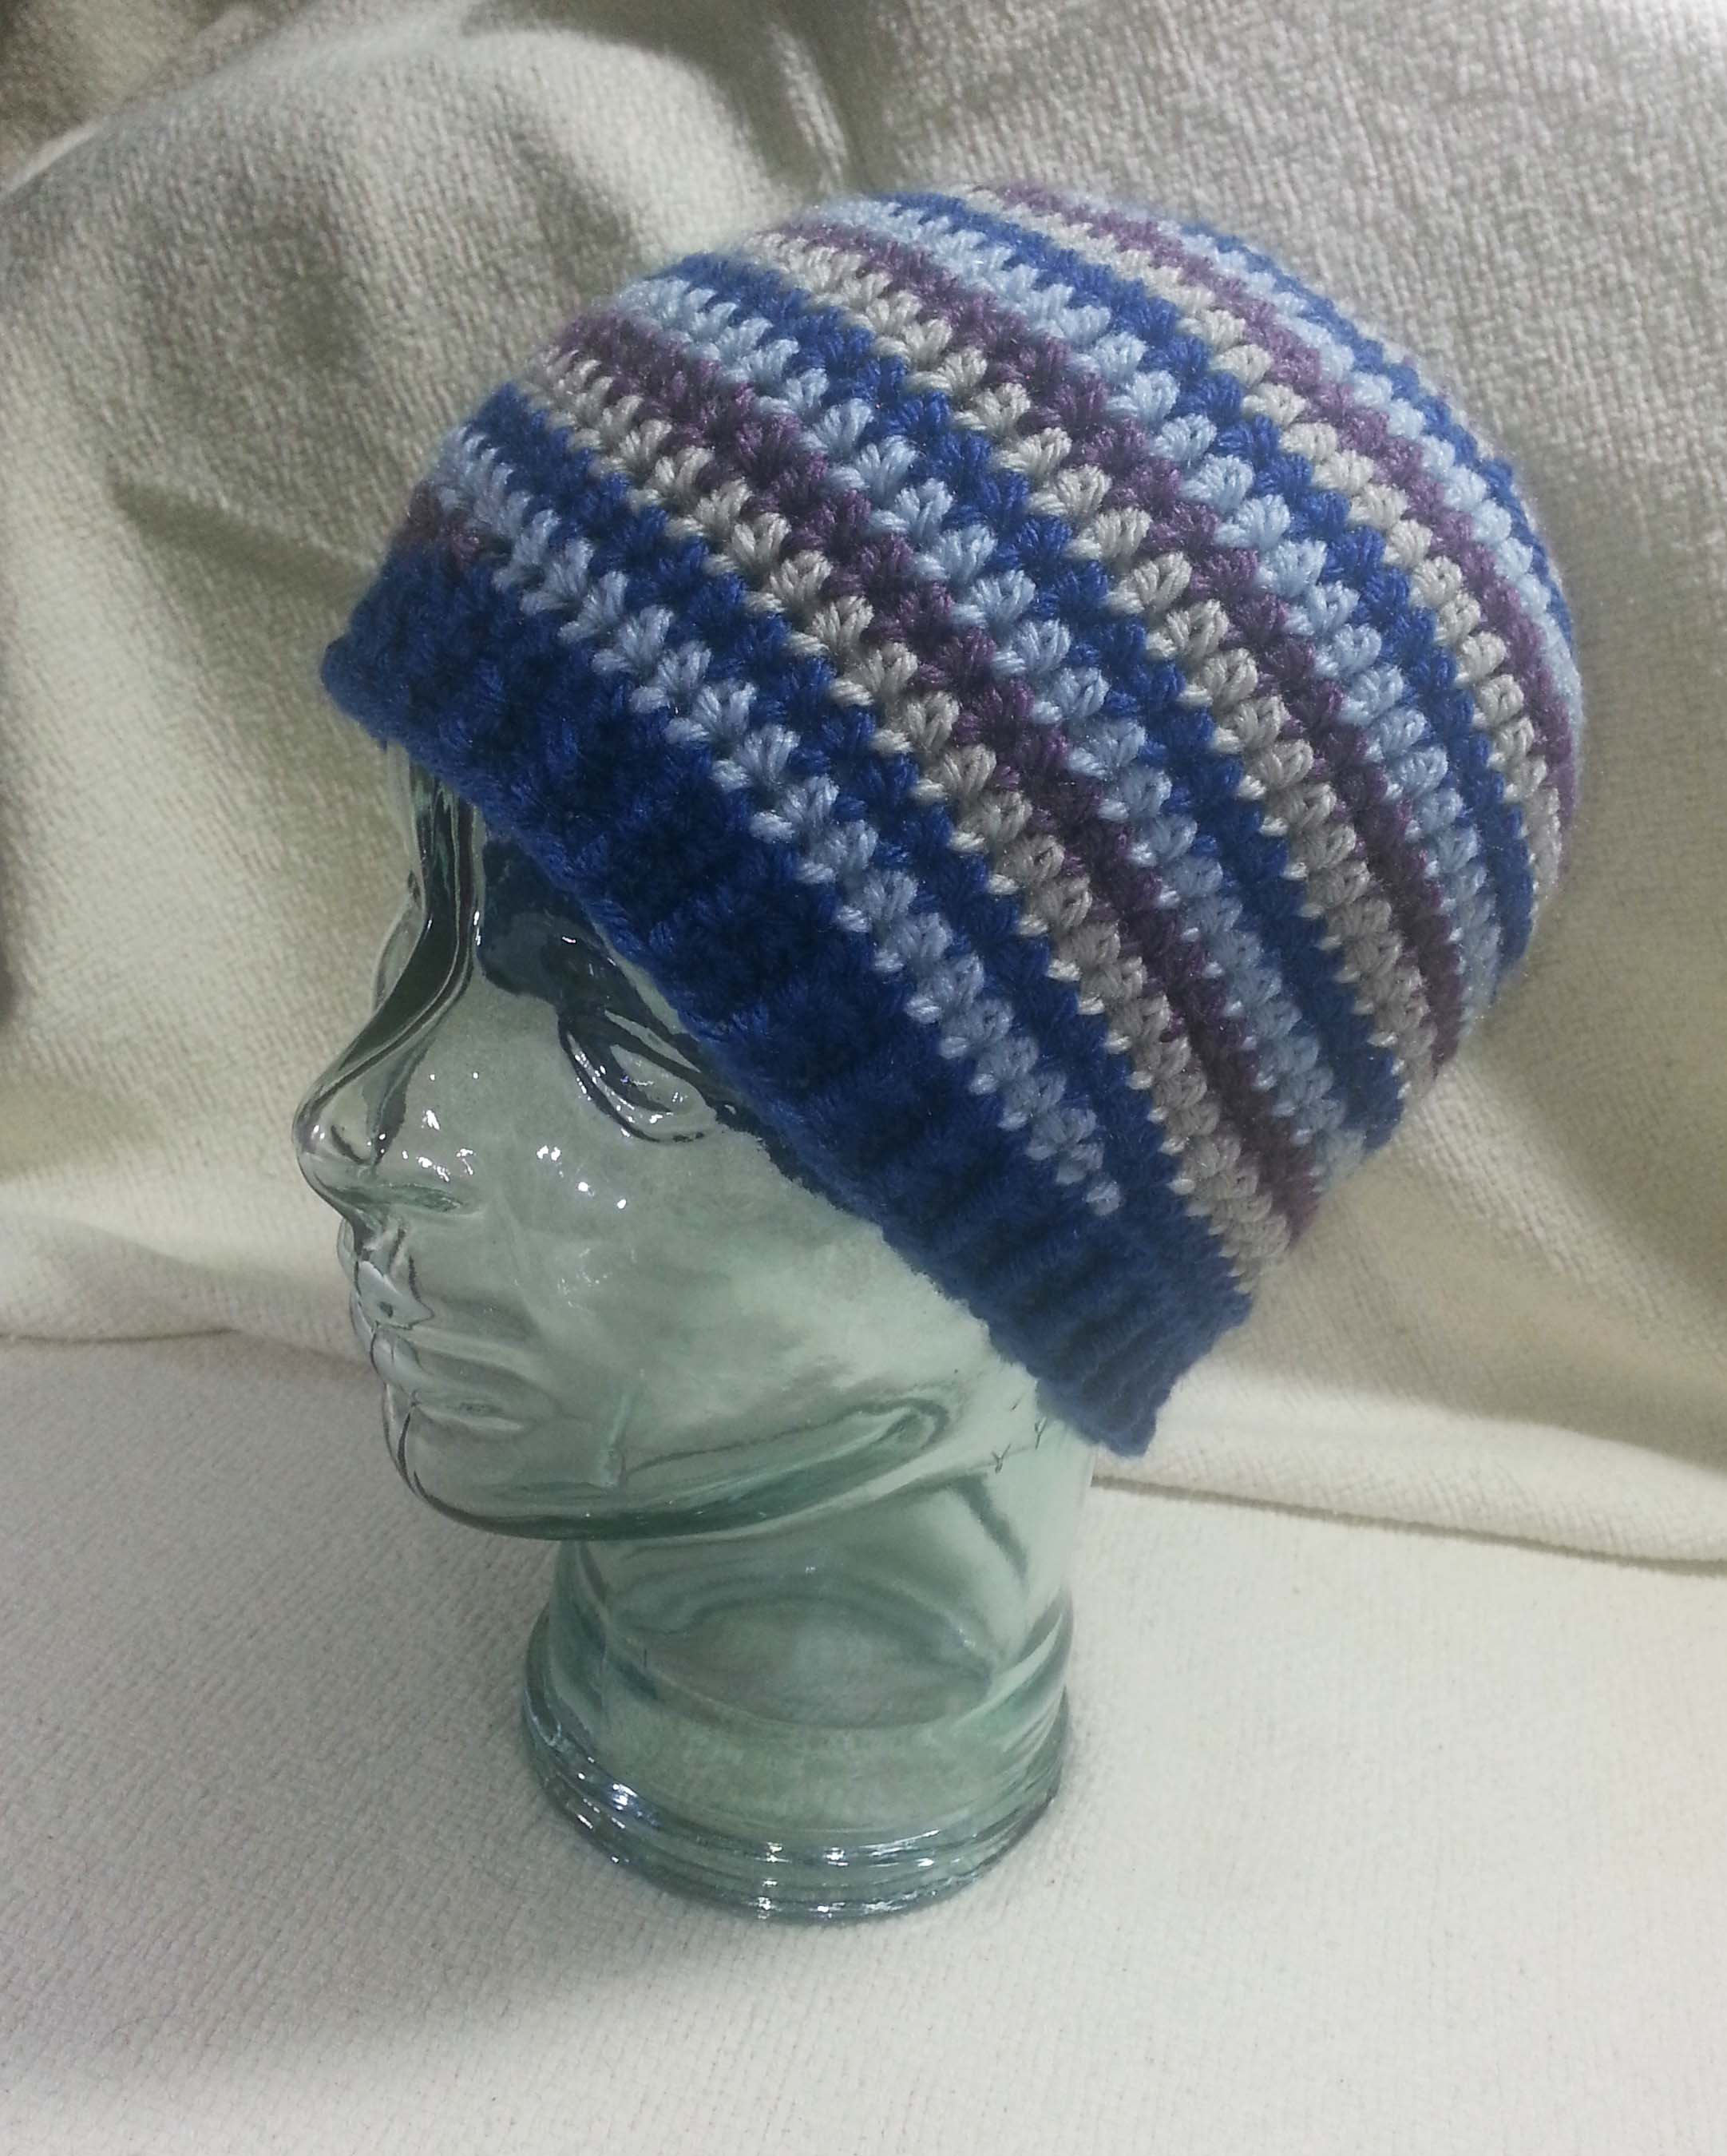
Last spring I bought a beautiful silk scarf with a rainbow of colors and decided I needed a hat to go with it. I had lots of fun selecting a yarn at the Longmont Yarn Shoppe that would match it. The selected yarn was Cosette by Dream in Color and is a glorious cashmere blend that was a delight to work with. My plan was to use the yarn to crochet a double crochet hat that used linked double crochet stitches.
I took that project with me on my trip to Philadelphia and Ireland. It was a great project to work on when traveling as it was small enough to fit in my carry-on for flights and my day-pack during our various bus trips. After a lot of experiments and little bit of frogging I finally settled on how I wanted the design to work.
The finished hat is my Snowy Rainbow Hat. The pattern is available for purchase in my Ravelry Shop. This pattern includes stitch charts and instructions on making the hat in various sizes.
I’m also teaching a class on working this hat at the Longmont Yarn Shoppe, Sunday, November 5th 12:30 p.m. – 3:30 p.m. (Mountain Time) {2:30 p.m. – 5:30 p.m. Eastern; 1:30 p.m. to 4:30 p.m. Central, 11:30 a.m. to 2:30 p.m. Pacific}. This class will be a hybrid class, so you can join me via Zoom or In-person. You can register for the Zoom seats here on the Longmont Yarn Shoppe website, and for the In-person seats here. For the class I recommend working with a solid color worsted weight yarn, the image above shows the hat worked in Berroco’s Ultra Wool. In class we will make a baby size hat so you can practice all the elements of making the hat and learning linked double crochet stitches in the round.
With cold weather and holiday gift giving right around the corner, hats are a great project to have in your works-in-progress. If you want to personalize your hat gifts you can have fun adding little embellishments. I love to add flowers to my hats or little snowflakes. For the younger members on my gift list I will sometimes turn a basic hat into a monster face. I made one for my nephew years back and when he outgrew it he asked me to turn it into a ball.
In keeping with my crochet spirals theme I wanted to share some dimensional spirals with you. So far everything I’ve shared has been flat spirals but they are also wonderful for making hats with. I like making my hats from the crown down to the brim to take full advantage of the stretchiness of the fabric. My favorite method is to work continuous rounds, which is basically a spiral. Creating hat patterns that use different color spiral arms is an easy adjustment. 2 of my favorite spiral hats are below.
Whirlwind Hat
This hat pattern is sized for a small adult head (circumference 21″) here on my blog. This pattern uses a four-arm spiral to create a colorfully striped top-down hat. It is a great pattern for using up leftover bits of yarn from your stash. Each spiral arm uses approximately 28 yards, 1 spiral uses 46 yards as it is a spiral arm and the brim. Click here to check out the pattern.
Spiraling Stripes Hat
This 2 arm spiral hat that was inspired by the folks at Round Mountain Fibers. They hand-dye some incredible colors. I wanted to create a hat that would blend a semi-solid and variegated color together. The sample I made had some interesting pooling of the colors so I got an almost plaid look in the finished hat.
This is another sample I made from the pattern using 2 solid color worsted weight yarns. This was made with Berroco Ultra Wool. The pattern is available for purchase in my Ravelry Shop. The pattern includes stitch charts and is written for a small adult size (21″ circumference).
If you are interested in making these hats in smaller or larger sizes you just need to stop increasing the crown of the hat when you reach the size you want, then work the sides of the hat in keeping with the size of the crown.
If you want a really detailed run-down on adjusting the size of top down hats you can purchase my “Perfect Fit Crocheted Hat” pattern in my Ravelry Shop. This pattern is basically my hat class in pattern form, it walks you thru the ins and outs of making a hat just the size you want.
I hope you are having a wonderful October, I’ll have a few more fun posts about crocheting spirals before the month is out.
Hello my friends, today is my actual Birthday! I’m 60 years young today! So I have a 6 inch blanket square to celebrate my 60th. Doesn’t everyone love alliteration with their crochet patterns?
Like all small spiral projects this is a great pattern to use up those odds and ends of worsted weight yarn that you have remaining from other projects. Just pick 2 contrasting colors for your spirals, you’ll only need 7 yards for each spiral arm.
This square is part of the Melange Blanket Mystery Crochet-Along with Underground Crafter. This is a year long project that is coming to a conclusion soon. Be sure to check out this post at Underground Crafter that has all the links for the other squares, great information on joining your squares together and the information and links you need to get in on a chance to win some of the marvelous give-away prizes.
Color A: Marina #28437 (approximately 7 yards/ 3.2 grams) Spiral Arm 1
Color B: Seashell #28447 (approximately 7 yards/ 3.2 grams) Spiral Arm 2
Color C: Tranquil #28453 (approximately 20 yards/9.5 grams) Square Border
Hook J / 6mm
Notions
Yarn/tapestry needle
8 Medium Locking Stitch markers (2 in one color, 6 in second color)
Gauge
First 5 rounds of pattern = 4” across circle
Abbreviations/Special Stitches
(Standing dc) Standing Double Crochet: make slip knot in yarn and place loop snugly on shaft of hook, yo and insert hook into indicated st, yo, pull up a loop, (yo, pull thru 2 loops on hook) twice.
(sl st loosely) Loose slip stitch: Insert hook in indicated place, YO, pull up a loop thru place and loop on hook keeping loose like making a chain st.
(sl st) Slip stitch: Insert hook in indicated place, YO, pull up a loop thru place and loop on hook, continue to pull up on working loop until original loop is tight.
(Edc)Extended Double Crochet: YO, insert hook in indicated st or sp, YO pull up a loop, YO pull thru first loop on hook, (YO, pull thru 2 loops on hook) 2 times.
Pattern Notes:
Start square with an adjustable slip knot. Beginning tail tightens the loop on the hook. If you prefer to start with a magic loop crochet 1 less chain stitch at start.
Stitch counts at the end of each round are shown in italicized brackets at end of each round.
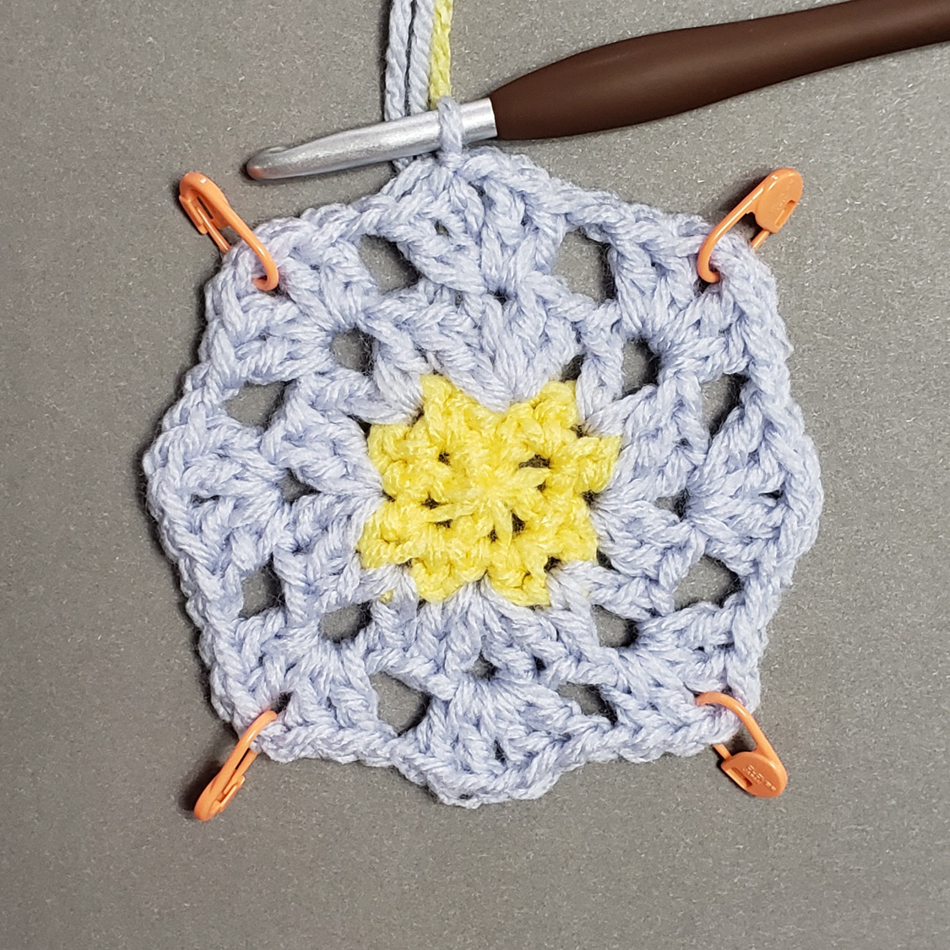
Square starts with a 2 color hdc spiral circle as the center, then rounds are worked to square the circle.
When instructions specify “sl st loosely”, this means work those slip stitches similar to a chain stitch and do not pull the working loop to tighten them as in a joining slip stitch. You will be working into those loose slip stitches for the next round.
Instructions
Spiral Circle
Rnd 1 (RS): Begin with Color A, ch 2, (sc, 3 hdc) in second ch from hook, pull up long loop of color A and remove hook, insert hook in same ch as previous work, pull up a loop of Color B on shaft of hook, ch 1, (sc, 3 hdc) in same ch st, pull beginning tail of Color A to close center tightly. Place st markers in each st using a different color marker to indicate the last st of each color section. [1 sc, 3 hdc, in each color]
Rnd 2: Begin with Color A, *(2 hdc in marked st, move st marker up to second st worked) 4 times*, pull up loop of Color A, switch to Color B, Repeat from * to *. [8 hdc, in each color]
Rnd 3: Begin with Color A, *(hdc in next st, 2 hdc in marked st, move st marker up to second st worked) 4 times*, pull up loop of Color A, switch to color B, Repeat from * to *. [12 hdc, in each color]
Rnd 4: Begin with Color A, *(hdc in each of next 2 sts, 2 hdc in marked st, move st marker up to second st worked) 4 times*, pull up loop of Color A, switch to Color B, Repeat from * to *. [16 hdc, in each color]
Rnd 5: Begin with Color A, *(hdc in each of next 3 sts, 2 hdc in marked st, move st marker up to second st worked) 4 times*, pull up loop of Color A, switch to Color B, Repeat from * to * once,
**hdc next st, sc next st, sl st loosely in back loop and back bar of next st, sl st in back loop and back bar of next st**, fasten off Color B, switch to Color A, Repeat from ** to ** once, fasten off Color A. [21 hdc, 1 sc, 2 slip st, in each color]
Square Border
Remove every other st marker leaving 4 markers equally spaced around circle.
Rnd 6 (Round to Square 1): With RS facing attach Color C yarn with a standing dc in any marked st, 2 Edc in same st, *skip 2 sts, hdc next st, hdc & sc next st, sc next st, sc & hdc next st, hdc next st, skip 2 sts, (2 Edc, dc, ch 2, dc, 2 Edc) next marked st, move marker to ch-2 sp just made*; Repeat from * to * 2 times; skip 2 sts, hdc next st, hdc & sc next st, sc next st, sc & hdc next st, hdc next st, skip 2 sts, (2 Edc, dc) in same st as join, ch 2, sl st to first dc of Rnd. [16 Edc, 8 dc, 16 hdc, 12 sc, 4 ch-2 sp]
Rnd 7 (Round to Square 2): Turn (sc, ch 1 {counts as first hdc}, hdc, ch 2, hdc ) in first marked ch-2 sp, move marker to ch-2 sp just made, [*hdc in each of next 4 sts, sc in each of next 5 sts, hdc in each of next 4 sts,* (2 hdc, ch 2, hdc) in next marked ch-2 sp, move marker to ch-2 sp just made] 3 times, Rep from * to * once, sl st to top of first hdc. [48 hdc, 20 sc, 4 ch-2 sp {17 sts}]
Rnd 8: Turn, sc in first st, ch 1 {counts as first hdc}, [hdc in each st until reach marked ch-2 sp, (hdc, ch 2, hdc) in marked ch-2 sp, move marker to ch-2 sp just made] 4 times, hdc in each st until reach start of Rnd, sl st to top of first hdc. [76 hdc, 4 ch-2 sps {19 sts each side}]
In keeping with my love of crocheting spirals I have a fun afghan square pattern for you all. This idea has been kicking around in my brain for a couple of years. I finally sat down and worked out the design with yarn and wrote up the pattern. It has a few challenges to keep it interesting, but those of you that are feeling intrepid will have lots of fun with it.
Worsted wt (Sample uses Red Heart “With Love” 100% Acrylic (7 oz/ 198 g, 370 yd/ 338 m)
Color A: Eggshell (sample used approximately 67.5 yards/ 36 grams)
Color B: Bluebell (sample used approximately 14 yards/ 7.5 grams)
Color C: Bubblegum Pink (sample used approximately 14 yards/ 7.5 grams)
Color D: Country Blue (sample used approximately 14 yards/ 7.5 grams)
Hook Size J (6 mm)
Notions
Medium Locking Stitch Markers: 8 in 1 color, 4 in 2nd color
Large Locking Stitch Markers 4 in any color
Tapestry Needle
Scissors
Gauge Small spiral square = 4” across
Abbreviations/Special Stitches
Standing Single Crochet (Standing sc): make slip knot in yarn and place loop snugly on shaft of hook, insert hook into indicated st, yo, pull up a loop, yo, pull thru 2 loops on hook.
Loose slip stitch (loose slip st): Insert hook in indicated place, YO, pull up a loop thru place and loop on hook keeping loose like making a chain st.
Joining slip st (slip st): Insert hook in indicated place, YO, pull up a loop thru place and loop on hook, continue to pull up on working loop until original loop is tight.
Double Crochet Cross Stitch (X-st): Skip one st, dc in next st, working around previously made dc, dc in skipped st. Each X-st uses 2 sts and creates 2 sts.
Pattern Notes:
Start square with an adjustable slip knot. Beginning tail tightens the loop on the hook.
Stitch counts at the end of each round and row are shown in italicized brackets at end of each round or row.
Square starts with 4 small four color dc spiral squares that are joined together as the center, then a border of 5 rounds is worked as a frame.
When instructions specify “sl st loosely”, this means work those slip stitches similar to a chain stitch and do not pull the working loop to tighten them as in a joining slip stitch. You will be working into those loose slip stitches.
Instructions
Spirals (make 4)
Rnd 1: Begin with an adjustable slip knot in Color A, ch 2, (sc, hdc, dc) in second ch from hook {center ch st}, pull up working loop of current color and remove hook, place a large locking stitch marker in working loop to secure,
*insert hook in center ch st, pull up a loop of new color on shaft of hook, ch 1, working over beginning tail (sc, hdc, dc) in same ch st, pull up working loop of current color and remove hook, place a large locking stitch marker in working loop to secure*,
Rep from * to * with 2 other colors, 4 different colors total for the arms of your spiral, gently pull beginning tail of Color A to close center tightly. Place medium st markers in each st using a different color marker to indicate the last st of each color section. [1 sc, 1 hdc, 1 dc in each color]
Rnd 2: Begin with Color A, *(2 dc in marked st, move st marker up to second st worked) 3 times, pull up working loop of current color and secure*, [switch to next color, Repeat from * to *] 3 times. [6 dc in each color]
Rnd 3: Begin with Color A, *(dc in next st, 2 dc in marked st, move st marker up to second st worked) 3 times, pull up working loop of current color*, [switch to next color, Repeat from * to *] 3 times. [9 dc in each color]
Rnd 4 (Round to Square): Begin with Color A,
*Tr in next st, (Tr, ch 1, Tr) in next st, 2 dc in next st, hdc in next st, sc in next st, sl st loosely in next st, sl st in back loop of next st*, cut Color A with 10” tail, [switch to next color, Repeat from * to *] 3 times, cut Color B & C with 6” tail, cut Color D with 10” tail. [3 Tr, 1 ch-1 sp, 2 dc, 1 hdc, 2 sc, 1 loose sl st, 1 sl st in each color,{44 sts and 4 ch-1 sp around. 2nd sl st is not counted}]
Weave in center tails of spiral. Weave in Color B & C ending tails. Sew 4 spiral squares together with a whip-stitch using Color A and D ending tails (refer to photo for placement).
PM in ch-1 sp corners of joined spirals block (Color C Corners).
Square Border
Rnd 1: With RS facing, attach Color A in 3rd st to the right of corner ch-sp with a standing sc, *sc in each st and ch-sp until reach the marked corner ch-sp, (sc, ch-2, sc) in marked sp, move st marker up to ch-2 sp just made*, Repeat from * to * 3 times, sc in each st and ch-sp until reach beginning of Rnd, sl st to first sc of rnd to join. [104 sc, 4 ch-2 sp, {26 sc each side between ch-2 sps}]
Rnd 2: Ch 3, turn, dc in st before join {counts as first X-st of Rnd}, *X-st over next 2 sts*, Repeat from * to * 11 times, [(2 dc, ch 1, 2 dc) in marked ch-2 sp, Repeat from * to * 13 times] 3 times, (2 dc, ch 1, 2 dc) in next marked ch-2 sp, move st marker up to ch-1 sp just made, Repeat from * to * once, join to top of ch-3 with slip st. [52 X-sts, 16 dc, 4 ch-2 sp, {13 X-sts, 4 dc each side between ch-2 sps}]
Rnd 3: Turn, sc, ch 1 in first st {sc and ch 1 count as first hdc of Rnd}, [hdc in each st until reach marked ch-sp, (hdc, ch 2, hdc) in marked ch-sp, move st marker up to ch-2 sp just made] 4 times, hdc in each st until reach end of Rnd, join to first hdc with slip st. [128 hdc, 4 ch-2 sp {32 hdc each side between ch-2 sps}]
Rnds 4 & 5: Repeat Rnd 3.
Count end of Rnd 4 [136 hdc, 4 ch-2 sp {34 hdc each side between ch-2 sps}]
Count end of Rnd 5 [144 hdc, 4 ch-2 sp {36 hdc each side between ch-2 sps}]
It’s October and it’s definitely Autumn up here on my mountain. Most of our aspen trees have dropped their leaves, we have had a few traces of snow as well. I am loving the cooler temperatures. I’m really not cut out for super hot days and we had a lot of those this past couple of months. October has always been a favorite month for me because I love autumn, but it is also my Birthday this month.
It is a very special birthday this year as I am celebrating my 6th decade traveling around our sun. I wanted to do some extra fun things to celebrate with my marvelous readers and decided this month is going to be all about the Spirals! If you have been following my blog you already know that I have an abiding fondness for crocheting circles and spirals. Working in the round just makes me very happy.
I have been planning for this month all summer. Starting next week I’ll finally be able to share some fun new designs that have been in the top secret drawer all summer. But right now let’s take a quick look at some of my flat spiral designs of the past (just in case you missed them the first time).
My early design experiments with spirals involved working continuous rounds then working surface crochet to emphasize the spiral. The first 2 patterns listed below used this technique.
“Flat Fuzzy Friend” is available on the ‘Crochet Uncut’ website as a free pattern. This is a great lovey for a little one or even a fun whimsical gift for an older child. This pattern was published in 2010.
“Spiral in a Heart” is available here on my blog as a free pattern and makes a fun little embellishment. I like to make these to decorate hats and gloves for loved ones. They are also really cute on cuddle blankets. This pattern was published in 2011
I began to get more into the math of circles worked in the round and that that gave me the idea to play with spirals that had more than 1 arm. Once I started down this path I started having way too much fun. Since then I have continued to play with different height of stitches and number of arms to create designs that incorporate spirals.
“Whirlwind Afghan Square” this was my first afghan square for the Moogly CAL in 2015. You can find the free pattern for this square here on my blog.{Not the most exciting photo I’ve ever taken, but you get the idea.} I also have a video and additional blog posts on working this square.
“Dizzy Corner Afghan Square” this square was part of the 2017 Moogly CAL the pattern is available here on my blog for free. This post includes a detailed photo tutorial on crocheting the spiral circle.
“Whirling Ends Scarf” this fun scarf pattern is available for purchase in my Ravelry shop. The pattern includes detailed photo tutorials and stitch charts for both the spirals and the body of the scarf. It was part of the Stitch Makers Virtual Crochet Conference in September 2019.
These are just a short review of some of the flat spiral designs I’ve created over the years. Next week we will have a couple of new designs to add to this list, so be sure to stop by again.
Summer is officially over, though here in Colorado we are still having some pretty hot days. The weather is predicted to start cooling off nicely in the next week. My kiddos are both back at school, and I’m back to teaching classes at my local yarn shop; Longmont Yarn Shoppe.
I taught my first class last weekend: Learn to Crochet Level 1 – Getting Started. I have 9 other classes coming up in the next 4 months. 3 of them will be Hybrid classes that will have seats both in-person and via Zoom. All the times listed below are in Mountain Time, Zoom classes include the other US time zones on the registration page at LongmontYarn.com.
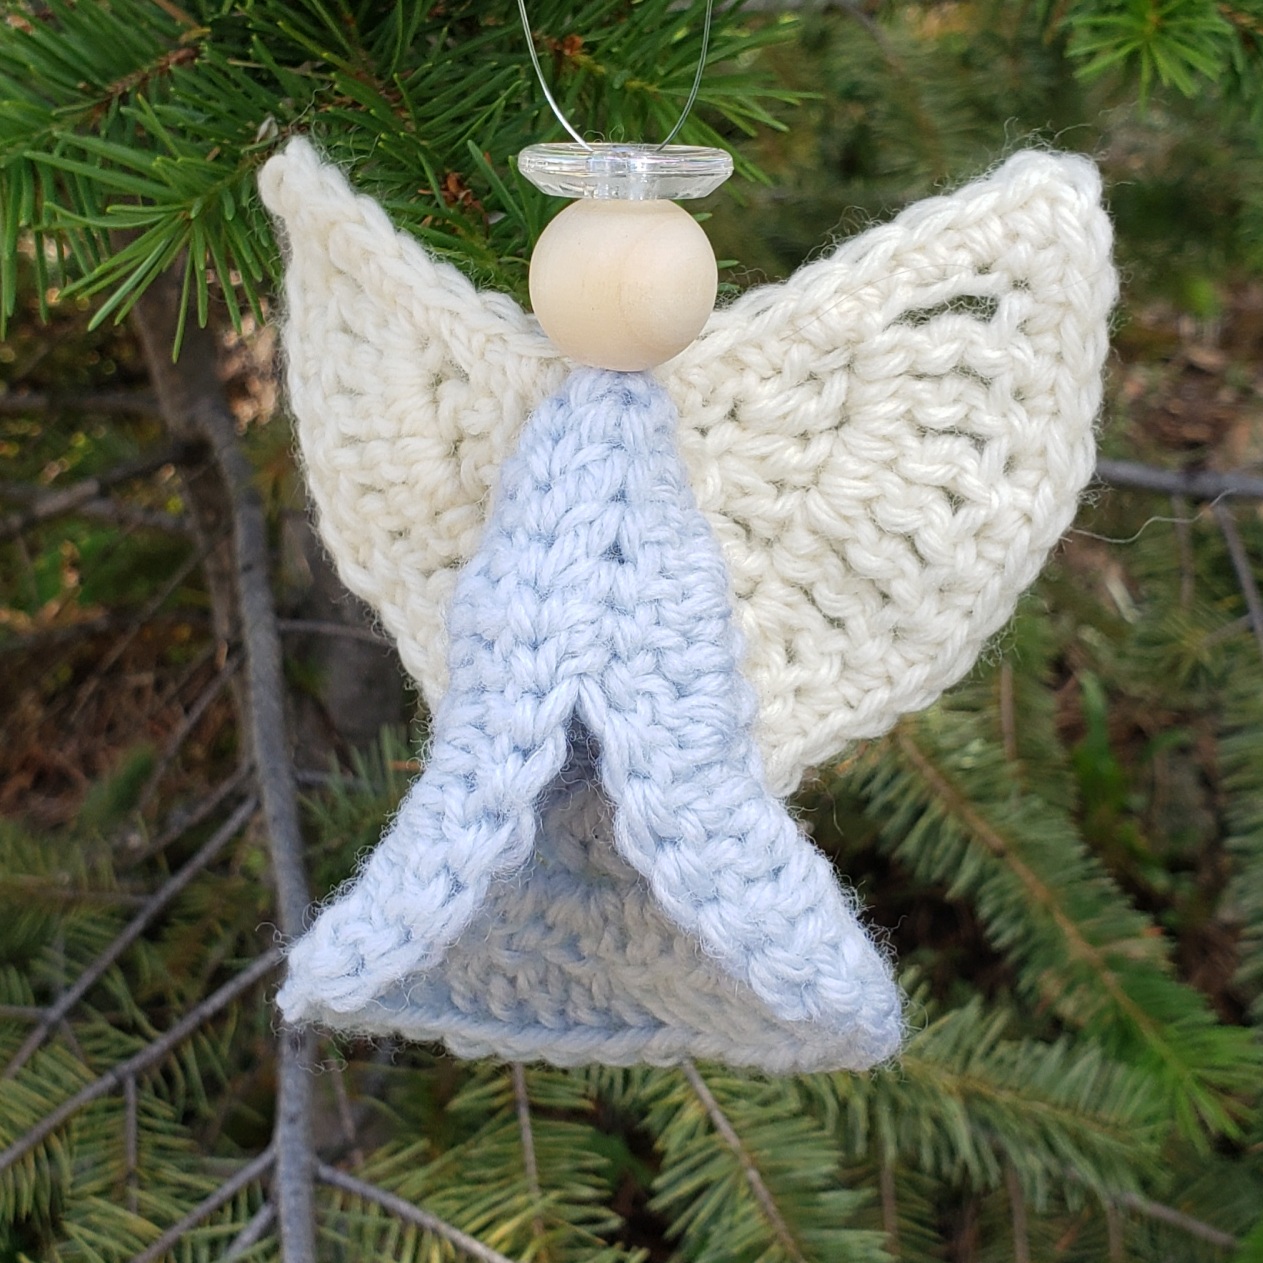
I updated my Memory Angel Ornament pattern to use a large wooden bead and a button for the head. This class includes a class kit for $8 payable at the time of class and is in-person at the shop classroom. The kit booklet includes the pattern for the angel as well as additional tips and tricks on making your angel.
This is the next step in learning to crochet. If you already know how to comfortably make chain stitches this is the class for you. You’ll learn how to make slip, single, half-double, double and treble crochet stitches along with working into a foundation chain and the basics of reading a pattern. The class cost includes the kit for class, so all you need to bring is a crochet hook.
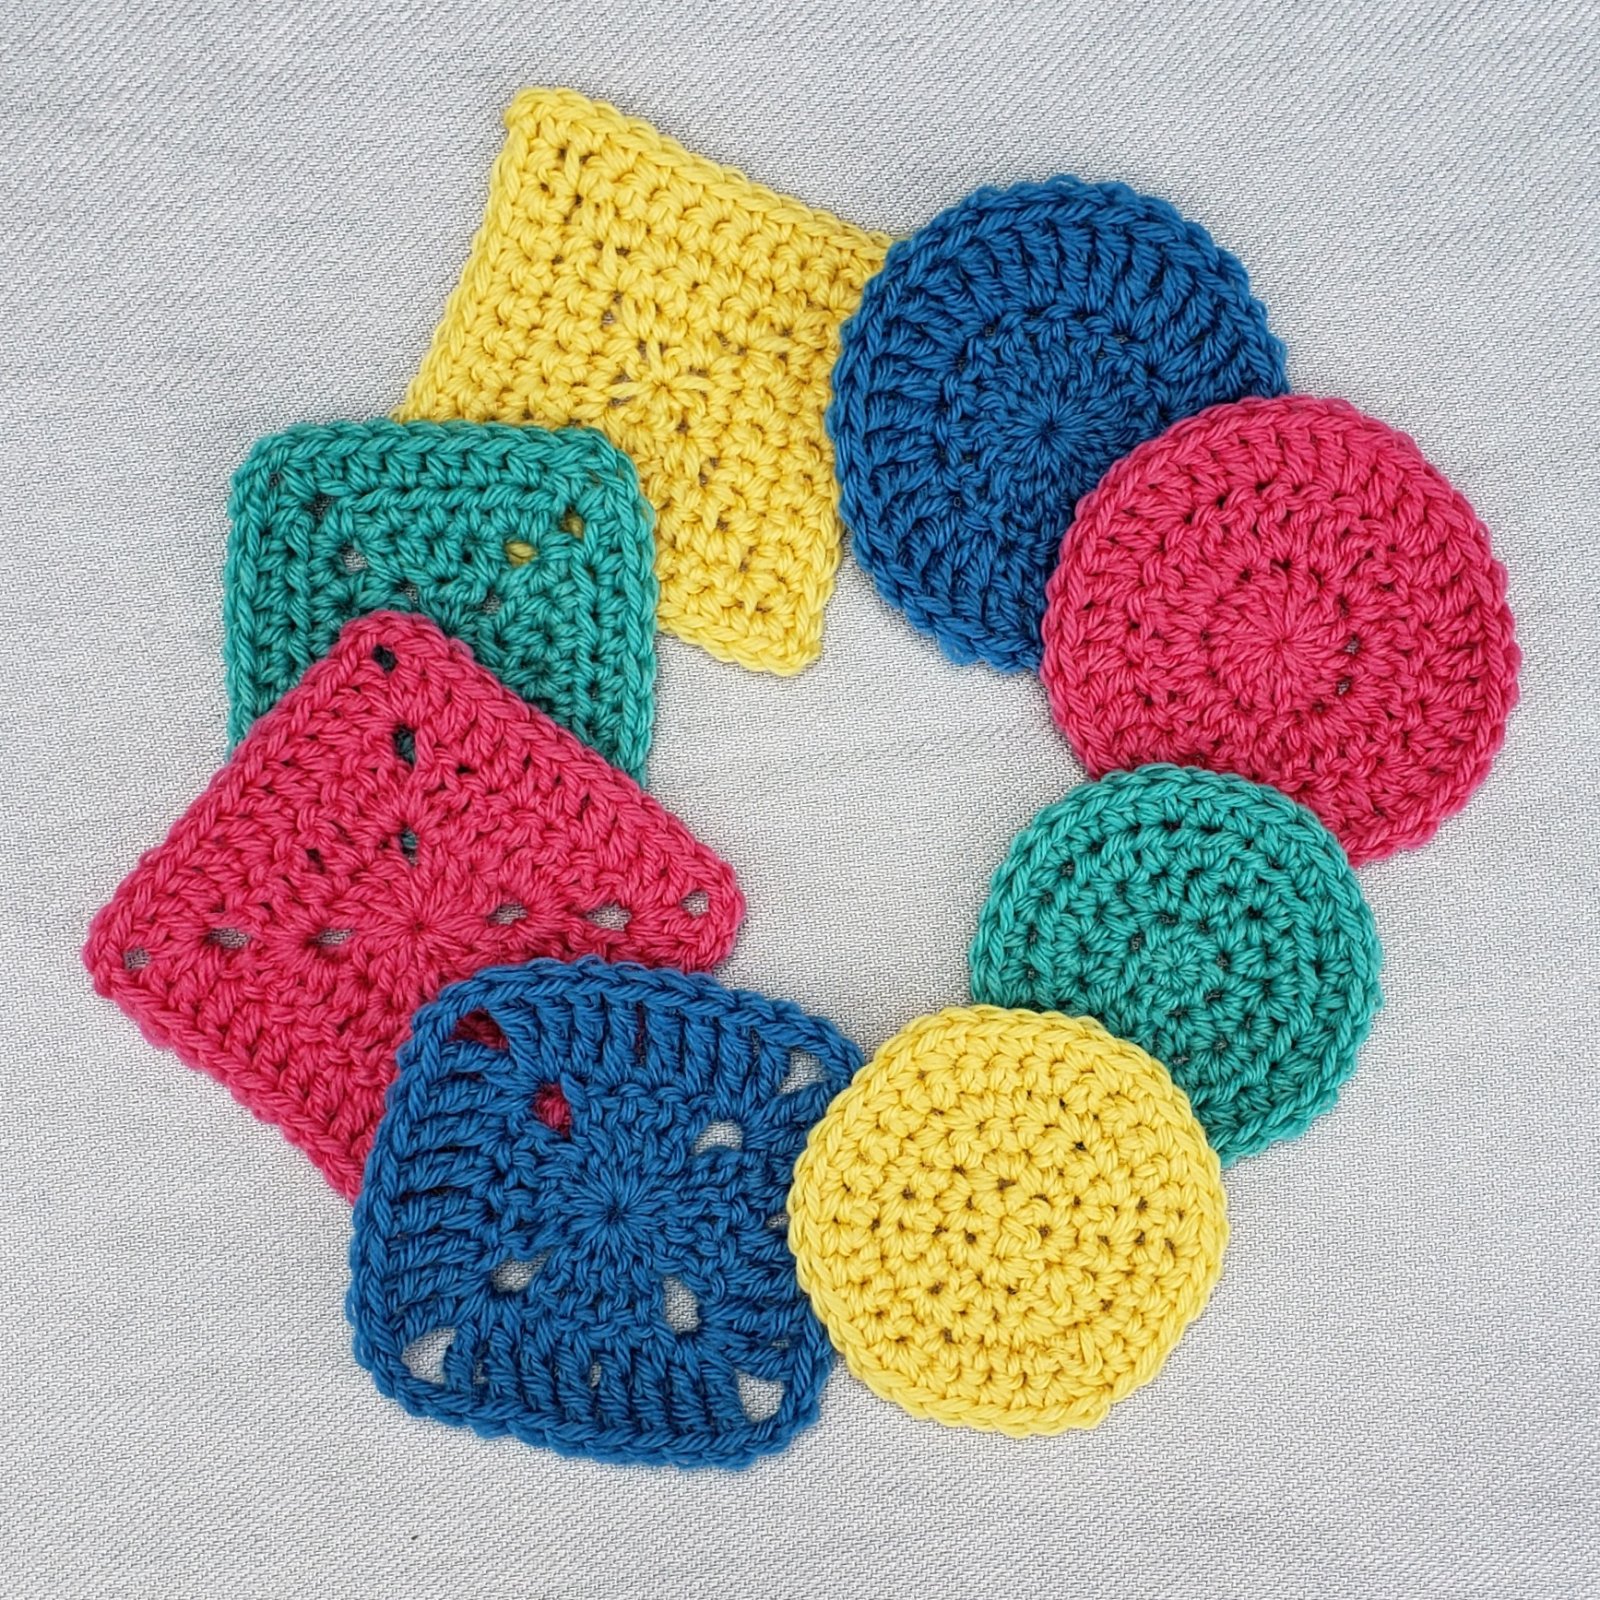
This class is all about getting comfortable working the stitches you picked up in Level 2 in concentric rounds. You’ll learn all about starting and joining your rounds and how to make the motifs in your hand-out in a variety of sizes.
Granny Square Basics with Andee (hybrid) : Saturday September 30th, 1:30 p.m. to 4:30 p.m.
Granny Squares are a classic crochet motif that has been used since the mid-1800’s to make blankets and other projects. The squares are worked in the round with 4 corners and are great for using up bits of yarn left from other projects. In this class you will learn how to crochet the classic granny square as well as modifications to the granny square pattern for more drape in your project. We will cover 2 methods of joining a new color at the beginning of a round including standing stitches, invisible joins for the last round of a square, easy ways to weave in all those tails and working multiple rounds in one color.
This class is a great introduction to making a basic crocheted hat. The class kit includes a booklet with everything you need to know to make any size of hat with any yarn of your choice.
Rectangles are one of the most useful shapes to crochet, depending on their size they can be a scarf, wrap, throw or blanket. Working in the round, from the inside out, like a granny square makes it easy to change colors and add a fun border. But how do you get the rectangle started and how do you determine how big your finished project will be? Come join Andee for this class and you will learn everything you need to know to get the size rectangle you want.
Class tuition includes a full color workbook. We will cover beginning your project with the Stacked Rows Foundation and how long you need it to be for the finished size you want. You will even learn a No Math version using your workbook in class. As well as learning how to figure out the size project you can create with the yardage you have available. The workbook will include 3 different stitch patterns to use to make your projects.
Joining Your Granny Squares with Andee (hybrid): Saturday October 28th, 9:30 a.m. to 12:30 p.m.
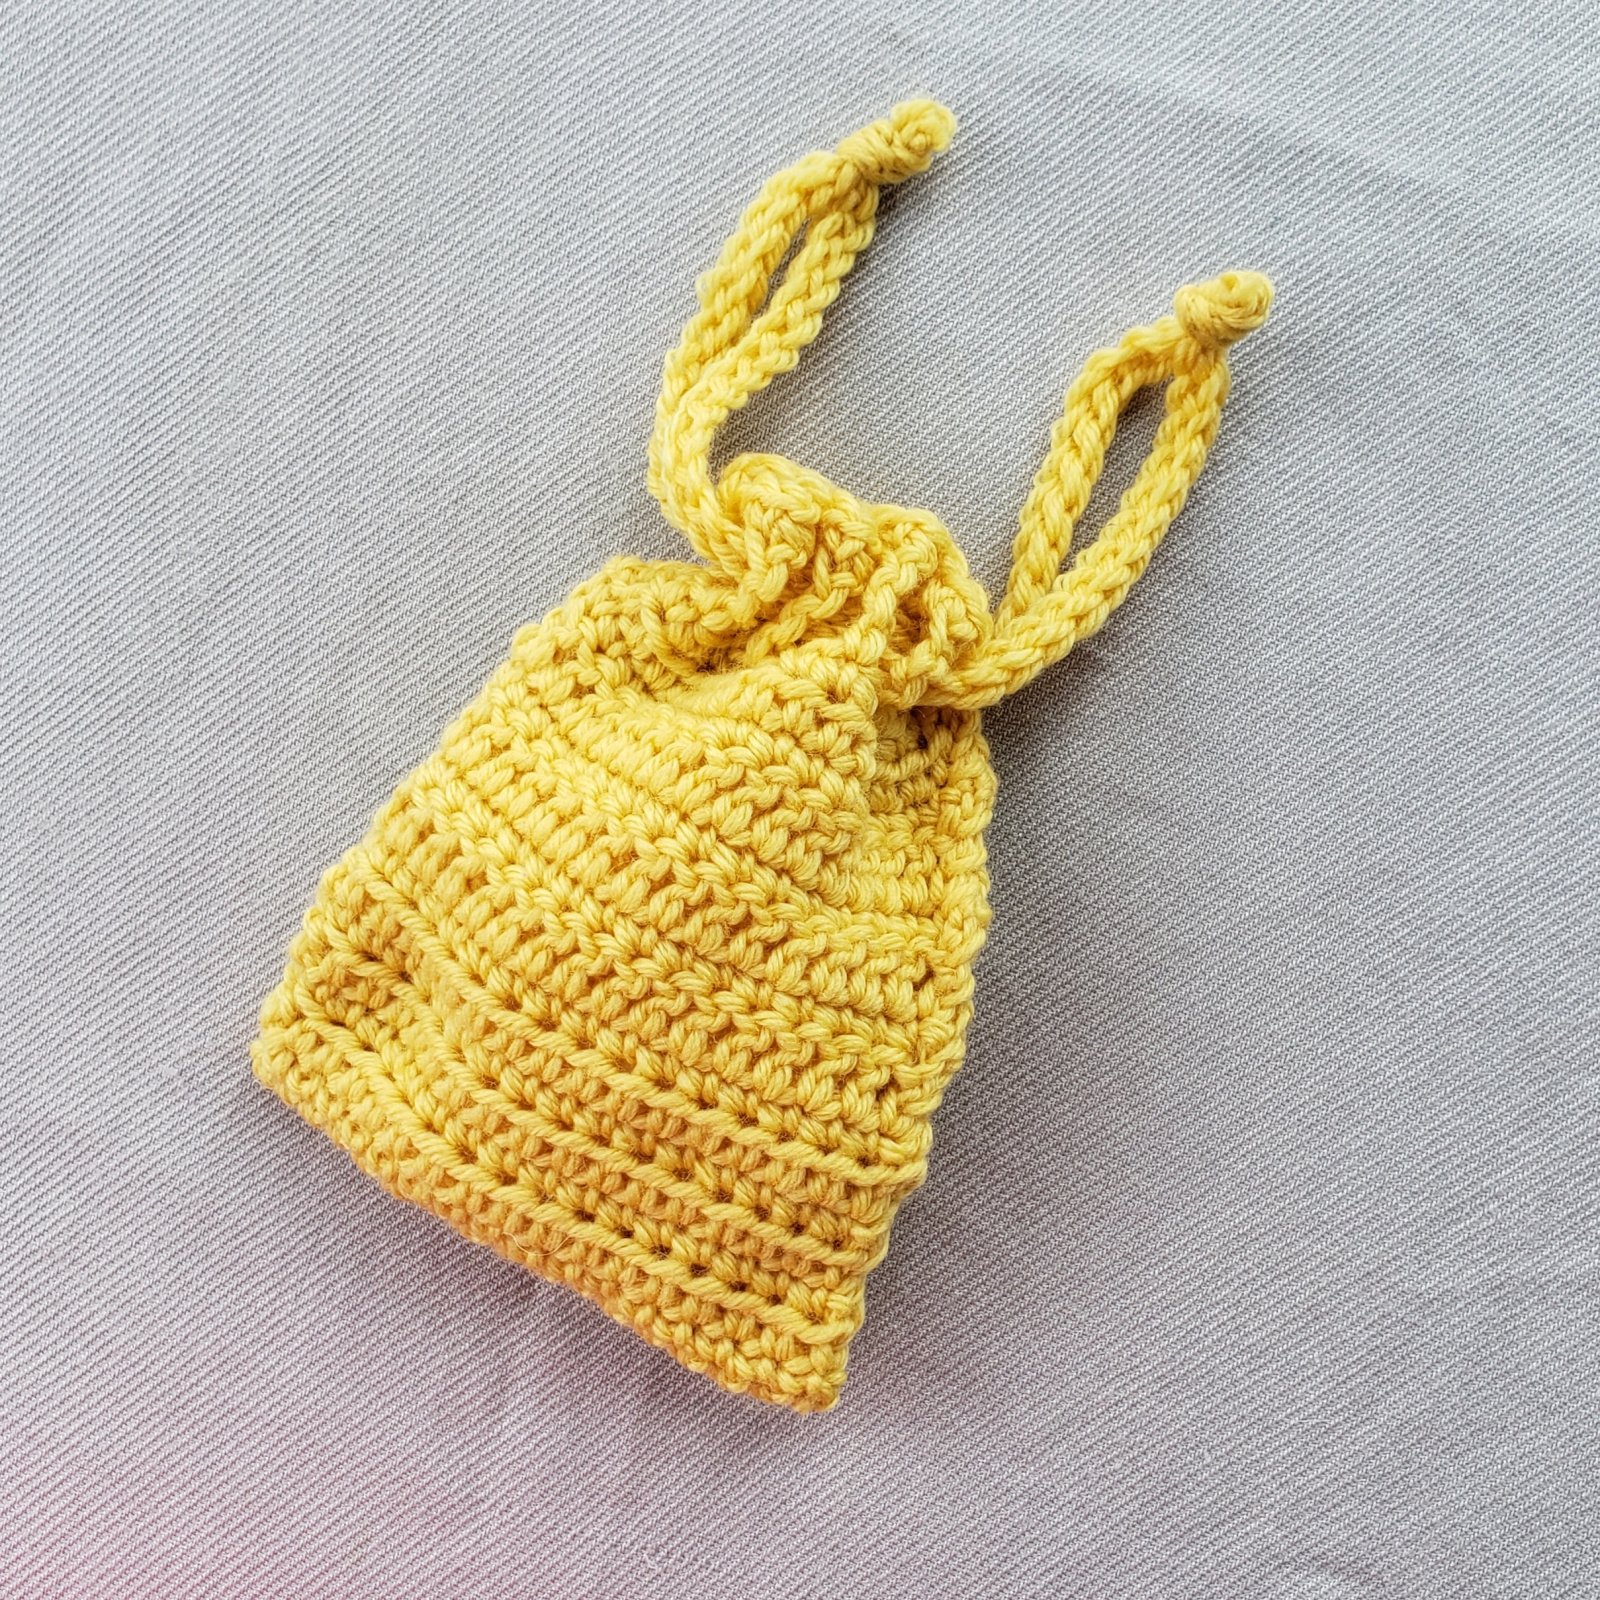
For this class you will need the “Helen’s Yarn Adventures” granny square blanket pattern. The pattern includes stitch diagrams and directions for making granny squares. For this class you will need to make 12 squares that have 4 rounds and 4 squares that have 3 rounds before class so you can practice the various joins. For those that want, I will show how the 16 squares from the homework can be made into a bag.
You’ve gotten comfortable with crocheting the classic Granny Square, so now it’s time to learn all the tips and tricks for joining your granny squares together to make a blanket or other projects. Class will cover 4 methods for joining squares together: Sewing, 2 Crochet joins and a Join-as-you-Go method. We will also cover how to weave in all those ends to create a fabric that is both beautiful and long wearing, plus tricks for blocking and edging your granny square project.
Linked Stitches Hat with Andee (hybrid): Sunday November 5th, 12:30 p.m. to 3:30 p.m.
Hats are fun, and quick projects to crochet and make wonderful gifts, but if you have crocheted a hat using double crochet stitches you may have been disappointed with how holey the fabric is. You need Linked Stitches!
Come learn how to work linked double crochet stitches in this hat project. You will have a fun hat that is warm and stretchy without any holes. During class you will crochet an infant size hat to practice the techniques and leave with the skills to make your hat in 4 additional sizes (Toddler, Child, Small Adult, Large Adult). Students will also learn how to adjust the size of their hat to use different weights of yarn.
Come learn how to create this adorable compact little angel. In three hours you will be confident with using a variety of needle felting sculptural techniques to create a dense long-lasting felted ornament that will be loved for years. Project will introduce using a template for starting your sculpture and directional gathering of fiber to create 3 dimensional shapes. Class is ideal for those that have a little experience with needle-felting already.
All materials are included in the class fee. TO ENSURE YOU GET YOUR KIT IN TIME IF IT IS SHIPPED register 7-8 business days before class starts.
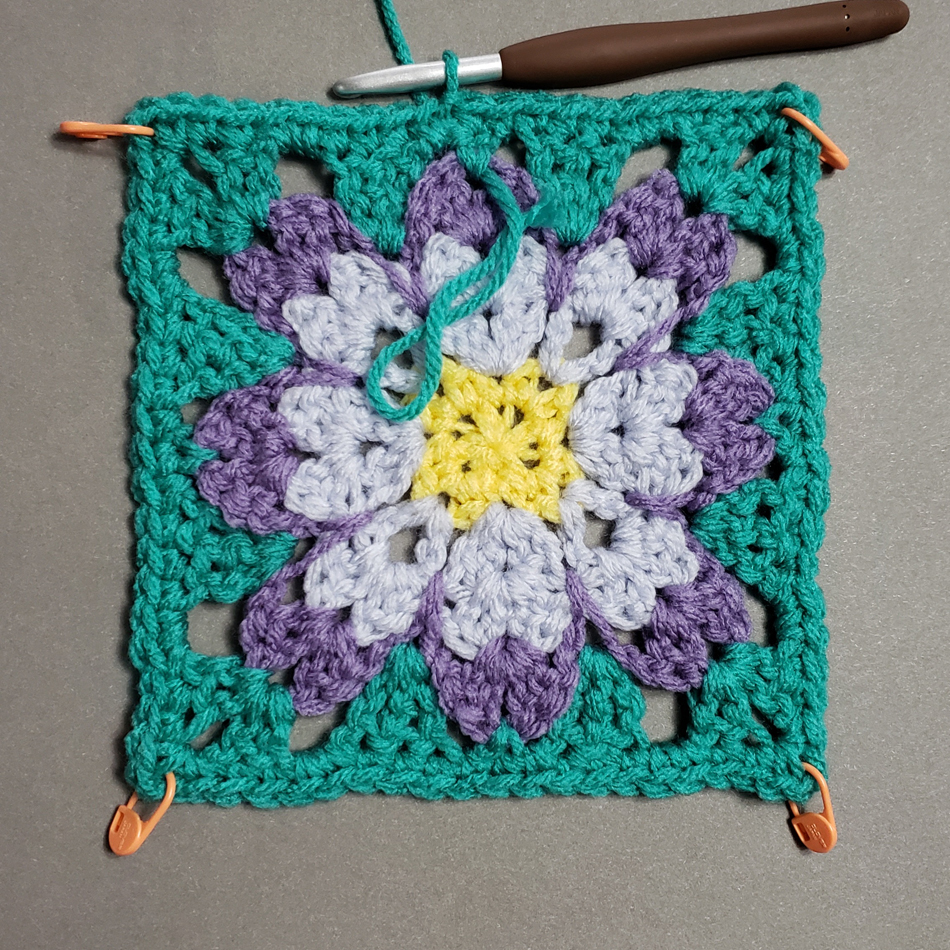
Hello my friends, I have another fun afghan square for you. I have been traveling and having all sorts of adventures with my family this summer. Early in June I went to Ireland with the Craft Tours trip hosted by Tamara Kelly of Moogly Blog. Appropriately this square pattern is Block #18 for the Moogly 2023 Afghan CAL and was inspired by the beautiful gardens we saw on the Ireland trip. You can find out more about the Moogly 2023 Afghan CAL and how Tamara adapted her colors for my design here.
Clematis Garden Afghan Square
Designed by Andee Graves
Skill level: Intermediate
Finished Size: 12” square
Materials:
Yarn
Worsted wt (Sample uses Red Heart “With Love” 100% Acrylic (7 oz/198 g, 370 yd/338 m)
Color A: Daffodil (sample used approximately 2 yards/ 1.1 gram) Rnds 1-2
Color B: Oxford (sample used approximately 70 yards/ 37.6 grams) Rnds 3-4: 3.8 g, Rnds 9-13: 33.5 g
Color C: Lilac (sample used approximately 6.5 yards/ 3.5 grams) Rnd 5
Color D: Jade (sample used approximately 22.5 yards/ 12.1 grams) Rnds 6-8
Hook J / 6mm
Notions Yarn/tapestry needle, Stitch markers
Gauge First 4 rounds of pattern = 4” across square
Special Stitches and Abbreviations:
Place stitch marker (PM)
Standing Double Crochet (Standing dc): Make slip knot and place loop snugly on shaft of hook, yo and insert hook into indicated place, yo, pull up a loop, (yo, pull through 2 loops on hook) twice.
4 dc Shell Stitch (Shl): (2 dc, ch 1, 2 dc) in indicated place.
Single crochet spike stitch (scSpike): Insert hook in indicated place, YO, pull up a loop back to original round/row, 2 loops on hook, YO, pull thru both loops on hook to complete single crochet.
Extended Double Crochet stitch (ExtDC): YO, insert hook in indicated place, YO, pull up a loop, YO, pull through 1 loop on hook, (YO, pull through 2 loops on hook) 2 times.
V-stitch (V-st): (Dc, ch 1, dc) in indicated place.
Granny Shell Stitch (GrShl): 3 dc in indicated place.
3 dc Cluster Stitch (CL): (YO, insert hook in indicated place, YO, pull up a loop, YO, pull thru 2 loops) 3 times, YO pull through remaining 4 loops on hook.
Pattern Notes:
Square is worked center out. Attach yarn using a slip stitch unless otherwise stated. Keep tails to wrong side of fabric and weave in as work progresses. Ch 3 at beginning of rounds counts as a double crochet stitch unless otherwise stated. Be sure to pay close attention if a round is Right Side (RS) or Wrong Side (WS).
Instructions
Rnd 1 (WS): With Color A begin with adjustable slip knot, ch 2, (sc, ch 2) 4 times in second ch from hook, sl st to first sc, gently tighten center of square, PM in ch-2 sps to mark corners. (4 sc, 4 ch- 2 spcs)
Rnd 2 (WS): Ch 1, sc in same st as join, [*(sc, ch 2, sc) in next marked ch-2 sp, move up st marker to ch-2 sp just made*, sc in next st] 3 times, Repeat from * to * once, sl st to first sc.
Fasten off Color A. (12 sc, 4 ch- 2 spcs)
Rnd 3 (RS): With back side of Rnd 2 facing attach Color B with standing dc in middle sc of any side, dc in same st as join, [*sk next st, (dc, ch 2, dc) in next marked ch-2 sp, move st marker up to ch-2 sp just made, sk next st,* Shl in next st]3 times, repeat from * to * once, 2 dc in same st as join, ch 1, sl st to first dc of Rnd {completes first Shl of Rnd}. (4 Shl, 4 ch- 2 spcs)
Rnd 4 (RS): Ch 3, dc in same ch-sp as join, [ch 1, sk next 3 sts, Shl in next ch-sp] 7 times, move st markers up to ch-1 sp of Shls worked in marked ch-2 sps, ch 1, sk next 3 sts, 2 dc in same ch-sp as join, ch 1, sl st to 3rd ch of beginning ch-3 {completes first Shl of Rnd}.
Fasten off Color B. (8 Shls, 8 ch-1 sp)
Rnd 5 (RS): With front side of Rnd 4 facing, attach Color C in ch-1 sp of side Shl with standing dc, dc in same ch-sp as join, [*ch 2, sk 2 sts, scSpike in corresponding sp between Shl and corner dc of Rnd 3, ch 2, sk 2 sts, Shl in marked ch-1 sp of next Shl, move st marker up to ch-1 sp of Shl just made, ch 2, sk 2 sts, scSpike in next corresponding sp between corner dc and next Shl of Rnd 3, ch 2, sk 2 sts,* Shl in ch-1 sp of next Shl] 3 times, Rep from * to * once, 2 dc in same ch-sp as join, ch 1, sl st to 3rd ch of beginning ch-3, {completes first Shl of Rnd}.
Fasten off Color C. (8 Shls, 16 ch-2 sps, 8 scSpike)
Rnd 6 (RS) Squaring up: With front side of Rnd 5 facing, attach Color D to ch-1 sp of side Shl, ch 1, sc in same sp as join, [*ch 1, sk 2 sts and ch-sp, (2 Tr, ExtDC) in next st, ch 2, sk ch-sp and 2 sts, (2 dc, ch 2, 2 dc) in marked ch-1 sp, move st marker up to ch-2 sp just made, ch 2, sk 2 sts and ch-sp, (2 Tr, ExtDC) in next st, ch 1, sk ch-sp and 2 sts,* sc in ch-1 sp of next Shl] 3 times, Repeat from * to * once, sl st to first sc of Rnd.
(4 sc, 8 ch-1 sp, 16 Tr, 8 ExtDC, 12 ch-2 sp, 16 dc {17 sts each side between corner ch-2 sps})
Rnd 7 (WS): Ch 1, turn, sc in first ch-1 sp, [*sc in each of next 3 sts, 2 sc in next ch-2 sp, sc in each of next 2 sts, (sc, ch 2, sc) in marked ch-2 sp, move st marker up to ch-2 space just made, sc in each of next 2 sts, 2 sc in next ch-2 sp, sc in each of next 3 sts, sc in next ch-1 sp, sc in next st,* sc in next ch-1 sp] 3 times, Repeat from * to * once, sl st to first sc of Rnd.
(76 sc, 4 ch-2 sp {19 sc each side between corner ch-2 sps})
End of Rnd 7 WS of Square
End of Rnd 7 from RS of Square
Rnd 8 (RS) V-sts: Ch 4, turn, dc in next st {counts as first V-st of Rnd}, (sk 2 sts, V-st in next st) 3 times, [*(dc, ch-2, dc) in marked ch-sp, move st marker up to ch-2 sp just made, V-st in next st,* (sk 2 sts, V-st in next st) 6 times] 3 times, Repeat from * to * once, (sk 2 sts, V-st in next st) 2 times, sk 2 sts, sl st to 3rd ch of beginning ch 4 to join.
Fasten off Color D. (28 V-sts, 8 dc, 4 ch-2 sp)
Rnd 9 (RS) Granny Shls: With front side of Rnd 8 facing, attach Color B with standing dc in ch-1 sp of any V-st along a side, 2 dc in same ch-sp as join {counts as first GrShl}, *sk 2 sts, GrShl in ch-1 sp of next V-st,* Repeat from * to * until reach marked ch-2 sp, sk 2 sts, (2 dc, ch 2, 2 dc) in marked ch-2 sp, move st marker up to ch-2 sp just made] 4 times, Repeat from * to * until reach end of Rnd, sl st to first dc of first GrShl to join.
(28 GrnShl, 16 dc, 4 ch-2 sp {25 sts each side between corner ch-2 sps})
Rnd 10 (WS) Bobbles: Ch 1, turn, sc in next st, (CL in next st, sc in each of next 2 sts) 4 times, CL in next st, [*(sc, ch 2, sc) in marked ch-2 sp, move st marker up to ch-2 sp just made, CL in next st,* (sc in each of next 2 sts, CL in next st) 8 times] 3 times, Repeat from * to * once, (sc in each of next 2 sts, CL in next st) 3 times, sc in next st, sl st to first sc of Rnd.
(36 CL, 72 sc, 4 ch-2 sp {27 sts each side between ch-2 sp corners})
End of Rnd 10 WS of Square
End of Rnd 10 RS of Square
Rnd 11 (RS): Turn, sc, ch 2 {counts as first dc}, [dc in each st until reach marked ch-2 sp, (2 dc, ch 2, 2 dc) in marked ch-2 sp, move st marker up to ch-2 sp just made] 4 times, dc in each st until reach beginning of Rnd, sl st to join to 2nd ch of first ch-2.
(124 dc, 4 ch-2 sp {31 dc each side between ch-2 sp corners})
Rnd 12 (WS): Repeat Rnd 11. (140 dc, 4 ch-2 sp {35 dc each side between ch-2 sp corners})
End of Rnd 12 RS of Square
Rnd 13 (RS): Ch 1, turn, [sc in each st until reach marked ch-2 sp, (sc, ch 2, sc) in marked ch-2 sp, move stitch marker up to ch-2 sp just made] 4 times, sc in each st until reach beginning of Rnd, sl st to first sc to join.
Fasten off Color B. (148 sc, 4 ch-2 sp {37 sc each side between ch-2 sp corners})
It’s beginning to warm up more days on my mountain and the bunnies are venturing out to see if they can find any fresh greens to nibble. We will still get some snow storms before our real warm weather arrives, but I am enjoying every hour of warmth we get. Easter is coming up this weekend and I have a fun little crochet pattern for you. The written version is below, for those of you that prefer a stitch chart or PDF version you can purchase it in my Ravelry Shop by clicking here.
Spring Bunny
designed by Andee Graves
This fun little bunny can be worked flat facing either left or right. Add your bunny as an embellishment to hats, mittens, sweaters or blankets. Or make the stuffy version for a fun little toy to add to Easter baskets or as a gift for a bunny lover in your life.
Finished Size: Finished bunny is approximately 4.25” tall
Materials
Yarn: Worsted Weight yarn, #4 weight category,
1 Flat Bunny uses approximately 7-10 yards of yarn. Stuffy Bunny uses approximately 15 – 20 yards of yarn
Sample was made with Premier “Every Day Worsted Anti-Pilling”, 180 yds/165 m, 3.5 oz/100 g,
Hook: H / 5mm or size needed to obtain gauge.
Notions: Yarn/tapestry needle, Poly fiber fill if making stuffy
Gauge: First 2 dc rounds = 2 3/8” (6 cm) diameter
Special Stitches:
Chain 4 Picot (ch-4 Picot) Chain 4, slip stitch in previous stitch made using front loop and top side loop.
Pattern Notes
Round 1 of stitches is worked into an adjustable slip knot, if you prefer the magic circle start, make 1 less chain stitch at the start of Round 1.
For Stuffy version use the scraps left from weaving in the beginning tails and Side 1 ending tail to stuff the bunny’s head.
Instructions for Flat Bunny
Right Facing Bunny
Rnd 1: Starting with adjustable slip knot, ch 3 {counts as center and first dc}, 11 dc in third chain from hook, join with slip st to top of beginning ch. (12 dc) Tighten center and weave in beginning tail.
Rnd 2: Ch 2 {counts as first dc}, dc in same st as join, 2 dc in each of next 4 sts, (dc, ch-4 Picot, dc) in next st, 2 dc in each of next 6 sts, join with slip st to top of beginning ch. (24 dc, 1 ch-4 Picot)
Row 3 (Bunny head): Ch 3 {counts as first Tr}, Tr in same st as join, 3 Tr in next st, *ch 7, working in back bumps of chs just made, hdc in third ch from hook, dc in each of next 2 chs, hdc in next ch, sc in next ch, slip st thru front loop and top side loop of previous Tr, * {first ear made}, Rep from * to * once, {second ear made}, (dc, ch 2, slip st) in next st. Fasten off. (5 Tr, 6 dc, 4 hdc, 2 sc)
Left Facing Bunny
Rnd 1: Work same as Right Facing Bunny.
Rnd 2: Ch 2 {counts as first dc}, dc in same st as join, 2 dc in each of next 7 sts, ch-4 Picot, 2 dc in each of next 4 sts, join with slip st to top of beginning ch. (24 dc, 1 ch-4 Picot)
Row 3 (Bunny head): Ch 2, dc in same st as join, *ch 7, working in back bumps of chs just made, hdc in third ch from hook, dc in each of next 2 chs, hdc in next ch, sc in next ch, slip st thru front loop and top side loop of previous dc, *{first ear made}, Rep from * to * once, {second ear made}, 3 Tr in next st, (Tr, ch 3, slip st) in next st. Fasten off. (5 Tr, 6 dc, 4 hdc, 2 sc)
Finishing
Weave in ending tail or use to sew bunny to project.
Instructions for Bunny Stuffy
Side 1 Bunny
Rnds 1 – 2: Work same as Right Facing Flat Bunny. Save beginning tail scrap.
Row 3 (Bunny head): Work same as Right Facing Flat Bunny but work only first Ear. Fasten off. (5 Tr, 4 dc, 2 hdc, 1 sc) Weave in ending tail, saving ending tail scrap.
Side 2 Bunny
Rnds 1 – 2: Work same as Left Facing Flat Bunny. Save beginning tail scrap.
Row 3 (Bunny head): Work same as Left Facing Flat Bunny but work only first Ear. Fasten off leaving 20” long tail. (5 Tr, 4 dc, 2 hdc, 1 sc)
Finishing
Holding Side 1 and 2 with WS together, using a whip stitch sew around Rnd 2 of body of bunny from 1 side of head to other, place a bit of fiber fill stuffing inside circle of bunny body. Sew along base of bunny head to close circle.
Sew around head, using a whipstitch and leaving bunny ears free, use beginning tail and ending tail scraps to lightly stuff head before sewing nose. Weave in last tail and trim excess.
In the image above you can see how I squished my bunny stuffy to make him sit on a flat bottom. I didn’t stuff the body very firmly so that I had some squishability when the bunny was finished.
I hope you are having a wonderful return to spring and enjoy crocheting some bunnies of your own.
I love March. It is National Crochet Month, National Crafting Month and it has my favorite geeky day…Pi Day.
March 14 is written as 3/14 for most of us here in the US and 3.14 is the short form for Pi. For those of you uncertain what Pi is…it is a mathematical constant that is the ratio of a circle’s circumference to its diameter, approximately equal to 3.14159. It also appears in many formulae across mathematics and physics.
For my crochet design work I tend to use the short form of 3.14. That is more than enough accuracy for creating circles for hats, bags and rugs.
This month I’ve been busy with fun crochet projects at the Longmont Yarn Shoppe. We yarn bombed the tree in front of the shop. My friend Margie in the Casual Crochet group also has us all participating in “Random Acts of Crochet Kindness”. My favorites are the ones made using Googly Eye Finger Puppets.
Like this snuggly “Pocket Hug”. If you would like to make your own Pocket Hug I’ve included the pattern here today. I had fun coming up with the basic circle that I used for this pattern. I had to get a little creative with how I worked the center of the circle, since it is worked around the ring of the Googly Eye Finger Puppet.
CL (2 double crochet Cluster Stitch) – (yo, insert hook in indicated place, yo, pull up a loop, yo, pull thru 2 loops) 2 times, yo, pull thru remaining 4 loops on hook.
Pattern Notes:
Round 1 of stitches is worked into the finger ring of the googly eye puppet.
Instructions
Circle with Arms
Rnd 1: With googly eyes of puppet facing, attach yarn with a slip st in the puppet finger ring, ch 1, 10 sc in ring, ch 2, bring hook behind googly eyes, sl st to join to first sc worked in ring. (10 sc, 1 ch-2 sp)
Rnd 2: (Ch 3 {counts as first dc}, dc) in same st as join, 2 dc in each of next 9 sts, 4 dc in ch-2 sp, join with sl st to top of beginning ch-3. (24 dc)
Rnd 3: Ch 2 {counts as first hdc}, hdc in next st, 2 hdc next st, hdc in next st, ^ ch 6, CL in 3rd st from hook, sc in back bar of each of next 3 chs, sl st thru front loop and side loop of previous hdc,^ hdc in next st, 2 hdc in next st, *(hdc in each of next 2 sts, 2 hdc in next st)3 times,* Rep from ^ to ^ once, Rep from * to * once, sl st to join to top of beginning ch-2. (32 hdc, 6 sc, 2 CL)
Heart
This is my Simple Sweetheart pattern from February 2012
Rnd 1: Starting with adjustable slip knot, ch 2, 7 sc in 2nd ch from hook, join with sl st to first sc of Rnd. (7 sc)
Rnd 2: Skip 1 st, 5 dc in next st, 1 dc in next st, (dc, picot, dc) in next st, dc in next st, 5 dc in next st, skip next st, join with sl st to first sc of Rnd 1. Fasten off. (14 dc, 1 picot)
Finishing
Use tails for sewing pieces together. Sew Heart to front of Circle below eyes. Fold arms of circle so they are hugging the heart, sew in place. Weave in any remaining tails.