If you didn’t know, today is Pi-Day. For those of you that are new to visiting my blog I am a bit of a geek. I use geometry in my designing process all the time, but my favorite geometrical shapes are circles.
This blog post contains affiliate links, purchases through these links help support me without additional cost to you.
For those of you uncertain what Pi is and how it relates to circles…it is a mathematical constant that is the ratio of a circle’s circumference to its diameter, approximately equal to 3.14159. It also appears in many formulae across mathematics and physics. For most uses the abbreviated version of 3.14 is more than enough. March 14 is written as 3/14 for most of us here in the US, so some of us geeky souls like to refer to today as Pi-Day.
I have been playing with some circles lately, I made this fun little pouch as an experiment. It is still a work in progress, but so far I like what I’ve come up with. This was just 2 flat circles worked in 5 rounds of double crochet, I then crocheted them together and added a Romanian Cord to create a little wearable pocket for my phone and a few odds and ends when I am running around the house. The crochet hook is to give you a feel for the size of the pouch.
If you are wondering about how to get your flat circles as round as mine you can check out my post about Crocheting Really Round Circles here. I get very detailed in that post about crocheting flat circles and keeping their edges round.
If you are more interested in using Pi to crochet hats that fit the person they are made for, check out my Perfect Fit Crocheted Hat pattern. It is basically my Perfect Fit Crochet Hat class in a pattern. Everything you need to know for adjusting the size of your hat for fit and for the yarn you are using. You don’t even need to be a wizard at math, because I have some easy visual cheats included in the pattern. Once you have worked through the pattern you will understand how to adjust any crown-down constructed hat to fit your yarn and whomever you are making the hat for.
I recently purchased some 24 inch diameter floral hoops to use for creating some crochet art. The first piece I have been making is fairly free-form, so math hasn’t been as much help in this project. This is just the start of it. Once the hoop is filled in and the crochet open work is anchored to it, I’ll be adding crochet pieces to the foreground to make a fun little scene. The whole thing is currently anchored to my work surface so that I can stretch it as I go.
I do have some additional pieces planned that will involve more math as I fill in the hoop. I’ll share more images as these projects progress.
I bought my hoops on Amazon and am very happy with the quality of what I received. You can check them out by clicking here. These hoops are strong and well shaped without any distortion from shipping. They have them in variety of sizes, so I may be ordering some of the smaller ones for making framed snowflakes in the fall. The 24″ diameter ones were the largest offered on that product listing.
Saint Patrick’s Day is this coming Sunday and I decided to make up a little clover for all my lovely readers.
This quick little shamrock can be crocheted up in just a few minutes with about 4 yards of worsted weight yarn. I used Berroco’s Ultra Wool and a 5mm hook for the shamrocks shown above. You can sew or glue your shamrock onto a pin back to create a fun brooch to wear or sew the finished shamrock unto a hat, gloves, or scarf.
I have a PDF version available through my Ravelry shop that also includes a stitch chart. The PDF version is available for free in my Ravelry shop with coupon code 2024QSSPD through 11:30 p.m. Mountain Time Saturday, March 16, 2024. Just place the pattern in your cart and when checking out put the coupon code in the code spot.
3.5 oz/100 g, 219 yds/200 m (1.8 g/4 yds for 1 Shamrock)
Hook H / 5 mm or size needed to obtain consistent fabric
Gauge is not critical to this project; fabric needs to be consistent and tight. Shamrock can be worked with different weight of yarn, just adjust the size hook so you get the desired result.
Notions Yarn/tapestry needle, pin back if turning into brooch/pin
Special Stitches and Abbreviations
Adjustable Slip Knot: Make like a regular slip knot but use the beginning tail to form the working loop. Pulling on the beginning tail snugs the working loop on the shaft of the hook. If desired can use the magic circle method instead, just count your circle as the first chain stitch. Click here for my YouTube video if you need helpwith the Adjustable Slip Knot.
2 Extended Double crochet Cluster (2ExDcCL): [Yo, insert hook into indicated stitch, yo, pull up a loop, yo, pull through 1 loop, yo, pull through 2 loops] 2 times, yo, pull through remaining 3 loops on hook.
Pattern Notes
This shamrock is worked from the center out in 2 rounds, at the end of the second round you chain a length then work back towards the body of the shamrock to create the stem.
Pattern Instructions
Rnd 1: Make an adjustable slip knot, ch 2, 6 hdc in second ch from hook, join with a slip st to first hdc of round. (6 hdc)
Rnd 2: (Ch 4, 2ExDcCL, hdc, 2ExDcCL, ch 4, slip st) in first st, [slip st loosely in next st, (slip st, ch 4, 2ExDcCL, hdc, 2ExDcCL, ch 4, slip st) in next st] 2 times, slip st loosely in next st,
{Stem} ch 6, sc in back bump of second ch from hook, slip st loosely in back bump of each of next 4 chs, slip st to join to Rnd 1 between last and first hdc. Fasten off.
I used Vanna’s Choice with an I hook (5.5mm) for the brighter green Shamrock shown above, you can see that it came out a bit bigger than the shamrocks made with Berroco Ultra Wool.
Happy Saint Patrick’s Day to all my Irish and Irish Heritage readers.
Happy National Crochet Month my friends! March has started off with a bang for me. I”m helping out with all sorts of fun stuff at the Longmont Yarn Shoppe and will be sharing more about that. Suffice to say that I’ve been so busy that I didn’t get a chance until today to do my first post of March to celebrate NatCroMo.
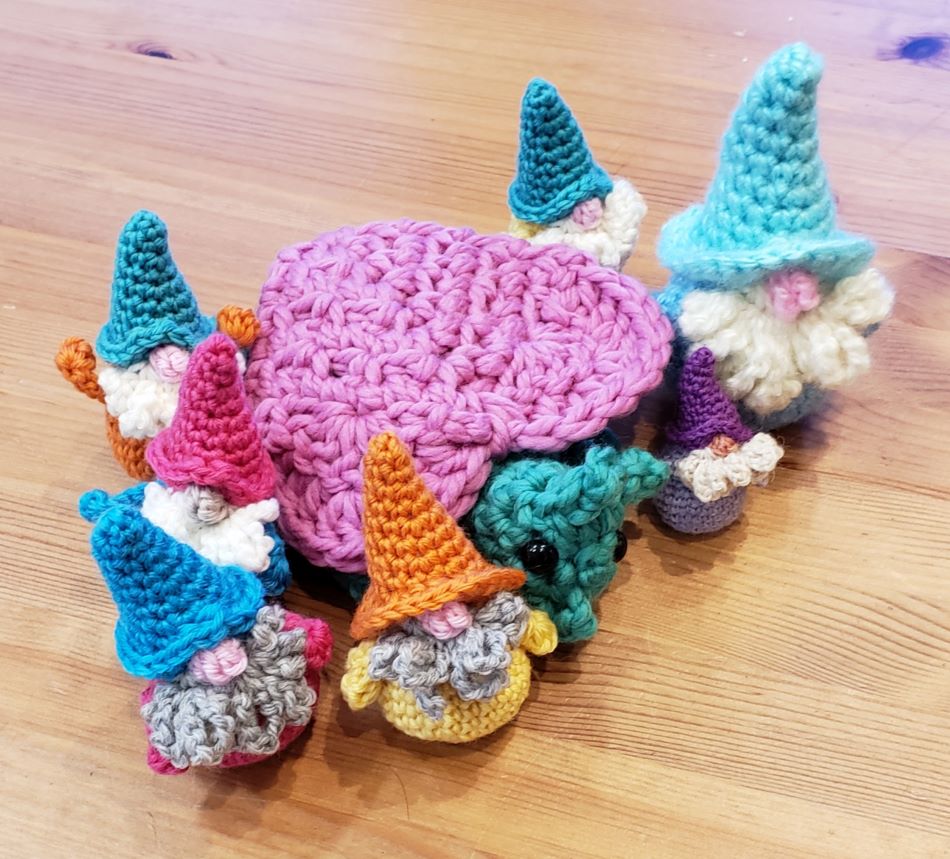
First of all say hello to my newest design, this is my “Cute Lil Gnome” pattern. This fun amigurumi is made using small bits of worsted weight yarn. Approximate yardage for each of the 4 pieces are: body -14 yards, Hat – 8.5 yards, Nose – 2 yards, and Beard – 3.5 yards.
I’ve been having fun making these little gnomes from various weights of yarn. The worsted weight gnomes are worked with Berroco Ultra Wool using a H (5mm) size hook and are 4.5 inches (10.6 cm) tall.
All my current crop of gnomes were having a little party with the Luv Bug at the shop on March 1st. The majority of the gnomes were made with Berroco Ultra Wool. The tiny one was made with KFI Collections “Teenie Weenie Wool”. The big one in pastel colors was made with some discontinued Lion Brand “Jiffy” that I had in my stash.
The big Gnome and Luv Bug are being crochet mascots at the Longmont Yarn Shoppe, so if you are in the area stop by and get your photo taken with them. We are also looking for suggestions for a name for the Gnome. If you stop in with a finished crochet project to get your photo taken at the shop, you can get a cute little butterfly or sheep stitch marker and enter the shop drawing to win an awesome product prize at the end of NatCroMo.
I designed this project so you only have to sew one seam. The hat is worked top down with the nose and beard crocheted at the end of the hat. The body is worked bottom up with the arms crocheted along the way. You fasten off the body with a long tail and use it to sew the body to the hat/head. A couple of fancy cluster stitches make the nose and hands, post stitches create the first round of the hat brim, but the rest of the project is single crochet, slip stitches and chain stitches.
The pattern currently has written instructions with some clarifying photo tutorials and 1 stitch chart. I’ll be updating the pattern at the end of March with stitch charts for all the parts and more photo tutorials. Once it is updated the price will go up. If you purchase your pattern now at the lower price, you will get the updated version for no additional cost when it is available.
Make sure to check back regularly this month as I reveal more new patterns and all the creative ways I will be celebrating crochet with my local crochet community.
October is almost done and I’m winding down my spiral blog posts. I wanted to share a different sort of spiral with you all today. As you know I love crocheting in the round, it is a great way to create amazing borders on a project as well as a fun way to create shaping. Today I want to talk about continuous rounds in crochet.
Working a continuous round in crochet is often a spiral style. Especially when you are crocheting top down hats or amigurumi. When you work concentric rounds in crochet you join the first stitch to the last stitch of the round, but for continuous rounds you are working the rounds without joins and step-up to the first stitch of the next round after the last stitch of the previous round. Continuous rounds also eliminate those pesky seams. When working an increasing circle, like for the crown of a hat, your rounds look like a classic spiral.
My flat fuzzy friend is an example of a classic double crochet spiral worked as a continuous round, then surface crochet is worked to emphasize the spiral.
I used the classic double crochet spiral as a continuous round for my Simple Double Crochet Hat design as well. But I don’t really like how open the stitches are for a hat made with double crochet stitches. That open stitch work is great for a warm climate hat, but on my mountain I need something a little less breezy. This inspired me to start playing around with how to work a double crochet hat that didn’t have all the open spaces.
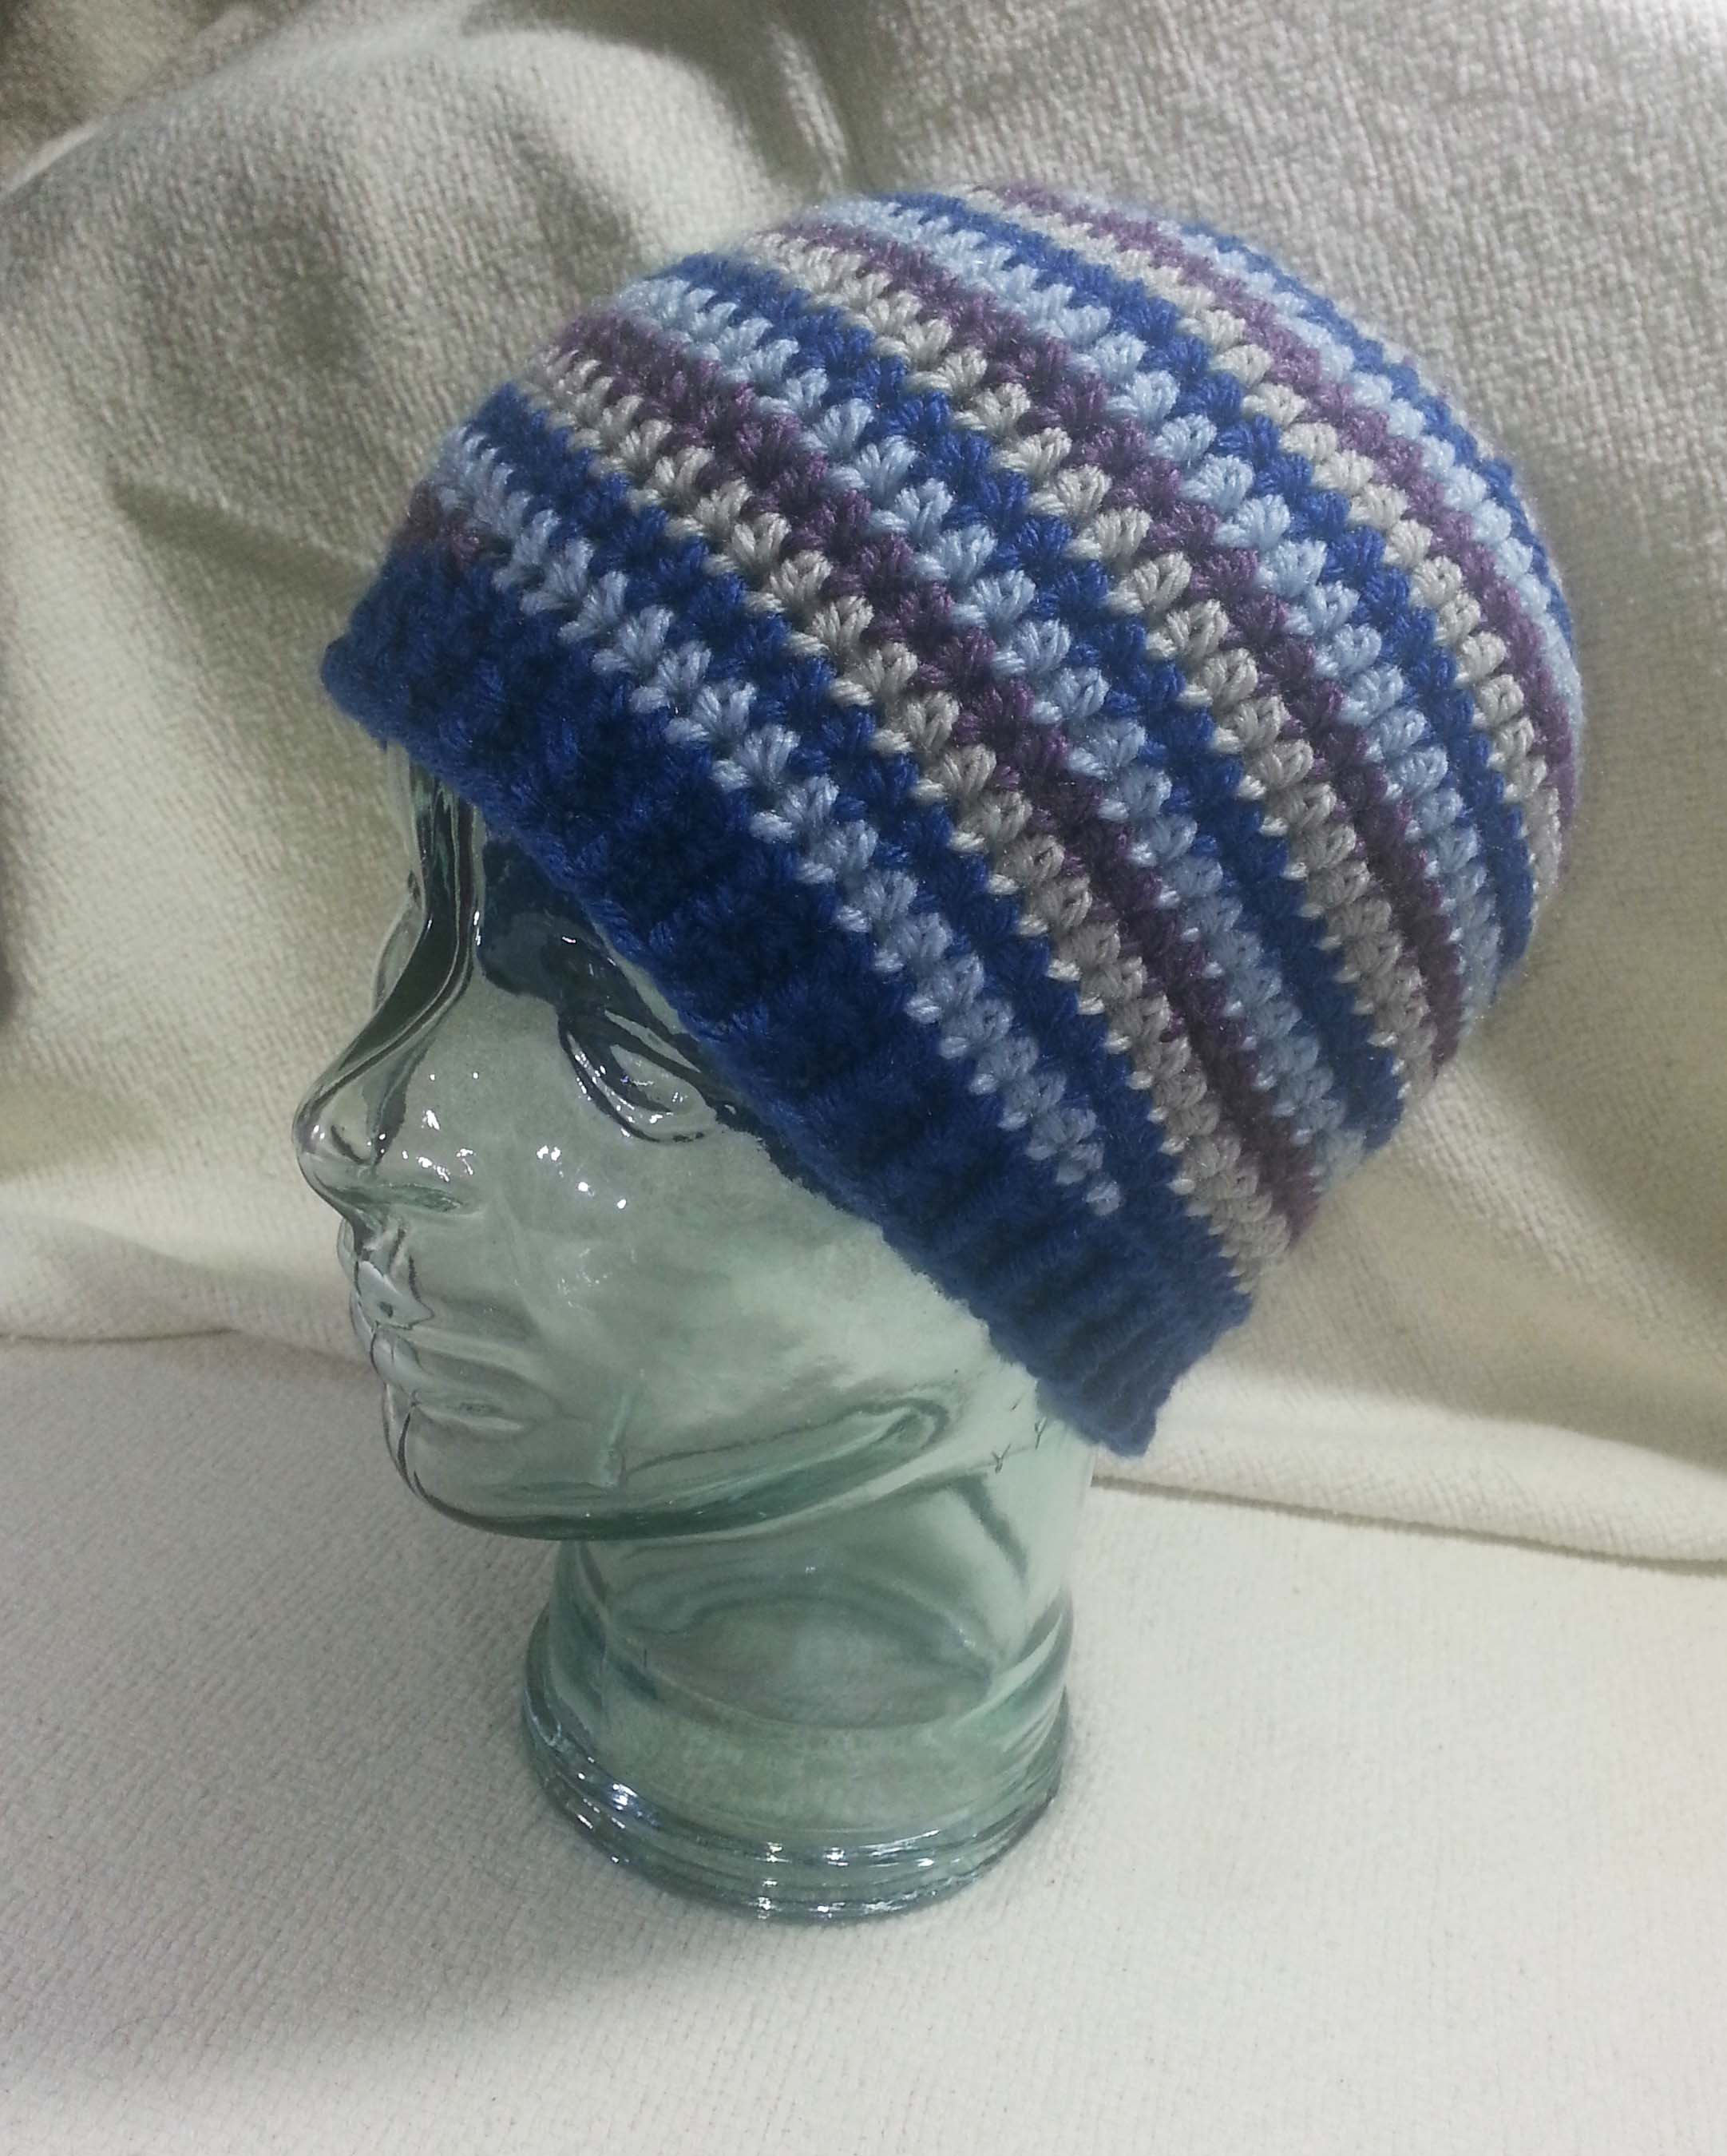
Last spring I bought a beautiful silk scarf with a rainbow of colors and decided I needed a hat to go with it. I had lots of fun selecting a yarn at the Longmont Yarn Shoppe that would match it. The selected yarn was Cosette by Dream in Color and is a glorious cashmere blend that was a delight to work with. My plan was to use the yarn to crochet a double crochet hat that used linked double crochet stitches.
I took that project with me on my trip to Philadelphia and Ireland. It was a great project to work on when traveling as it was small enough to fit in my carry-on for flights and my day-pack during our various bus trips. After a lot of experiments and little bit of frogging I finally settled on how I wanted the design to work.
The finished hat is my Snowy Rainbow Hat. The pattern is available for purchase in my Ravelry Shop. This pattern includes stitch charts and instructions on making the hat in various sizes.
I’m also teaching a class on working this hat at the Longmont Yarn Shoppe, Sunday, November 5th 12:30 p.m. – 3:30 p.m. (Mountain Time) {2:30 p.m. – 5:30 p.m. Eastern; 1:30 p.m. to 4:30 p.m. Central, 11:30 a.m. to 2:30 p.m. Pacific}. This class will be a hybrid class, so you can join me via Zoom or In-person. You can register for the Zoom seats here on the Longmont Yarn Shoppe website, and for the In-person seats here. For the class I recommend working with a solid color worsted weight yarn, the image above shows the hat worked in Berroco’s Ultra Wool. In class we will make a baby size hat so you can practice all the elements of making the hat and learning linked double crochet stitches in the round.
With cold weather and holiday gift giving right around the corner, hats are a great project to have in your works-in-progress. If you want to personalize your hat gifts you can have fun adding little embellishments. I love to add flowers to my hats or little snowflakes. For the younger members on my gift list I will sometimes turn a basic hat into a monster face. I made one for my nephew years back and when he outgrew it he asked me to turn it into a ball.
In keeping with my crochet spirals theme I wanted to share some dimensional spirals with you. So far everything I’ve shared has been flat spirals but they are also wonderful for making hats with. I like making my hats from the crown down to the brim to take full advantage of the stretchiness of the fabric. My favorite method is to work continuous rounds, which is basically a spiral. Creating hat patterns that use different color spiral arms is an easy adjustment. 2 of my favorite spiral hats are below.
Whirlwind Hat
This hat pattern is sized for a small adult head (circumference 21″) here on my blog. This pattern uses a four-arm spiral to create a colorfully striped top-down hat. It is a great pattern for using up leftover bits of yarn from your stash. Each spiral arm uses approximately 28 yards, 1 spiral uses 46 yards as it is a spiral arm and the brim. Click here to check out the pattern.
Spiraling Stripes Hat
This 2 arm spiral hat that was inspired by the folks at Round Mountain Fibers. They hand-dye some incredible colors. I wanted to create a hat that would blend a semi-solid and variegated color together. The sample I made had some interesting pooling of the colors so I got an almost plaid look in the finished hat.
This is another sample I made from the pattern using 2 solid color worsted weight yarns. This was made with Berroco Ultra Wool. The pattern is available for purchase in my Ravelry Shop. The pattern includes stitch charts and is written for a small adult size (21″ circumference).
If you are interested in making these hats in smaller or larger sizes you just need to stop increasing the crown of the hat when you reach the size you want, then work the sides of the hat in keeping with the size of the crown.
If you want a really detailed run-down on adjusting the size of top down hats you can purchase my “Perfect Fit Crocheted Hat” pattern in my Ravelry Shop. This pattern is basically my hat class in pattern form, it walks you thru the ins and outs of making a hat just the size you want.
I hope you are having a wonderful October, I’ll have a few more fun posts about crocheting spirals before the month is out.
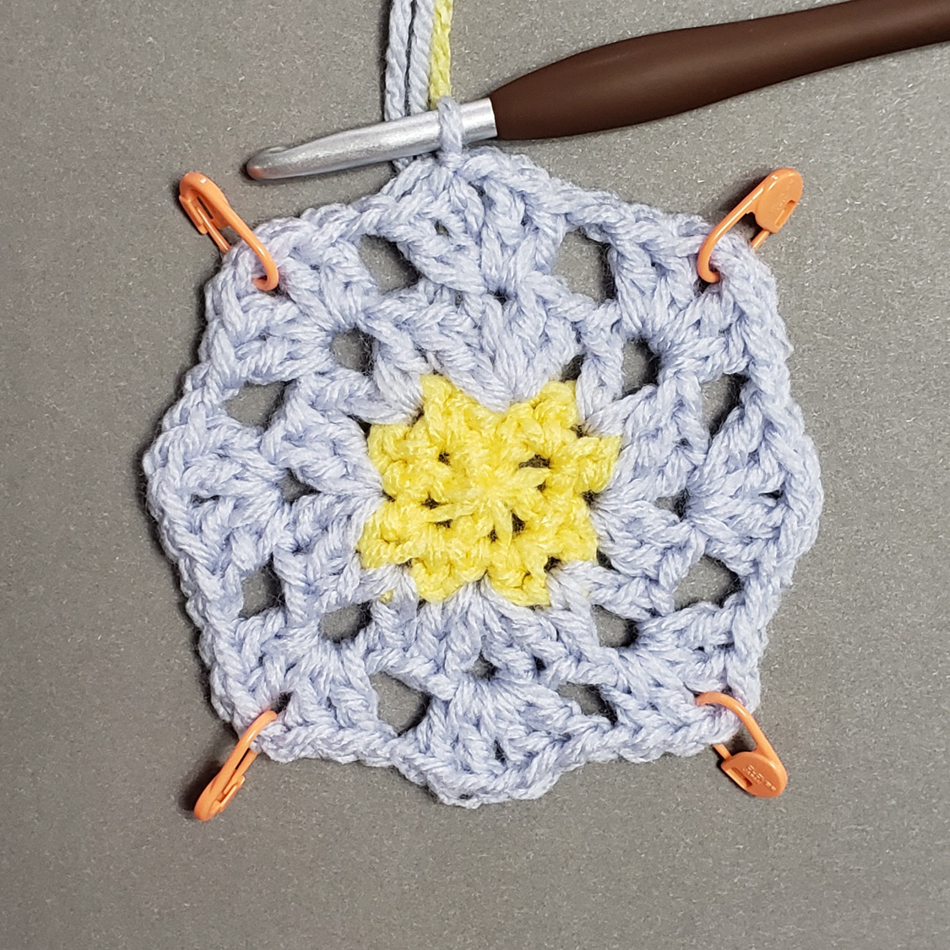
Hello my friends, today is my actual Birthday! I’m 60 years young today! So I have a 6 inch blanket square to celebrate my 60th. Doesn’t everyone love alliteration with their crochet patterns?
Like all small spiral projects this is a great pattern to use up those odds and ends of worsted weight yarn that you have remaining from other projects. Just pick 2 contrasting colors for your spirals, you’ll only need 7 yards for each spiral arm.
This square is part of the Melange Blanket Mystery Crochet-Along with Underground Crafter. This is a year long project that is coming to a conclusion soon. Be sure to check out this post at Underground Crafter that has all the links for the other squares, great information on joining your squares together and the information and links you need to get in on a chance to win some of the marvelous give-away prizes.
Color A: Marina #28437 (approximately 7 yards/ 3.2 grams) Spiral Arm 1
Color B: Seashell #28447 (approximately 7 yards/ 3.2 grams) Spiral Arm 2
Color C: Tranquil #28453 (approximately 20 yards/9.5 grams) Square Border
Hook J / 6mm
Notions
Yarn/tapestry needle
8 Medium Locking Stitch markers (2 in one color, 6 in second color)
Gauge
First 5 rounds of pattern = 4” across circle
Abbreviations/Special Stitches
(Standing dc) Standing Double Crochet: make slip knot in yarn and place loop snugly on shaft of hook, yo and insert hook into indicated st, yo, pull up a loop, (yo, pull thru 2 loops on hook) twice.
(sl st loosely) Loose slip stitch: Insert hook in indicated place, YO, pull up a loop thru place and loop on hook keeping loose like making a chain st.
(sl st) Slip stitch: Insert hook in indicated place, YO, pull up a loop thru place and loop on hook, continue to pull up on working loop until original loop is tight.
(Edc)Extended Double Crochet: YO, insert hook in indicated st or sp, YO pull up a loop, YO pull thru first loop on hook, (YO, pull thru 2 loops on hook) 2 times.
Pattern Notes:
Start square with an adjustable slip knot. Beginning tail tightens the loop on the hook. If you prefer to start with a magic loop crochet 1 less chain stitch at start.
Stitch counts at the end of each round are shown in italicized brackets at end of each round.
Square starts with a 2 color hdc spiral circle as the center, then rounds are worked to square the circle.
When instructions specify “sl st loosely”, this means work those slip stitches similar to a chain stitch and do not pull the working loop to tighten them as in a joining slip stitch. You will be working into those loose slip stitches for the next round.
Instructions
Spiral Circle
Rnd 1 (RS): Begin with Color A, ch 2, (sc, 3 hdc) in second ch from hook, pull up long loop of color A and remove hook, insert hook in same ch as previous work, pull up a loop of Color B on shaft of hook, ch 1, (sc, 3 hdc) in same ch st, pull beginning tail of Color A to close center tightly. Place st markers in each st using a different color marker to indicate the last st of each color section. [1 sc, 3 hdc, in each color]
Rnd 2: Begin with Color A, *(2 hdc in marked st, move st marker up to second st worked) 4 times*, pull up loop of Color A, switch to Color B, Repeat from * to *. [8 hdc, in each color]
Rnd 3: Begin with Color A, *(hdc in next st, 2 hdc in marked st, move st marker up to second st worked) 4 times*, pull up loop of Color A, switch to color B, Repeat from * to *. [12 hdc, in each color]
Rnd 4: Begin with Color A, *(hdc in each of next 2 sts, 2 hdc in marked st, move st marker up to second st worked) 4 times*, pull up loop of Color A, switch to Color B, Repeat from * to *. [16 hdc, in each color]
Rnd 5: Begin with Color A, *(hdc in each of next 3 sts, 2 hdc in marked st, move st marker up to second st worked) 4 times*, pull up loop of Color A, switch to Color B, Repeat from * to * once,
**hdc next st, sc next st, sl st loosely in back loop and back bar of next st, sl st in back loop and back bar of next st**, fasten off Color B, switch to Color A, Repeat from ** to ** once, fasten off Color A. [21 hdc, 1 sc, 2 slip st, in each color]
Square Border
Remove every other st marker leaving 4 markers equally spaced around circle.
Rnd 6 (Round to Square 1): With RS facing attach Color C yarn with a standing dc in any marked st, 2 Edc in same st, *skip 2 sts, hdc next st, hdc & sc next st, sc next st, sc & hdc next st, hdc next st, skip 2 sts, (2 Edc, dc, ch 2, dc, 2 Edc) next marked st, move marker to ch-2 sp just made*; Repeat from * to * 2 times; skip 2 sts, hdc next st, hdc & sc next st, sc next st, sc & hdc next st, hdc next st, skip 2 sts, (2 Edc, dc) in same st as join, ch 2, sl st to first dc of Rnd. [16 Edc, 8 dc, 16 hdc, 12 sc, 4 ch-2 sp]
Rnd 7 (Round to Square 2): Turn (sc, ch 1 {counts as first hdc}, hdc, ch 2, hdc ) in first marked ch-2 sp, move marker to ch-2 sp just made, [*hdc in each of next 4 sts, sc in each of next 5 sts, hdc in each of next 4 sts,* (2 hdc, ch 2, hdc) in next marked ch-2 sp, move marker to ch-2 sp just made] 3 times, Rep from * to * once, sl st to top of first hdc. [48 hdc, 20 sc, 4 ch-2 sp {17 sts}]
Rnd 8: Turn, sc in first st, ch 1 {counts as first hdc}, [hdc in each st until reach marked ch-2 sp, (hdc, ch 2, hdc) in marked ch-2 sp, move marker to ch-2 sp just made] 4 times, hdc in each st until reach start of Rnd, sl st to top of first hdc. [76 hdc, 4 ch-2 sps {19 sts each side}]
It’s October and it’s definitely Autumn up here on my mountain. Most of our aspen trees have dropped their leaves, we have had a few traces of snow as well. I am loving the cooler temperatures. I’m really not cut out for super hot days and we had a lot of those this past couple of months. October has always been a favorite month for me because I love autumn, but it is also my Birthday this month.
It is a very special birthday this year as I am celebrating my 6th decade traveling around our sun. I wanted to do some extra fun things to celebrate with my marvelous readers and decided this month is going to be all about the Spirals! If you have been following my blog you already know that I have an abiding fondness for crocheting circles and spirals. Working in the round just makes me very happy.
I have been planning for this month all summer. Starting next week I’ll finally be able to share some fun new designs that have been in the top secret drawer all summer. But right now let’s take a quick look at some of my flat spiral designs of the past (just in case you missed them the first time).
My early design experiments with spirals involved working continuous rounds then working surface crochet to emphasize the spiral. The first 2 patterns listed below used this technique.
“Flat Fuzzy Friend” is available on the ‘Crochet Uncut’ website as a free pattern. This is a great lovey for a little one or even a fun whimsical gift for an older child. This pattern was published in 2010.
“Spiral in a Heart” is available here on my blog as a free pattern and makes a fun little embellishment. I like to make these to decorate hats and gloves for loved ones. They are also really cute on cuddle blankets. This pattern was published in 2011
I began to get more into the math of circles worked in the round and that that gave me the idea to play with spirals that had more than 1 arm. Once I started down this path I started having way too much fun. Since then I have continued to play with different height of stitches and number of arms to create designs that incorporate spirals.
“Whirlwind Afghan Square” this was my first afghan square for the Moogly CAL in 2015. You can find the free pattern for this square here on my blog.{Not the most exciting photo I’ve ever taken, but you get the idea.} I also have a video and additional blog posts on working this square.
“Dizzy Corner Afghan Square” this square was part of the 2017 Moogly CAL the pattern is available here on my blog for free. This post includes a detailed photo tutorial on crocheting the spiral circle.
“Whirling Ends Scarf” this fun scarf pattern is available for purchase in my Ravelry shop. The pattern includes detailed photo tutorials and stitch charts for both the spirals and the body of the scarf. It was part of the Stitch Makers Virtual Crochet Conference in September 2019.
These are just a short review of some of the flat spiral designs I’ve created over the years. Next week we will have a couple of new designs to add to this list, so be sure to stop by again.
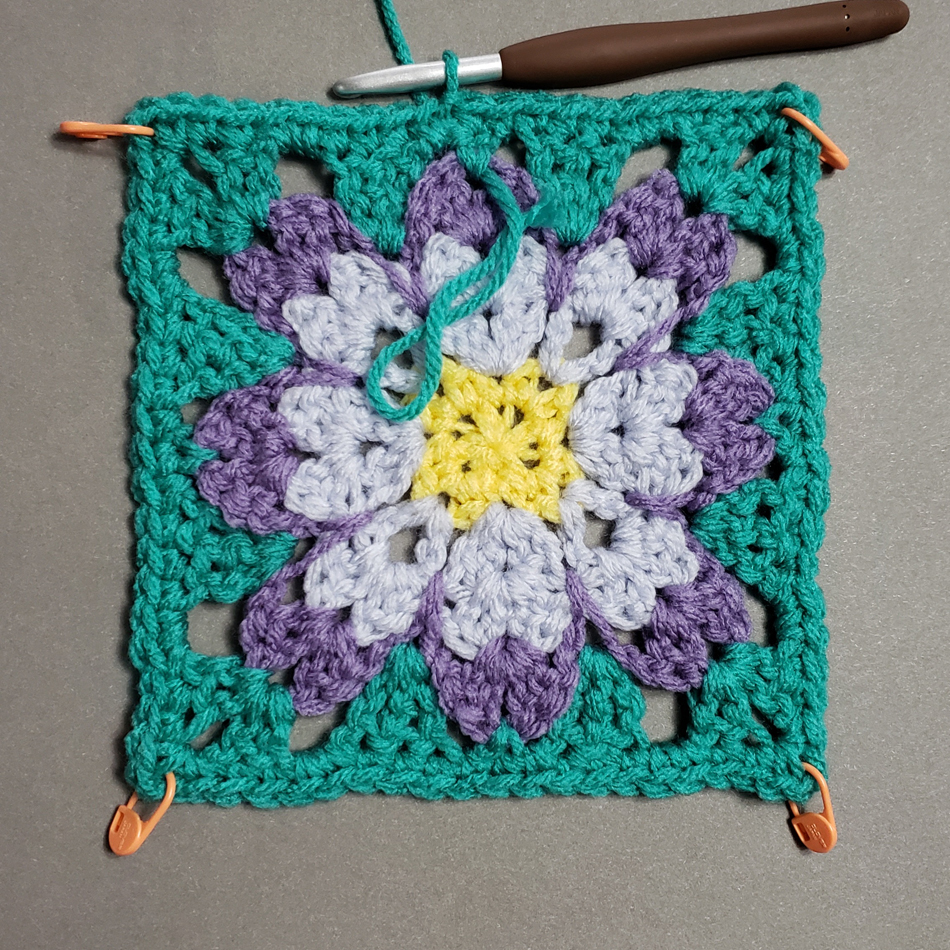
Hello my friends, I have another fun afghan square for you. I have been traveling and having all sorts of adventures with my family this summer. Early in June I went to Ireland with the Craft Tours trip hosted by Tamara Kelly of Moogly Blog. Appropriately this square pattern is Block #18 for the Moogly 2023 Afghan CAL and was inspired by the beautiful gardens we saw on the Ireland trip. You can find out more about the Moogly 2023 Afghan CAL and how Tamara adapted her colors for my design here.
Clematis Garden Afghan Square
Designed by Andee Graves
Skill level: Intermediate
Finished Size: 12” square
Materials:
Yarn
Worsted wt (Sample uses Red Heart “With Love” 100% Acrylic (7 oz/198 g, 370 yd/338 m)
Color A: Daffodil (sample used approximately 2 yards/ 1.1 gram) Rnds 1-2
Color B: Oxford (sample used approximately 70 yards/ 37.6 grams) Rnds 3-4: 3.8 g, Rnds 9-13: 33.5 g
Color C: Lilac (sample used approximately 6.5 yards/ 3.5 grams) Rnd 5
Color D: Jade (sample used approximately 22.5 yards/ 12.1 grams) Rnds 6-8
Hook J / 6mm
Notions Yarn/tapestry needle, Stitch markers
Gauge First 4 rounds of pattern = 4” across square
Special Stitches and Abbreviations:
Place stitch marker (PM)
Standing Double Crochet (Standing dc): Make slip knot and place loop snugly on shaft of hook, yo and insert hook into indicated place, yo, pull up a loop, (yo, pull through 2 loops on hook) twice.
4 dc Shell Stitch (Shl): (2 dc, ch 1, 2 dc) in indicated place.
Single crochet spike stitch (scSpike): Insert hook in indicated place, YO, pull up a loop back to original round/row, 2 loops on hook, YO, pull thru both loops on hook to complete single crochet.
Extended Double Crochet stitch (ExtDC): YO, insert hook in indicated place, YO, pull up a loop, YO, pull through 1 loop on hook, (YO, pull through 2 loops on hook) 2 times.
V-stitch (V-st): (Dc, ch 1, dc) in indicated place.
Granny Shell Stitch (GrShl): 3 dc in indicated place.
3 dc Cluster Stitch (CL): (YO, insert hook in indicated place, YO, pull up a loop, YO, pull thru 2 loops) 3 times, YO pull through remaining 4 loops on hook.
Pattern Notes:
Square is worked center out. Attach yarn using a slip stitch unless otherwise stated. Keep tails to wrong side of fabric and weave in as work progresses. Ch 3 at beginning of rounds counts as a double crochet stitch unless otherwise stated. Be sure to pay close attention if a round is Right Side (RS) or Wrong Side (WS).
Instructions
Rnd 1 (WS): With Color A begin with adjustable slip knot, ch 2, (sc, ch 2) 4 times in second ch from hook, sl st to first sc, gently tighten center of square, PM in ch-2 sps to mark corners. (4 sc, 4 ch- 2 spcs)
Rnd 2 (WS): Ch 1, sc in same st as join, [*(sc, ch 2, sc) in next marked ch-2 sp, move up st marker to ch-2 sp just made*, sc in next st] 3 times, Repeat from * to * once, sl st to first sc.
Fasten off Color A. (12 sc, 4 ch- 2 spcs)
Rnd 3 (RS): With back side of Rnd 2 facing attach Color B with standing dc in middle sc of any side, dc in same st as join, [*sk next st, (dc, ch 2, dc) in next marked ch-2 sp, move st marker up to ch-2 sp just made, sk next st,* Shl in next st]3 times, repeat from * to * once, 2 dc in same st as join, ch 1, sl st to first dc of Rnd {completes first Shl of Rnd}. (4 Shl, 4 ch- 2 spcs)
Rnd 4 (RS): Ch 3, dc in same ch-sp as join, [ch 1, sk next 3 sts, Shl in next ch-sp] 7 times, move st markers up to ch-1 sp of Shls worked in marked ch-2 sps, ch 1, sk next 3 sts, 2 dc in same ch-sp as join, ch 1, sl st to 3rd ch of beginning ch-3 {completes first Shl of Rnd}.
Fasten off Color B. (8 Shls, 8 ch-1 sp)
Rnd 5 (RS): With front side of Rnd 4 facing, attach Color C in ch-1 sp of side Shl with standing dc, dc in same ch-sp as join, [*ch 2, sk 2 sts, scSpike in corresponding sp between Shl and corner dc of Rnd 3, ch 2, sk 2 sts, Shl in marked ch-1 sp of next Shl, move st marker up to ch-1 sp of Shl just made, ch 2, sk 2 sts, scSpike in next corresponding sp between corner dc and next Shl of Rnd 3, ch 2, sk 2 sts,* Shl in ch-1 sp of next Shl] 3 times, Rep from * to * once, 2 dc in same ch-sp as join, ch 1, sl st to 3rd ch of beginning ch-3, {completes first Shl of Rnd}.
Fasten off Color C. (8 Shls, 16 ch-2 sps, 8 scSpike)
Rnd 6 (RS) Squaring up: With front side of Rnd 5 facing, attach Color D to ch-1 sp of side Shl, ch 1, sc in same sp as join, [*ch 1, sk 2 sts and ch-sp, (2 Tr, ExtDC) in next st, ch 2, sk ch-sp and 2 sts, (2 dc, ch 2, 2 dc) in marked ch-1 sp, move st marker up to ch-2 sp just made, ch 2, sk 2 sts and ch-sp, (2 Tr, ExtDC) in next st, ch 1, sk ch-sp and 2 sts,* sc in ch-1 sp of next Shl] 3 times, Repeat from * to * once, sl st to first sc of Rnd.
(4 sc, 8 ch-1 sp, 16 Tr, 8 ExtDC, 12 ch-2 sp, 16 dc {17 sts each side between corner ch-2 sps})
Rnd 7 (WS): Ch 1, turn, sc in first ch-1 sp, [*sc in each of next 3 sts, 2 sc in next ch-2 sp, sc in each of next 2 sts, (sc, ch 2, sc) in marked ch-2 sp, move st marker up to ch-2 space just made, sc in each of next 2 sts, 2 sc in next ch-2 sp, sc in each of next 3 sts, sc in next ch-1 sp, sc in next st,* sc in next ch-1 sp] 3 times, Repeat from * to * once, sl st to first sc of Rnd.
(76 sc, 4 ch-2 sp {19 sc each side between corner ch-2 sps})
End of Rnd 7 WS of Square
End of Rnd 7 from RS of Square
Rnd 8 (RS) V-sts: Ch 4, turn, dc in next st {counts as first V-st of Rnd}, (sk 2 sts, V-st in next st) 3 times, [*(dc, ch-2, dc) in marked ch-sp, move st marker up to ch-2 sp just made, V-st in next st,* (sk 2 sts, V-st in next st) 6 times] 3 times, Repeat from * to * once, (sk 2 sts, V-st in next st) 2 times, sk 2 sts, sl st to 3rd ch of beginning ch 4 to join.
Fasten off Color D. (28 V-sts, 8 dc, 4 ch-2 sp)
Rnd 9 (RS) Granny Shls: With front side of Rnd 8 facing, attach Color B with standing dc in ch-1 sp of any V-st along a side, 2 dc in same ch-sp as join {counts as first GrShl}, *sk 2 sts, GrShl in ch-1 sp of next V-st,* Repeat from * to * until reach marked ch-2 sp, sk 2 sts, (2 dc, ch 2, 2 dc) in marked ch-2 sp, move st marker up to ch-2 sp just made] 4 times, Repeat from * to * until reach end of Rnd, sl st to first dc of first GrShl to join.
(28 GrnShl, 16 dc, 4 ch-2 sp {25 sts each side between corner ch-2 sps})
Rnd 10 (WS) Bobbles: Ch 1, turn, sc in next st, (CL in next st, sc in each of next 2 sts) 4 times, CL in next st, [*(sc, ch 2, sc) in marked ch-2 sp, move st marker up to ch-2 sp just made, CL in next st,* (sc in each of next 2 sts, CL in next st) 8 times] 3 times, Repeat from * to * once, (sc in each of next 2 sts, CL in next st) 3 times, sc in next st, sl st to first sc of Rnd.
(36 CL, 72 sc, 4 ch-2 sp {27 sts each side between ch-2 sp corners})
End of Rnd 10 WS of Square
End of Rnd 10 RS of Square
Rnd 11 (RS): Turn, sc, ch 2 {counts as first dc}, [dc in each st until reach marked ch-2 sp, (2 dc, ch 2, 2 dc) in marked ch-2 sp, move st marker up to ch-2 sp just made] 4 times, dc in each st until reach beginning of Rnd, sl st to join to 2nd ch of first ch-2.
(124 dc, 4 ch-2 sp {31 dc each side between ch-2 sp corners})
Rnd 12 (WS): Repeat Rnd 11. (140 dc, 4 ch-2 sp {35 dc each side between ch-2 sp corners})
End of Rnd 12 RS of Square
Rnd 13 (RS): Ch 1, turn, [sc in each st until reach marked ch-2 sp, (sc, ch 2, sc) in marked ch-2 sp, move stitch marker up to ch-2 sp just made] 4 times, sc in each st until reach beginning of Rnd, sl st to first sc to join.
Fasten off Color B. (148 sc, 4 ch-2 sp {37 sc each side between ch-2 sp corners})
It’s beginning to warm up more days on my mountain and the bunnies are venturing out to see if they can find any fresh greens to nibble. We will still get some snow storms before our real warm weather arrives, but I am enjoying every hour of warmth we get. Easter is coming up this weekend and I have a fun little crochet pattern for you. The written version is below, for those of you that prefer a stitch chart or PDF version you can purchase it in my Ravelry Shop by clicking here.
Spring Bunny
designed by Andee Graves
This fun little bunny can be worked flat facing either left or right. Add your bunny as an embellishment to hats, mittens, sweaters or blankets. Or make the stuffy version for a fun little toy to add to Easter baskets or as a gift for a bunny lover in your life.
Finished Size: Finished bunny is approximately 4.25” tall
Materials
Yarn: Worsted Weight yarn, #4 weight category,
1 Flat Bunny uses approximately 7-10 yards of yarn. Stuffy Bunny uses approximately 15 – 20 yards of yarn
Sample was made with Premier “Every Day Worsted Anti-Pilling”, 180 yds/165 m, 3.5 oz/100 g,
Hook: H / 5mm or size needed to obtain gauge.
Notions: Yarn/tapestry needle, Poly fiber fill if making stuffy
Gauge: First 2 dc rounds = 2 3/8” (6 cm) diameter
Special Stitches:
Chain 4 Picot (ch-4 Picot) Chain 4, slip stitch in previous stitch made using front loop and top side loop.
Pattern Notes
Round 1 of stitches is worked into an adjustable slip knot, if you prefer the magic circle start, make 1 less chain stitch at the start of Round 1.
For Stuffy version use the scraps left from weaving in the beginning tails and Side 1 ending tail to stuff the bunny’s head.
Instructions for Flat Bunny
Right Facing Bunny
Rnd 1: Starting with adjustable slip knot, ch 3 {counts as center and first dc}, 11 dc in third chain from hook, join with slip st to top of beginning ch. (12 dc) Tighten center and weave in beginning tail.
Rnd 2: Ch 2 {counts as first dc}, dc in same st as join, 2 dc in each of next 4 sts, (dc, ch-4 Picot, dc) in next st, 2 dc in each of next 6 sts, join with slip st to top of beginning ch. (24 dc, 1 ch-4 Picot)
Row 3 (Bunny head): Ch 3 {counts as first Tr}, Tr in same st as join, 3 Tr in next st, *ch 7, working in back bumps of chs just made, hdc in third ch from hook, dc in each of next 2 chs, hdc in next ch, sc in next ch, slip st thru front loop and top side loop of previous Tr, * {first ear made}, Rep from * to * once, {second ear made}, (dc, ch 2, slip st) in next st. Fasten off. (5 Tr, 6 dc, 4 hdc, 2 sc)
Left Facing Bunny
Rnd 1: Work same as Right Facing Bunny.
Rnd 2: Ch 2 {counts as first dc}, dc in same st as join, 2 dc in each of next 7 sts, ch-4 Picot, 2 dc in each of next 4 sts, join with slip st to top of beginning ch. (24 dc, 1 ch-4 Picot)
Row 3 (Bunny head): Ch 2, dc in same st as join, *ch 7, working in back bumps of chs just made, hdc in third ch from hook, dc in each of next 2 chs, hdc in next ch, sc in next ch, slip st thru front loop and top side loop of previous dc, *{first ear made}, Rep from * to * once, {second ear made}, 3 Tr in next st, (Tr, ch 3, slip st) in next st. Fasten off. (5 Tr, 6 dc, 4 hdc, 2 sc)
Finishing
Weave in ending tail or use to sew bunny to project.
Instructions for Bunny Stuffy
Side 1 Bunny
Rnds 1 – 2: Work same as Right Facing Flat Bunny. Save beginning tail scrap.
Row 3 (Bunny head): Work same as Right Facing Flat Bunny but work only first Ear. Fasten off. (5 Tr, 4 dc, 2 hdc, 1 sc) Weave in ending tail, saving ending tail scrap.
Side 2 Bunny
Rnds 1 – 2: Work same as Left Facing Flat Bunny. Save beginning tail scrap.
Row 3 (Bunny head): Work same as Left Facing Flat Bunny but work only first Ear. Fasten off leaving 20” long tail. (5 Tr, 4 dc, 2 hdc, 1 sc)
Finishing
Holding Side 1 and 2 with WS together, using a whip stitch sew around Rnd 2 of body of bunny from 1 side of head to other, place a bit of fiber fill stuffing inside circle of bunny body. Sew along base of bunny head to close circle.
Sew around head, using a whipstitch and leaving bunny ears free, use beginning tail and ending tail scraps to lightly stuff head before sewing nose. Weave in last tail and trim excess.
In the image above you can see how I squished my bunny stuffy to make him sit on a flat bottom. I didn’t stuff the body very firmly so that I had some squishability when the bunny was finished.
I hope you are having a wonderful return to spring and enjoy crocheting some bunnies of your own.
I colored my page with my Staedler Noris Club colored pencils. I have found these to be a great inexpensive pencil for coloring. I also really like the Anti-Breaking System these pencils have. I can get super sharp points without losing chunks of the lead.
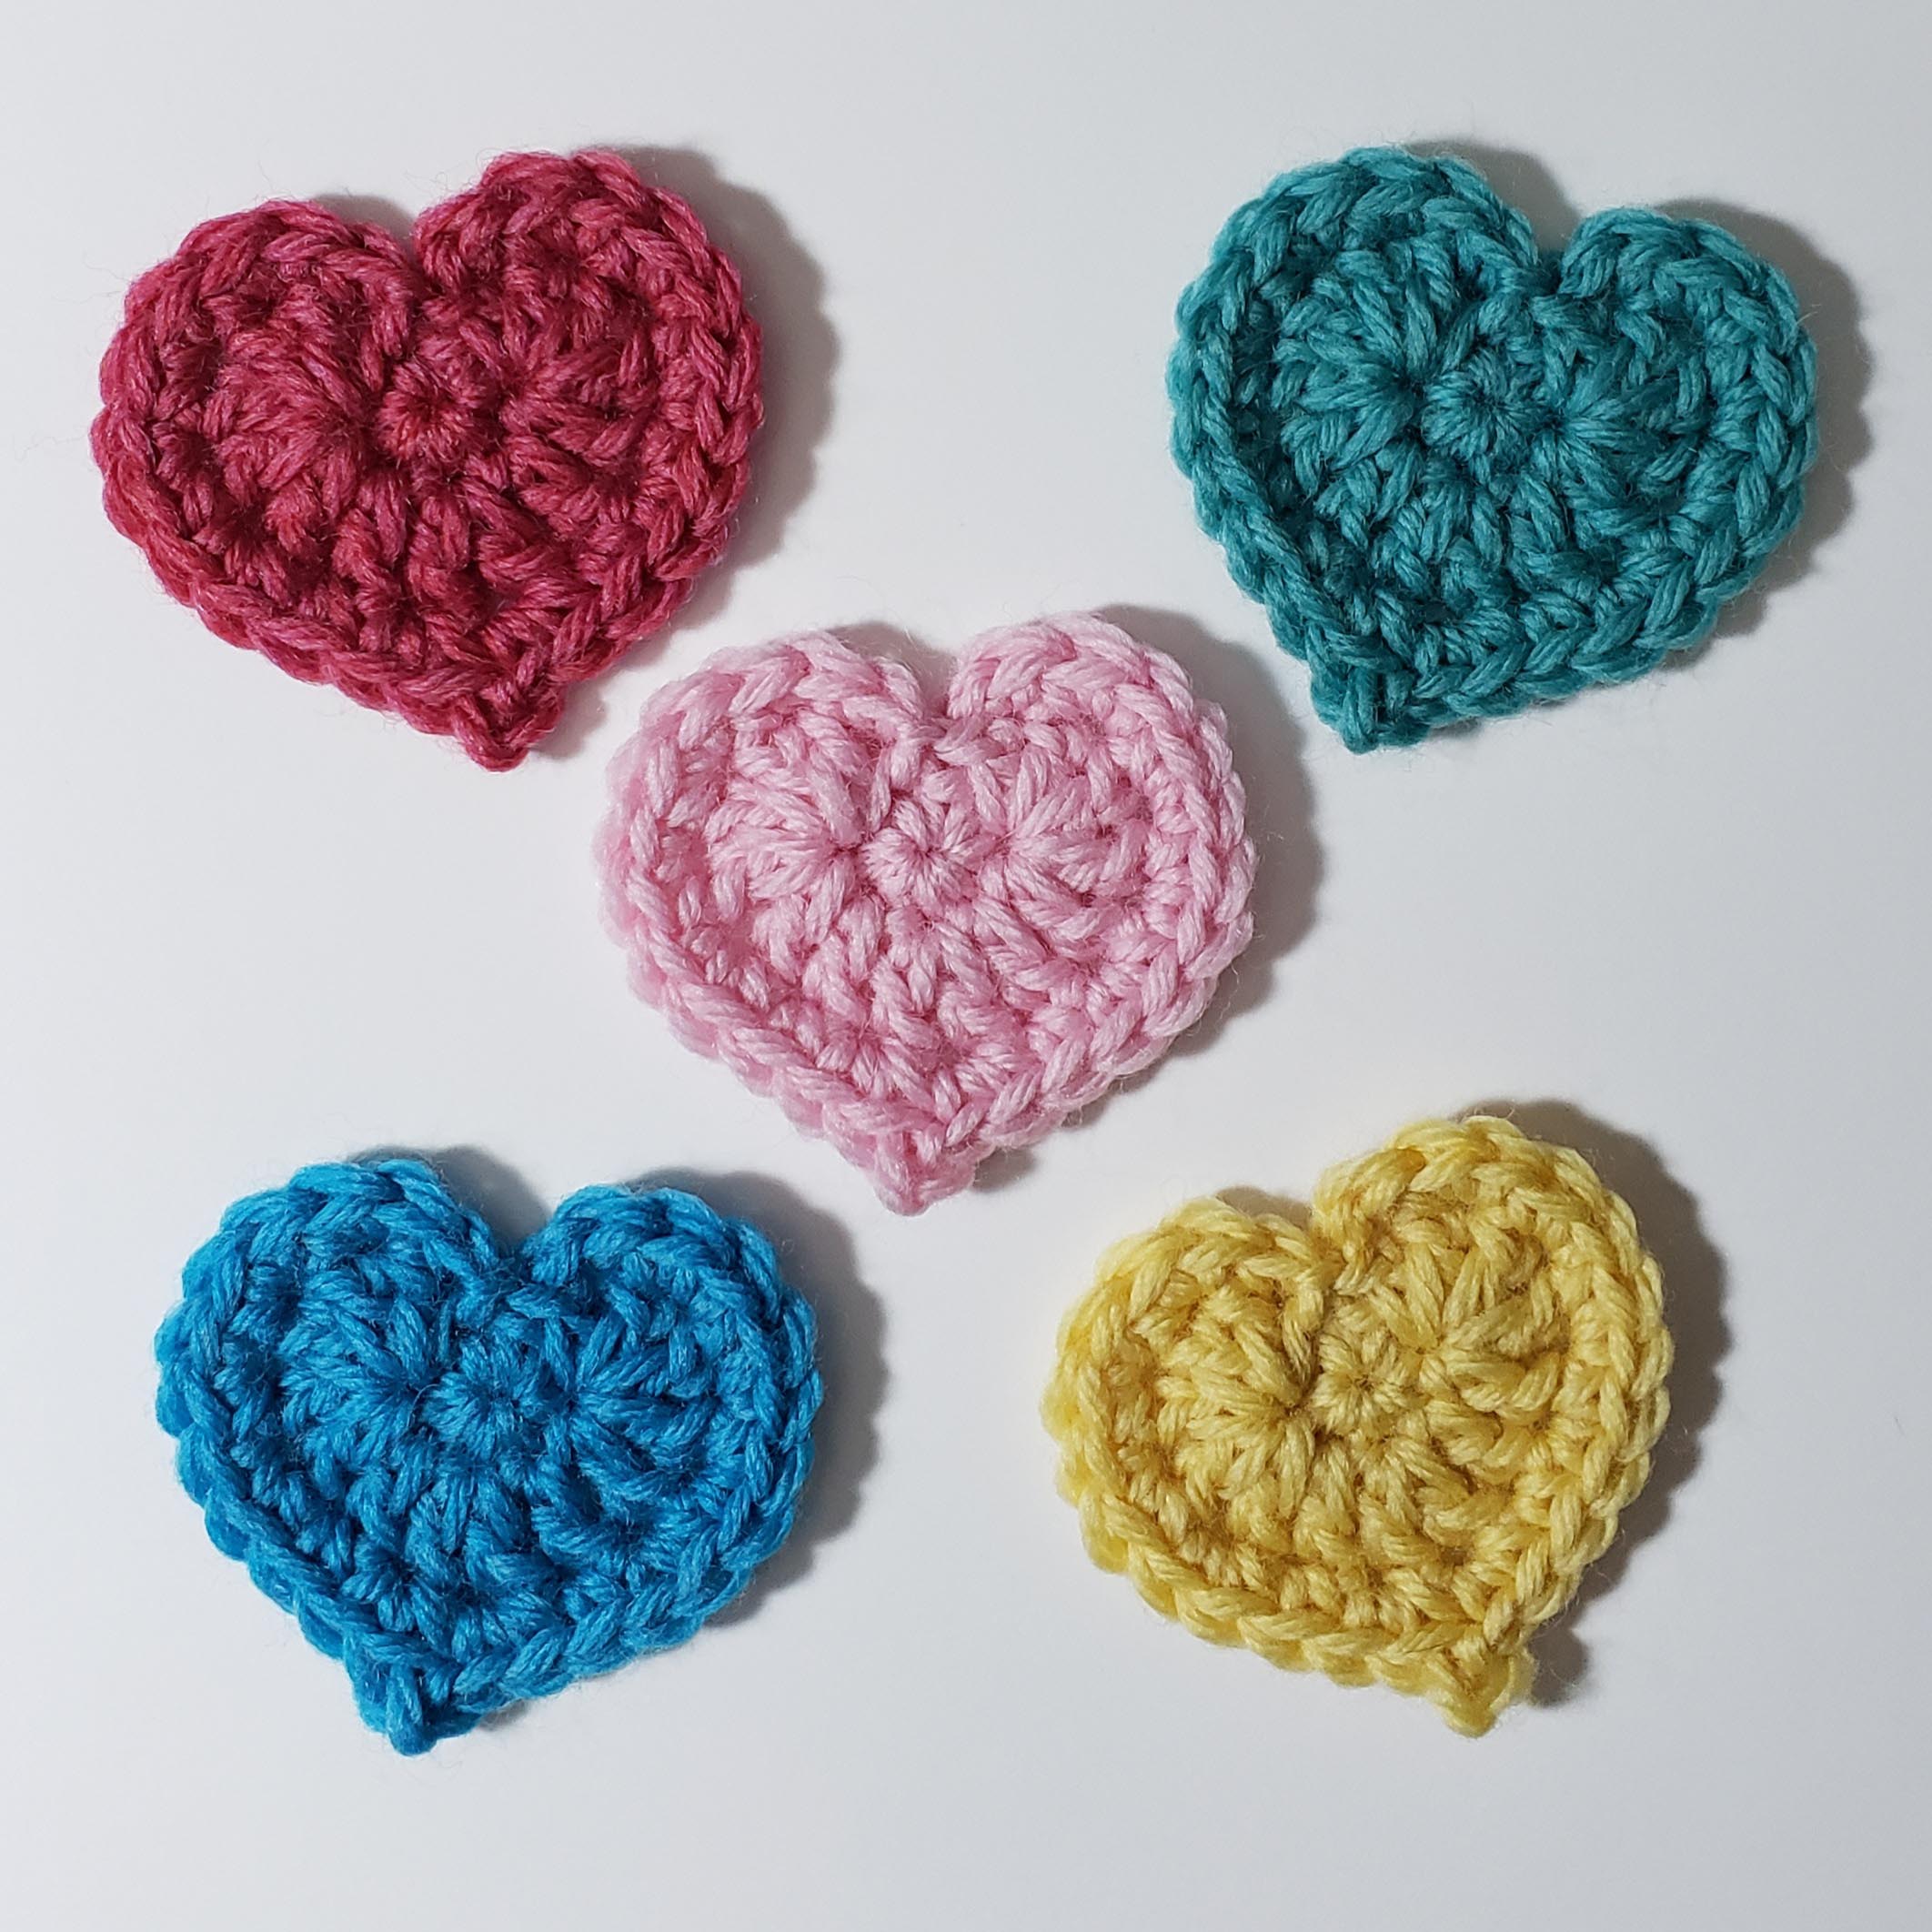
All My Love Heart Motif Pattern
This little heart is a great way to add some love to your crochet projects, or work a bunch up in a variety of colors to decorate handmade cards. Needing only a little over 8 yards of worsted weight yarn to make, they are a prefect way to use up those bits of yarn scraps.
Yarn & Hook: Worsted Weight yarn with Size H (5 mm) Hook. Samples in photo are made with Berroco Ultra Wool worsted weight yarn in a variety of colors from my stash with a size H / 5 mm hook.
Heart is 2 1/8 inches across widest point and 2” tall from top of bumps to bottom point.
Notions
Tapestry needle for weaving in ends.
Special Stitches
Chain 2 Picot: Ch 2, slip st in top of previous stitch working under the front loop and top side loop. If you need help with this technique visit my blog post: Don’t Fear the Picot.
Pattern Notes:
This heart motif begins with an Adjustable slip knot. If you need help with this technique check out my YouTube video.
Instructions
Rnd 1: Starting with an adjustable slip knot, ch 2, 7 sc in 2nd ch from hook, tighten center, slip st to top of first sc. [7 sc]
Rnd 2: Skip first st, 5 dc in next st, dc in next st, 2 dc in next st, dc in next st, 5 dc in next st, skip next st, slip st to to of first sc of Rnd 1. [14 dc]
Rnd 3: Sc in first st, 2 sc in each of next 4 sts, sc in next st, 2 sc in next st, ch-2 picot in previous sc, 2 sc in next st, sc in next st, 2 sc in each of next 4 sts, (sc, slip st) in last st. [24 sc]
Fasten off and pull ending tail thru slip st and tighten. Weave in all ends.
Have a great time crocheting hearts and showing your love. Tag me on Instragram: @andee.graves so I can see how your hearts turned out and how you used them.