
Have you ever noticed how working a flat circle in larger sizes with regular increases you end up with a polygon shape. The stitches between the increase points make a flat edge. These can be fun shapes, but what if you want the pleasing curve of a really rounded edge for your circle?
Today I’m posting a pattern for a 10 round flat circle that comes out really round, as well as the tips and tricks to make even larger flat rounds that will be really round.
The simple formula to remember for working flat circles is:
Number of stitches in Round 1 = Number of increases in each following round.

You can learn more about the number of stitches recommended for the first round for different stitch heights in my post: Another Pi Day Celebration. For my example today I’m using the half double crochet stitch which needs 8 stitches in the first round.
There are 2 methods of crocheting in the round: Continuous Spiral or Concentric Rounds. For today’s pattern I am using the continuous spiral method. It eliminates the noticeable joins and chains to get to taller stitch heights each round. It does mean you need to keep track of the final stitch in each round. I use a stitch marker that is a different color than my increase stitch markers. If you prefer to work concentric rounds you can apply these same tips for getting a really round circle.
When working circles you want your increases to be evenly spaced each round. My favorite way to keep track of my increases is to use stitch markers. In the case of our half double crochet circle, I place a stitch marker in each stitch at the end of Round 1. I also add my end of round stitch marker in the last stitch.

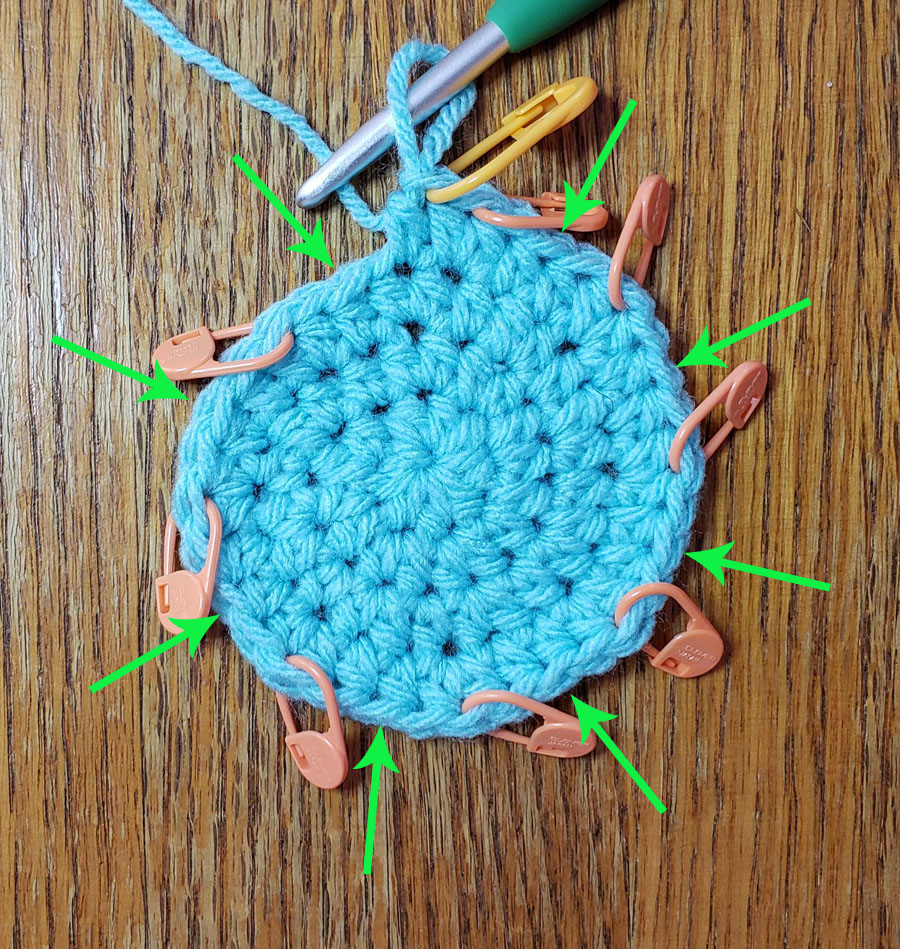
For all the following rounds I work 2 stitches in the marked stitch then move the stitch marker to the second stitch made. When I work the next round of the circle I crochet 2 stitches in the newly marked stitch and move it up the same way. The photo above shows the end of Round 2 with 8 increase markers (orange) and the last stitch marked with a larger yellow stitch marker.

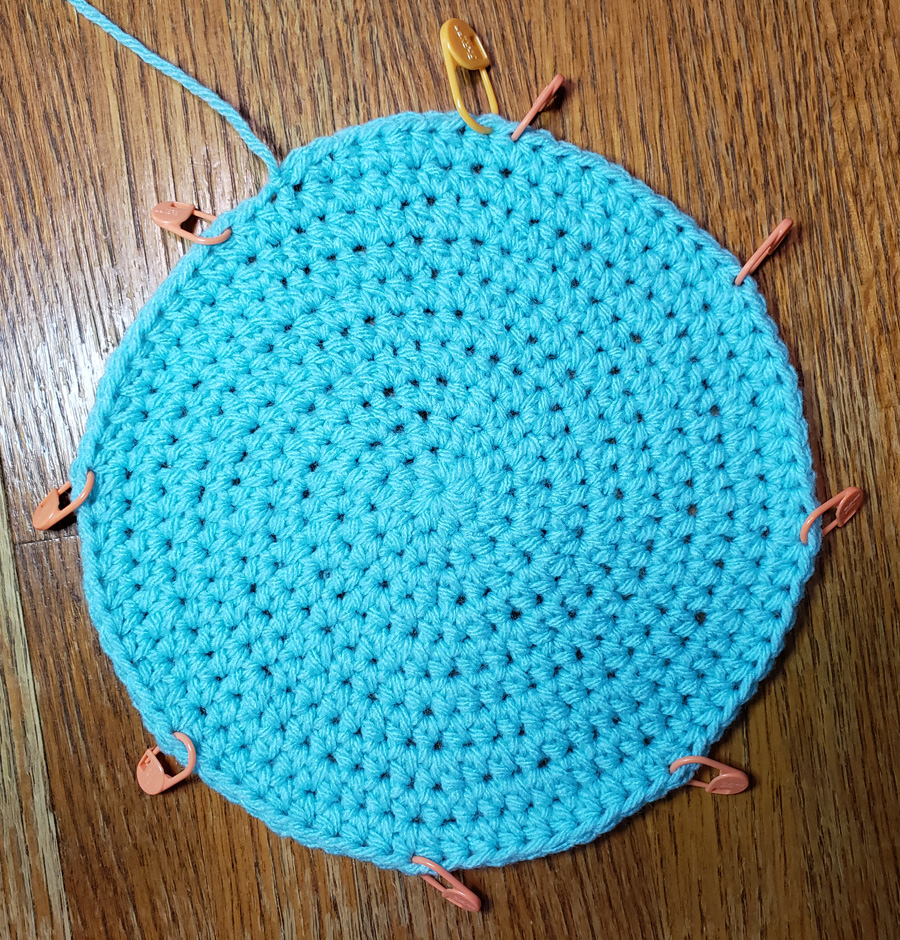
If I continue increasing in this same style after about 5 rounds it becomes noticeable how the increases line up like the spokes of a wheel. The stitches on the last round will begin to flatten out along the edge giving an octagonal shape instead of a circle. The more rounds worked the more this becomes exaggerated. The photo above shows a completed 10 round circle worked this way.
The trick to creating a really round circle is to break up those “spokes” of increases. The easiest way to do that is to move your increase points before starting the next round. The stitch markers are still really handy, especially as you work larger rounds.

When working circles, whether really round style or the traditional spoke style of increases, the number of stitches in each increase section of your circle will be the same as the Round number you are working. Example (photo above) in Round 4 you will have 3 unmarked stitches and 1 marked stitch for 4 stitches in each section. This holds true no matter what height and number of stitches you begin with in Round 1.
To break up the spokes of increases you will need to move your increases to the approximate center of each of these sections. Example: after completing Round 4 there are 3 unmarked stitches between each marked stitch. You will shift your stitch markers over to the middle of the unmarked stitches.
Let’s get you started crocheting your first Really Round Circle. For this pattern I have included suggested hook size and the gauge I got, but you can play with hook size and even yarn size to get a fabric that appeals to you. I worked my circles with a worsted weight acrylic yarn, if you used 100% cotton these rounds make great hot pads for your table top.
Really Round Circle
By Andee Graves
Finished Size: 10 Rounds 7.25 inches/18.5 cm diameter (across center),
Gauge: 5 Rounds = 4 inches/10 cm.
Yarn: Worsted Weight Acrylic Yarn, approximately 42 yards/38.4 meters, .67 oz/19 grams for one circle.
Hook: US Size I/9 (5.5.mm) or size needed to obtain gauge
Notions: 8 stitch markers in one color (Increase stitch markers), 1 stitch marker in different color (End-of-Round stitch marker), yarn needle for weaving in ends.
Pattern Notes: Stitch counts for each round are shown in italicized square brackets at end. Once you are sure of you count at end of Round 2 or 3, you may find it helpful to weave in the beginning tail to get it out of your way. Always move End-of-Round stitch marker to last stitch of each round as completed.
Instructions
Rnd 1: Start with an adjustable slip knot (YouTube Video here), Ch 2, (sc, 7 hdc) in 2nd chain from hook. Pull gently on beginning tail to tighten center. With increase stitch markers place 1 in each stitch, place End-of-Round stitch marker in last stitch. [1 sc, 7 hdc]
Rnd 2: 2 hdc in each marked st, moving increase stitch markers to second st made in each stitch. [16 hdc]
Rnd 3: (Hdc in unmarked st, 2 hdc in marked st, move stitch marker to first st made) 8 times. [24 hdc]

Rnd 4: [Hdc in next st, 2 hdc in marked st, move stitch marker to second st made in marked st, hdc in next st] 8 times. [32 hdc]
Rnd 5: Move each Increase st marker back 2 sts from original marked st. [2 hdc in marked st, move st marker to second st made in marked st, hdc in next 3 sts] 8 times. [40 hdc]

Rnd 6: Move each Increase st marker forward 2 sts from original marked st. [hdc in next 3 sts, 2 hdc in marked st, move st marker to second st made in marked st, hdc in next st] 8 times. [48 hdc]

Rnd 7: Move each Increase st marker back 3 sts from original marked st. [hdc in next st, 2 hdc in marked st, move st marker to second st made in marked st, hdc in next 4 sts] 8 times. [56 hdc]

Rnd 8: Move each Increase st marker forward 3 sts from original marked st. [hdc in next 5 sts, 2 hdc in marked st, move st marker to second st made in marked st, hdc in next st] 8 times. [64 hdc]

Rnd 9: Move each Increase st marker back 4 sts from original marked st. [hdc in next 2 sts, 2 hdc in marked st, move st marker to second st made in marked st, hdc in next 5 sts] 8 times. [72 hdc]

Rnd 10: Move each Increase st marker forward 4 sts from original marked st. [hdc in next 7 sts, 2 hdc in marked st, move st marker to second st made in marked st, hdc in next st] 8 times. [80 hdc]

Step Down to finish Circle: Hdc in next st, 2 hdc next st, hdc next 2 sts, sc next st, slip st next 2 sts. Fasten off and weave in ending tail.
Note: If you are wanting to crochet larger circles you may need to experiment with the length of the step-down in for your final round.

One thought on “Crochet Really Round Circles”