Linked Stitches Hat

October is almost done and I’m winding down my spiral blog posts. I wanted to share a different sort of spiral with you all today. As you know I love crocheting in the round, it is a great way to create amazing borders on a project as well as a fun way to create shaping. Today I want to talk about continuous rounds in crochet.

Working a continuous round in crochet is often a spiral style. Especially when you are crocheting top down hats or amigurumi. When you work concentric rounds in crochet you join the first stitch to the last stitch of the round, but for continuous rounds you are working the rounds without joins and step-up to the first stitch of the next round after the last stitch of the previous round. Continuous rounds also eliminate those pesky seams. When working an increasing circle, like for the crown of a hat, your rounds look like a classic spiral.

My flat fuzzy friend is an example of a classic double crochet spiral worked as a continuous round, then surface crochet is worked to emphasize the spiral.

I used the classic double crochet spiral as a continuous round for my Simple Double Crochet Hat design as well. But I don’t really like how open the stitches are for a hat made with double crochet stitches. That open stitch work is great for a warm climate hat, but on my mountain I need something a little less breezy. This inspired me to start playing around with how to work a double crochet hat that didn’t have all the open spaces.

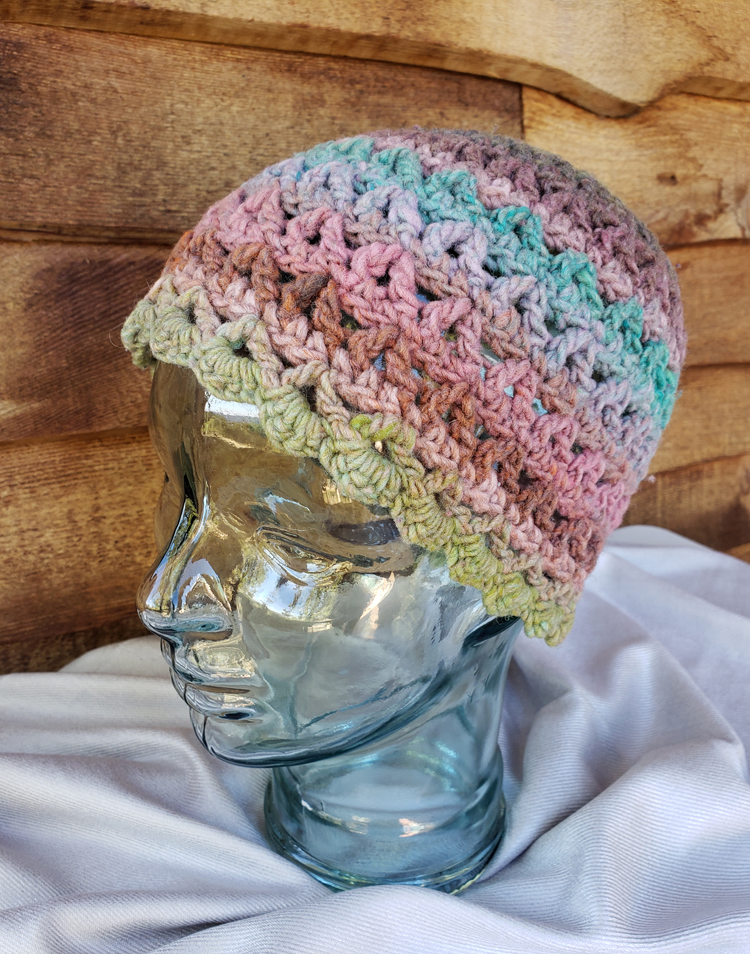
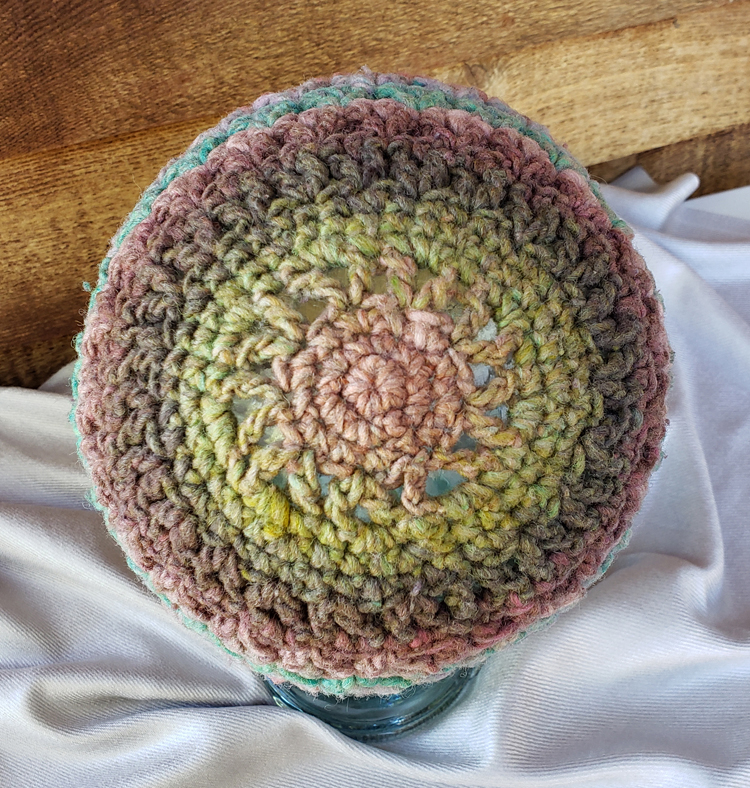
Last spring I bought a beautiful silk scarf with a rainbow of colors and decided I needed a hat to go with it. I had lots of fun selecting a yarn at the Longmont Yarn Shoppe that would match it. The selected yarn was Cosette by Dream in Color and is a glorious cashmere blend that was a delight to work with. My plan was to use the yarn to crochet a double crochet hat that used linked double crochet stitches.

I took that project with me on my trip to Philadelphia and Ireland. It was a great project to work on when traveling as it was small enough to fit in my carry-on for flights and my day-pack during our various bus trips. After a lot of experiments and little bit of frogging I finally settled on how I wanted the design to work.

The finished hat is my Snowy Rainbow Hat. The pattern is available for purchase in my Ravelry Shop. This pattern includes stitch charts and instructions on making the hat in various sizes.

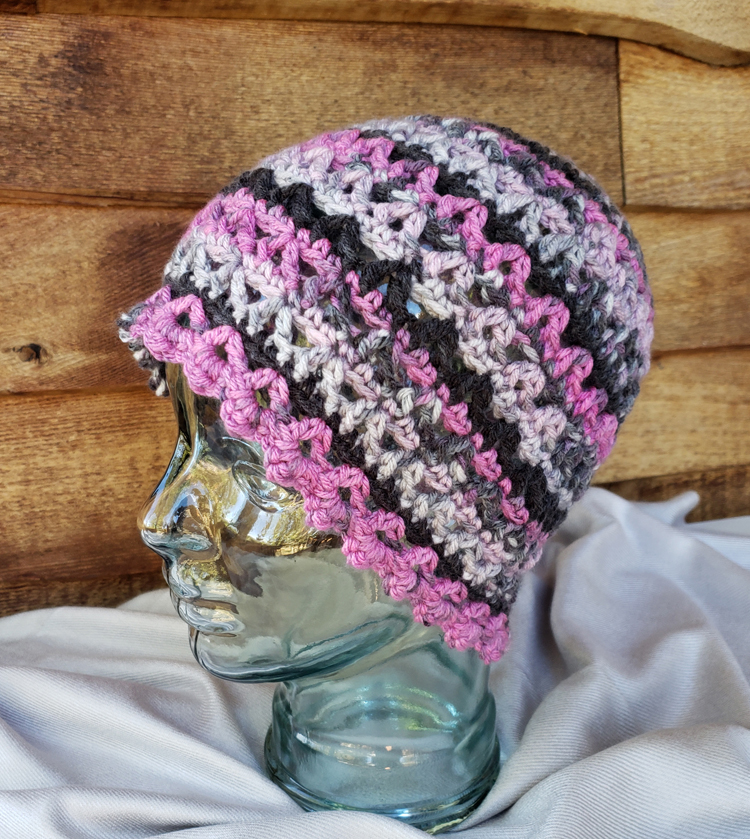
I’m also teaching a class on working this hat at the Longmont Yarn Shoppe, Sunday, November 5th 12:30 p.m. – 3:30 p.m. (Mountain Time) {2:30 p.m. – 5:30 p.m. Eastern; 1:30 p.m. to 4:30 p.m. Central, 11:30 a.m. to 2:30 p.m. Pacific}. This class will be a hybrid class, so you can join me via Zoom or In-person. You can register for the Zoom seats here on the Longmont Yarn Shoppe website, and for the In-person seats here. For the class I recommend working with a solid color worsted weight yarn, the image above shows the hat worked in Berroco’s Ultra Wool. In class we will make a baby size hat so you can practice all the elements of making the hat and learning linked double crochet stitches in the round.

With cold weather and holiday gift giving right around the corner, hats are a great project to have in your works-in-progress. If you want to personalize your hat gifts you can have fun adding little embellishments. I love to add flowers to my hats or little snowflakes. For the younger members on my gift list I will sometimes turn a basic hat into a monster face. I made one for my nephew years back and when he outgrew it he asked me to turn it into a ball.

Cakewalk Beanie – Free Crochet Pattern

This past weekend was my birthday and this year I am doing something a little different. Instead of a blanket square as my birthday pattern I am sharing this fun pattern for a women’s beanie.

I designed this hat almost 10 years ago when I had just one cake of Noro Kureyon yarn leftover from another project. With only 109 yards in the 50 gram cake I knew I needed an openwork stitch that would give me enough fabric to reach my ears. But I wanted the crown of the hat to have some solid stitch work to help with warmth.

The finished hat has been one of my favorites to stuff in a coat pocket. It’s a light layer of warmth when the weather is chilly and also works as a great cover for “bad-hair” days. I’ve been wearing it again as our mornings up here on the mountain have been chilly for the past month.

This post contains affiliate links. I may receive compensation (at no added cost to you) if you make a purchase using these links.

Premier “Everyday Soft Worsted”

I decided it was time to write up the pattern and share it with my readers. In the process of writing the pattern I worked 2 new samples in different worsted weight yarns. Premier “Every Day Soft Worsted” and Berroco “Ultra Wool”. Because these yarns come in 100 gram skeins I also added some more rounds for better coverage of the ears. I used approximately 118 yards for each sample.

Berroco “Ultra Wool”

A PDF version of pattern without ads and with a Stitch chart is also available for purchase in my Ravelry Shop for $2.99.

Cakewalk Beanie

Designed by Andee Graves

Skill Level:  Easy

Stitches used – Chain (ch), Single Crochet (sc), Slip Stitch (sl st), Double Crochet (dc), Half Double Crochet (hdc)

Materials:

  • Yarn –  Worsted Weight – Category 4
    • Premier “Everyday Soft Worsted” (3.5 oz/100 g; 165 yds/165 m); color# 200-08 Parfait
    • Berroco “Ultra Wool” (3.5 oz/100 g; 219 yds/200 m); color #33123 Iris
  • Hook – size J (6 mm)
  • Notions – yarn/tapestry needle, stitch markers

Gauge:  First 7 Rnds in pattern = 4” diameter

Special Stitches/Abbreviations:

  • V-st (V stitch)– (dc, ch 1, dc) in indicated stitch or space.
  • PM – Place Stitch Marker

Pattern Notes:

Hat is worked Crown down and started with an adjustable slip knot. If you prefer to use a magic circle work only 1 chain at start of instructions and use your circle as the “2nd ch from hook”.

Each round is joined with a tight slip stitch to make the join as invisible as possible. At start of single crochet rounds make the chain stitch a little smaller than usual to keep joins less noticeable. PM in first stitch of single crochet rounds to make it easier to find at end of round.

Instructions

Crown

Rnd 1: Starting with Adjustable Slip Knot, ch 2, 6 sc in 2nd ch from hook, sl st to first sc of Rnd. Gently tighten center of circle. [6 sc]

Rnd 2: Ch 1, 2 sc in each st around, sl st to first sc of Rnd. [12 sc]

Rnd 3: Ch 1, (sc in next st, 2 sc in next st) 6 times, sl st to first sc of Rnd. [18 sc]

Rnd 4: Ch 4, dc in same st as join {counts as first V-st of Rnd}, (skip 1 st, V-st in next st) 8 times, sl st to 3rd ch of beginning ch-4. [9 V-st]

Rnd 5: Ch 1, sc in same st as join, (2 sc in next ch-1 sp, sc next 2 sts) 8 times, 2 sc in next ch-1 sp, sc in next st, sl st to first sc of Rnd. [36 sc]

Rnd 6: Ch 1, (sc in next 5 sts, 2 sc in next st) 6 times, sl st to first sc of Rnd. [42 sc]

Rnd 7: Ch 1, (sc in next 6 sts, 2 sc in next st) 6 times, sl st to first sc of Rnd. [48 sc]

Rnd 8: Ch 4, dc in same st as join {counts as first V-st} (sk 1 st, V-st next st) 23 times, sl st to 3rd ch of beginning ch-4. [24 V-sts]

Sides

Rnd 9: Ch 1, sc in same st as join, (sc in next ch-1 sp, sc in next 2 sts) 22 times, sc in next ch-1 sp, sc in next st, sl st to first sc of Rnd. [72 sc]

Rnd 10: Ch 4, dc in same st as join {counts as first V-st}, (sk 2 sts, V-st in next st) 22 times, sl st to 3rd ch of beginning ch-4. [24 V-sts]

Rnds 11 – 24: Alternate repeating Rnd 9 and Rnd 10, ending with a Rnd 10. {For a smaller beanie like my original Kureyon sample end at Round 20, then work Rnd 25 (Edging).}

Rnd 25 (Edging): Ch 1, turn, (2 sc, hdc, 2 sc) in each ch-1 sp around, sl st to first sc of Rnd. Fasten off [96 sc, 24 hdc]

Finishing – Weave in ends and block gently.