
Happy Thanksgiving to all my U.S. readers. I’m so thankful to all of you coming to visit my blog.
I’m sharing this latest free pattern with you. I’m having fun with spirals again this time around. To keep things even more interesting I’ve added some Join-as-You-Go edgings for making the spiral grid that is the centerpiece for this square.
For those that prefer to have a PDF with stitch charts for each element and no ads, you can purchase the pattern for less than $4 thru my Ravelry Shop by clicking here.
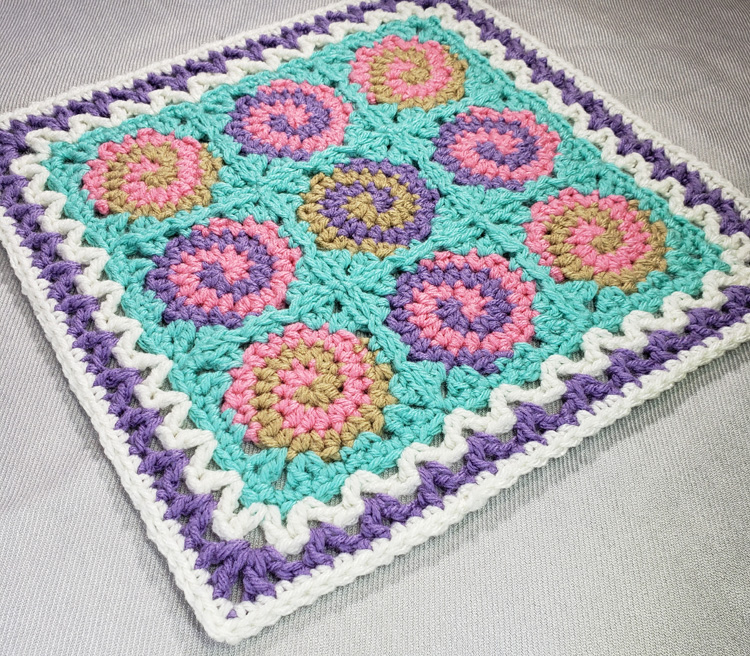
Spirals and Lace Afghan Square
Designed by Andee Graves
Skill level: Intermediate
Finished Size:
12” square
Materials:
Yarn Worsted wt (Sample uses Red Heart “With Love” 100% Acrylic (7 oz/198 g, 370 yd/338 m)
- Color A: #1704 Bubble Gum
- Color B: #1308 Tan
- Color C: #1538 Lilac
- Color D: #1969 Wintergreen
- Color E: #1101 Eggshell
This post contains affiliate links. I may receive compensation (at no added cost to you) if you make a purchase using these links.
Hook J / 6 mm
Notions 8 locking st markers (2 in one color, 6 in another color), Yarn/tapestry needle for weaving in ends

My favorite locking stitch markers are from the Clover company, like the ones above. If you can’t find them locally click on the photo above to find them on Amazon.

This handy 6 inch ruler is great for checking your gauge, especially with the center finding measure on one side it’s perfect for measuring center out motifs, whether squares or rounds. If you can’t find one locally click on the photograph above to find it on Amazon.
Gauge 1 Spiral Square = 3 inches square
Abbreviations/Special Stitches
Loose slip stitch (sl st loosely): Insert hook in indicated place, YO, pull up a loop thru place and loop on hook keeping loose like making a chain st.
Joining slip st (sl st): Insert hook in indicated place, YO, pull up a loop thru place and loop on hook, continue to pull up on working loop until original loop is tight.
Standing Double Crochet (Standing dc): make slip knot in yarn and place loop snugly on shaft of hook, yo and insert hook into indicated st, yo, pull up a loop, (yo, pull thru 2 loops on hook) twice. If substituting for a chain start of a round, do not work the first 3 chains of the round instructions.
V-stitch (V-st): (dc, ch 1, dc) in indicated st or sp.
Join-As-You-Go (JAY-Go)
Pattern Notes:
Overall square starts with 9 2-armed spiral rounds, then spirals are joined together in a grid with Join-as-you-Go round to square edging creating a 9.5 inch square. Bordering Rounds are worked along outside edge of this grid to finish.
Start each spiral with an adjustable slip knot. Beginning tail tightens the loop on the hook. If you need help with this technique check out my video tutorial on my YouTube channel.
Stitch counts at the end of each round are shown in italicized brackets.
Instructions
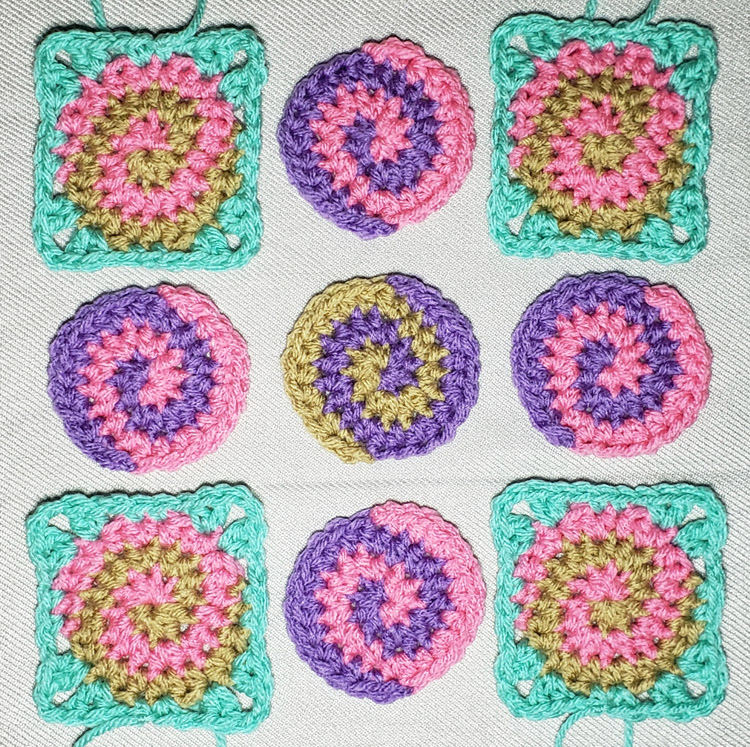
Spirals – Make 9
In Sample: 4 corner spirals used Colors A & B, 4 side spirals used Colors A & C, and center spiral used Colors C & B.
Note: Round 3 of Spirals specifies “sl st loosely”, this means work the indicated slip stitches similar to a chain stitch and do not pull the working loop to tighten it as in a joining slip stitch. You will be working into those loose slip stitches in the edging rounds.
Rnd 1 (RS): Begin with first Color and adjustable slip knot, ch 2, (2 sc, 2 hdc) in second ch from hook, pull up long loop of first Color and remove hook, insert hook in same ch as previous work, pull up a loop of second Color on shaft of hook, ch 1, working over beginning tail (2 sc, 2 hdc) in same ch st, pull beginning tail of first Color to close center tightly. [2 sc, 2 hdc, in each color {8 sts total}]
Place st markers in each st using a different color marker to indicate the last st of each color section.
Rnd 2: Begin with first Color, *(2 hdc in marked st, move st marker up to second st worked) 4 times*, pull up loop of first Color, switch to second Color, Repeat from * to *. [8 hdc, in each color {16 sts total}]
Rnd 3: Begin with first Color, *(hdc in next st, 2 hdc in marked st, remove st marker) 4 times*, pull up loop of first Color, switch to second Color, Repeat from * to *, [12 hdc in each color],
Switch back to first Color, **hdc in next st, sc in next st, sl st loosely in next st, sl st in back loop of next st, fasten off and pull tail thru final sl st and snug**, switch to second Color, Repeat from ** to ** once. [10 hdc, 1 sc, 1 loose slip st, in each color of open sts]
Joining Spirals
Note: When working the sl st joins into the ch-sps of previous edgings it works better to lay the work on a flat surface and bring the working loop for the loose sl st over the top of the ch-sp and pull the working yarn thru from behind. This will give you a flat and tidy join.
Corner Spiral Squares Edging
Rnd 1:
Insert hook in any open stitch along edge of spiral round, pull up a loop of Color D, ch 1, working over beginning tail sc in same st as join, (*ch 1, skip next st, hdc & dc in next st, ch 2, dc & hdc in next st, ch 1, skip next st,* sc in next 2 sts) 3 times, Repeat from * to * once, sc in next st, sl st to first sc of Rnd, fasten off and pull tail thru final st. [8 sc, 8 ch-1 sp, 4 ch-2 sp, 8 hdc, 8 dc]
Center Spiral Square JAY-Go Edging

Rnd 1: Insert hook in any open stitch along edge of spiral round, pull up a loop of Color D, ch 1, working over beginning tail sc in same st as join, (*ch 1, skip next st, hdc & dc in next st, ch 1, sl st tightly to adjacent ch-2 sp of a Corner Spiral edging, ch 1, return to center spiral, dc & hdc in next st, ch 1, skip next st,* sc in next 2 sts) 3 times, Repeat from * to * once, sc in next st, sl st to first sc of Rnd, fasten off and pull tail thru final st. [8 sc, 8 ch-1 sp, 4 ch-2 JAY-Go corner sp, 8 hdc, 8 dc]
Side Spiral Squares #1-3 JAY-Go Edging

Rnd 1: Insert hook in any open stitch along edge of spiral round that will be outside edge of square, pull up a loop of Color D, ch 1, working over beginning tail sc in same st as join, ch 1, skip next st, hdc & dc in next st, *ch 1, sl st tightly to adjacent ch-2 sp of a Corner Spiral edging, ch 1, return to side spiral, dc & hdc in next st,*
sl st loosely in nearest ch-1 sp of adjacent spiral edging, return to side spiral, skip next st, sc in next 2 sts, sl st loosely in nearest ch-1 sp of adjacent spiral edging, return to side spiral, skip next st, hdc & dc in next st,
(ch 1, sl st tightly to adjacent corner join, ch 1, return to side spiral, dc & hdc in next st, sl st loosely in nearest ch-1 sp of adjacent spiral edging, return to side spiral, skip next st, sc in next 2 sts, sl st loosely in nearest ch-1 sp of adjacent spiral edging, return to side spiral, skip next st, hdc & dc in next st) 2 times,
Repeat from * to * once, ch 1, skip next st, sc in next st, sl st to first sc of Rnd, fasten off and pull tail thru final st. [8 sc, 2 ch-1 sp, 6 sl st JAY-Go sp, 4 ch-2 JAY-Go corner sp, 8 hdc, 8 dc]

Side Spiral Square #4 JAY-Go Edging
Work same as Side Spiral Squares #1-3 JAY-Go Edging but do NOT fasten off at end. [8 sc, 2 ch-1 sp, 6 sl st JAY-Go sp, 4 ch-2 JAY-Go corner sp, 8 hdc, 8 dc]

Border
Rnd 1: Ch 1, sc in same st as join, sc in next 13 sts, [*(sc, ch 2, sc) in corner ch-2 sp, PM in ch-2 sp just made,* sc in next 28 sts] 3 times, Repeat from * to * once, sc in next 14 sts, sl st to first sc of rnd. Fasten off. [120 sc, 4 ch-2 corner sps]

Rnd 2: Attach Color E with Standing dc in 14th st from any left ch-2 corner sp, *skip 2 sts, V-st in next st*, Repeat from * to * 3 times, skip next st, [(dc, ch 2, dc) in marked ch-2 sp, move st marker up to ch-2 just made, skip 1 st, V-st in next st, Repeat from * to * 9 times, skip 1 st] 3 times, [(dc, ch 2, dc) in marked ch-2 sp, move st marker up to ch-2 just made, skip 1 st, V-st in next st, Repeat from * to * 4 times, skip 2 sts, dc in same st as standing dc, ch 1, sl st to first dc {counts as final V-st of round}. Fasten off. [40 V-sts, 8 dc, 4 ch-2 sp]
Rnd 3: Attach Color C with a Standing dc in any ch-1 sp of any V-st, [V-st in each ch-1 sp until reach marked ch-2 sp, (V-st, ch 2, V-st) in ch-2 sp, move marker up to ch-2 sp just made] 4 times, V-st in each ch-1 sp until reach beginning, dc in first ch-1 sp, ch 1, sl st to first dc of rnd {makes last V-st of Rnd}. Fasten off. [48 V-sts, 4 ch-2 sp]
Rnd 4: Insert hook in any dc along a side, pull up a loop of Color E, ch 1, working over beginning tail sc in same st as join, [sc in each st and ch-1 sp until reach marked ch-2 sp, (sc, ch 2, sc) in marked ch-2 sp, remove st marker] 4 times, sc in each st and ch-1 sp until reach end of Rnd, sl st to first sc. [152 sc, 4 ch-2 sp]
Finishing
Block gently, weave in loose ends.
This square is block #24 of the 2019 Moogly Afghan CAL. You can find Tamara’s version of my square and links to the other 23 squares by clicking here: MooglyBlog.


