Puff Star Afghan Hexagon

Wow! The last couple of months have been zipping by, and I am so happy to finally be able to share one of the projects I’ve been keeping under my hat. I’m participating in the 2021 Stitch & Hustle Blog Hop: Puff the Magic Stitch. A big thank you to WeCrochet.com for providing the yarn for this blog hop and to Michele of Stitch & Hustle for organizing the hop.

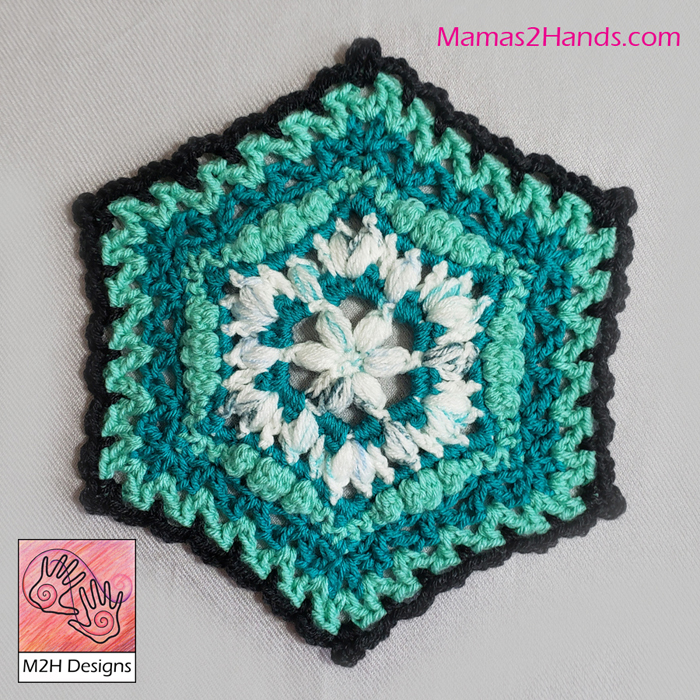
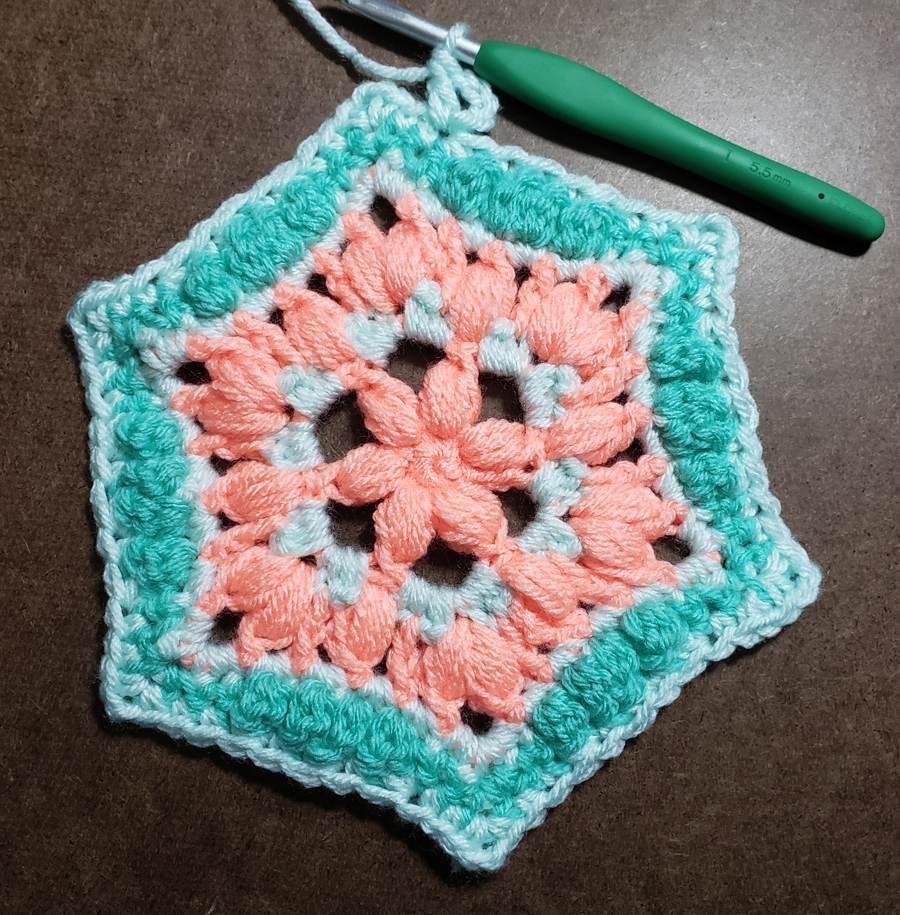
My design is the Puff Star Afghan Hexagon. You can have so much fun mixing up the colors for the various elements of this fun hexagon, the final round is a Jay-Go edging that makes it easy to join your hexagons together to create an afghan of any size. I’ve included the amounts of yarn needed for the A, B, C & D colors as written, so if you want you can use these hexagons as a scrap busting project. If you do scrap hexagons I recommend using a single color for the Jay-Go Rounds to tie your afghan together.

Puff stitches are a great textural element to have in your crochet toolbox. They are especially nice because they create a texture on both sides of your fabric. If you haven’t ever made puff stitches they can be a bit tricky. My mom would have said, “You have to hold your mouth just right.” The most important thing to keep in mind is that you want all the loops you pull up to be the same length, that way your puff stitches won’t get wonky.

My favorite style of puff stitch has an extra step at the end that captures all the puff stitch loops and makes a clean “top” for the stitch. For this pattern the majority of the puffs are made using 4 yarn-overs and the first puff stitch in Round 2 and 4 are started with a chain-2 then 3 yarn-overs.

Image shows crochet hook with 2 loops on it (one loop is coming thru all the "puff" loops) and arrows showing the direction to pull a yarn-over thru the 2 loops.
The last step of my preferred puff stitch.

Be sure to scroll down after the pattern for links to more fun free patterns featuring the puff stitch and to find out about the great yarn giveaways that are part of this blog hop.

This pattern is also available for purchase as an Ad PDF download in my Ravelry shop. The PDF includes stitch charts for the entire hexagon as well as a stitch diagram of the Join-as-you- Go technique.

Puff Star Afghan Hexagon Pattern

Pattern Details

Skill Level: Intermediate

Materials:

Yarn – We Crochet “Brava”, Worsted weight, category #4, 100% premium Acrylic (100 g; 218 yds)

The colors I used for the hexagons are shown above and starting in the left top corner are: Mint (C28438), Seashell (C28447), Marina (C2843), Tidal Speckle (C29246), Tranquil (C28454). Then I used Asphalt Heather (C28411) {not pictured} for joining my hexagons together.

I had one ball of each of the hexagon colors and have been playing with using each of them for the various A, B & C instructions. For one hexagon the approximate amount of yarn needed for each Color is:

  • Color A: Rnds 1, 2 & 4 = 8.5 g (19 yds);
  • Color B: Rnds 3, 5, 7 & 8 = 8 g (18 yds);
  • Color C: Rnds 6 & 9 – 7 g (16 yds);
  • Color D: Rnd 10 = 5 g (11 yds).

Hook – I-9 (5.5 mm)

Notions – yarn/tapestry needle, stitch markers

Finished Size: 10 inches from point to point and 8.5 inches across middle between sides.

Gauge:  First 3 Rounds in pattern = 2.75” across middle between sides

Special Stitches/Abbreviations:

BegPuff (Beginning Puff Stitch) – Ch 2, [Yo, insert hook into indicated place, yo, pull up a loop to needed height] 3 times, yo pull thru 6 loops on hook, yo pull thru final 2 loops on hook {like making a single crochet}.

Puff (Puff Stitch) – [Yo, insert hook into indicated place, yo, pull up a loop to needed height] 4 times, yo pull thru 8 loops on hook, yo pull thru final 2 loops on hook {like making a single crochet}.

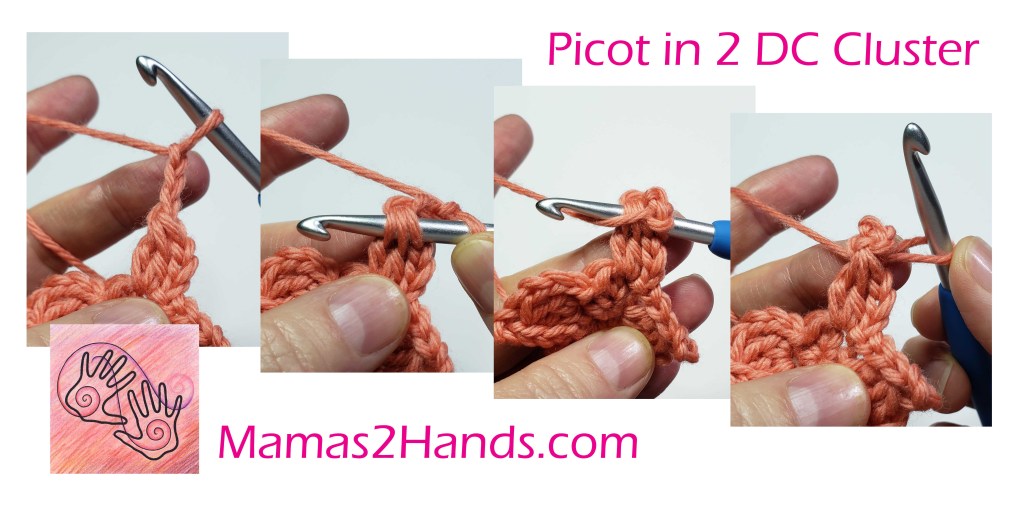
CL (2 Double Crochet Cluster) – [Yo, insert hook into indicated place, yo, pull up a loop, yo, pull thru 2 loops on hook] 2 times, yo, pull thru remaining 3 loops on hook.

sc2tog (Single Crochet 2 Together) – Insert hook in first indicated st/sp, yo, pull up a loop, insert hook in next st, yo pull up a loop, yo, pull thru all 3 loops on hook.

hdcVst (Half Double Crochet V-stitch) – (hdc, ch 1, hdc) in indicated stitch or space.

V-st (Double Crochet V-stitch) – (dc, ch 1, dc) in indicated stitch or space.

Pattern Notes:

Starting with an adjustable slip knot this afghan block is worked in concentric hexagonal rounds.

All rounds are worked with right side (RS) facing except round 6. Round 6 is worked with wrong side (WS) facing so the cluster bobble stitches will push to RS of fabric.

When skipping stitches chains count as 1 stitch each, unless otherwise stated.


Instructions

Rnd 1 (RS): With Color A, ch 2, 6 sc in second ch from hook, slip st to first sc of Rnd. (6 sc)

Rnd 2 (RS): BegPuff st in same sc as join, ch 3, [Puff st in next sc, ch 3] 5 times, slip st to top of BegPuff st. Fasten off Color A. (6 Puff, 6 ch-3 sp)

Rnd 3 (RS): Change to Color B, With RS facing join in right hand side of ch-3 sp with a slip st, ch 1, (3 sc, ch 2, 3 sc) in same ch-3 sp, [ch 1, skip next st, (3 sc, ch 2, 3 sc) in next ch-3 sp] 5 times, ch 1, skip next st, slip st to first sc of Rnd. Fasten off Color B. (36 sc, 6 ch-1 sp, 6 ch-2 sp)

Rounds 1-3 finished

Rnd 4 (RS): Change to Color A, with RS facing, join in any ch-1 sp with a slip st, BegPuff st in same ch-1 sp, [*ch 1, skip 1 st, dc next st, ch 1, skip 1 st, (Puff, ch 3, Puff) in next ch-2 sp, ch 1, skip 1 st, dc next st, ch 1, skip 1 st*, Puff in next ch-1 sp] 5 times, Rep from * to * once, slip st to first Puff st of Rnd. Fasten off Color A.  (18 Puff, 12 dc, 24 ch-1 sp, 6 ch-3 sp)

Rnd 5 (RS): Change to Color B, with RS facing join in ch-1 sp to left of center Puff on one side, ch 1, 2 sc in same ch-1 sp, skip next dc, 2 sc in next ch-1 sp, skip next Puff, [*(2 sc, ch 2, 2 sc) in next ch-3 sp, skip next Puff*, (2 sc in next ch-1 sp, skip next st) 4 times,] 5 times, Rep from * to * once, (2 sc in next ch-1 sp, skip next st) 2 times, slip st to first sc of Rnd. Fasten off Color B. (72 sc, 6 ch-2 sp)

Puff Star Crocheted thru Round 5.

Rnd 6 (WS): Change to Color C, with WS facing join yarn in first sc before ch-2 sp at point, ch 1, [(sc, ch 2, sc) in next ch-2 sp, skip next st, sc next 2 sts, CL next st, sc next st, CL next 2 sts, sc next st, CL next st, sc next 2 sts, skip next st] 6 times, slip st to first sc of Rnd. Fasten off Color C. (48 sc, 24 CL, 6 ch-2 sp)

Note: At this point your hexagon is looking a little ruffly, don’t worry we are fixing that in the rest of the rounds.

Rnd 7 (RS): Change to Color B, with RS facing join in second sc before ch-2 sp at point, ch 1, sc in next 2 sts, [*(sc, ch 2, sc) in next ch-2 sp, sc in next st, (sc in next st, sc2tog using next 2 sts) 3 times*, sc in next 2 sts] 5 times, Repeat from * to * once, slip st to first sc of Rnd. (48 sc, 18 sc2tog, 6 ch-2 sp)

Starting Round 8

Rnd 8 (RS): Ch 4, dc in same st as join {counts as first V-st of Rnd}, skip 2 sts, [*(hdcVst, ch 2, hdcVst) in next ch-2 sp*, (skip 2 sts, V-st in next st) 3 times] 5 times, Repeat from * to * once, (skip 2 sts, V-st in next st) 2 times, slip st to 3rd ch of beginning ch-4. Fasten off Color B. (12 hdcVst, 18 V-st, 6 ch-2 sp)

Rnd 9 (RS): Change to Color C, with RS facing join in second ch-1 sp before ch-2 sp at point, ch 4, dc in same ch-1 {counts as first V-st of Rnd}, skip 2 sts, [*V-st in next ch-1 sp, skip next st, (dc, ch 2, dc) in ch-2 sp, skip 1 st*, (V-st in next ch-1 sp, skip 2 sts) 4 times] 5 times, Repeat from * to * once, (V-st in next ch-1 sp, skip 2 sts) 3 times, slip st to 3rd ch of beg ch-4. Fasten off Color C. (30 V-st, 12 dc, 6 ch-2 sp)

Rnd 10 (RS) Jay-Go Rnd: Change to Color D, with RS facing join in ch-1 sp of second V-st before ch-2 sp at point, ch 1, sc in same sp as join, [*ch 3, skip 2 sts, sc in next ch sp*, Repeat from * to * until work in ch-2 sp at point, ch 3, sc in same ch-2 sp] 6 times, Repeat from * to * until reach last V-st before beg of Rnd, ch 3, skip 2 sts, slip st to first sc of Rnd. (42 ch3 sp, 42 sc)

2 Hexagons joined along 1 side.

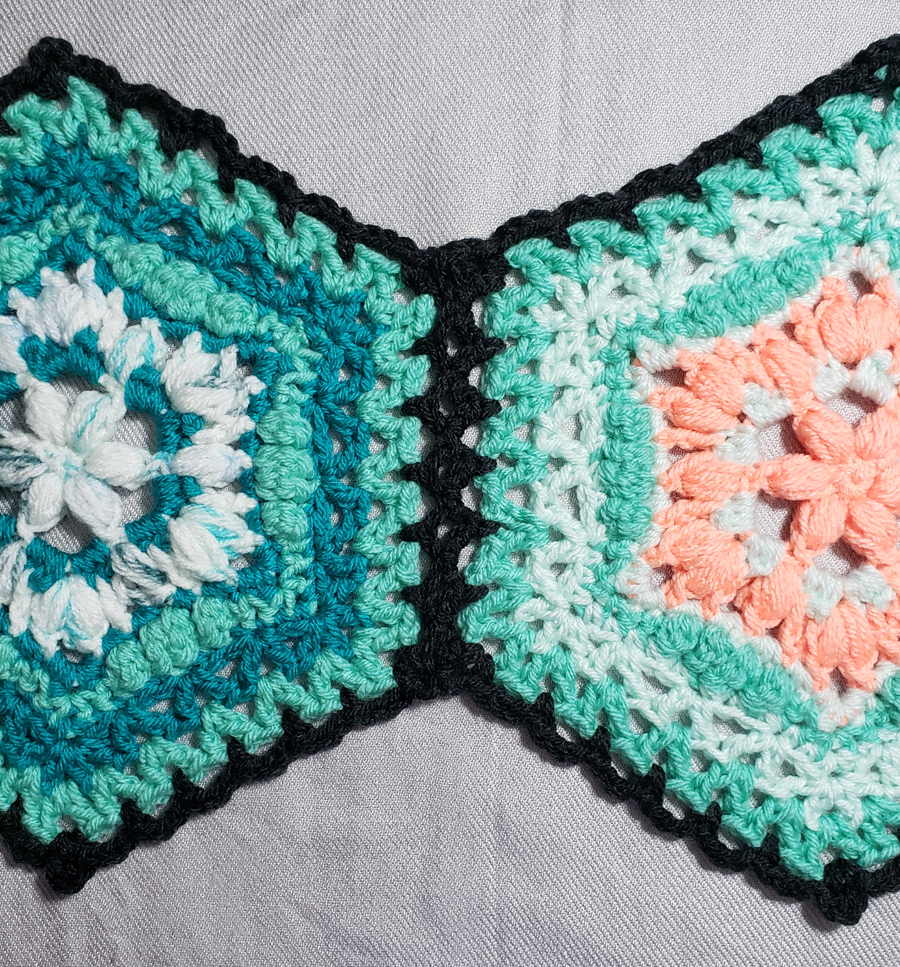
For first Hexagon of project work Rnd 10 as written, when joining to another hexagon change the ch-3 sps to (ch 1, slip st, ch 1) working the slip st in the corresponding ch-3 sp on the side or sides of hexagon(s) you are joining to.

Finishing

Weave in all tails and block gently.

If desired, you can work a border of sc around the outside edges of your finished afghan, place 2 sc in each open ch-3 sp and 1 sc in each side of point joins.

In addition to all the fun free patterns using the puff stitch, you can enter to win giveaways of all the yarn needed to make groupings of the patterns available in the hop. The Giveaways start today and go thru October 8, 2021. You can learn more about the blog hop and giveaway by visiting the Stitch & Hustle blog post.

Pufftastic Bandana Cowl, Talara Hooded Duster, and Puff Star Afghan Hexagon

Follow any of the links below to check out the other patterns in this Blog Hop.

Josephine Cloche Crochet Pattern

I’m so excited to be part of the 4th Annual Stitch & Hustle Blog Hop: The Perfect Picot. Links to visit the other participating designers patterns are after this pattern, as well as a link to the “Win All You Need to Make This” Giveaway information. A big Thank You to WeCrochet.com for providing the yarn for all these designs.

Picots are a stitch that I love for edgings because they add a visual texture that creates a finished look. For this pattern I have incorporated the picot stitch for the edging on the brim of the hat and each flower has picots for additional texture and shaping of the petals. If you have a hard time working picots you can check out my blog post: Don’t Fear the Picot with photo tutorials to help you see how I work them. I have also included a mini photo tutorial in the instructions for Flower 1 to help you with the picots worked into the cluster stitches.

I hope you enjoy my pattern for this fun Cloche Hat. I named it after my Great Aunt Josephine, who was quite the style maven in the 1920s. I’ve always loved looking at old photos of her from those years and she was my inspiration.

I have been wanting to design a winter hat that shaded my eyes a bit during the winter as our Colorado winters can be very sunny. I have lots of summer hats that provide plenty of shade from the sun, but most of my winter hats are beanie styles. The drunken brim on this hat is has just enough extension to give a little protection, while the wool yarn makes for a lovely warm hat perfect for the colder weather.

Josephine Cloche

designed by Andee Graves

Pattern Details

Skill Level: Intermediate

Stitches used – Chain (ch), Single Crochet (sc), Half Double Crochet (hdc), Double Crochet (dc), Cluster (Cl), Extended Double Crochet (Exdc), Picot (picot)

Size: Finished size 23 inches head circumference at beginning of brim.

Materials:

Yarn – We Crochet “Swish Worsted”, 100% Fine Superwash Merino Wool (50 g; 110yds), #4 weight category

Color A – #25630 Rainforest Heather (Dark Teal)

Color B – #26067 Wonderland Heather (Pale Aqua)

Color C – #25147 Amethyst Heather (Deep Purple)

Color D – #26068 Conch (Bright Peach)

Hook – H (5mm) or size needed to obtain gauge.

Notions

yarn/tapestry needle,

16 stitch markers in 2 colors: 8 in first color, 8 in second color

Gauge:  Diameter of first 6 Rnds of Crown, also 9 rows and 16 sts of double crochet worked in the Rnd, both = 4 inches (10 cm)

Special Stitches/Abbreviations:

Picot – ch 3, insert hook thru front loop and top side loop of indicated st, YO, slip st tightly.

Cl (2 dc cluster) – (YO, insert hook in indicated place, YO, pull up a loop, YO, pull thru 2 loops) 2 times, YO pull thru remaining loops on hook.

Exdc (Extended double crochet) – YO, insert hook in indicated place, YO, pull up a loop, YO, pull thru 1 loop, [YO, pull thru 2 loops] twice.

PM (Place Marker)

Pattern Notes:

This hat is worked crown down with standard increases in continuous rounds for the first 13 rounds, then worked is turned so that the front of the previous rounds’ stitches become the wrong side of fabric.

The band of the hat is worked in joined rounds with short rows worked to create an asymmetrical shaping. All band rounds and short rows are worked in the same direction.  I have included a photo of how I used stitch markers to help me keep track of where the stitch heights change. I used a different color marker for the regular band rounds from the markers for the short rows.

After band is finished work is turned again. Next a flared “drunken” brim is worked in joined rounds, without turning. Then work is turned to crochet the edging. If a more structured brim is desired the edging can be crocheted over millinery wire to stiffen.

Flowers are worked separately and can be sewn to the hat band or sewn to a pin backing to attach to hat.

Instructions

Crown

Rnd 1: Start with Color A using an adjustable slip knot, ch 2, (1 sc, 7 hdc) in 2nd ch from hook. PM in last hdc with first color st marker. [1 sc, 7 hdc]

Rnd 2: 2 hdc in each st, PM in 2nd hdc made using second color st markers 7 times, move last st marker to last st made. [16 hdc]

Rnds 3-10: Hdc in each unmarked st, 2 hdc in each marked st moving st marker to 2nd st made. At end of Rnd 10 remove all markers except last st marker. [Count at end of Rnd 10 – 80 hdc]

Rnds 11 – 13: Hdc in each st to last st, move st marker up to last st of Rnd.

Step down at end of Rnd 13: Sc in next st, loosely sl st in next st, sl st in next st. Fasten off Color A, change to Color B.

Band

Rnd 1: Continue with Color B, ch 1, turn, sc in loose sl st from step down, sc next 6 sts, hdc next 18 sts, dc next 30 sts, hdc next 18 sts, sc next 7 sts, join with sl st to first sc of Rnd. [14 sc, 36 hdc, 30 dc]

Short Row 1: With Color C. Attach new yarn with sl st at 10th st from beginning of previous Rnd, sc next 10 sts, hdc next 10 sts, dc next 20 sts, hdc next 10 sts, sc next 10 sts, sl st next st, fasten off yarn. [20 sc, 20 hdc, 20 dc]

Rnd 2: Ch 1, sc next 7 sts, hdc next 18 sts, dc next 30 sts, hdc next 18 sts, sc next 7 sts, join with sl st to first sc of Rnd. [14 sc, 36 hdc, 30 dc]

Short Row 2: With Color D. Repeat Short Row 1.

Rnd 3: Repeat Rnd 2.

Short Row 3: With Color C. Repeat Short Row 1.

Rnd 4: Repeat Rnd 2.

Short Row 4: With Color D. Repeat Short Row 1.

Rnd 5: Repeat Rnd 2.

Short Row 5: With Color C. Repeat Short Row 1.

Rnd 6: Repeat Rnd 2. Fasten off Color B, change to Color A.

Brim

Rnd 1: Continue with Color A, ch 2 (does not count as a st), turn, hdc in each st around, skip beginning ch-2, join with sl st to first hdc of Rnd. [80 hdc]

Rnd 2: Using 8 st markers PM in 3rd st then in every 10th st around, ch 2, hdc in each un-marked st, 2 hdc in marked sts moving st marker to second st made, skip beginning ch-2, join with sl st to first hdc of Rnd. [88 hdc]

Rnd 3: Add a st marker in 5th st past current st markers, total of 16 markers, ch 2, hdc in each un-marked st, 2 hdc in each marked st, move st markers to second st made, skip beginning ch-2, join with sl st to first hdc of Rnd. [104 hdc]

Rnd 4 & 5: Ch 2, hdc in each un-marked st, 2 hdc in each marked st, move st markers to second st made, skip beginning ch-2, join with sl st to first hdc of Rnd. [end of Rnd 5 – 136 hdc]

Rnd 6 (Picot edging): Ch 1, turn, sc next 2 sts, picot in sc just made, (sc next 4 sts, picot in last sc just made) 33 times, sc in next 2 sts, join with sl st to first sc of Rnd. Fasten off. [136 sc, 34 picot]

All flowers start with an adjustable slip knot, if substituting magic circle ch 1 at start instead of ch 2.

Flower 1

Rnd 1: Color D, ch 2, 5 sc in 2nd ch from hook, tighten center of circle, join with sl st to first sc of Rnd. [5 sc]

Rnd 2: Ch 3, Cl in same sc as join, picot in Cl, ch 3 [(sl st, ch 3, Cl) in next sc, picot in Cl, ch 3,] 4 times, sl st in first sc again. Fasten off.


Flower 2

Rnd 1: With Color C, ch 2, 10 sc in 2nd ch from hook, tighten center of circle, join with sl st to first sc of Rnd. [10 sc]

Rnd 2: Ch 1, sc in same sc as join, [ch 3, sc in next st, ch 1, sc in next st] 4 times, ch 3, sc in next st, ch 1, join with sl st to first sc of Rnd. [10 sc, 5 ch-1 sp, 5 ch-3 sp]

Rnd 3: Ch 1, [(sc, hdc, dc, 3 Exdc, dc, hdc, sc) in ch-3 sp, skip to next ch-3 sp,] 5 times, join with sl st to beginning ch-1 of Rnd.

Rnd 4: [Ch 2, skip 2 sts, sc next st, ch 2, sc next st, (sc, picot in sc just made, sc) in next st, sc in next st, ch 2, sc next st, ch 2, skip 2 sts, sl st before next sc] 5 times. Fasten off

Flower 3 

Rnd 1: With Color B, ch 2, 10 sc in 2nd ch from hook, tighten center of circle, join with sl st to first sc of Rnd. [10 sc]

Rnd 2: Ch 1, [(sc, ch 5, sc) in next st, ch 1, skip next st] 5 times, join with sl st to first sc of Rnd. [10 sc, 5 ch-1 sp, 5 ch-5 sp]

Rnd 3: Ch 1, [(sc, hdc, 2 dc, Exdc, ch 1, Exdc, 2 dc, hdc, sc) in next ch-5 sp] 5 times, join with sl st to beginning ch-1 sp.

Rnd 4: [Ch 2, skip 2 sts, sc next st, ch 2, skip 1 st, {(sc, picot in sc just made) in next st/ch sp} 3 times, ch 2, skip 1 st, sc next st, ch 2, skip 2 sts, sl st before next sc,] 5 times. Fasten off

Finishing

Weave in tails for hat.

Stack Flowers sandwiching flower 2 between 1 and 3. Use tails to sew them together referencing photo for staggering of petals.

Finish by sewing flowers to hat band where the pink X is shown in photo, or sew to a pin backing to make removable.

A PDF version of this pattern is available in my Ravelry Shop and includes stich charts for the flowers and crown. You can purchase it by clicking here: BUY NOW.

You can visit all the other designers in the Perfect Picot Blog Hop using the links below:

Be sure to enter the drawing for the fantastic giveaway “Win All You Need to Make This”. There will be 5 lucky winners for 5 different groups of designs. The drawing is open Worldwide and ends October 9th. Visit the Stitch & Hustle blog hop main post for all the details.

Floating Diamonds Shawlette

I’m excited to be participating in the 2019 Celebrate Mom Blog Hop hosted by Pattern Paradise! Each day in May, a different crochet designer will be featured and share a new free pattern with you! There are lots of fun prizes too, so come join the fun! For the list of designers and all the details, go to this post => 2019 Celebrate Mom Blog Hop & Giveaway

My kids and I have a daily tradition that we start and end our days with a hug. But what do you do when your mom (or other dear friends) are far away? You can make them this lovely shawlette that can be a hug for the times you are out of arms reach.

It uses just one ball of Berroco’s “ReMix Light” yarn. Which is a perfect weight and fiber mix for a summer wearable. The open mesh and lace work also make for a very breathable fabric.

This is a little bit more challenging crochet project as you need to keep track of the changes for the diamond pattern. It is definitely one of those projects where you want to check your count at the end of each row to be sure you didn’t add or miss a stitch.

Floating Diamonds Shawlette

Designed by Andee Graves / M2H Designs

Skill level:  Intermediate

Finished Size: 59” (149.9 cm) wide x 11” (27.9 cm) tall after blocking

Materials

Yarn: Berroco “Remix Light” 30% Nylon, 27% Cotton, 24% Acrylic, 10% Silk, 9% Linen (3.5 oz/100 g, 432 yd/400 m), 1 Ball of Color # 6977

Hook: 7 / 4.5 mm (or size needed to obtain gauge)

Notions: Yarn/tapestry needle, Stitch markers

Gauge: In V-st pattern 16 stitches and 9 rows = 4” (10.16 cm)

Special Stitches or Abbreviations

PM – Place stitch marker

V-st – V Stitch: (dc, ch 1, dc) in indicated place

Pattern Notes

Shawl is worked top-down from a stacked rows foundation with a center increase point and decreases at ends of rows. Once body of shawl is finished, yarn is cut and rejoined at end of foundation to work edging along sides and bottom edge.

The majority of the body of this shawl is worked in staggered V-stitches. This means the 2 legs of the V-stitch are worked in the space between two V-stitches.

Instructions:

Foundation Rows

Row 1: Ch 2, sc in second ch from hook.

Row 2 (RS): Ch 3, turn, 2 dc in sc.

Row 3: Ch 1, turn, sc in first dc.

Rows 4 – 157: Alternate repeating Rows 2 and 3 (ending with a Row 3). PM in Row 79. [78 “scallops”]

Shawl Body

Row 1: Ch 2, turn to work along flat side of foundation rows, slip st in side of first sc row, ch 3 {counts as dc}, *skip next dc row, V-st in next sc row*, Repeat from * to * until work in sc row before marked sc row, (V-st,  ch 2, V-st) in marked sc row, move st marker to ch-2 sp just made, Repeat from * to * until work in next to last sc row, skip last dc row, dc in final sc row. [1 ch-2 sp, 2 dc, 78 V-sts]

The marked ch-2 space is the increase point for the rest of the body of the shawl.

Row 2: Ch 3 {counts as dc}, turn, skip first V-st, *V-st in space before next V-st, skip next V-st*, Repeat from * to * until reach marked ch-2 sp, (V-st, ch 2, V-st) in marked ch-2 sp, move st marker up to ch-2 sp just made, Repeat from * to * until 1 V-st is left in row, dc in top of previous row ch-3.  [1 ch-2 sp, 2 dc, 78 V-sts]

Rows 3-9: Repeat Row 2. Count at end of Row 9 – [1 ch-2 sp, 2 dc, 78 V-sts]

Row 10: Ch 3 {counts as dc}, turn, skip first V-st, *V-st in space before next V-st, skip next V-st*, Repeat from * to * 6 times, [V-st in space before next V-st, ch 10, skip next 2 V-sts, Repeat from * to * 5 times] 4 times, V-st in space before next V-st, ch 10, skip next 2 V-sts, Repeat from * to * once, (V-st, ch 2, V-st) in marked ch-2 sp, move st marker up to ch-2 sp just made, skip next V-st, [V-st in space before next V-st, ch 10, skip next 2 V-sts, Repeat from * to * 5 times] 4 times, V-st in space before next V-st, ch 10, skip next 2 V-sts, repeat from * to * 8 times, dc in top of previous row ch-3.  [1 ch-2 sp, 2 dc, 10 ch-10 sp, 68 V-sts]

Row 11: Ch 3 {counts as dc}, turn, skip first V-st, *V-st in space before next V-st, skip next V-st*, Repeat from * to * 5 times, [V-st in space before next V-st, ch 6, skip next V-st, sc in ch-10 sp, ch 6, skip next V-st, Repeat from * to * 4 times] 4 times, V-st in space before next V-st, ch 6, skip next V-st, sc in ch-10 sp, ch 6, skip next V-st, Repeat from * to * once, (V-st, ch 2, V-st) in marked ch-2 sp, move st marker up to ch-2 sp just made, skip next V-st,  [V-st in space before next V-st, ch 6, skip next V-st, sc in ch-10 sp, ch 6, skip next V-st, Repeat from * to *4 times] 4 times, V-st in space before next V-st, ch 6, skip next V-st, sc in ch-10 sp, ch 6, skip next V-st, Repeat from * to * 7 times, dc in top of previous row ch-3.  [1 ch-2 sp, 2 dc, 20 ch-6 sp, 10 sc, 58 V-sts]

Row 12: Ch 3 {counts as dc}, turn, skip first V-st, *V-st in space before next V-st, skip next V-st*, Repeat from * to * 4 times, [V-st in space before next V-st, ch 6, skip next V-st, sc in next ch-6 sp, sc in next sc, sc in next ch-6 sp, ch 6, skip next V-st, Repeat from * to * 3 times] 4 times, V-st in space before next V-st, ch 6, skip next V-st, sc in next ch-6 sp, sc in next sc, sc in next ch-6 sp, ch 6, skip next V-st, Repeat from * to * once, (V-st, ch 2, V-st) in marked ch-2 sp, move st marker up to ch-2 sp just made, skip next V-st, [V-st in space before next V-st, ch 6, skip next V-st, sc in next ch-6 sp, sc in next sc, sc in next ch-6 sp, ch 6, skip next V-st, Repeat from * to * 3 times] 4 times, V-st in space before next V-st, ch 6, skip next V-st, sc in next ch-6 sp, sc in next sc, sc in next ch-6 sp, ch 6, skip next V-st, Repeat from * to * 6 times, dc in top of previous row ch-3.  [1 ch-2 sp, 2 dc, 20 ch-6 sp, 30 sc, 48 V-sts]

Row 13: Ch 3 {counts as dc}, turn, skip first V-st, *V-st in space before next V-st, skip next V-st*, Repeat from * to * 3 times, [V-st in space before next V-st, ch 6, skip next V-st, sc in next ch-6 sp, sc in next 3 sc, sc in next ch-6 sp, ch 6, skip next V-st, Repeat from * to * 2 times] 4 times, V-st in space before next V-st, ch 6, skip next V-st, sc in next ch-6 sp, sc in next 3 sc, sc in next ch-6 sp, ch 6, skip next V-st, Repeat from * to * once, (V-st, ch 2, V-st) in marked ch-2 sp, move st marker up to ch-2 sp just made, skip next V-st, [V-st in space before next V-st, ch 6, skip next V-st, sc in next ch-6 sp, sc in next 3 sc, sc in next ch-6 sp, ch 6, skip next V-st, Repeat from * to * 2 times] 4 times, V-st in space before next V-st, ch 6, skip next V-st, sc in next ch-6 sp, sc in next 3 sc, sc in next ch-6 sp, ch 6, skip next V-st, Repeat from * to * 5 times, dc in top of previous row ch-3.  [1 ch-2 sp, 2 dc, 20 ch-6 sp, 50 sc, 38 V-sts]

Row 14: Ch 3 {counts as dc}, turn, skip first V-st, *V-st in space before next V-st, skip next V-st*, Repeat from * to * 2 times, [V-st in space before next V-st, ch 6, skip next V-st, sc in next ch-6 sp, sc in next 5 sc, sc in next ch-6 sp, ch 6, skip next V-st, Repeat from * to * once] 4 times, V-st in space before next V-st, ch 6, skip next V-st, sc in next ch-6 sp, sc in next 5 sc, sc in next ch-6 sp, ch 6, skip next V-st, Repeat from * to * once, (V-st, ch 2, V-st) in marked ch-2 sp, move st marker up to ch-2 sp just made, skip next V-st, [V-st in space before next V-st, ch 6, skip next V-st, sc in next ch-6 sp, sc in next 5 sc, sc in next ch-6 sp, ch 6, skip next V-st, Repeat from * to * once] 4 times, V-st in space before next V-st, ch 6, skip next V-st, sc in next ch-6 sp, sc in next 5 sc, sc in next ch-6 sp, ch 6, skip next V-st, Repeat from * to * 4 times, dc in top of previous row ch-3.  [1 ch-2 sp, 2 dc, 20 ch-6 sp, 70 sc, 28 V-sts]

Row 15: Ch 3 {counts as dc}, turn, skip first V-st, *V-st in space before next V-st, skip next V-st*, Repeat from * to * once, [ch 6, skip next V-st, sc in next ch-6 sp, sc in next 7 sc, sc in next ch-6 sp, ch 6, skip next V-st, V-st in space before next V-st] 4 times, ch 6, skip next V-st, sc in next ch-6 sp, sc in next 7 sc, sc in next ch-6 sp, ch 6, skip next V-st, Repeat from * to * once, (V-st, ch 2, V-st) in marked ch-2 sp, move st marker up to ch-2 sp just made, skip next V-st, V-st in space before next V-st, [ch 6, skip next V-st, sc in next ch-6 sp, sc in next 7 sc, sc in next ch-6 sp, ch 6, skip next V-st, V-st in space before next V-st] 4 times, ch 6, skip next V-st, sc in next ch-6 sp, sc in next 7 sc, sc in next ch-6 sp, ch 6, skip next V-st, Repeat from * to* 3 times, dc in top of previous row ch-3.  [1 ch-2 sp, 2 dc, 20 ch-6 sp, 90 sc, 18 V-sts]

Row 16: Ch 3 {counts as dc}, turn, skip first V-st, *V-st in space before next V-st, skip next V-st*, Repeat from * to * once, [V-st in next ch-6 sp, ch 6, skip next sc, sc in next 7 sc, ch 6, skip next sc, V-st in next ch-6 sp, skip next V-st] 4 times, V-st in next ch-6 sp, ch 6, skip next sc, sc in next 7 sc, ch 6, skip next sc, V-st in next ch-6 sp, skip next V-st, Repeat from * to * once, (V-st, ch 2, V-st) in marked ch-2 sp, move st marker up to ch-2 sp just made, skip next V-st, repeat from * to * once, [V-st in next ch-6 sp, ch 6, skip next sc, sc in next 7 sc, ch 6, skip next sc, V-st in next ch-6 sp, skip next V-st] 4 times, V-st in next ch-6 sp, ch 6, skip next sc, sc in next 7 sc, ch 6, skip next sc, V-st in next ch-6 sp, skip next V-st, Repeat from * to * 2 times, dc in top of previous row ch-3.  [1 ch-2 sp, 2 dc, 20 ch-6 sp, 70 sc, 28 V-sts]

Row 17: Ch 3 {counts as dc}, turn, skip first V-st, *V-st in space before next V-st, skip next V-st*, Repeat from * to * once, [V-st in next ch-6 sp, ch 6, skip next sc, sc in next 5 sc, ch 6, skip next sc, V-st in next ch-6 sp, skip next V-st, Repeat from * to * once] 4 times, V-st in next ch-6 sp, ch 6, skip next sc, sc in next 5 sc, ch 6, skip next sc, V-st in next ch-6 sp, skip next V-st, Repeat from * to * 2 times, (V-st, ch 2, V-st) in marked ch-2 sp, move st marker up to ch-2 sp just made, skip next V-st, repeat from * to * 2 times, [V-st in next ch-6 sp, ch 6, skip next sc, sc in next 5 sc, ch 6, skip next sc, V-st in next ch-6 sp, skip next V-st, Repeat from * to * once] 4 times, V-st in next ch-6 sp, ch 6, skip next sc, sc in next 5 sc, ch 6, skip next sc, V-st in next ch-6 sp, skip next V-st, Repeat from * to * 2 times, dc in top of previous row ch-3.  [1 ch-2 sp, 2 dc, 20 ch-6 sp, 50 sc, 38 V-sts]

Row 18: Ch 3 {counts as dc}, turn, skip first V-st, *V-st in space before next V-st, skip next V-st*, Repeat from * to * once, [V-st in next ch-6 sp, ch 6, skip next sc, sc in next 3 sc, ch 6, skip next sc, V-st in next ch-6 sp, skip next V-st, Repeat from * to * 2 times] 4 times, V-st in next ch-6 sp, ch 6, skip next sc, sc in next 3 sc, ch 6, skip next sc, V-st in next ch-6 sp, skip next V-st, Repeat from * to * 3 times, (V-st, ch 2, V-st) in marked ch-2 sp, move st marker up to ch-2 sp just made, skip next V-st, repeat from * to * 3 times, [V-st in next ch-6 sp, ch 6, skip next sc, sc in next 3 sc, ch 6, skip next sc, V-st in next ch-6 sp, skip next V-st, Repeat from * to * 2 times] 4 times, V-st in next ch-6 sp, ch 6, skip next sc, sc in next 3 sc, ch 6, skip next sc, V-st in next ch-6 sp, skip next V-st, Repeat from * to * 2 times, dc in top of previous row ch-3.  [1 ch-2 sp, 2 dc, 20 ch-6 sp, 30 sc, 48 V-sts]

Row 19: Ch 3 {counts as dc}, turn, skip first V-st, *V-st in space before next V-st, skip next V-st*, Repeat from * to * once, [V-st in next ch-6 sp, ch 6, skip next sc, sc in next sc, ch 6, skip next sc, V-st in next ch-6 sp, skip next V-st, Repeat from * to * 3 times] 4 times, V-st in next ch-6 sp, ch 6, skip next sc, sc in next sc, ch 6, skip next sc, V-st in next ch-6 sp, skip next V-st, Repeat from * to * 4 times, (V-st, ch 2, V-st) in marked ch-2 sp, move st marker up to ch-2 sp just made, skip next V-st, repeat from * to * 4 times, [V-st in next ch-6 sp, ch 6, skip next sc, sc in next sc, ch 6, skip next sc, V-st in next ch-6 sp, skip next V-st, Repeat from * to * 3 times] 4 times, V-st in next ch-6 sp, ch 6, skip next sc, sc in next sc, ch 6, skip next sc, V-st in next ch-6 sp, skip next V-st, Repeat from * to * 2 times, dc in top of previous row ch-3.  [1 ch-2 sp, 2 dc, 20 ch-6 sp, 10 sc, 58 V-sts]

Row 20: Ch 3 {counts as dc}, turn, skip first V-st, *V-st in space before next V-st, skip next V-st*, Repeat from * to * once, [V-st in first ch of next ch-6 sp, skip next sc, V-st in last ch of next ch-6 sp, skip next V-st, Repeat from * to * 4 times] 4 times, V-st in first ch of next ch-6 sp, skip next sc, V-st in last ch of next ch-6 sp, skip next V-st, Repeat from * to * 5 times, (V-st, ch 2, V-st) in marked ch-2 sp, move st marker up to ch-2 sp just made, skip next V-st, repeat from * to * 5 times, [V-st in first ch of next ch-6 sp, skip next sc, V-st in last ch of next ch-6 sp, skip next V-st, Repeat from * to * 4 times] 4 times, V-st in first ch of next ch-6 sp, skip next sc, V-st in last ch of next ch-6 sp, skip next V-st, Repeat from * to * 2 times, dc in top of previous row ch-3.  [1 ch-2 sp, 2 dc, 68 V-sts]

Rows 21 – 23: Repeat Row 2. Fasten off at end of Row 23. [1 ch-2 sp, 2 dc, 68 V-sts]

Edging: With RS of foundation facing attach yarn with slip st in ch-2 at beginning of Row 1 {indicated by pink arrow in photo above}, working along side of Shawl body Rows, (ch 2, dc) in same ch-2 sp as slip st join, [(slip st, ch 2, dc) in top of next row] 22 times, slip st in last st at top of Row 23, turn to work along top of Row 23 stitches, ch 3, dc in first dc of first V-st, skip 2 sts, *[(slip st, ch 3, dc) in first dc of next V-st, skip 2 sts]* 33 times, (slip st, ch 3, dc) in marked ch-2 sp, remove st marker, Repeat from * to * 34 times, (slip st, ch 2, dc) in last dc of Row 23, turn to work along side of Shawl Body rows at last end, [(slip st, ch 2, dc) in top of next row] 22 times, slip st in sc at end of foundation rows,Fasten off. [23 small scallops at each end, 69 scallops along top of Row 23]

Finishing

Before weaving in ends, wet block work to open lace. Once shawlette has completely dried, weave in all loose ends.

The stitch markers in my project photos above are my favorite newest Clover stitch markers. They are light weight and come in a variety of colors and sizes. If you can’t find them locally you can click on the product photo below to find them on Amazon.com. This post contains affiliate links. I may receive compensation (at no added cost to you) if you make a purchase using these links.

I hope you have a fun time crocheting this shawlette. If you make it and want to share photos with me of your finished project tag me on Instagram. You can follow me there using the icons at the top of the sidebar. Or just search for me as Andee.Graves.