It’s October and it’s definitely Autumn up here on my mountain. Most of our aspen trees have dropped their leaves, we have had a few traces of snow as well. I am loving the cooler temperatures. I’m really not cut out for super hot days and we had a lot of those this past couple of months. October has always been a favorite month for me because I love autumn, but it is also my Birthday this month.
It is a very special birthday this year as I am celebrating my 6th decade traveling around our sun. I wanted to do some extra fun things to celebrate with my marvelous readers and decided this month is going to be all about the Spirals! If you have been following my blog you already know that I have an abiding fondness for crocheting circles and spirals. Working in the round just makes me very happy.
I have been planning for this month all summer. Starting next week I’ll finally be able to share some fun new designs that have been in the top secret drawer all summer. But right now let’s take a quick look at some of my flat spiral designs of the past (just in case you missed them the first time).
My early design experiments with spirals involved working continuous rounds then working surface crochet to emphasize the spiral. The first 2 patterns listed below used this technique.
“Flat Fuzzy Friend” is available on the ‘Crochet Uncut’ website as a free pattern. This is a great lovey for a little one or even a fun whimsical gift for an older child. This pattern was published in 2010.
“Spiral in a Heart” is available here on my blog as a free pattern and makes a fun little embellishment. I like to make these to decorate hats and gloves for loved ones. They are also really cute on cuddle blankets. This pattern was published in 2011
I began to get more into the math of circles worked in the round and that that gave me the idea to play with spirals that had more than 1 arm. Once I started down this path I started having way too much fun. Since then I have continued to play with different height of stitches and number of arms to create designs that incorporate spirals.
“Whirlwind Afghan Square” this was my first afghan square for the Moogly CAL in 2015. You can find the free pattern for this square here on my blog.{Not the most exciting photo I’ve ever taken, but you get the idea.} I also have a video and additional blog posts on working this square.
“Dizzy Corner Afghan Square” this square was part of the 2017 Moogly CAL the pattern is available here on my blog for free. This post includes a detailed photo tutorial on crocheting the spiral circle.
“Whirling Ends Scarf” this fun scarf pattern is available for purchase in my Ravelry shop. The pattern includes detailed photo tutorials and stitch charts for both the spirals and the body of the scarf. It was part of the Stitch Makers Virtual Crochet Conference in September 2019.
These are just a short review of some of the flat spiral designs I’ve created over the years. Next week we will have a couple of new designs to add to this list, so be sure to stop by again.
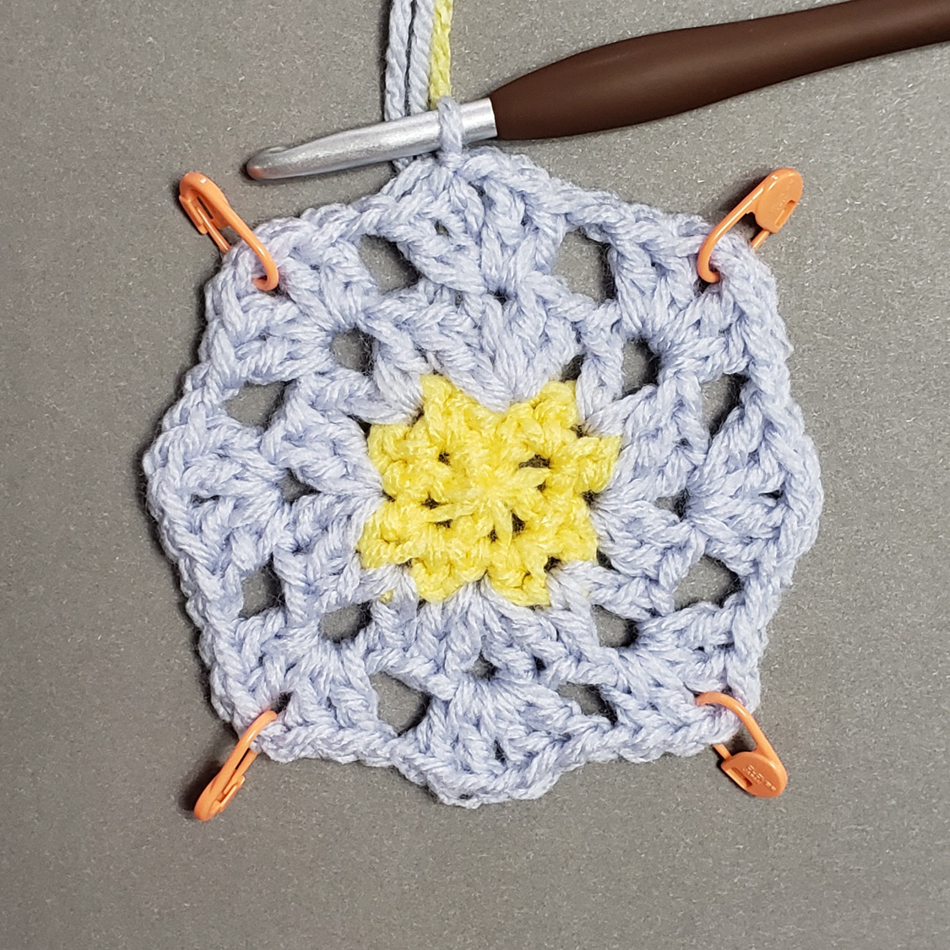
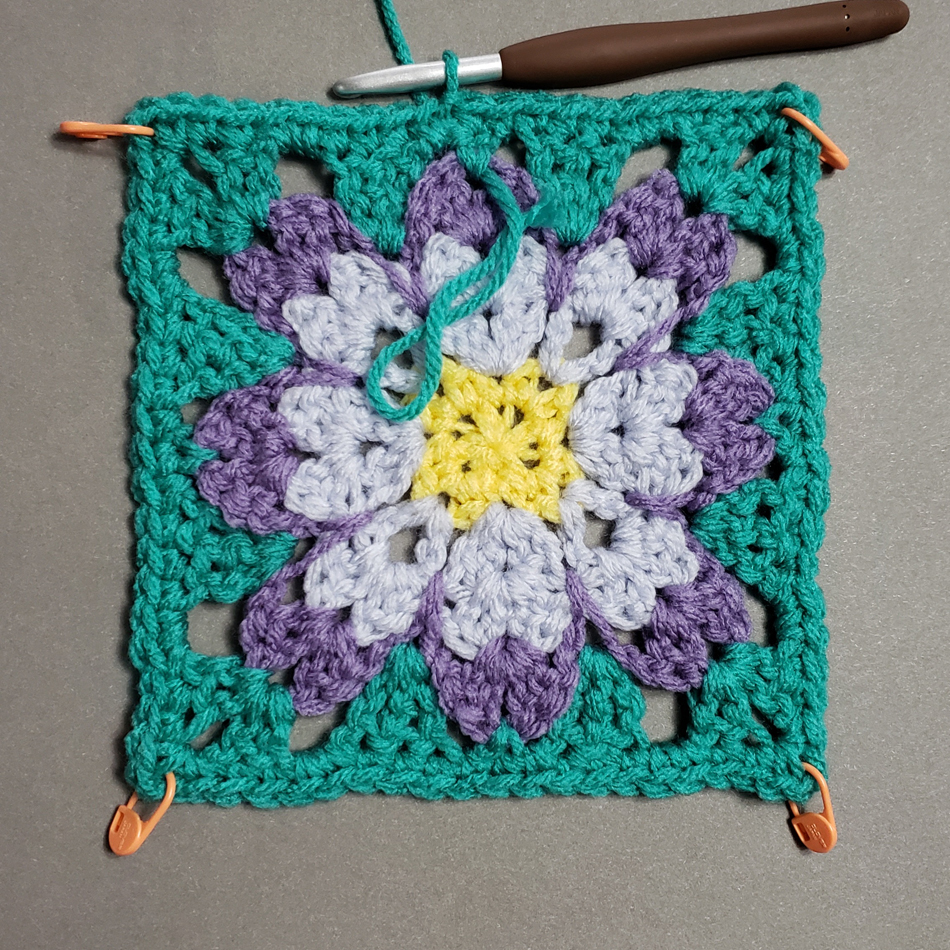
Hello my friends, I have another fun afghan square for you. I have been traveling and having all sorts of adventures with my family this summer. Early in June I went to Ireland with the Craft Tours trip hosted by Tamara Kelly of Moogly Blog. Appropriately this square pattern is Block #18 for the Moogly 2023 Afghan CAL and was inspired by the beautiful gardens we saw on the Ireland trip. You can find out more about the Moogly 2023 Afghan CAL and how Tamara adapted her colors for my design here.
Clematis Garden Afghan Square
Designed by Andee Graves
Skill level: Intermediate
Finished Size: 12” square
Materials:
Yarn
Worsted wt (Sample uses Red Heart “With Love” 100% Acrylic (7 oz/198 g, 370 yd/338 m)
Color A: Daffodil (sample used approximately 2 yards/ 1.1 gram) Rnds 1-2
Color B: Oxford (sample used approximately 70 yards/ 37.6 grams) Rnds 3-4: 3.8 g, Rnds 9-13: 33.5 g
Color C: Lilac (sample used approximately 6.5 yards/ 3.5 grams) Rnd 5
Color D: Jade (sample used approximately 22.5 yards/ 12.1 grams) Rnds 6-8
Hook J / 6mm
Notions Yarn/tapestry needle, Stitch markers
Gauge First 4 rounds of pattern = 4” across square
Special Stitches and Abbreviations:
Place stitch marker (PM)
Standing Double Crochet (Standing dc): Make slip knot and place loop snugly on shaft of hook, yo and insert hook into indicated place, yo, pull up a loop, (yo, pull through 2 loops on hook) twice.
4 dc Shell Stitch (Shl): (2 dc, ch 1, 2 dc) in indicated place.
Single crochet spike stitch (scSpike): Insert hook in indicated place, YO, pull up a loop back to original round/row, 2 loops on hook, YO, pull thru both loops on hook to complete single crochet.
Extended Double Crochet stitch (ExtDC): YO, insert hook in indicated place, YO, pull up a loop, YO, pull through 1 loop on hook, (YO, pull through 2 loops on hook) 2 times.
V-stitch (V-st): (Dc, ch 1, dc) in indicated place.
Granny Shell Stitch (GrShl): 3 dc in indicated place.
3 dc Cluster Stitch (CL): (YO, insert hook in indicated place, YO, pull up a loop, YO, pull thru 2 loops) 3 times, YO pull through remaining 4 loops on hook.
Pattern Notes:
Square is worked center out. Attach yarn using a slip stitch unless otherwise stated. Keep tails to wrong side of fabric and weave in as work progresses. Ch 3 at beginning of rounds counts as a double crochet stitch unless otherwise stated. Be sure to pay close attention if a round is Right Side (RS) or Wrong Side (WS).
Instructions
Rnd 1 (WS): With Color A begin with adjustable slip knot, ch 2, (sc, ch 2) 4 times in second ch from hook, sl st to first sc, gently tighten center of square, PM in ch-2 sps to mark corners. (4 sc, 4 ch- 2 spcs)
Rnd 2 (WS): Ch 1, sc in same st as join, [*(sc, ch 2, sc) in next marked ch-2 sp, move up st marker to ch-2 sp just made*, sc in next st] 3 times, Repeat from * to * once, sl st to first sc.
Fasten off Color A. (12 sc, 4 ch- 2 spcs)
Rnd 3 (RS): With back side of Rnd 2 facing attach Color B with standing dc in middle sc of any side, dc in same st as join, [*sk next st, (dc, ch 2, dc) in next marked ch-2 sp, move st marker up to ch-2 sp just made, sk next st,* Shl in next st]3 times, repeat from * to * once, 2 dc in same st as join, ch 1, sl st to first dc of Rnd {completes first Shl of Rnd}. (4 Shl, 4 ch- 2 spcs)
Rnd 4 (RS): Ch 3, dc in same ch-sp as join, [ch 1, sk next 3 sts, Shl in next ch-sp] 7 times, move st markers up to ch-1 sp of Shls worked in marked ch-2 sps, ch 1, sk next 3 sts, 2 dc in same ch-sp as join, ch 1, sl st to 3rd ch of beginning ch-3 {completes first Shl of Rnd}.
Fasten off Color B. (8 Shls, 8 ch-1 sp)
Rnd 5 (RS): With front side of Rnd 4 facing, attach Color C in ch-1 sp of side Shl with standing dc, dc in same ch-sp as join, [*ch 2, sk 2 sts, scSpike in corresponding sp between Shl and corner dc of Rnd 3, ch 2, sk 2 sts, Shl in marked ch-1 sp of next Shl, move st marker up to ch-1 sp of Shl just made, ch 2, sk 2 sts, scSpike in next corresponding sp between corner dc and next Shl of Rnd 3, ch 2, sk 2 sts,* Shl in ch-1 sp of next Shl] 3 times, Rep from * to * once, 2 dc in same ch-sp as join, ch 1, sl st to 3rd ch of beginning ch-3, {completes first Shl of Rnd}.
Fasten off Color C. (8 Shls, 16 ch-2 sps, 8 scSpike)
Rnd 6 (RS) Squaring up: With front side of Rnd 5 facing, attach Color D to ch-1 sp of side Shl, ch 1, sc in same sp as join, [*ch 1, sk 2 sts and ch-sp, (2 Tr, ExtDC) in next st, ch 2, sk ch-sp and 2 sts, (2 dc, ch 2, 2 dc) in marked ch-1 sp, move st marker up to ch-2 sp just made, ch 2, sk 2 sts and ch-sp, (2 Tr, ExtDC) in next st, ch 1, sk ch-sp and 2 sts,* sc in ch-1 sp of next Shl] 3 times, Repeat from * to * once, sl st to first sc of Rnd.
(4 sc, 8 ch-1 sp, 16 Tr, 8 ExtDC, 12 ch-2 sp, 16 dc {17 sts each side between corner ch-2 sps})
Rnd 7 (WS): Ch 1, turn, sc in first ch-1 sp, [*sc in each of next 3 sts, 2 sc in next ch-2 sp, sc in each of next 2 sts, (sc, ch 2, sc) in marked ch-2 sp, move st marker up to ch-2 space just made, sc in each of next 2 sts, 2 sc in next ch-2 sp, sc in each of next 3 sts, sc in next ch-1 sp, sc in next st,* sc in next ch-1 sp] 3 times, Repeat from * to * once, sl st to first sc of Rnd.
(76 sc, 4 ch-2 sp {19 sc each side between corner ch-2 sps})
End of Rnd 7 WS of Square
End of Rnd 7 from RS of Square
Rnd 8 (RS) V-sts: Ch 4, turn, dc in next st {counts as first V-st of Rnd}, (sk 2 sts, V-st in next st) 3 times, [*(dc, ch-2, dc) in marked ch-sp, move st marker up to ch-2 sp just made, V-st in next st,* (sk 2 sts, V-st in next st) 6 times] 3 times, Repeat from * to * once, (sk 2 sts, V-st in next st) 2 times, sk 2 sts, sl st to 3rd ch of beginning ch 4 to join.
Fasten off Color D. (28 V-sts, 8 dc, 4 ch-2 sp)
Rnd 9 (RS) Granny Shls: With front side of Rnd 8 facing, attach Color B with standing dc in ch-1 sp of any V-st along a side, 2 dc in same ch-sp as join {counts as first GrShl}, *sk 2 sts, GrShl in ch-1 sp of next V-st,* Repeat from * to * until reach marked ch-2 sp, sk 2 sts, (2 dc, ch 2, 2 dc) in marked ch-2 sp, move st marker up to ch-2 sp just made] 4 times, Repeat from * to * until reach end of Rnd, sl st to first dc of first GrShl to join.
(28 GrnShl, 16 dc, 4 ch-2 sp {25 sts each side between corner ch-2 sps})
Rnd 10 (WS) Bobbles: Ch 1, turn, sc in next st, (CL in next st, sc in each of next 2 sts) 4 times, CL in next st, [*(sc, ch 2, sc) in marked ch-2 sp, move st marker up to ch-2 sp just made, CL in next st,* (sc in each of next 2 sts, CL in next st) 8 times] 3 times, Repeat from * to * once, (sc in each of next 2 sts, CL in next st) 3 times, sc in next st, sl st to first sc of Rnd.
(36 CL, 72 sc, 4 ch-2 sp {27 sts each side between ch-2 sp corners})
End of Rnd 10 WS of Square
End of Rnd 10 RS of Square
Rnd 11 (RS): Turn, sc, ch 2 {counts as first dc}, [dc in each st until reach marked ch-2 sp, (2 dc, ch 2, 2 dc) in marked ch-2 sp, move st marker up to ch-2 sp just made] 4 times, dc in each st until reach beginning of Rnd, sl st to join to 2nd ch of first ch-2.
(124 dc, 4 ch-2 sp {31 dc each side between ch-2 sp corners})
Rnd 12 (WS): Repeat Rnd 11. (140 dc, 4 ch-2 sp {35 dc each side between ch-2 sp corners})
End of Rnd 12 RS of Square
Rnd 13 (RS): Ch 1, turn, [sc in each st until reach marked ch-2 sp, (sc, ch 2, sc) in marked ch-2 sp, move stitch marker up to ch-2 sp just made] 4 times, sc in each st until reach beginning of Rnd, sl st to first sc to join.
Fasten off Color B. (148 sc, 4 ch-2 sp {37 sc each side between ch-2 sp corners})
It’s beginning to warm up more days on my mountain and the bunnies are venturing out to see if they can find any fresh greens to nibble. We will still get some snow storms before our real warm weather arrives, but I am enjoying every hour of warmth we get. Easter is coming up this weekend and I have a fun little crochet pattern for you. The written version is below, for those of you that prefer a stitch chart or PDF version you can purchase it in my Ravelry Shop by clicking here.
Spring Bunny
designed by Andee Graves
This fun little bunny can be worked flat facing either left or right. Add your bunny as an embellishment to hats, mittens, sweaters or blankets. Or make the stuffy version for a fun little toy to add to Easter baskets or as a gift for a bunny lover in your life.
Finished Size: Finished bunny is approximately 4.25” tall
Materials
Yarn: Worsted Weight yarn, #4 weight category,
1 Flat Bunny uses approximately 7-10 yards of yarn. Stuffy Bunny uses approximately 15 – 20 yards of yarn
Sample was made with Premier “Every Day Worsted Anti-Pilling”, 180 yds/165 m, 3.5 oz/100 g,
Hook: H / 5mm or size needed to obtain gauge.
Notions: Yarn/tapestry needle, Poly fiber fill if making stuffy
Gauge: First 2 dc rounds = 2 3/8” (6 cm) diameter
Special Stitches:
Chain 4 Picot (ch-4 Picot) Chain 4, slip stitch in previous stitch made using front loop and top side loop.
Pattern Notes
Round 1 of stitches is worked into an adjustable slip knot, if you prefer the magic circle start, make 1 less chain stitch at the start of Round 1.
For Stuffy version use the scraps left from weaving in the beginning tails and Side 1 ending tail to stuff the bunny’s head.
Instructions for Flat Bunny
Right Facing Bunny
Rnd 1: Starting with adjustable slip knot, ch 3 {counts as center and first dc}, 11 dc in third chain from hook, join with slip st to top of beginning ch. (12 dc) Tighten center and weave in beginning tail.
Rnd 2: Ch 2 {counts as first dc}, dc in same st as join, 2 dc in each of next 4 sts, (dc, ch-4 Picot, dc) in next st, 2 dc in each of next 6 sts, join with slip st to top of beginning ch. (24 dc, 1 ch-4 Picot)
Row 3 (Bunny head): Ch 3 {counts as first Tr}, Tr in same st as join, 3 Tr in next st, *ch 7, working in back bumps of chs just made, hdc in third ch from hook, dc in each of next 2 chs, hdc in next ch, sc in next ch, slip st thru front loop and top side loop of previous Tr, * {first ear made}, Rep from * to * once, {second ear made}, (dc, ch 2, slip st) in next st. Fasten off. (5 Tr, 6 dc, 4 hdc, 2 sc)
Left Facing Bunny
Rnd 1: Work same as Right Facing Bunny.
Rnd 2: Ch 2 {counts as first dc}, dc in same st as join, 2 dc in each of next 7 sts, ch-4 Picot, 2 dc in each of next 4 sts, join with slip st to top of beginning ch. (24 dc, 1 ch-4 Picot)
Row 3 (Bunny head): Ch 2, dc in same st as join, *ch 7, working in back bumps of chs just made, hdc in third ch from hook, dc in each of next 2 chs, hdc in next ch, sc in next ch, slip st thru front loop and top side loop of previous dc, *{first ear made}, Rep from * to * once, {second ear made}, 3 Tr in next st, (Tr, ch 3, slip st) in next st. Fasten off. (5 Tr, 6 dc, 4 hdc, 2 sc)
Finishing
Weave in ending tail or use to sew bunny to project.
Instructions for Bunny Stuffy
Side 1 Bunny
Rnds 1 – 2: Work same as Right Facing Flat Bunny. Save beginning tail scrap.
Row 3 (Bunny head): Work same as Right Facing Flat Bunny but work only first Ear. Fasten off. (5 Tr, 4 dc, 2 hdc, 1 sc) Weave in ending tail, saving ending tail scrap.
Side 2 Bunny
Rnds 1 – 2: Work same as Left Facing Flat Bunny. Save beginning tail scrap.
Row 3 (Bunny head): Work same as Left Facing Flat Bunny but work only first Ear. Fasten off leaving 20” long tail. (5 Tr, 4 dc, 2 hdc, 1 sc)
Finishing
Holding Side 1 and 2 with WS together, using a whip stitch sew around Rnd 2 of body of bunny from 1 side of head to other, place a bit of fiber fill stuffing inside circle of bunny body. Sew along base of bunny head to close circle.
Sew around head, using a whipstitch and leaving bunny ears free, use beginning tail and ending tail scraps to lightly stuff head before sewing nose. Weave in last tail and trim excess.
In the image above you can see how I squished my bunny stuffy to make him sit on a flat bottom. I didn’t stuff the body very firmly so that I had some squishability when the bunny was finished.
I hope you are having a wonderful return to spring and enjoy crocheting some bunnies of your own.
I love March. It is National Crochet Month, National Crafting Month and it has my favorite geeky day…Pi Day.
March 14 is written as 3/14 for most of us here in the US and 3.14 is the short form for Pi. For those of you uncertain what Pi is…it is a mathematical constant that is the ratio of a circle’s circumference to its diameter, approximately equal to 3.14159. It also appears in many formulae across mathematics and physics.
For my crochet design work I tend to use the short form of 3.14. That is more than enough accuracy for creating circles for hats, bags and rugs.
This month I’ve been busy with fun crochet projects at the Longmont Yarn Shoppe. We yarn bombed the tree in front of the shop. My friend Margie in the Casual Crochet group also has us all participating in “Random Acts of Crochet Kindness”. My favorites are the ones made using Googly Eye Finger Puppets.
Like this snuggly “Pocket Hug”. If you would like to make your own Pocket Hug I’ve included the pattern here today. I had fun coming up with the basic circle that I used for this pattern. I had to get a little creative with how I worked the center of the circle, since it is worked around the ring of the Googly Eye Finger Puppet.
CL (2 double crochet Cluster Stitch) – (yo, insert hook in indicated place, yo, pull up a loop, yo, pull thru 2 loops) 2 times, yo, pull thru remaining 4 loops on hook.
Pattern Notes:
Round 1 of stitches is worked into the finger ring of the googly eye puppet.
Instructions
Circle with Arms
Rnd 1: With googly eyes of puppet facing, attach yarn with a slip st in the puppet finger ring, ch 1, 10 sc in ring, ch 2, bring hook behind googly eyes, sl st to join to first sc worked in ring. (10 sc, 1 ch-2 sp)
Rnd 2: (Ch 3 {counts as first dc}, dc) in same st as join, 2 dc in each of next 9 sts, 4 dc in ch-2 sp, join with sl st to top of beginning ch-3. (24 dc)
Rnd 3: Ch 2 {counts as first hdc}, hdc in next st, 2 hdc next st, hdc in next st, ^ ch 6, CL in 3rd st from hook, sc in back bar of each of next 3 chs, sl st thru front loop and side loop of previous hdc,^ hdc in next st, 2 hdc in next st, *(hdc in each of next 2 sts, 2 hdc in next st)3 times,* Rep from ^ to ^ once, Rep from * to * once, sl st to join to top of beginning ch-2. (32 hdc, 6 sc, 2 CL)
Heart
This is my Simple Sweetheart pattern from February 2012
Rnd 1: Starting with adjustable slip knot, ch 2, 7 sc in 2nd ch from hook, join with sl st to first sc of Rnd. (7 sc)
Rnd 2: Skip 1 st, 5 dc in next st, 1 dc in next st, (dc, picot, dc) in next st, dc in next st, 5 dc in next st, skip next st, join with sl st to first sc of Rnd 1. Fasten off. (14 dc, 1 picot)
Finishing
Use tails for sewing pieces together. Sew Heart to front of Circle below eyes. Fold arms of circle so they are hugging the heart, sew in place. Weave in any remaining tails.
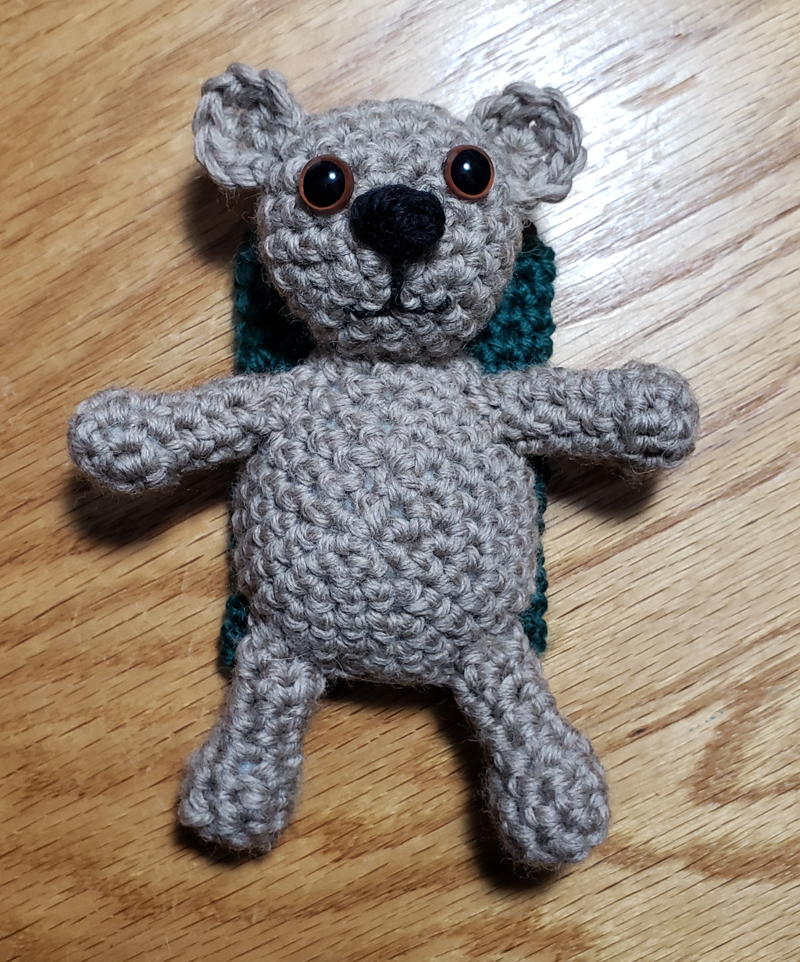
I hope you are all enjoying the festive season. It seems like December gets here faster every year. But to start off my December I have a fun little pattern to share with you, this little bear can be an ornament on your tree or stocking stuffer. They have a pouch to hold a standard gift card on their back.
This pattern is part of the 2022 Holiday Stashdown CAL you can find all the details on following along or catching up by clicking on the Stashdown link above. The Holiday Stashdown CAL is the fifth and final crochet along of 2022 hosted in the CAL Central Facebook and Ravelry groups. This call includes 22 free crochet patterns for winter holiday gifts, decorations, gift wrap, and more! Join us to make wonderful projects, chat with other crocheters, and enter for your chance to win a prize!
I chose this little bear gift card holder because you can make them with bits of yarn left over in your stash from other projects. The entire project takes less than 65 yards to crochet.
A Very Beary Christmas (Gift Card holder)
Designed by Andee Graves
Skill Level: Intermediate
Description: Slide a gift card into the pouch of this sweet little teddy bear as a fun way to celebrate the holidays with your family or friends. Make them for stocking stuffers or add a hanging loop to add to your holiday tree.
Notions: Safety Eyes (9-10 mm) or buttons for Bears eyes (if making for a child under 5 years embroider eyes with black yarn), black pearl cotton for embroidering mouth, appropriate yarn and embroidery needles for finishing, a handful of polyfill for stuffing.
Hooks H-8/5mm
Gauge: 4 rounds for Head Back = 2”/5 cm diameter in “With Love”; 1 7/8”/4.7 cm diameter in “Ultra Wool”.
Pattern notes: All rounds for bear are worked in spirals unless otherwise noted. Use an adjustable slip knot to make tightening center of rounds easier. Weave in beginning tails as you finish each piece or when instructed in pattern. Leave long tails at ends of pieces to use to sew bear together. Pouch is made in joined rounds without turning. You may find it helpful to use a stitch marker in the last stitch of the round to help you keep track of rounds.
The RS of fabric for all the bear pieces is the back side of your fabric, the WS is the front of stitches.
Instructions:
Head (Back) Bear Color
Rnd 1: ch 2, 6 sc in 2nd ch from hook. (6 sc)
Rnd 2: (2 sc in next st) 6 times. (12 sc)
Rnd 3: (sc in next st, 2 sc in next st) 6 times.(18 sc)
Rnd 4: (sc in each of next 2 sts, 2 sc in next st) 6 times, fasten off with 6 inch tail. (24 sc)
Head (Front) Bear Color with Nose Color
Rnd 1: With main color, ch 2, (3 sc, {switch to nose color} 3dcCL {switch back to main color}, 3 sc) in 2nd ch from hook. (6 sc, 1 CL)
Rnd 2: 2 sc in each of next 3 sts, sc in CL, 2 sc in each of next 3 sts. (13 sc)
Rnd 3: (*sc in next st, 2 sc in next st*) 3 times, sc in each of next 3 sts, Rep from * to * 2 times. (18 sc)
Rnd 4: (sc in each of next 2 sts, 2 sc in next st) 6 times. (24 sc)
Rnd 5: Sc in each st around, fasten off with a 10 inch long tail.
Ears (make 2) Bear Color
Rnd 1: ch 2, 6 sc in 2nd ch from hook.
Rnd 2: 2 sc in next 3 sts, sl st next 2 sts, fasten off with 8 inch long tail.
Arms (make 2) Bear Color
Rnd 1: ch 2, 6 sc in 2nd ch from hook.
Rnd 2: (1 sc in next st, 2 sc in next st) 3 times, weave in beginning tail.
Rnd 3: (1 sc in next st, sc2tog next st) 3 times.
Rnd 4 – 7: sc in each st around, fasten off with an 8 inch long tail.
After Rnd 4 lightly stuff hand end with poly fill.
Legs (make 2) Bear Color
Rnd 1: Ch 2, 6 sc in 2nd ch from hook.
Rnd 2: (1 sc in next st, 2 sc in next st) 3 times, weave in beginning tail.
Rnd 3: Sc in each st around.
Rnd 4: (1 sc in next st, sc2tog over next 2 sts) 3 times.
Rnd 5 – 8: Sc in each st around, fasten off with an 8 inch long tail.
After Rnd 5 lightly stuff foot end with poly fill.
Body (make 1) Bear Color
Rnd 1: Ch 2, 3 sc in 2nd ch from hook, ch 2, sc in back bar of 2nd ch from hook, 3 sc in sam place as first 3 sc. (7 sc)
Rnd 2: 2 sc in each of next 2 sts, sc in each of next 2 sts, 4 sc in next st, sc in next st, 2 sc in each of next 2 sts. (15 sc)
Rnd 3: *(Sc in next st, 2 sc in next st) 2 times*, sc in each of next 3 sts, 3 sc in next st, sc in each of next 3 sts, Repeat from * to * once. (21 sc)
Rnd 4: *(Sc in each of next 2 sts, 2 sc in next st) 2 times*, sc in each of next 4 sts, 3 sc in next st, sc in each of next 4 sts, Repeat from * to * once. (27 sc)
Rnd 5: *(Sc in each of next 3 sts, 2 sc in next st) 2 times*, sc in each of next 5 sts, 3 st in next st, sc in each of next 5 sts, Repeat from * to * once. (33 sc)
Rnd 6: *Sc in each of next 16 sts*, 3 st in next st, Repeat from * to * once, sl st in next 2 sts, fasten off with a 10 inch long tail. (35 sc)
Card Pouch (make 1) Pouch color
Rnd 1: With Color B, ch 11, sc in back bar of 2nd ch from hook, sc in back bar of each rem ch to end, turn to work along the opposite side of chain, sc in each 10 sts, sl st to first sc to join. (20 sc)
Rnd 2: Ch 1, sc in each st around, sl st to first sc to join. (20 sc)
Rnds 3 – 16: Repeat Rnd 2. Fasten off.
Bowtie (make 1) Bow Color
Ch 15, sl st tightly in 10th ch from hook, ch 9, sl st tightly in 10th ch from hook, ch 5, fasten off. Pull on beginning and ending tails to tighten knots. Trim short.
Cut an additional 10 inch length of same color, wrap around center of bow 2 or 3 times and tie in back, use loose ends to sew in place on bear following finishing directions.
Finishing
Embroider mouth on RS of Front Head. Sew buttons or place safety eyes on Front of Head.
Sew front and back of head together using a whip stitch joining last rounds. Leave a small opening and stuff with fiberfill, after stuffing sew opening closed.
Sew body of bear to front layer of card pouch using photo for reference as to placement. It is helpful to have a card in pouch while sewing. Sew to front layer of pouch using a whip stitch, leaving a small opening and stuff with fiberfill, after stuffing sew opening closed.
Sew ears, with tops pointed outward and WS facing forward, to either side of top half of bear’s head.
Sew Head to top of body and front layer of pouch
Using long ending tail sew Arms and Legs to body spaced as in photo.
Place bow in front under head on body, sew in place.
Weave in any remaining tails. Add your favorite method for ornament hanging to top of Bear’s head.
Happy Birthday to me! Again! That means it is time for an Afghan Block pattern in celebration of another trip around the sun! My block is #21 in the 2022 Moogly Afghan CAL too. You can find out more about the CAL and the links to the other blocks over on Mooglyblog.com. Check out what Tamara did with my block on her post about Block #21.
I had a lot of fun creating this block, especially since I was doing my favorite style of design where I go from 1 shape to another. In this block that is Round to Square. I’ve labeled the different parts of the pattern to help you stay on track when working your square.
Floating Star Afghan Block
designed by Andee Graves
Skill level: Intermediate
Finished Size: 12” square
Materials:
Yarn – Worsted weight yarn – Sample uses Red Heart “With Love” 100% Acrylic (7 oz/198 g, 370 yds/338 m),
Color A: #1304 Santorini – Rnds 1-3, 13-14 (used 18.1 g / 34 yds)
Color B: #1502 Iced Aqua – Rnds 4-5, 8-12 (used 29.4 g / 55 yds)
Color C: #1101 Eggshell – Rnds 6 -7 (used 9.9 g / 18 yds)
Hook – J / 6mm or size needed to meet gauge
Notions Yarn/tapestry needle, Stitch markers
Gauge First 3.5 rounds of pattern = 4” across diameter
Abbreviations/Special Stitches
(RS) Right Side: The side that will be the textured side of the fabric.
(WS) Wrong Side: The side that will be the flat side of the fabric.
(PM) Place Marker
(sl st) Joining slip st: Insert hook in indicated place, YO, pull up a loop thru place and loop on hook, continue to pull up on working loop until original loop is tight.
(V-st) V-stitch: (dc, ch 1, dc) in indicated st or sp.
(Ch 3 picot): Ch 3, insert hook under front loop and top side loop of previous stitch, slip stitch tightly.
(Fan) Pointed Fan Stitch: (3 dc, ch 3 picot, 3 dc) in indicated st or sp.
(Standing dc) Standing double crochet: Start with a slip knot loop on hook, hold in place and YO, insert hook in indicated place, YO, pull up a loop, [YO, pull thru 2 loops] 2 times.
(Standing hdc) Standing half double crochet: Start with a slip knot loop on hook, hold in place and YO, insert hook in indicated place, YO, pull up a loop, YO, pull thru all 3 loops on hook.
(Standing BPdc) Standing Back Post double crochet: Start with a slip knot loop on hook, hold in place and YO, insert hook to one side of indicated stitch post from back to front, then to opposite side of post from front to back, YO, pull up a loop, complete like a standard double stitch.
(BPTr) Back Post Treble: YO twice, insert hook to one side of indicated stitch post from back to front, then to opposite side of post from front to back, YO, pull up a loop, complete like a standard treble stitch.
(BPdc) Back Post double crochet: YO once, insert hook to one side of indicated stitch post from back to front, then to opposite side of post from front to back, YO, pull up a loop, complete like a standard double crochet stitch.
(BPhdc) Back Post half double crochet: YO once, insert hook to one side of indicated stitch post from back to front, then to opposite side of post from front to back, YO, pull up a loop, complete like a standard half double crochet stitch.
Pattern Notes:
Start square with an adjustable slip knot. Beginning tail tightens the loop on the hook.
Keep tails on wrong side of square as you work to help track which is wrong side and right side.
All rounds are joined with a tight slip stitch to the indicated stitch or chain.
Stitch counts at the end of each round are shown in italicized brackets at end. After Rnd 8, stitch counts along each side are shown in italicized curly brackets after round count and do not include corner chain spaces.
Instructions
Rnd 1 (RS): Starting with adjustable slip knot, ch 4 {counts as center and first dc}, 11 dc in 4th chain from hook, join {see pattern notes} to top of beg ch. [12 dc]
Rnd 2 (RS): Ch 4 {counts as first dc and ch-1 sp}, [dc in next st, ch 1] 11 times, join to 3rd ch of beg ch-4. [12 dc, 12 ch-1 sp]
Rnd 3 (RS): (sl st, ch 3 {counts as first dc}, 2 dc) in first ch-1 sp, [3 dc in next ch-1 sp] 11 times, join to top of first ch-3. Fasten off Color A. [36 dc]
Rnd 4 (RS): Attach Color B with Standing dc in 2nd dc of a 3 dc group, (ch 1, dc) in same st {counts as first V-st}, [ch 1, skip 2 sts, V-st in next st] 11 times, ch 1, join to first dc of rnd. [12 V-st, 12 ch-1 sp]
Rnd 5 (RS): Ch 3 {counts as first dc}, dc in ch-1 sp of same V-st, dc in 2nd dc of same V-st, [2 dc in next ch-1 sp, dc in first dc of next V-st, dc in ch-1 sp of same V-st, dc in 2nd dc of same V-st] 11 times, 2 dc in last ch-1 sp, join to top of first ch-3. Fasten off Color B [60 dc]
Rnd 6 (RS): Attach Color C with Standing dc in center dc that was worked in a ch-1 sp of Rnd 4 V-st, (ch 1, dc) in same st {counts as first V-st}, [*skip 2 sts, V-st in sp before next dc, skip 2 sts,* V-st in next dc] 11 times, Rep from * to * once, join to first dc of rnd. [24 V-sts]
Rnd 7 (RS): Ch 1, sc in ch-1 sp of first V-st, [*skip 2 sts, Fan in ch-1 sp of next V-st, skip 2 sts,* sc in ch-1 sp of next V-st] 11 times, Rep from * to * once, join to first sc of rnd. Fasten off Color C. [12 Fans, 12 sc]
Round to Square
Rnd 8 (RS): Attach Color B with Standing BPdc around post of first dc of a Fan, BPdc next st, BPhdc next st,
[ch 1, *skip picot, BPhdc next st, BPdc next st, BPTr next st, skip next sc, BPTr next st, BPdc next st, BPhdc next st,* ch 3, Rep * to * once, ch 1, skip picot, BPhdc next st, BPdc each of next 2 sts, skip next sc, BPdc each of next 2 sts, BPhdc next st] 3 times, ch 1, Rep * to * once, ch 3, Rep * to * once, ch 1, skip picot, BPhdc next st, BPdc each of next 2 sts, skip next sc, join to first BPdc of rnd. PM in ch-3 sps to mark 4 corners. [16 BPTr, 32 BPdc, 24 BPhdc, 8 ch-1 sp, 4 ch-3 sp]
Rnd 9 (RS): Ch 1, [sc in each of next 3 sts, loose sl st in next ch-1 sp, sc in each of next 3 sts, hdc in next st, dc in each of next 2 sts, (2 dc, ch 2, 2 dc) in marked ch-3 sp, move st marker up to ch-2 sp just made, dc in each of next 2 sts, hdc in next st, sc in each of next 3 sts, loose sl st in next ch-1 sp, sc in next 3 sts] 4 times, join to first sc of rnd. [4 ch-2 sps, 48 sc, 8 loose sl st, 8 hdc, 32 dc] {24 sts per side}
Rnd 10 (RS): Ch 1, [sc in each of next 3 sts, sc in ch-1 sp of Rnd 8, sc in next st of Rnd 9, hdc in each of next 2 sts, dc in each of next 5 sts, (2 dc, ch 2, 2 dc) in marked ch-2 sp, move st marker up to ch-2 sp just made,
dc in each of next 5 sts, hdc in each of next 2 sts, sc in next st, sc in ch-1 sp of Rnd 8, sc in each of next 3 sts of Rnd 9] 4 times, join to first sc of Rnd. [4 ch-2 sps, 40 sc, 16 hdc, 56 dc] {28 sts per side}
Square Rounds to 12”
Rnd 11 (WS): Turn, (sc, ch 1) in first st {counts as first hdc}, [hdc in each st until reach marked corner ch sp, (hdc, ch 1, hdc) in marked ch sp, move st marker up to ch-1 sp just made] 4 times, hdc in each st back to beg of Rnd, join to first hdc. [120 hdc, 4 ch-1 sp] {30 sts per side}
Rnd 12 (RS): Ch 1, turn, [sc in each st until reach marked corner ch sp, (sc, ch 1, sc) in marked ch sp, remove st marker] 4 times, sc in each st back to beg of Rnd, join with sl st to first sc. Fasten off Color B. [128 sc, 4 ch-1 sp] {32 sts per side}
Rnd 13 (WS): With WS facing attach Color A with Standing hdc to any st on side, Rep Rnd 11. [136 hdc, 4 ch-1 sp] {34 sts per side}
Weave in tails and block. When pinning out to block it is helpful to pin points of star to lay flat and then gently steam to make them lay down on the surface of the block.
For those of you that may be wondering why the blog has been so quiet, I have been a busy little bee working on lots of freelance designs for various publications. I’ll share more about those designs once they are published. I’ve also been working away on developing more classes to teach at local shops, fiber festivals and hopefully online soon.
I’m participating in the Christmas in July Make Along with Underground Crafter. Come join the fun! 28 bloggers have teamed up to bring you a month full of free patterns to kick start the handmade holiday season — including crochet, knitting, and sewing projects. There’s something new to make every day in July. Each week will have a theme.
Week 1 (July 1-7): Babies, Kids, and Teens Week 2 (July 8-14): Women Week 3 (July 15-21): Gifts for Anyone Week 4 (July 22-28): Home Week 5 (July 29-31): Pets
We’ve also partnered with some of our favorite companies to get some great prizes for you. Find out more information about participating designers, the schedule, and how to enter to win the prizes on Underground Crafter. The deadline for entering the giveaway is Thursday, August 4, 2022 at 11:59 p.m. Eastern.
How To Join the 2022 Christmas in July Make Along
You can join in by crocheting, knitting, sewing, or making the projects as you have time.
Share your progress and post pictures of your finished projects. Tag your projects and posts #CIJMakeAlong2022 on all social media.
If you’d like to chat with other crafters, join the Underground Crafters Facebook group
By the end of the Make Along, you’ll have up to 31 awesome projects. Get ready for the handmade holiday season while having fun with us!
Visit Underground Crafter to learn more about the prizes, enter the giveaway, and to get links to each Christmas in July Make Along post as it is released.
Today I am sharing with you my pattern for making the “Cuddlebug Pet Bed”. As many of you know my old dog Kenna left us for her journey over the Rainbow Bridge back in early February. We found a very young dog (10 months old) at the Humane Society of Boulder in late February.
This is Daisy Mae, she has completely stolen our hearts. She is a super sweet doggie, but she can be pretty destructive with her chewing overnight. So she stays in her kennel while we are all sleeping. I decided to make a new bed pad for her kennel to spoil her. Yes it may get chewed on, though she has been pretty good with her kennel bedding so far.
Cuddlebug Pet Bed
This project is also about using up scrap yarn and re-use of other materials I had around the house. You can use any scraps of worsted weight yarn you have on hand to make your own pet bed. I recommend using acrylic yarns as they can be machine washed with ease. You’ll be using 4 strands of yarn together, so you won’t have to worry about weaving in tails except at the beginning and end of the project.
I cut up a piece of foam padding that was part of an old folding futon we had in my youngest kiddo’s room. The cover of the futon had been destroyed in one section, but the foam was still in decent shape. I measured the kennel and then used an old bread knife to saw the foam to the size I needed.
You can adjust the size of the pet bed pattern for your pet. You just need to know the size of the rectangle you want the final bed to be.
Draw out your rectangle on the foam you are using, if not using foam then draw your rectangle size on an appropriate size sheet of paper. Find the center of the rectangle along the length. See photo above.
Then draw 45 degree lines from the corners intersecting the center line.
The length between the intersections is the length you need your foundation to be (see photo above). Crochet the stacked rows foundation to that length. You need an even number of stitches for the foundation, so add 1 row to foundation if needed to get an even number.
Cuddlebug Pet Bed
Designed by Andee Graves
SKILL LEVEL: Easy
FINISHED SIZE: 31 x 19 x 4 inches (77.5 x 47.5 x 10 cm)
CROCHET HOOK: US N/P (10 mm) or size needed to obtain gauge.
ADDITIONAL MATERIALS:
Yarn needle, Stitch markers, 4 – 1 inch buttons
GAUGE: In Up & Down Stitch pattern: 7.5 stitches 7 rows = 4″ (10 cm)
SPECIAL STITCHES
Up & Down Stitch: Alternates single crochet stitches worked into double crochet stitches, and double crochet stitches worked into single crochet stitches.
PATTERN NOTES
This project is crocheted holding 4 strands of yarn together the whole time. It is is a great way to use up scraps, when one strand gets close to running out, overlap the new strand about 8 – 10 inches and continue crocheting. Both the ending strand and new strand will be caught up in the body of the stitches. No weaving in ends except at the end and beginning of your project.
The bed is worked center out in the round from a long stacked rows foundation as a large rectangle in up & down stitch (also known as Grit or Griddle stitch). The first round of the sides is work as front post single crochet to make a sharp turn along the top edge. Then rounds are worked in single crochet to get to the height of the foam being used to stuff the bed.
A second rectangle is worked for the bottom of the bed, then sewn to the last round of the sides, leaving one end open. Buttons are sewn along the bottom piece at the opening and chain loops are attached to the side to close the open end.
Tip: Mark the beginning stitch of the round to help you find it at the end of round. Every round should start with single crochet.
INSTRUCTIONS
Bed Top
Stacked Rows Foundation
Row 1: Ch 2, sc in 2nd ch from hook.
Row 2: Ch 1, turn, sc in previous row sc.
Row 3 – 20: Rep Row 2.
Turn to work into the sides of the Stacked Rows Foundation stitches.
Rnd 1: Ch 1, sc in first st, dc in next st, *sc in next st, dc in next st*, repeat from * to * until reaching end of foundation, ch 1, turn 90 degrees to work in end of foundation, sc & dc in end, ch 1, turn 90 degrees to work along opposite side of stacked rows foundation, Repeat from * to * beginning in first st until reaching end of foundation, ch 1, turn 90 degrees to work in end of row, sc & dc in end of row, ch 1, turn 90 degrees, join with slip st to first st of Rnd PM in corner ch-1 sps. (22 dc, 22 sc, 4 ch-1 sp)
Rnd 2: Ch 1, turn, *(sc, ch 1, dc) in marked sp, move st marker up to ch-1 sp just made, sc in dc, dc in sc until reach next marked ch-1 sp; repeat from * around, join with slip st to first st of Rnd. (26 dc, 26 sc, 4 ch-1 sp)
Rnd 3: Ch 1, turn, [*sc in dc, dc in sc* until reach marked ch-1 sp, (dc, ch 1, sc) in marked sp, move st marker up to ch-1 sp just made] 4 times, repeat from * to * until reach end of Rnd, join with sl st to first st of round. (30 dc, 30 sc, 4 ch-1 sp)
Rnd 4:: Ch 1, turn, [*sc in dc, dc in sc* until reach marked ch-1 sp, (sc, ch 1, dc) in marked sp, move st marker up to ch-1 sp just made] 4 times, repeat from * to * until reach end of Rnd, join with sl st to first st of round. (34 dc, 34 sc, 4 ch-1 sp)
Rnd 17: Ch 1, turn, [FPsc in each st until reach marked ch-1 sp, skip marked sp, remove st marker] 4 times, FPsc in each st until reach beginning of Rnd, join with slip st to first st of Rnd. (164 FPsc)
Rnd 18: Ch 1, turn, sc in each st until reach beginning of Rnd, join with slip st to first st of Rnd. (164 sc)
Rnds 19 – 23: Rep Rnd 18. Fasten off at end of Rnd 23.
Bed Bottom
Repeat Foundation and Rnds 1 – 15 from Bed Top. Fasten off.
FINISHING
Weave in all ends.
Sew Bed Bottom Round 15 stitches to top of Bed Top Rnd 24 stitches using a whip stitch. Leave one short end of bed open. Chain 15 with 1 strand of yarn and H (5mm) hook to make button loops. Attach button loops to last round of Bed Top along opening. Sew buttons on Bed bottom aligning with button loops.
Summer is just around the corner and it’s time to make something special to wrap around your shoulders when you need a bit of warmth in the air conditioning or to ward off the chilly breeze when walking on the beach.
My latest design the “Pavona Wrap” for “I Like Crochet” is an ideal pretty layer to make for yourself or as a gift. Crocheted in Universal Yarns “Bamboo Pop” the combination of cotton and bamboo rayon is cool against your skin when temperatures start to climb, but provides just a touch of warmth when needed.
The wrap used a semi-solid lace pattern in the main body with open lace stripes on the ends to add a strong graphic finish. It is crocheted in 2 pieces off of a central foundation.
You can find the pattern on at ILikeCrochet.com in the June 2022 issue of their online magazine.
I colored my page with my Staedler Noris Club colored pencils. I have found these to be a great inexpensive pencil for coloring. I also really like the Anti-Breaking System these pencils have. I can get super sharp points without losing chunks of the lead.
All My Love Heart Motif Pattern
This little heart is a great way to add some love to your crochet projects, or work a bunch up in a variety of colors to decorate handmade cards. Needing only a little over 8 yards of worsted weight yarn to make, they are a prefect way to use up those bits of yarn scraps.
Yarn & Hook: Worsted Weight yarn with Size H (5 mm) Hook. Samples in photo are made with Berroco Ultra Wool worsted weight yarn in a variety of colors from my stash with a size H / 5 mm hook.
Heart is 2 1/8 inches across widest point and 2” tall from top of bumps to bottom point.
Notions
Tapestry needle for weaving in ends.
Special Stitches
Chain 2 Picot: Ch 2, slip st in top of previous stitch working under the front loop and top side loop. If you need help with this technique visit my blog post: Don’t Fear the Picot.
Pattern Notes:
This heart motif begins with an Adjustable slip knot. If you need help with this technique check out my YouTube video.
Instructions
Rnd 1: Starting with an adjustable slip knot, ch 2, 7 sc in 2nd ch from hook, tighten center, slip st to top of first sc. [7 sc]
Rnd 2: Skip first st, 5 dc in next st, dc in next st, 2 dc in next st, dc in next st, 5 dc in next st, skip next st, slip st to to of first sc of Rnd 1. [14 dc]
Rnd 3: Sc in first st, 2 sc in each of next 4 sts, sc in next st, 2 sc in next st, ch-2 picot in previous sc, 2 sc in next st, sc in next st, 2 sc in each of next 4 sts, (sc, slip st) in last st. [24 sc]
Fasten off and pull ending tail thru slip st and tighten. Weave in all ends.
Have a great time crocheting hearts and showing your love. Tag me on Instragram: @andee.graves so I can see how your hearts turned out and how you used them.
As many of you have noticed the blog has been rather quiet the past couple of months. Fortunately I had signed up to do some hops and tours with other designer friends or I may not have posted anything at all.
What have I been doing instead of blogging you may ask? I’ve been working on a bunch of freelance designs for magazines. I’ve been designing a number of pieces for “Crochet World”, “Crochet! Magazine” and “ILikeCrochet.com”.
Plenty of Clusters Pillow Set in the August 2021 issue of Crochet World. This is a pattern for 2 different square pillows that are covered with texture using my favorite textural stitch; the cluster bobble. I’ve been playing with cluster bobbles a lot lately, so you’ll be seeing them in my freelance patterns and my indie pattern line over the next 6 months.
Jolly Wreath Pillow in the Fall 2021 Crochet World: Have a Happy Crochet Christmas special issue. More bobbles for nubbly wreath on a cuddly round pillow to decorate for Christmastime in your home.
Falling Snow Fingerless Mitts in the Autumn 2021 Crochet! Quick and Easy Crochet special issue. Do you need a quick gift for the holidays? These are the perfect project. Worked with just 1 skein of Berroco “Ultra Wool Chunky”, you can finish a pair in just a couple hours.
The One Skein Mathilde Cowl in the August 2021 issue of ILikeCrochet.com online magazine. This fun cowl has lace points on one side. As the name suggests it uses just one skein of Berroco Ultra Wool worsted weight, so it is a quick project to work up. You can make it in all your favorite colors.
Lovely Lace Ponchette in the Winter 2021 issue of Crochet! Magazine. Designed in one of my favorite yarns, Berroco “Folio”. This is a super soft yarn with great warmth, so this lacy layer is perfect for a cozy cover-up as the temperatures drop.
Glacier Wrap in the December 2021 issue of Crochet World magazine. Another fun lacy pattern that uses cluster stitches for visual texture. Worked from the center out both ends are finished with a pretty pointed border.
I have more freelance designs that will be coming out over the next 9 months, so keep an eye out here on the blog for me to share about those as well as some new designs in my indie pattern line.