Don’t Fear the Picot

shell-with-picot-edging-andee-graves-m2h-designs

Ah picots, very possibly the most feared and hated stitch in crochet.  Personally I avoided the picot stitch for a very long time. When I would look at stitch dictionaries I would skip over any stitch patterns that contained picots. Or if I used those stitch patterns, I would eliminate the picots.

picot-edgings

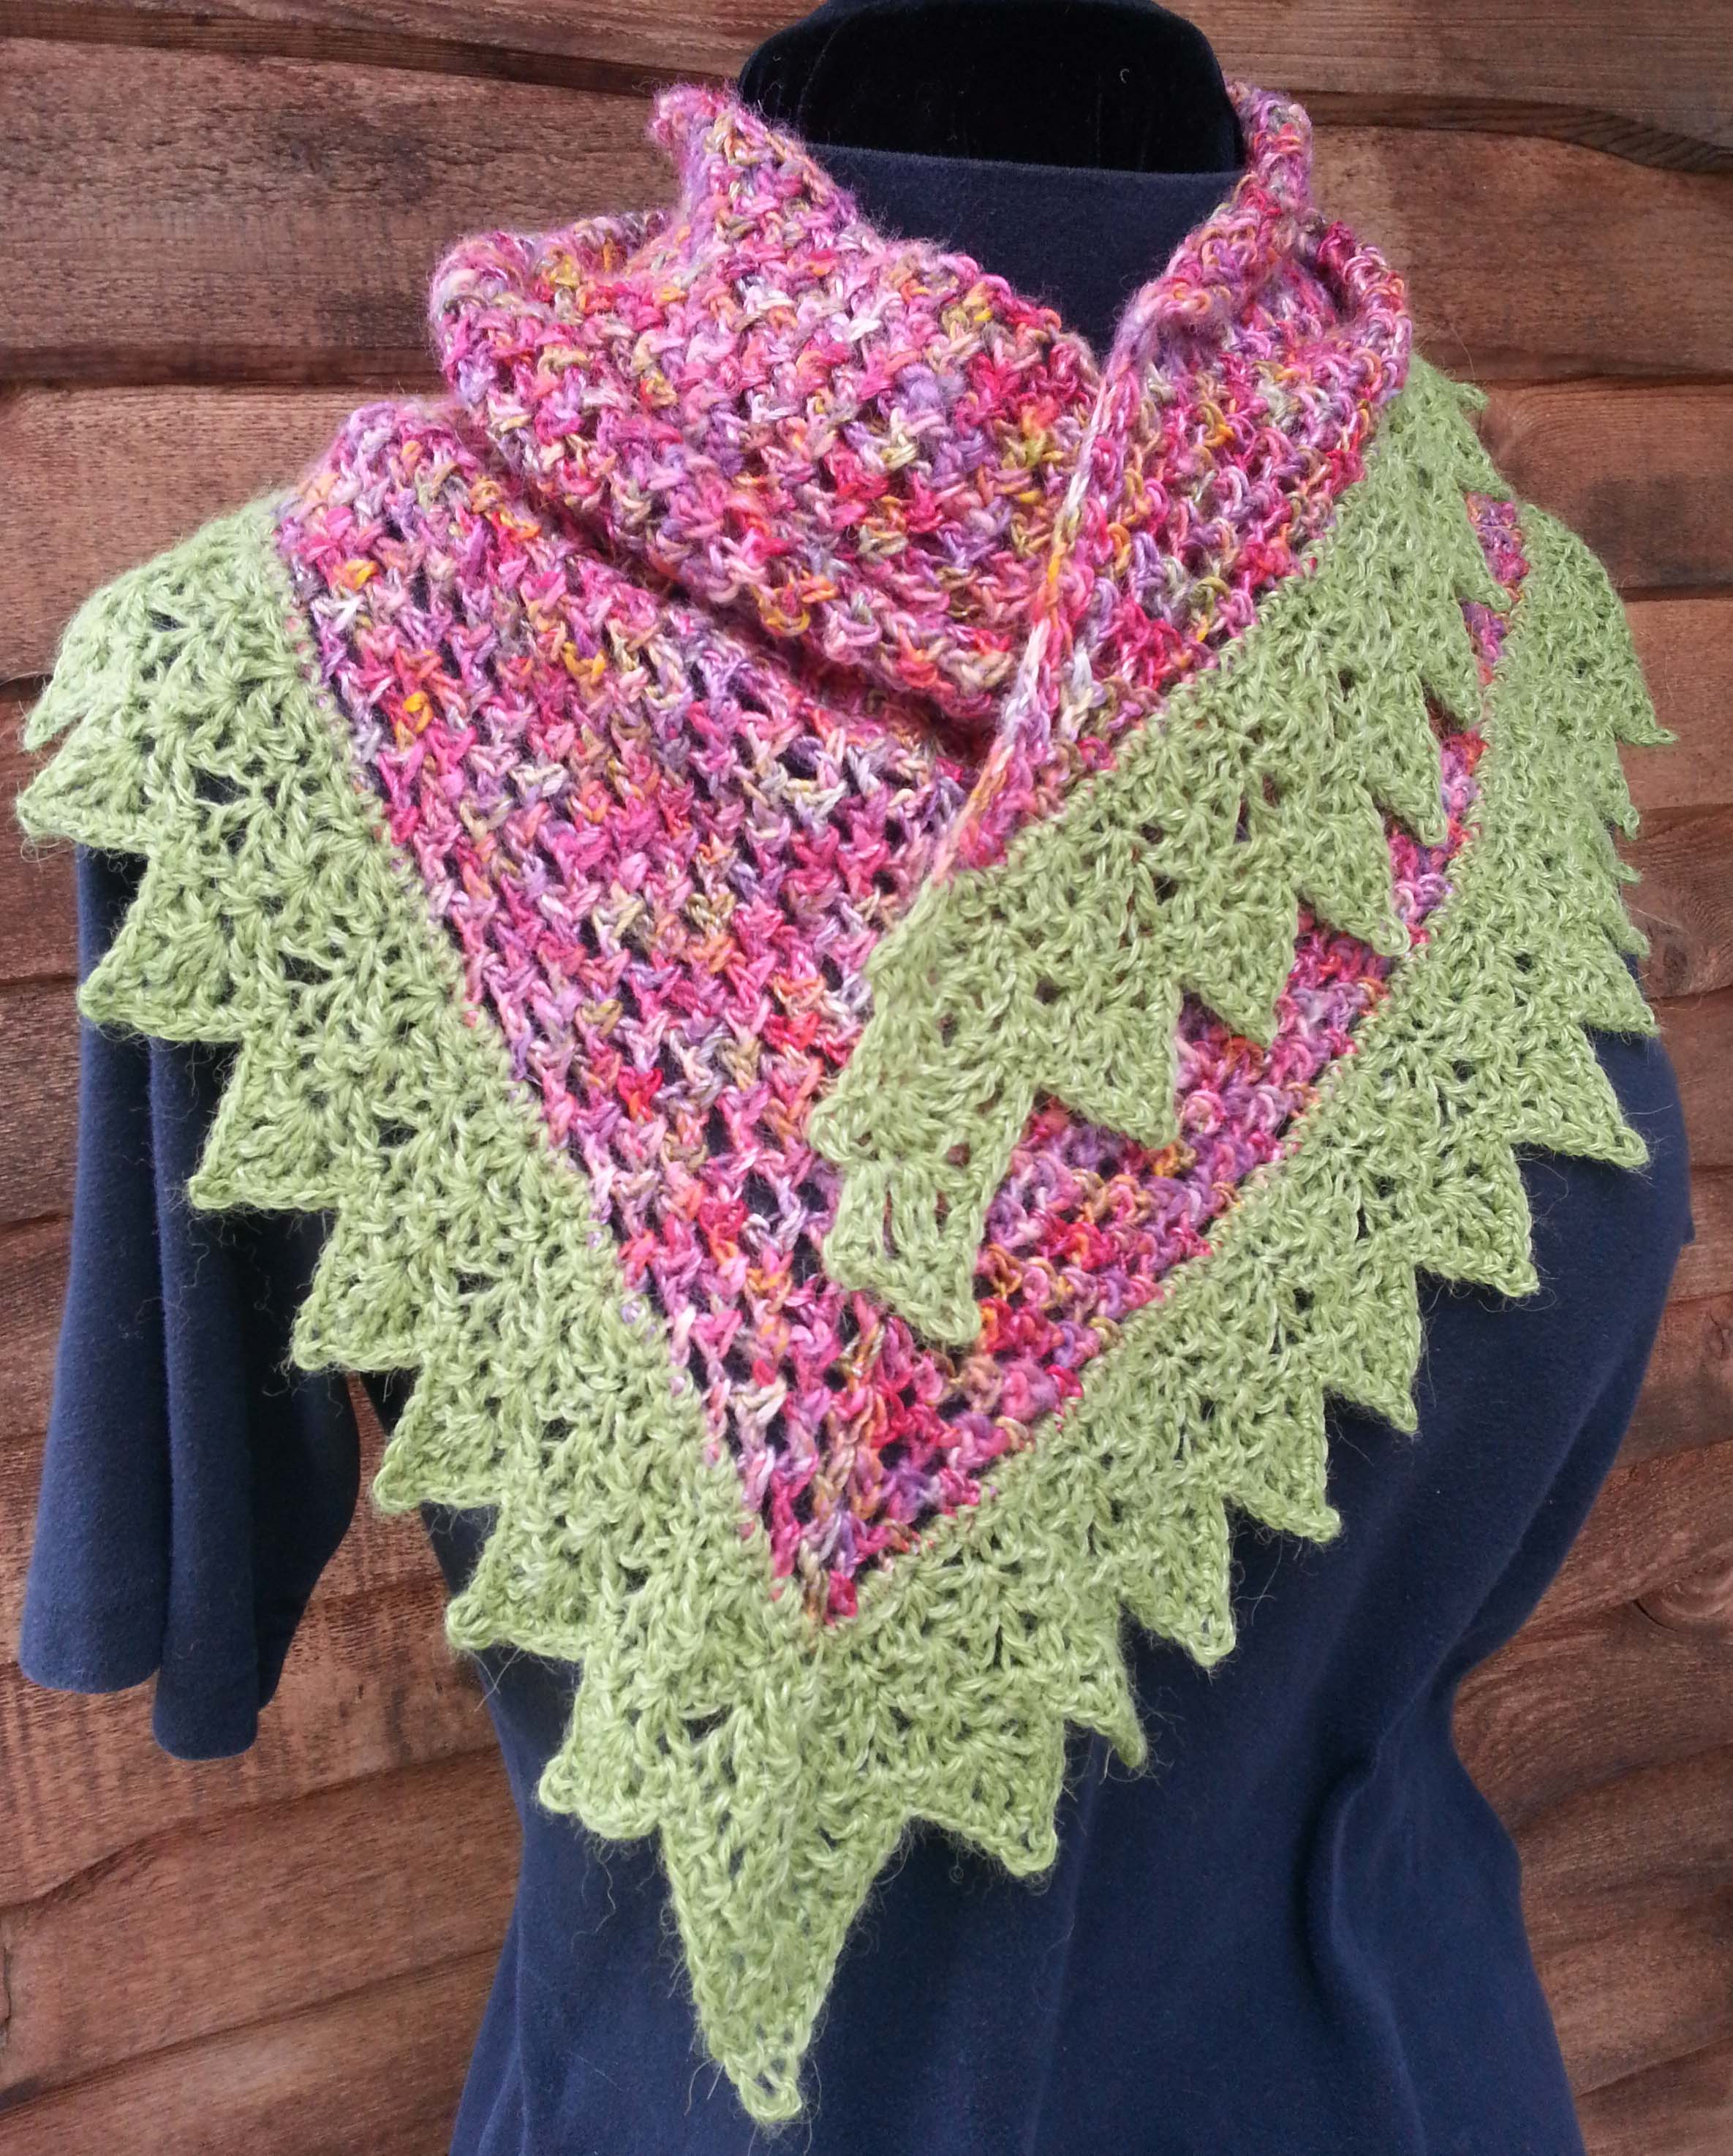
In the past I had primarily seen picots used as a decorative element for edgings or borders. These tiny stitches can turn a plain shell stitch into a lavish embellishment, or make “points” have sharper definition.

fabrics-with-picots-andee-graves-m2h-designs

In many of the Japanese stitch dictionaries I own there are stitch patterns where the picot is used as part of the overall fabric not just on the edge. I found this an exciting new way of looking at the picot.

 buttonhole-for-sota-andee-graves-m2h-designs

In my designs I’ve kept with using the picot as an edging embellishment. I used the picot in my “Shells on the Aegean Neck Cozy” to embellish the button hole. The picot directions in that pattern tell you to: “Chain 3, slip stitch in top of previous stitch”. The previous stitch I’m referring to is the stitch made before the “chain 3”.

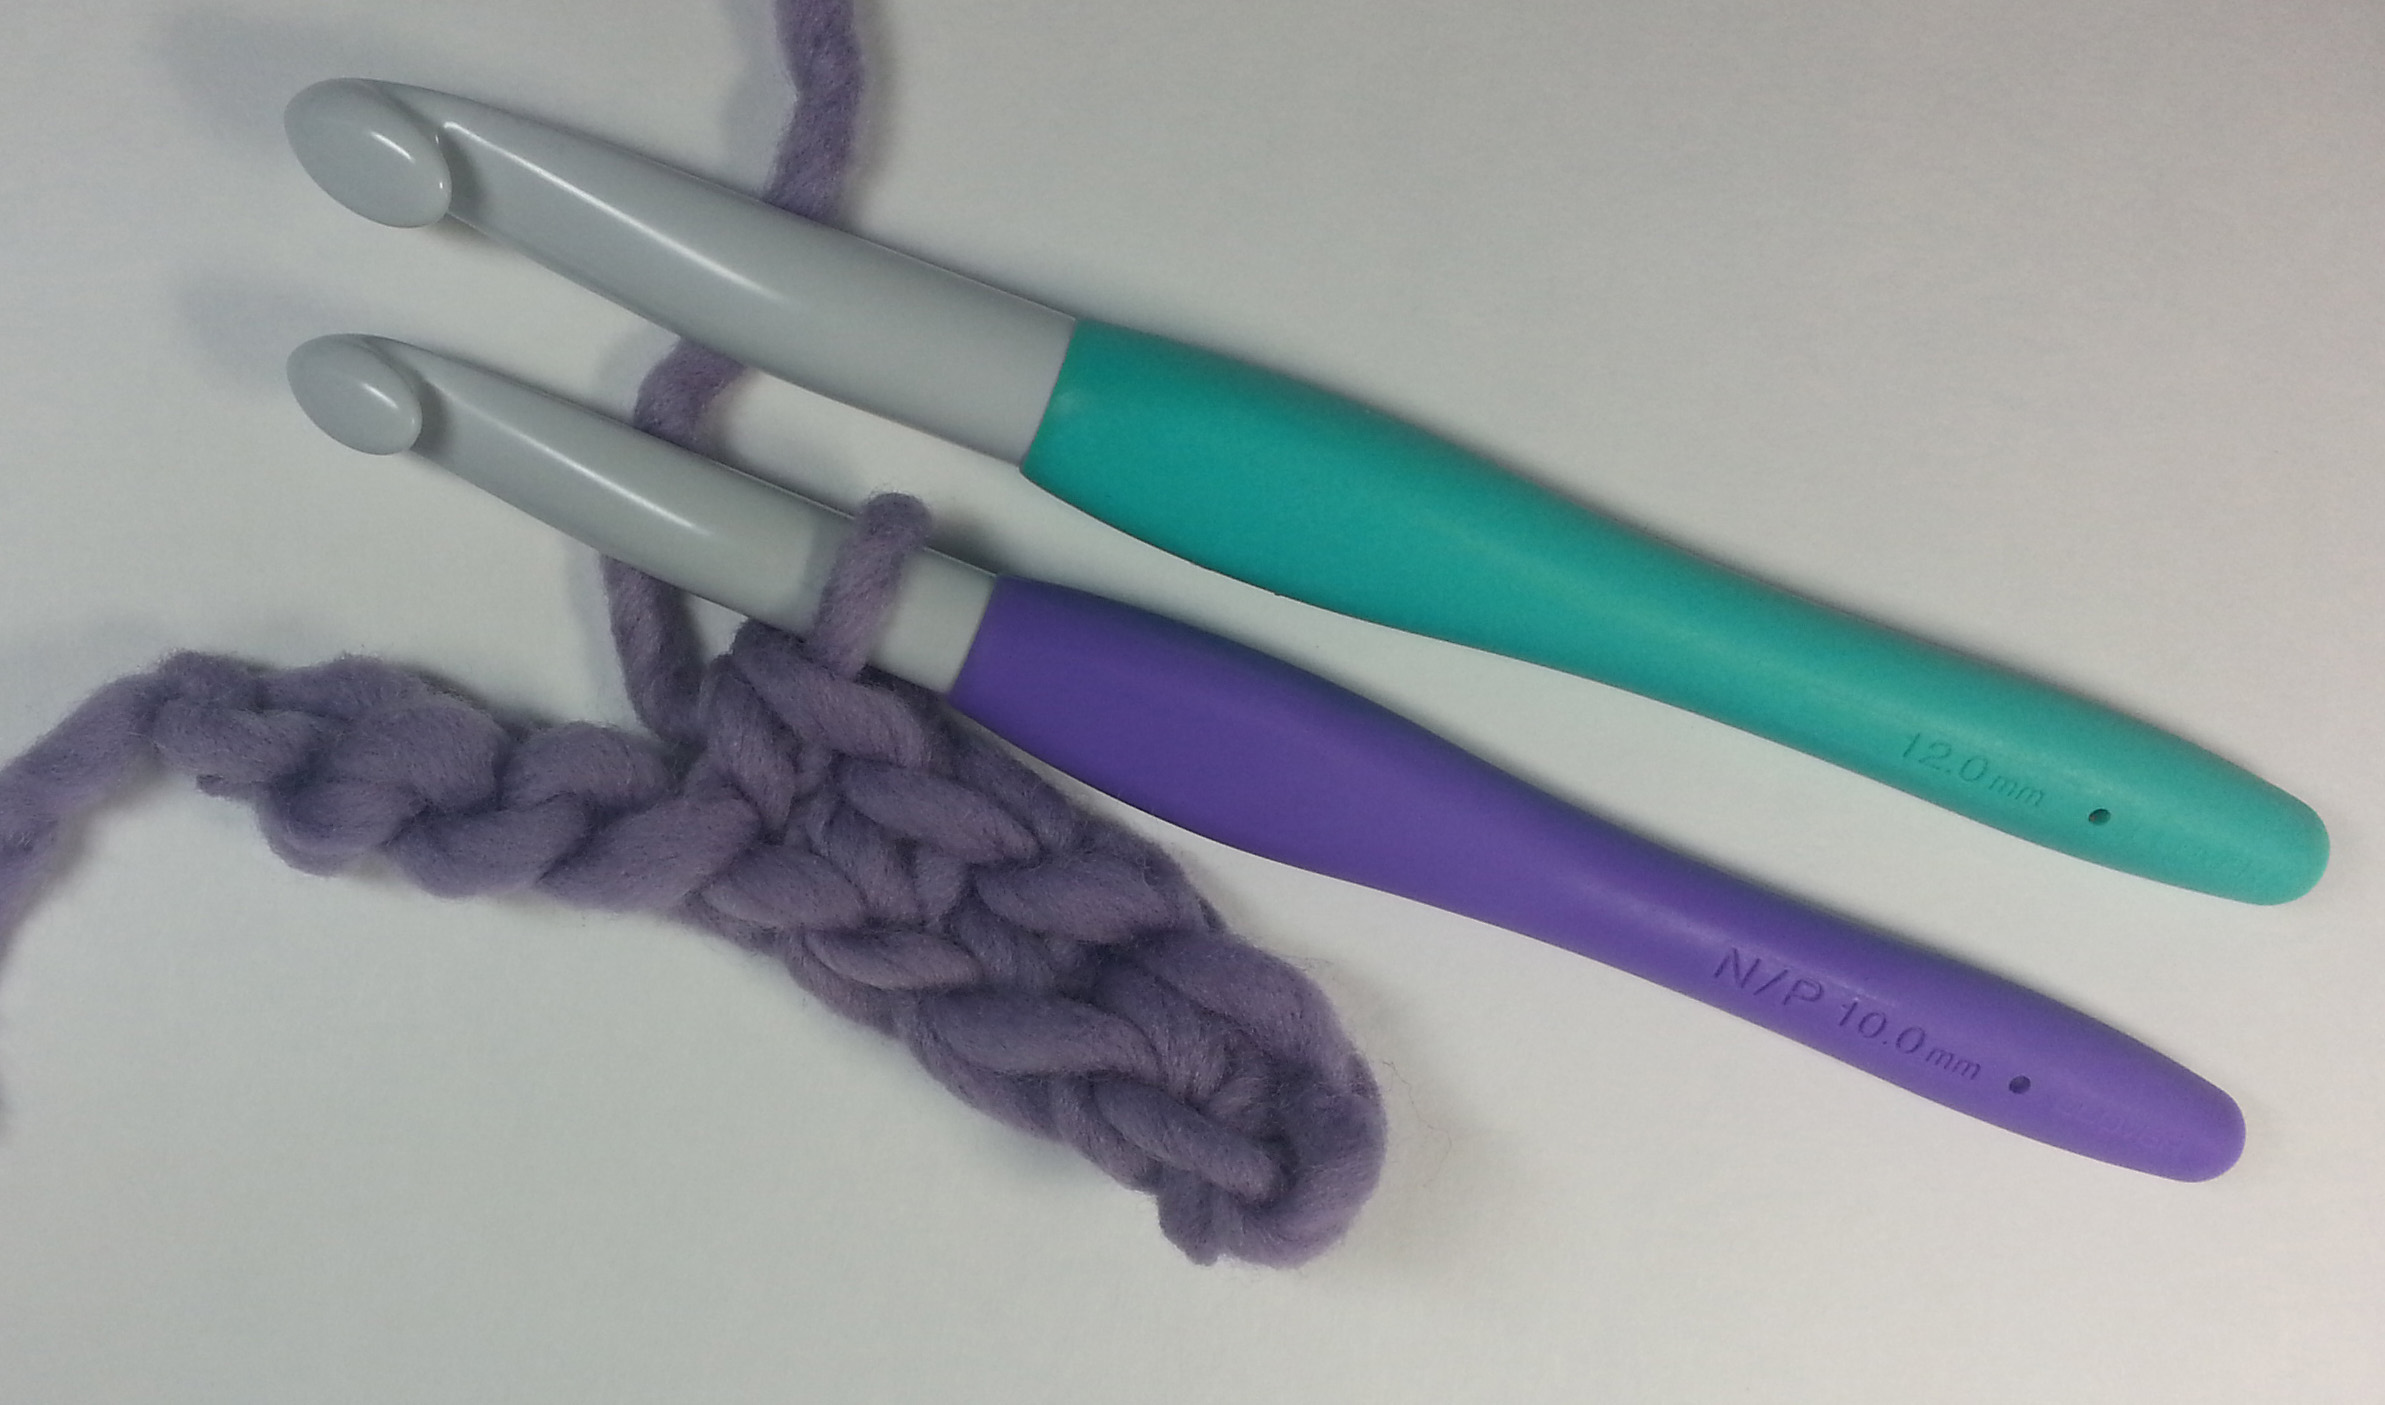
One of the biggest difficulties I had with picots is that I like to work with a larger hook than usual for the size yarn. I especially like to do that when crocheting garments or wraps. Picot stitches tend to work better with a firmer fabric though, so if you want to add them to your project you need to keep that in mind.

crocheted-love-rainbow-heart-andee-graves-m2h-designs

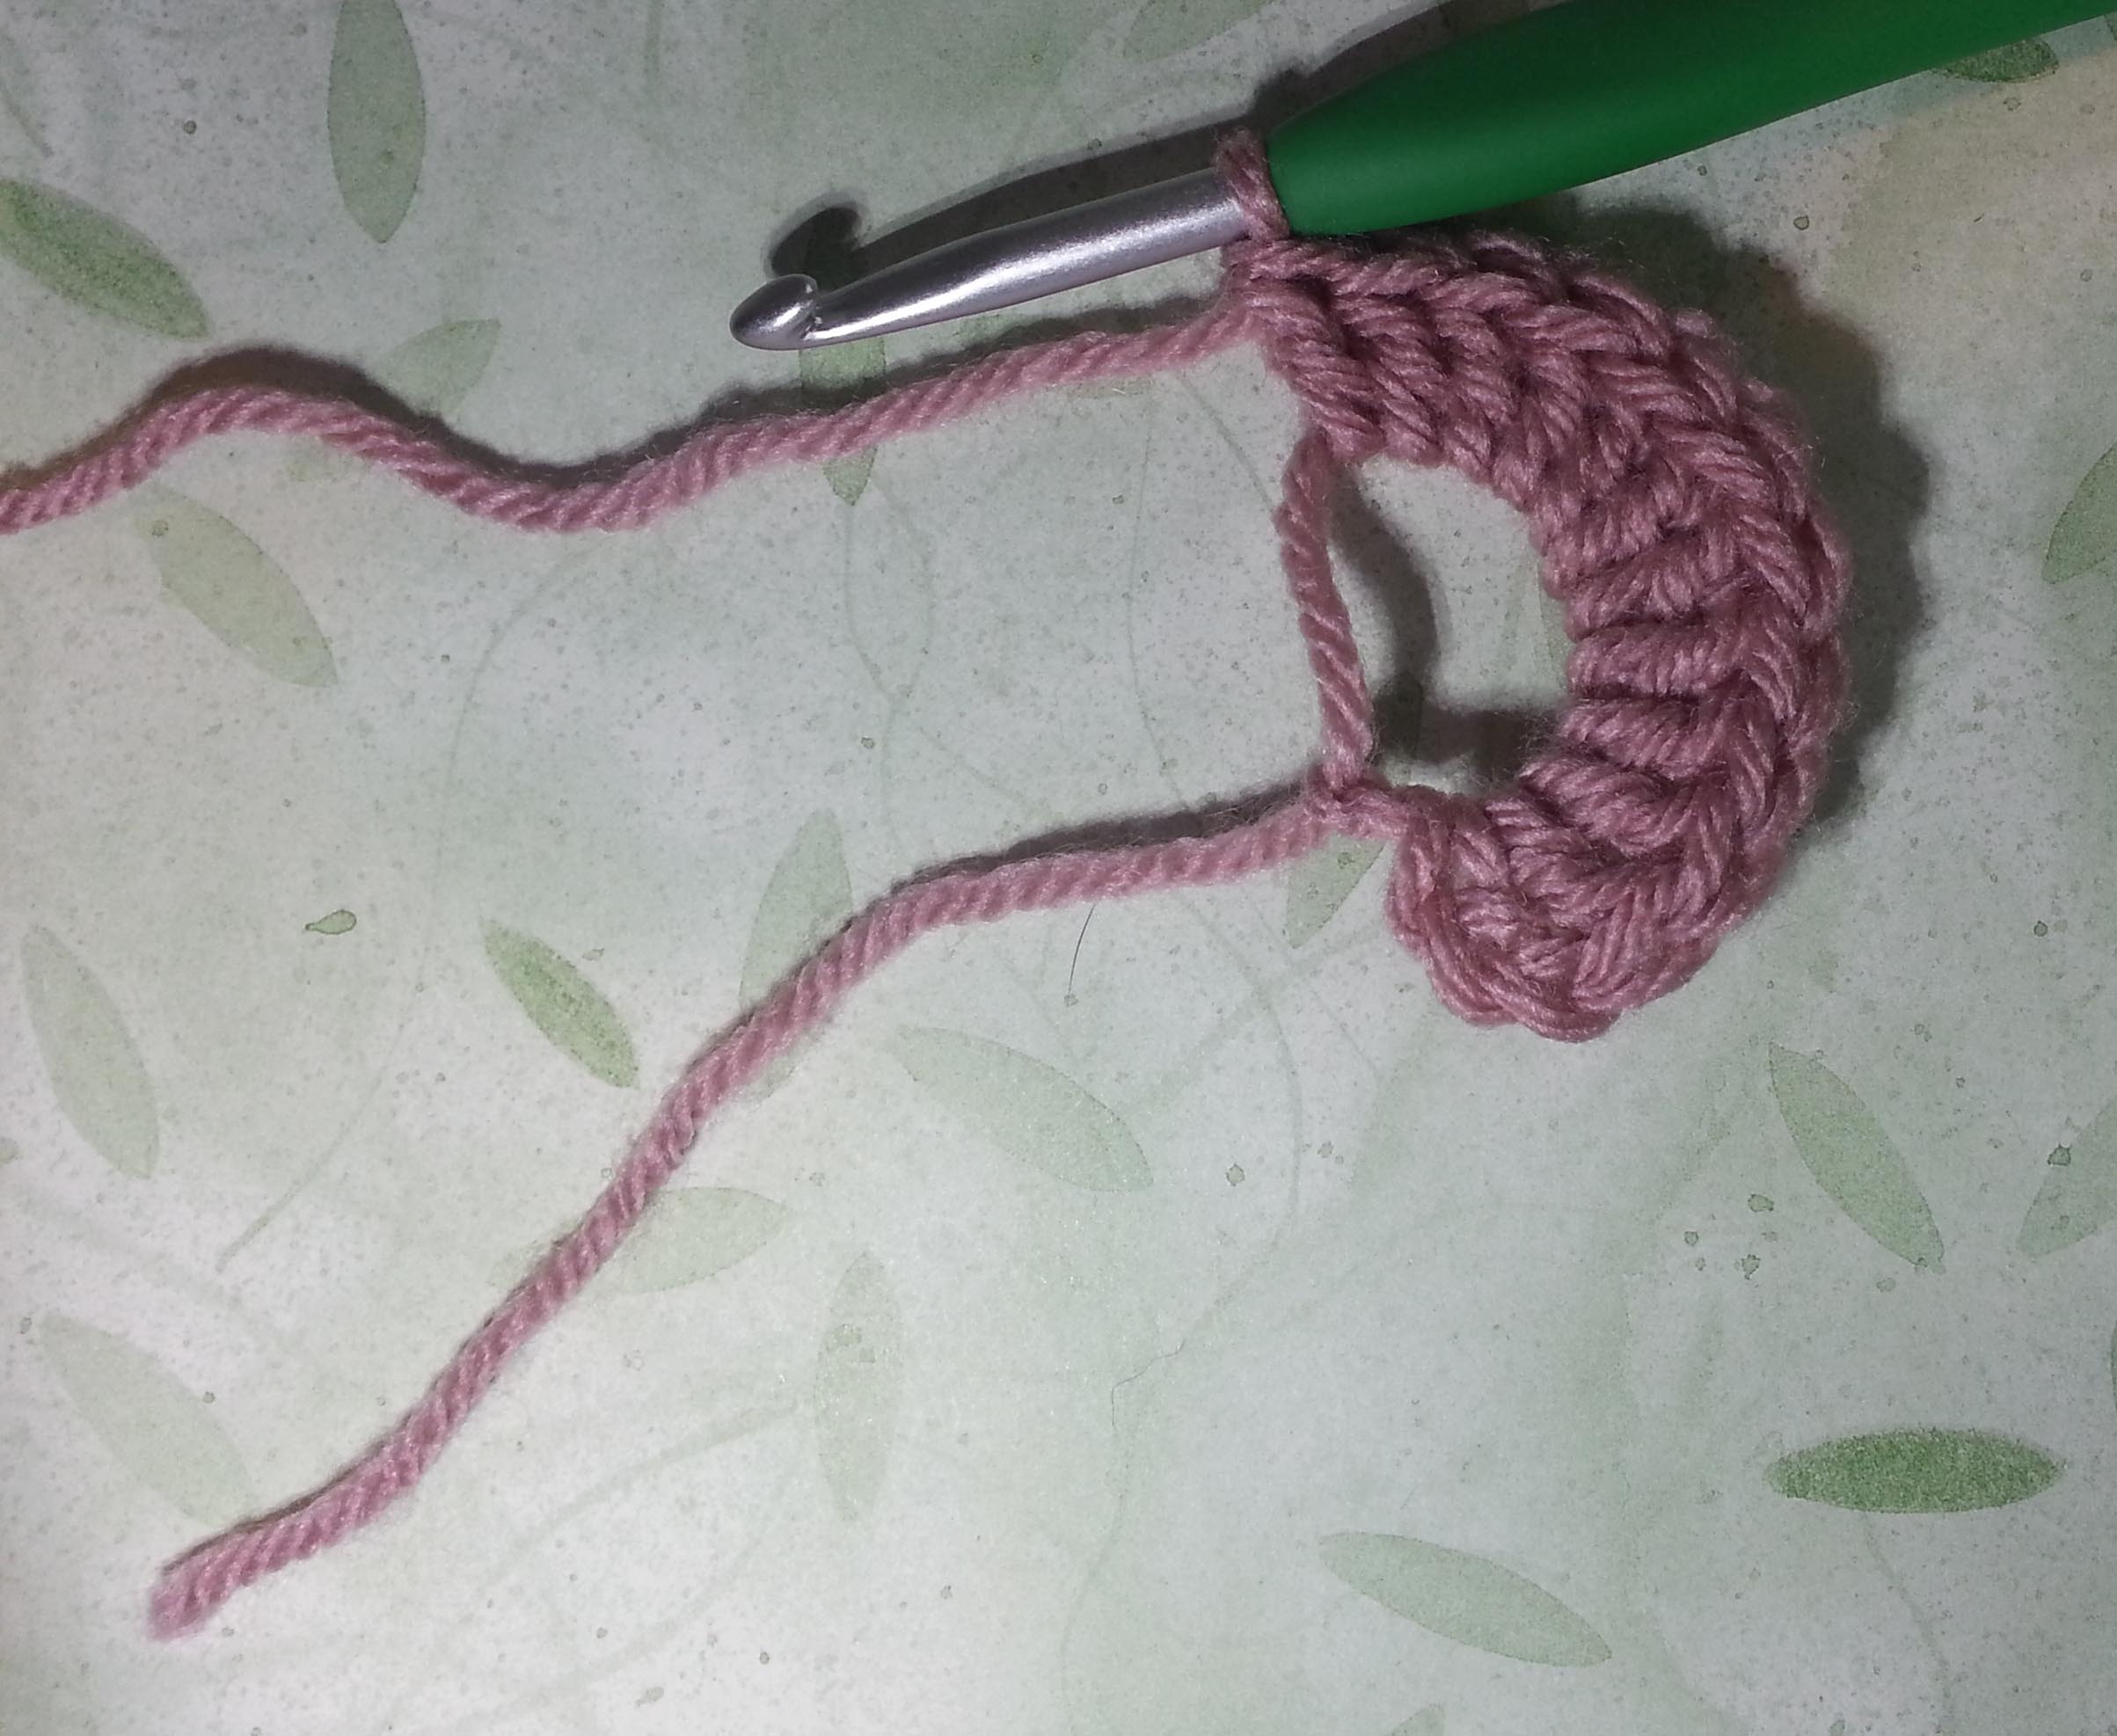
My little heart “Crocheted Love” uses a modified picot to create the point at the bottom of the heart. I only have you chain 1, instead of the usual 3, before anchoring into the previous stitch. You could try making the heart with more chains in the picot for the bottom point and see how you like it.

There are some yarns that are a little trickier to get good picots from. Highly textured yarns or extremely limp yarns with fibers like rayon or alpaca in them are the most difficult. It is possible to do a picot with these yarns, the resulting stitch will just be a bit different from the traditional picot. I recommend using a smaller hook to help give the picot more structure.

How do you work the picot?

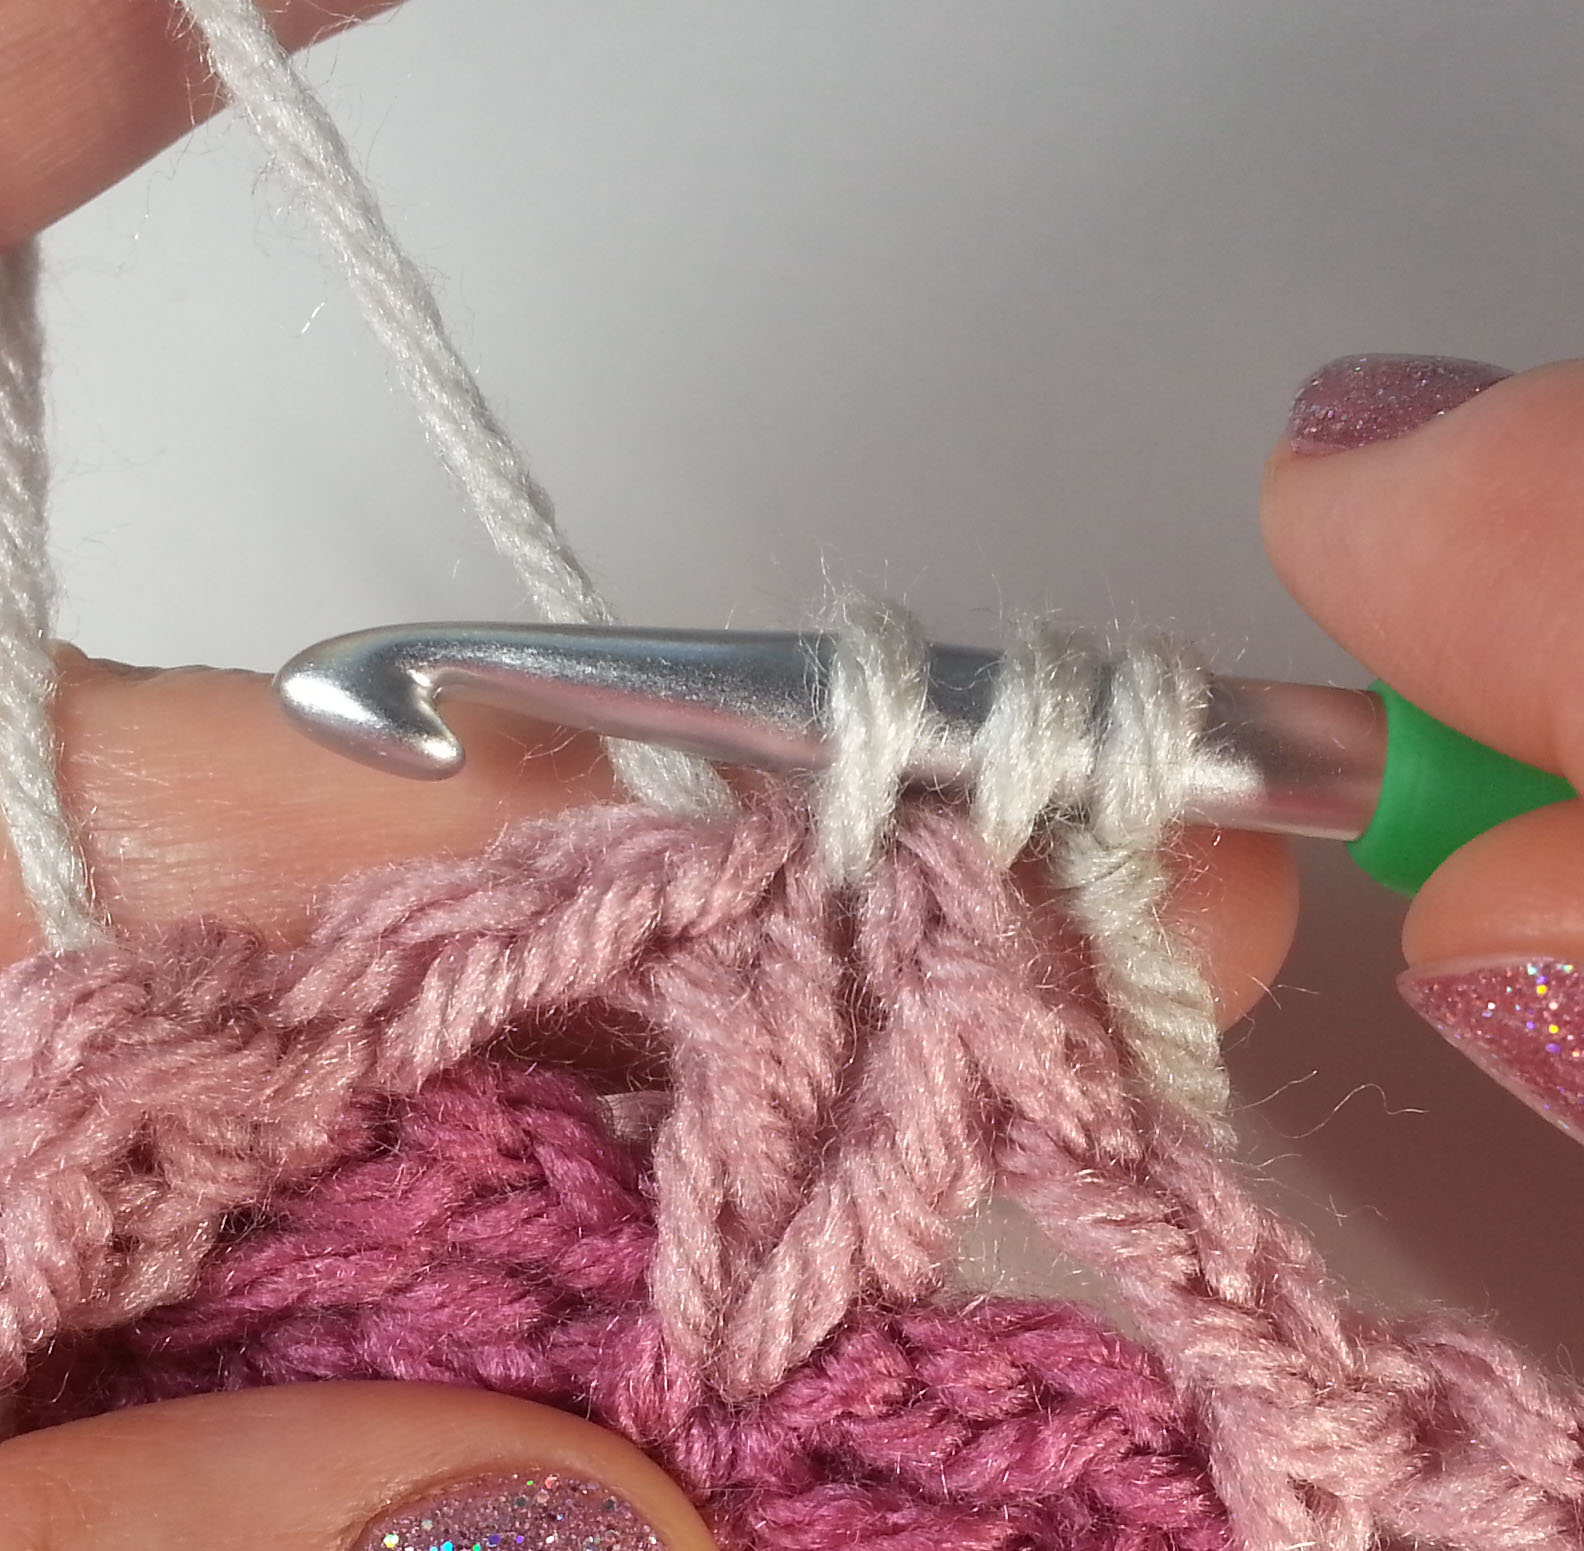
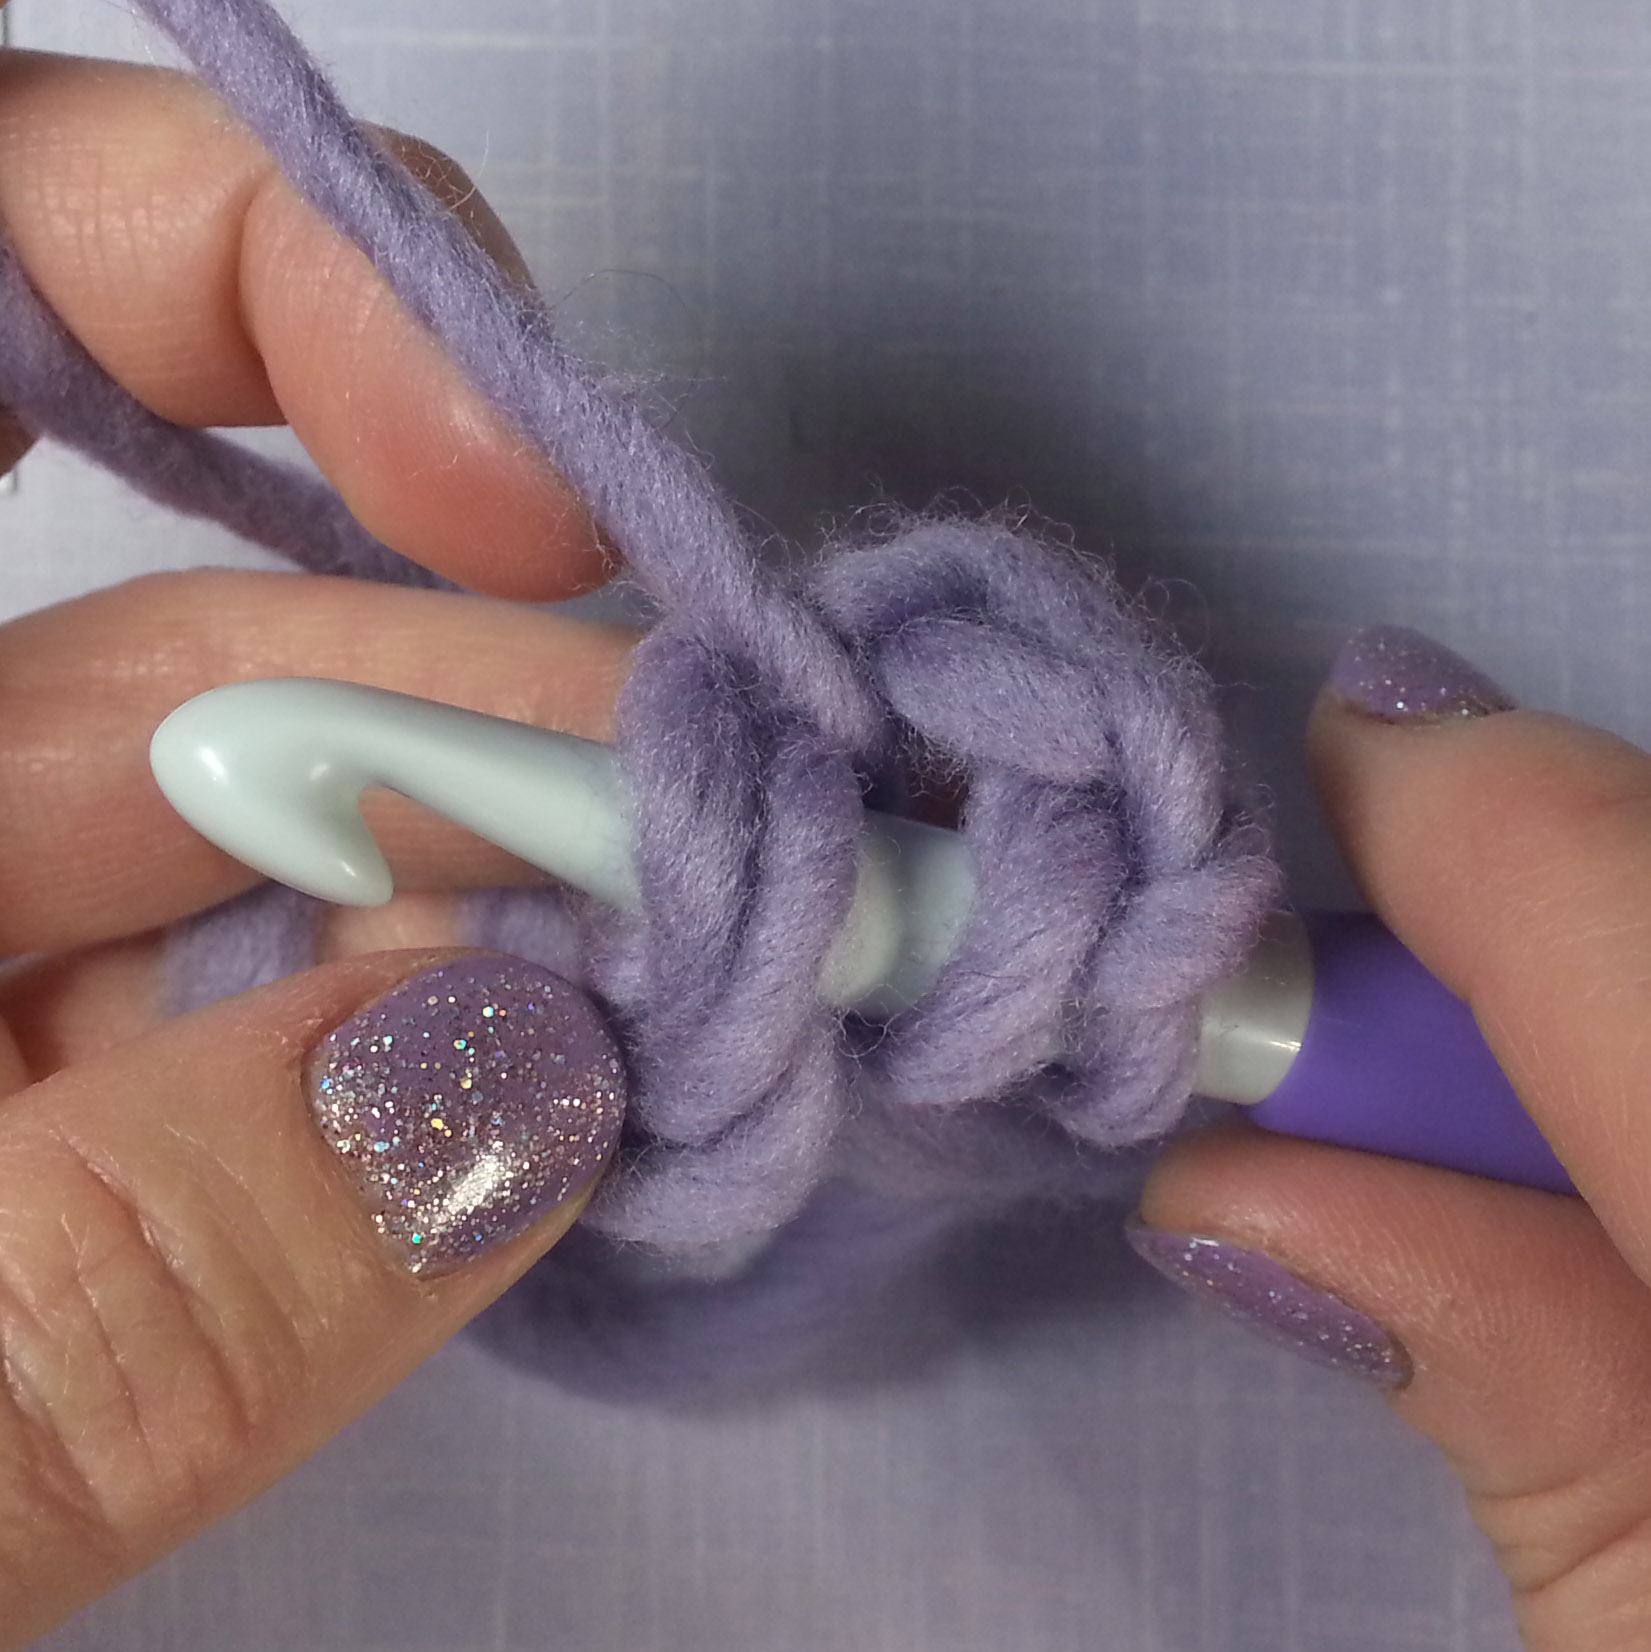
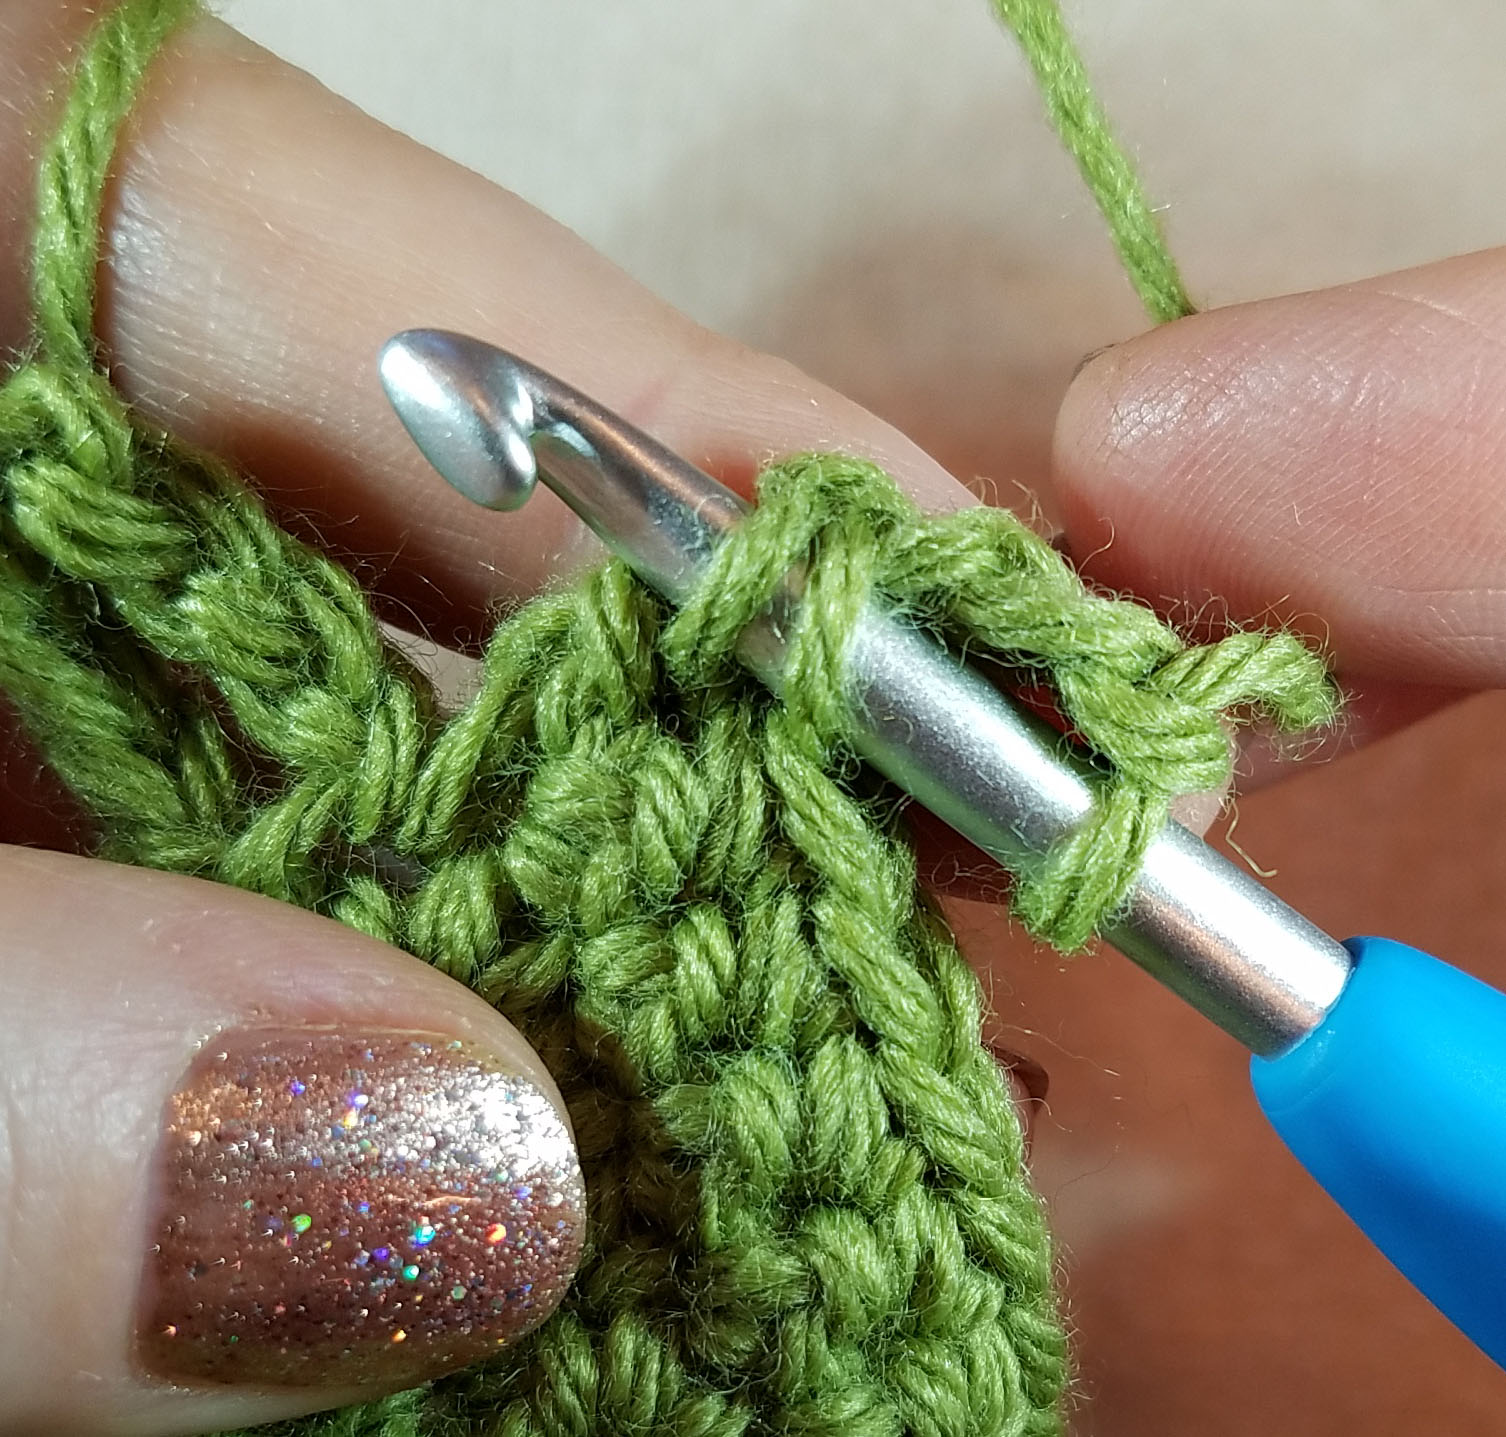
The problem many folks run into is the picot distorting their stitches. When the picot is anchored to a single strand, it tends to pull and distort the stitch it is worked into. This is solved by catching 2 strands when anchoring the picot stitch.

picot-ch-3-andee-graves-m2h-designs

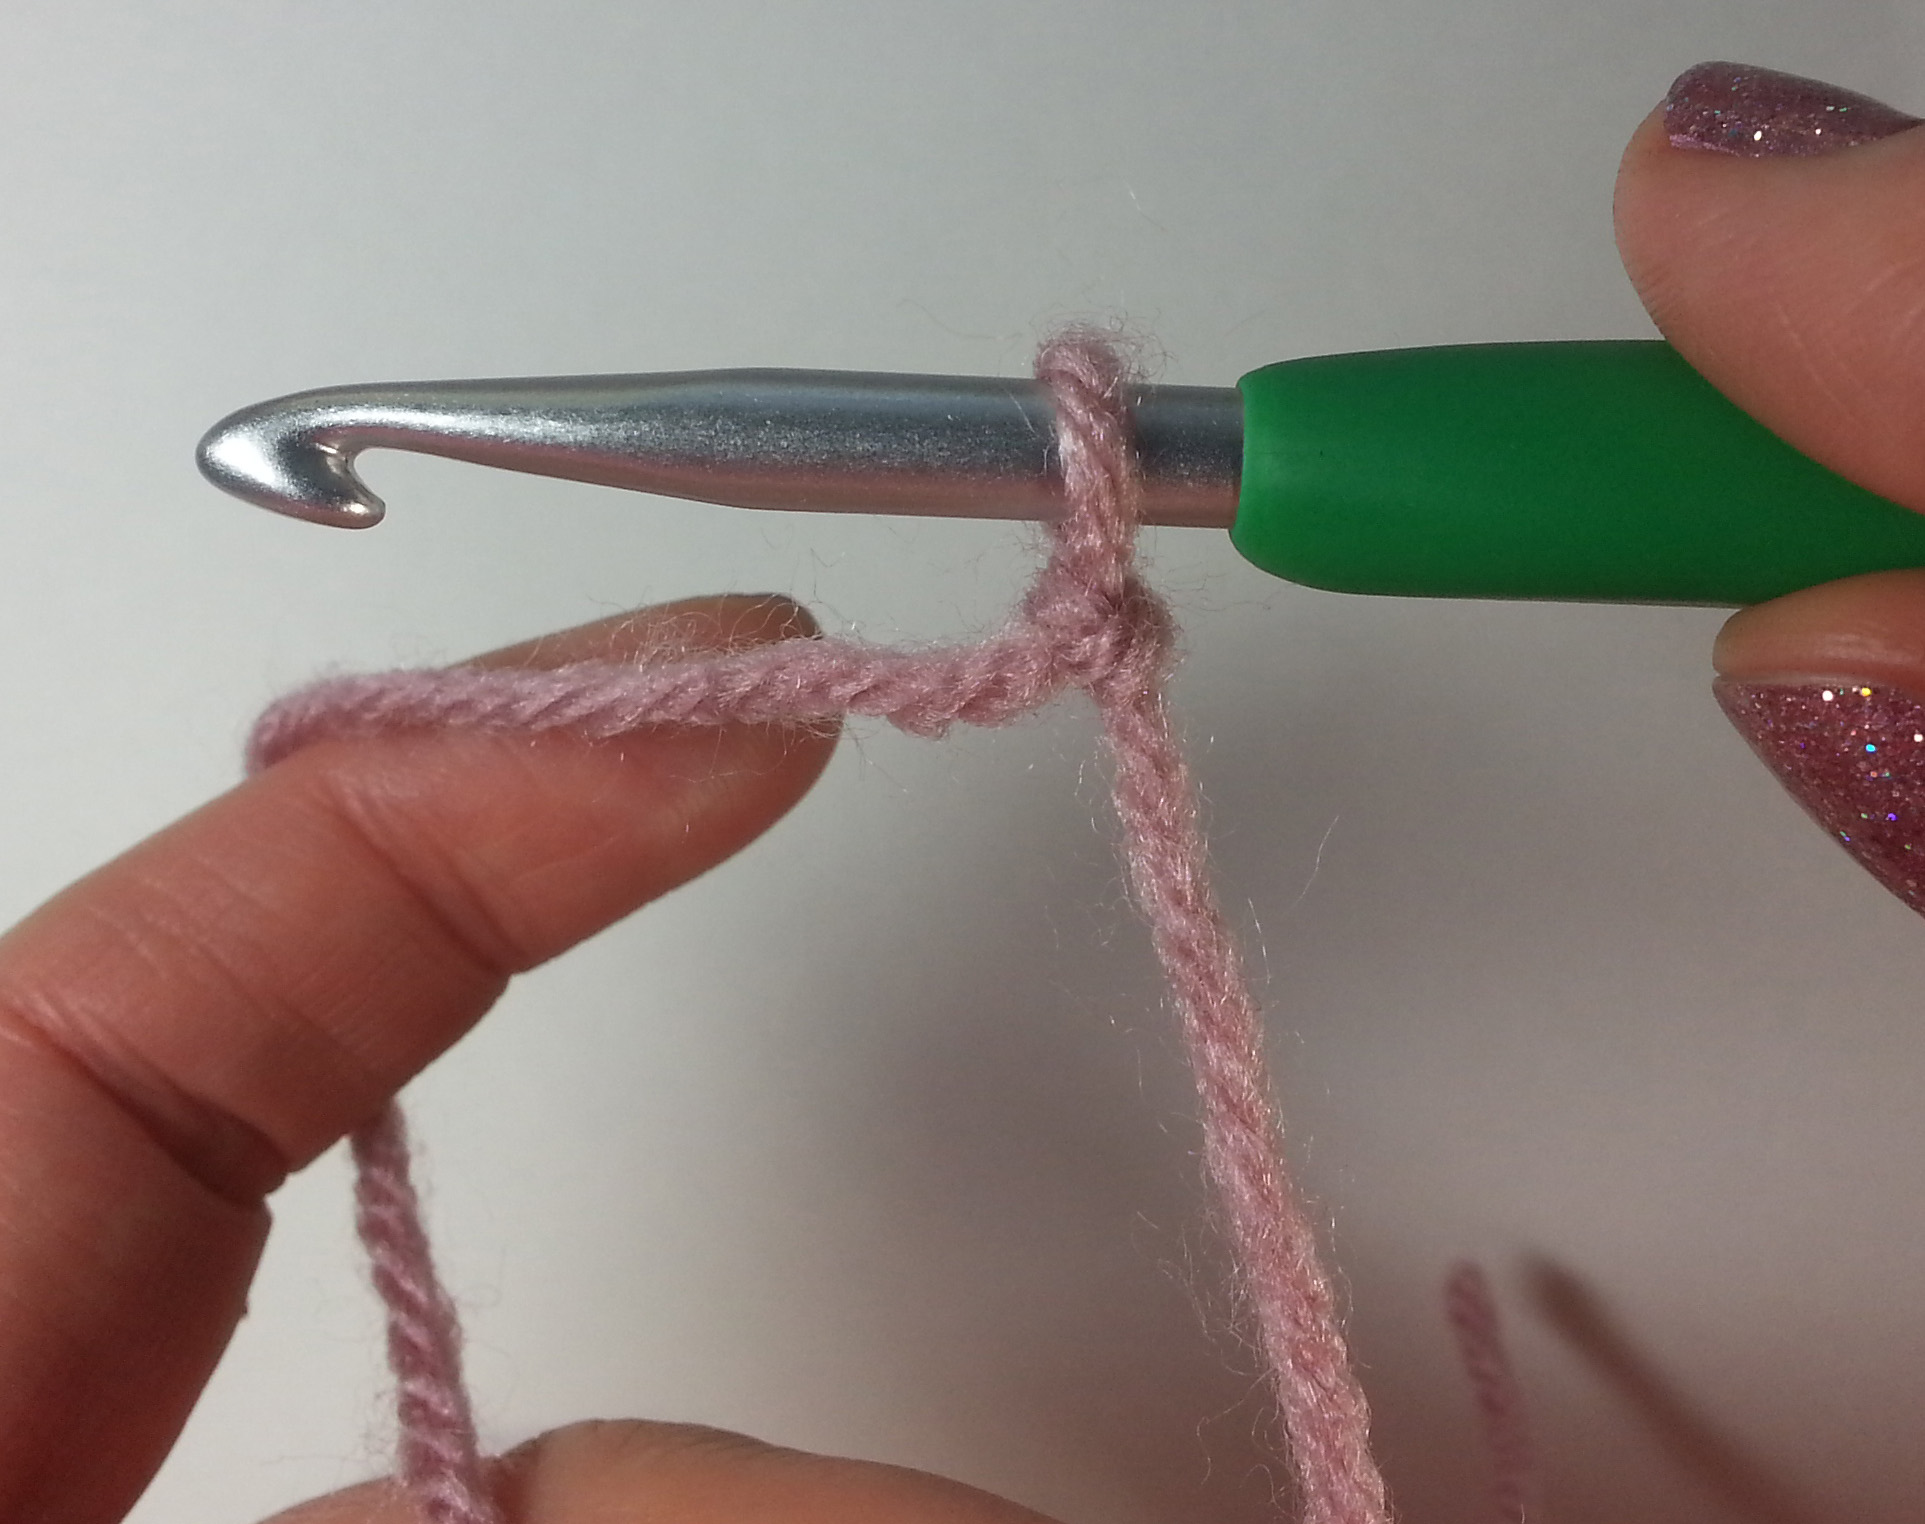
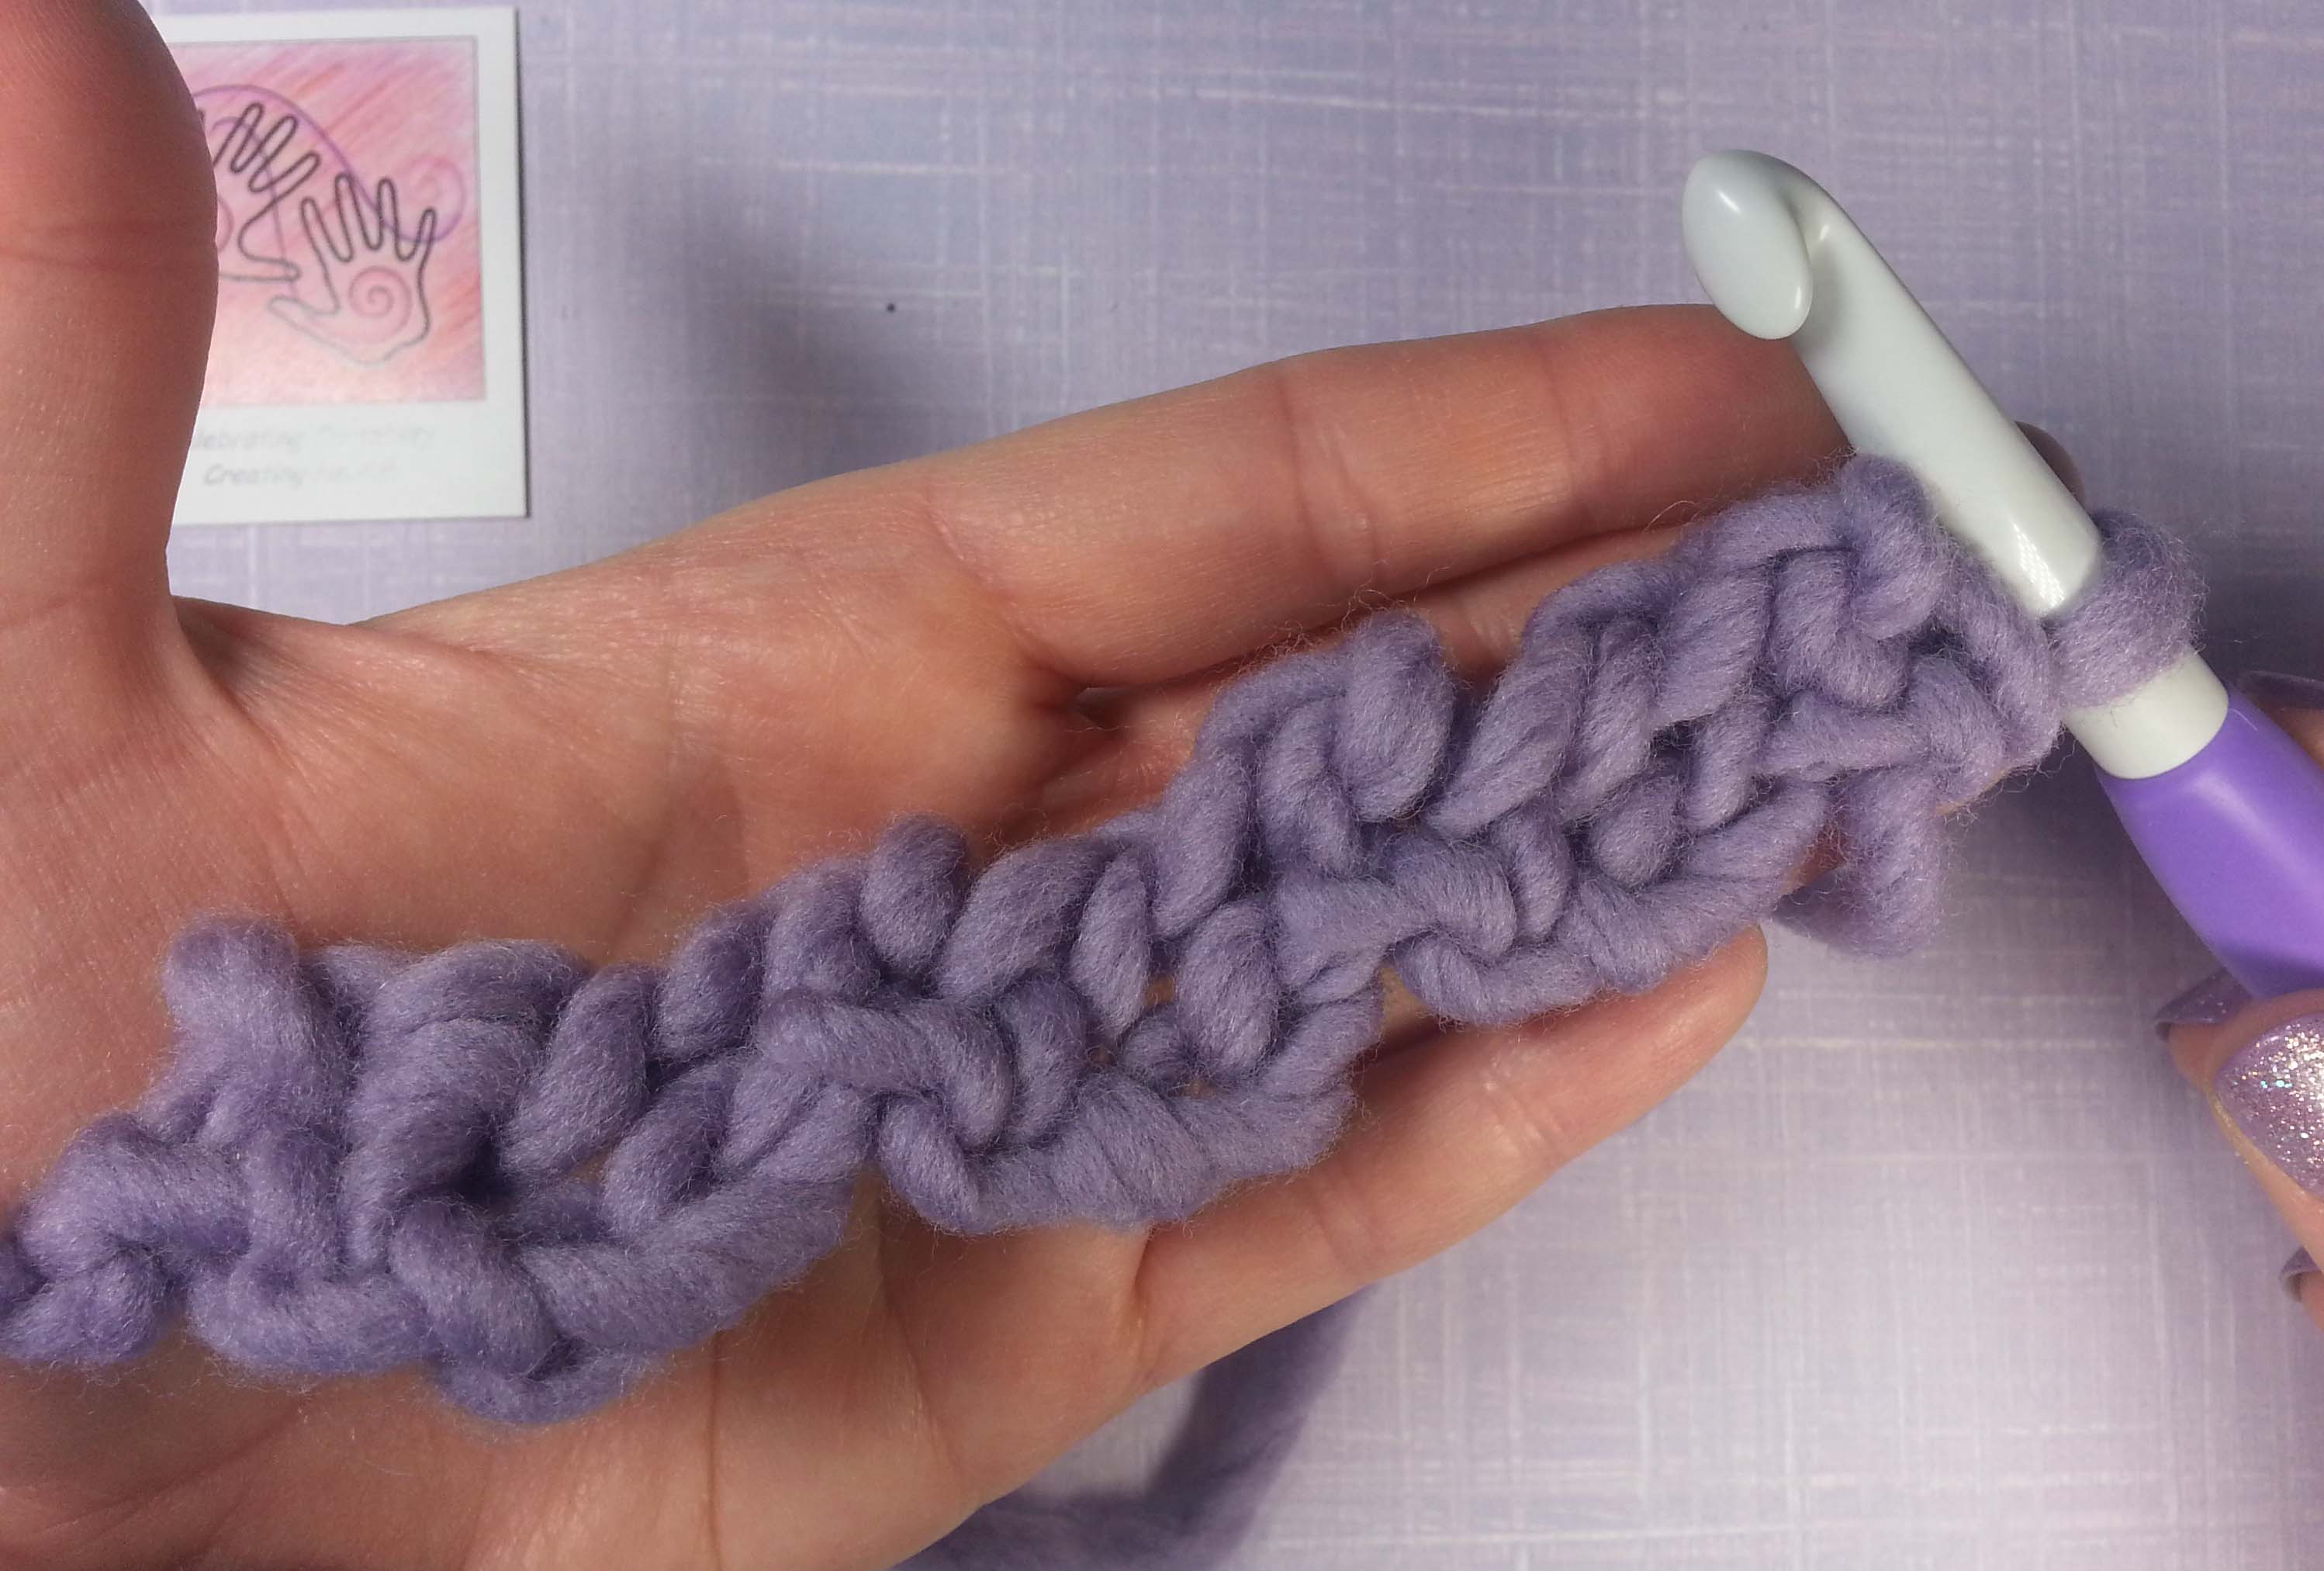
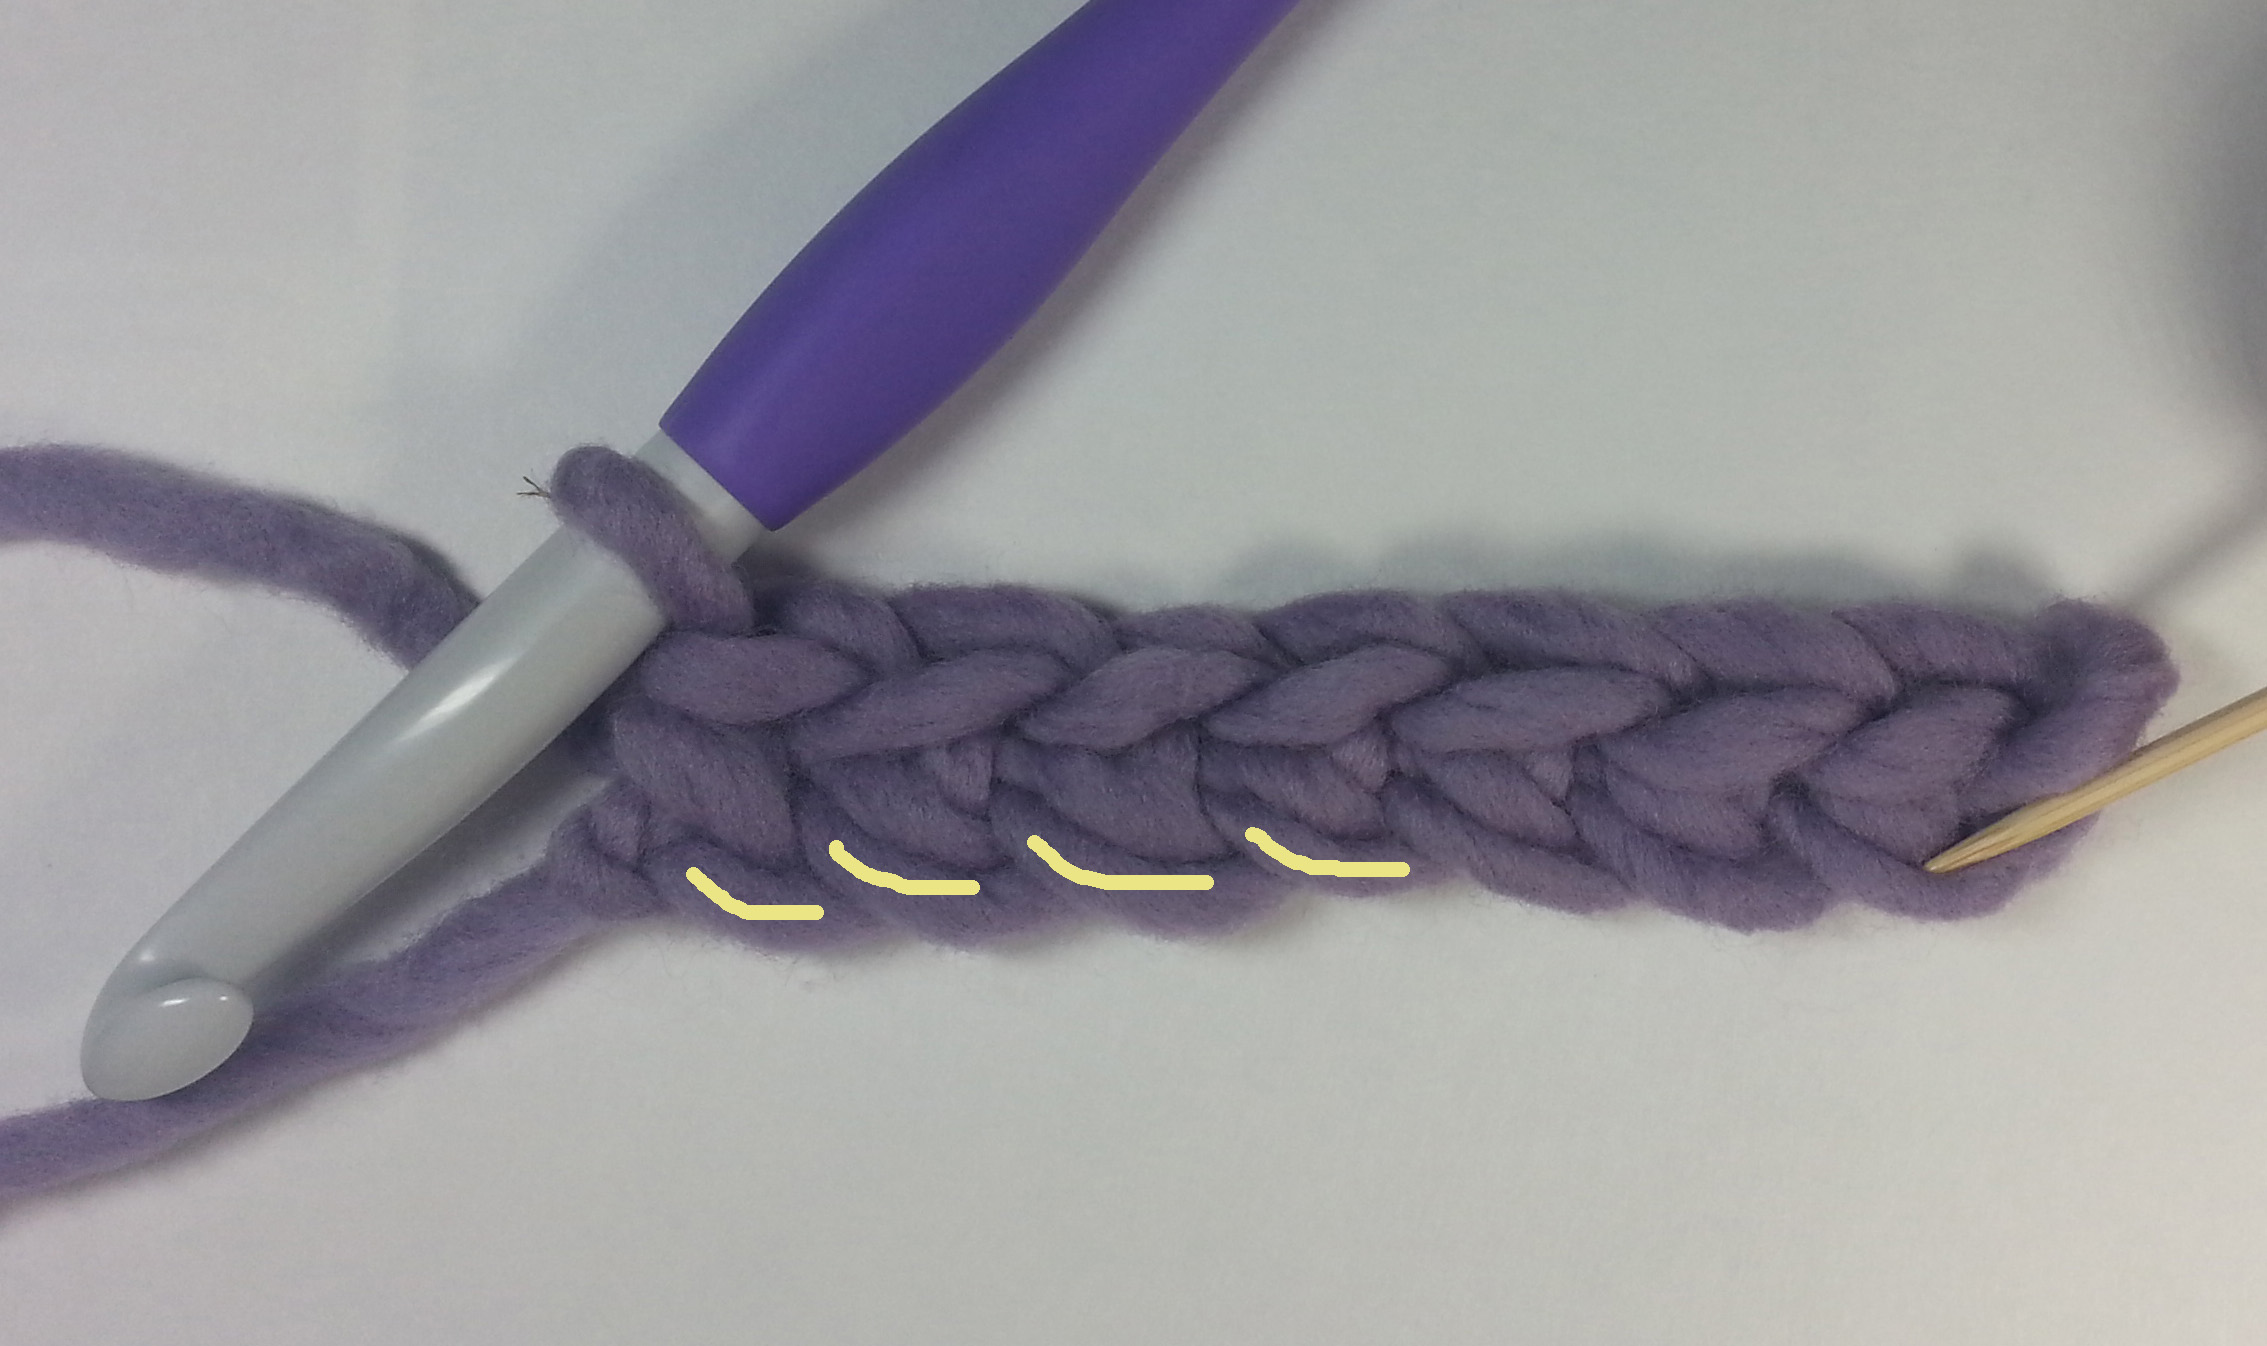
Picots are started with a short chain, usually 3 chain stitches.  I have occasionally seen picots made with 5 chains, I tend to prefer the look of the 3 chains.

picot-insert-pt-for-hook-marked-andee-graves-m2h-designs

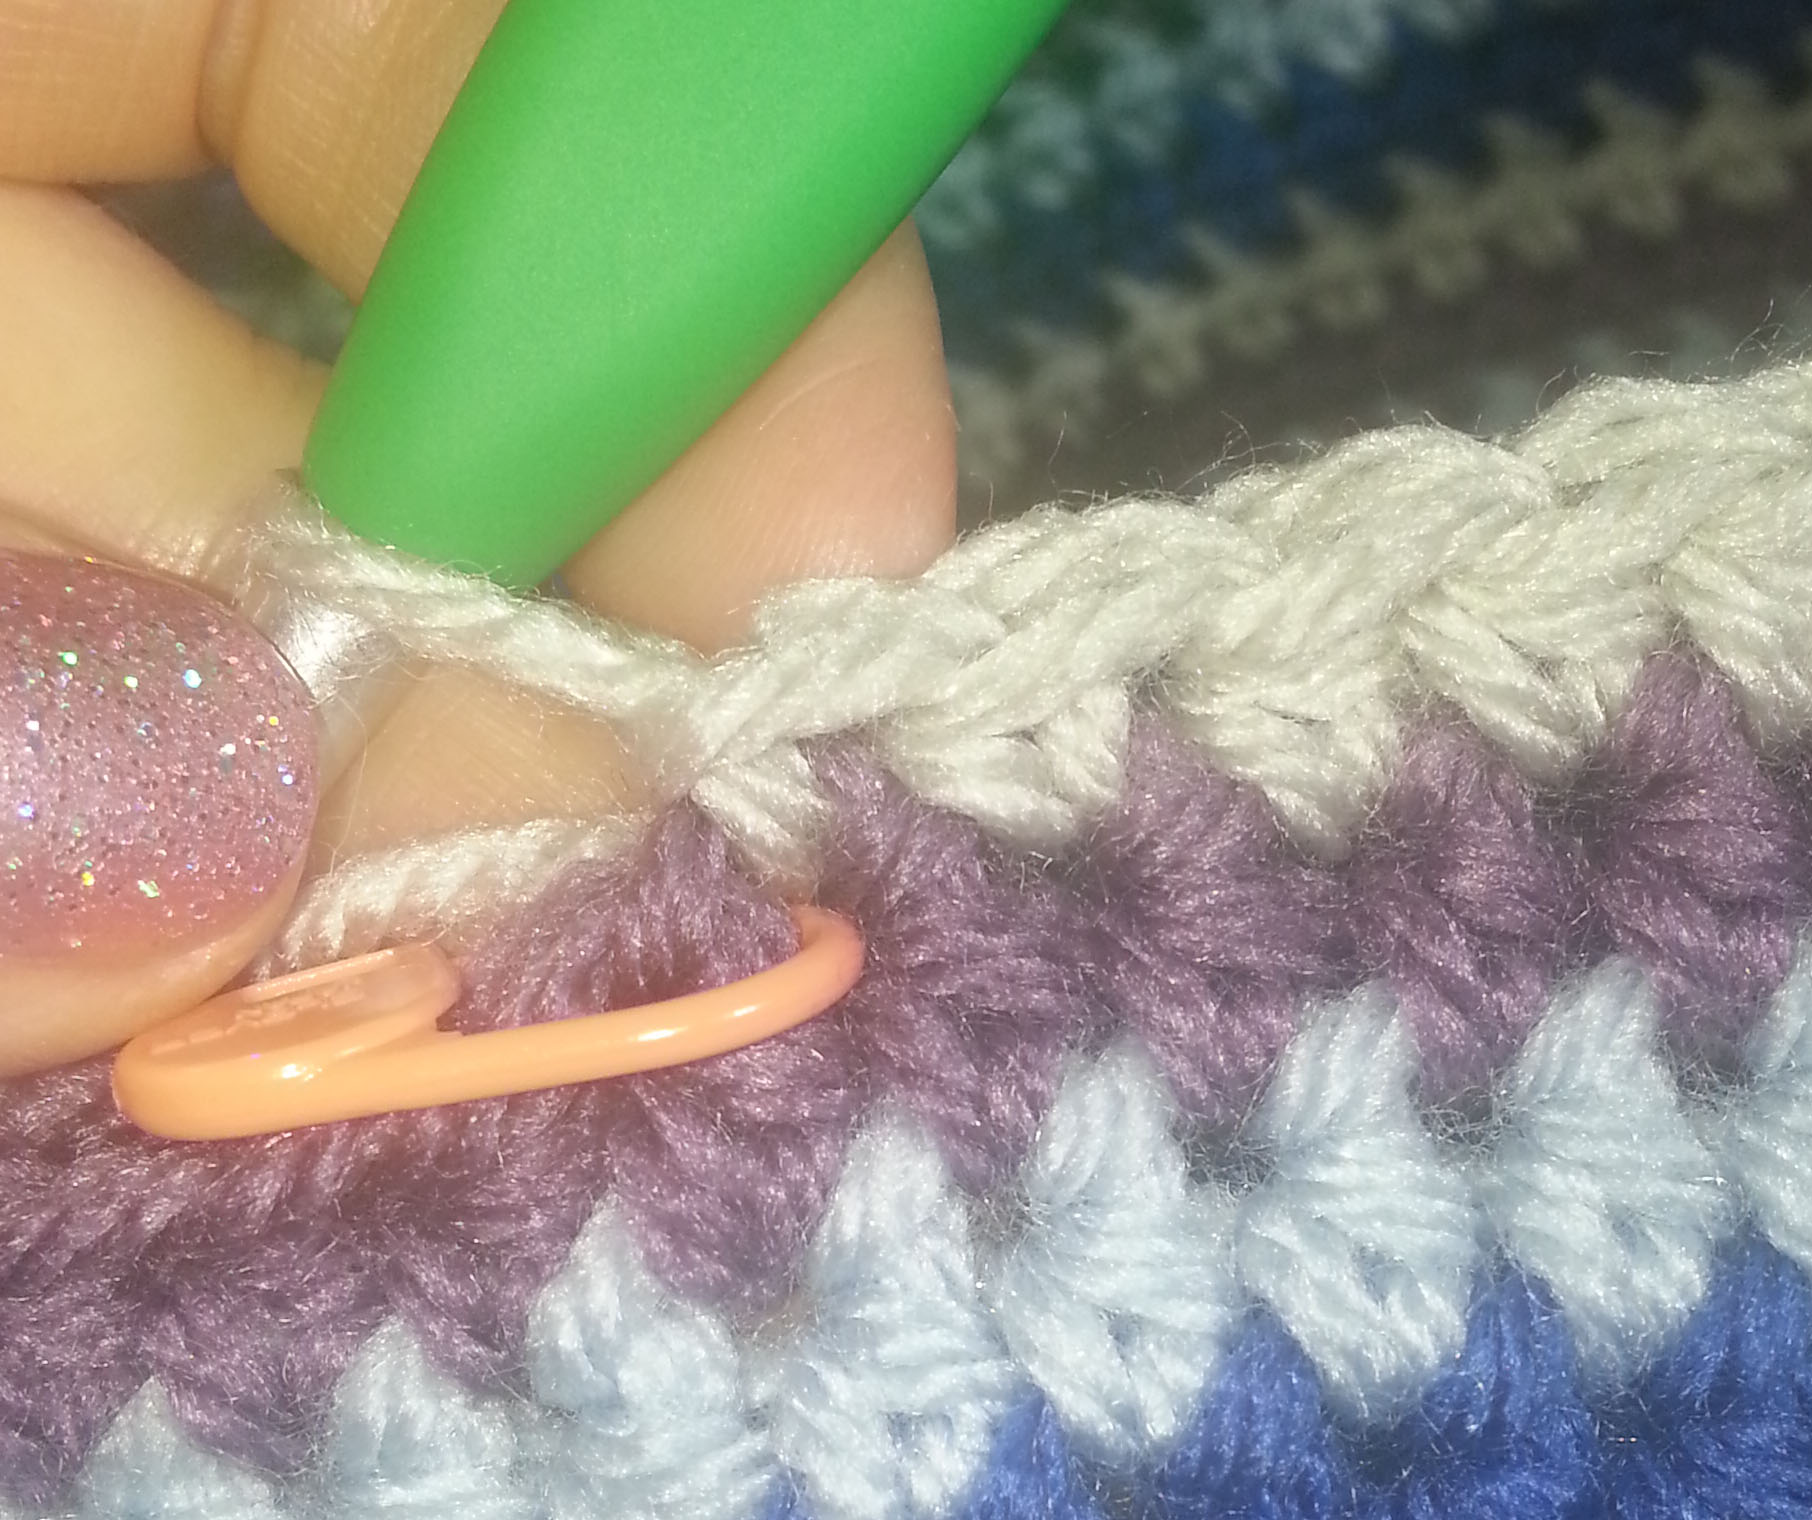
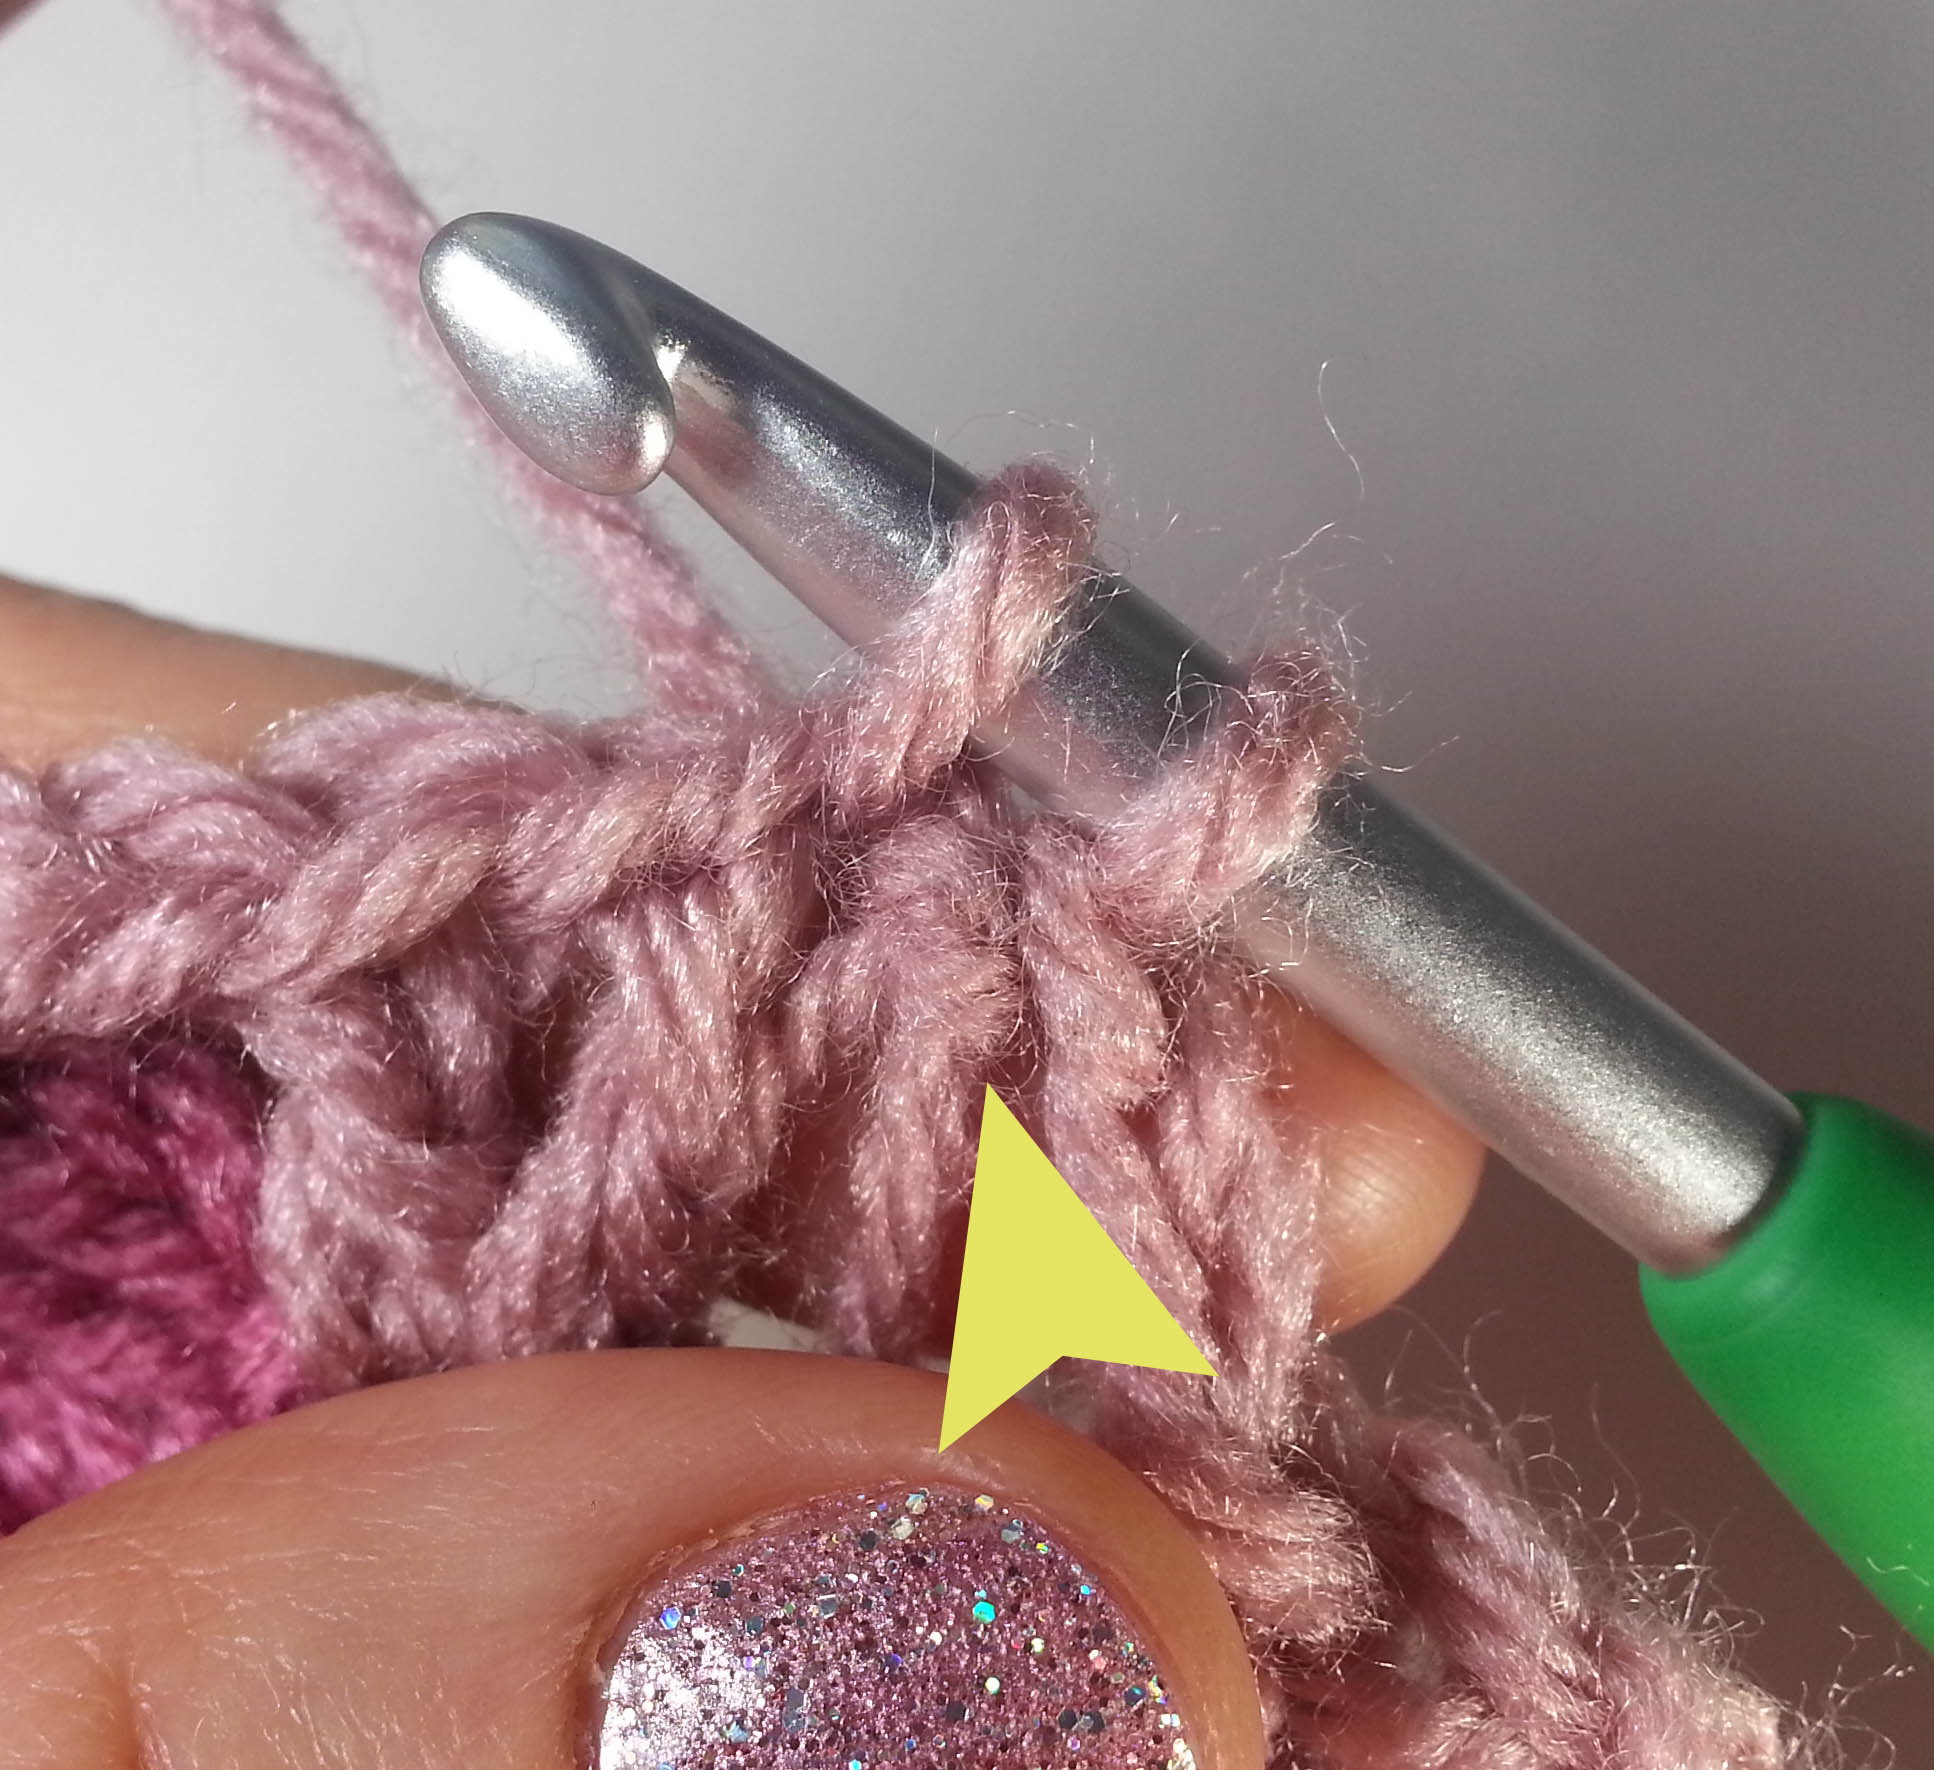
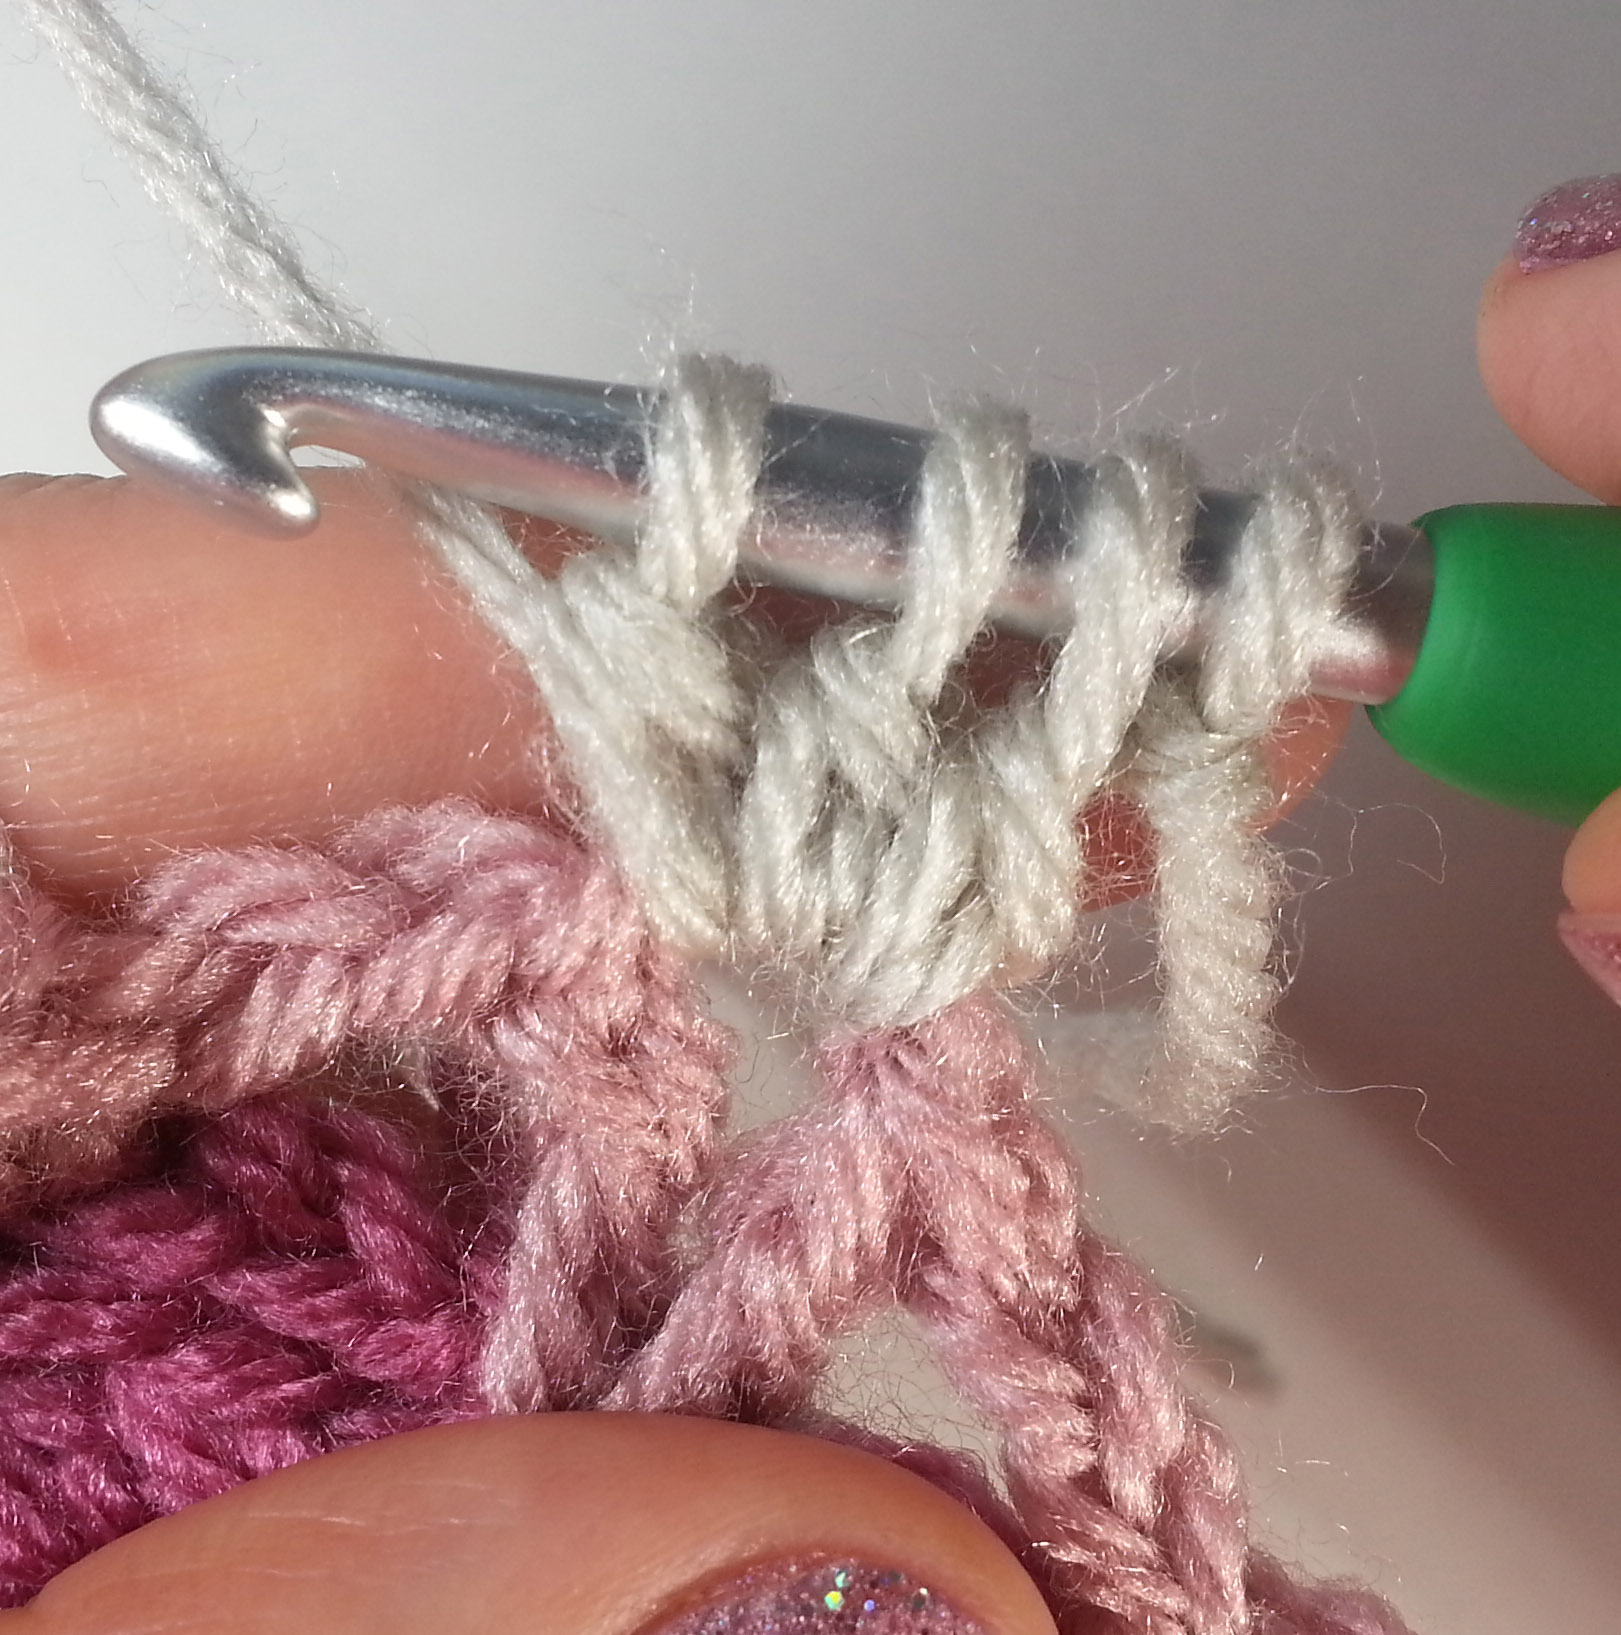
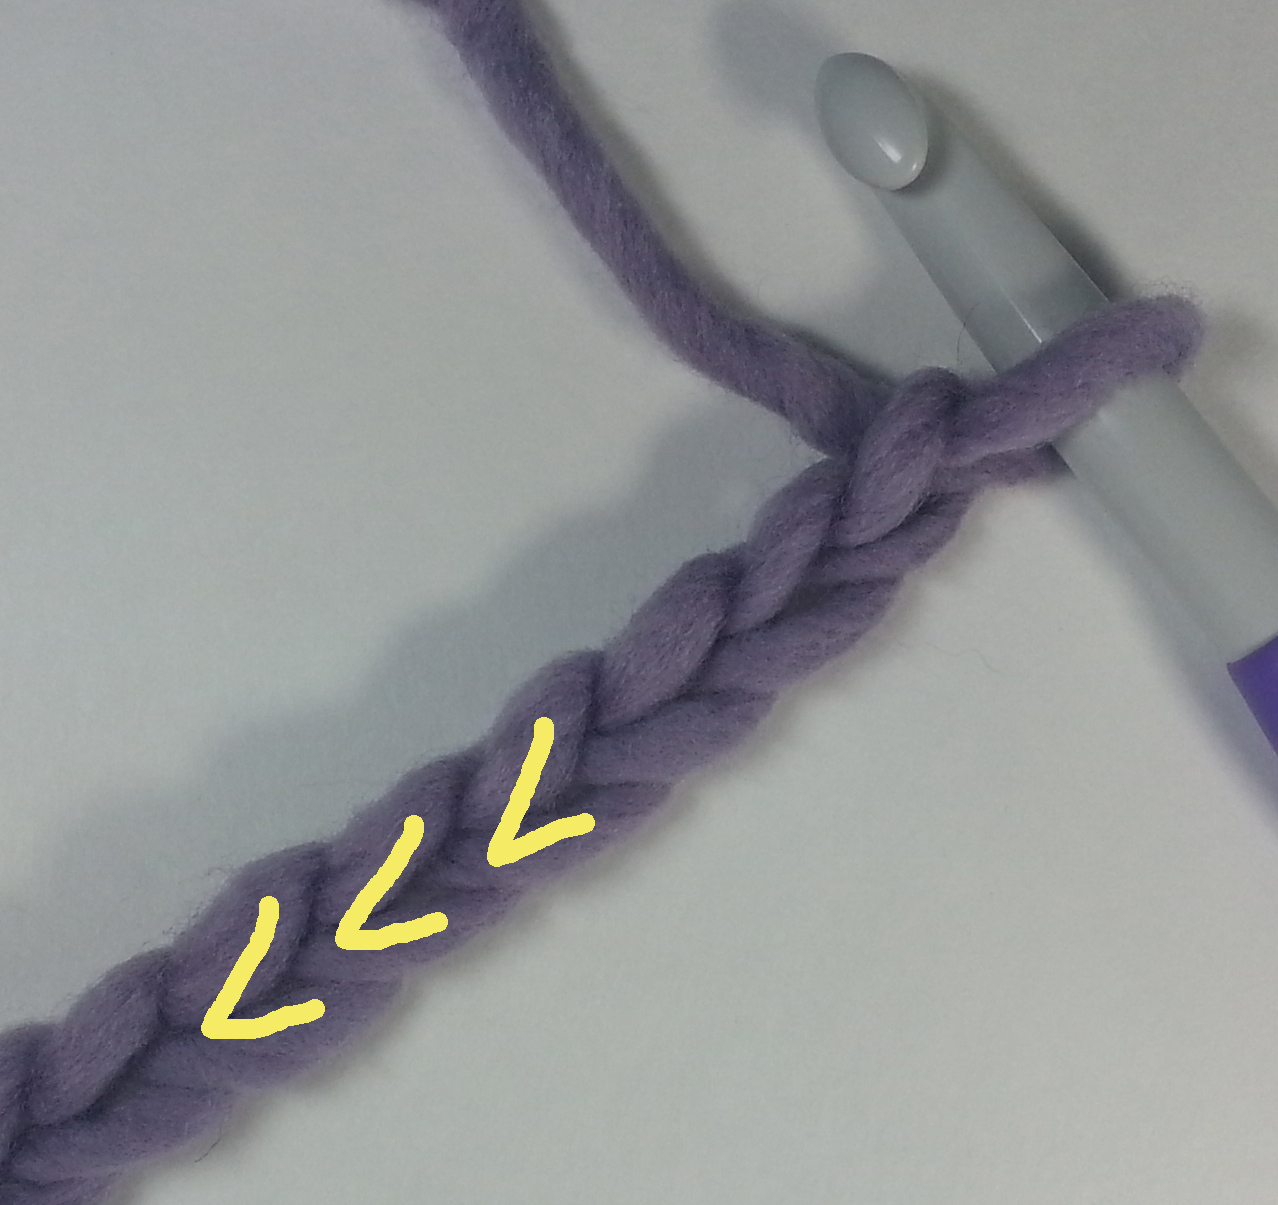
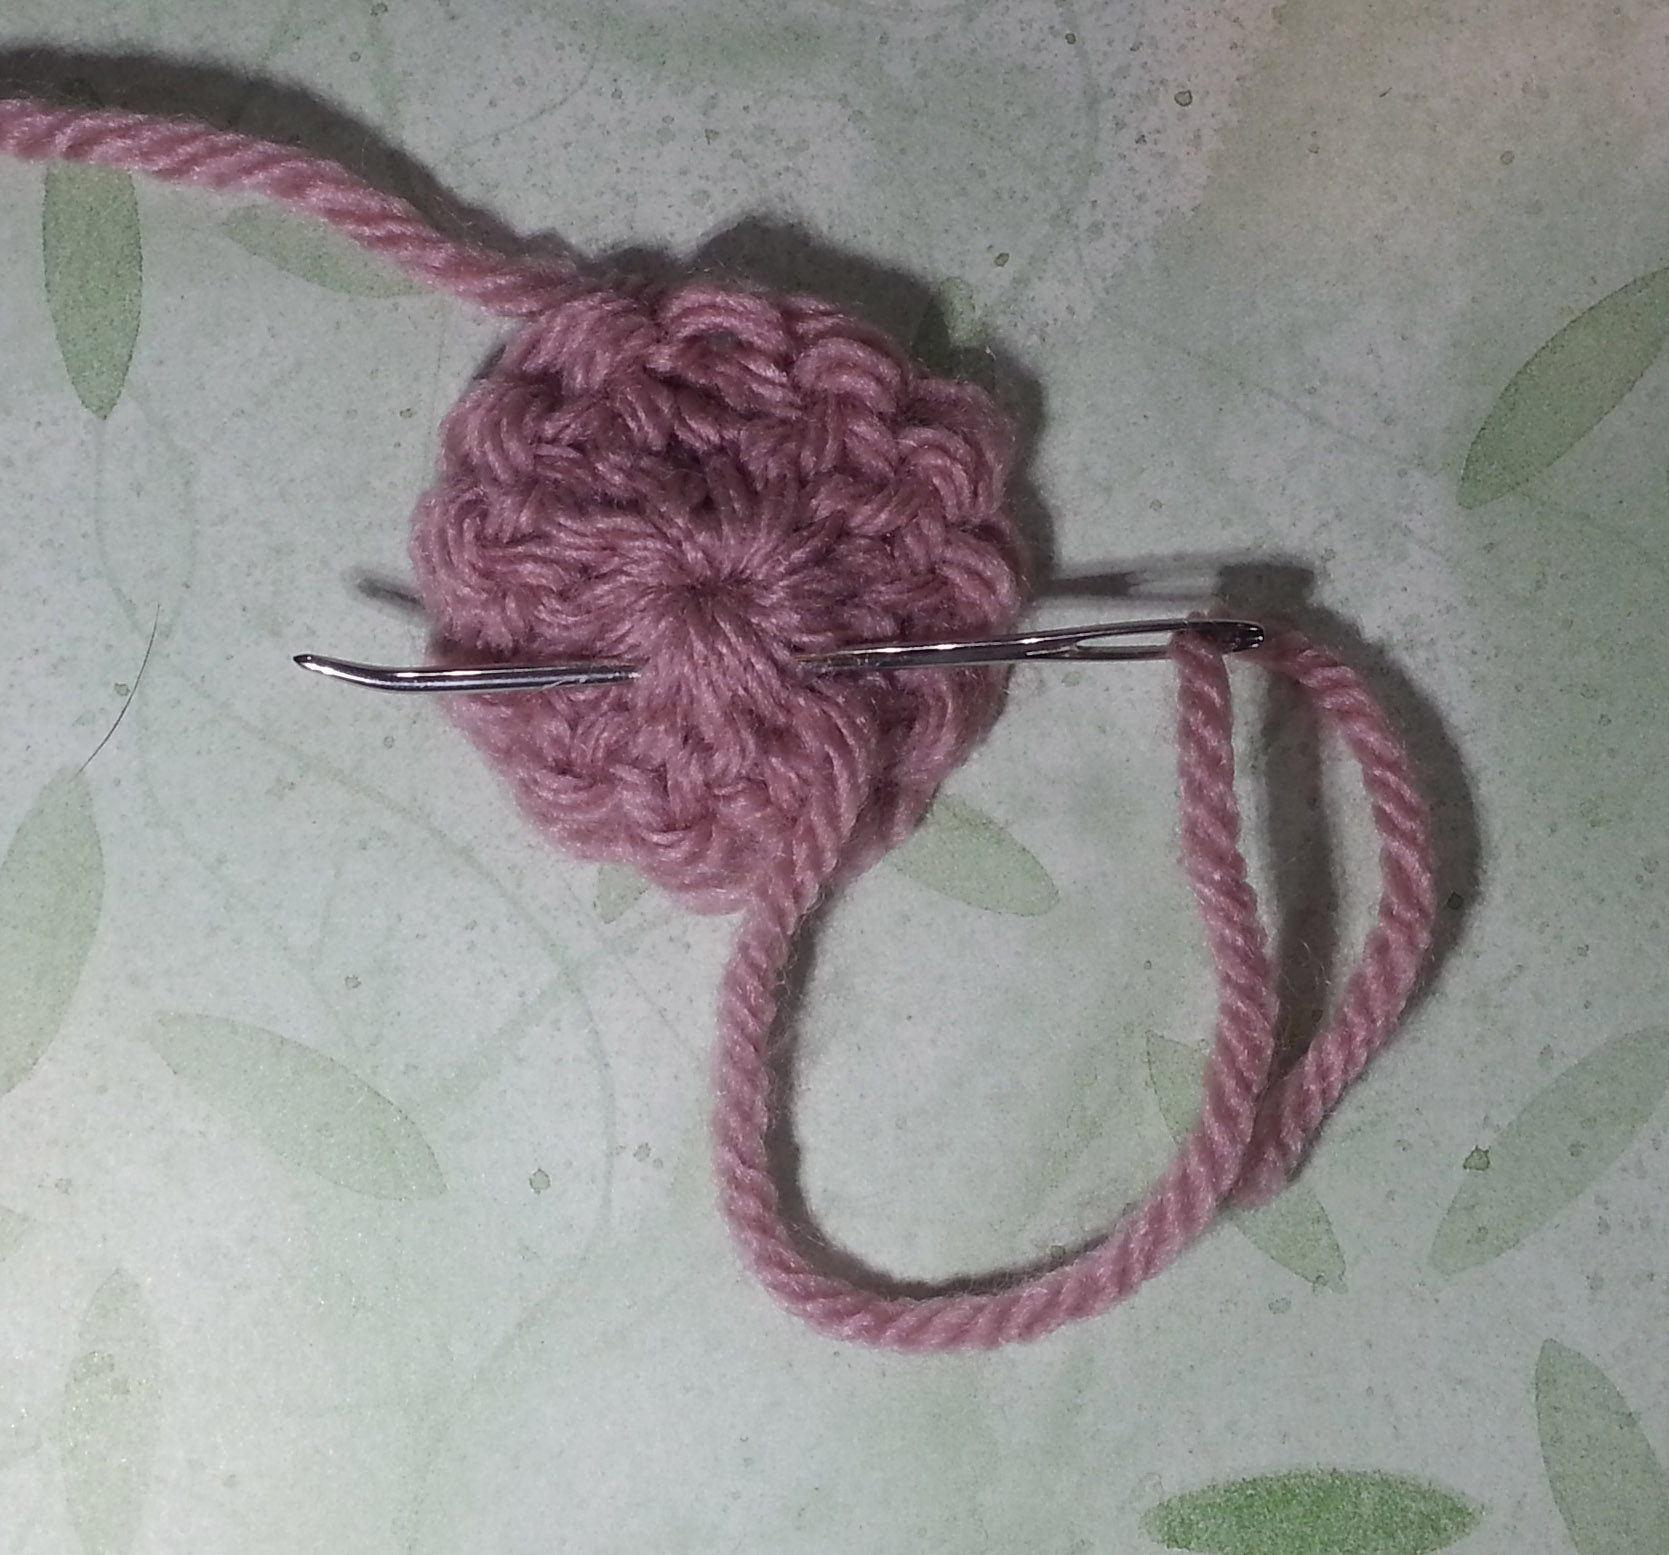
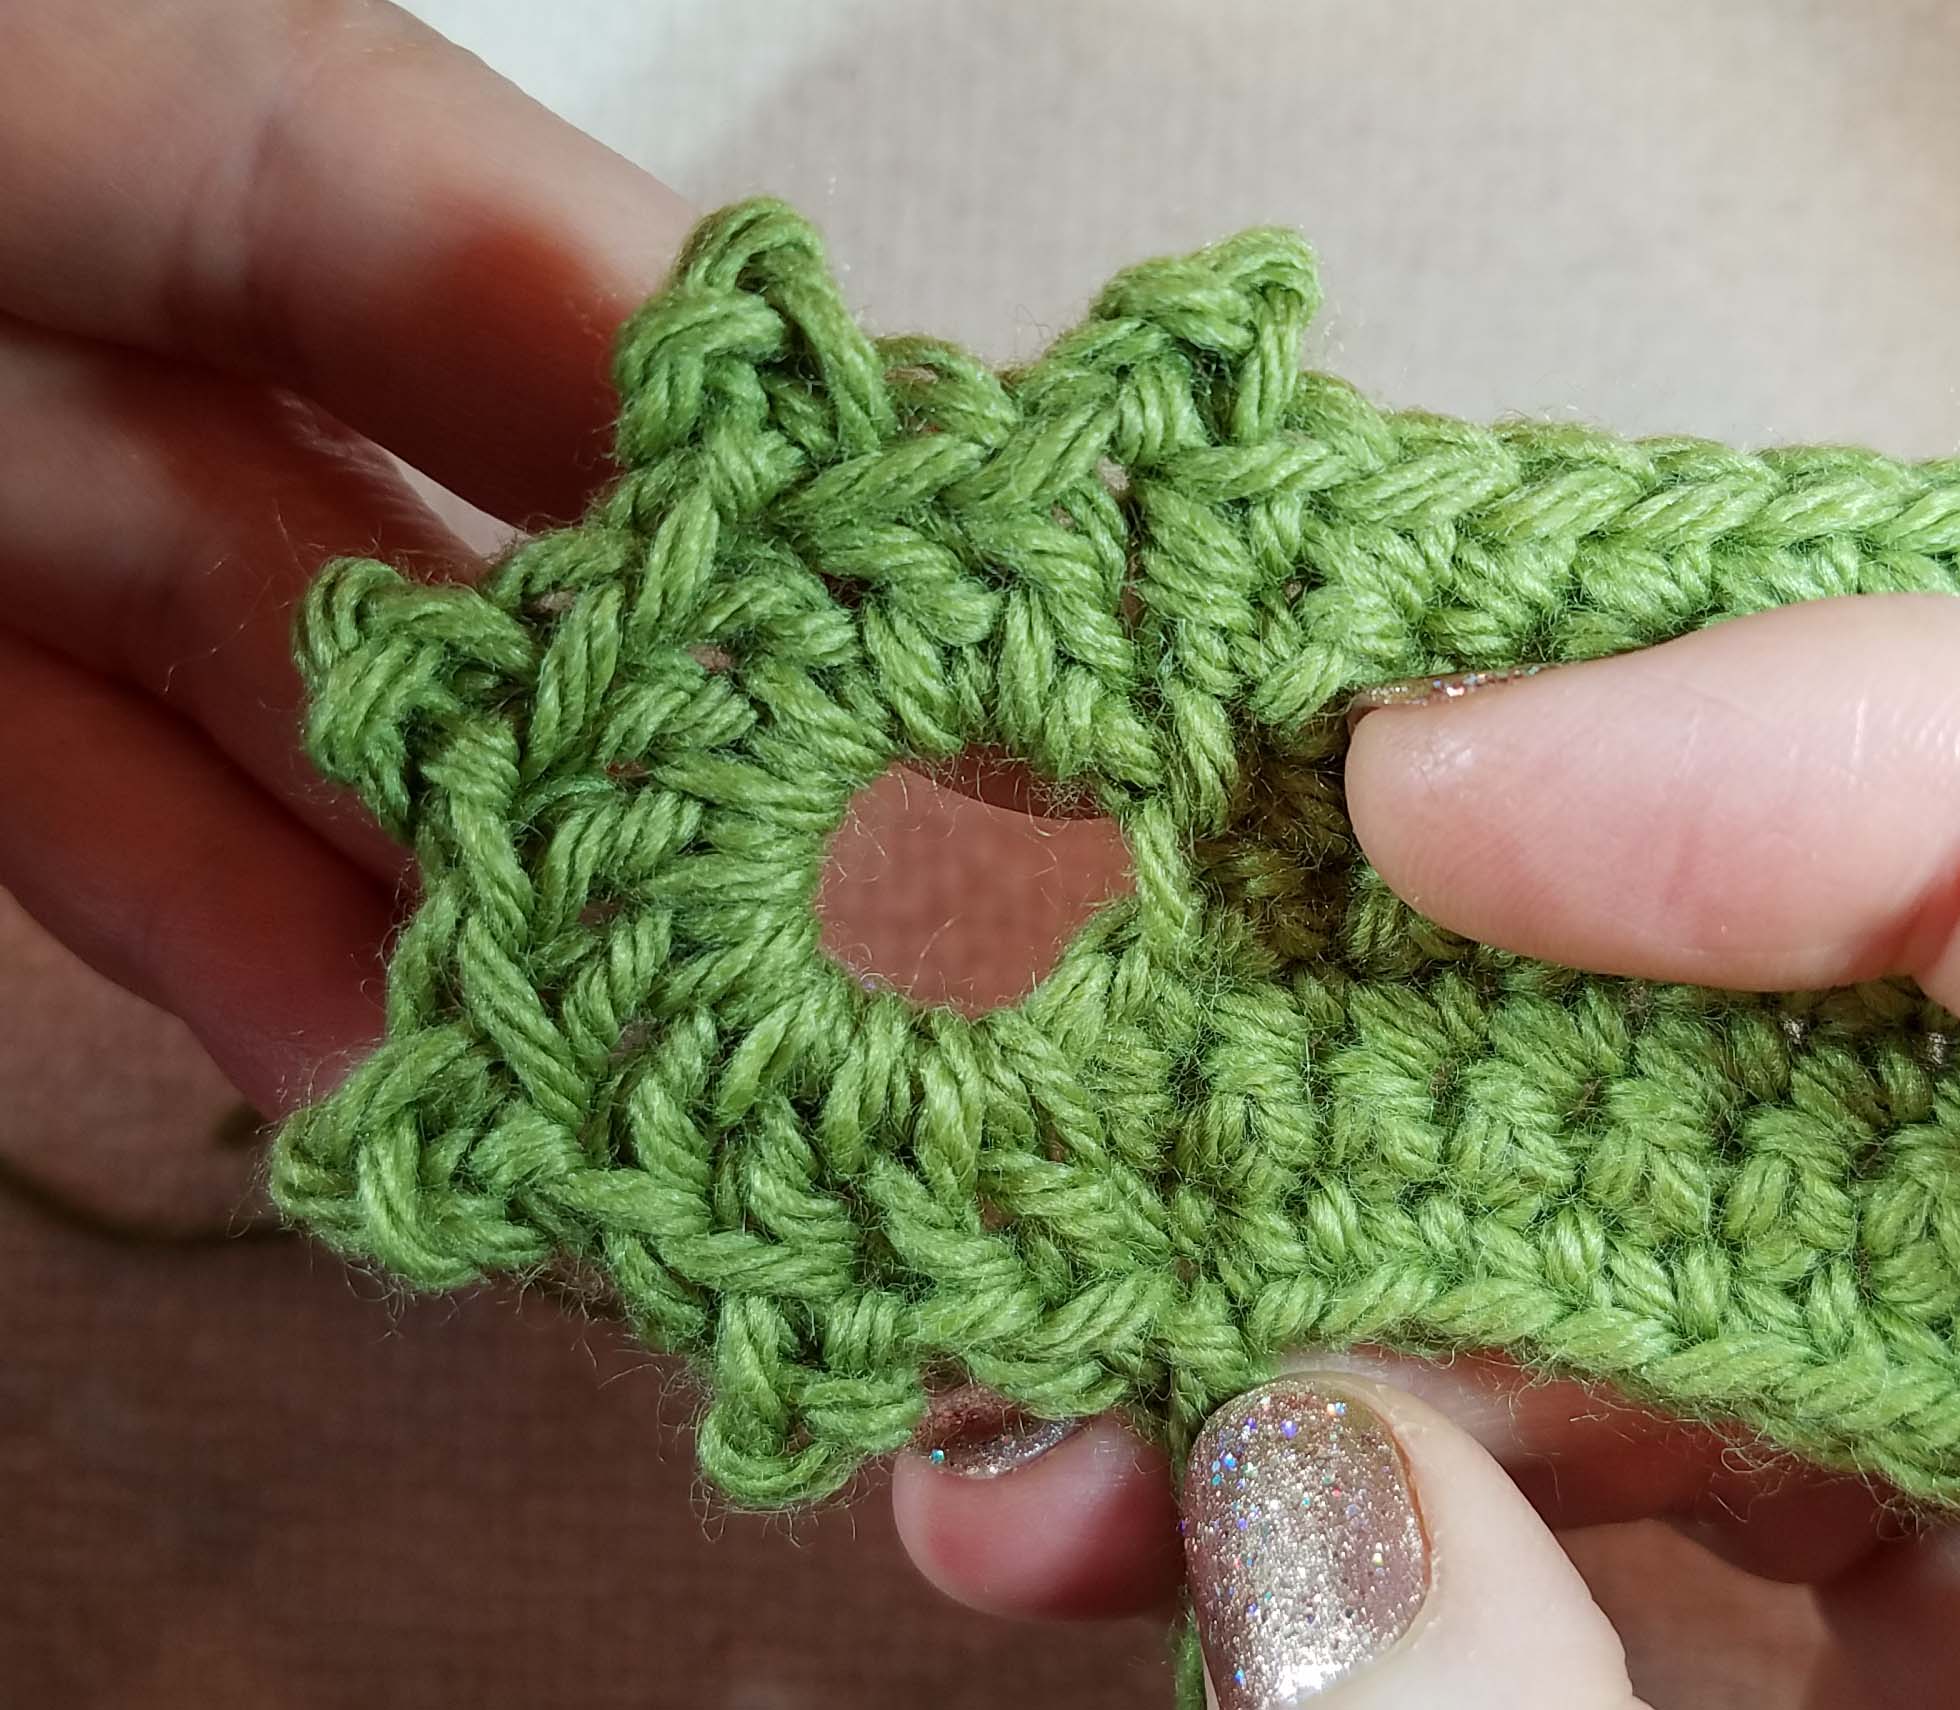
When anchoring the picot on the previous stitch, you next insert your hook into the top of the stitch under the front loop (1) and then under the side loop of that same stitch (2).

picot-2-strands-caught-andee-graves-m2h-designs

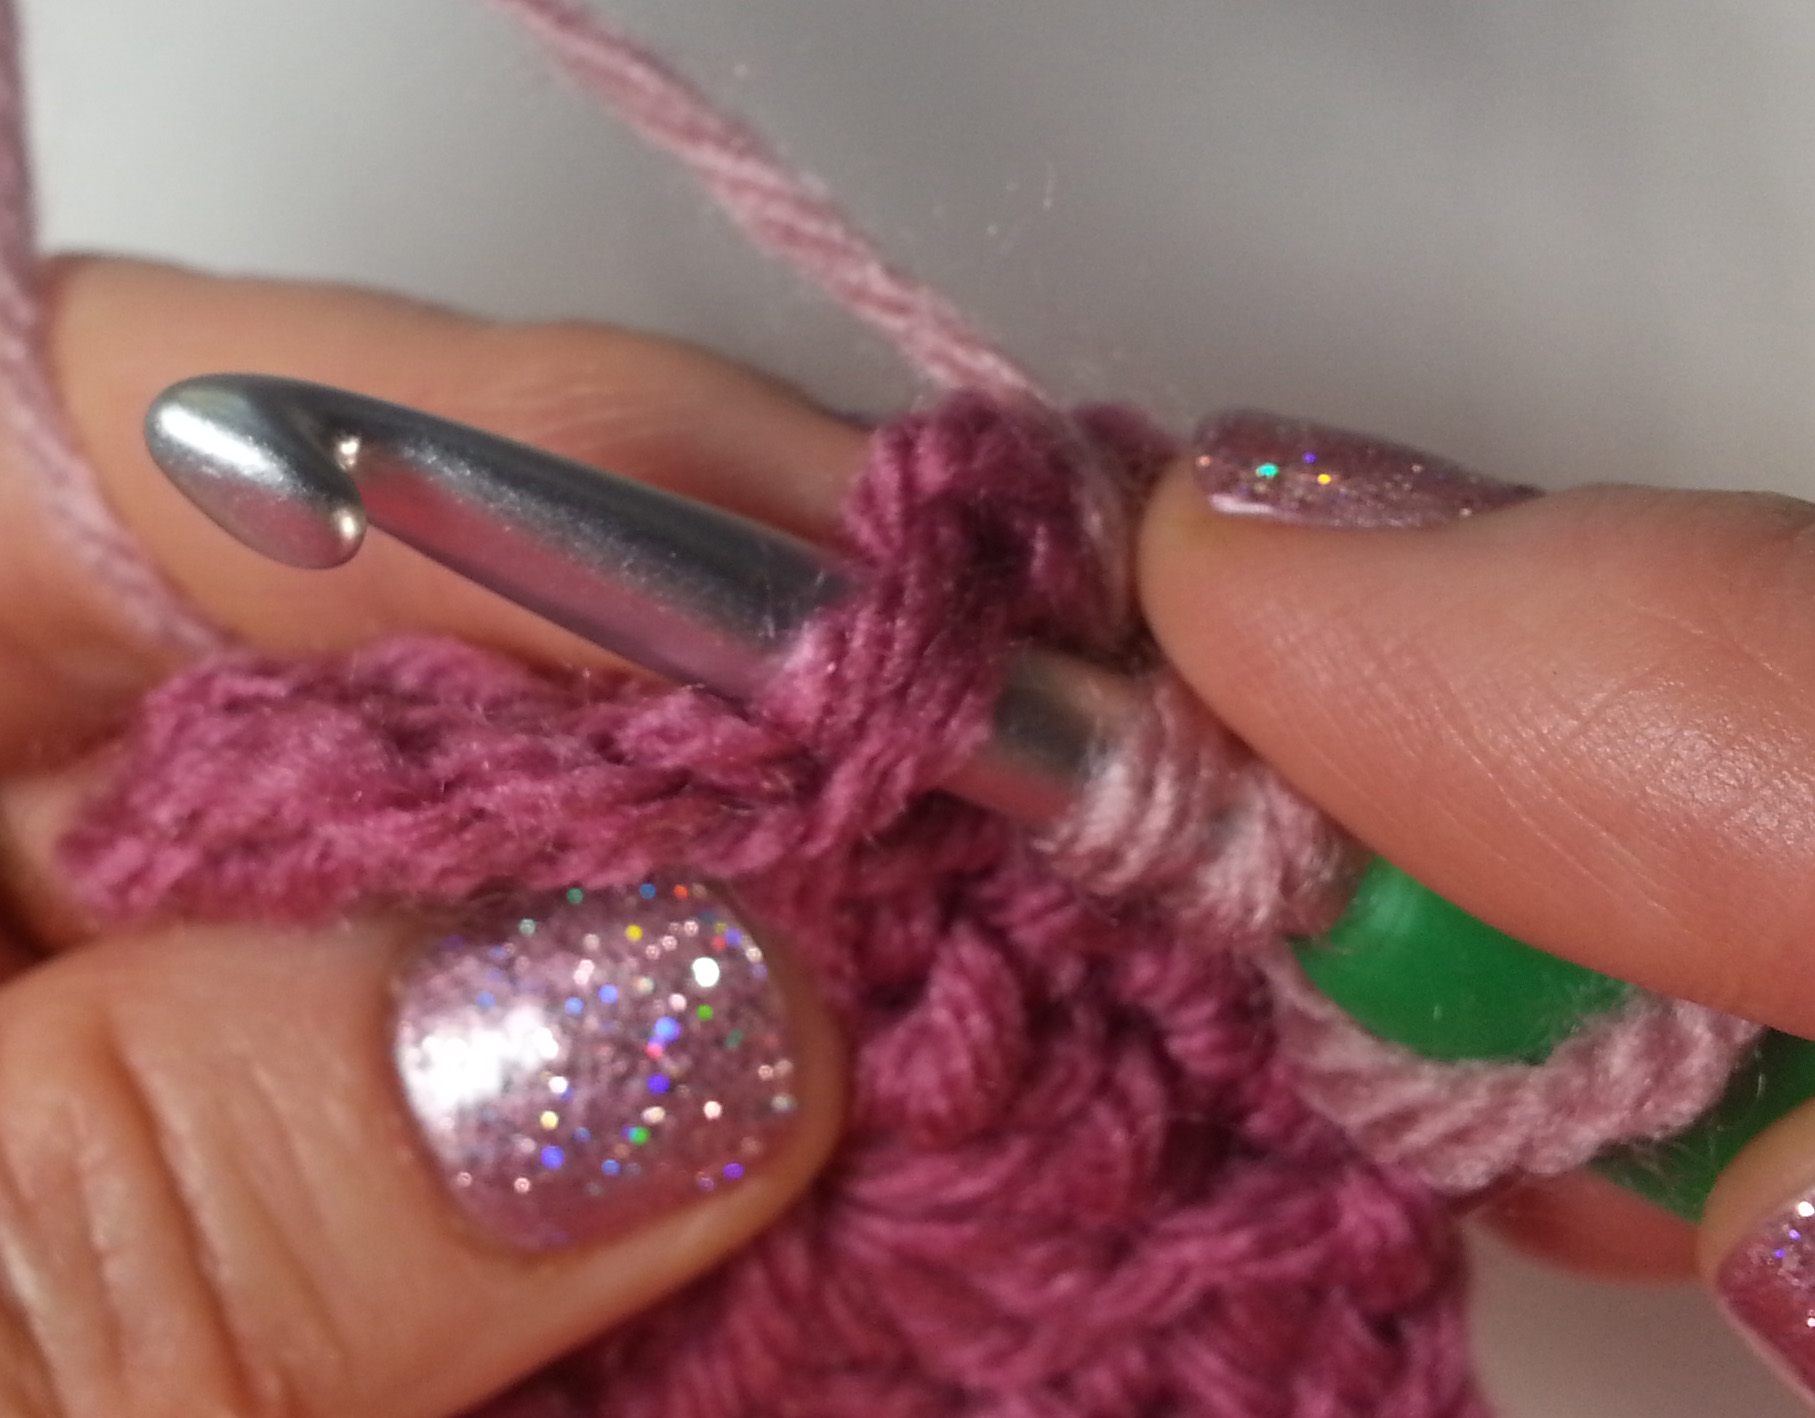
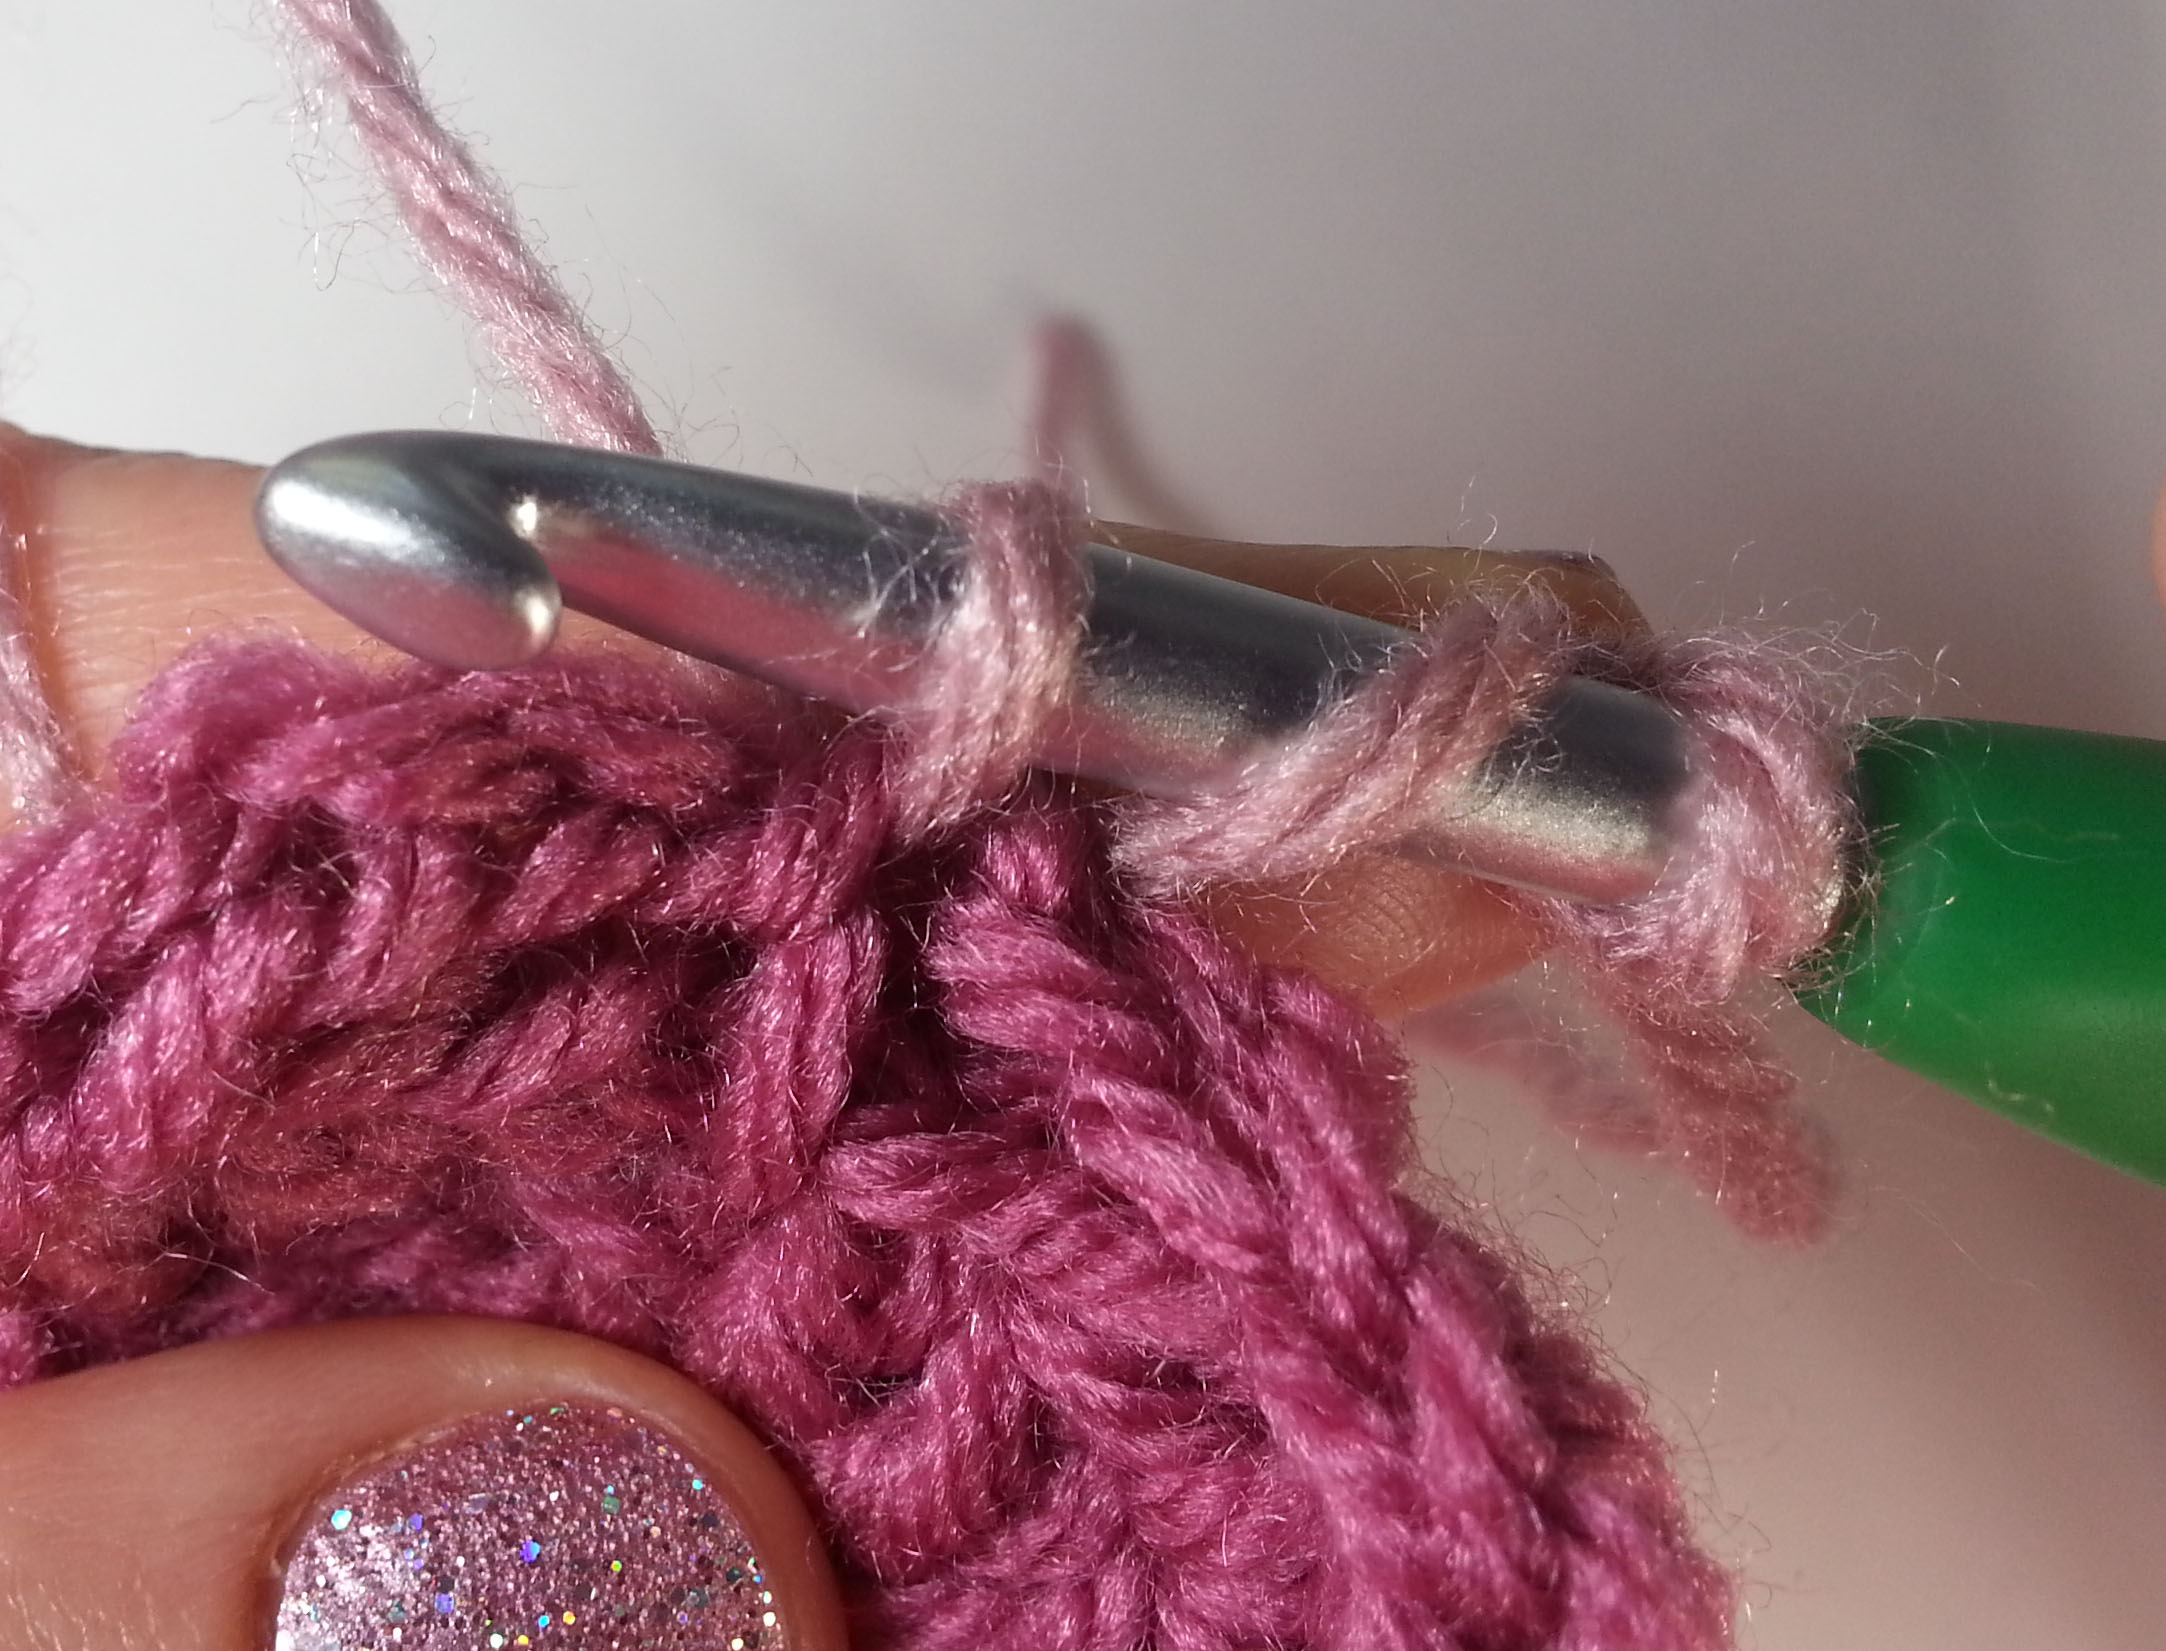
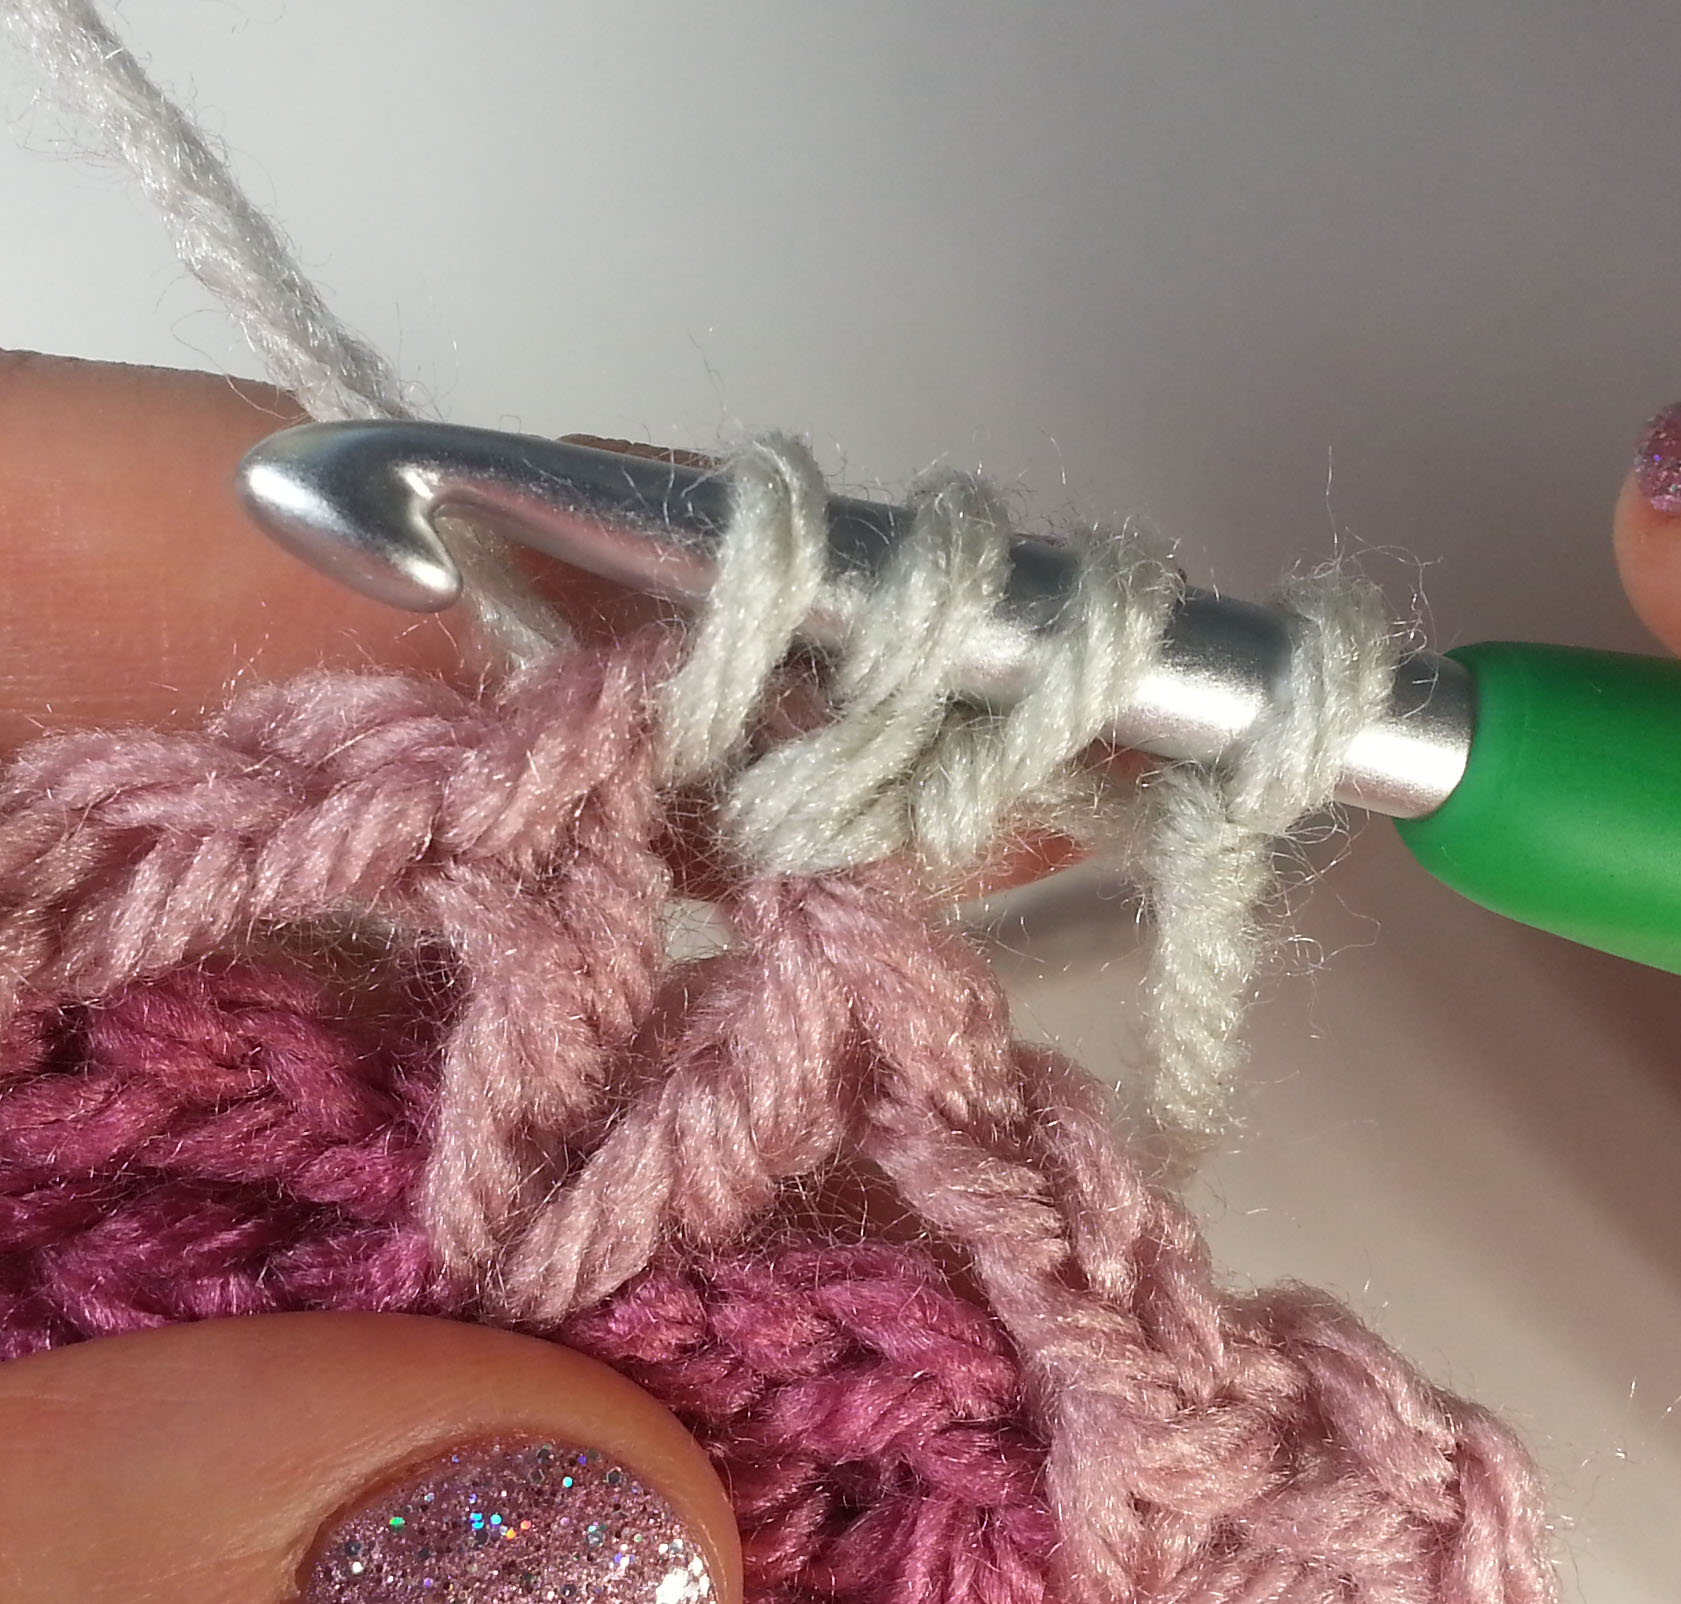
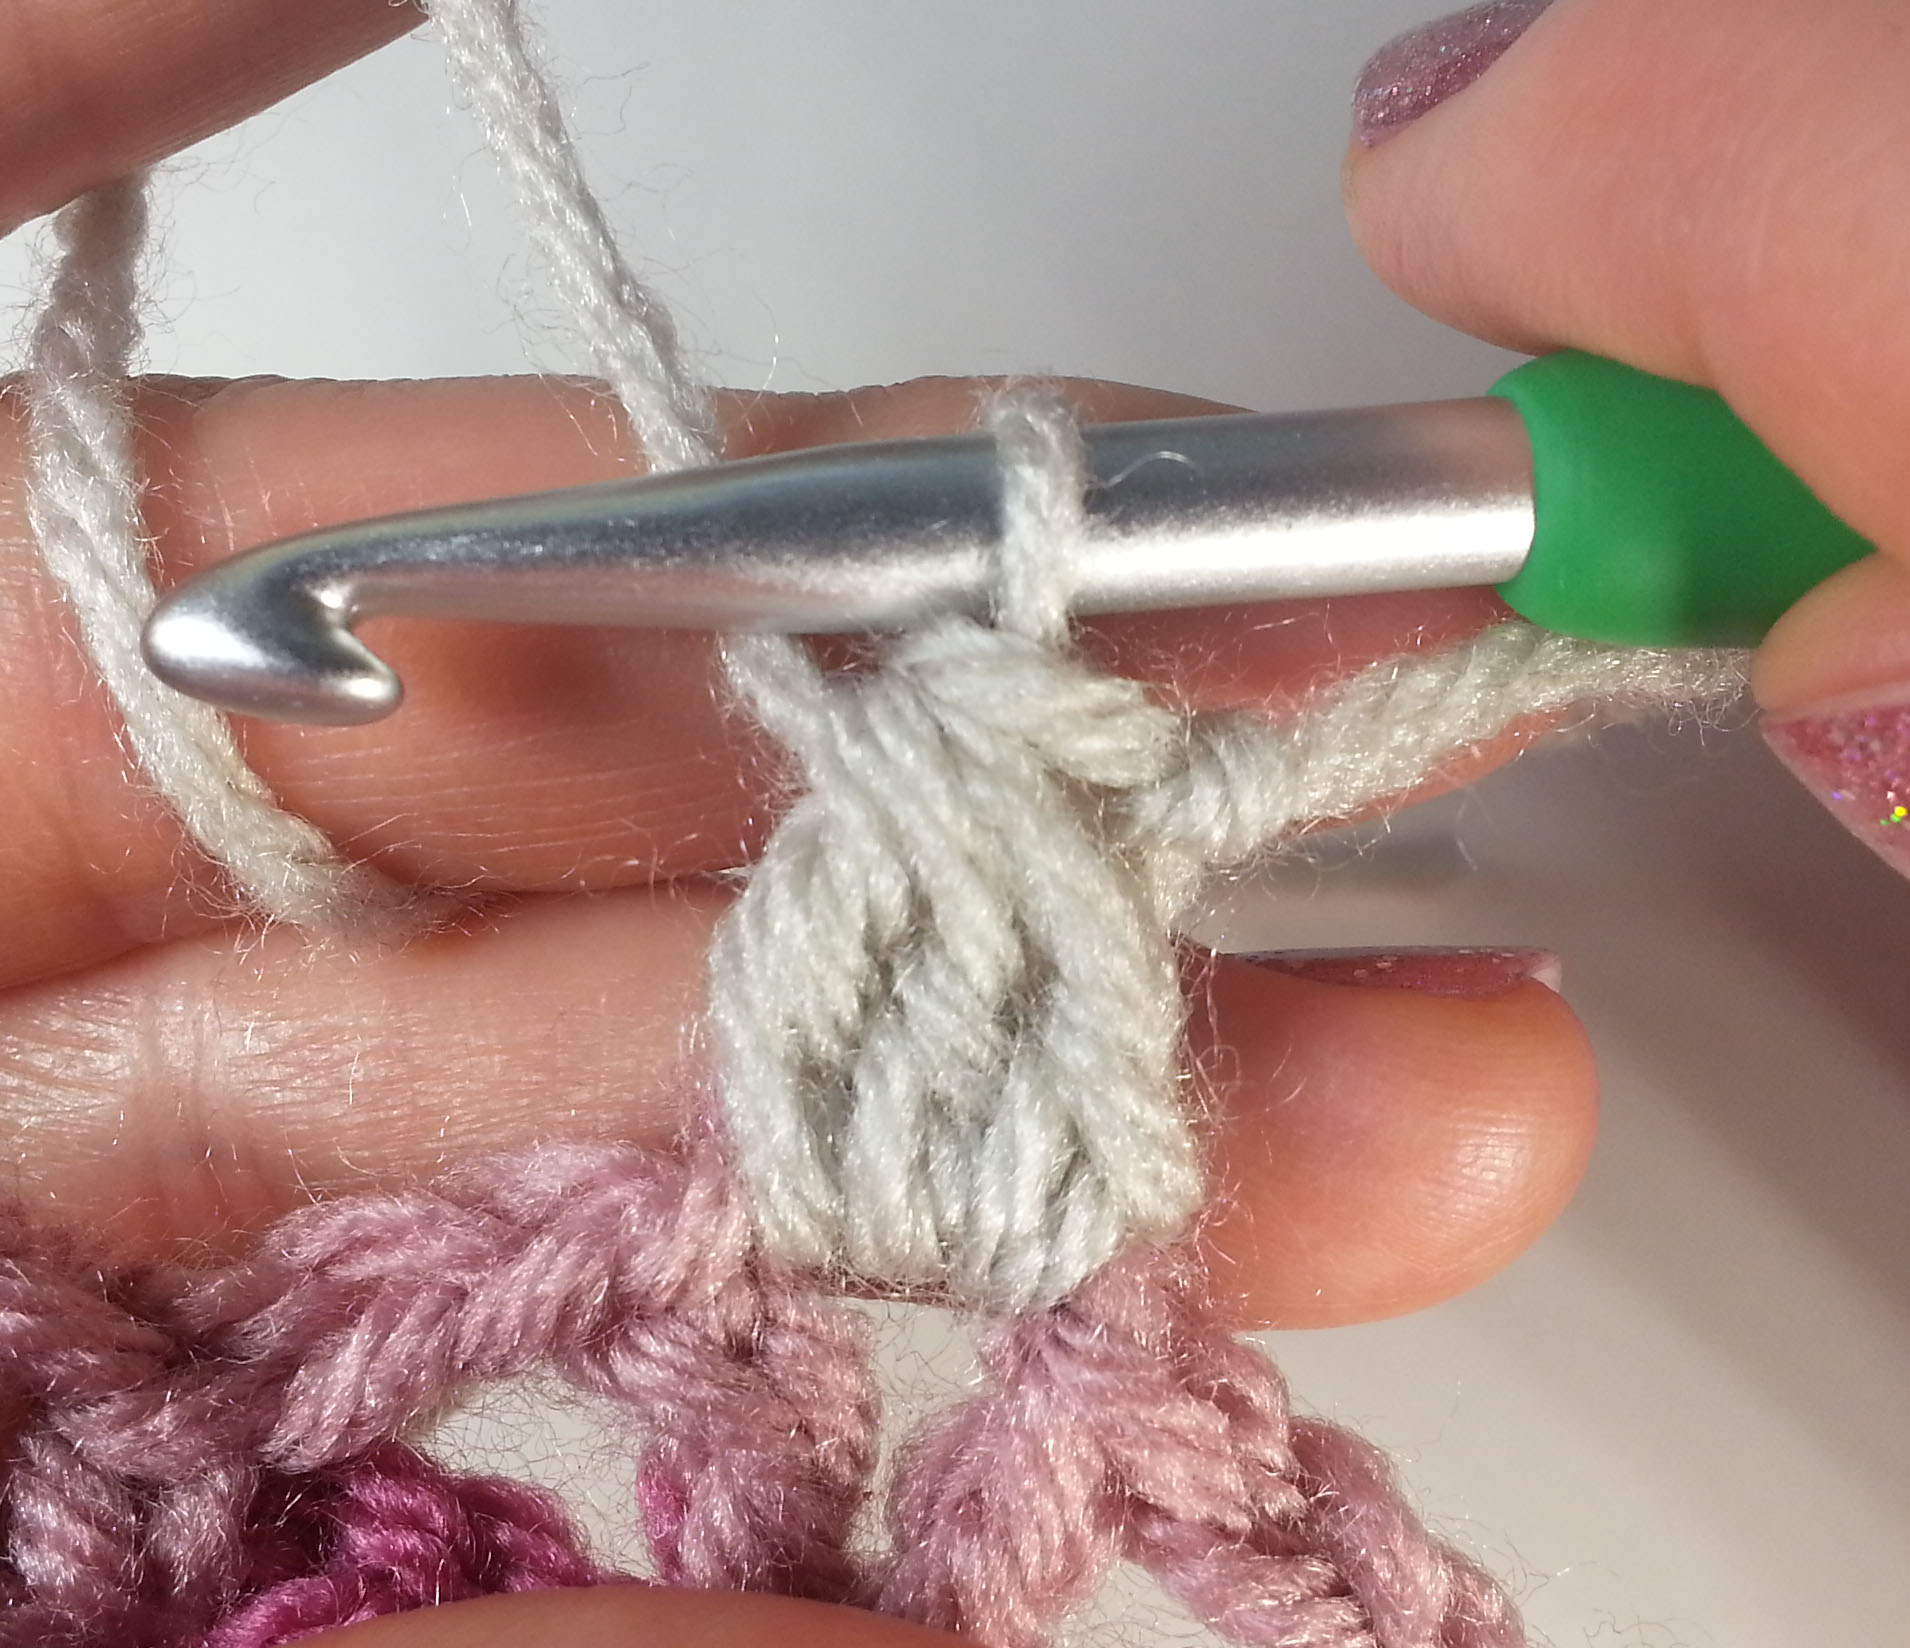
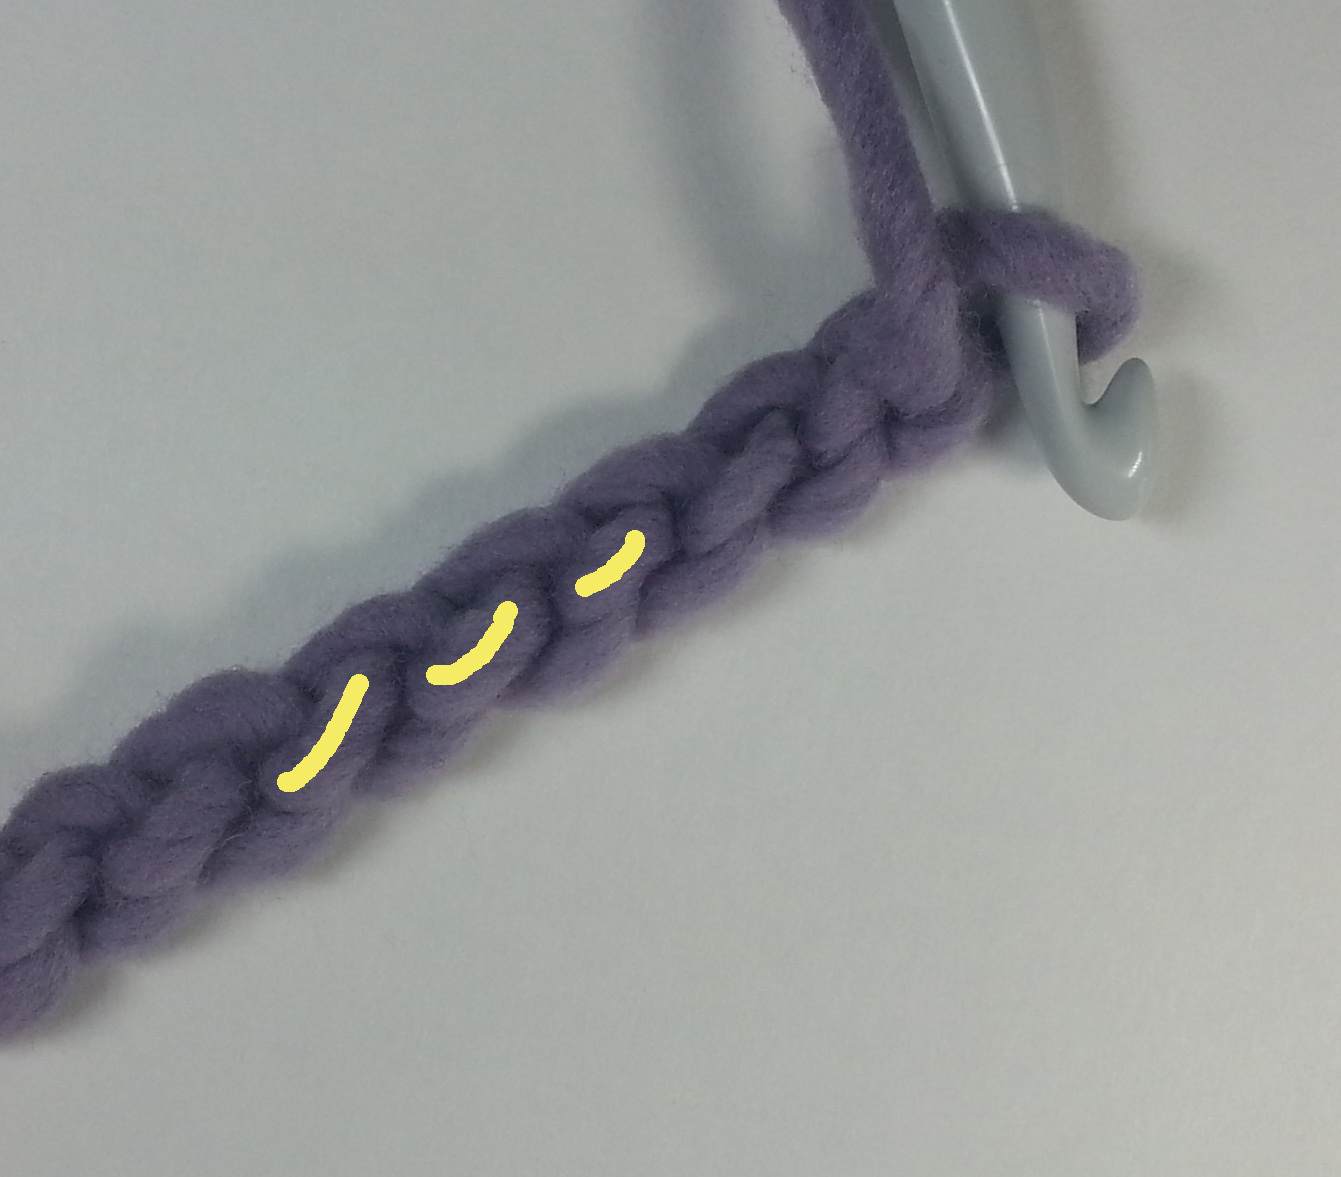
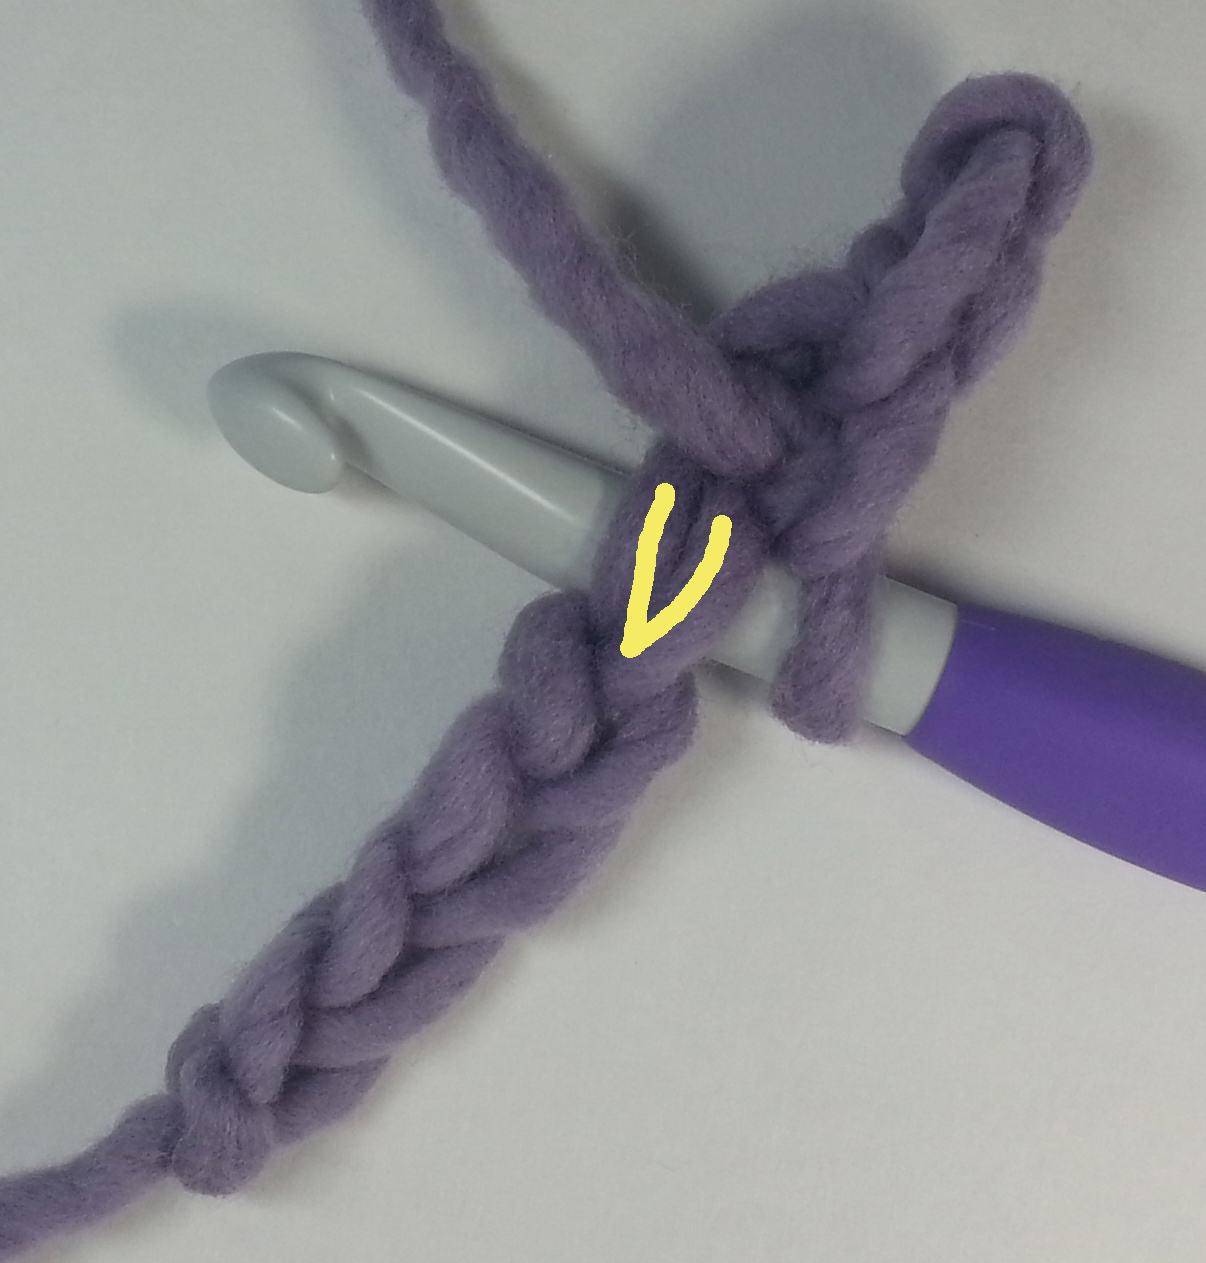
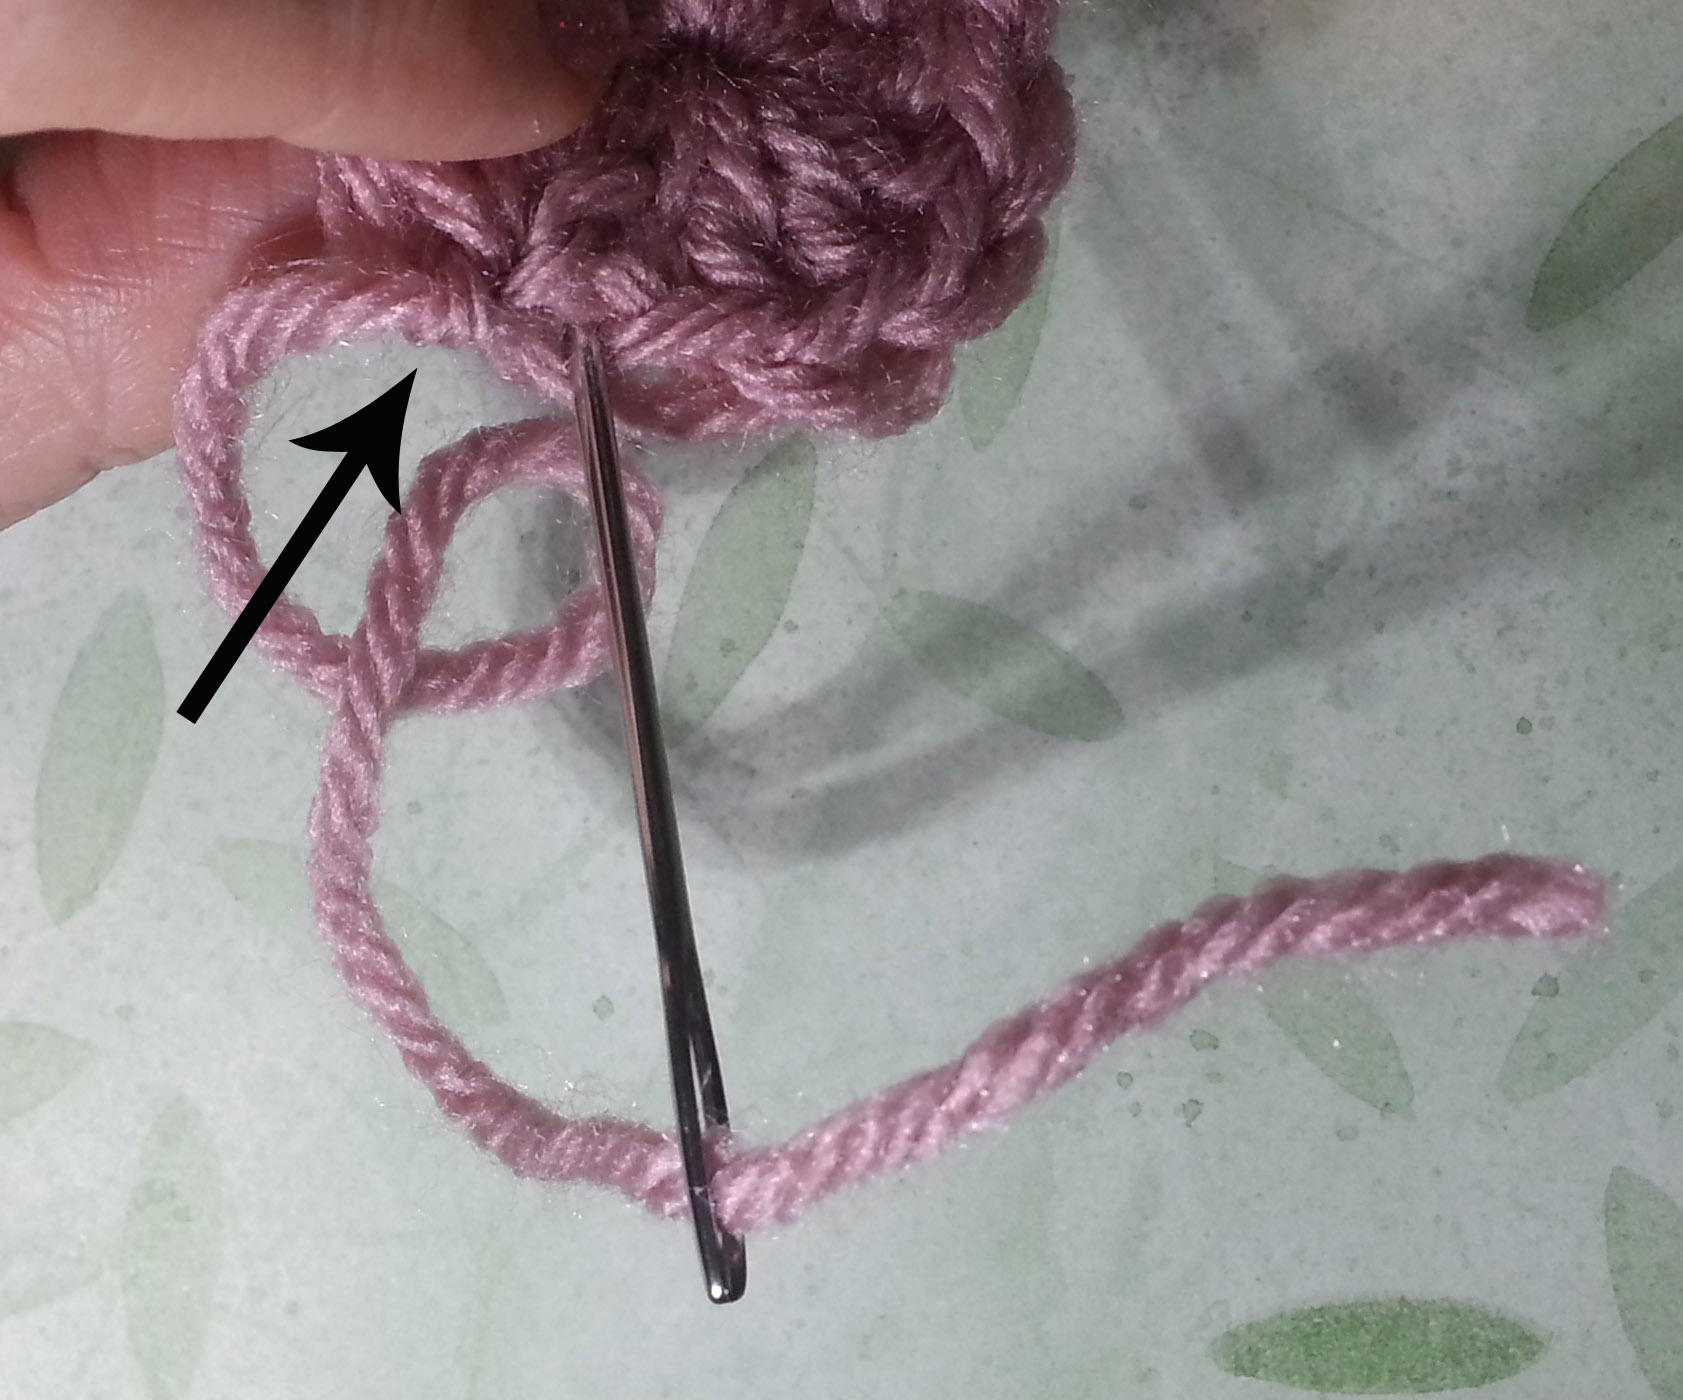
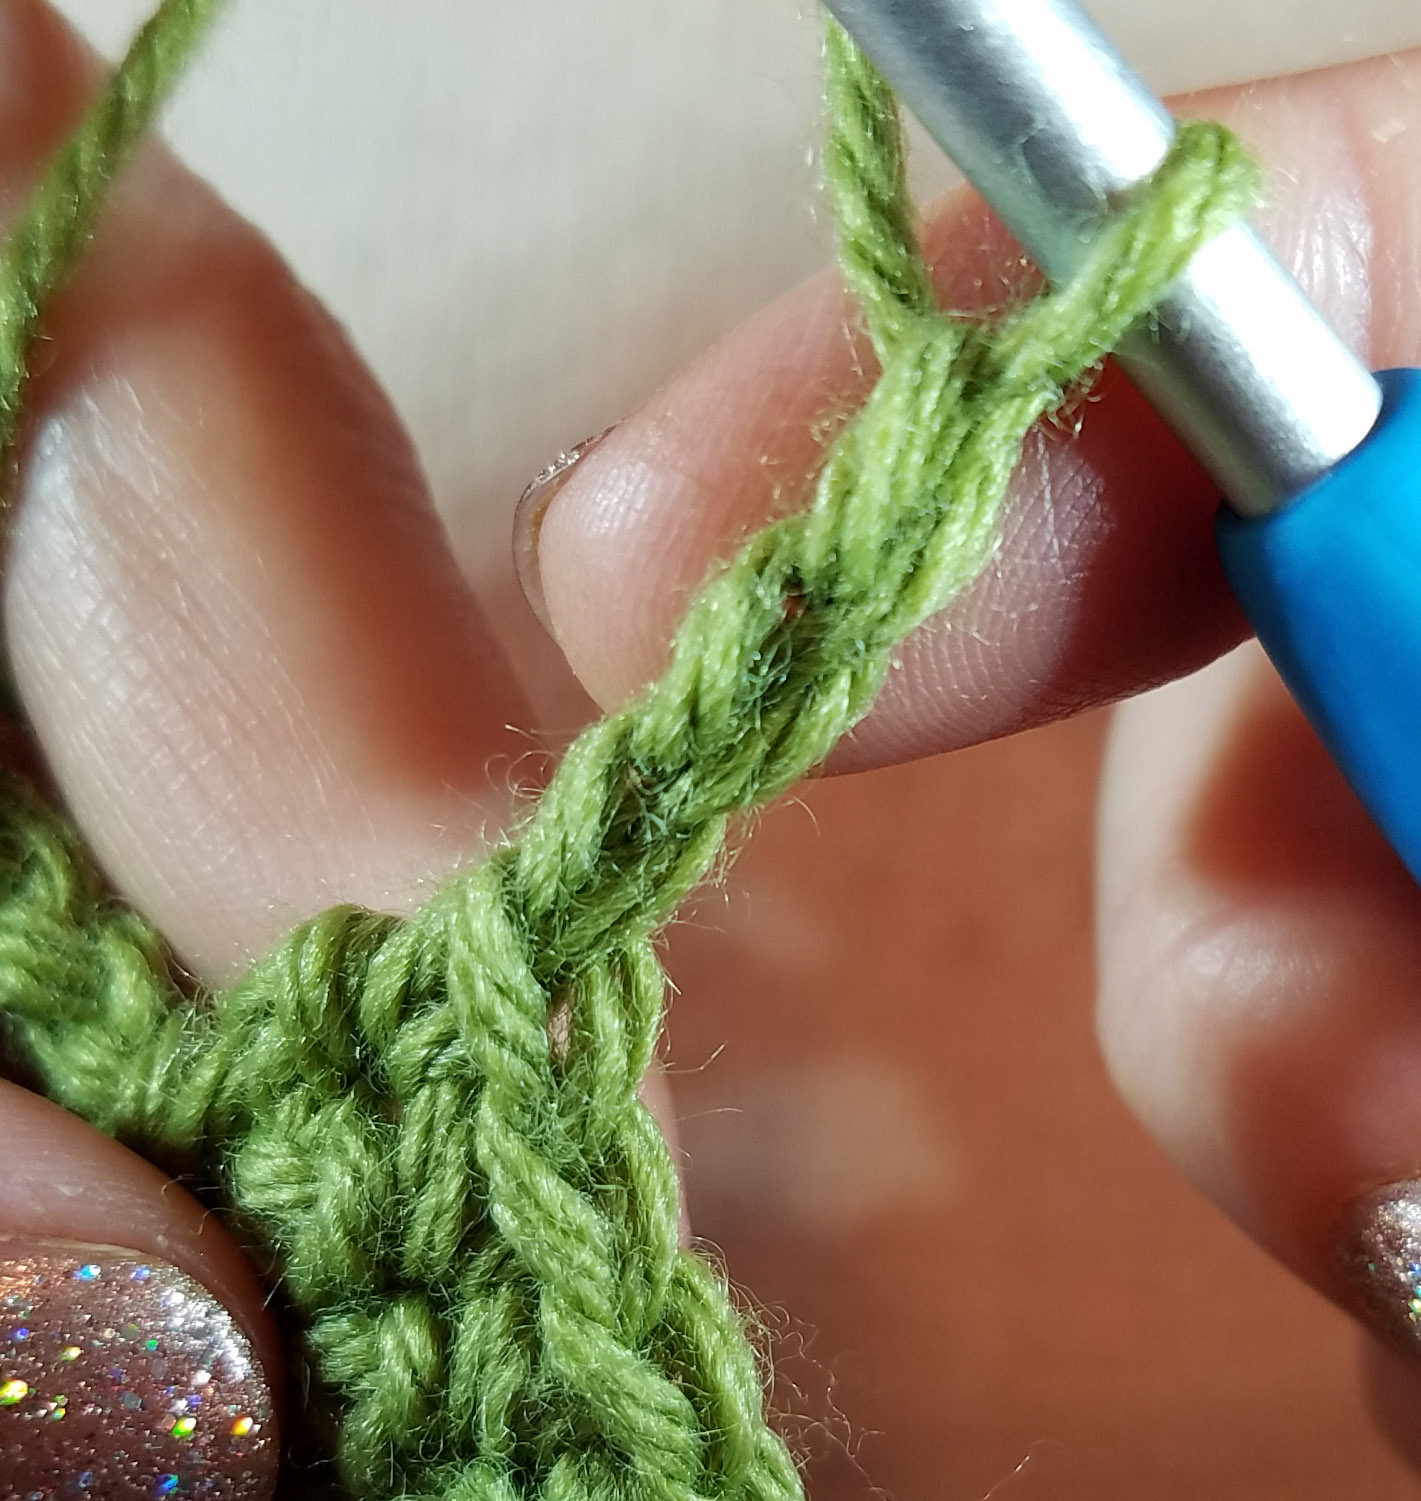
It is important to be sure to capture 2 strands of yarn with the slip stitch that anchors your picot. Whether that is working into a regular crochet stitch or…

picot-2-strands-ch-st-andee-graves-m2h-designs

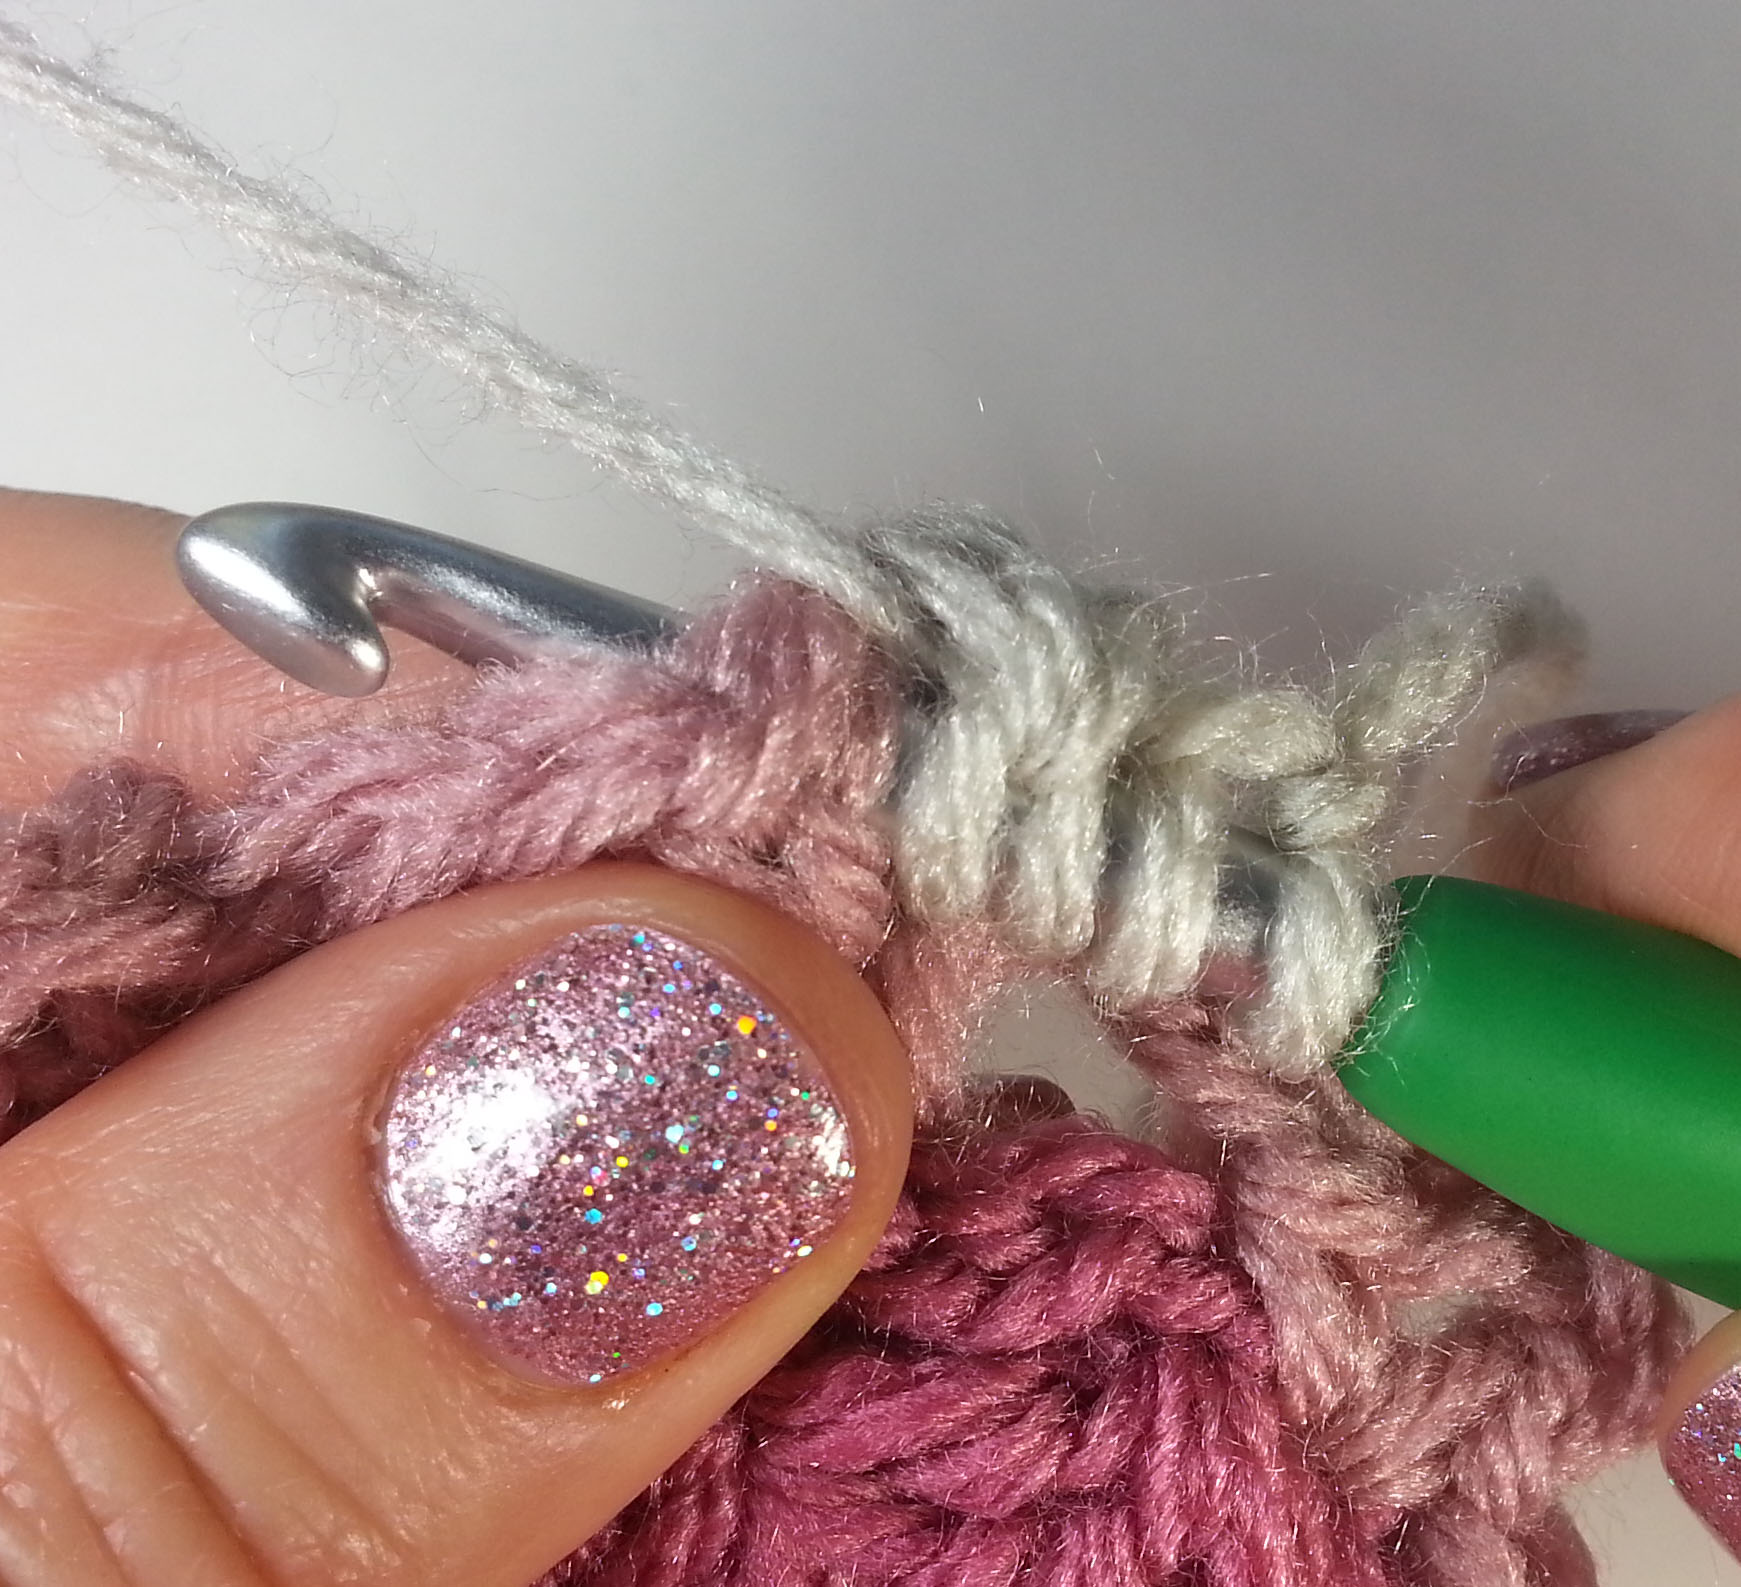
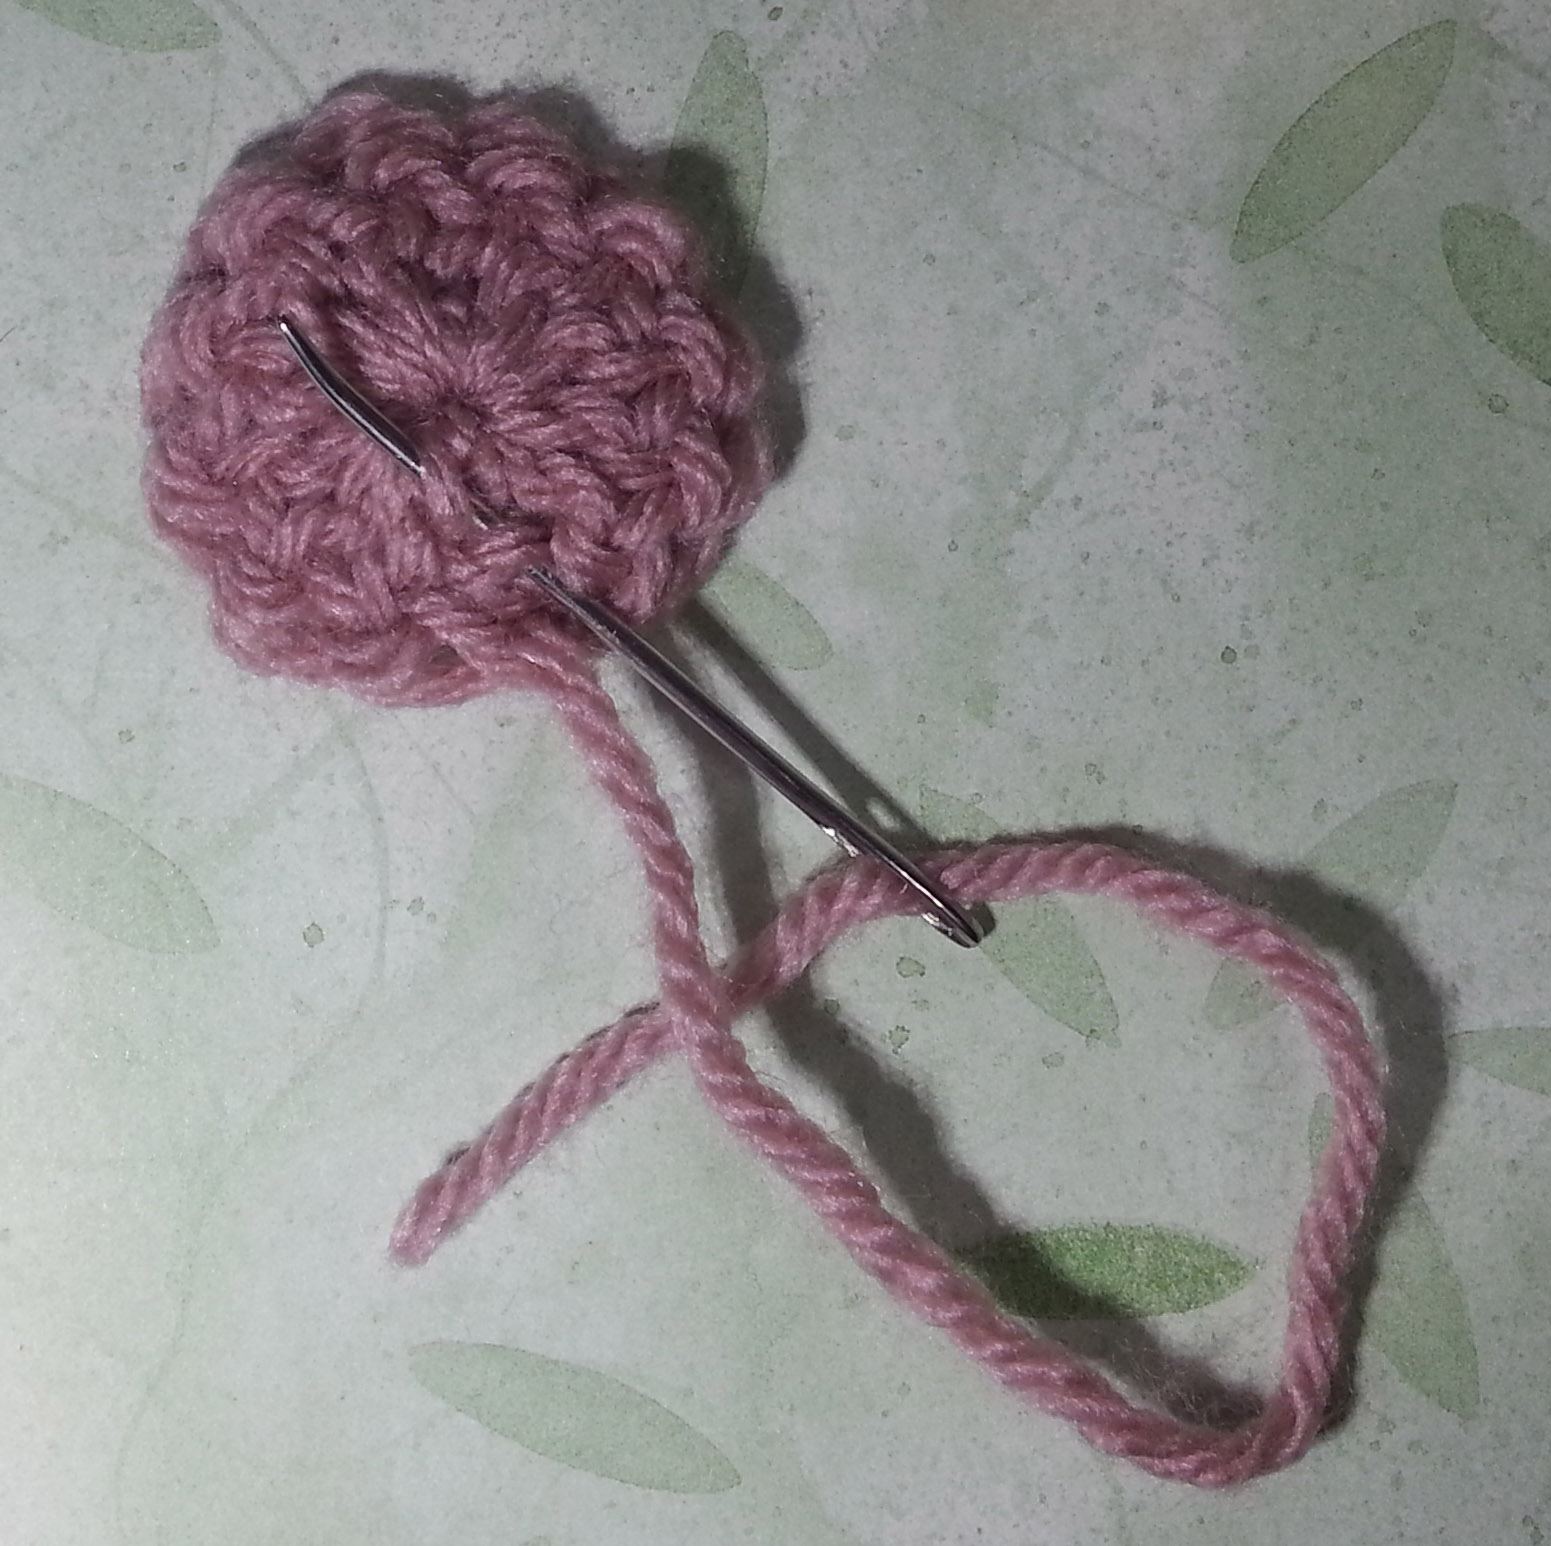
into a chain stitch. When anchoring a picot into a chain stitch I insert my hook thru the V and behind the back bump.

picots-loose-and-tight-andee-graves-m2h-designs

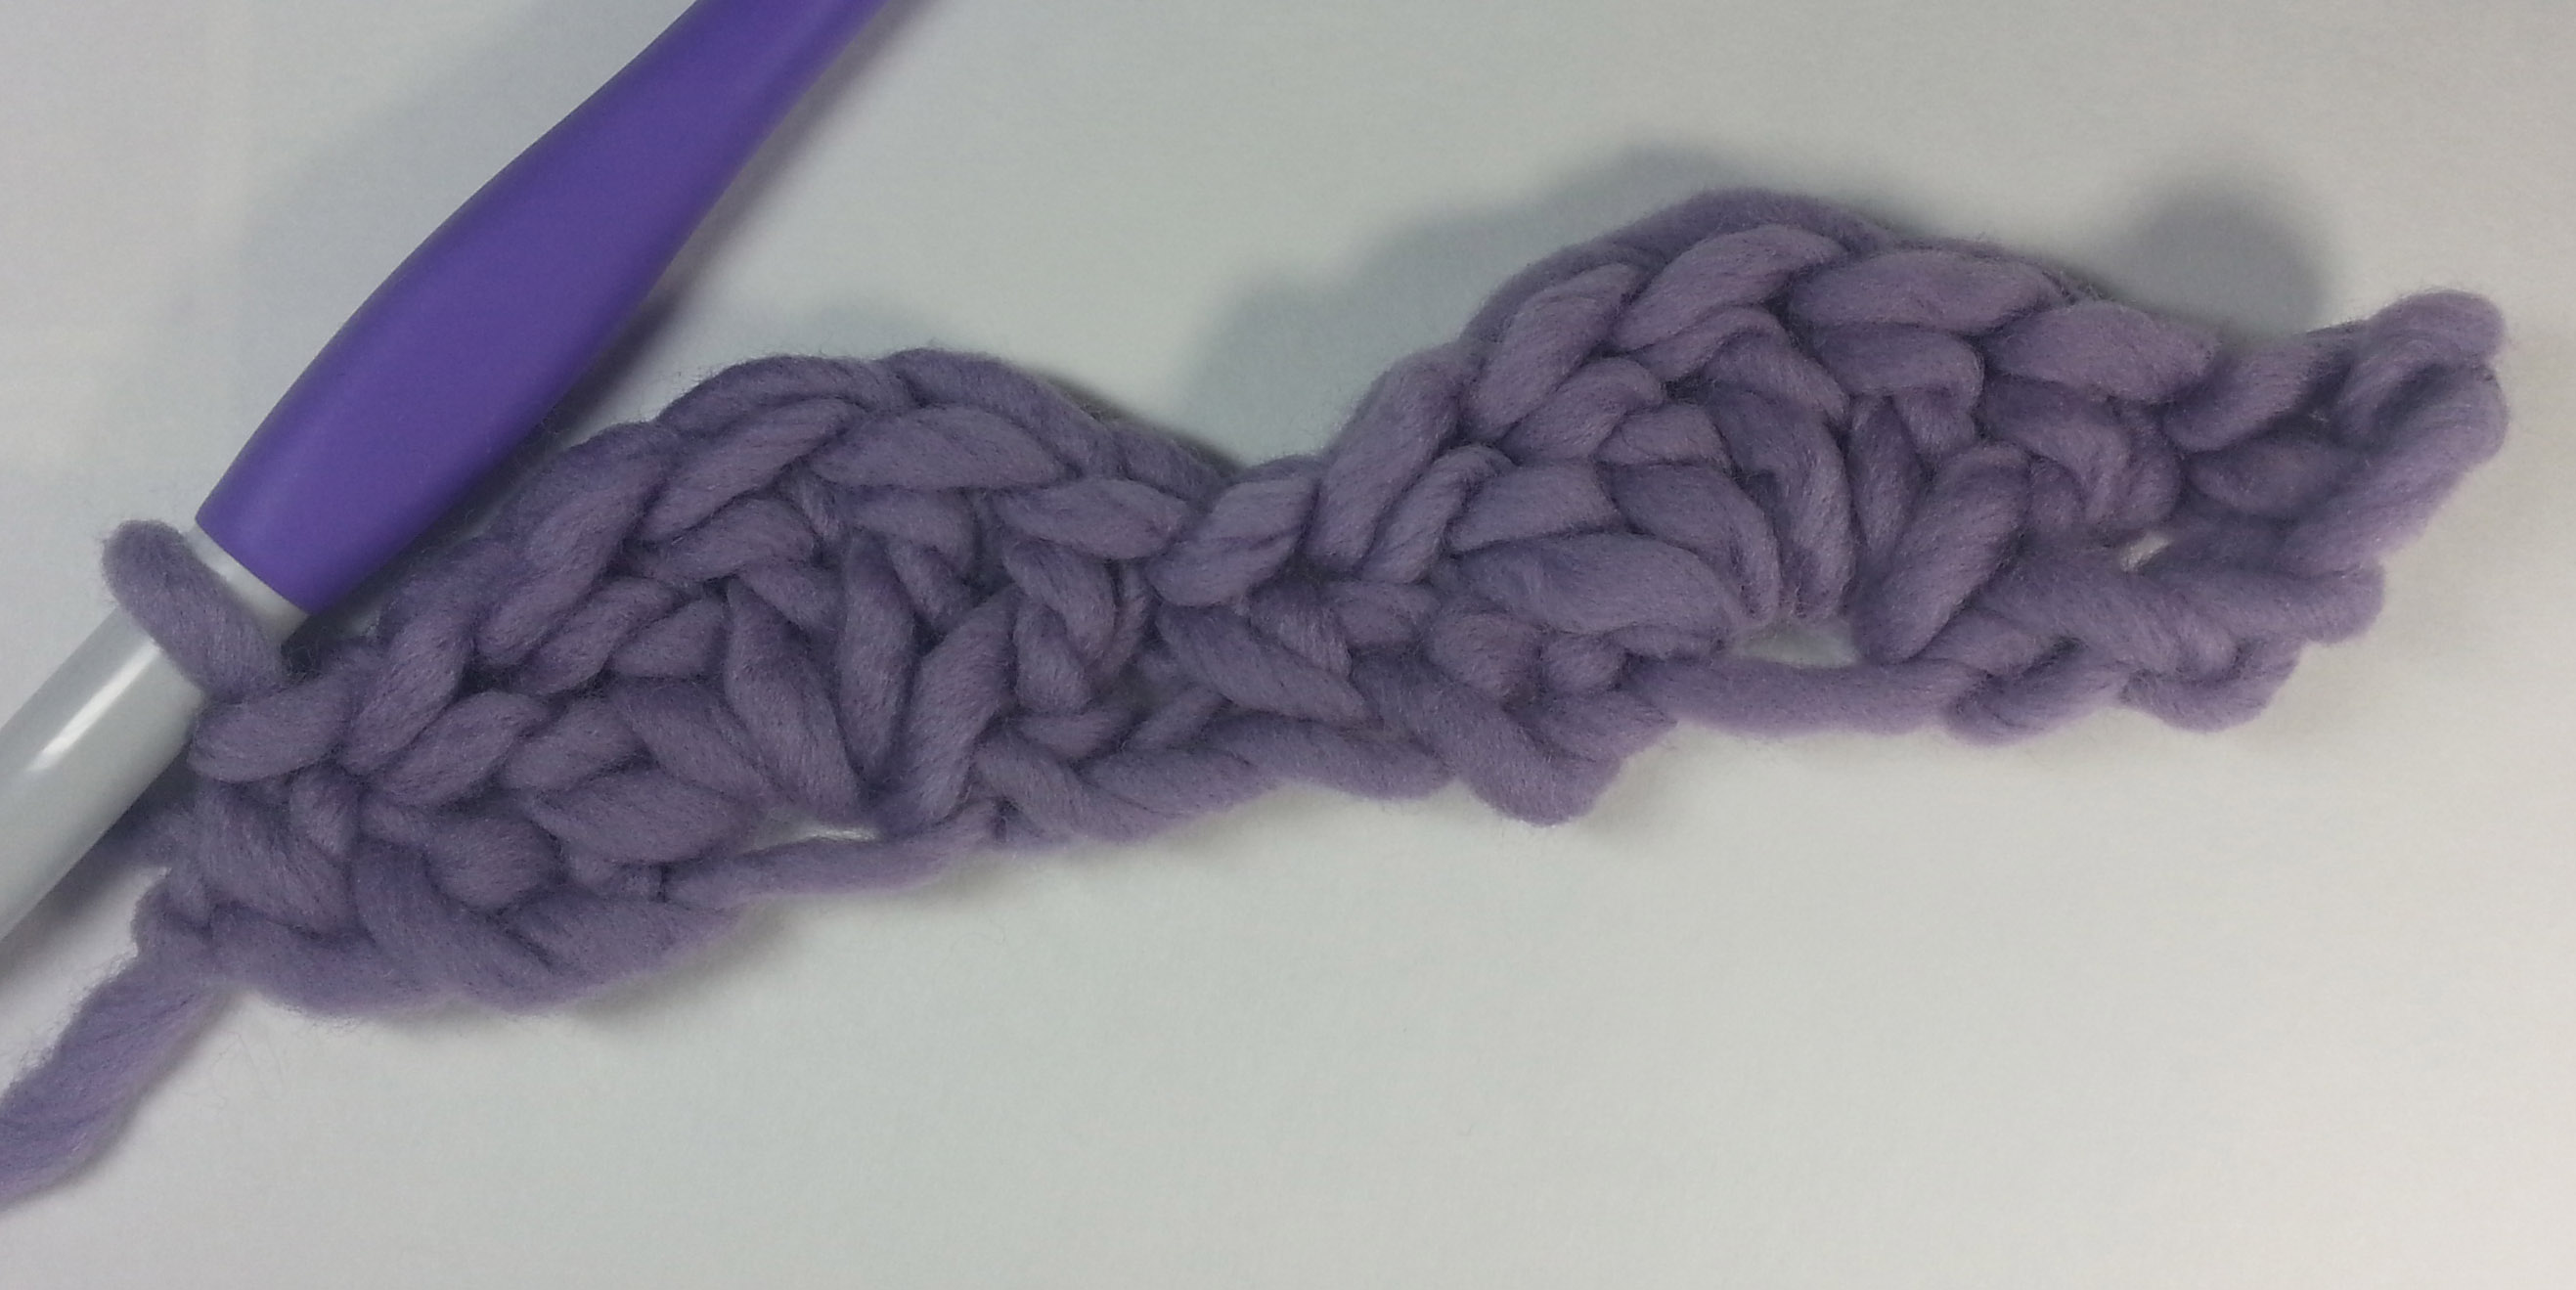
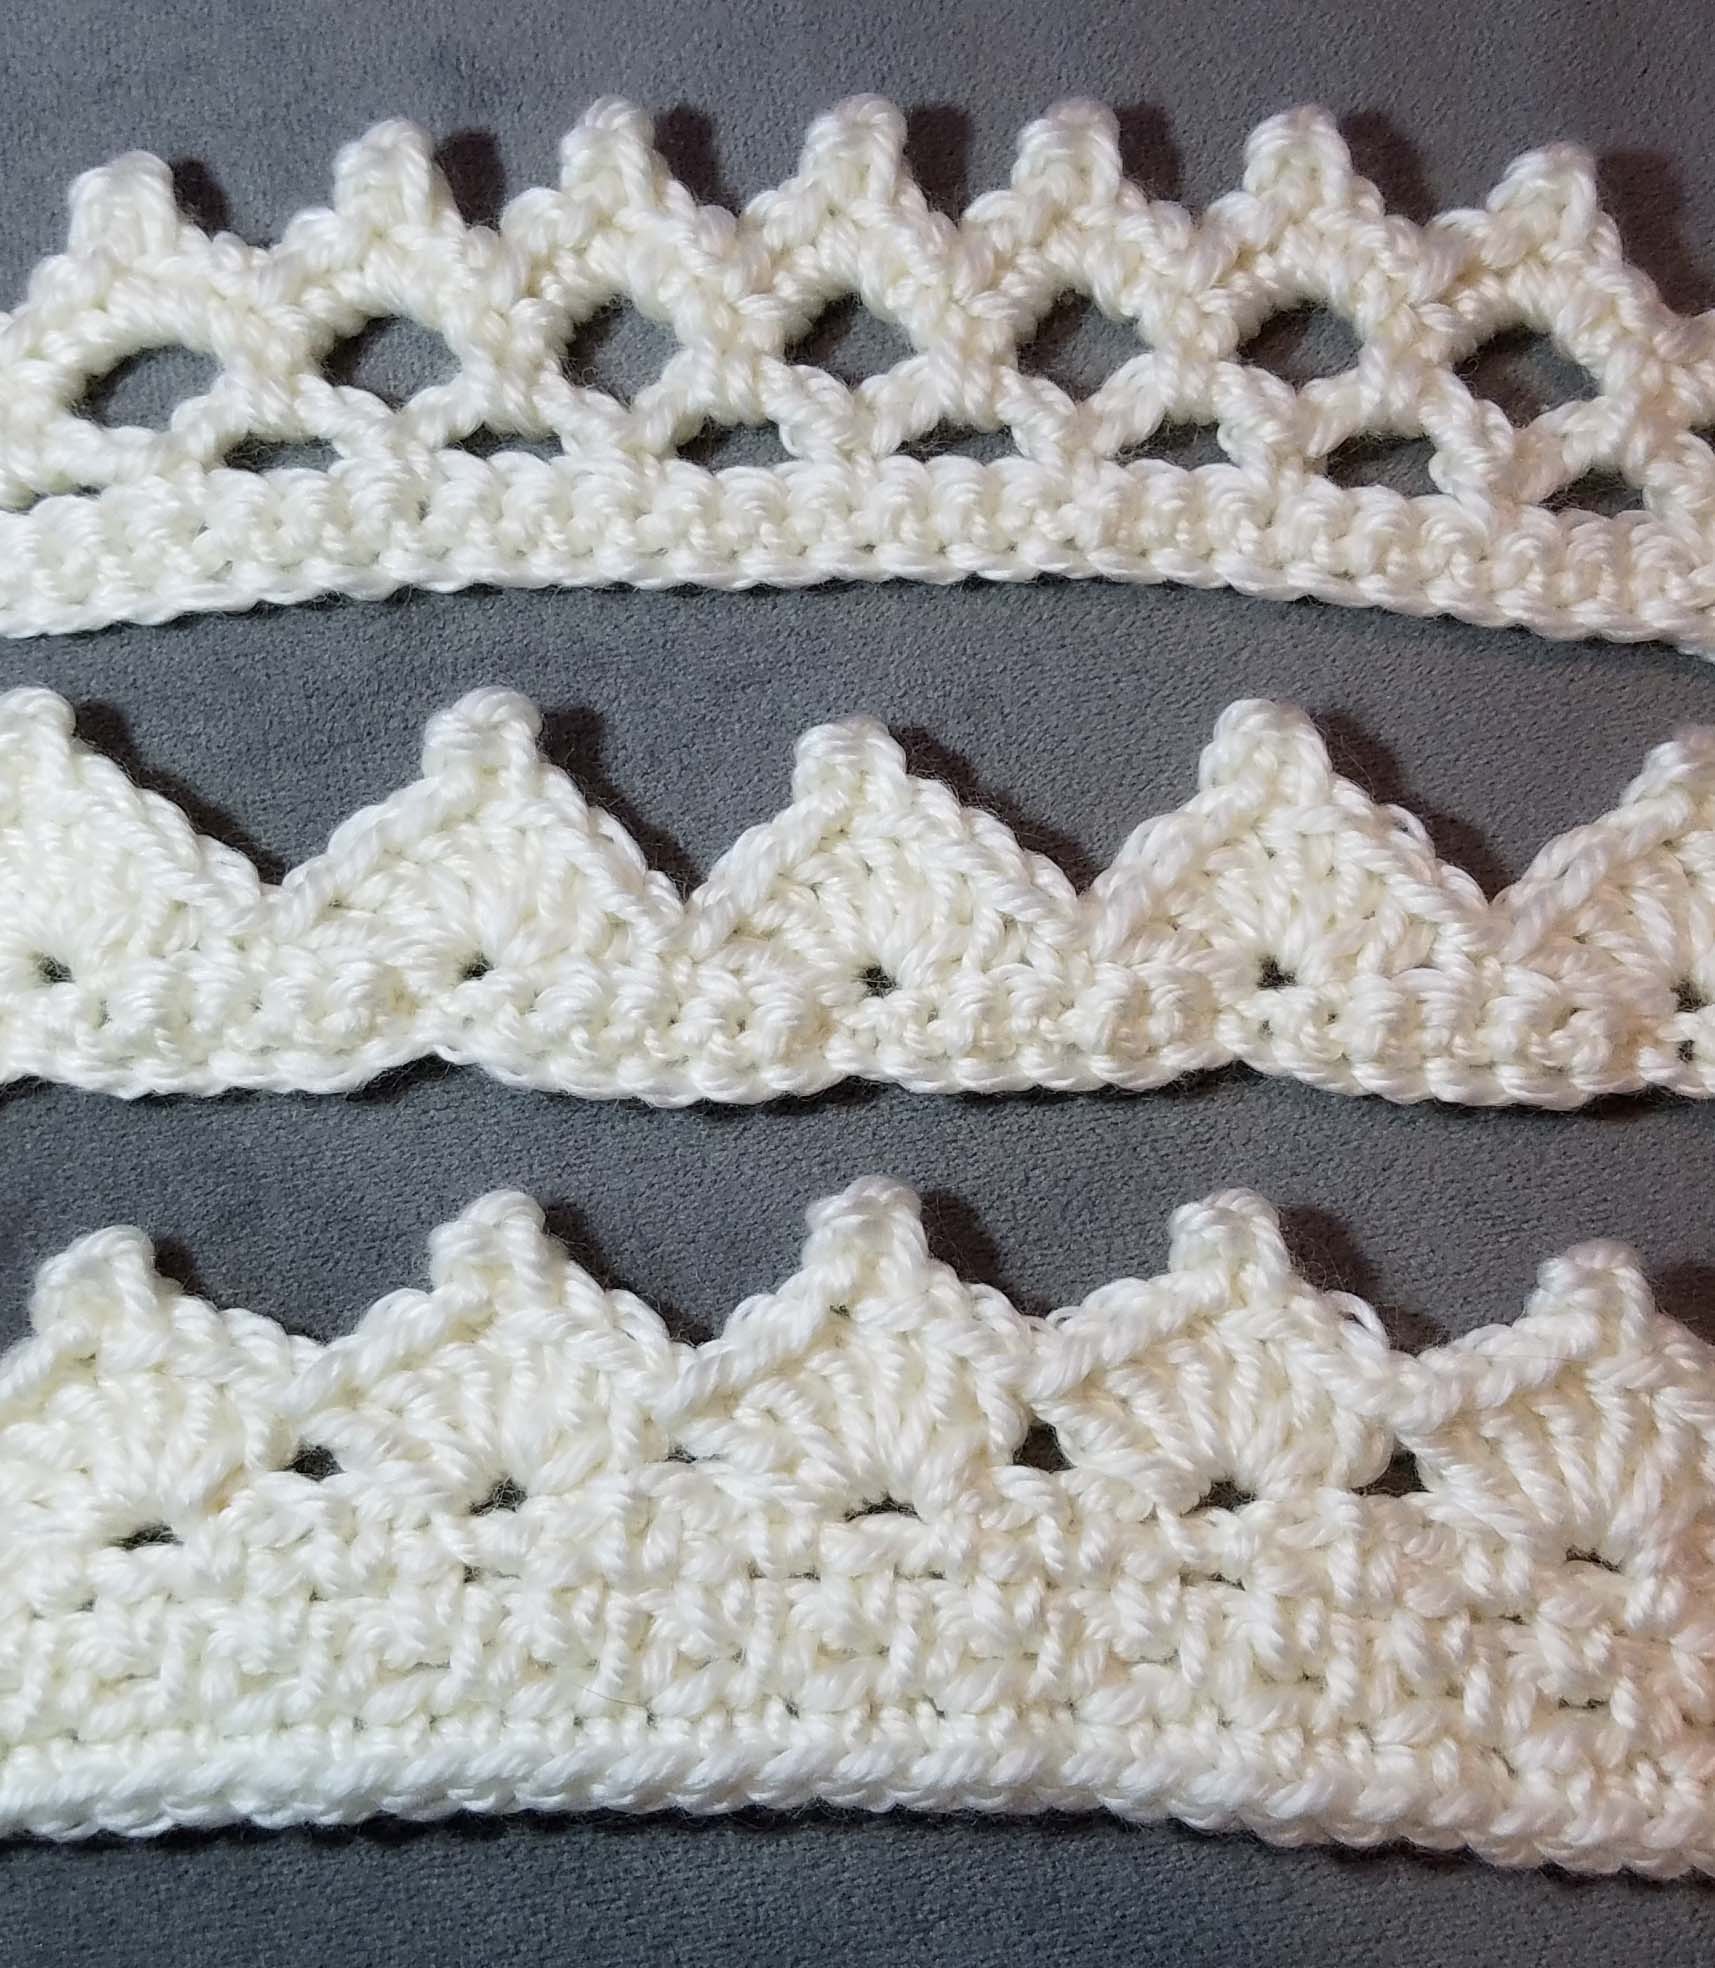
You can achieve different looks by how tight you make your picot’s anchoring slip stitch. The picots on the left shell are worked with a loose slip stitch, the picots on the right shell are worked with a tight slip stitch. The differences are subtle and either way is acceptable, you just want to be consistent thru-out your project.

I have found that making my anchoring slip stitch tighter helps off-set my tendency to work with larger hooks. I’ve only tested this working with “worsted” weight yarn and an I/5.5mm or J/6mm hook. I haven’t attempted picots in any of my “extreme” projects where I work “fingering” weight yarn with an I/5.5mm hook or “worsted” weight with a L/8mm, M/9mm or N/10mm hook.

picots-practice-strip-andee-graves-m2h-designs

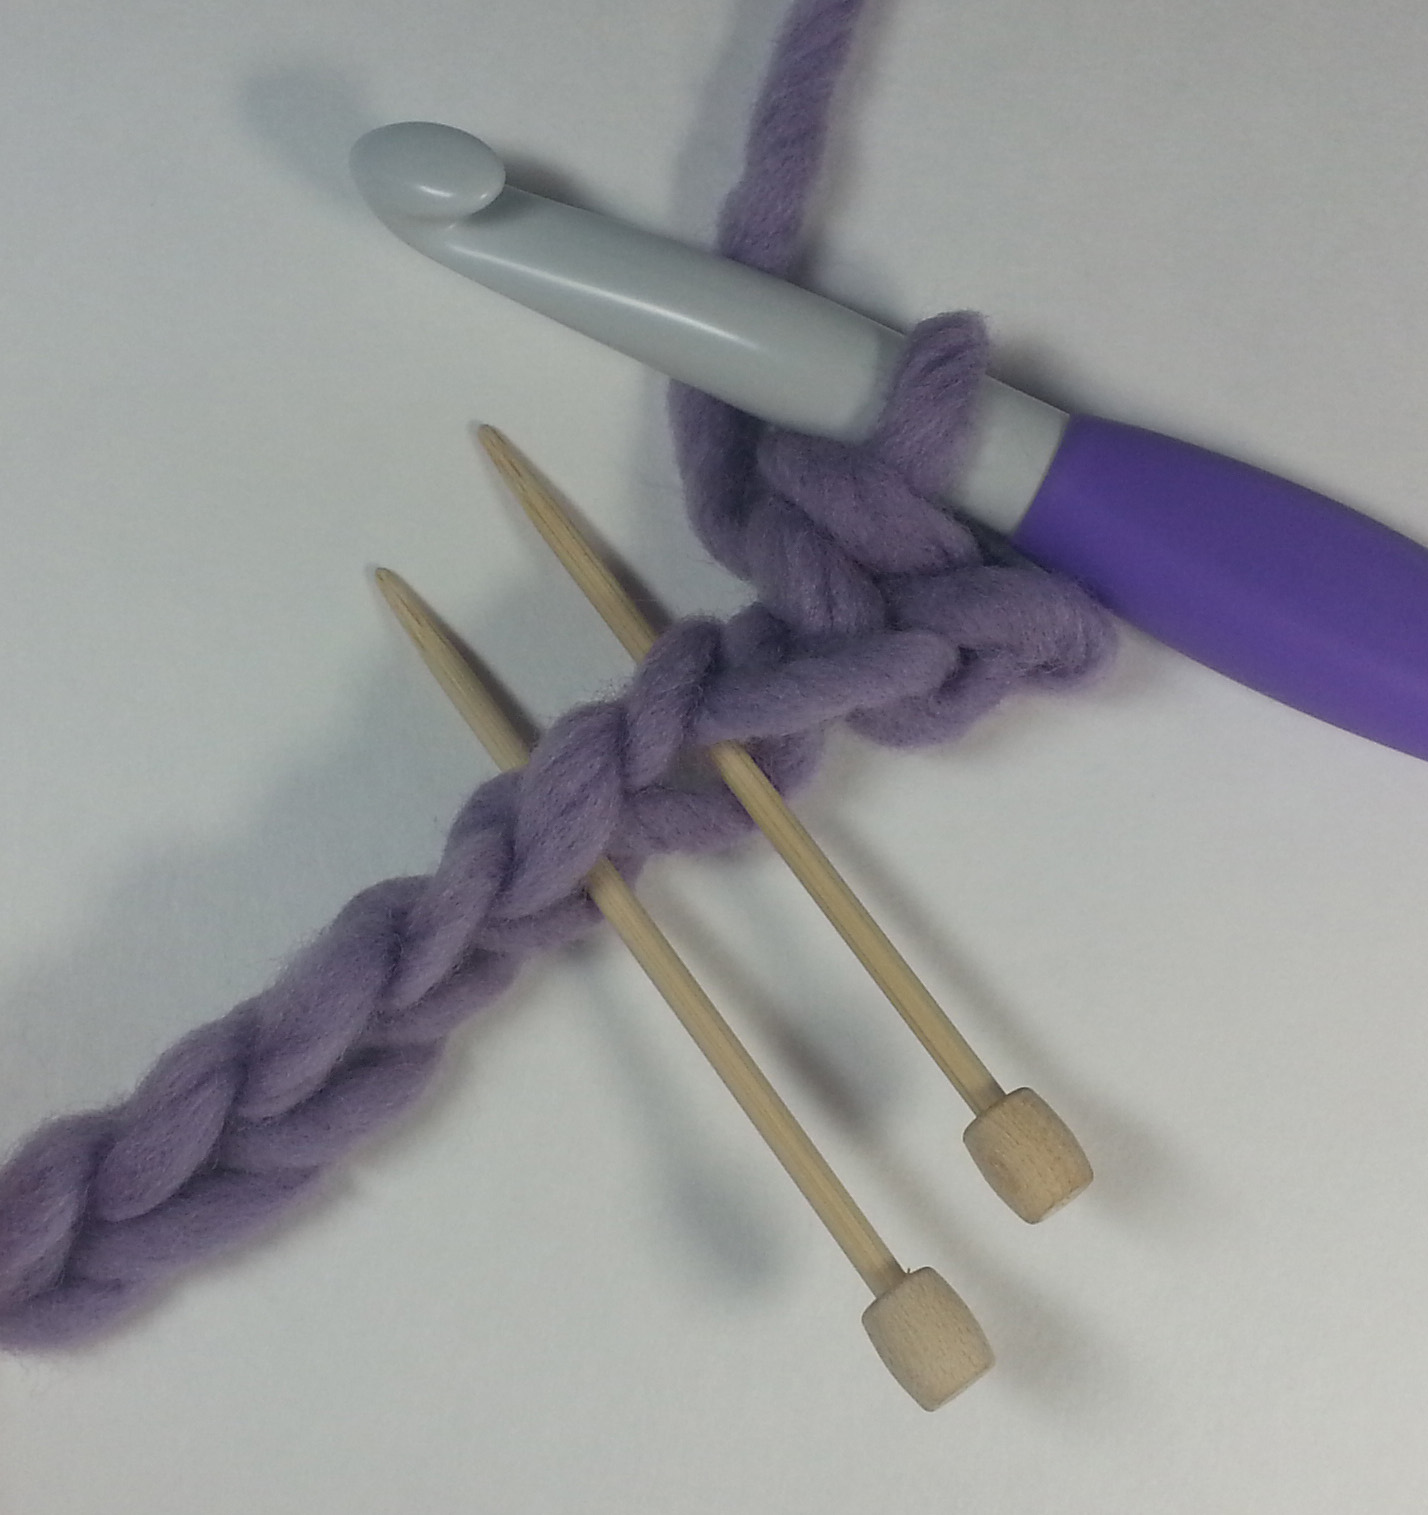
Practice you picot stitches on a long strip of single crochets, work a second row of single crochets and place a picot every other stitch. I make strips like these to practice stitches and try out new yarns. Even if they don’t come out perfect, they make great ties for gift bags or embellishments for greeting cards.

simple-dc-hat-with-picots-andee-graves-m2h-designs

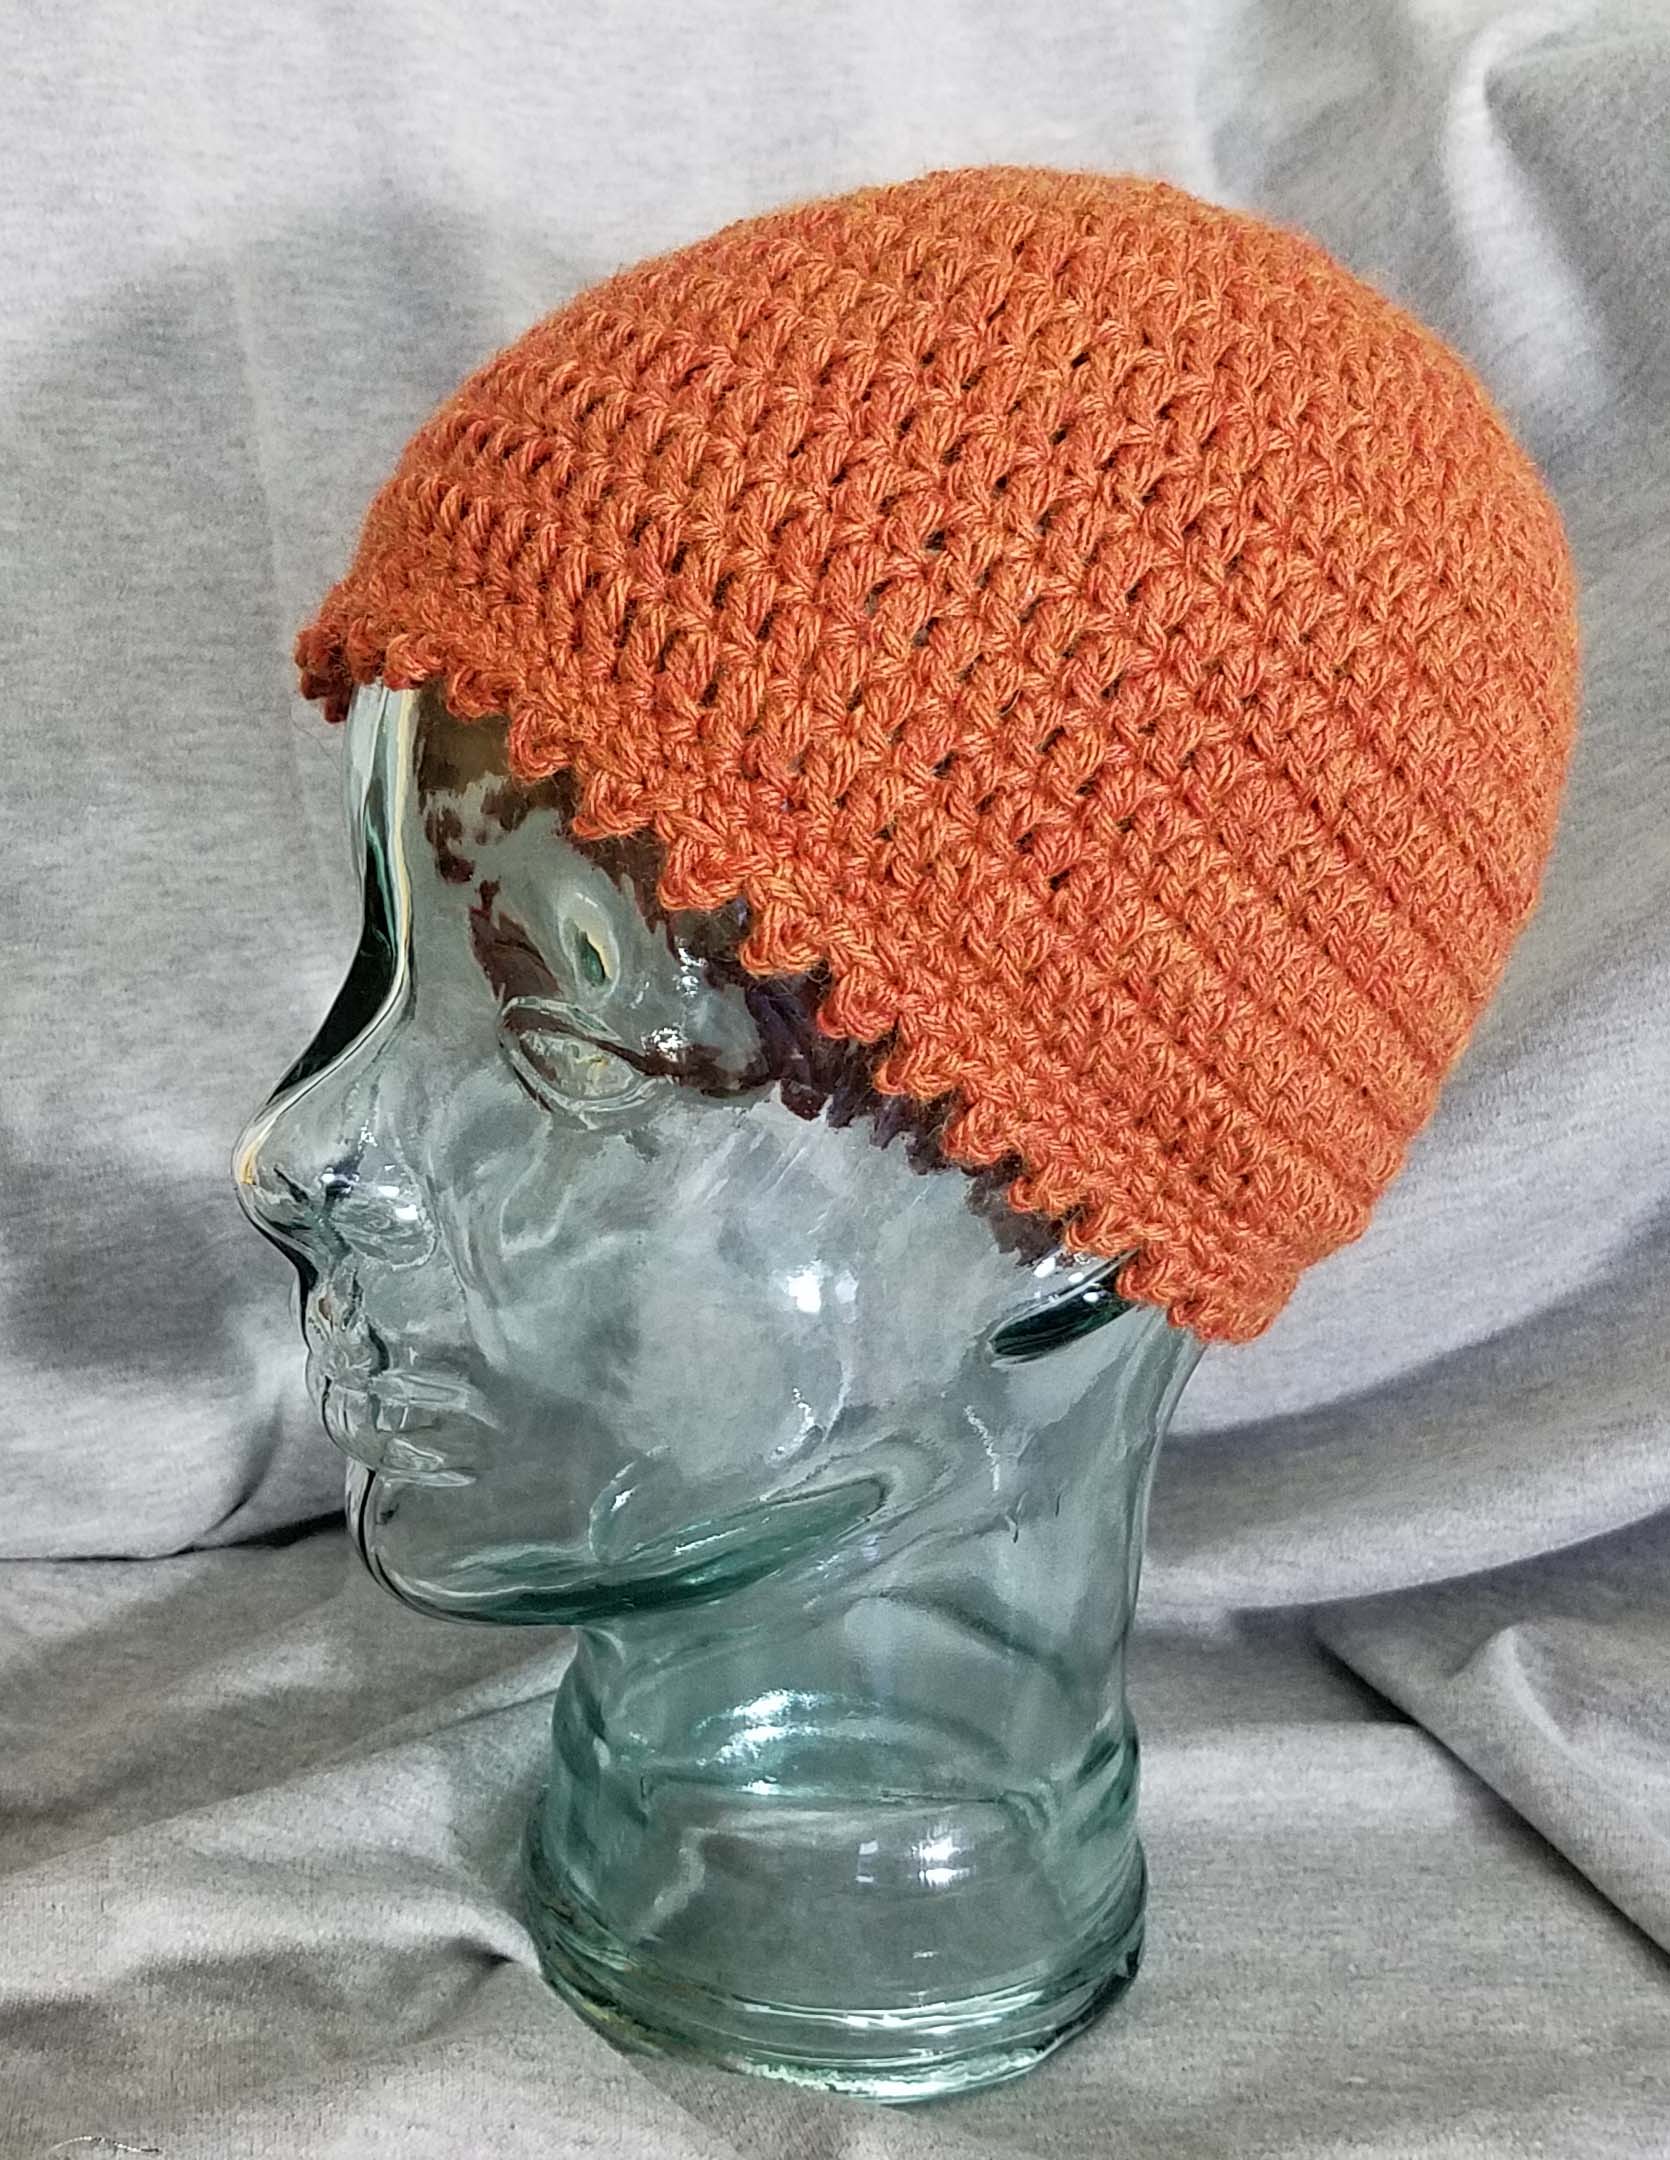
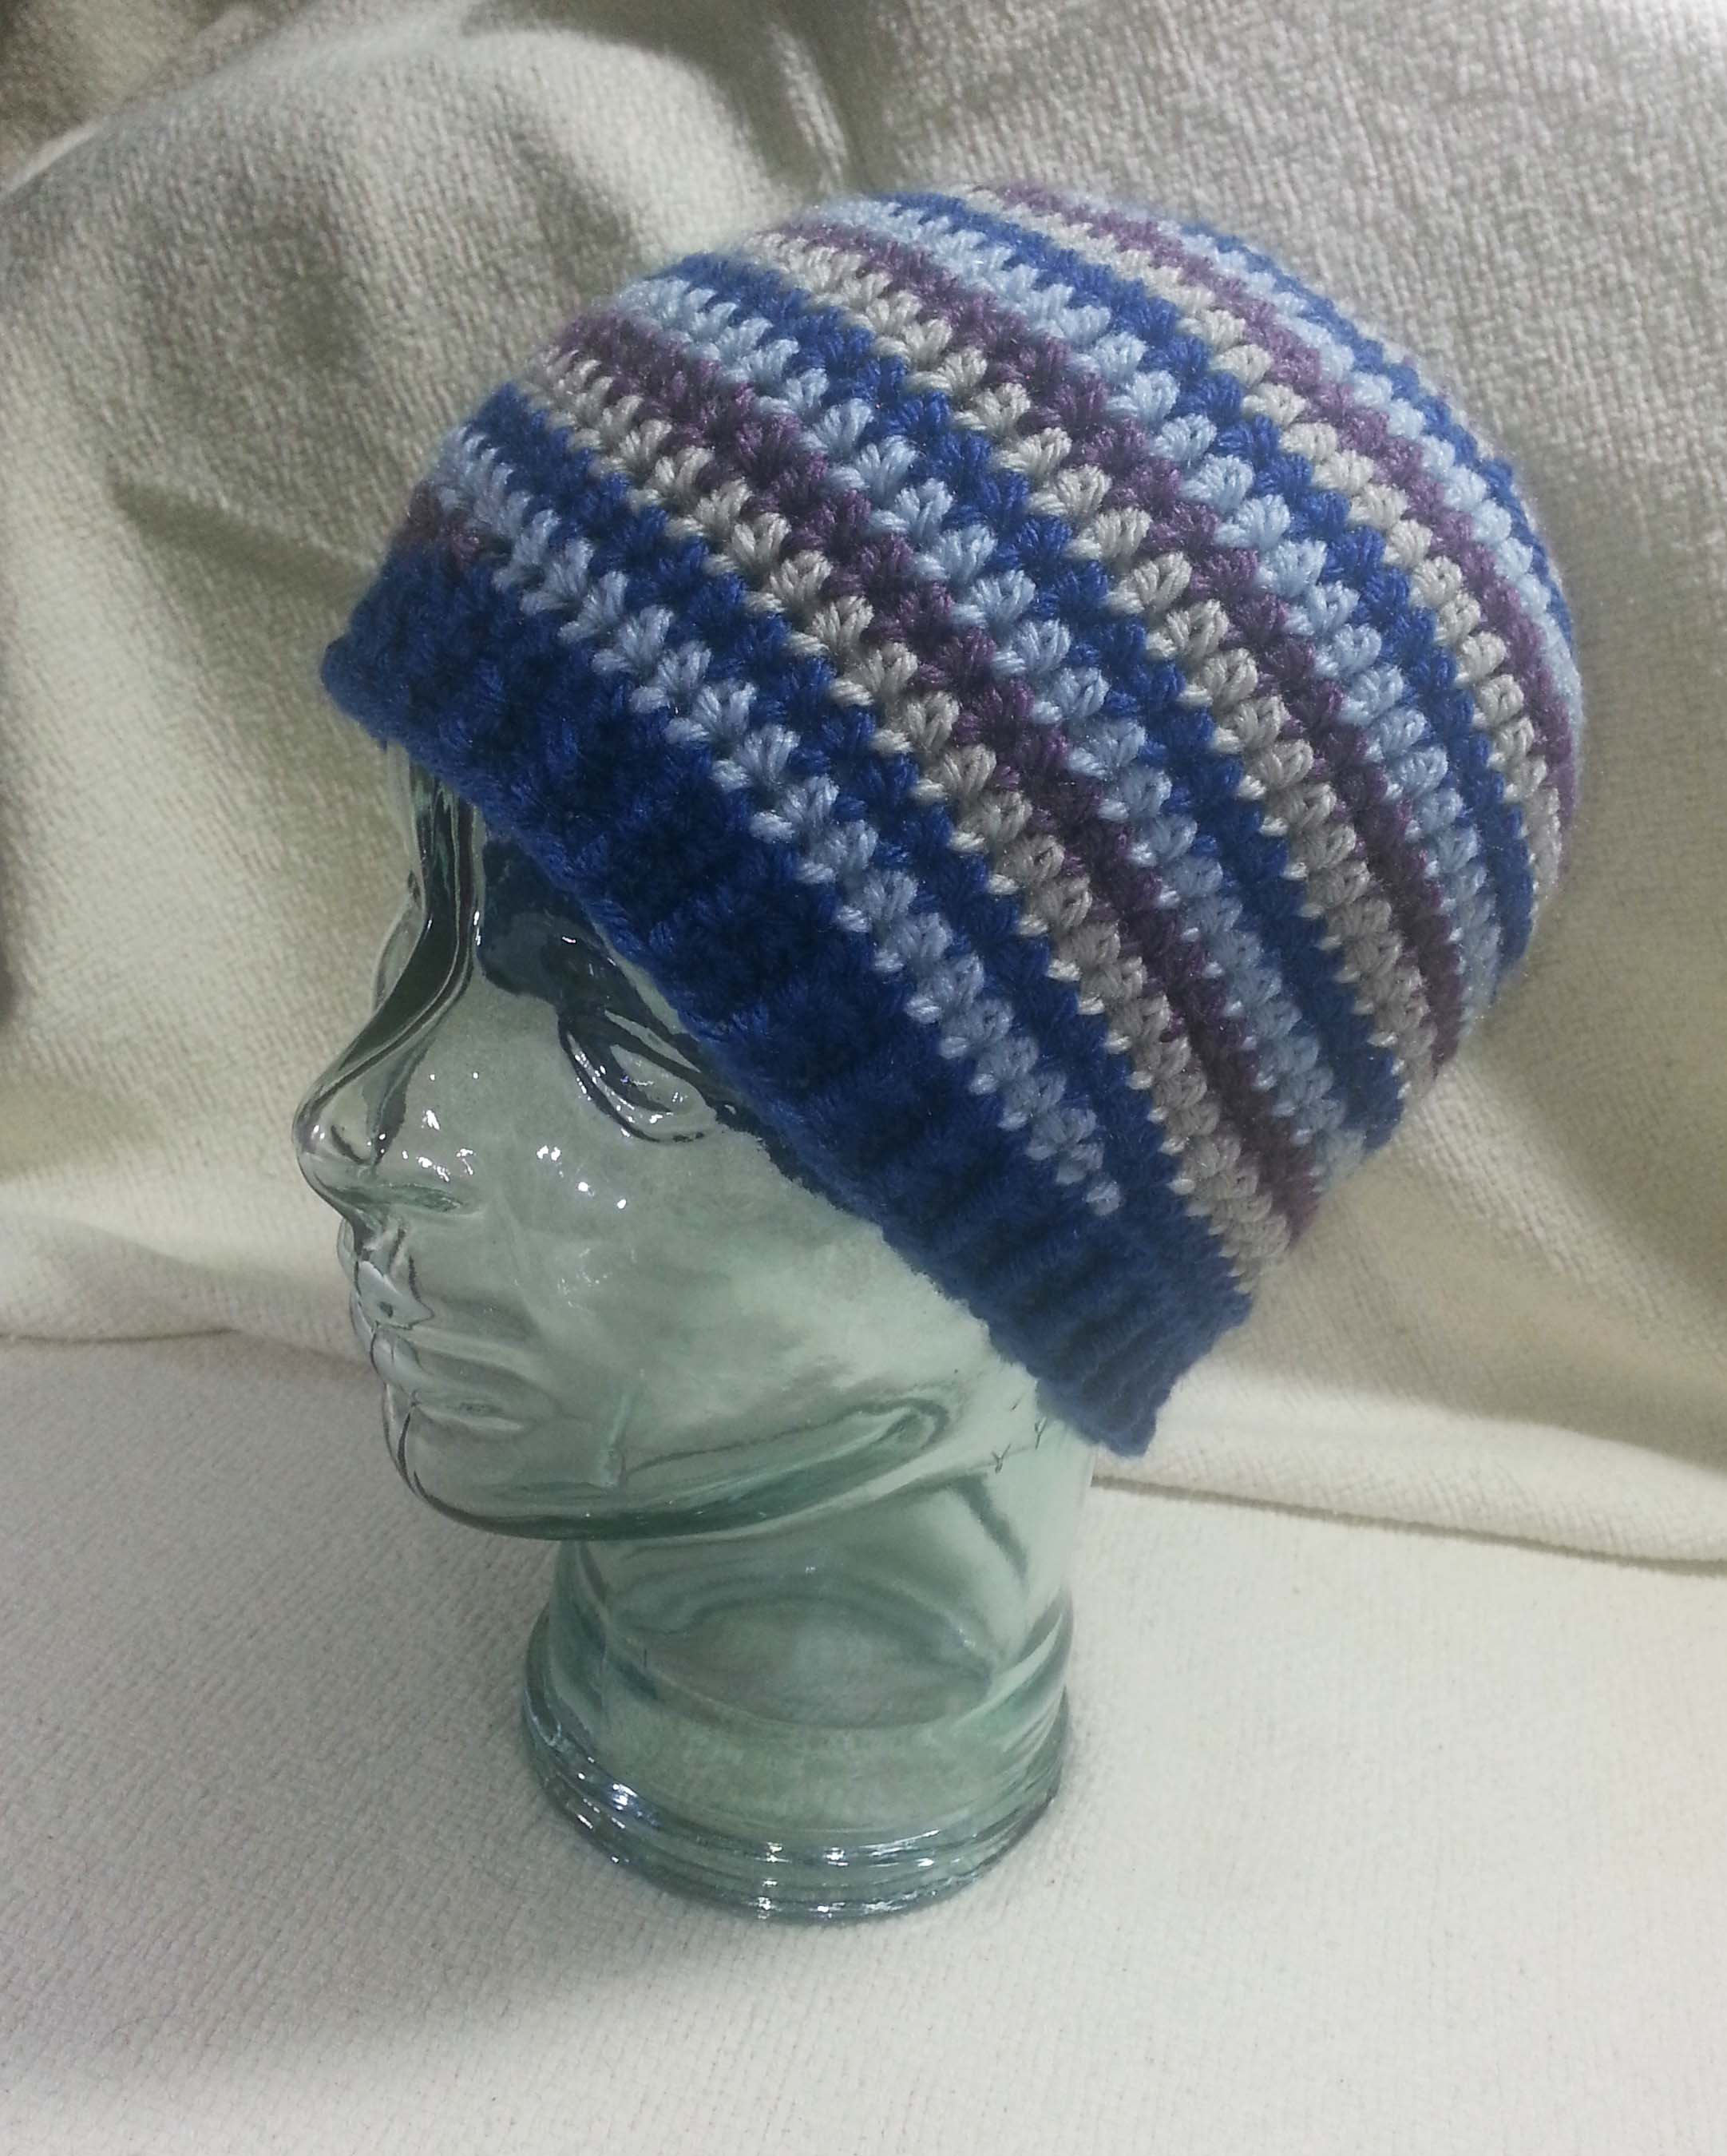
For another practice project, try making my “Simple Double Crochet Hat” but on the last round of the brim single crochets work a picot after each odd numbered sc.

You’ll find after some practice that you won’t have to fear the picot anymore.

Some Holiday Bling

I’ve been super busy making last minute arrangements for our holiday celebrations. We are going to be having a number of visits with family and friends over the next couple of weeks. That means lots of house-cleaning, laundry, wrapping and shipping gifts.

snowy-valley

We’ve been getting some real snow accumulation and days of below freezing temperatures up here on the mountain the past week. The snowy cold weather has definitely gotten me in the mood for Christmas-time. I’ve been thinking about hats and ear-warmers. These are great crochet projects for a quick gift. Especially ear-warmers as they don’t take very much yarn or time. You may recall my Springtime Headband design that I published during NatCroMo 2015.

headband-on-model

I decided to make it again using Brown Sheep Wool’s “Lambs Pride” worsted weight yarn and some sparkly silver beads. A bit of bling for some holiday cheer. This headband might become a gift for one of my family members, or I may adopt it to keep me warm during all the running around we will be doing over the boys’ holiday break from school.

headband-w-beads-flat

It is very simple to make this headband with beads. You’ll need 38 beads. I used size 2/0 E beads, but any bead that has a large enough hole for your yarn to fit thru works. Crochet the headband following the pattern until you reach the Edging section.

headband-close-up

Following the Side One edging instructions as written for stitch placement, *work 22 regular sc, then place a bead on the top of the next sc, (work 2 regular sc, then place a bead on next sc) 18 times,* follow instructions for edging until reach the beginning of Side Two instructions; Repeat the modifications from * to* for bead placement, finish the edging following the original instructions from the pattern.

If you need help with how to add beads using the “hoist-on” method, there is a tutorial about half way thru my blog post: Making a Pendant.

You can use this hoist-on method to add beads to the top of any stitches, not just single crochets. Try using this method to add beads for some bling to any of your holiday projects. Think how pretty some beads could look on the edge of a cowl or the end of a scarf.


Whirlwind Hat

As many of my readers already know, I love to crochet hats. They are a fun quick project and a great canvas for experimenting with stitch patterns and new yarns. I seem to also make them frequently for gifts to family and friends.

My favorite construction method is working crown down in continuous rounds. Because there isn’t a join for each round the hat will come out seamless in appearance. This also creates a nice elastic fabric, a handy attribute for a project that will need to fit comfortably on your head.

But what if you want a hat with color stripes and you aren’t using one of the handy yarns with gradual color changes?

You can create stripes of color in your hats by changing the color of yarn as you work, but that can leave you with a “jog” in the fabric when you change colors.  Another option in this style of color change is to “step down” your stitches in the first color, then “step up” with the new color. It will look less disruptive to the fabric colors, but it is a bit fiddly and not always ideal for the elasticity of your hat fabric.

What is a crocheter to do?

whirlwind-hat-andee-graves-m2h-designs

Fortunately the solution is actually quite simple. Spirals.

crown-of-hat

This method gives you not only a lovely smooth striped fabric, it also creates a visually interesting crown for your hat. You can work with anywhere from 2 to 8 “arms” in your spiral and use a different color for each arm to get the different color of stripes. Using stitch markers will make this method almost mindless as you work the hat.

yarn-management-solution

The only thing you have to contend with is how many balls of yarn you are juggling. My favorite way to keep the yarn from tangling is to have the balls snuggly secured in a container. Then I turn the container as I work each color. In the photo above I used a small clean waste bin to hold the yarn.

As you see in the photo I also have my yarn inside a large clear plastic storage bag. If needed I can toss the hat, hook and pattern into this bag and grab the whole thing to take with me to work on while I’m on the go.

Today I have a hat pattern for you that some may find a bit challenging. Fortunately my video tutorial for my Whirlwind Afghan Square: “Whirlwind How-To Part 1” uses the same technique as the first 8 rounds of the hat, and should help you understand the construction of the spiral.

Whirlwind Hat

Designed by Andee Graves

Skill level:       Intermediate

Finished Size:

21” circumference

Materials:

Yarn

Worsted wt (Sample uses Lion Brand Yarns “Vanna’s Choice” 100% Acrylic (3.5 oz/100g, 170 yd/156 m)

Color A: #105 Silver Blue (used approximately 28 yds)

Color B: #109 Colonial Blue (used approximately 46 yds – this was my Brim color)

Color C: #099 Linen (used approximately 28 yds)

Color D: #146 Dusty Purple (used approximately 28 yds)

Hook

I / 5.5mm

Notions

Yarn/tapestry needle

8 Stitch markers

8 Stitch markers in 3 colors (1 in first color, 3 in next color, 4 in last color)

Gauge

First 5 rounds of pattern = 4” in diameter

Abbreviations/Special Stitches

Adjustable Slip Knot – Beginning tail tightens the loop on the hook shaft. Video on my YouTube Channel if you need help.

Hdc – Half double Crochet stitch

PM – Place stitch marker

FPhdc – Front Post half double crochet stitch

BPhdc – Back Post half double crochet stitch

BPsc – Back Post single crochet stitch

Pattern Notes:

Hat uses 4 colors, follow instructions for using stitch markers so you don’t lose your place.

Color 1 of stitch markers is used to mark last stitch of entire round as well as last stitch/increase point of that color section.

Color 2 of stitch markers is used to mark the other 3 last stitch/increase point of color sections.

Color 3 of stitch markers is used to mark the first increase point in each color section.

When working the first 9 rounds move stitch markers up to 2nd stitch worked in each increase point, For Rounds 10 – 18 you will only be using the markers for the last stitch of each color section.

Instructions

CROWN

Crown at End of Round 9

Rnd 1: Starting with color A make an adjustable slip knot, ch 2, (sc, hdc) in 2nd ch from hook, pull up a long loop and remove hook, with color B *insert hook in center/first ch of round, pull up a loop on hook, ch 1, (sc, hdc) in same center/ch, pull up a long loop and remove hook,* ; Repeat from * to * with Color C and D. PM in each hdc w/end of color/round markers (placing single color marker in hdc of Color D), PM in each sc with first increase markers. [4 sc, 4 hdc]

Rnd 2: *2 hdc in next 2 sts, move st marker to 2nd st worked in each st, pull up long loop and remove hook**, insert hook in next color*; Repeat from * to * 2 times; Repeat from * to ** once. [16 hdc]

Rnd 3: *(Hdc in next st, 2 hdc in marked st, move st marker to 2nd st worked) 2 times, pull up long loop and remove hook, insert hook in next color*; Repeat from * to * 2 times; Repeat from * to ** once. [24 hdc]

Note: Measure gauge after finishing Round 5, if your gauge is small and you don’t want to start over work 10 rounds following the increase pattern, if your gauge is large only work 8 rounds following the increase pattern.

Rnds 4 – 9: *(1 hdc in each unmarked st, 2 hdc in marked st, move st marker to 2nd st worked in marked st) 2 times, pull up long loop and remove hook,** insert hook in next color*; Repeat from * to * 2 times; Repeat from * to ** once. Stitch count for end of Rnd 9 [72 hdc]

SIDES9th-rnd-inc-markers-removed

Remove the Color 3 stitch markers – you will not be increasing any further.

st-marker-side-of-round-9-last-st

I put one of these stitch markers in the side of the last stitch in Round 9, this makes it easier to keep track of the number of side rounds worked.

working-sides-with-color-sections

Rnd 10: * hdc in each st until work in marked st, move marker up to st worked in marked st,** insert hook in next color*; Repeat from * to * 2 times; Repeat from * to ** once. [72 hdc]

Rnds 11 – 20: Repeat Rnd 10.

Rnd 21: Step down to one color: Decide which of your 4 colors you want to be your brim color,

stepping-down-colors

then with each of the other 3 color segments: Hdc in each st until one st remains un-worked before the marked st, sc next st, slip st loosely in next st, pull up a long loop, remove st marker.

With brim color: Hdc in each st ending in the marked st, place stitch marker in last st;

Go back to other 3 colors: slip st snugly in next st, fasten off and pull end thru last slip st.

Stitch counts at end of Round 21 [66 hdc, 3 sc, 3 loose slip st]

BRIM

Rnd 1: Hdc in each st around, move st marker up to st worked in marked st. [72 hdc]

Rnd 2: (FPhdc next st, BPhdc next st) 36 times. [36 FPhdc, 36 BPhdc]

Rnd 3 (FPhdc next st, BPhdc next st) 35 times, FPhdc next st, BPsc next st, loose slip st next 2 sts, slip st snugly next st, fasten off and pull end thru last slip st. [35 BPhdc, 36 FPhdc, 1 BPsc, 2 loose slip st]

Finishing

Weave in tails.

Now have some fun making hats. Play around with the colors you use, make 2 arms of the spiral in 1 color and the other 2 arms in a contrasting color for a 2 color version. Mix it up with using a variegated yarn for one of the arms and pulling solid colors for the yarns you make the other 3 arms with.

Working the Standing DC Stitch

fans-n-lace-sq-closeup-andee-graves-m2h-designs

In my Fans & Lace Afghan Square I started a number of the rounds with the “Standing Double Crochet Stitch”. Some of you may not know this stitch, so I wanted to share a little photo tutorial with tips on working it.

I like the standing dc for starting a new color instead of fastening on the new yarn color with a slip stitch, then chaining 3 to be the first dc. I have used the chain 3 method in the Fans & Lace square too, but only for when I am not changing the color in the next round.

standing-dc-1

To start a standing double crochet, make a slip knot in your new yarn color and place the loop over the shaft of your hook.

standing-dc-2

Yarn over on the shaft of the hook like you would do for working any double crochet in a project. Use you thumb or forefinger to keep the yarn over from twisting away.

standing-dc-3

Insert your hook into the stitch or space where you want to make your first double crochet.

standing-dc-4

Yarn over and pull up a loop. 3 loops on the shaft of your hook.

standing-dc-5

Yarn over, pull thru 2 of the loops on your hook. 2 loops left on hook.

standing-dc-6

Yarn over, pull thru the last 2 loops on your hook. You’ve made your double crochet stitch and attached your new color of yarn in one go. Continue crocheting as normal.

When you are working rounds that end with a slip stitch join there is a little trick that I like to use for working into the standing dc.

standing-dc-7

Insert your hook into the standing dc and pull the tail to get the slip knot (yellow arrow) below your hook, complete your slip stitch.

standing-dc-8

The completed slip stitch (purple arrow) should sit in front of the knot (yellow arrow) of your standing dc.

fans-n-lace-sq-closeup-andee-graves-m2h-designs

In Round 4 of the Fans & Lace Square I started the round with a standing dc as part of a cluster stitch. You could call this a “Standing Cluster”.  In a cluster stitch the base of the double crochets being used are worked first, then the last step pulls thru all the top loops of those stitches to bind them together.

standing-cl-1

I start the cluster with my slip knot loop  and a yarn-over on the shaft of my hook, then insert the hook into the space where I will work the cluster (just like I did for the standing dc).

standing-cl-2

Yarn over and pull up a loop (3 loops on hook).

standing-cl-3

Yarn over and pull thru 2 loops on hook (2 loops on hook).

standing-cl-4

Yarn over, insert into space again (3 loops on hook).

standing-cl-5

Yarn over, pull up a loop (4 loops on hook).

standing-cl-6

Yarn over, pull thru 2 loops on hook (3 loops on hook).

standing-cl-7

Yarn over, insert into space a 3rd time (4 loops on hook).

standing-cl-8

Yarn over, pull up a loop (5 loops on hook).

standing-cl-9

Yarn over, pull thru 2 loops on hook (4 loops on hook).

standing-cl-10

Yarn over, pull thru all 4 remaining loops.

completed-cluster

Cluster stitch completed.

If you haven’t seen the pattern for my Fans & Lace Afghan Square you can find it by clicking here.

Picking colors for Free Form Crochet

Pile of Yarn from Scotts Bluff Valley Fiber Arts Fair

Remember all that yarn I brought back with me from the Scotts Bluff Valley Fiber Arts Fair? I’m putting some of it together with other yarn from my stash to make a free form crochet scrumble.

When I made my first free form scrumble years ago I thought it would be an easy way to use up left-over odds and ends from my stash. That was when I discovered that one of the trickiest things about free form, is picking the colors of yarn to use together. I wasn’t all that happy with my first scrumbles, but I was intrigued enough to persist.

hank-ready-to-go


A great short cut for choosing colors is to pick out a multi-colored yarn that appeals to you, then match it with solid yarns in the colors that are in the variegated yarn. This is exactly what I did to begin this project. I used this hand-dyed yarn as my guide for picking the other colors.

If you are like me, a large percentage of your yarn stash is dominated by a couple of colors. In my case I have lots of Purples and blues. I purchased the hand-dyed hank of yarn knowing that I would have other yarns in my stash that would work with it. If you don’t already have a variegated yarn you want to use in your free-form project, look at your stash for color inspiration before purchasing one.

yarns-for-ff-project

In the end you want a variety of shades as well as colors for your yarn choices. I looked at lighter and darker variations of the colors in my variegated yarn. Like the very deep blue in the furry yarn, that deep color and texture will add some interesting effects to the final fabric. The bright Lime will create contrasting pops.

Hopefully I’ll have some pretty Free Form scrumbles to show you in the next couple of weeks.

Pretty and Easy Foundation

length-of-fndtn

A foundation that I have been playing with a lot lately uses a “stack” of alternating single and double crochet rows. I don’t really have a name for it other than Stacked Foundation.

Update May 16, 2017: I’ve decided to refer to this foundation as the Stacked Rows Foundation. I now have a video on my YouTube Channel demonstrating both the single crochet rows version and the scalloped version that alternates single crochet and double crochet rows.

chain-2

As I’ve said before, I love “small start” crochet projects. You can’t get much smaller than this start, typically I start with chaining 2, then working in the second chain from the hook. The fun part is I can use it for a long foundation, like the long top edge of a shawl or wrap, it could even work for an afghan. The stitch spacing of the first row in the project is the deciding factor for using this foundation.

A few of my testers have had a hard time understanding the foundation. So I thought it would be helpful to do a blog post especially about this foundation.

Right Angle Wrap Photo courtesy of Annie's Publishing/Crochet! Magazine
Right Angle Wrap
Photo courtesy of Annie’s Publishing/Crochet! Magazine

If you have crocheted my design “Right Angle Wrap”, that first appeared in the “Crochet! Magazine” July 2011 issue, you may see some similarity to that foundation. For that design I used stacked rows of single crochet stitches. I came up with this foundation because so many folks had complained to me about the foundation single crochet (fsc) that I liked to use. I found that working rows of 1 stitch could create a flexible foundation that was rather prettier along the “raw” edge than the typical fsc.

length-of-fndtn-scallops

For this latest foundation I am using stacked rows that alternate single and double crochet stitches. Again these are just very short rows of 1 stitch. Because you need a chain 3 to get to the correct height of your double crochet stitch, there is a lovely subtle scalloped look to one side of the foundation.

length-of-fndtn-row-1-wrk-pts

The first row of the project is worked off the opposite side from the chain 3s, into the single crochets. The bright blue dots indicate where your hook is inserted to work the first row of the project once the foundation is finished.

work-sc-in-2nd-ch-from-hook

To start, make a regular slip knot and chain 2. Insert hook under the top leg and back bump of the second chain from the hook.

completed-1st-sc

Make a single crochet stitch.

ch-3-4th-v-from-hook

Chain 3, turn to work a double crochet stitch into the top of the previous single crochet. If you are having a difficult time locating the top of the single crochet stitch, count to the 4th V from your hook, that is the top of your stitch.

insert-hook-front-to-back

The Vs should be pointing away from your hook before you insert the hook. You always want to insert the hook from front to back (or right to left when looking at the Vs pointing downward) for your stitches in this foundation. Finish your double crochet stitch.

ch-1-for-next-sc-row

Next you’ll chain 1 for your single crochet row. Again look at the Vs to locate the top of your double crochet stitch on the previous row. You will work into the second V.

I’ll continue alternating single and double crochet rows until I reach the length I want for my foundation. Typically I begin and end this foundation with a single crochet row.

swatch-of-v-sts-on-stacked-fndtn

This is a great foundation to use for my favorite stitch pattern: V-stitches. I skip the double crochets and work a V-stitch in each of the single crochets. This sample is a simple swatch of rows, usually when I incorporate this foundation I am working an increase at each end, but it works this way as well.

I’ll be re-visiting this foundation in a number of my patterns over the next year. Hopefully this will help everyone understand how to crochet it.

Reading your Stitches – Part 2

Part 1 of my “Reading your Stitches” was posted back in June this summer. Originally I was going to show you the Half Double Crochet stitch for Part 2, but I realized I needed to go a bit more basic first. Instead, I’m showing you some guidelines for working into chain foundations.

Even after over 45+ years of crocheting I find that the most aggravating and tedious part of a crochet project is the beginning. My favorite part is after the first rows or rounds are established, then I can just crochet peacefully along. Even a complex stitch pattern is preferable to the start. This is the reason that I tend to design the majority of my projects with small starts that have increases allowing the work to grow from there. Because I want to get to the “good stuff” as quickly as possible.

All that said, knowing how to work into traditional chain foundations is a good skill to have in your crochet tool box.

The typical start for a crochet project is to chain a length and then work back into the chain. Of course this often leads to the question from beginners about how to work into the chain. Which loop do you work under and how many of them?

Vs on front of Chain Sts

First of all, let’s look at the anatomy of a chain. The tops of the stitches are the V that we saw with the top of our single crochet stitches in Part 1.

Back Bumps of Chain Sts

The chain stitch doesn’t have a “post” or “legs”. There is simply the back “bar” or “bump”. You will see either term used in patterns. It will depend on the publication what terminology they chose.

Chain w larger hook

If you find that your chain stitches seem to always be much tighter than the rest of your crochet fabric it can help to use a hook one size larger for the foundation chain, then switch down to the next hook size when you are ready to begin your first row into the chains.

sts worked in back bump


Sts wrkd in back bump base view
Arrow points to base Vs of stitches worked into back bump.

If a pattern doesn’t specify which loop of the chain to use, I tend to use the back bar. I like the way the finished foundation looks as it echoes the top of the stitches on the last row of the project. When putting an edging all the way around the finished project I find the base of this foundation easier and neater looking to work into.

Traditional method

One of the first ways I learned to work into a chain was by going into the center of the V on the top of the chain and catching the back bar and top leg of the V in the stitch being made. This is the more traditional way of working into a foundation chain.

Trad method free loops

This leaves a single strand at the base of the stitches in your first row. This can work well if you are working pieces of a garment that are going to be seamed together along the base of the foundation rows.

Trad method showing twist

The first row worked into the chain using the traditional method tends to have quite a bit of twist to it before you work additional rows.

Shells worked into chain

It also is more stable when you are starting a stitch pattern that requires multiple stitches worked into some of the chain stitches of your foundation. For example…shell stitches.Wkig under 2legs V

Another option is to work under both legs of the V on each chain st. I find this to be the most difficult way to work into the chain. It does give you a very stable foundation and the single strand at the base is free for seaming pieces together along the foundation. Working into a chain using this method is easier when your foundation chain is loose enough.

Trad method free loops

The finished row will again have single strands at it’s base, but they will be a bit more centered. This row will have a lot of twist to it like the traditional method of working into a chain.

Now that you have the chain foundation out of the way, we are going to take a closer look at the single, half double and double crochet stitches in Part 3.


Scrap Projects: Yo-yos

Pile of Yoyos

One of the easiest of scap projects is the humble crocheted yo-yo. I’ve always enjoyed these fun little circles of color and find them a terrific learning project for new crocheters. When worked in worsted weight yarn with a size I-9 (5.5mm) hook they use just under 2 yards of yarn each.

Beginning chain 4, arrow indicates 4th ch from hook.

I make my Yo-yos by starting with an adjustable slip knot, then chain 4,

11 dc in ch

11 double crochet in the 4th chain from the hook,

Tightening center, arrow indicates beginning tail.

Tighten the center of the stitches by pulling the beginning tail snug,

Insert hook in top of Tch

Insert hook in top of the beginning chain 4,

Sl St completed

Slip Stitch to close round of stitches. Fasten off.

Weave in beg tail

Weave in the beginning tail in the center. You can weave in the ending tail as well, or use it for sewing the yo-yos together. For my yo-yos I did weave in the ending tail, because I will be crocheting these yo-yos together.

Weaving in the ending tail. Arrow indicates the slip stitch.

To weave in the ending tail I like to insert my yarn needle thru the top of the chain stitch that I had slip stitched to.

Weave in end tail 2

Then I turn the yo-yo over and weave the tail thru the back bumps of that beginning chain and on around the center of the yo-yo. I pull this end gently when weaving it in so I don’t collapse the side of the yo-yo.

Finished Yoyo

I trim off the excess yarn from the yo-yo and it is ready to join my other yo-yos. I will fill a bag with yo-yos until I have collected enough to make them into a project.

You can use yo-yos in any number of projects. My favorite is to make scarves with them. You can also make yo-yos in other yarns or threads. You will need to adjust the size hook you use to get a yo-yo fabric that you find pleasing.

Before the Instructions Begin

As my long-time readers are aware, I put a lot of work into my pattern writing. This has been amplified since I started my independent pattern line “M2H Designs”.

My goal when writing a pattern is to create a document that will be clear to follow. Many of my patterns are fairly easy by design and when I use more complex crochet techniques I try to have explanations or links to tutorials for the crocheter to use.

Some of my designs are published in magazines or at yarn company websites. In those cases I have less control over how the pattern is edited and presented. Even so, with attentive reading of the pattern most crocheters can figure out the pattern. Since I started my designing work by writing patterns for magazines I tend to follow a similar format in my indie line.

One thing to remember, all the information in the pattern is important. Sometimes you might want to skip right to the instructions to get started, but that can make completing the project much more difficult than it needs to be. The information at the beginning of the pattern isn’t there just to take up space. Reading thru it can make a big difference.

Skill Level

This is an estimate for the average crocheters skill. Keep in mind what your crochet experience is. You may have been crocheting for 30 years, but if it is the first time you’ve tackled a garment or item with shaping you might find you need to take it a bit more slowly and you might find aspects of the pattern confusing.

Finished Size

This is handy information especially if you are making a wearable item. The finished size should be the actual size of the garment, not necessarily the size you have made, ie….your bust size is 34 inches, but the finished size bust is 40 inches for the size recommended for your bust measurement. That is because the designer has created a garment that will have 6 inches of positive ease. Knowing the finished size can help you make decisions about the fit and help you estimate how the item will fit the body it is intended for.

In the case of blankets or afghans this size information can also help you decide if the finished project will be as large or small as you want. For example, if you want to make a baby blanket from a larger blanket pattern, you know that you will have to change the length of your starting foundation. Or the reverse, you want to make a larger blanket from a baby blanket pattern. You will need to purchase more yarn at the start of your project to be sure you have enough.

materials gathered

Materials

This is where the Yarn, hook and other tools needed for the project can be found. Under Yarn you will see information on the brand and name of the yarn used, the yardage needed, and the fiber content of the yarn. You will also be given the size of the hook that was used, though you may want to use a different size once you check your gauge.

Also listed in this section will be things like buttons, beads or zippers. It is a good idea to gather all these materials ahead of time.

Gauge

Ah gauge, everyone’s favorite part of yarn crafting. Not really. But it is important if you want your finished project to come out the right size. Being off in your gauge can mean that you will not have the right amount of yarn or that the finished fabric will not drape properly.

Gauge is especially important when you are making a fitted garment like a sweater or skirt. It’s a little less important for items like blankets or wraps, but being off in gauge for those items can still run you into difficulties like yardage or the quality of your finished fabric.

Special Stitches

This is one of the sections most over-looked in a pattern. Lots of times folks assume they know what a listed stitch is, but there isn’t really a standardization of stitches in crochet. Checking this section over gives you a clear definition (and the abbreviation) so you can be certain what the designer means when they use a term like “V-st” in the pattern instructions.

A V-stitch could be 2 double crochet stitches worked in one stitch and separated by 1 chain stitch or 2 chain stitches, could even be 2 single crochet stitches worked in one stitch and separated by 1 chain stitch or 2 chain stitches. Reading the special stitches section beforehand and referring to it while working the pattern will keep you on track.

Pattern Notes

This section is a great place to understand the pattern better before beginning. This could be an overview of how the garment is constructed, ie…Cardigan is worked in 2 sections off top and bottom of a center back foundation row, then joined at under-arm and sleeves worked outward. Remaining fabric is worked around the body opening to create the rest of the cardigan.

Instructions

After reading thru all the previous information and preparing for the start of your project you can now concentrate on working the instructions and completing your project. It’s a good idea to read thru the instructions once before you start crocheting. They may not make complete sense to you, but if you do one read-thru before starting you may find them easier to follow when you start crocheting.

If the pattern is in a book or magazine you own it can help to highlight areas that you think will be tricky for you. If you are making a garment from a pattern that has instructions for more than 1 size, it is a good idea to highlight the instructions for the size you are making.

Highlighter Tape

If the pattern is in a publication you can’t mark up purchase some “highlight” removable tape. I found mine at my local yarn shop and it is very handy. You may be able to find it at your local office supply store or college bookstore.

Hope this all helps you the next time you are tackling a new pattern.


Blocking a Ruffled Edge

Most Tuesday mornings my friend Val and I get together to crochet and visit. This last Tuesday we had a project to work on together. She wanted to block a shawl that has a deep softly ruffled border.

Eleonora Shawlette - Andee Graves/M2H Designs

Last summer Val had used my Eleonora Shawlette pattern to work up a shawl in some Silk/Rayon blend yarn she had in her stash. She has been working to decrease her stash a little and had been in search for a project for that yarn for ages. Once she finished the Eleonora we gently blocked it to open up the stitches a little, though not the aggressive blocking that I usually do.

Val liked the shawl, but she still had a lot of that yarn left over. She enjoys what we refer to as “seat of the pants” designing. The two of us have experimented with various crochet projects over the years and she doesn’t have any problem pulling out her work if she isn’t happy with it. She asked me if I could figure out a way to add to the shawl to use up more of the yarn she still had left-over.

In my original Eleonora the lace border fits with just a soft bit of ruffle.  I used 2 different yarns for the sample I crocheted. Berocco “Boboli” for the body and the little finer weight “Folio” for the border. This reduced the ruffle effect.

When Val crocheted her shawl with the same weight yarn for the body and the border, the ruffle was more pronounced. She liked the ruffle and for the additional rows she wanted even more ruffling.  She also liked the openness of the lace work and I kept that in mind as I was designing the new rows. I started sketching stitch diagram ideas for how to transition from the lace border to add length to the shawl and use up more of the yarn.

When she started working the new rows we kept experimenting with how much she could add to the shawl and still have enough yarn to complete it. She finally finished it in mid-May and told me she wanted to block it. We’ve both been a little busy with the start of summer-time, so this week was the first time we finally got a chance to block the shawl.

I brought my blocking mats and T-pins, Val dug up a couple of towels and her spray bottle to use. We got everything laid out on the floor and discussed what we wanted to do with the blocking. Val felt that she didn’t really need to block the mesh body since we had done that previously, she really wanted to open up the lace border more instead.

Because the ruffled border is actually much more fabric than the length of the last row of the mesh body, there is a curve to factor in when laying it out flat for blocking. I thought about it a moment and realized the border would curve in over itself if we opened out the shawl fully. Then I recalled that I had heard of folks folding their finished project in half to block it when they had limited room to block on.

Shawl folded in half pinning started.

I folded the shawl down the center point and spread it out. The lace curve would be completely manageable and the 2 halves of lace lined up beautifully. I began with pinning the base of the lace border and then gently stretching out the points. As you can see in the photo I started in the center of the lace so I could work out evenly from there. Val and I worked together pinning all the lace.

Shawl folded in half and pinned

Once the border was fully pinned it made a nearly complete circle. Then we sprayed it with water and patted it in to be sure both layers of the border were completely wetted.

Finished Shawl folded on table

Val took out the pins and laid out the finished shawl, still folded in half, on her table the next day.

Close up of blocked lace

You can see how much the lace opened up.

Finished Shawl

It looks even prettier when worn. I think Val is going to enjoy wearing this shawl for a long time. Now we just need to figure out what she can make with the one ball that is left-over.