Blocking with a Twist

Beauty shot wide 4web

My latest moebius pattern is available thru my Ravelry Shop “Infinite Grande Cowl”. This a super simple long cowl designed in a luscious baby alpaca chunky yarn, Plymouth Yarn’s Baby Alpaca Grande. The hardest aspect of this pattern is the Foundation Single Crochet length and being sure you get your moebius twist correct. The rest of the pattern is single crochet, chains and slip stitches. Pattern instructions are in text using U.S. crochet terminology and stitch diagrams.

You can find the pattern on Ravelry,  Click here to buy it now.

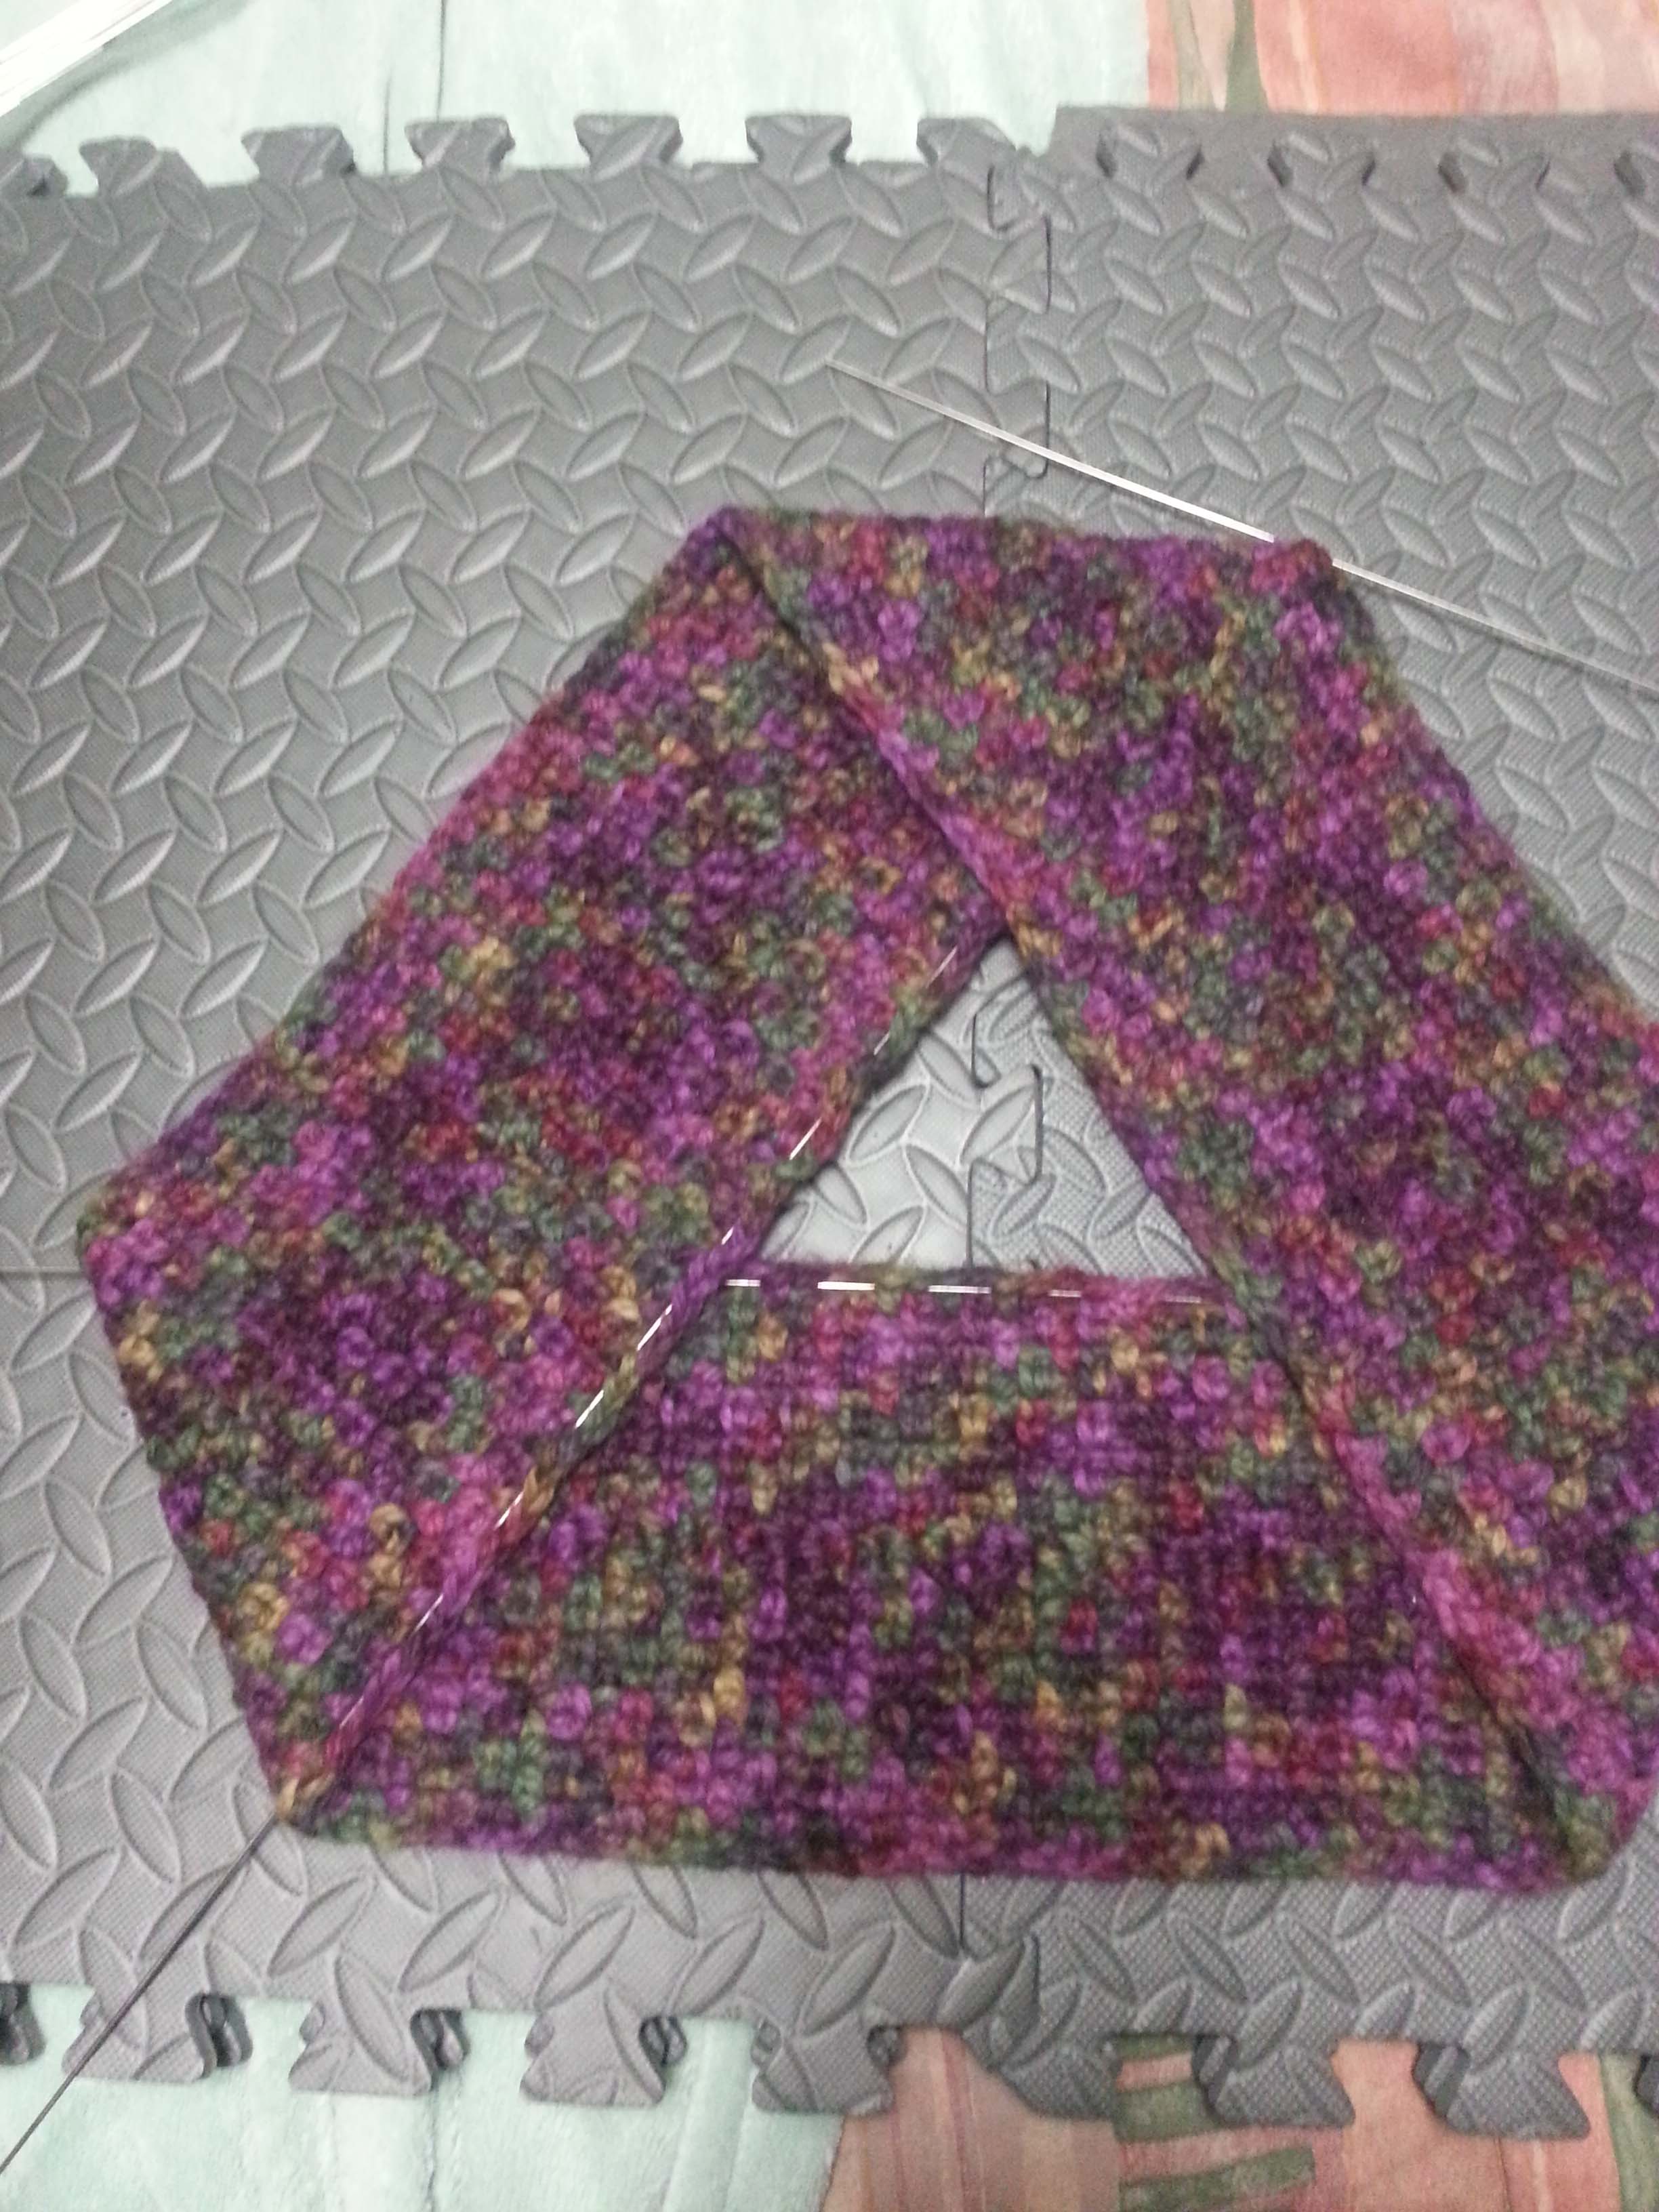
Looking at the patterns I have available you can see that my favorite foundation to use for a cowl or “infinity” scarf is a moebius. But a moebius does present you with some interesting challenges when it comes to blocking your finished project.

Laying out Moebius

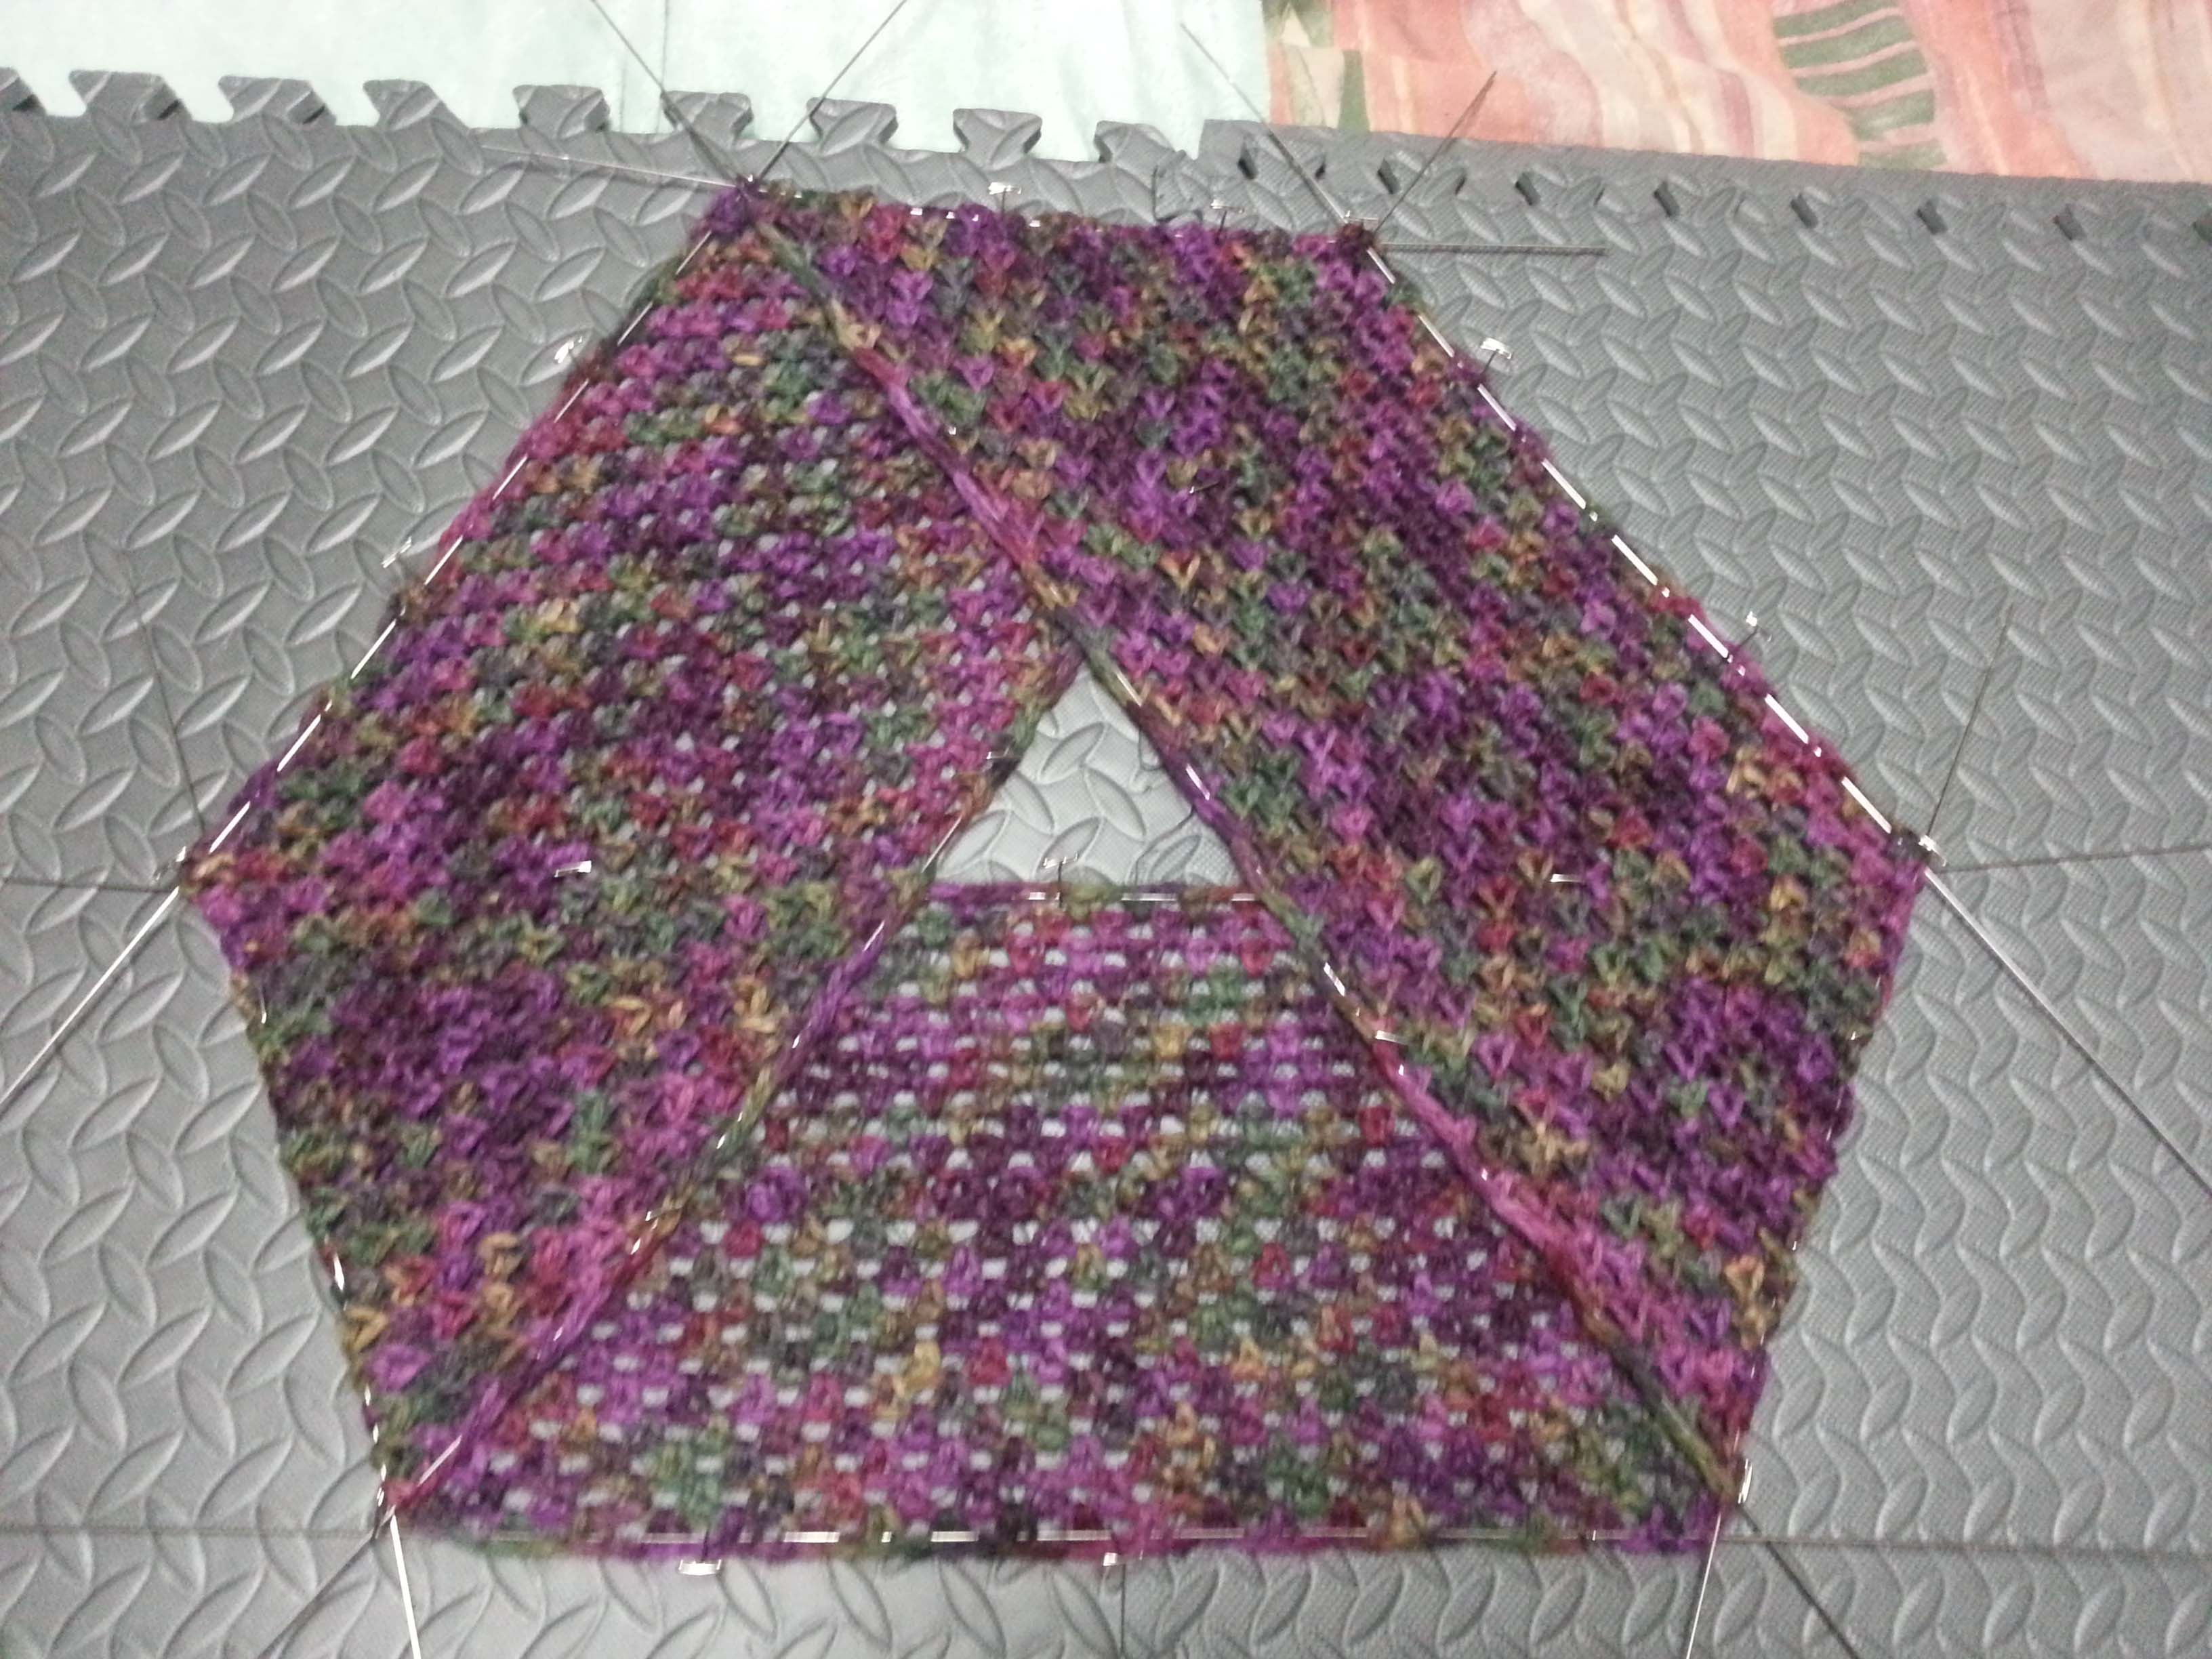
Because of the twist in the fabric a moebius doesn’t lay flat like most other projects. The best way to “flatten” a moebius is to lay it out in a triangular shape like above.

Fold and weave in first wire

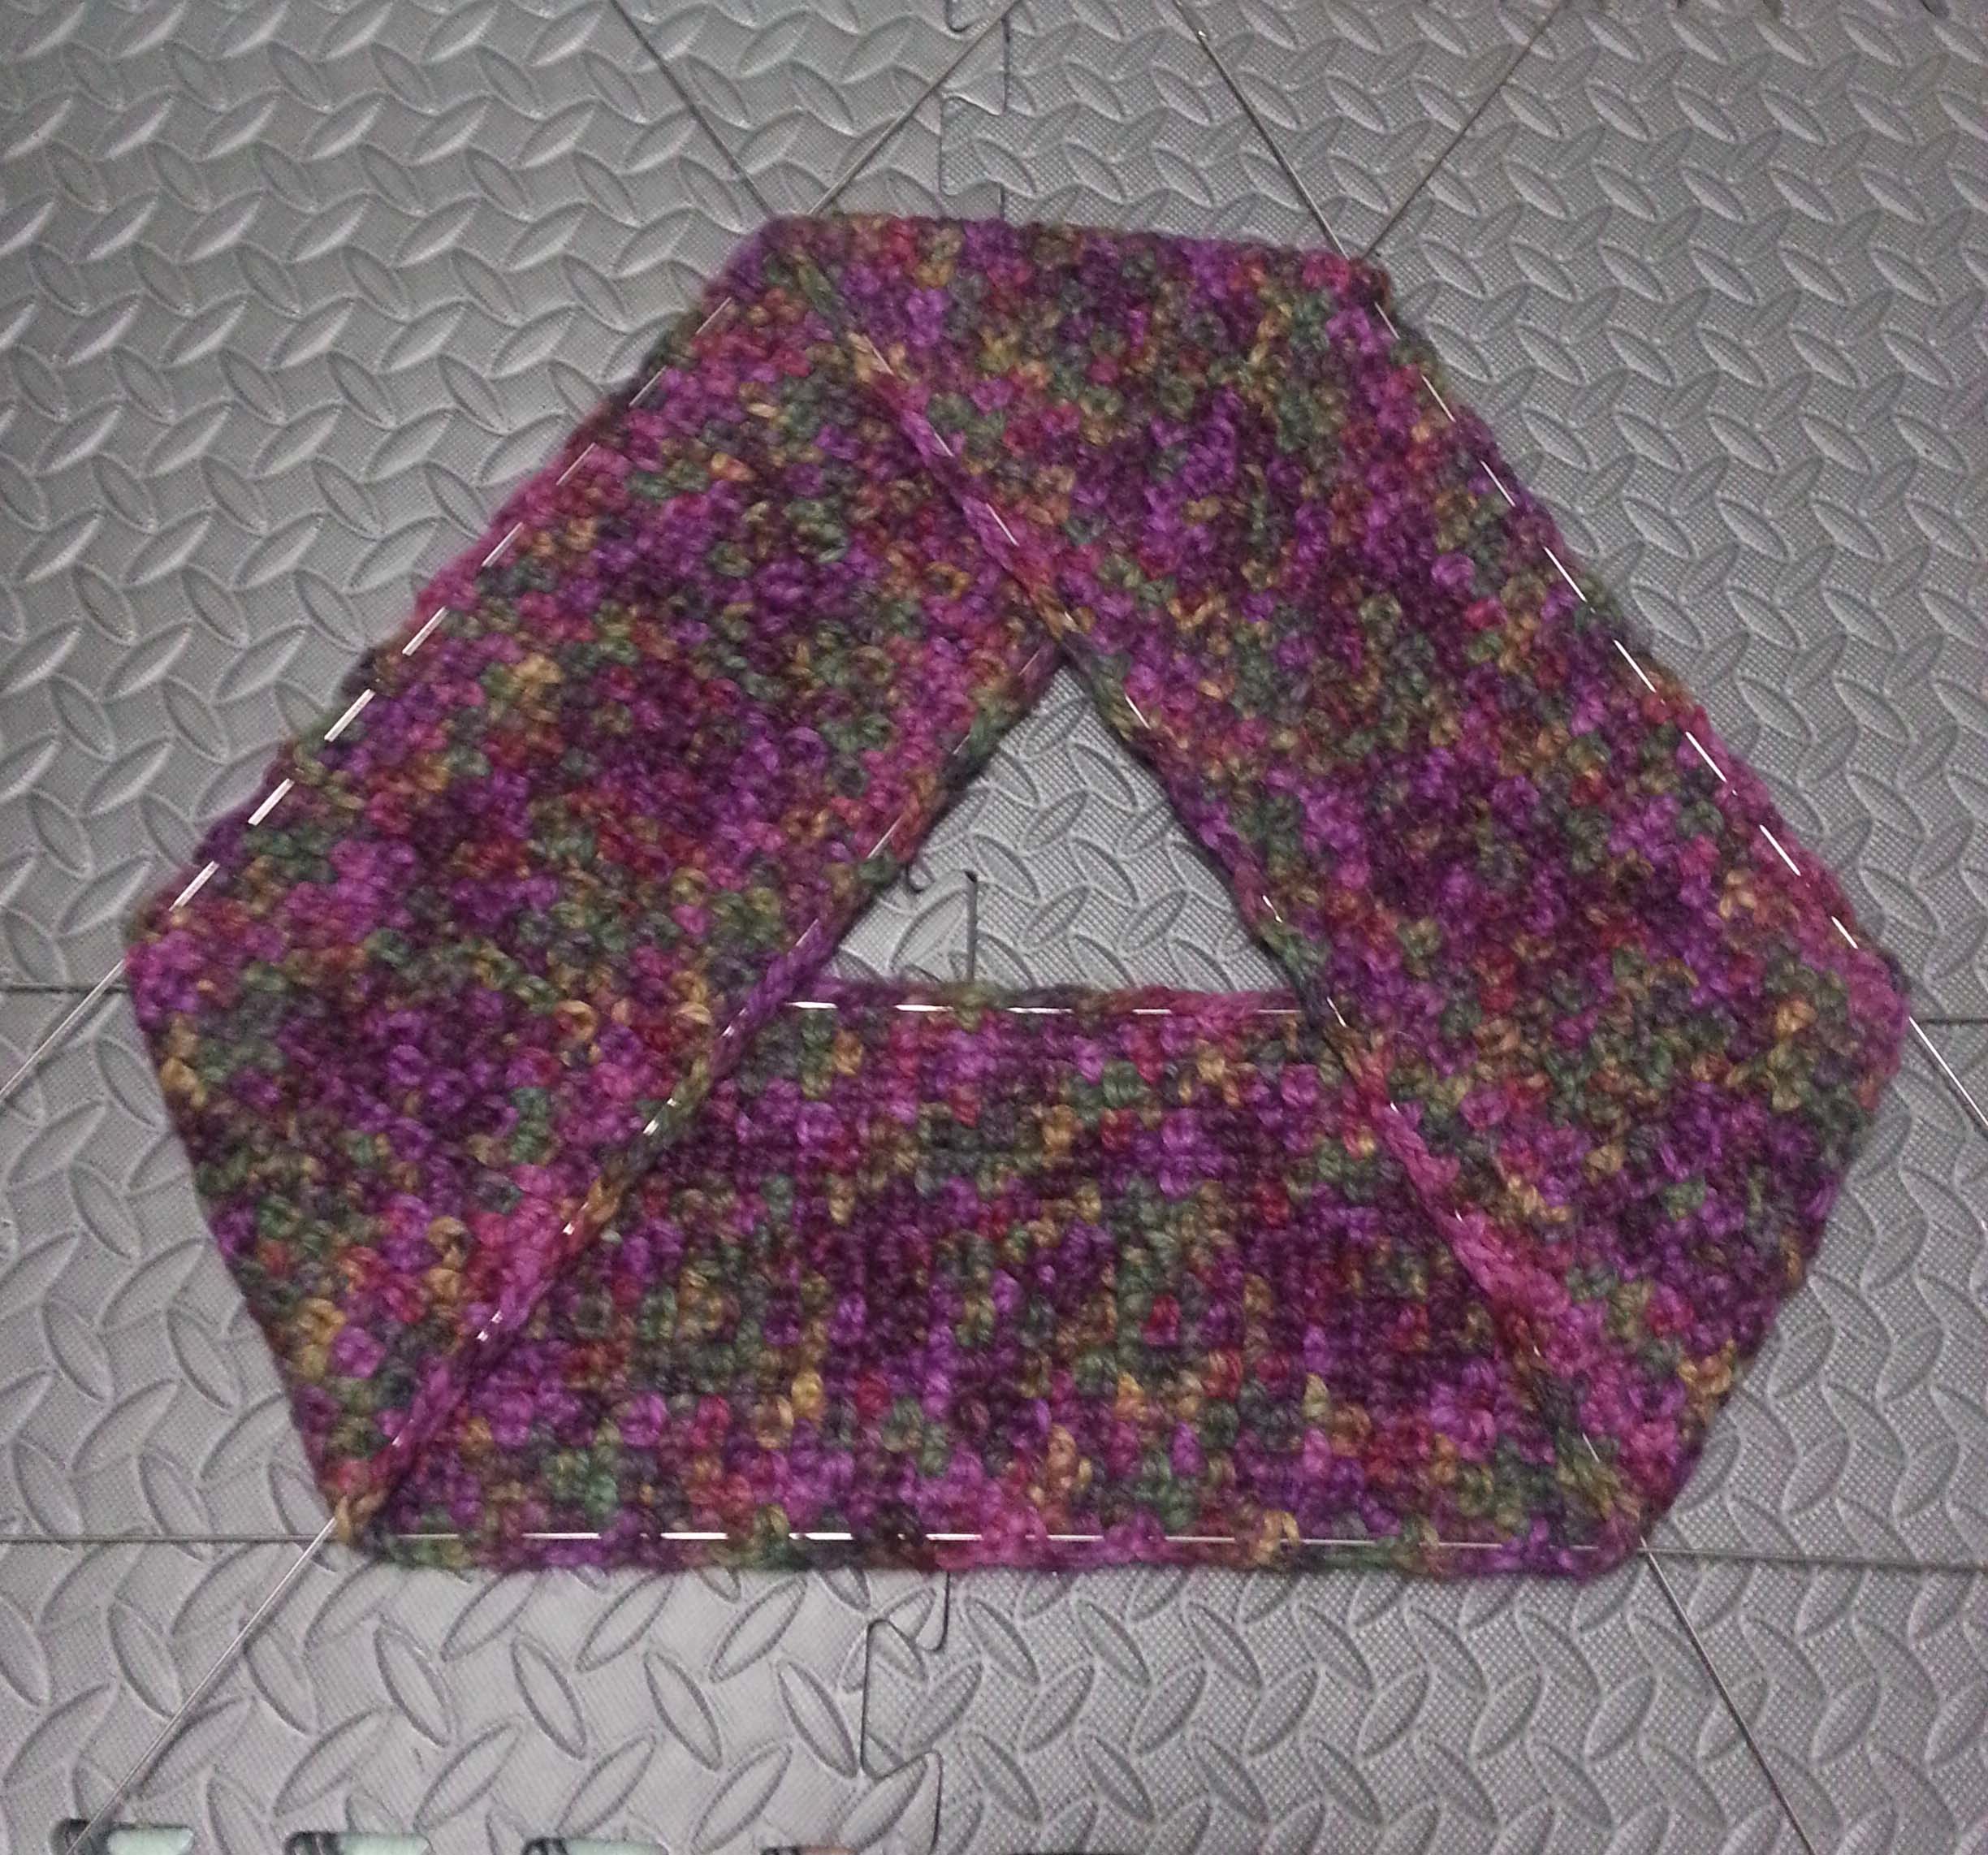
I like to block using my blocking wires. So my next step in blocking a moebius is to fold the “top” of the triangle down to expose the top edge of the bottom strip in the triangle. I then wove in one of my long blocking wires along that edge.

Mark corner and weave 2nd wire

I then return the top of the triangle to the mat and flatten it out. The first wire sticks out of the corners on the bottom strip. I marked the top corner then weave my next wire along the inside edge of the next level of my moebius strip.

3 wires woven along inside edges

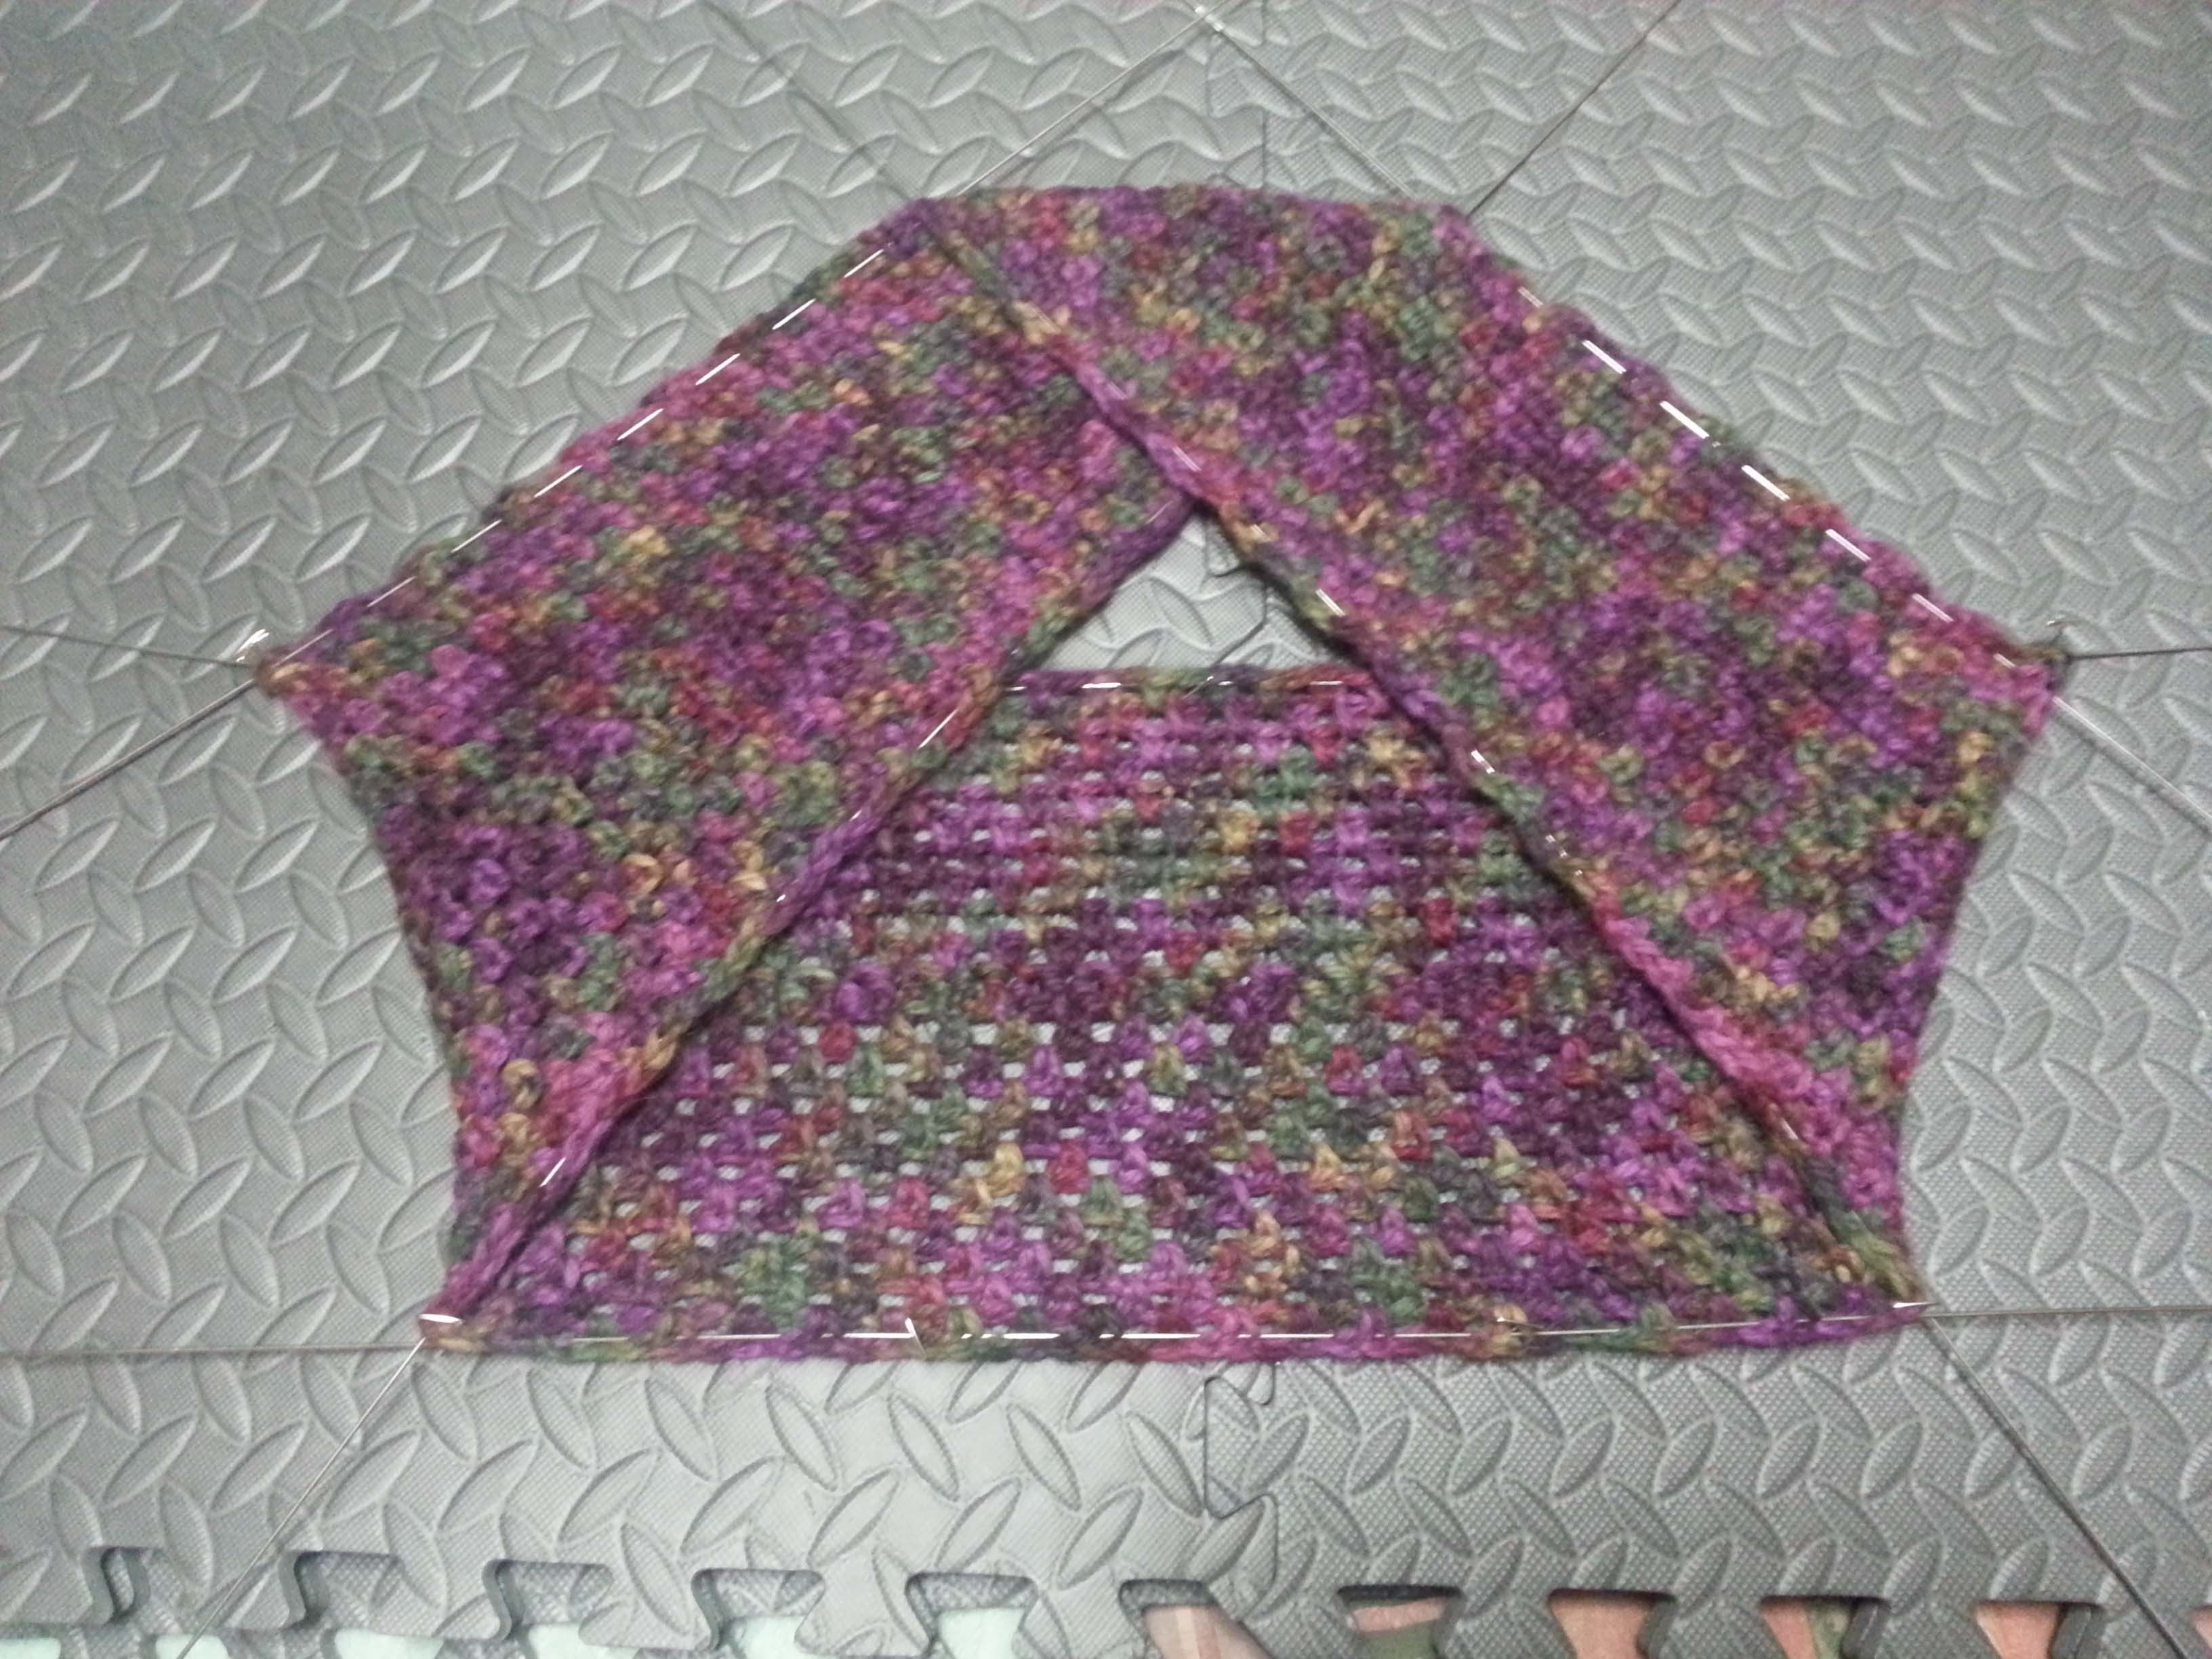
Last inside edge gets it’s wire next.

Wires woven along edge

Now I weave wires thru the outside edges. We are ready to begin stretching out the project for blocking.

Beginning to pin out

I tend to be pretty aggressive when I block and open the stitches as much as possible. I pin the bottom outside edge in place, then shift the inside wire upward to stretch open the fabric. I use nickel-plated T-pins to hold the wires in place. Nickel is important to use in blocking as it doesn’t rust and won’t mark your fabric when it is wet.

All stretched out

I work my way around the moebius pinning and stretching until I am happy with how much I’ve opened the stitches. Part way thru the stretching I realized I needed to place wires thru the “folds” at each corner of my triangle to keep the stretch from deforming the fabric. I just slipped the wires under the top layer of the strip at the corners.

Blocking paraphelia

Once everything is pinned out how I wanted I heated up my hand-held steamer and steamed the open fabric. I let it sit for about an hour to dry completely and then my cowl was ready to be photographed. Being this cowl is alpaca the stitch work didn’t open up tremendously, but the overall fabric was smoother and draped nicer afterward.

Now you know one of the ways to block a moebius. I hope you enjoy crocheting some in your projects. They are one of my favorite shapes to crochet.

Getting Ready for Cold Weather Again

I know many of you are experiencing record-breaking hot weather right now and colder temperatures seem a dream. Up here on the mountain though the temperatures are beginning to feel a bit nippy. We are getting emails reminding us that school is starting up again in one short month. Augh! Summer always zips by so quickly.

Of course for those of you that are super organized it’s time to think about projects for your holiday gift giving. I’ll be releasing 5 patterns over the next week that are wonderful gift items that don’t take a lot of yarn or time to work up.

AMC Beauty Shot 1 web

Anna Moebius Cowl

My crochet friend V was looking for quick projects for last-minute gifts for Christmas this past November. So I created this design.  The cowl is worked off a moebius strip foundation with one ball of chunky size yarn and a large hook so you can make one in an evening. I named this design after my friend’s grand-daughter because she really loved the cowl and liked to wear ones with a shorter foundation as an ear-warmer.

amc closeup 1 web

My sample is worked using one ball of Plymouth Yarns “Gina Chunky” with a size L /8mm hook. The 100% wool of this yarn means you get a wonderfully warm cowl (or with a shorter foundation, ear-warmer), and the color changes in “Gina” make the shells in the stitch pattern stand out individually. Or go with a solid color yarn for a subtle textured look to your cowl.

This pattern is available in my Ravelry Shop for $3.99  BUY NOW

I’m heading to San Diego for the Knit and Crochet Show this coming Tuesday, but I will have more patterns posting while I am on my trip. Be sure to check back.


The Next Best Thing to a Hug

Eleonora Shawlette
Eleonora Shawlette

Sometimes we can’t be with those we love, but we can send our love to them. My favorite way of sending a package of love is in the form of a crocheted goodie. Usually it’s a shawl. They are marvelously useful and the closest to a warm hug that I can give when I can’t actually put my arms around a loved one.

Back View sample

My Eleonora Shawlette is a quick wrap project to crochet up. The shawlette size is made using just one ball of Berroco Boboli Lace yarn, but you can make it larger by using more yarn. The simple stitch pattern is easy to catch on to and makes a snuggly drapey fabric.

Eleonora Shawl

The pattern comes with instructions and charts for both the body of the shawlette and the lovely lace border. You can find the pattern in my Ravelry shop here.

I also wanted to share some links to wonderful shawl patterns that are available free from the blogs of my crochet designer friends. These lovely designs are available as free patterns because these designers have ads on their websites to help them make ends meet. I hope you enjoy checking out what they have available.

Branching-Out-Shawlette-1

Branching-Out-Shawlette-front

Tamara Kelly’s “Branching Out Shawlette” This is a terrific shawlette pattern that is interesting for experienced crocheters, yet simple enough that intrepid beginners can tackle it. If you want something different take a look at the other wrap patterns that Tamara has on offer at “Mooglyblog.com”.


16586498017_ec5142b21d

Jessie Rayot’s “Juliette Shawl“. I think this design is so clever. I love that it is actually a sort of “poncho” that won’t go slipping off your shoulders and getting lost.  Jessie made her sample in a variety of lovely colors. If this particular shawl doesn’t catch your fancy, take a cruise around her blog “JessieAtHome.com” where she has lots of other lovely shawls and fun designs.


butterfly-fling

Kim Guzman’s “Butterfly Fling Wrap“. This beautiful wrap is an intermediate pattern and with the open stitch pattern is a perfect layer for warmer weather. I can totally see wearing this all scrunched up around my neck in the Fall and winter season as well, especially if made with an animal fiber blend like wool/silk. If this pattern isn’t quite the one for you, don’t worry, Kim has got loads of other beautiful wraps as well as garments to share with visitors to her blog, “CrochetKim.com”.

I hope everyone finds a shawl that is just right for making a “hug” for their loved ones.  It may be too late this year to make a shawl for mother’s day, but you can put it on your “To-Do list” for next year. I’ll be celebrating Mother’s Day this year with my boys at the Colorado Chocolate Festival on Saturday. I’ll have lots of photos and news about that for you this weekend.

The Annetta Square Re-visited

I’m a designer. Which means I am always fiddling with design ideas. A few weeks ago I posted a pattern for a little square motif that I created rather quickly one evening at a party.

My 2 squares today

I’ve been re-thinking that design since then. There were a few things I wasn’t completely satisfied with. I liked the openness of the round center, but the center circles in the original inspiration photo were a bit more solid and there was a hint of texture. My pattern was also making the center more hexagonal than circular.

5 Rnds of Annetta Sq

The round of stitches that I used to go from circle to square, were not squaring up as nicely as I wanted. Once the final round of single crochets were added it was fairly square but, being the recovering perfectionist I am, I knew I could make them better. Plus I had an idea in mind of a join-as-you go approach for the center circles using the squaring round. More about that later though.

This part of design work requires a lot of tearing out at times. I made 5 different attempts before I was happy with this approach. I hope you will like it too.

Hot Spot Square copyright 2015 M2HDesigns/Andee Graves
Hot Spot Square
copyright 2015 M2HDesigns/Andee Graves


With this design the center circle is a little bit bigger and it can be stiffer. So you may want to try a few using different sized hooks with your yarn of choice to get the amount of movement and drape you want in your fabric. I’ve noticed that the fabric with the smaller hook will be especially stiffer with 100% acrylic yarns, you may want to go up as large as a size L (8mm) hook with those yarns.

Hot Spot Square (Annetta Square #2)

Designed by Andee Graves

Skill level:       Intermediate

Finished Size:

Approximately 3.75” square

Materials:

Yarn

Worsted wt (Sample uses Lion Brand Heartland)

Yardage amounts allow for 6 inch beginning and ending tails

Center Circle (Rnds 1-4): 10 yards

Squaring Rnd (Rnd 5): 6 yards

Hook

K / 6.5mm

Notions

Yarn/tapestry needle

Gauge:

First 4 rounds of pattern = 3.25” in diameter

Special Stitches:

3 double crochet cluster st (Cl): (YO, insert hook in indicated st or sp, YO pull up a loop, YO pull thru 2 loops on hook) 3 times, YO pull thru remaining 3 loops on hook. (If you are having difficulty with the cluster stitches you can find a photo-tutorial on my post: Crochet & Springtime)  

Beginning 3 dc cluster st (Beg Cl): Ch 2, (YO, insert hook in indicated st or sp, YO pull up a loop, YO pull thru 2 loops on hook) 2 times, YO pull thru remaining 3 loops on hook.

Pattern Notes:

Start square with an adjustable slip knot. Beginning tail tightens the loop on the hook.

Instructions

Rnd 1: Starting with adjustable slip knot, ch 2, 6 sc in 2nd ch from hook, sl st to first sc of Rnd. [6 sc]

Rnd 2: Ch 1, 2 sc in same st as join, 2 sc in next 5 sts, sl st to first sc of Rnd. [12 sc]

Rnd 3: Beg Cl in same st as join, (ch 1, Cl in next st) 11 times, ch 1, sl st to top of Beg Cl. [12 ch-1 sp, 12 Cl]

Rnd 4: Ch 1, (3 sc in next ch-1 sp) 12 times, sl st to first sc of Rnd. [36 sc]

Change color here to get circle in square look

Rnd 5: Ch 1, sc next st,(*hdc next 2 sts, (hdc, dc) next st, (dc, ch 2, dc) next st, (dc, hdc) next st, hdc next 2 sts,* sc next 2 sts) 3 times; Repeat from * to * once, sc next st, sl st to first sc of Rnd. [8 sc, 24 hdc, 16 dc, 4 ch-2 spcs]

Fasten off. Weave in ends being sure to tighten beginning tail to close center of circle.

Connecting with Crochet

Yesterday was quite the crochet day for me. I taught the “Learn to Crochet” class at the Longmont Yarn Shoppe. I always have a great time teaching and love it when my students have that light bulb moment when things begin to work for them.  It’s also a great reminder of what it’s like to be at the beginning of the crochet journey.

Then I ran a few quick errands in town and headed back home. At home it was a flurry getting my family herded up so we could head over to a friend’s house for a 50th birthday party. There were lots of kids there and our hosts have a nice trampoline that my kids headed straight for.

Meanwhile there were only a few people I knew, so I said “hi” then found a well-lit spot outside to sit with my crochet and keep an eye on my kids. After awhile I got a bit chilly so I came back inside.

One of the other women at the party asked me about someone in Jamestown and if I knew them. Turned out we had a mutual acquaintance. We introduced ourselves and had a chuckle when it turned out her name is Annette, though pronounced the German way, the “e” at the end sounds like an “a”. We chatted about living in the mountains and wildlife visiting my home.

While we were talking I was crocheting on my project and she asked me about my crochet. She is from Germany originally and both knits and crochets, though she said she was a bit out of practice. She told me that she had started a crocheted blanket project about 2 years ago, but had gotten a bit stuck when she went back to work on it.

Her husband had to run their teen-age daughter home about then and Annette asked him to bring her project bag back with him. When he returned the 2 of us dug thru the bag. There were a number of completed squares, but they were very tightly crocheted and we talked about how they would work in a blanket.

Annette with her inspiration photo and squares

She had been inspired by a photo of a crocheted blanket in a catalog. She had the original inspiration photo in the bag. So we took a look at it together. Her squares were pretty different from the squares in the blanket so I asked her if she would be interested in trying something different.

Close up of Square

I grabbed a ball of the yarn she had and began designing a different square there on the spot. I was having a great time playing with yarn, and we talked about crochet and our families as the square took shape. She liked what I came up with and thought it would be a nicer blanket than the tight squares she had done. Since she had made so many of those I suggested she use them for a pillow that would carry the same colors as her blanket.

My 2 squares today

Today I experimented a bit more with the square pattern I had come up with last night and made these 2 versions. The difference between the 2 is in where I decided to make the color change. Instructions for the squares are below and, in honor of my new crochet friend, it is named the Annetta Square.

ANNETTA SQUARE

designed by Andee Graves

Skill level:   Intermediate

Materials:

Worsted Weight yarn

I-9/5.5mm hook

Finished Size:

Approximately 3 7/8” square

Gauge:

First 3 Rounds = 2.25”

Special Stitches:

3 double crochet cluster st (Cl): (YO, insert hook in indicated st or sp, YO pull up a loop, YO pull thru 2 loops on hook) 3 times, YO pull thru remaining loops on hook. If you are having trouble with this stitch check out my blog post “Crochet and Springtime” for a tutorial on it.

Beginning 3 dc cluster st (Beg Cl): Ch 2, (YO, insert hook in indicated st or sp, YO pull up a loop, YO pull thru 2 loops on hook) 2 times, YO pull thru remaining loops on hook.

Instructions

Rnd 1: Starting with adjustable slip knot, ch 2, 6 sc in 2nd ch from hook, sl st to first sc of Rnd. [6 sc]

Rnd 2: Ch 1, sc in same st as join, (ch 1, sc in next st) 5 times, ch 1, sl st to first sc of Rnd. [6 ch-1 sps, 6 sc]

Rnd 3: Sl st and Beg Cl in next ch-1 sp, (ch 3, Cl in next ch-1 sp) 5 times, ch 3, sl st to top of Beg Cl. [6 ch-3 sp, 6 Cl]

Change color here to get suspended flower look

Rnd 4: Ch 1, sc in same st as join, (4 sc in next ch-3 sp, sc in next st) 5 times, 4 sc in next ch-3 sp, sl st to first sc of Rnd. [30 sc]

Rnd 5: Ch 1, sc in same st as join, sc next st, (2 sc next st, sc in next 4 sts) 5 times, 2 sc next st, sc next 2 sts, sl st to first sc of Rnd. [36 sc]

Change color here to get circle in square look

Rnd 6: Ch 1, sc next 2 sts,(*hdc next st, (dc, tr) next st, (tr, ch 2, tr) next st, (tr, dc) next st, hdc next st,* sc next 4 sts) 3 times; Repeat from * to * once, sc next 2 sts, sl st to first sc of Rnd. [16 sc, 8 hdc, 8 dc, 16 Tr, 4 ch-2 spcs]

Rnd 7: Ch 1, sc next 6 sts, *(sc, ch 2, sc) next ch-2 sp,** sc next 12 sts*; Repeat from * to * 2 times, then Repeat from * to ** once, sc in next 6 sts, sl st to first sc of Rnd. [56 sc, 4 ch-2 sps]

Fasten off

I really like how these little squares came out. I hope you enjoy making some to use in your projects this spring.

Another Happy Birthday

Maple Leaves

I can’t believe it, but another birthday has come and gone. Now it really feels like Fall.

It was a great birthday, I spent the day with my family. We went to a photo studio and had some really nice pictures taken of the 4 of us, as well as a couple of just the boys. Next we headed down to the Denver Museum of Nature and Science. We explored the new Whale Exhibit and saw the Imax movie “Journey to the South Pacific” which had some awesome under water footage. Afterward we headed home and stopped for dinner at a nice restaurant.

Barn and Pumpkins 3

Now Halloween is just around the corner with the Thanksgiving and Christmas holidays not far behind. That has me thinking about my gift list and sending off Christmas/New Years cards and letters.

If you are making gifts for folks this year you might find the following pattern helpful. I love getting homemade jams and jellies at Christmas time, and I’m always impressed with the various presentations. Got me thinking though about ways of creating a gift that would still serve a purpose after all the yummy stuff is eaten.

Crochet Chain Tie

I came up with a jar cover. Once all the jam or jelly is gone you still have a pretty jar that can be used to send out your own home-made goodies, or you can remove the little cover and use it as a bag.

Ribbon Tie

The tie for the cover can be crocheted or you can dress it up further by using a satin ribbon. In this example I used a 32 inch length of 1 1/2 inch wide ribbon.

SPARKLY JAR COVER

FINISHED MEASUREMENTS

Jar Cover is 9”/ 22.5cm around x 5 1/4“/13.125cm long.

Fits a Pint size Mason Jar

YARN

Lion Brand Yarns, Vanna’s Glamour (96% Acrylic, 4% Metallic Polyester), 1.75oz/50g, 202 yds/185m

Color used for sample is: #150 Platinum, approximately 12g/49 yards were used for sample

CROCHET HOOKS

Size US G=6 / (4mm) or size needed to obtain gauge

ADDITIONAL MATERIALS

Stitch markers

Yarn needle

Pint Mason Jar

Optional:

GAUGE

First 3 rounds of pattern = 2.5” in diameter

SPECIAL STITCHES

V Stitch (V-st): (Dc, ch 1, dc) in indicated st or sp.

INSTRUCTIONS

Rnd 1: Ch 4 (counts as 1st dc and center), 11 dc in 4th ch from hook, sl st to top of beg ch-4. [12 dc]

Rnd 2: Ch 3 (counts as dc here and thru out), dc in same spot as join, 2 dc in next 11 sts, sl st to top of beg ch-3. [24 dc]

Rnd 3: Ch 3, 2 dc next st, (dc next st, 2 dc next st) 11 times, sl st to top of beg ch-3. [36 dc]

Rnd 4: Ch 1, sc in same spot as join, sc next 5 sts, 2 sc next st, (sc next 5 sts, 2 sc next st) 5 times, sl st to first sc of rnd. [42 sc]

Rnd 5: Ch 1, sc in each stitch around, sl st to first sc of rnd. [42 sc]

Rnd 6: Ch 3, dc in next 41 sts, sl st to top of beg ch-3. [42 dc]

Rnd 7: Ch 4 (counts as dc and ch-1), dc in same st as join, (sk 2 sts, V-st in next st) 13 times, sl st in 3rd ch of beginning ch-4. [14 V-sts]

Rnds 8 – 15: (Repeat Rnd 6 then Rnd 7) 4 times.

Tie (Make 1)

Ch 100 and fasten off

FINISHING

Weave in tails.

Weaving in ribbon

Thread the tie (or ribbon) thru the openings in the last round.  Slide the jar into the cover, tie a bow. Tie knots in the ends of the tie, cut off excess yarn.

A Little Birdie Told Me

I’ve been crocheting and designing like crazy, but nothing that I could share with everyone quite yet.

Image courtesy of Storey Publishing

Finally I can tell you all about a wonderful new book: “Christmas Crochet for Hearth, Home and Tree: Stockings, Ornaments, Garlands and More” by Edie Eckman.  I was very honored when Edie Eckman asked me to contribute a design to this compilation back in January 2013.

My original sample prototype.

Edie selected my Little Bird Ornament, called “Bird Trio” in the book. I love to decorate my Christmas tree with symbols from nature. Which meant a bird ornament was the perfect design for me to create.

One of my favorite things about this book is that all the designs have written instructions and stitch diagrams. When working sculptural projects I always find stitch diagrams to be very helpful.

Sparkly Birdie

I decided to work up another bird for my tree this year. I used Lion Brand’s Vanna’s Glamour in the Silver color, and switched to an E hook for the thinner yarn. I also added some pearly white glass beads along the edges of his wings for some extra sparkle. He is going to look marvelous with the Christmas lights, I might need to make a few more.

The book is available from Storey Publishing on Amazon.com as both a paperback or Kindle Ebook. Get yourself a copy soon and you can Crochet your Christmas this year.

Twisted Vs Cowl

Jennifer at Holiday Yarns

At the Knit and Crochet Show I saw one of my yarn company friends that I had just seen at the TNNA trade show in May. Jennifer from Holiday Yarns. Jennifer dyes yarn and her booth is always a visual feast for the eyes.

We have been talking about me creating some crochet designs using her lovely yarns and decided that there was no time like the present. After some conferring we settled on a simple cowl design worked up in a bulky yarn.

4 hanks of yarn and a lovely ball of sparkly pencil roving from Holiday Yarns.

As you can see in the above photo, I bought a few hanks of her lovely yarns for my own enjoyment. She also sent me off with a hank of her Bea-Ewe-tiful Bulky to design the cowl from. Of course the big challenge would be to see if I could get the pattern written, tech-edited, the sample crocheted and sent off to her in time for her to have it in her booth at Stitches Midwest. Challenge Accepted!

Project modeled 2_edited-1

I spent most of my time on the flight home to Colorado swatching. I tried a couple of stitch patterns but finally found myself returning to an old favorite: The V-stitch. Of course I had to make this a moebius.

The pattern for this snuggly cowl is available now in my Ravelry Shop for $3.99, and you can order the perfect color of Bea-ewe-tiful Bulky at the Holiday Yarns website or check with your own LYS, they might have some of it on their shelves.

Winged Columns Wrap

It’s getting to be that busy time of year, just a little less than 18 weeks until Christmas. If you are planning on making your holiday gifts, then you know it’s time to get started.

Cover of Special Issue
Cover of October 2014 issue : Image courtesy of Annie’s Publishing.

Fortunately the folks at Annie’s Publishing know that we are all on the hunt for ideas for lovely gifts that won’t take forever to make. They have just published a special issue magazine: “Crochet! presents 70+ Crochet Gifts in 1-2-3”.

Winged Columns Shawl 2
Wrap with a Shawl pin fastener – Image courtesy of Annie’s Publishing

You can find loads of wonderful gift ideas in this issue, including my new design “Winged Columns Wrap”.

Winged Columns Shawl 3
Back view of Wrap – Image courtesy of Annie’s Publishing

The wrap is worked outward from a central back foundation in 2 parts and requires no finishing other than weaving in a few ends. It only takes 2 skeins of yarn, 1 skein for each half. The lacy stitch pattern makes for a lot of fabric without a lot of bulk.

Wrap worn as a Scarf.

Because the fabric isn’t bulky it can also be worn as a scarf.

I really love this stitch pattern, the shapes within the columns put me in mind of migrating flocks of birds. Thus the name, Winged Columns.

I hope you get yourself a copy of this Crochet! Special issue. Then you’ll be all set for making gifts for the upcoming holidays. It is currently available on newsstands, or visit their website  to order a copy for yourself.

Flower Power Stole

photo used courtesy of MainlyCrochet.com

Okay,  I love this design, but I might love it even more because of the name Michele Maks (the owner of MainlyCrochet.com) and I came up with for it. One of the very fun things about doing design work with Michele is she has the same zany hippie-chick sensibility as me.

Orig Swatch

My original swatch for this design was using a combination of Red Heart’s “Heart & Sole Sock Yarn” with their “Stardust” yarn. Both yarns are light-weight “fingering/sock” type yarns, so I knew the effect would be very delicate in the finished design. And of course, Stardust has sparkle which is always a win with me. Michele wanted to use all one type of yarn, and that decided us on the Stardust, since Michele likes some sparkle in her yarn as well.

My "test" flowers for color.
My “test” flowers for color.

Michele picked out the colors and once the yarn arrived I began working on the piece.  I played around with the color to check with Michele before I began the project in earnest. I wasn’t too sure about the 2 colors we had for the flowers, so wanted to be sure Michele was happy with the way they looked. Of course the finished design ended up looking wonderful, another lesson in trusting Michele’s color sense.

Photo courtesy of MainlyCrochet.com

The first version of this design used 52 flower squares in 3 different colors and 36 filler motifs in the green color. What this meant was 384 ends to weave in once the crocheting was done. Yikes!

This is exactly the type of project I have always avoided, though I love the look of colorful multi-motif designs. My entire reason for avoidance was a deep dislike of end-weaving. So of course the universe was going to find a way to make me face this dreaded task and make peace with it.

Whenever I have been faced with an overwhelming task I remember my Dad’s little saying, “How do you eat an Elephant? One bite at a time.” Yes, my Dad is a very funny guy, and he was right. I needed to figure out how to break this project down into manageable bites.

I realized that one way to make the end weaving less painful would be to do it as I completed each step of the project. I decided to take an “assembly line” approach to this problem.  Of course I was the only worker on this assembly line.

I organized myself with yarn, hook and plastic sealable baggies.  Each of my bags was a “stage” along the line.  First on the agenda was crocheting  26 centers in each of the “flower” colors.  Since each center is only a couple of rounds I quickly had a pile of them finished. I put the centers with dangling tails in a quart-sized plastic baggie, then as I wove in tails I moved them to a 2nd baggie.

Once I started adding petals to the centers I would move them to a 3rd baggie where they waited to have their tails woven in, after the petal tails were woven in they were moved to their final bag. I was finding all this a bit tedious, but the baggies allowed me to hop around in the project so I didn’t get too bored with one stage of the design. As I neared the completion of all the flowers I separated them by color into 2 bags to make the next step easier.

About the time of the PJ Jam in August I had finished all the crocheting of the centers, but still had a lot of tails to weave in. This is the motif project I was referring to in my “Zen and the Art of Weaving in Tails” post back in October, 2012.

IMG_4504

Finally all the flowers were finished and it was time to join them together using the green color. This step was a join-as-you-go method, I found it easiest to work on a flat surface. I would join together a row of flower squares, and then work the filler motifs in the open space. Every few rows I would stop and weave in the tails for the green.

Photo courtesy of MainlyCrochet.com

When all the motifs were completed I blocked the entire piece. You can see how it opened up nicely. I sent the project and pattern off to Michele and waited for it to be put up on the website. The plan was for a Spring release of it, this was back in Spring 2o13. Unfortunately, as can happen, the yarn we had chosen was discontinued about that time.

Michele returned the original sample to me at the show in North Carolina that Fall, but we weren’t sure what we wanted to do.

Both of us really liked the sparkly yarn for this design and it got me thinking about other yarns we could use. At first I was really stuck to the idea of using a fingering or sock weight yarn. Then I stumble upon the idea of working with a slightly heavier weight yarn. I sent off an email to Michele suggesting that we use Red Heart’s “Shimmer” yarn. The colors would be more intense, but we would still have the same sparkle.

Photo courtesy of MainlyCrochet.com

Because the motifs would be a bit larger I had to modify the original pattern. One thing that helped was there would be fewer motifs, so fewer ends to weave in. Hooray!

flower stole2 flatb

This version of the design has 33 flower motifs and 20 filler motifs, so is much quicker to crochet up. We also changed the way the colors are mixed together. The centers of the flowers are a multi-colored yarn and the petals are a solid color in the same tone. Then we picked a dark plum to frame out the flowers. I was really pleased with the way the flowers “pop” in this version.

If you are coming to the Knit and Crochet Show this week you may spot me wearing the original version of the Flower Power Stole, or you can see the “Shimmer” version at the MainlyCrochet.com Booth. Be sure to stop by and see all the wonderful projects that are on the site. If you aren’t at the show you can still go visit MainlyCrochet.com and subscribe to have access to all the lovely patterns.

I’m writing this blog post from Jan’s house in New Jersey. Tomorrow we load up the car and drive to Manchester, New Hampshire for the Knit & Crochet Show. Hope to see many of my yarnie friends there and for those that aren’t there I’ll try to have some posts about our adventures as soon as I can.