Jan & Andee’s Chicago Adventure – Part 2

Since I’m now on the CGOA Board of Directors I am very involved with helping to plan the 2018 Chain Link Conference this coming July in Portland, OR. With that in mind, I thought I should get Part 2 of Jan and I’s Chicago adventure up on the blog.

When Jan and I heard that the 2017 Chain Link Conference was going to be held in Chicago we were very excited. Jan lived in Chicago for 10 years before she moved back East to be closer to her family. She says Chicago was one of her favorite places. I’ve always wanted to visit Chicago because of the Art Institute. They have an amazing collection there, especially of Impressionists (my favorites). I also am very interested in architecture and I knew that Chicago has some famous buildings.

Jan and I generally plan to travel on the Tuesday before the conference starts and then we stay an extra day if it is a place we want to explore. Being Chicago was definitely a place we wanted to explore we decided to stay 2 extra days. Honestly, a week extra is really needed to fully explore all downtown Chicago has to offer.

The first challenge we faced when planning our outings for our 2 days was how to best get from the Westin Hotel in Itasca to downtown Chicago. I was in favor of riding the El, but we still needed to get from the hotel to the nearest station. Fortunately this is where meeting Mike, the friendly cab driver, earlier in the week came in handy.

Jan had done all kinds of research for our 2 days to get the most out of the time we had to explore. Sunday we had reservations to go on an architectural boat tour on the river.

It was a great way to see a lot of the landmark buildings of downtown with a super informative guide (and without getting blisters on our feet).

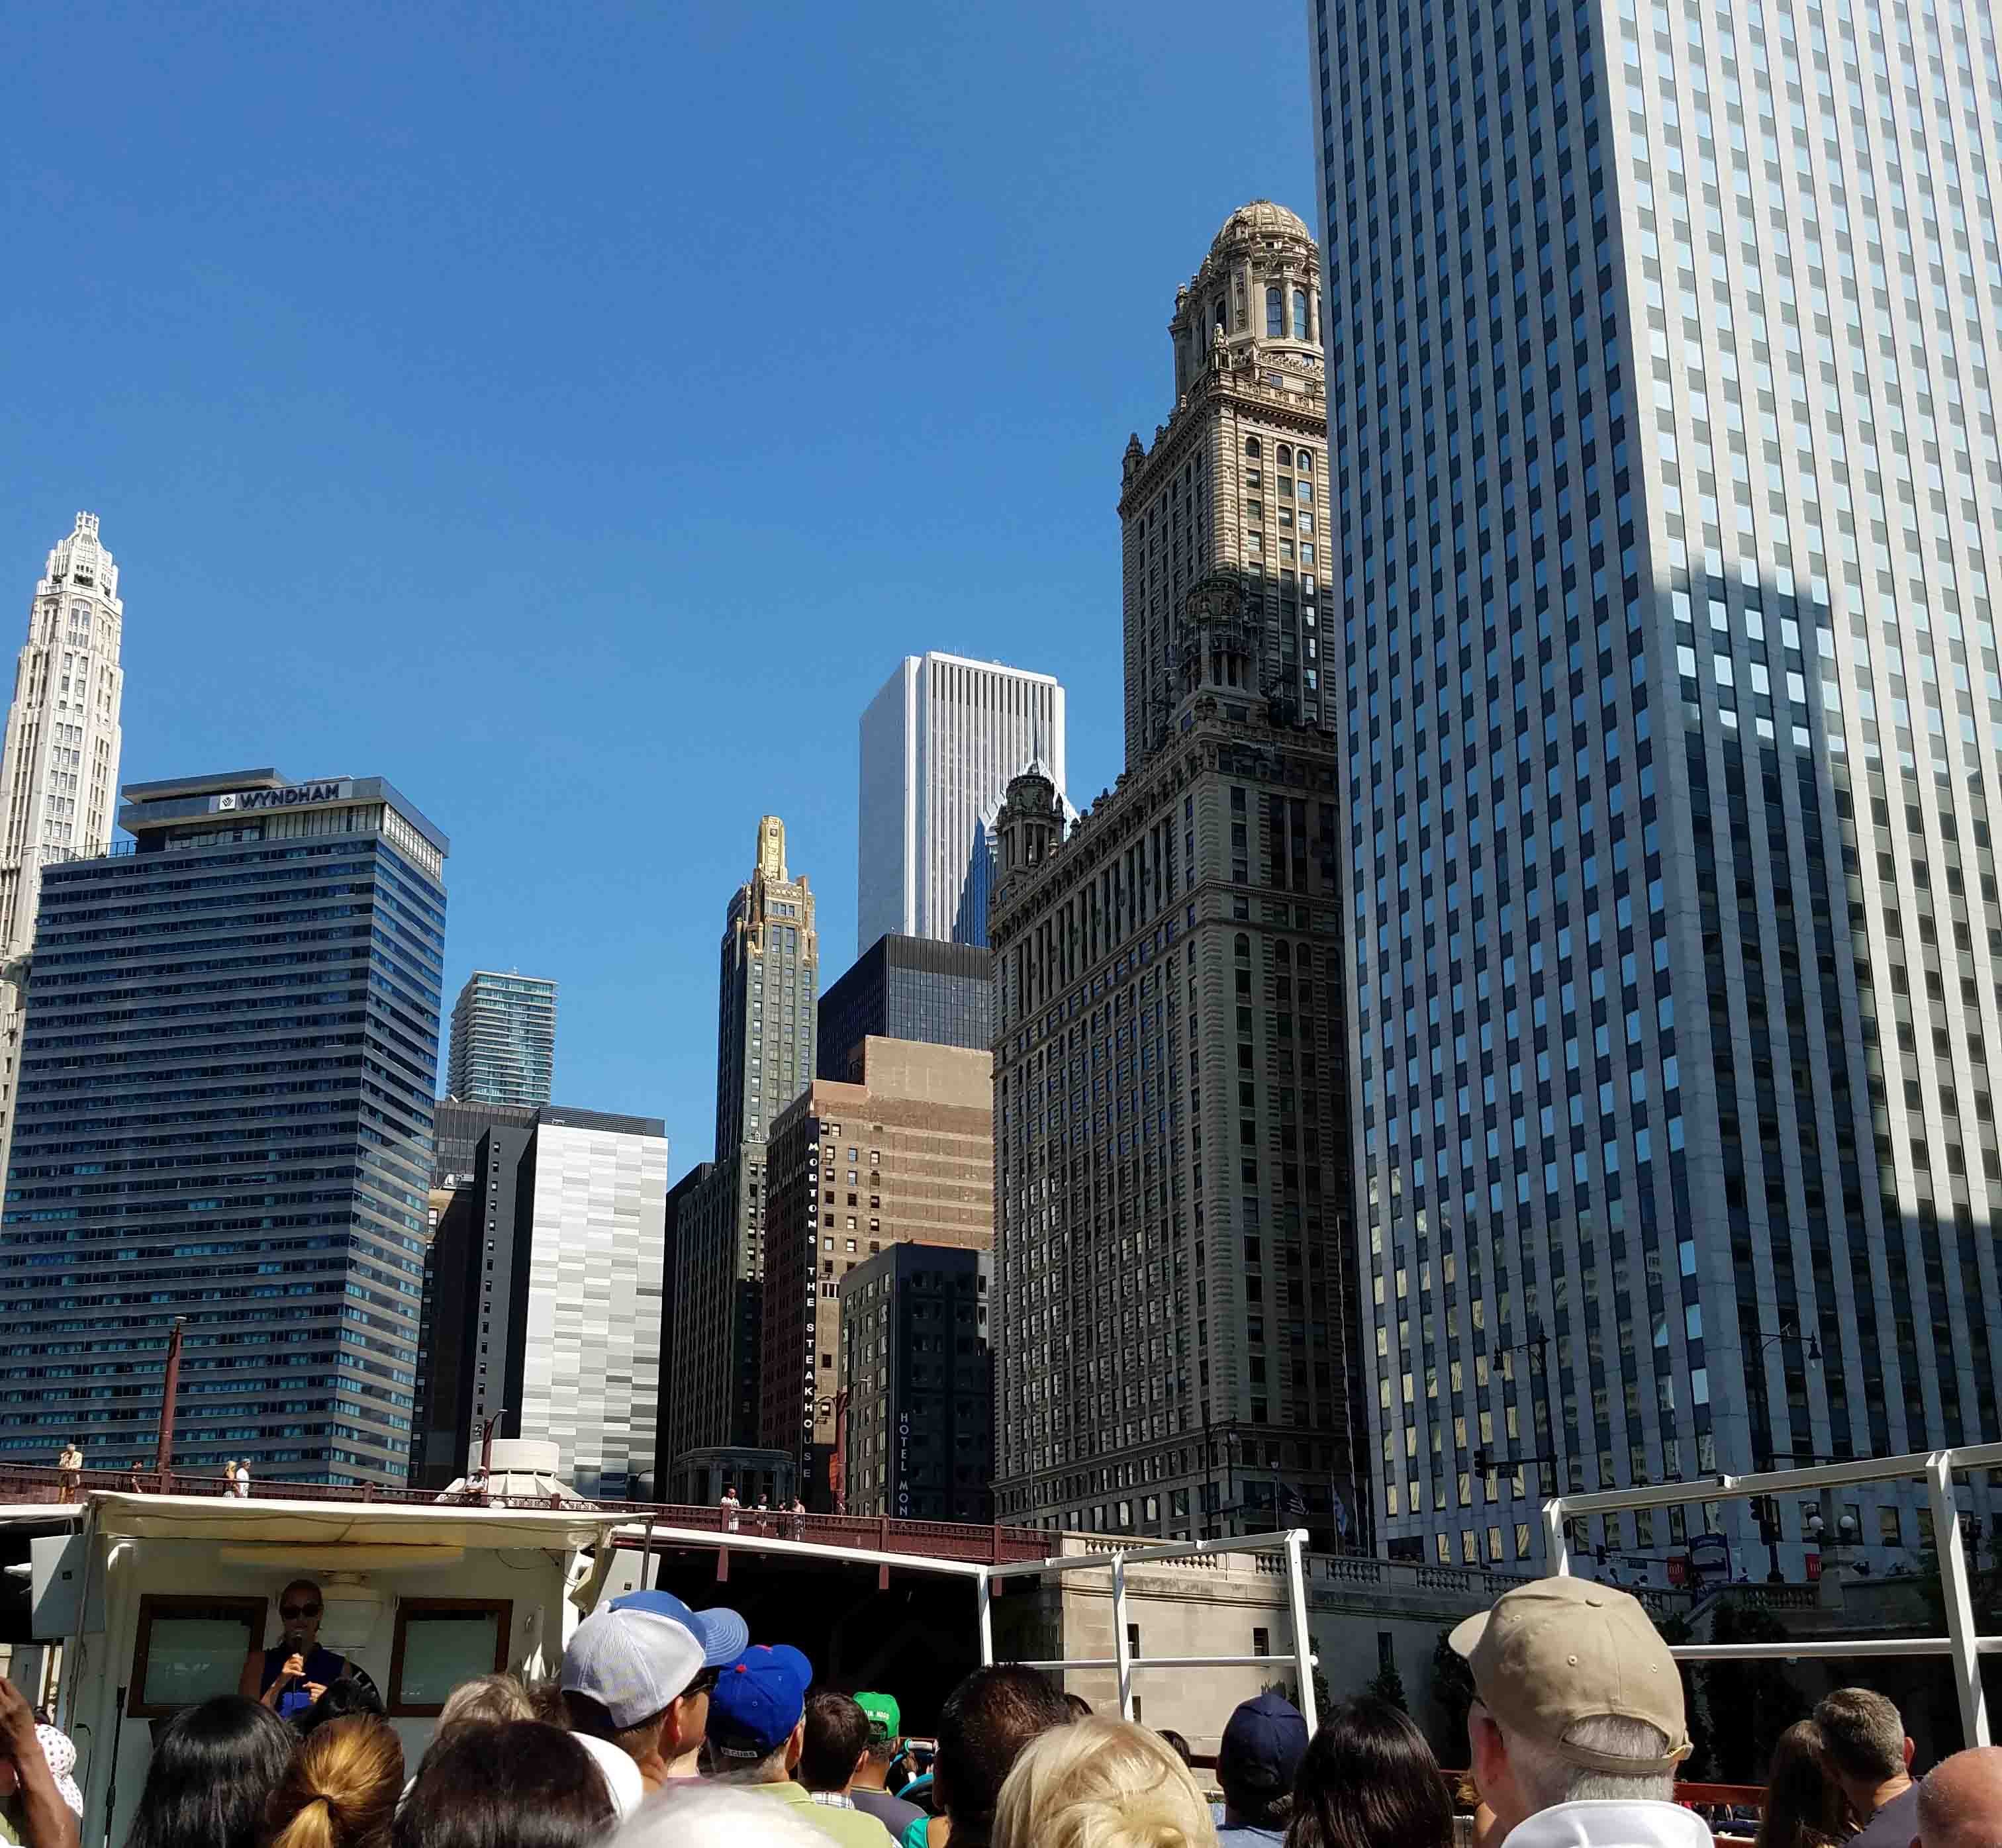
It was amazing to me how much of Chicago’s impressive architecture is visible from the river.

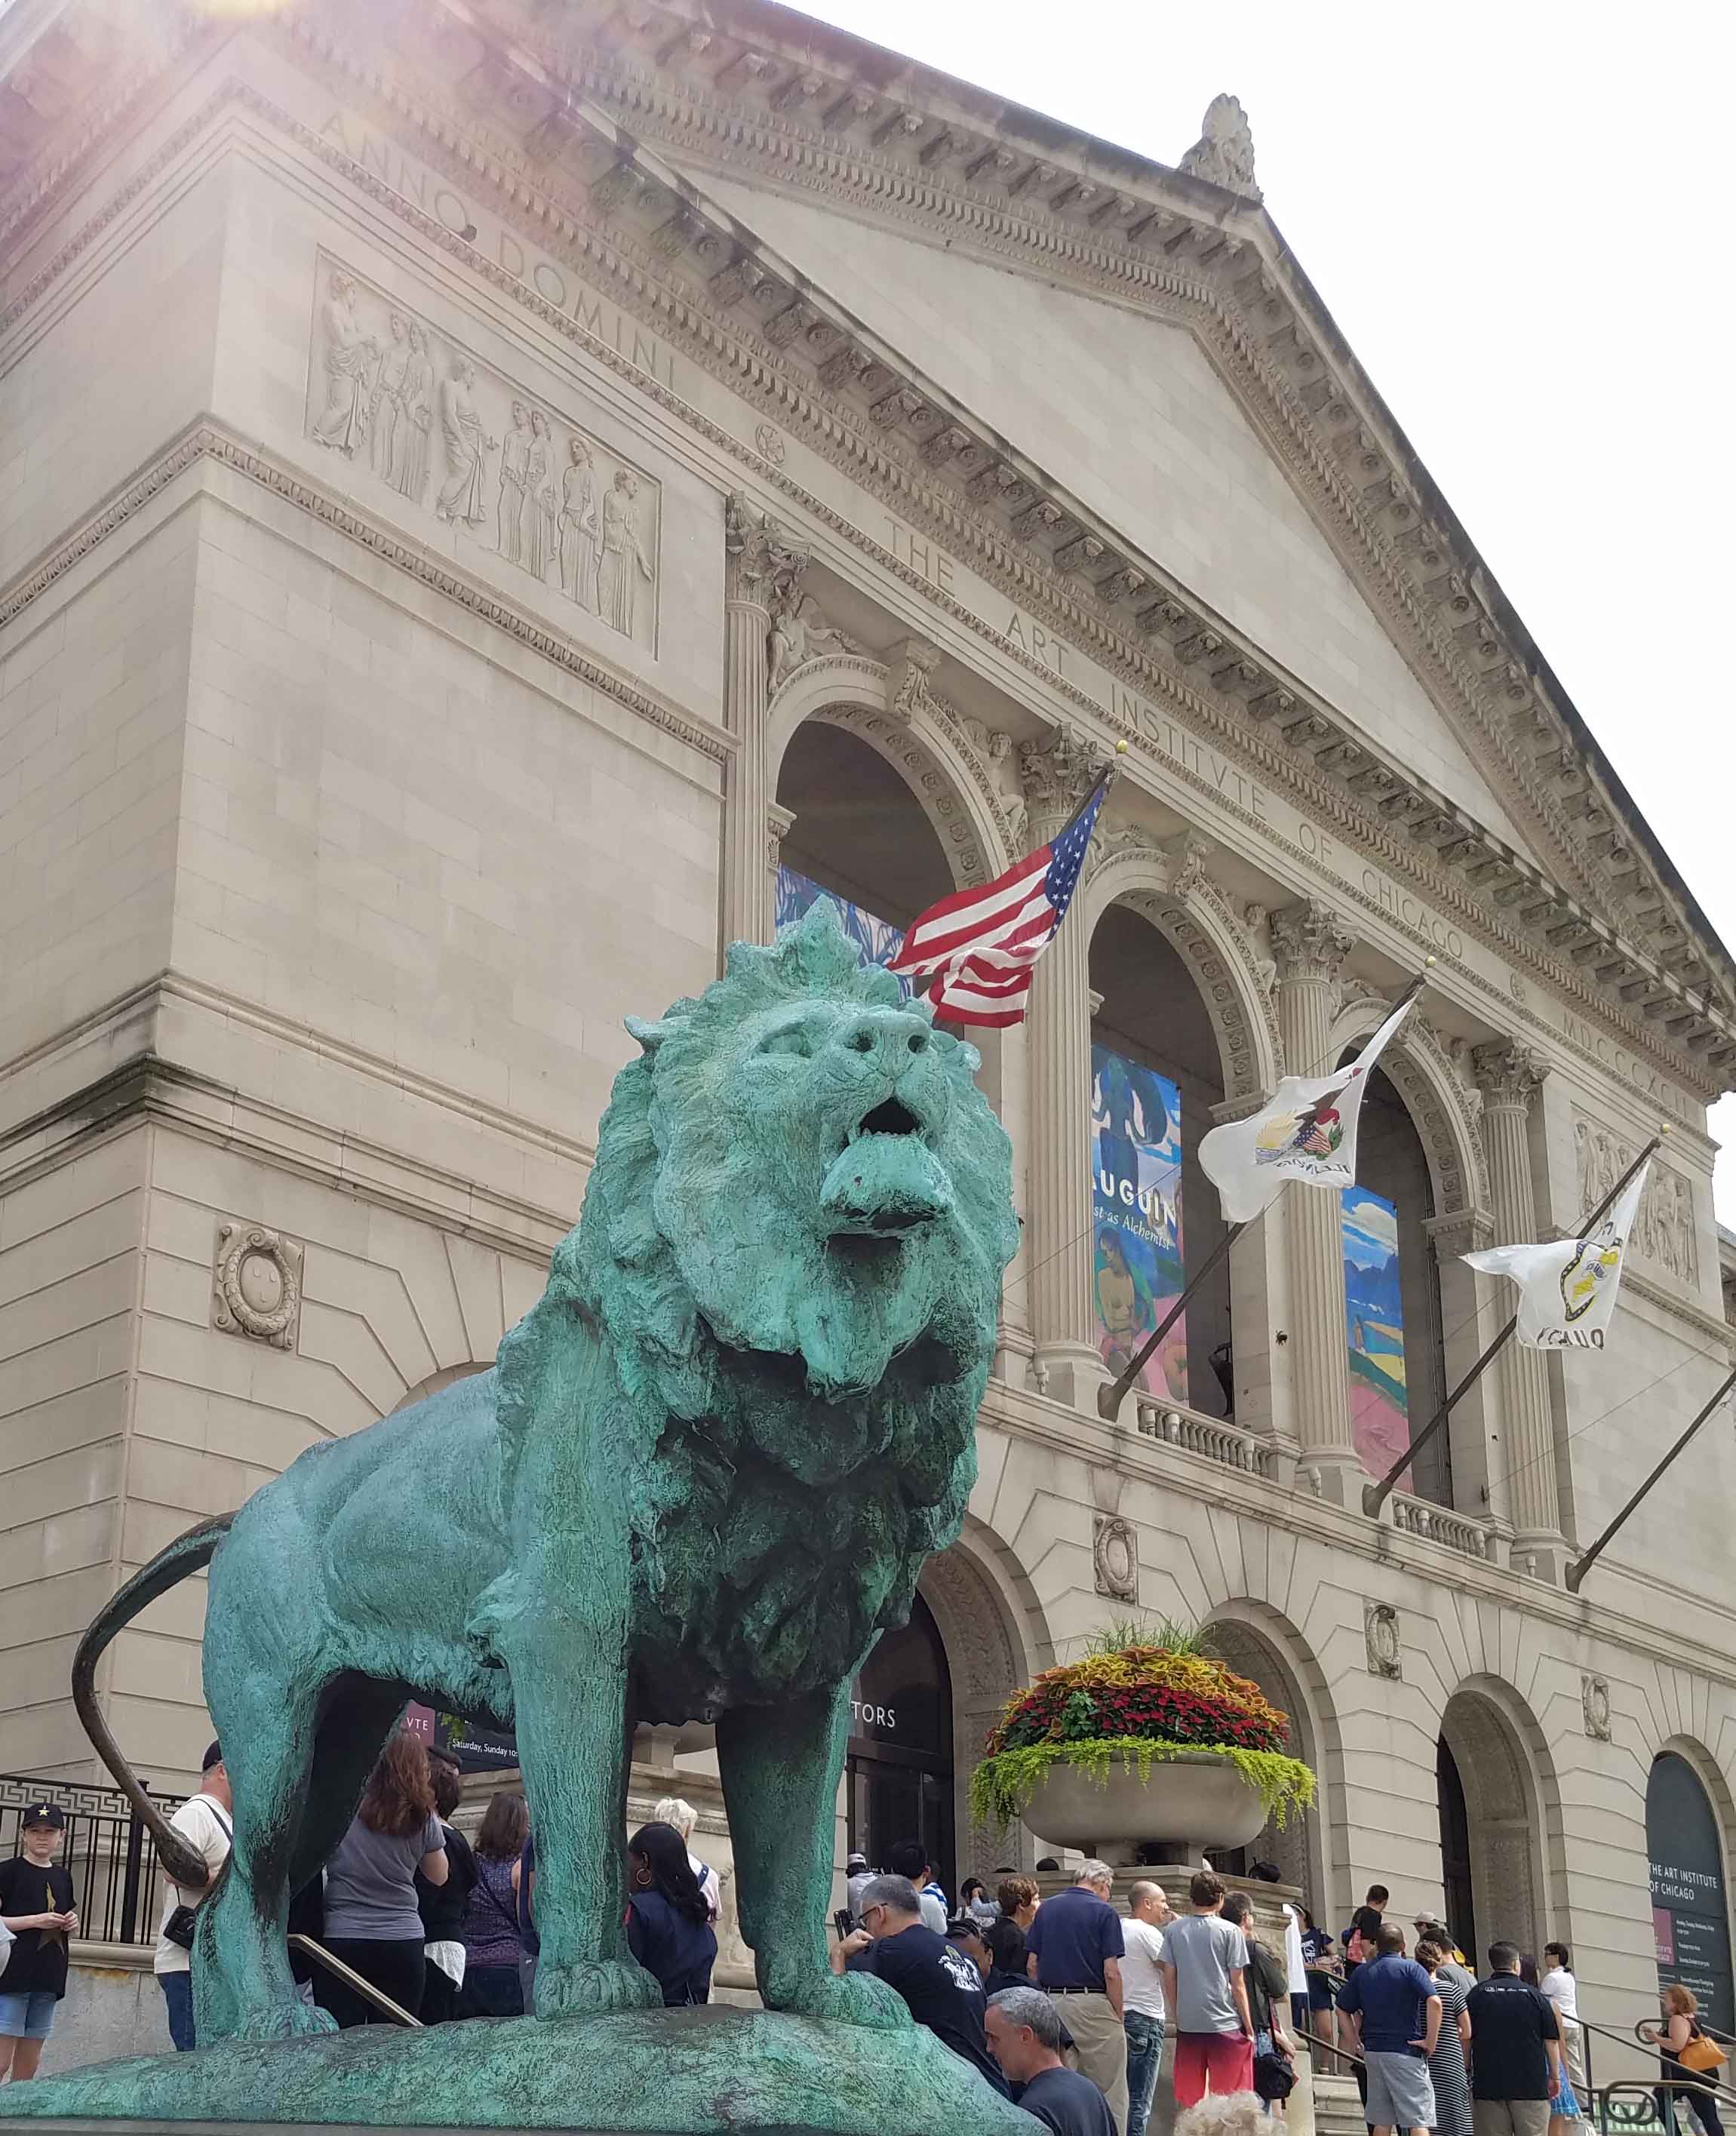
Our second day was dedicated to the Art Institute.

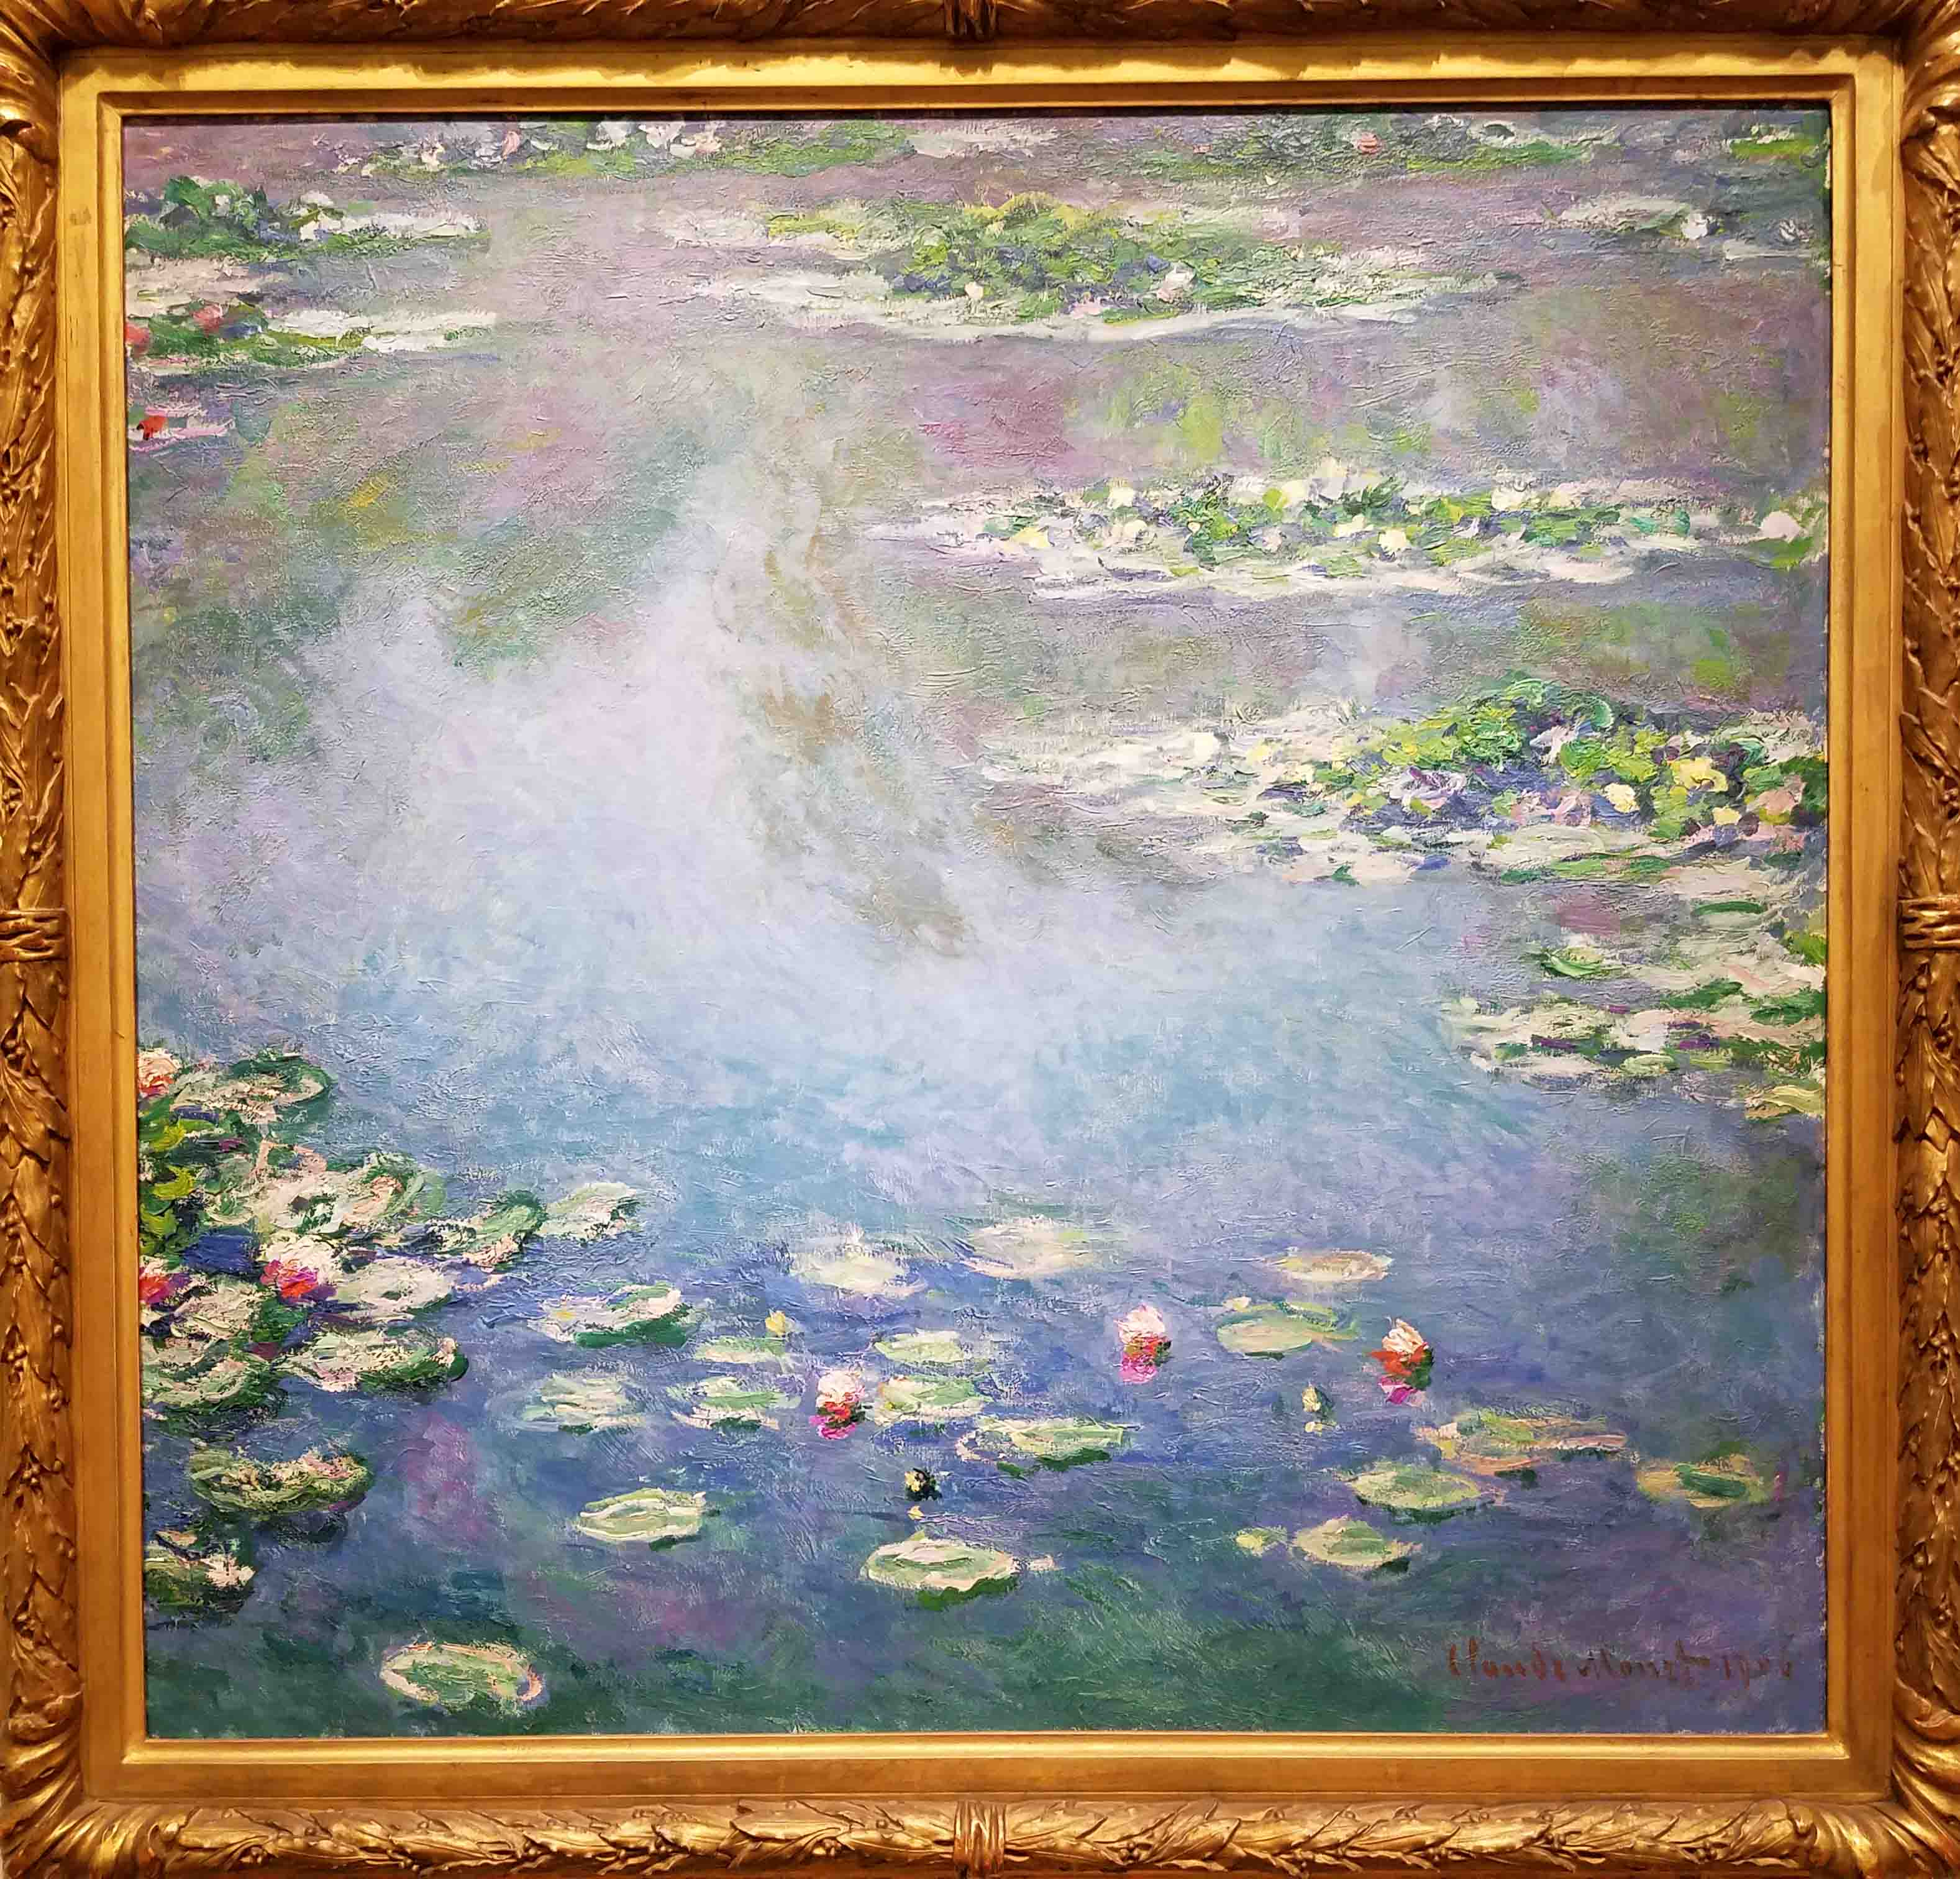
Jan was a little worried that I was going to hyperventilate in the room where the Monet paintings were on display. I wasn’t really in trouble, but I was excited to see those paintings. Most of them I had only seen as photos in books.

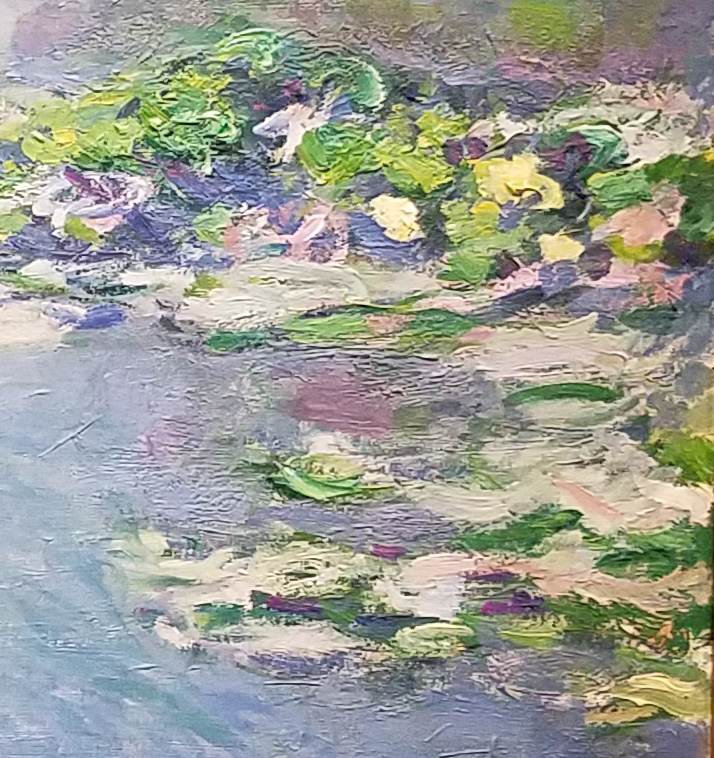
It was wonderful to get close enough to the canvas and see how Monet had picked up various colors of paint in one brush stroke. Made my fingers itch to paint again.

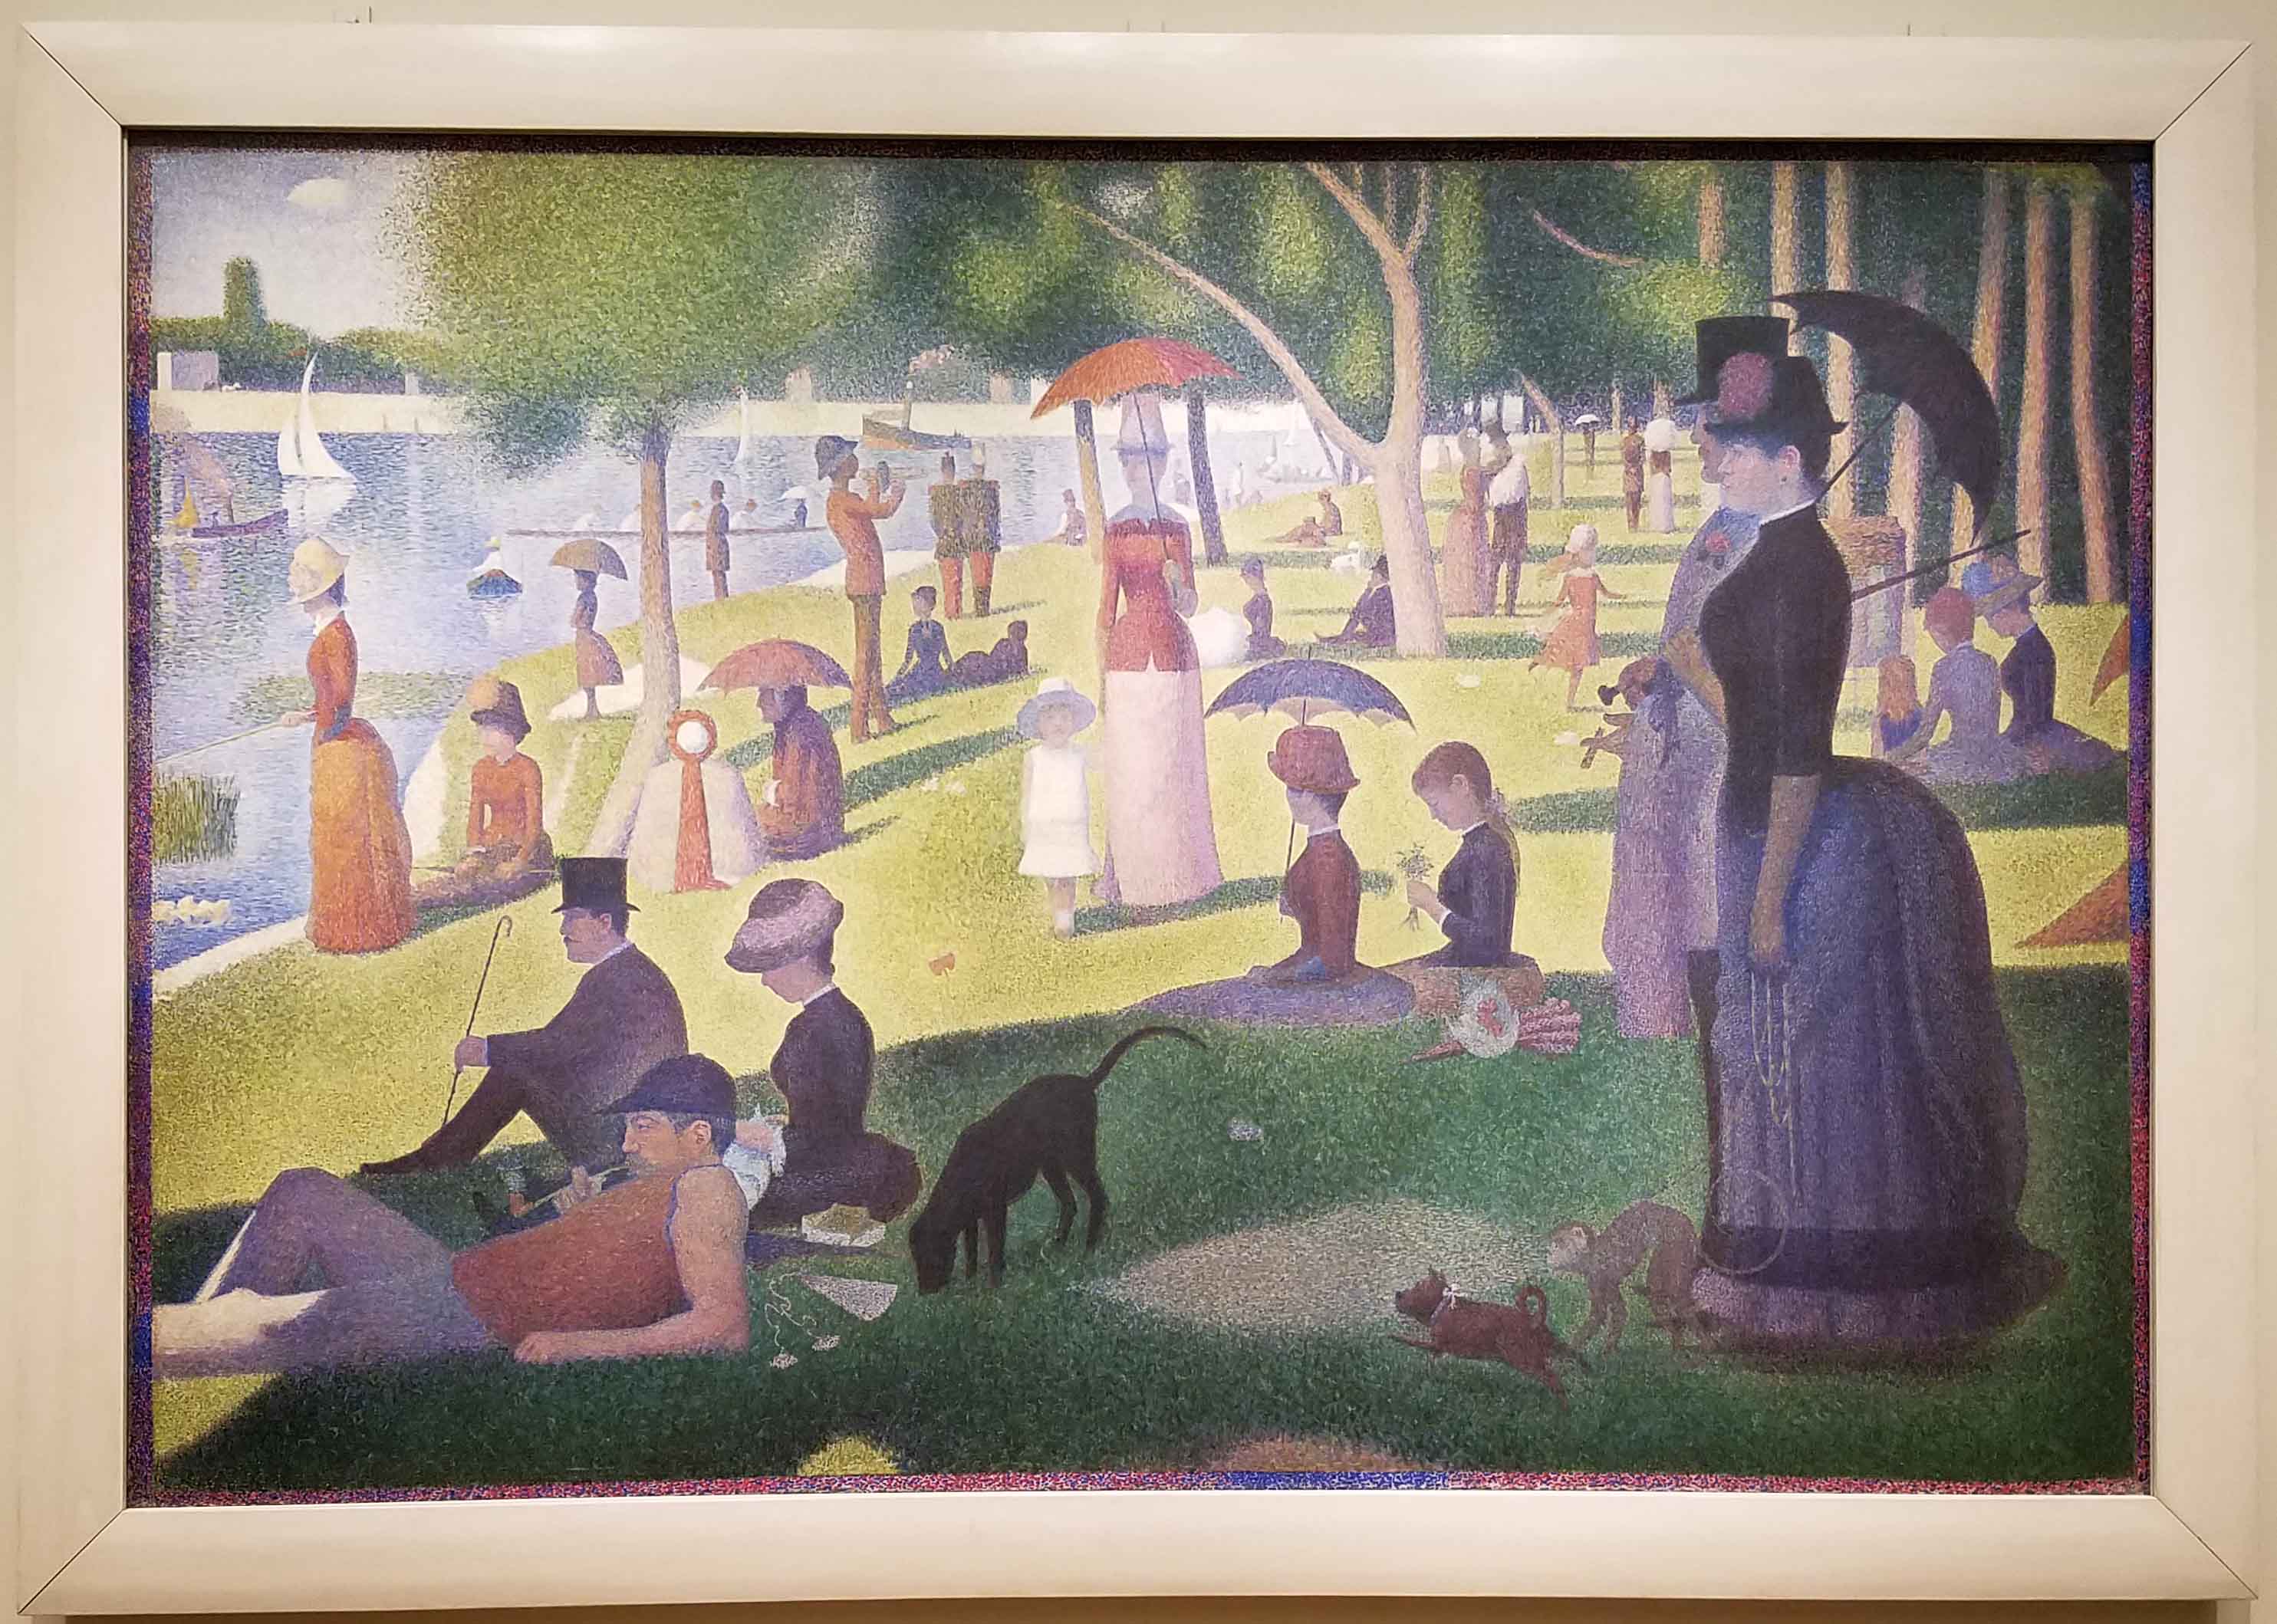
It wasn’t just the Monets though, there were also many other paintings that I’ve always wanted to see. Like the beautiful “A Sunday Afternoon on the Island of La Grand Jatte” by Georges Seraut. This is a massive canvas that took up most of one wall in the room with the Monets.

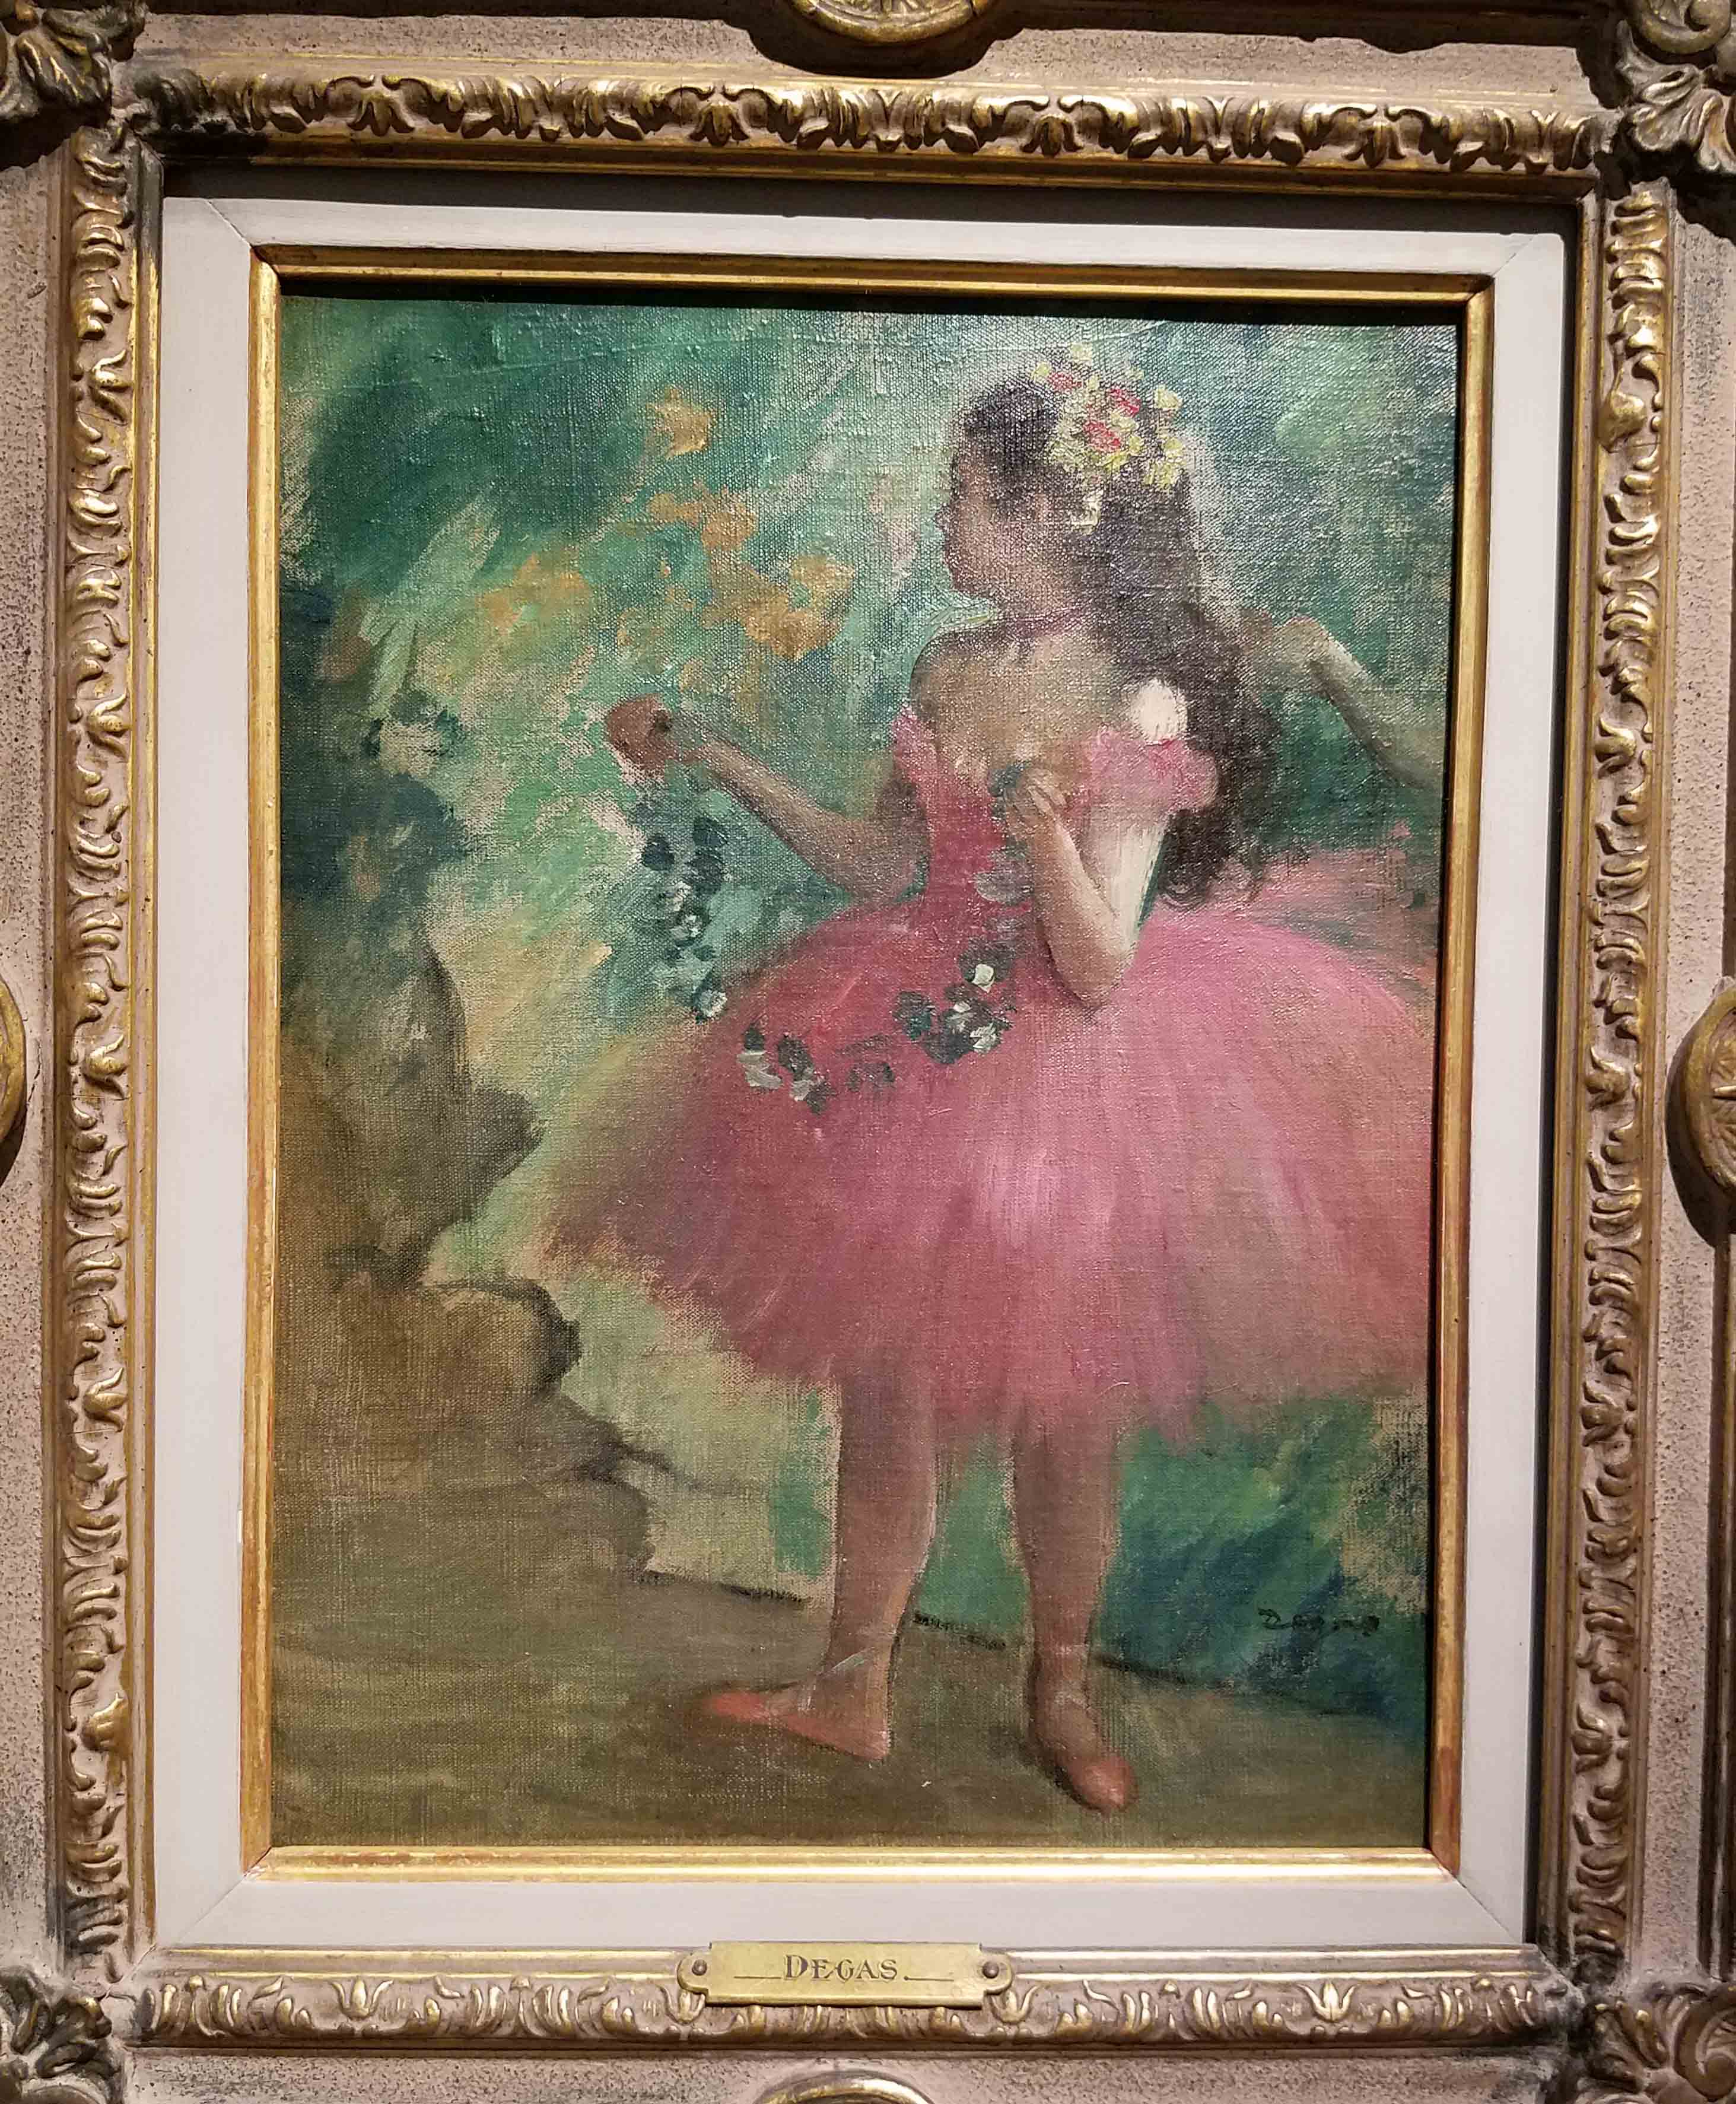
There was this lovely little painting by Degas, “Danseuse rose {Pink Dancer}“.

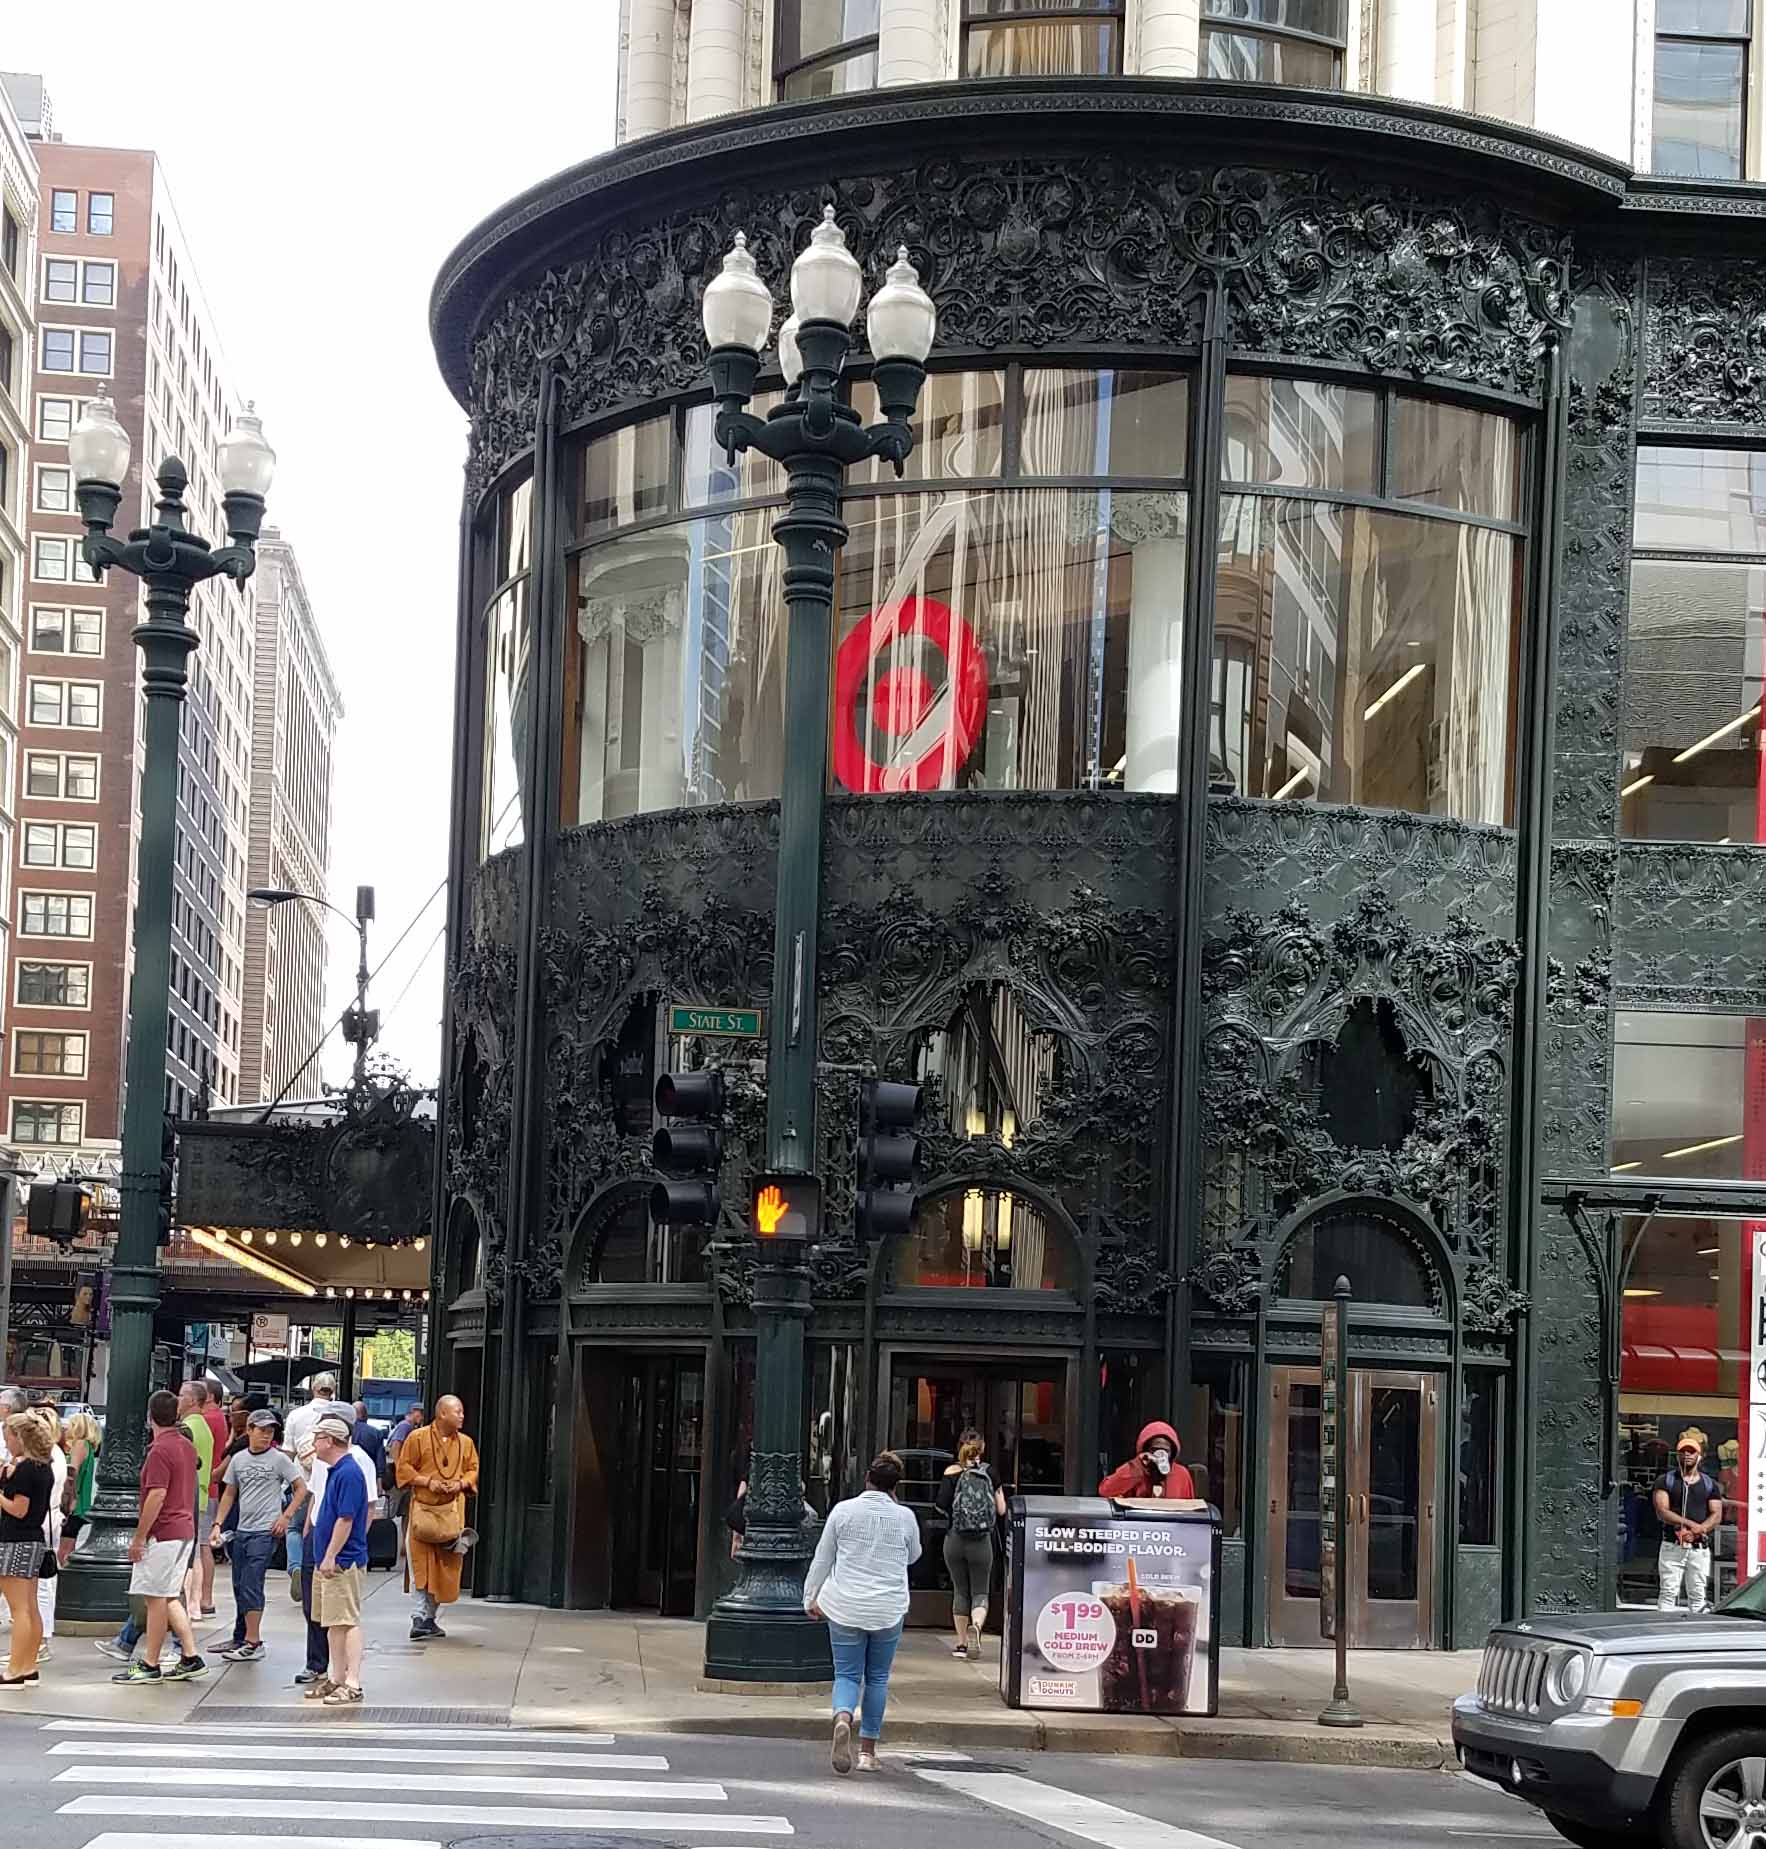
One of the things I most enjoyed about Chicago was the use of intricate metal working in the architectural details.  Jan had taken us on a specific path thru the city from the El to the Institute so I could see the beautiful Carson, Pirie,  Scott & Company store building (also known as the Sullivan Building). She was a bit horrified to realize it had been converted into a Target store. Though we were glad that the conversion was subtle, it had actually taken us sometime to realize it was a Target store and no longer the department store that Jan had known.

The Art Institute had many beautiful examples on display,

as well as some fascinating stone work.

We really could have spent a lot more time at the Art Institute, but our time was limited. I wanted to make it to the harbor to see Lake Michigan before we were heading back to our hotel.  I wasn’t able to get a really good photo of the lake, but I did get to see some ducks that were begging food off other harbor visitors.

Then we hiked back to our station to catch the El to head back to the hotel. We spent the evening discussing how we needed to do another trip to Chicago together as there were lots of other sites we never got to.

Later this summer I’ll have Jan and I’s next adventure to blog about when the 2 of us re-unite in Portland, Oregon at the 2018 Chain Link Conference. I hope you’ll be there too.


Flatirons Shawl

The Flatirons Shawl is my latest independent published design. This was what I was working on during our Mount Rushmore/Eclipse road trip. It is made with Theodora’s Pearls “Auxanometer” hand-dyed yarn, dyed in Longmont. This is a lovely rayon yarn that has beautiful sheen and drape in the finished project. Each hank contains approximately 400 yards of fingering weight yarn.

It is constructed of 3 triangles crocheted continuously from one triangle to the next, creating an asymmetrical wrap that has only 4 tails to weave in at the finish. There are 2 different lace patterns used to create the triangles and 2 colors of yarn to add textural interest. The triangles inspired the name “Flatirons” because of the dramatic rock formations bordering the Boulder Valley.

Back view of Kerchief wrap

Between the yarn and the shape this is an extremely wearable shawl. I tried styling it a number of ways on Collette.

Pinned Ends Cowl style

For this wearing option I pinned the two tips of the shawl at the back of the neck and made a doubled circle across the shoulders to create a cowl look.

Fastened with Shawl Pin

Then there is always the useful shawl pin option. This style really shows off the drape of the fabric and gives great coverage of the shoulders.

The pattern is an advanced intermediate level, so a definite skill builder. It involves working 4 row repeating lace patterns, decreases, color work, and changing direction of stitches. The pattern contains stitch charts for the lace pattern in each triangle as well as a detailed schematic for the edging directions.

Foothills Sunrise
Chautauqua Moonlight
Boulder Canyon
St. Vrain Trail

Today is the launch of this project at the Longmont Yarn Shoppe.  As part of their 5th year anniversary celebration the shop is doing kits of the above 4 different color combinations for $62 each. The pre-order of the kits starts today, September 5th thru September 17th. If you pre-order the yarn during this time the shop will provide a complimentary copy of the pattern. The yarn will be delivered to customers the week of the 25th.

Then I’ll be hosting the CAL starter party Saturday, September 30th from 2p – 4p at the shop. We will also have a thread in the Longmont Yarn Shoppe Ravelry group. So even if you live far from Longmont, Colorado you will be able to participate in the CAL and the pre-order of the yarn. Just call the shop to order your kit at 303-678-8242.

The color kits will still be available after the 17th, but will not include the complimentary pattern.  You will be able to purchase the pattern thru my Ravelry shop at any time.


Learning Lettering

This weekend I’m running a bit behind. Our Friday was super busy, it was the last day of school for both the kiddos and there were ceremonies and socializing that kept us on the go all day. I was carrying around my crochet project, but only caught a few minutes here and there to work on it.

Saturday was our first “official” day of summer break, though you still couldn’t tell it by the weather. It was cold and damp all day. We even had a bit of hail, making me very glad I hadn’t purchased a hanging planter of petunias that I was looking at the other day.

Instead, we all hung out as a family watching movies on the television. Not the most exciting first day of summer break, but pretty awesome to not have to worry about the school schedule next week. I did spend some of my day inputting next Fall’s school calendar in my calendar app. I figured I would get it out of the way while I’m still in the “school” mind-set. Hopefully this means that the start of school in the Fall won’t sneak up on me.

I have my dreams (some might call them fantasies, but let’s not split hairs). It could happen, I even put in a reminder about getting school supplies before the shops are all sold out. For now I’m ready to be in summer mode with the kids.

One of my goals this summer is to practice handwriting exercises with the kids. Cursive writing and penmanship are not really taught in school these days, so I’m hoping to fill that gap with a little home education. This is also inline with my New Year’s resolution to learn how to do Calligraphy.

I’ve been working on that resolution. My first step when wanting to tackle something like this is to read all about. Being I’m a bit old fashioned that usually means books. I did update my way of reading the books this time. I purchased my first book as a Kindle book off Amazon, “The First Steps Series: Calligraphy” by Don Marsh; 1996, North Light Books.

This is a good “nuts and bolts” kind of book. Honestly I found it a bit of a slog initially, so I am treating it more as a reference book. When I feel the need to add to my knowledge base I go back to it. There is an amazing amount of jargon that goes along with this new art. I suppose there is also a lot of jargon in crochet and knitting, but they have been so much a part of my life for so long that it seems much more familiar.

I decided to focus more on the art of Hand Lettering, rather than the formality of Calligraphy. I was intrigued by the reviews on Amazon for the book “The Art of Whimsical Lettering” by Joanne Sharpe; 2014, Interweave Press. This is a really fun and inspiring book. Lots of samples in the book of Joanne’s work with suggestions and guidance on making your own hand-lettered work.

My favorite thing about this book is the encouraging tone of the book. Joanne starts the book off with a quote from “The Wizard of Oz” by Glinda the Good Witch, “You’ve always had the power”. A big aspect of the book is Joanne encouraging readers, that no matter how much you might hate your hand writing, it can be the basis of beautiful and artistic lettering. The book has loads of beautiful and inspiring examples of Joanne’s work. My head was buzzing with ideas once I had read thru it.

It was in this book that I read about the Pilot Parallel Pen. I purchased one and liked it so much that I purchased a set of them in 4 different sizes. They come with black and red ink cartridges and I purchased a set of 12 different colored cartridges as well. Currently 3 of the pens are filled with black ink, but I’ll be trying out the colors soon.

I had also purchased another book in print form. “Hand Lettering: An Interactive Guide to the Art of Drawing Letters”, written and illustrated by Megan Wells; 2016, Peter Pauper Press. The reviews I had read of this book made it sound like one that I should have a physical copy of. It is sort of a workbook/journal style and has lots of pages that you can use for practicing your lettering. I am still reading thru it and trying the various exercises for practicing my lettering.

My favorite bit so far has been the author’s advice to not think of hand-lettering as writing, to instead approach it as drawing your letters. Now that might sound quite simple, but it really rang a bell for me. Suddenly I didn’t feel like I was struggling so much with what I was doing. I could relax and depend upon all those years of drawing to help me create lettering that I would like.

I’m still really in love with calligraphy and it will play a big part in any lettering art I create. I’ve been practicing with the parallel pens drawing various letters and words. Getting the hang of holding the pen properly is a big part of the process. I finally was ready to try to create my first real serious lettering project.

I used a pencil to create light lines on the paper to be guides for my letters. I also roughly followed the illustrations for writing italic style lettering. I picked one of my very favorite words.

I got really fancy with my letter “B”. But it still was a bit rough looking, the rest of the word needed a little cleaning up too.

I got out my new Staedler pigment pens to do the “drawing” part of my lettering to re-shape and refine the letters.

After all the tidying I was much happier with my work. I pulled the page out of my sketch book and copied it onto some heavy stock Vellum Bristol printer paper I purchased a few months back. I’m planning on playing with drawing and coloring on each of the pages to create different looks.

I also scanned my finished word into my computer, so I can play with it in my digital drawing program.

Like this.

I’ll hopefully have some other fun versions and more lettering to show you all soon. I’m excited about incorporating words and quotes in future art projects.

A fun exercise for you all in the meantime. Count how many words you can come up with that have “ea” in the middle and end with “e”. I’ll start you off with one of my other favorites: “Peace”.

Is it a Rock?

The other day I saw a really cool video on FaceBook of rugs that looked like river rocks. I love river rocks. I have five medium sized ones that sit on top of my woodstove in our living room. They act as heat sinks as well as looking pretty. A heat sink is a solid or liquid filled object that retains heat and slowly releases it as the air around it cools. Occasionally I put one of my river rocks in a thick cotton towel to warm my feet on when the temperatures really drop up here on the mountain.

The rugs in the video were made with felted wool rocks by the artist/designer Martina Schuhmann from Vienna, Austria  (you can see the video on YouTube here). I was very intrigued since I’ve been playing with needle-felting so much. I decided to find out as much as I could about felting wool rocks or “stones”.  I first went to the artist’s Etsy shop to see if there was more information. You can check her shop out at: FlussDesign

In the video there is a close-up of one of her rocks being squeezed and it bounced right back.  That made me wonder how she was felting her rocks, were they solid wool or was there something else? Looking at Martina’s shop got me part of the answer. She stated that her rocks were made with a foam core.

I had the video on my facebook page and stated that I was wondering how she felted her rocks. My friend Angela sent me a link to a video on YouTube where they were felting around actual rocks. That got me wandering around YouTube looking at a variety of felted rock and other wet felting videos. I decided it was time to try felting my own wool river rock.

I dug out this piece of 1 inch thick foam that I had leftover from another project. It was a little dusty, so I gave it a good wash and hung it up to dry overnight. You can see in the photo above where it was clipped to my drying line. It wasn’t a very pretty piece of foam, but it was going to be enclosed in wool anyway. I drew an ovoid shape for my rock.

Once I had cut out the foam rock I trimmed up the edges to soften them. I figured wrapping the wool fibers and felting them around it would likely soften any hard edges, but I wanted to make this first rock as easy as possible.

Remember when I purchased that wool fiber from the Brown Sheep Company at the Loveland Yarn Fest last April? There was some interesting striped fiber in one of the bags. I had taken it out and placed it aside in another bag because I knew it would be great for a “special” project someday. It’s day had come, I thought it would be ideal for giving some “rock” texture to my felted faux river rock.

Before I started with that fiber though, I wanted to add a bit of my plain wool to the flat sides of my foam rock. Of course, my handy felting needle came out for this part of the project. I used the felting needle to tack the wool to the foam, just enough that it wouldn’t come loose.

I then did the same to the opposite side of my foam shape.

Now I had a little wool and foam sandwich to wrap with my special fiber. I set that aside for the moment.

It was time to lay out my fiber that would be the outside of my rock. I first pulled out drafts of fiber laying them out lengthwise on my work surface.

Next I laid out a second layer perpendicular to the first layer.

I was ready to wrap my little foam sandwich. If I do this again I will make my strip of wool fibers wider, I ran into some small challenges getting the core wrapped well.

I rolled the core up as snugly as possible with my strip of loose fibers. Then I was ready to use my felting needle to tack the fiber down well to the core.

At this point I had covered the entire core with the fiber and secured it well using the felting needle.

It was time to submerge the rock in my bowl of hot soapy water.

Now it was just all about working the wet felt to shrink it snugly around the foam core. This is the really wet and messy stage of this project. I also think I had a bit too much soap in my water. I alternated going to my kitchen sink and rinsing my rock with cold water to shock the fibers further, and working with the hot soapy water.

I also used my felting stone when I started getting the rock closer to the shape I wanted. The felting stone helped me smooth the surface of my “rock”.

I had finally gotten it felted well and I set it out to dry overnight. It was still a bit furry looking and had some odd shaping issues on the “bottom” side. I knew I would be doing a little “fixing” with my felting needle once it was dry again.

The next afternoon my rock was dry and I was happy with the squish factor of it.  I wanted to correct some shaping issues on the bottom and ends. Especially this odd little flap that had formed at one end. Of course, real river rocks do sometimes have cracks and little protuberances, but I wanted my rock to be an “ideal” river rock.

Fortunately this was easy to fix, I just added some bits of fiber and needle felted them until they were smooth. No more flap. I continued shaping and smoothing my rock with my various needle felting tools. All of them joined the party; single, 3 and 5 needle tools. The 3 needle tool was especially useful for smoothing the surface of my rock with lots of shallow needling.

Before
After

I am pretty pleased with how this rock came out. You can see how much the fiber shrank from the starting size to the finished size in the Before and After photos above.

The finished rock is only a little bit bigger than the foam core. You can get an idea of the relative sizes by looking at the shape in the remaining foam.

The patterning on the rock from the “special” fiber actually came out very well. I definitely have a side I consider the “top” of my rock.

This is my finished rock from the bottom.

And the side. Any way you look at it is pretty “rock like”.

I learned so much making this rock, one of the most important things was how much work it is felting a rock. I’m sure with practice I would get faster and have better results. But I would say it would be worth every penny to purchase a rug or other item from Martina. There is an incredible amount of labor in her pieces.

I may make some more rocks, but I think they will become a pillow for the sofa and not a rug. I was thinking that I could crochet the backing for the rocks to be sewn to, or I might even needle felt the rocks to my crocheted fabric. That would be the ideal marriage of both my current favorite crafts.


Deconstructed Yarn Painting

This is one of my latest pretties.

Remember all those yarn tails I had leftover when I was working on some free-form crochet? Since they were all from 100% wool yarn I knew that I had a special job for them. At the time I wasn’t sure what it would be. I tucked them into a little zip lock bag and put them away.

Lately I’ve been doing a lot of needle felting in preparation for teaching it. I’ve made my own needle felting pads to work on.

I used some of those massive bags of fiber that I purchased from Brown Sheep Yarns last year at the Scotts Bluff Valley Fiber Arts Fair. That means that all my felting pads are the same color as the pieces I’m felting. Not the easiest thing to see with my “mature” eyes, especially in the evening using artificial lighting.

Then I had the brilliant idea that I could add color to the pads, using my left-over yarn tails! I told my friend Sue, who also does needle-felting. At the time I was saying I would cover the whole pad with color. She mentioned that sometimes she works with color and having a white background would be helpful.

That inspired me to only add color to one side of my pad. That way I would have both a natural white surface and a color surface.

First I started pulling apart the yarn. I would un-twist the yarn and then pull off strands or turn it into fluff.  I found it a little easier to do if I cut the yarn tails into lengths shorter than 2 inches. The single ply yarn was also easier to pull apart than the multiple plied yarn. Though the multiple plied yarn strands did add some interesting “wavy” texture. I filled up a container with all the deconstructed yarn.

Then I spread the yarn remains over the pad in a random pattern. It was rather fluffy and vague looking.

But once I felted it in using my multi-needle felting tool it looked quite beautiful. My final result actually reminded me of the expressionist paintings I saw last Fall at the Denver Art Museum. I’m thinking I may have to experiment more with this method of “painting” with yarn.

I’m going to need a lot more yarn tails.

Getting into the Swing of Things Again

Well, it’s been a bit of a hectic re-entry to life in our “normal” routine. We have had lots of snow and some very cold temperatures since our return, not what one would think of for Spring weather, though fairly typical for our springtime. I had quite a few things scheduled for this week, which would have been fine if I hadn’t had the wild 4 weeks preceding this one. I’m slowly chipping away at the mutant To-Do list though.

One of the best things about coming home from Spring Break was picking up our mail. This nifty little box was waiting for me from my dear friend Bonnie Pierce.

I met Bonnie and her husband Bill at the first ever CGOA conference I went too. She was wearing one of her gorgeous Free Form crochet capes and I practically attacked her to look at it closer. I was completely on my own at that show, but Bonnie and Bill took me under their wing and included me in many of the group events they were involved in.

They even rescued my hook case that I had left laying on the table one afternoon. Bonnie and I chuckle about it every time we get together. But it has been far too long since I last got to spend some in-person time with Bonnie. Fortunately we stay in touch online thru social media and messaging.

Recently Bonnie and I decided we needed to have a piece of each other’s work. These 2 drop-dead gorgeous scrumbles are what Bonnie sent me. I’m so inspired by her work, though a little chagrined at how clunky and chunky my own Free Form efforts look. Bonnie is truly a talent with her Free Form artistry.

She is well known for her bullion stitches. Which she had tried to teach me numerous times with limited success.

This flower with the sparkly embellishment is currently my favorite bit on this scrumble. But every time I look at them I see something that delights me.

When Bonnie and I met in Portland in 2008, one of the things we bonded over was Chocolate. We both have a love of wonderful dark chocolate. She told me about a Portland chocolate company called “Moonstruck” and shared some that she had with her. It is marvelous stuff and whenever I find the brand I purchase a few bars, but it is rather scarce in Colorado.

So it is very fitting that Bonnie included some delicious chocolate in the package too. I’ve got to get my piece finished to send to Bonnie now and will have to hunt down some special Colorado chocolates to include. This might require me attending the Chocolate Festival again, sigh, the sacrifices I make for my friends.

I’ve been busy with working on developing classes since our return from our big trip. This cute little needle-felted sheep is one of them. I’m finding the needle-felting quite addictive, I think the total attention that is required is a great form of meditation. That’s been very good for me as I process everything the last 4 weeks has thrown at me and my family.

I hope you are all having a beautiful springtime. April is looking to be another fast-moving and busy month. I’ll try to keep up with the blog and (fingers crossed) to have some more videos for you very soon.

More Books and Fiber to Play With

It’s been a busy week since my last post. I’ve been working on 5 different things all at the same time, a couple of them were to do with opening my Etsy Shop.  I have set the 15th of January as my goal for getting my shop open, that is tomorrow. Eek!

I may only have a couple of listings when I open my shop, but I figure you have to start somewhere. Funny thing is, the making items part is actually the easy task. It’s the getting all the information online and figuring out how to do all the listing stuff that slows me down. I’m hopeful that once I’ve gotten some practice listing items on there I will be faster.

Meanwhile there is yarn and fiber stuff happening too. Last night I was getting ready to do reading time with my boys and my husband said, “Oh I forgot, you got a huge box in the mail.” Then he handed me the box.  It was from my friend Pam in New Jersey.

We spoke on the phone a few weeks ago. She was doing some clearing out and she wanted to see if I would like any of the stuff she was getting rid of. At first I said “No” because my own studio needs a serious clear-out. She wasn’t giving up that easy though, and began to tell me about some books she thought I would like.  She also knows I have been doing needle-felting and offered some roving and felting tools that she thought I would find useful. Plus, as she put it, the roving would make good packing material for the books.

new-books

By the end of the conversation I had agreed that the books sounded very interesting. Here they all are: 3 books about crocheting with wire, 1 about wire-wrapping, and the last is any interesting book about Textile Techniques in Metal. She even included a couple of articles from Bead & Button issues that were about crocheting with wire. Very distracting and fun.

big-bag-of-roving

Then there was the colorful bag of roving.

roving-and-hankies

I was expecting wool roving, but Pam included some lovely alpaca and silk as well.

silk-hankies

Look at this beautiful stack of hand-dyed silk hankies. Pam and I have similar tastes in colors, so these just about jumped out of the bag into my hands. I haven’t played with silk in this form before, though I have read about it.

needle-felting-tool

Last of all was a handy Needle-Felting tool from FeltCrafts. This will be very useful when I am working on some of my larger projects.  I’m looking forward to testing it out. Don’t you love the fun little container it came it? It is really nice when one can keep all the sharp things gathered up.

I am very glad that Pam talked me into acquiring these new goodies, now I just have to behave myself and get some of the other stuff on the Mutant To-Do List done before I play with them.


Learning Something New

Earlier this month I shared with you my efforts to organize my bead stash. The primary motivation for that was because I am playing with designing jewelry again. Sometimes that means using beads and other jewelry components in my crochet wearables. Other times it means getting out the wire and jewelry making tools to create fun and sparkly pieces.

tools-and-supplies

As I’ve been organizing things and working on various jewelry designs, I became interested in metal stamping. This is a great way to add words and even quotes to my jewelry pieces. Which meant acquiring some new tools and supplies.

Yesterday evening I began to experiment with metal stamping. My sons were both very interested in what I was doing. This is definitely not a quiet craft. Both boys actually gave it a try.

thing-1-and-i

Then my oldest decided to be in charge of handing me the letter stamps I needed. This little disc of aluminum was our project we worked on together. Not too bad for a first attempt.

my-first-experiments

One of the fun things about this craft form is bashing the stamps and metal with hammers. It’s a great way to take out some controlled aggression. I was being a little timid at first, which is why that first piece had some rather faint impressions.  I soon overcame my timidity though and gave the stamps a hearty whack as needed.

2nd-alum-experiment

I made this little silvery aluminum disc next. I found I’m really not wild about aluminum, especially when it is this thin. It’s surprisingly strong, but super lightweight. I dropped this disc at one point and it practically flew away. I was hunting for it for 20 minutes. These discs would be great for earrings though, as being so lightweight they wouldn’t pull on the earlobe.

natural-brass-blank

Next I played with a brass blank. These blanks were labeled “natural brass” and don’t have that gleaming yellow color that I’m used to. Brass is a harder metal than aluminum, so it took more force to create a good impression on the blank.

final-project-of-the-evening

I am still figuring out the exact method for placing my stamps before striking them. I actually made a little mistake on this piece, but corrected it. Can you spot it?  Even with the mistake I’m pretty happy with how it came out.

You may be asking, “Are you nuts taking up a new craft during the madness of Christmas?” or even, “Where are you going with this Andee?”

If you have been reading my blog for very long, you already know the answer to the first question. Yes, I’m nuts. That said, I also find learning new things to be a good way for me to manage stress. In some ways this is all an early Christmas present to me.

Where I’m going with this is yet to be seen. I am playing around with the idea of finally getting my Etsy Shop going. It’s something I’ve wanted to do for years, yet it hasn’t ever come together.

compact-storage

Or this could just be a stop along my art journey as I keep expanding my creativity. It may seem counter-intuitive, but I find new creative energy for my crochet work by exploring other (sometimes un-related) crafts. For the moment this new craft isn’t taking up a lot of room mentally or physically…. and I’m having a lot of fun playing with hammers.


“Uncle!”

Sometimes getting back into the routine of school days is a rough transition. That would definitely be the case this week. This is the first full week my boys are back in school and to add to the fun (not): my husband is out of town for work and there are major construction delays on the 2  shortest routes down the mountain to school.

I am really glad that we are getting our roads back to better-than-before. If you all remember back in September 2013 there was a nasty flood here and we had extreme damage to numerous roadways in Colorado, especially in the mountains. The construction has been on-going for the past 3 years, with the big job starting last year about this time.

What all this means for me though, is less time in my office at home. Being on the go isn’t too bad when I’m crocheting away on a pattern, but it gets a bit tricky when I need to do photography and video work.

I had planned to have an awesome Tuesday post for all my dear readers. Unfortunately, I finally had to accept reality since it is now Wednesday evening and I still don’t have the awesome post completed. I’m crying “Uncle” this time. Awesome post is being moved to my Saturday post instead.

But I won’t leave you with a completely empty plate. No starving children in Mama Andee’s house!

One of the good things about being trapped down in town this week, I had the opportunity to get lots of shopping errands out of the way. Seems like there are always little errands that get pushed off the day’s list when I come down during summer break.

This past Tuesday I took care of all my grocery errands, but I also made some time for errands that were a bit more fun. Like stopping by JoAnn’s and Michaels.

RH WaterLily

I needed some foam cushions for a project and knew that JoAnn’s would have the ones I wanted. I spent a few minutes having a wistful browse of all the lovely Ott-Lites they have in stock. I did resist that temptation, but a skein of yarn said it needed to come home with me.

RH Friends

I really like crocheting with Red Heart’s “With Love” yarn (very aptly named as well). It is nice and soft with a lofty springy twist to it. Great for making home décor or even wearables. I picked the Water Lily color because I thought it would play well with some purple that I had in my stash. Don’t they look nice together? Will be coming back to them later this winter.

There has been a lot of posting in social media about Caron Yarn’s newest product “Caron Cakes”. They are only in Michaels stores from what I understand. They did have them online at the Michaels website, but as of this writing they are out-of-stock. You can take a look at the various colors online though and see if there is a store near you that carries them.

Caron Cakes at Michaels

I wanted to see if I could find them in my local Michaels. The store I go to is located in Superior, Colorado in the same shopping area as my nearest Costco.  I decided I had time for a stop in Michaels before heading to Costco for groceries. I was pleased to see the yarn there, though they had already sold quite a bit of it.

My Caron Cakes

I had to adopt a few balls for myself. I decided on 2 balls of the purple toned “Bumbleberry” and 1 ball of the “Blueberry Cheesecake”. The yardage in each ball is very generous at 383 yards. It is a yarn that requires a bit more care, the instructions on the label say “Hand Wash. Lay flat to dry.” A little surprising as the fiber content is 80% Acrylic/20% Wool. The yarn is very soft in the ball and doesn’t have that slight scratchiness you sometimes get with wool blends.

Jessies Cakes Round-Up

I’m looking forward to working with this yarn and seeing what new designs it inspires for me. Meanwhile my good friend and fellow yarnie blogger Jessie has put together a Round-up of pattern suggestions for folks that are wondering what they can crochet with this yarn.

C2C Scarf 1

You can find Jessie’s suggestions and the links to the patterns on her blog: Jessie At Home. I was flattered that she included my C2C Basics Scarf in there.  Some of my other patterns that could work up nicely in this yarn are:

Granny Fans Redux - Andee Graves/M2H Designs

Granny Fans Redux, this is one of my paid patterns that has detailed charts and the instructions for 3 different styles of neck wear. The long runs of color in the Caron Cakes would likely give you fans in each color.

2nd PWT

Playing with Triangles Shawl, this pattern is available here on my blog and I have a “how-to” video on my YouTube Channel.

3rd PWT attempt

You can see in the above photo how fun the color changes were using Red Heart’s Treasure. With the Caron Cakes the color stripes would be even more dramatic. The squishy loft of the Cakes yarn would make a very snuggly shawl, perfect for a gift for a dear friend or family member this coming holiday season.

Enjoy the rest of your week, and be sure to stop by on Saturday for another fun pattern and video.

Back to School again

This past week the weather has begun its swing back to cooler temperatures, at least up here on my mountain. It is getting us in the mood for autumn just as school is ready to start up again for my boys.

My youngest son is going into the 5th grade this year. It’s rather bittersweet as this will be his last year in elementary school. In our district 6th graders are in Middle School. So the Bean is looking forward to being one of the “big” kids this year. He also will have the opportunity to join band and learn to play an instrument. We will see if that happens. I’m trying to convince him that music is math, but he remains skeptical about it.

My oldest is going into 8th grade, his last year of Middle School. That means this year is going to be full of getting ready for his graduation at the end of the year and deciding what High School he’ll be attending for 9th grade. This will be the last year that I’ll be driving down or staying in town all day to pick them up after school. Starting next year they will both be able to take a bus home up to our little community after school.

For some reason our schools always start the new year with a short week. My youngest will be having his first day this coming Thursday and my other son’s will be that Friday.  I went on a massive shopping trip this last Tuesday and got all the required items for their return to school. I stocked up for my design office supplies too.

Pocket Folders

Inexpensive 2 pocket file folders, I use these for corralling my design notes when I am crocheting a new design and writing the pattern.

Spiral Notebooks

A stack of spiral notebooks, still my favorite to keep with me for scribbling ideas in or design notes when I am swatching for new designs. They also are a sort of ‘catch-all” for anything I need to write down. I fill them up and weed them out as the year progresses.

Pink Comp Notebooks

A few nicer looking composition notebooks that I’ll use when I go to conferences. The slightly smaller profile lets them fit nicely into my bags I carry during the conference.

Writing n Drawing Implements

I also picked up a few new writing and drawing implements. Haven’t used these colored pencils from Pentel before and wanted to see how they compare to others, and one always needs more highlighters and black markers.

Between all the back to school stuff I have been working on swatching for new design projects. It has been a reminder that even with the best ideas and yarn, swatches don’t always come out the way I envisioned. Unfortunately I wasn’t happy with how the yarn I had picked was working with the hook I had chosen. I ended up starting and frogging around 10 times when all was said and done.

The good news is that none of that time is wasted. I always learn a lot when swatching and get to know the stitch patterns I’m working with. I have almost an entire notebook full of notes to work from that will become future designs. I also found out that this was an amazingly durable yarn to withstand being crocheted then pulled out so many times.

I was using the left-overs from a skein of yarn I purchased at the Estes Park Wool Market a few years back. Textiles A Mano’s “La Jolla” a 40% Silk – 60% Wool blend worsted/aran weight yarn. I don’t know if they are still around as I didn’t see them at the wool market this summer and couldn’t get to their website when I was writing this post.

I had used part of the hank to knit my first ever lace project. It was a very large hank with approximately 500 yards in it, and I had plenty left over for swatching. I have 2 other hanks of this same yarn in different colors that I want to make into designs, so the swatching was to develop those designs. I’m hoping to revisit those ideas later this autumn.

The next 7 days should be very exciting. My family and I will be getting in a few last-minute summer vacation activities before the school schedule hits us full force. Then it all starts with my oldest and I stopping by his school this coming Wednesday for his locker assignment and getting his school photo ID. After that he is joining me at the Longmont Yarn Shoppe for my Causal Crochet group from 10:30a – 12:30p.

Mtn Top Beanie full view

He is going to be picking out the yarn for his new hat. He really liked my proto-type for the Mountain Top Beanie, but wanted a little calmer color.  Hopefully I will get it finished for him before the cold weather gets serious with us. If you want to make your own beanie for yourself or as a gift for someone else you can find the pattern in my Ravelry shop by clicking on the highlighted name above.

I’ll also be teaching a class at the Longmont Yarn Shoppe for this project on October 29th at 10 a.m. You can sign up for the class on the LYS website or by stopping by the shop.

I know some of you may have more summer vacation time ahead of you yet, so I’ll wish you a lovely break. For those of you that are in back-to-school mode like myself, buckle-up and away we go.