Part 1 of my “Reading your Stitches” was posted back in June this summer. Originally I was going to show you the Half Double Crochet stitch for Part 2, but I realized I needed to go a bit more basic first. Instead, I’m showing you some guidelines for working into chain foundations.
Even after over 45+ years of crocheting I find that the most aggravating and tedious part of a crochet project is the beginning. My favorite part is after the first rows or rounds are established, then I can just crochet peacefully along. Even a complex stitch pattern is preferable to the start. This is the reason that I tend to design the majority of my projects with small starts that have increases allowing the work to grow from there. Because I want to get to the “good stuff” as quickly as possible.
All that said, knowing how to work into traditional chain foundations is a good skill to have in your crochet tool box.
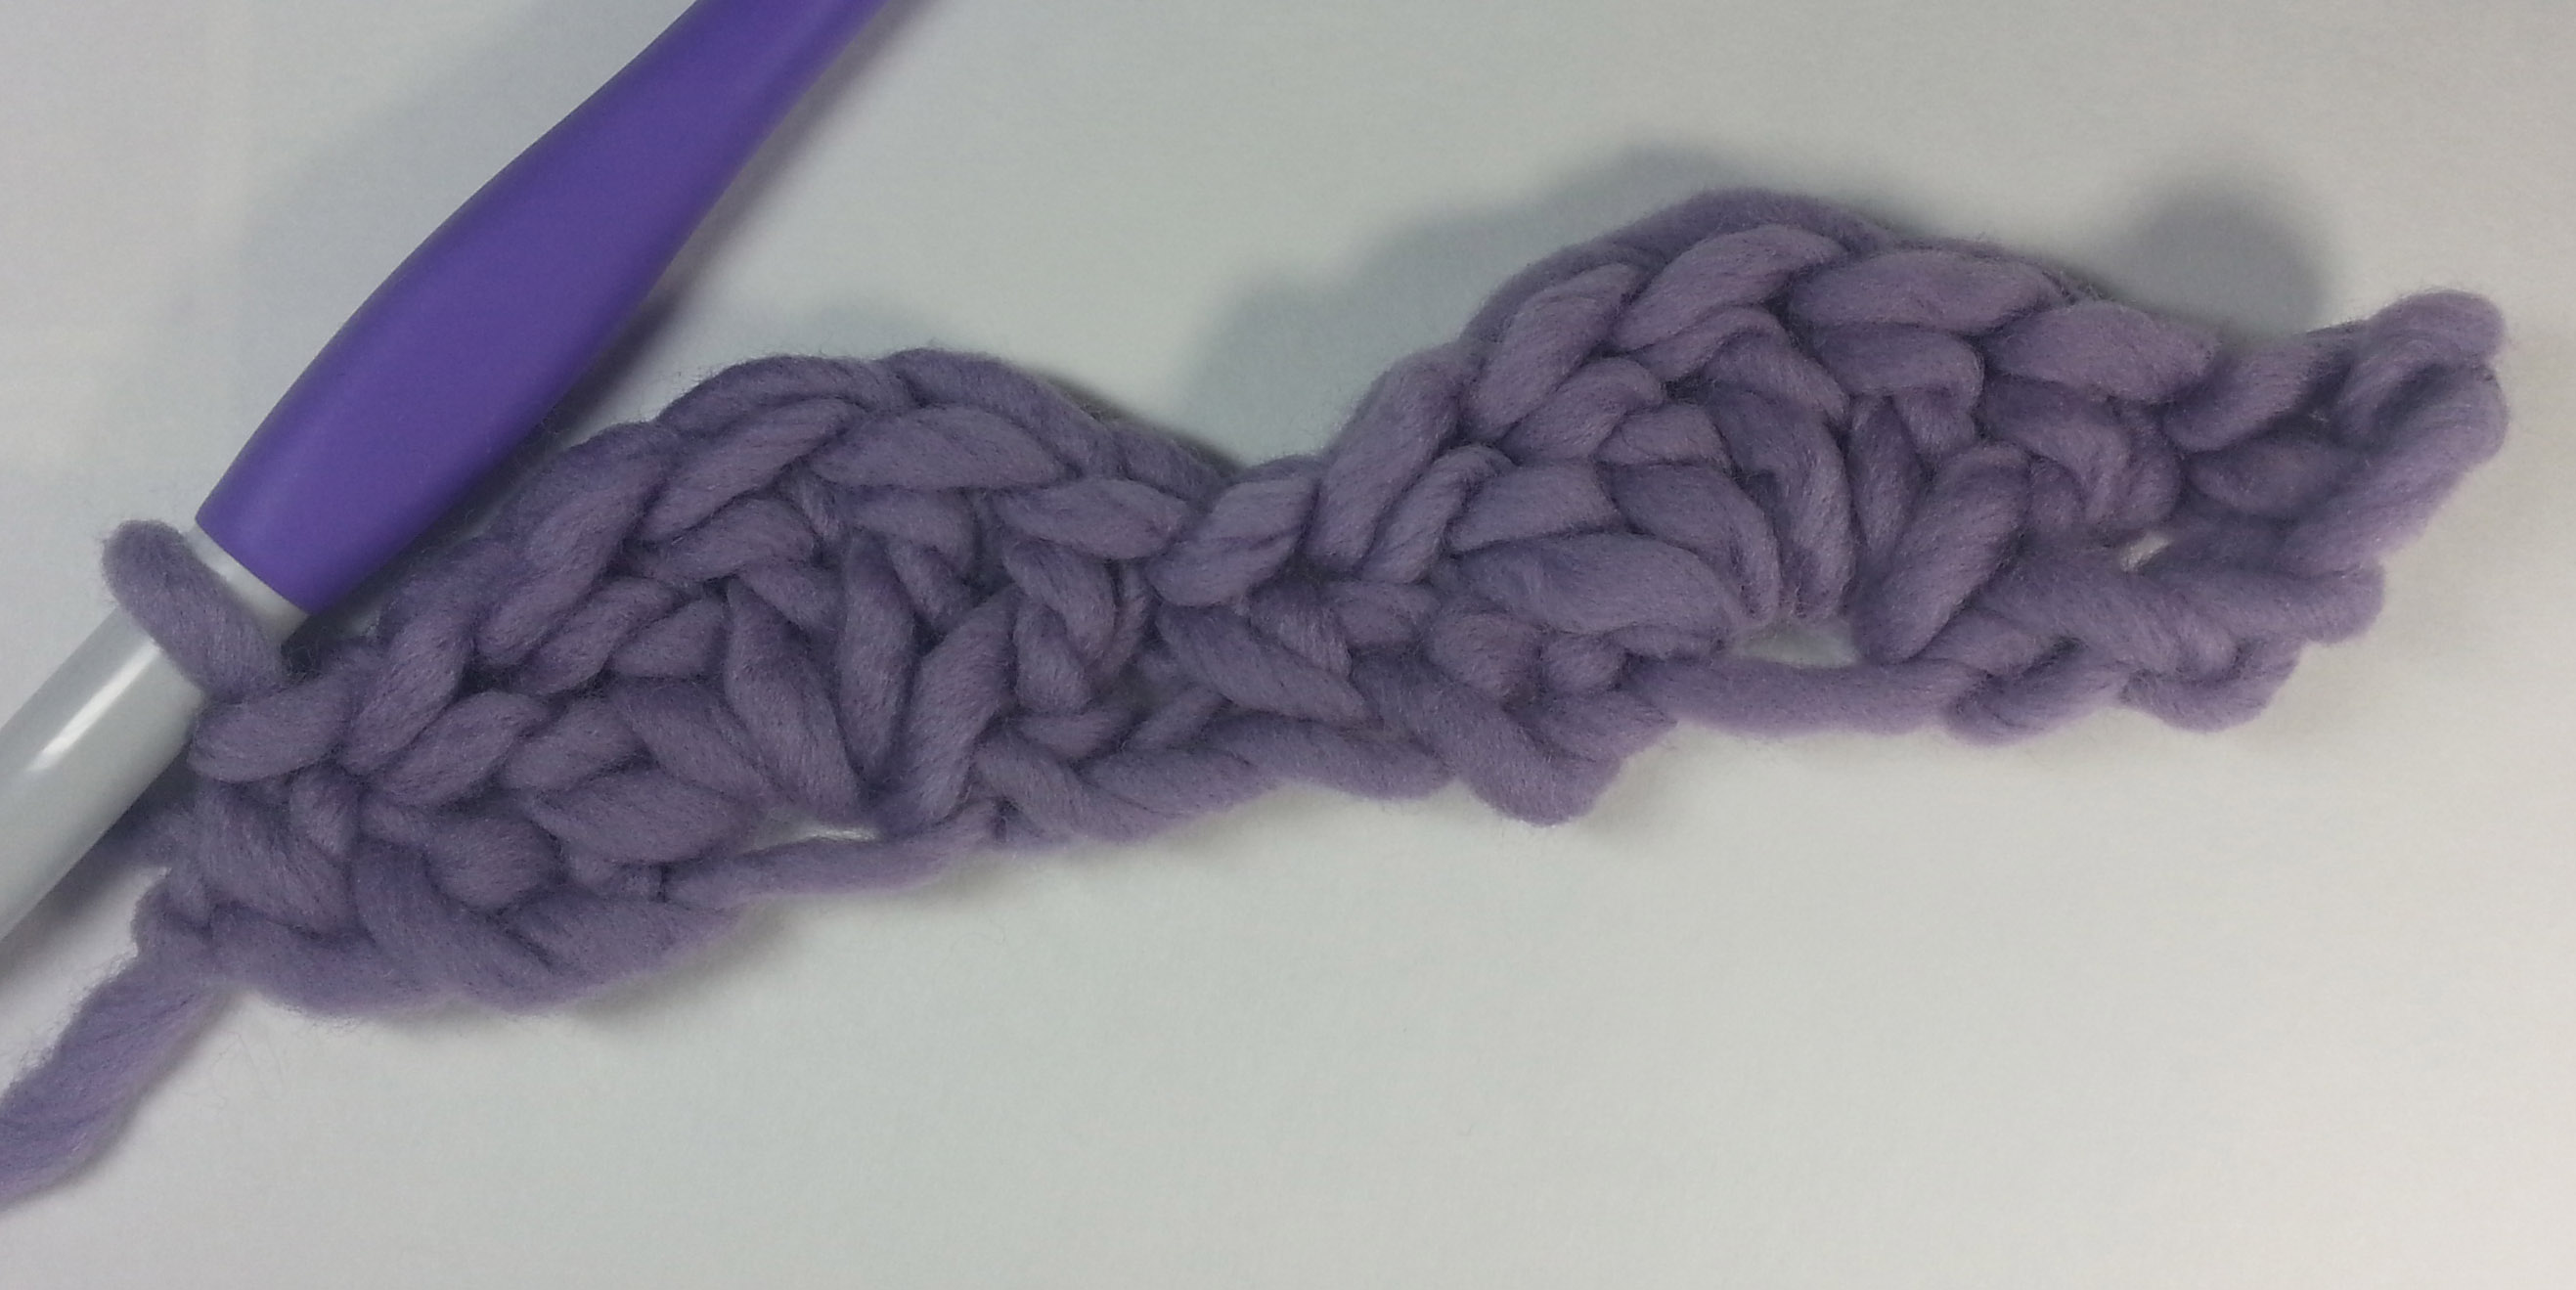
The typical start for a crochet project is to chain a length and then work back into the chain. Of course this often leads to the question from beginners about how to work into the chain. Which loop do you work under and how many of them?
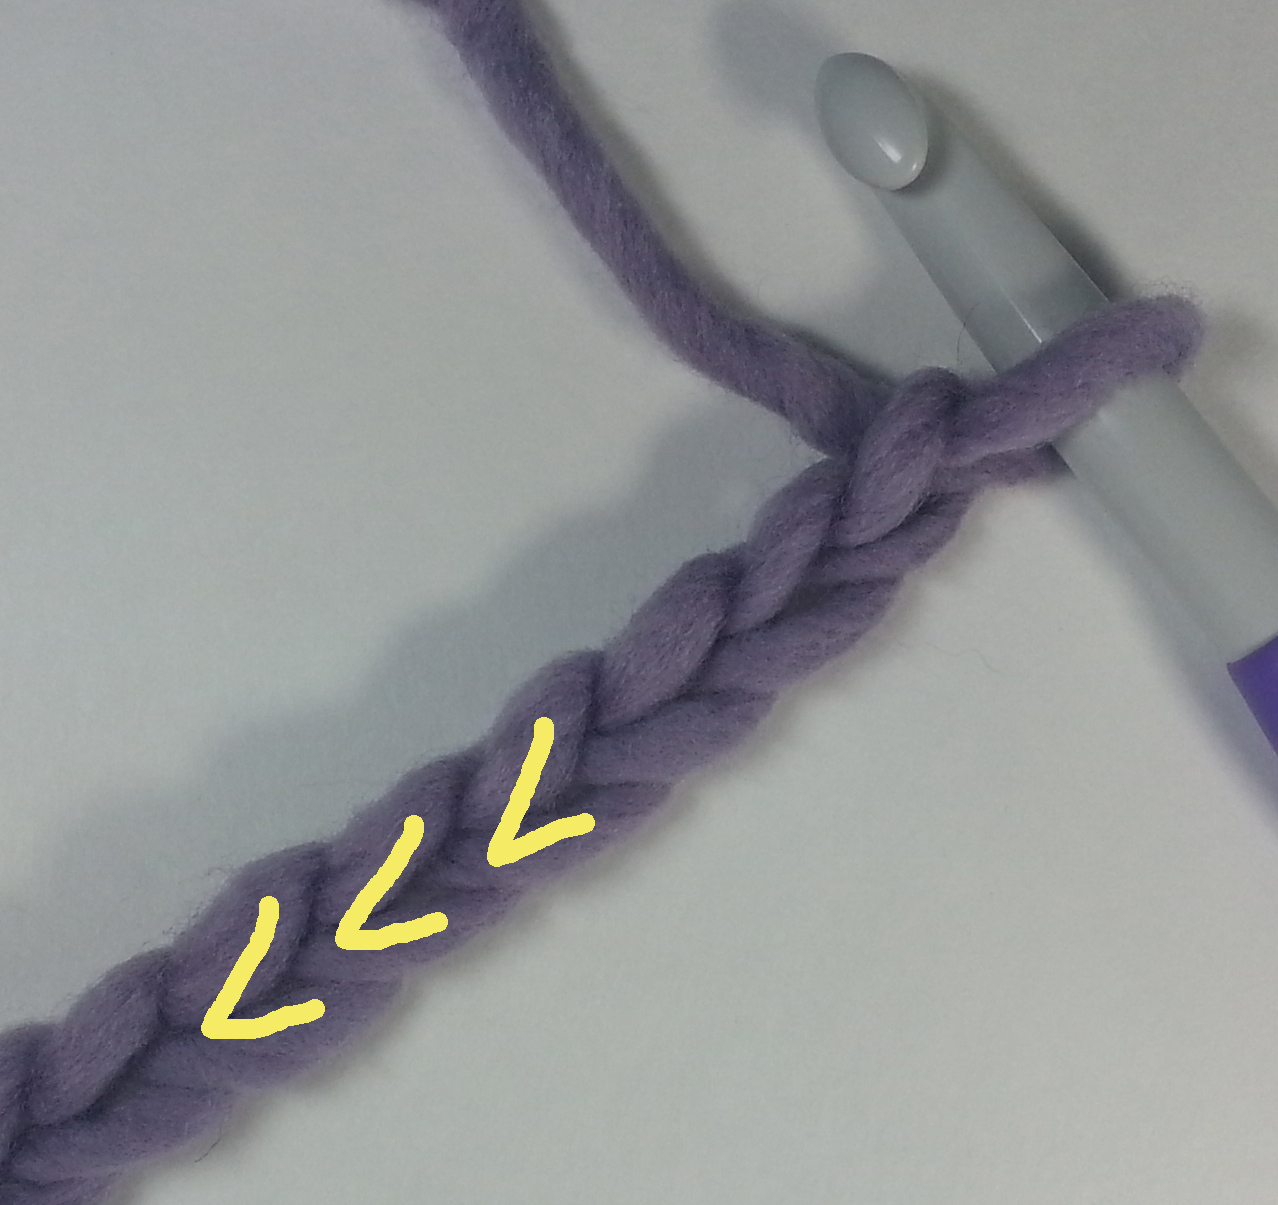
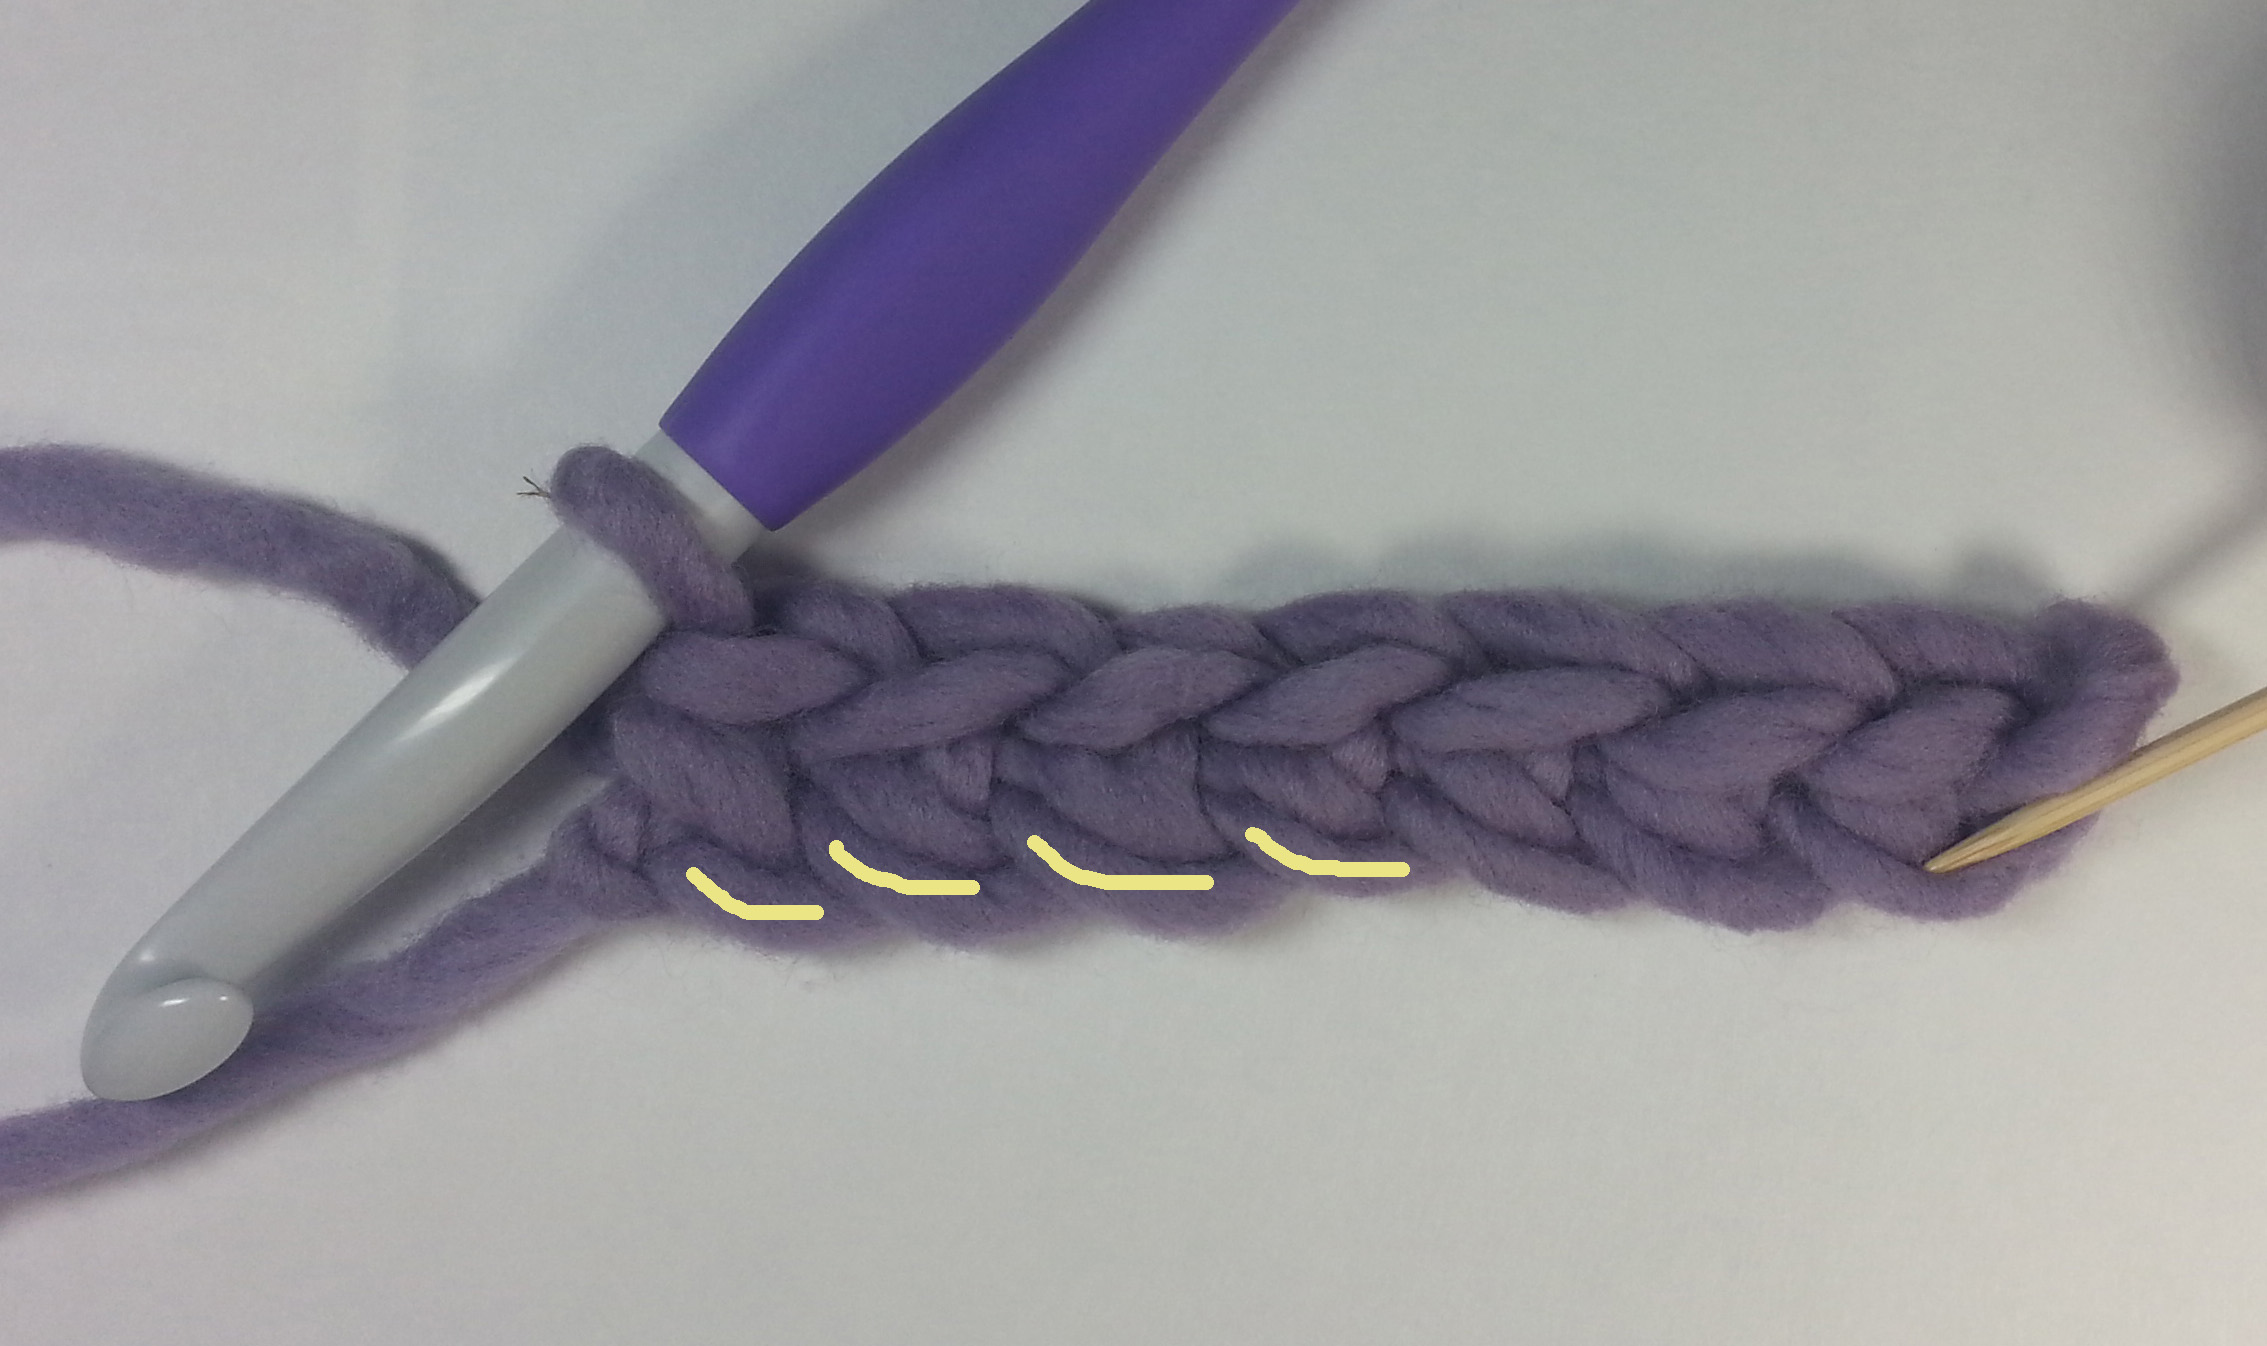
First of all, let’s look at the anatomy of a chain. The tops of the stitches are the V that we saw with the top of our single crochet stitches in Part 1.
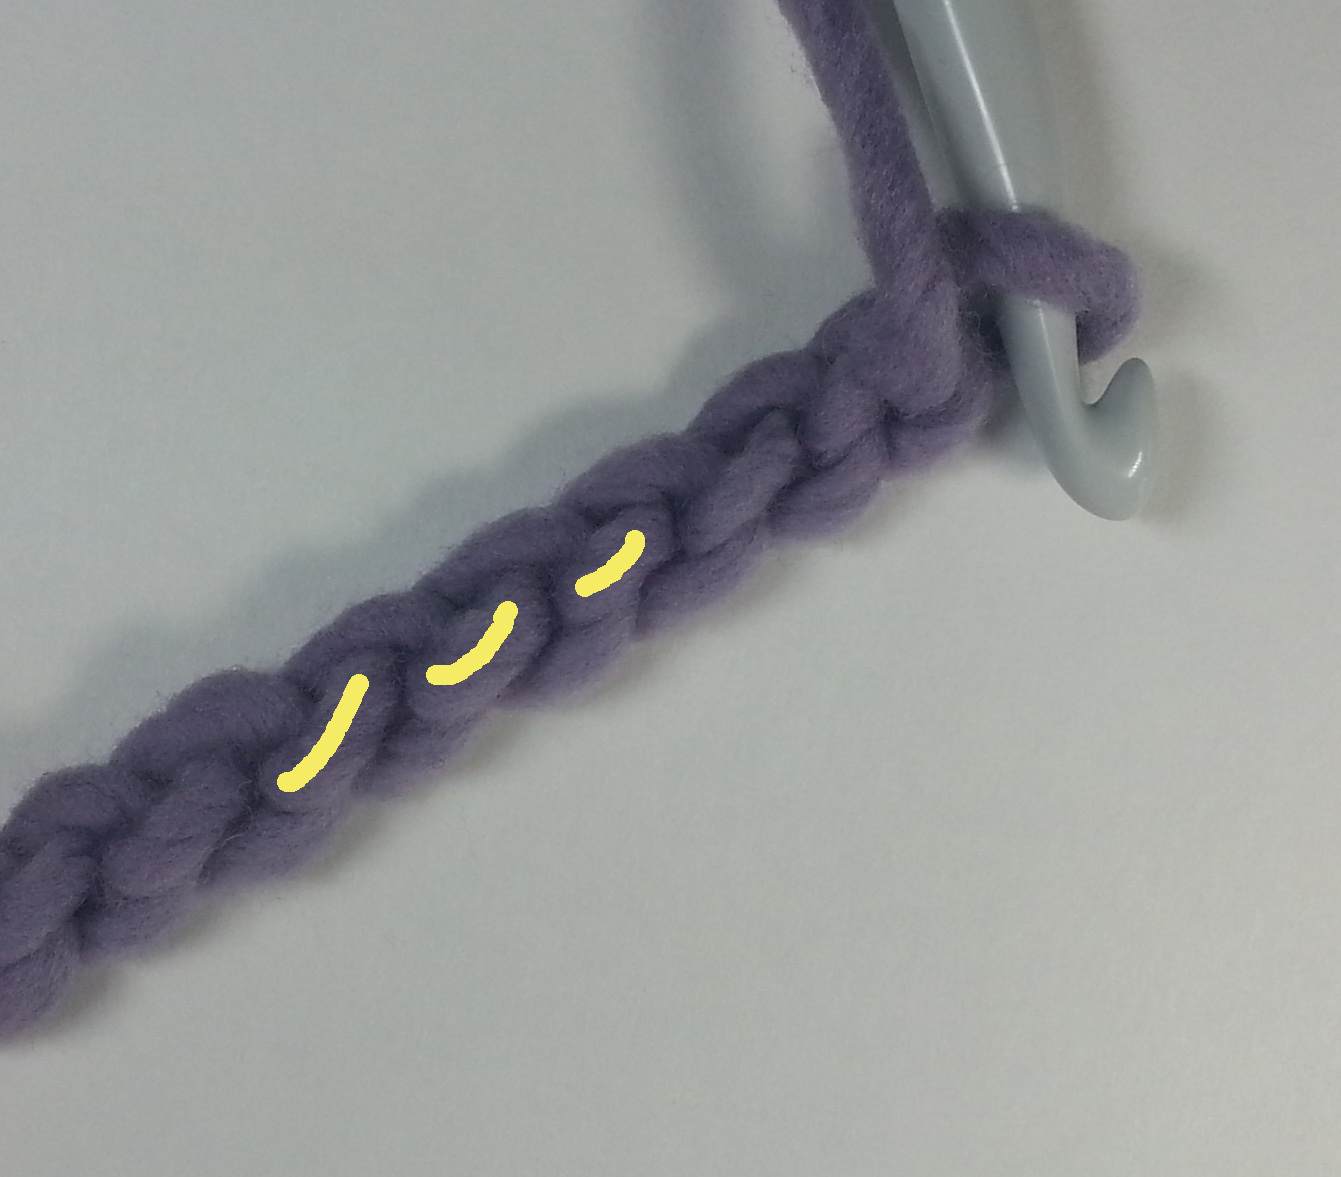
The chain stitch doesn’t have a “post” or “legs”. There is simply the back “bar” or “bump”. You will see either term used in patterns. It will depend on the publication what terminology they chose.
If you find that your chain stitches seem to always be much tighter than the rest of your crochet fabric it can help to use a hook one size larger for the foundation chain, then switch down to the next hook size when you are ready to begin your first row into the chains.
Arrow points to base Vs of stitches worked into back bump.
If a pattern doesn’t specify which loop of the chain to use, I tend to use the back bar. I like the way the finished foundation looks as it echoes the top of the stitches on the last row of the project. When putting an edging all the way around the finished project I find the base of this foundation easier and neater looking to work into.
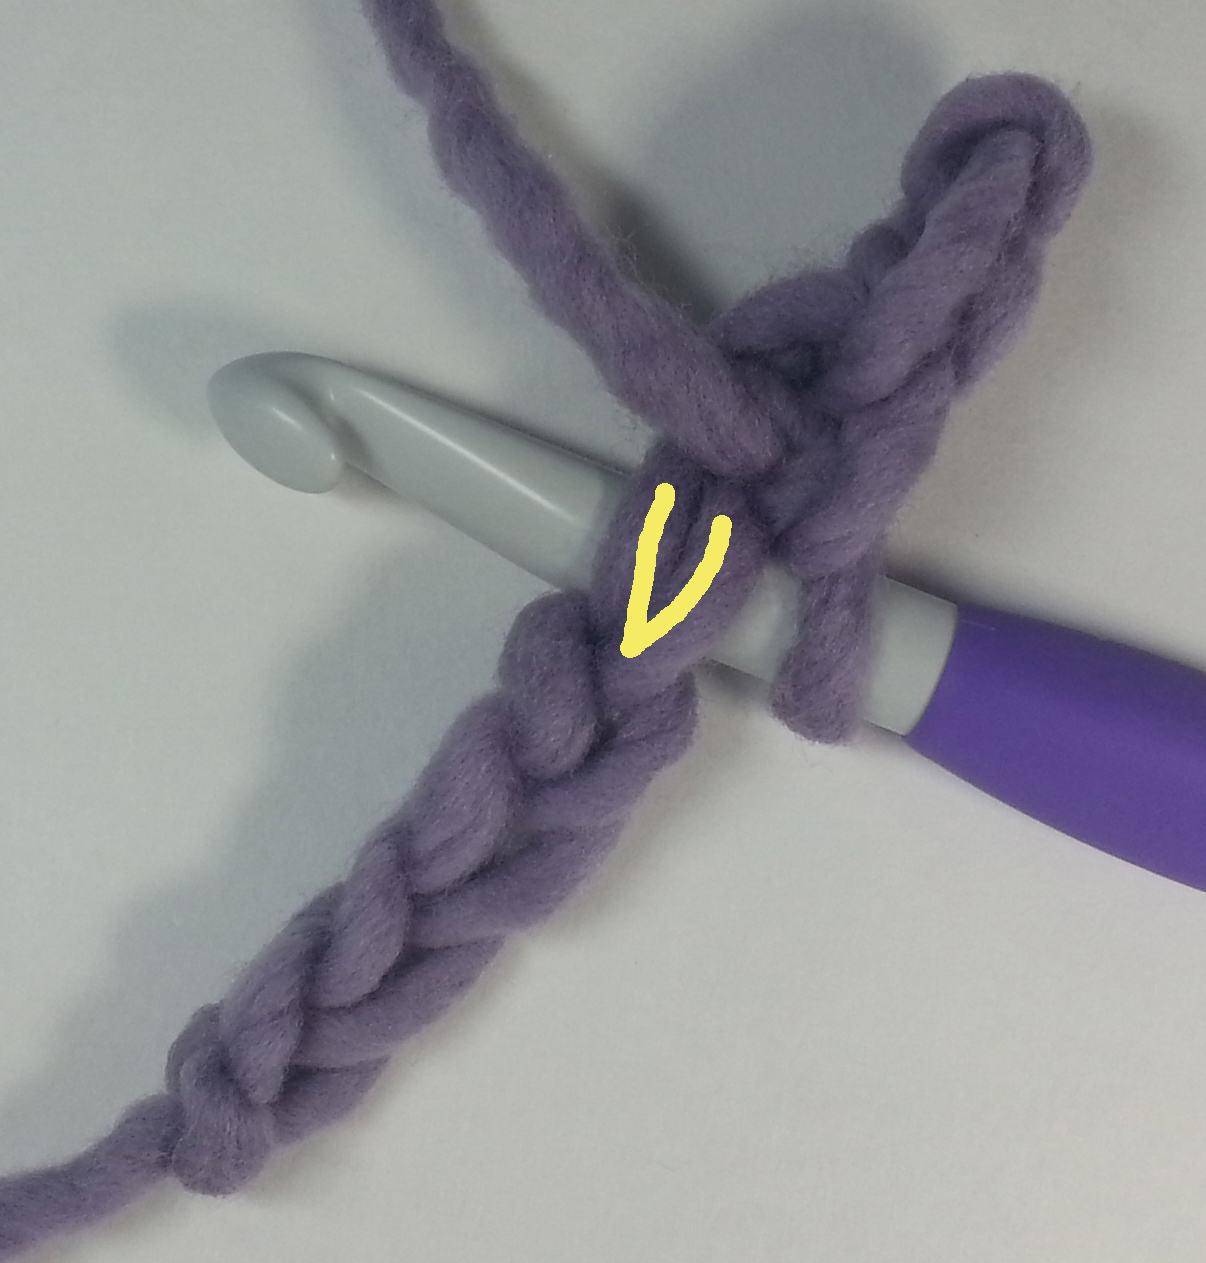
One of the first ways I learned to work into a chain was by going into the center of the V on the top of the chain and catching the back bar and top leg of the V in the stitch being made. This is the more traditional way of working into a foundation chain.
This leaves a single strand at the base of the stitches in your first row. This can work well if you are working pieces of a garment that are going to be seamed together along the base of the foundation rows.
The first row worked into the chain using the traditional method tends to have quite a bit of twist to it before you work additional rows.
It also is more stable when you are starting a stitch pattern that requires multiple stitches worked into some of the chain stitches of your foundation. For example…shell stitches.
Another option is to work under both legs of the V on each chain st. I find this to be the most difficult way to work into the chain. It does give you a very stable foundation and the single strand at the base is free for seaming pieces together along the foundation. Working into a chain using this method is easier when your foundation chain is loose enough.
The finished row will again have single strands at it’s base, but they will be a bit more centered. This row will have a lot of twist to it like the traditional method of working into a chain.
Now that you have the chain foundation out of the way, we are going to take a closer look at the single, half double and double crochet stitches in Part 3.
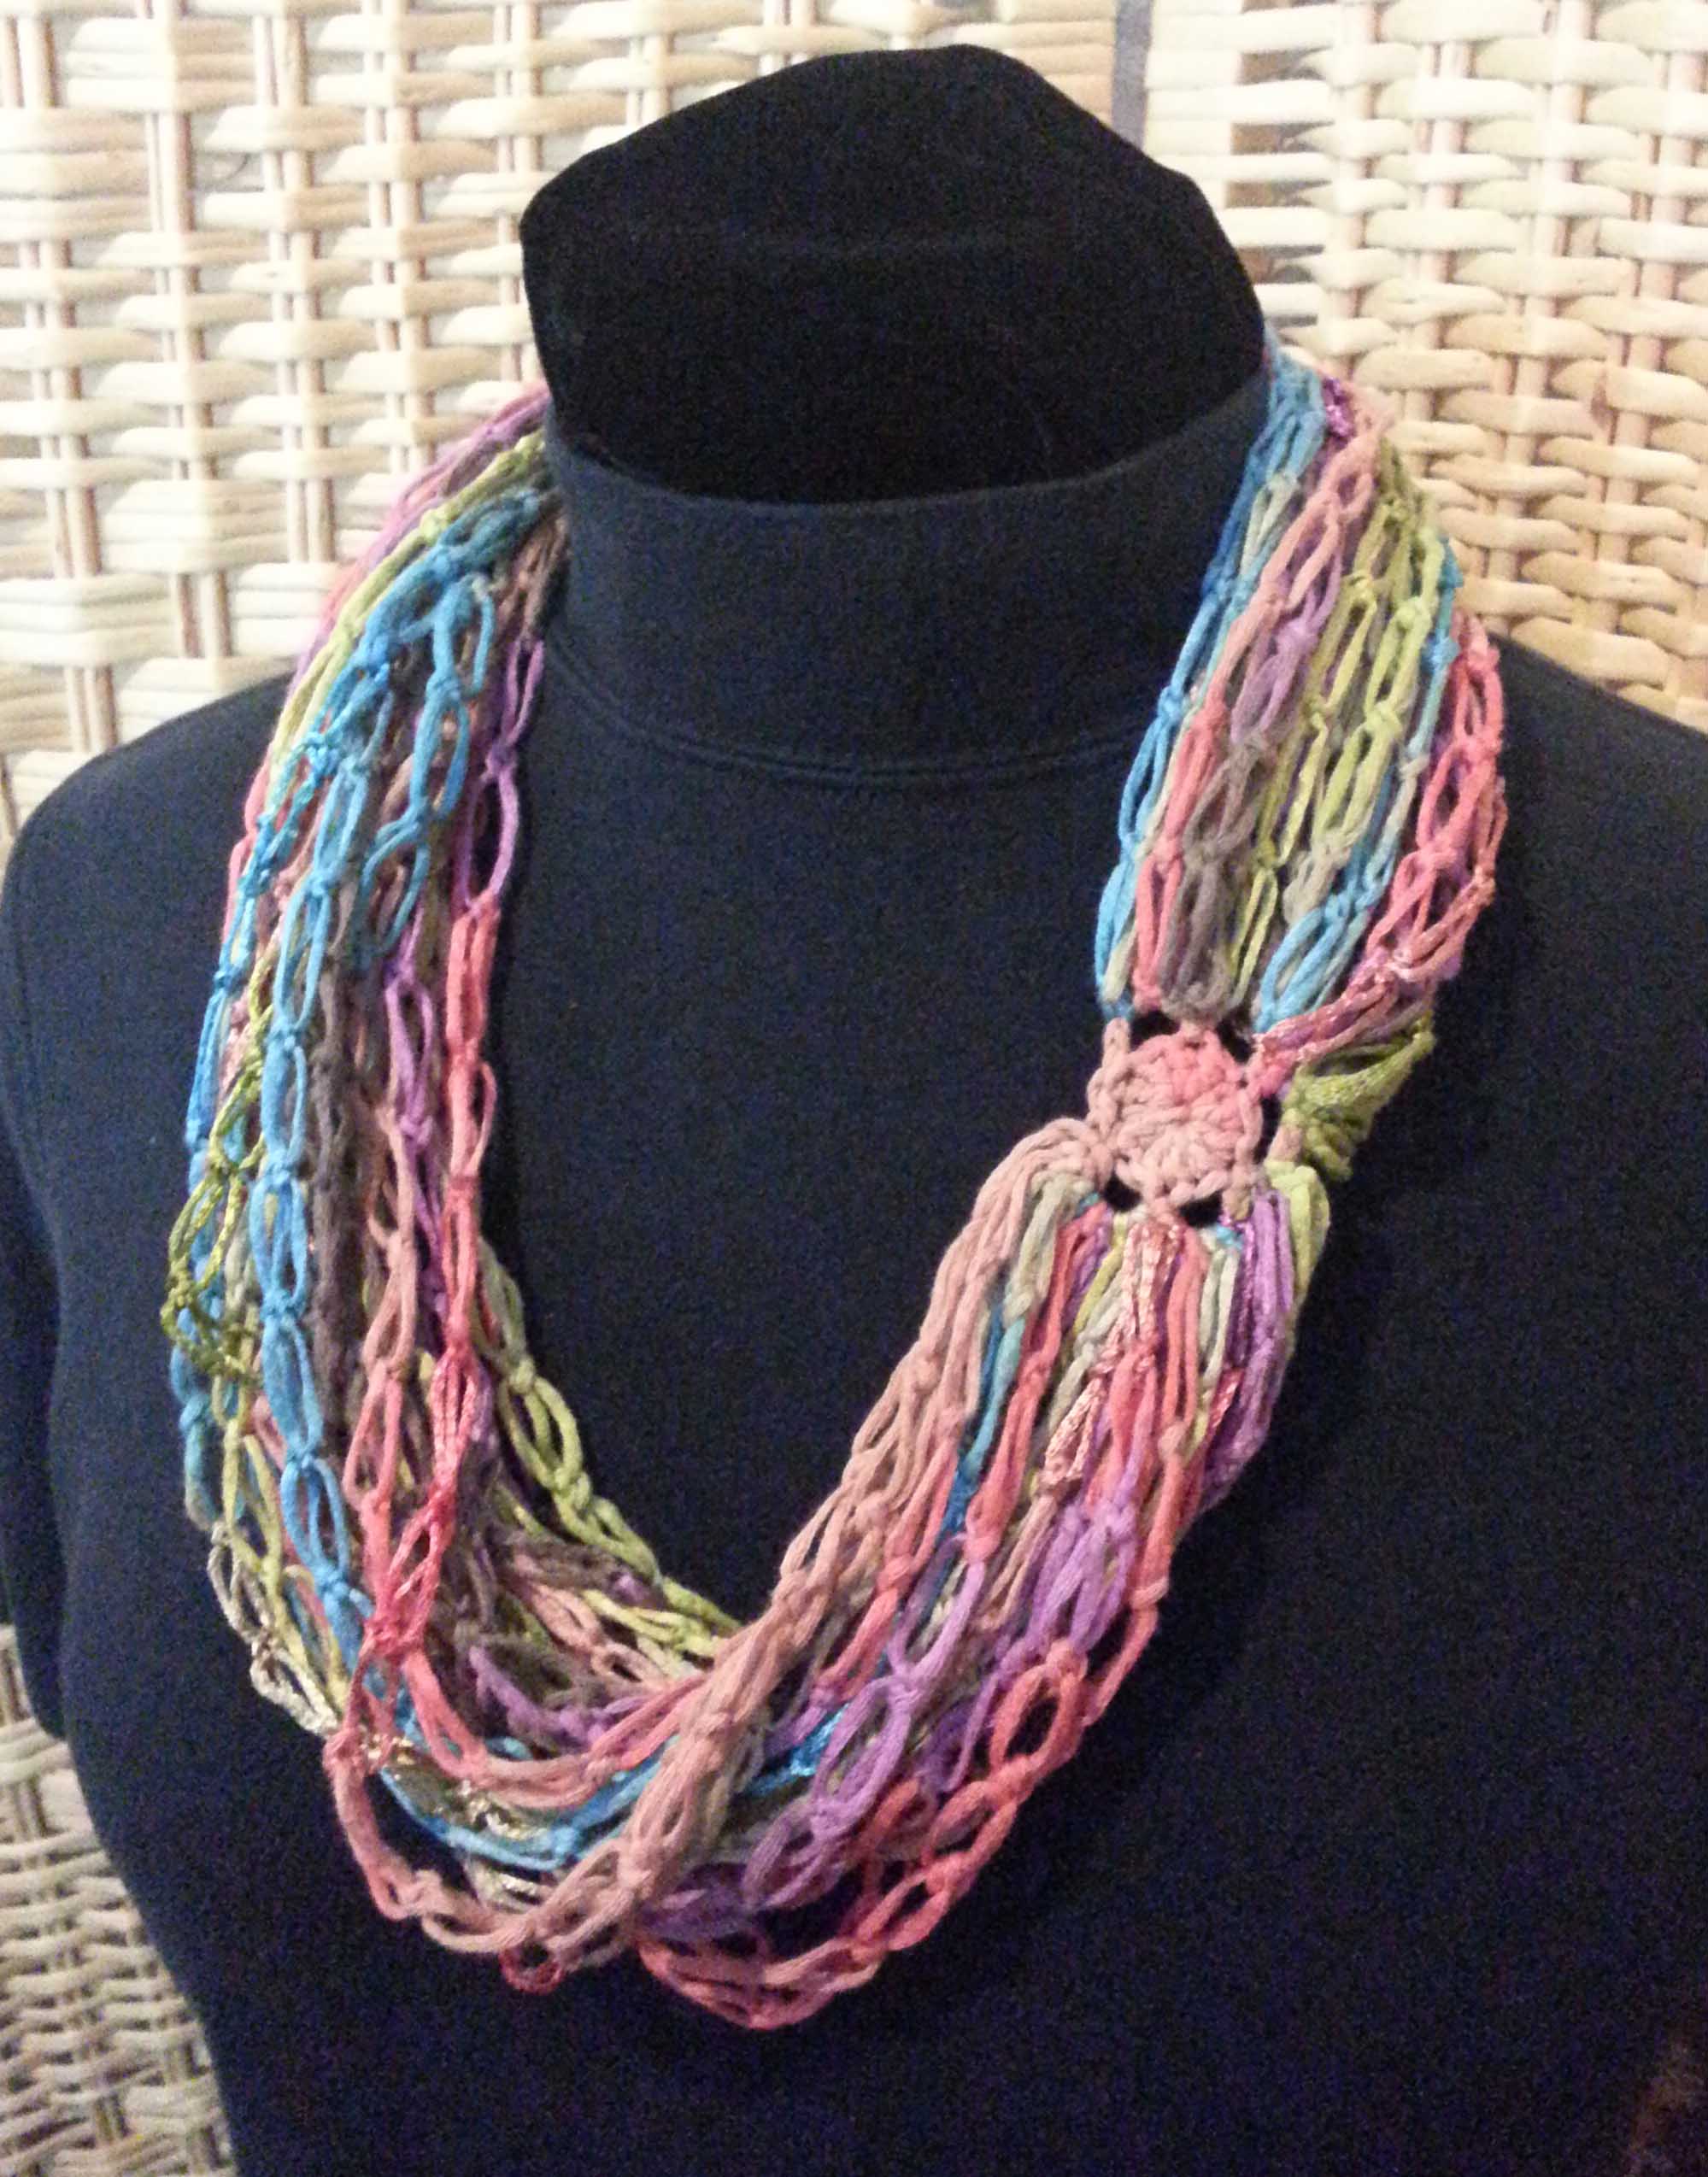
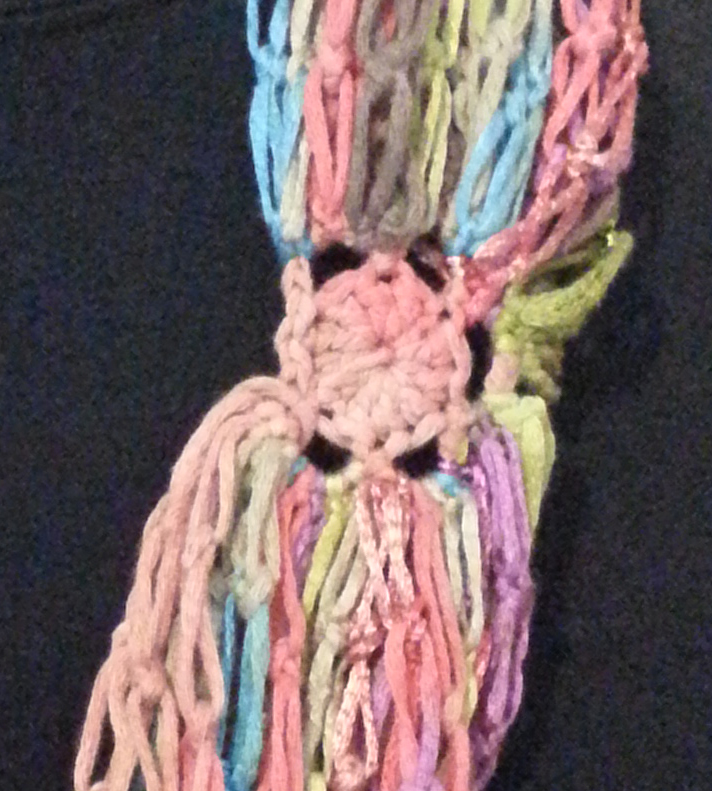
Right before I left for the CGOA conference in Charleston I posted about this necklace and said I would get the pattern up soon. It didn’t happen as soon as I had hoped, but here it is. This post contains the written pattern and I have a new video on my YouTube channel that walks you thru the pattern and the techniques you need to complete this fun necklace. It also has some animated stitch charts for those of you that like charts (like me). Click here to watch the video: “Loopy de Loop Necklace”.
I used Classic Elite’s “Santorini” yarn for this project because of the mixture of textures and colors in each ball. You can use other yarns, just remember to adjust your hook size if you need to. I choose a size F (3.75mm) hook for my necklace because I wanted the “knot” part of my love knots to be snug, since they provide the structure of this piece.
One thing to note, my love knots collapsed in the heat and humidity of Charleston, basically it was “blocked”. The necklace is still pretty but looks different now from my original photos.
This is a simple project, but I am using some techniques in slightly different ways. Hopefully between the pattern below and the video you will be crocheting along without any hiccups.
This necklace is worked by crocheting long Love Knot strands off a foundation motif. Each strand is attached at its beginning and end as it is worked.
Instructions
Foundation Motif (dc yo-yo with chain loops)
Rnd 1: Starting with adjustable slip knot, ch 4 (counts as a dc and center), 11 dc in 4th ch from hook, sl st to top of beginning ch-4. [12 dc]
Rnd 2: (Ch 4, sk 1 dc, sl st next dc) 5 times, ch 1, sl st next st, ch 1, sl st in first ch-4 sp, sl st above ch-4 space.
Do not Fasten Off
Note: You may find it helpful to weave in the beginning tail at this point to get it out of your way. I show my favorite way of weaving in the beginning tail in my “Loopy de Loop” video.
Love Knot Strands
Note: Ends of strands are connected to the Foundation Motif in the ch-4 loops created in Rnd 2.
Strand 1: Chain extending the loop on your hook to approximately 1 inch in length, sc in back loop of ch just made, first Love Knot created, continue making love knots until strand is 27 inches long (unstretched) or 32 inches long (stretched), sl st in center of third ch-4 space along motif.
Note: My love knots are consistently an inch long, so it takes 27 of them to reach the length of strand that I used. If your love knots are consistent in size you can count how many you have in your first strand, then crochet that number of love knots for the rest of your strands instead of measuring.
Strand 2: Sl st tightly above ch-sp to lock end of previous strand, work love knots until strand is desired length, sl st in first ch-4 space to right of previous strand starting point.
Strands 3 – 28: Work similar to Strand 2, slip stitching into ch-4 spaces along the foundation motif working back and forth to fill in the ch-4 spaces.
Fasten off and weave in all ends.
I hope you have fun with this project. You can vary the length and number of your strands to make a longer necklace or even a bracelet. Add beads, play with yarn, most of all…have fun crocheting.
Sometimes getting back into the routine of school days is a rough transition. That would definitely be the case this week. This is the first full week my boys are back in school and to add to the fun (not): my husband is out of town for work and there are major construction delays on the 2 shortest routes down the mountain to school.
I am really glad that we are getting our roads back to better-than-before. If you all remember back in September 2013 there was a nasty flood here and we had extreme damage to numerous roadways in Colorado, especially in the mountains. The construction has been on-going for the past 3 years, with the big job starting last year about this time.
What all this means for me though, is less time in my office at home. Being on the go isn’t too bad when I’m crocheting away on a pattern, but it gets a bit tricky when I need to do photography and video work.
I had planned to have an awesome Tuesday post for all my dear readers. Unfortunately, I finally had to accept reality since it is now Wednesday evening and I still don’t have the awesome post completed. I’m crying “Uncle” this time. Awesome post is being moved to my Saturday post instead.
But I won’t leave you with a completely empty plate. No starving children in Mama Andee’s house!
One of the good things about being trapped down in town this week, I had the opportunity to get lots of shopping errands out of the way. Seems like there are always little errands that get pushed off the day’s list when I come down during summer break.
This past Tuesday I took care of all my grocery errands, but I also made some time for errands that were a bit more fun. Like stopping by JoAnn’s and Michaels.
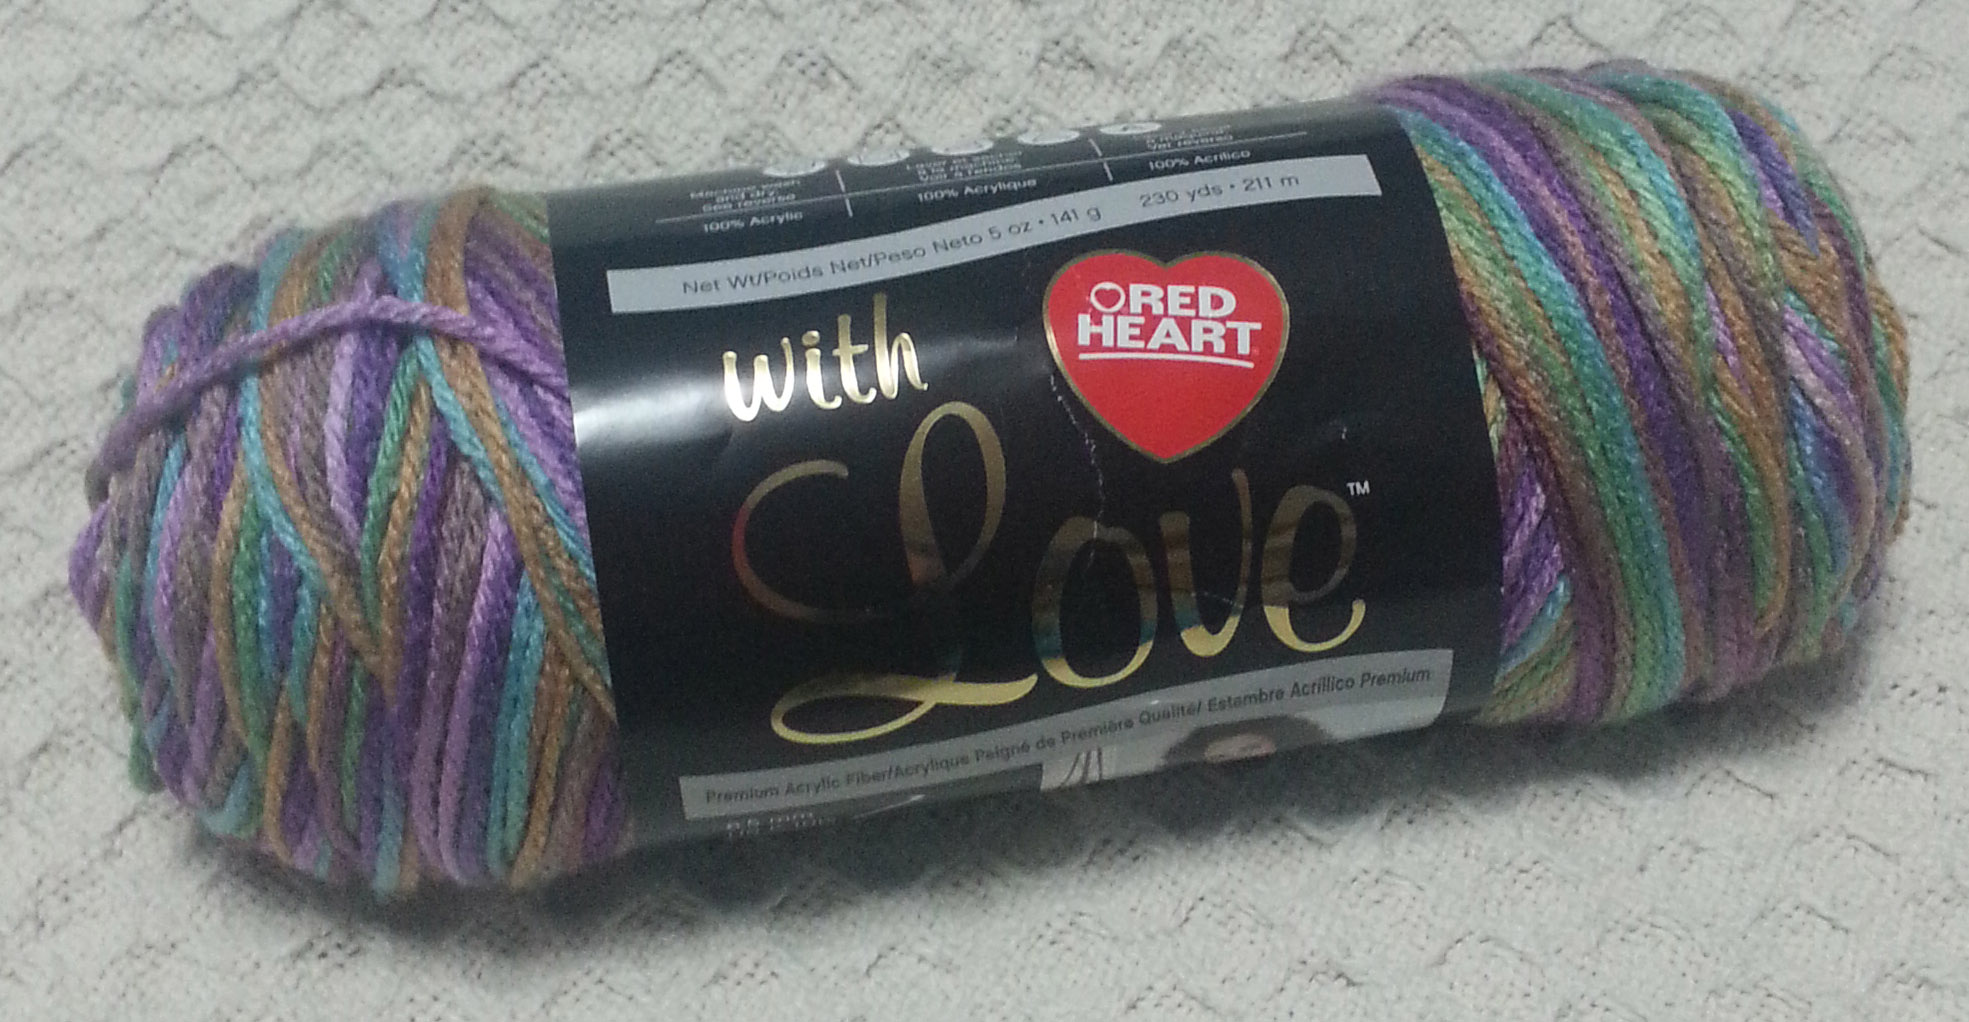
I needed some foam cushions for a project and knew that JoAnn’s would have the ones I wanted. I spent a few minutes having a wistful browse of all the lovely Ott-Lites they have in stock. I did resist that temptation, but a skein of yarn said it needed to come home with me.
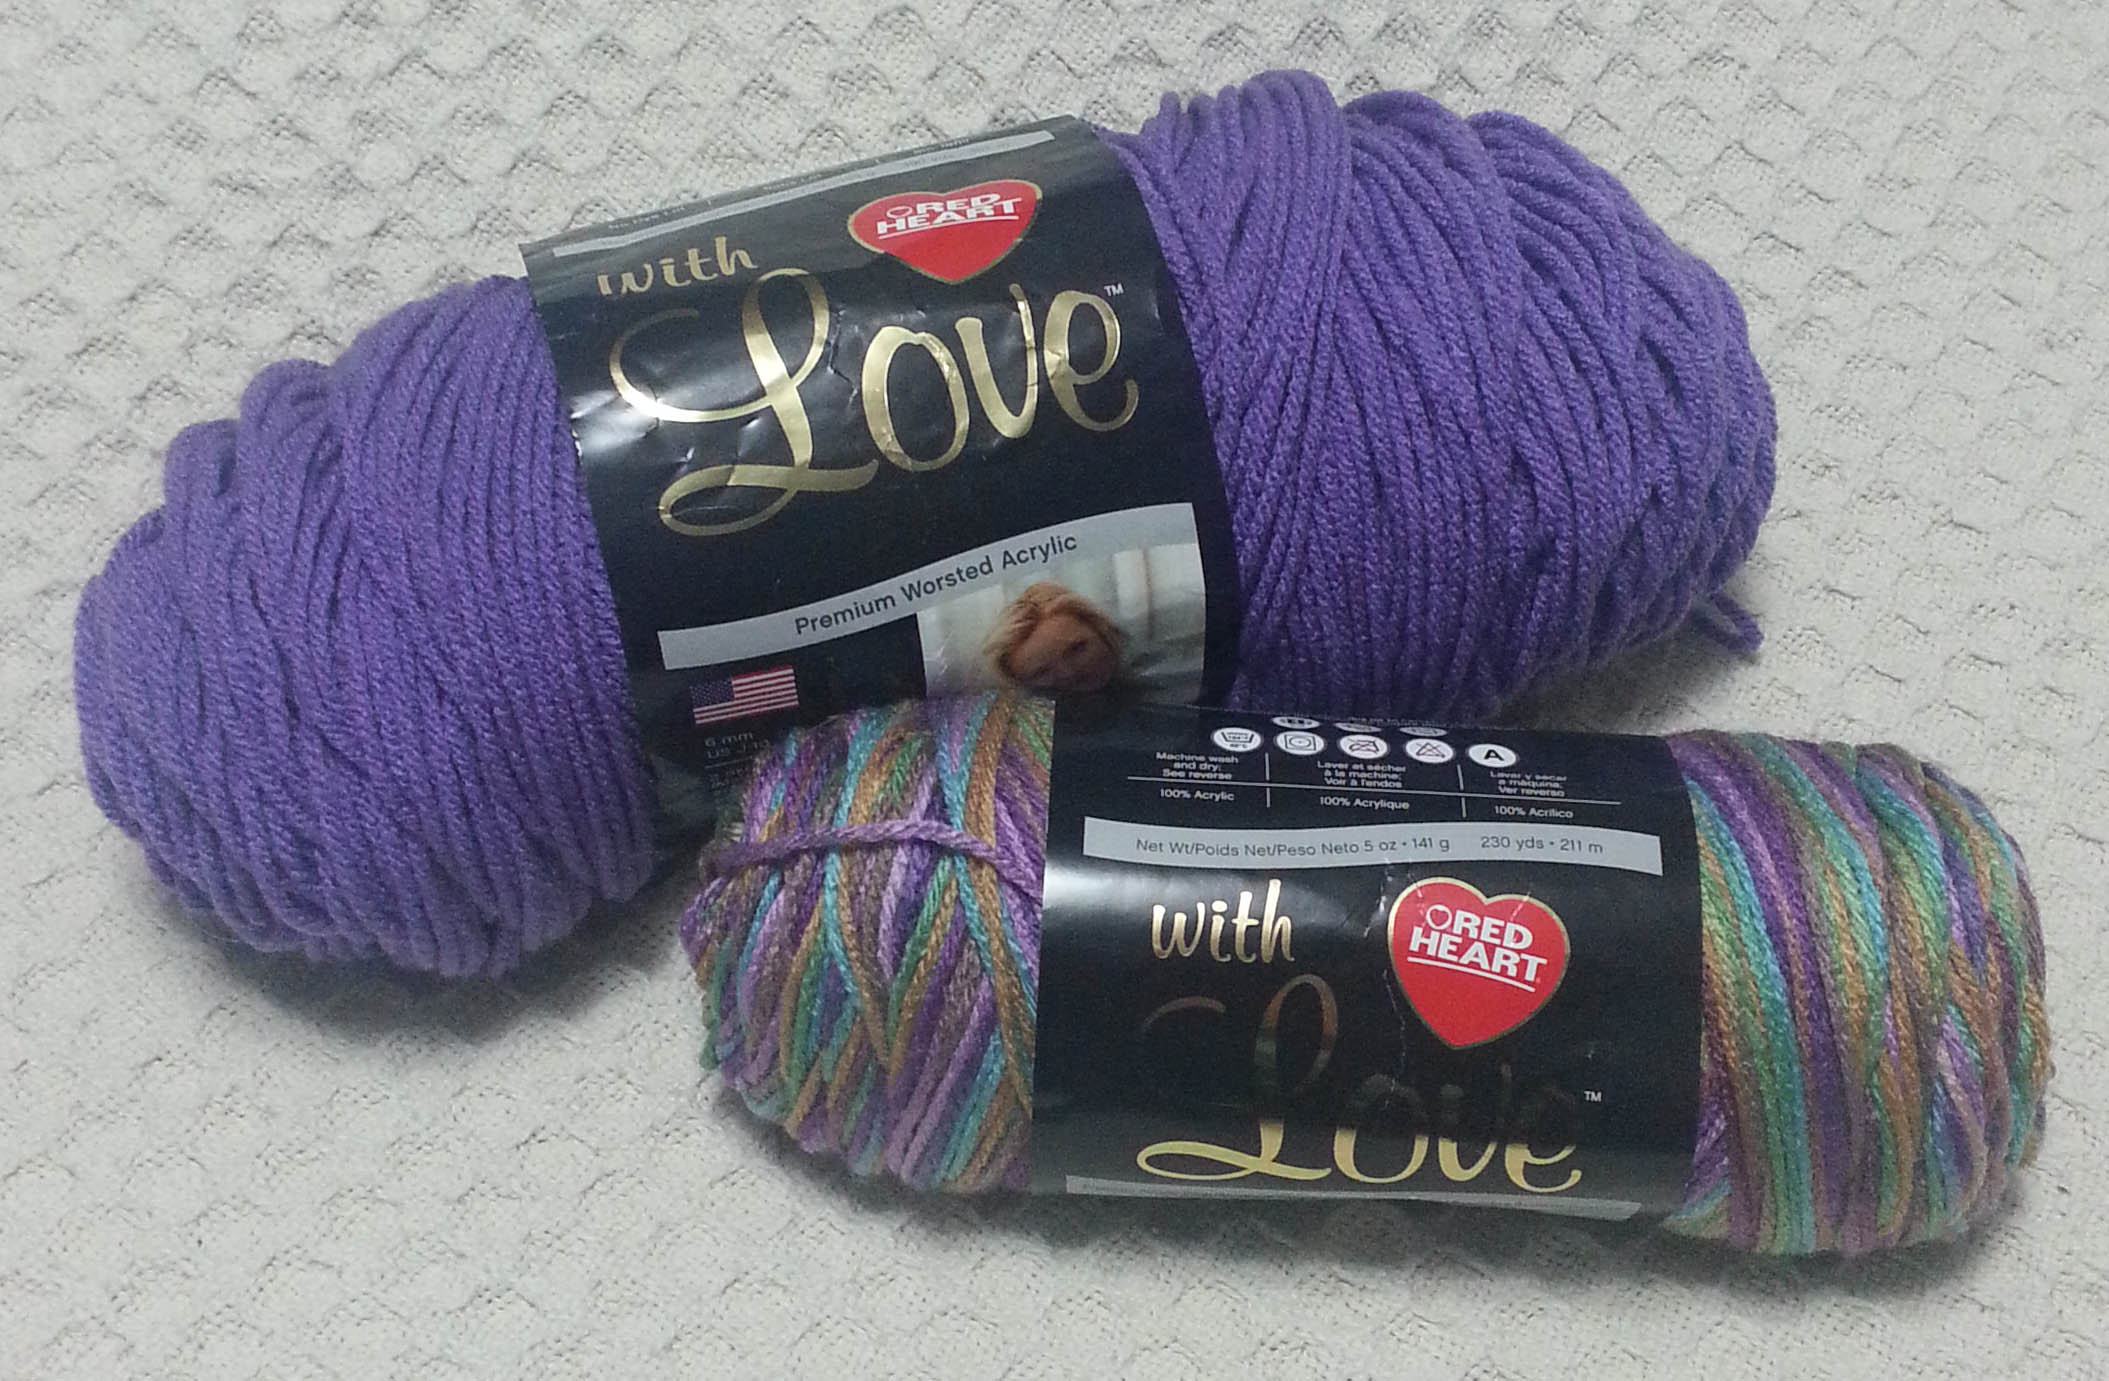
I really like crocheting with Red Heart’s “With Love” yarn (very aptly named as well). It is nice and soft with a lofty springy twist to it. Great for making home décor or even wearables. I picked the Water Lily color because I thought it would play well with some purple that I had in my stash. Don’t they look nice together? Will be coming back to them later this winter.
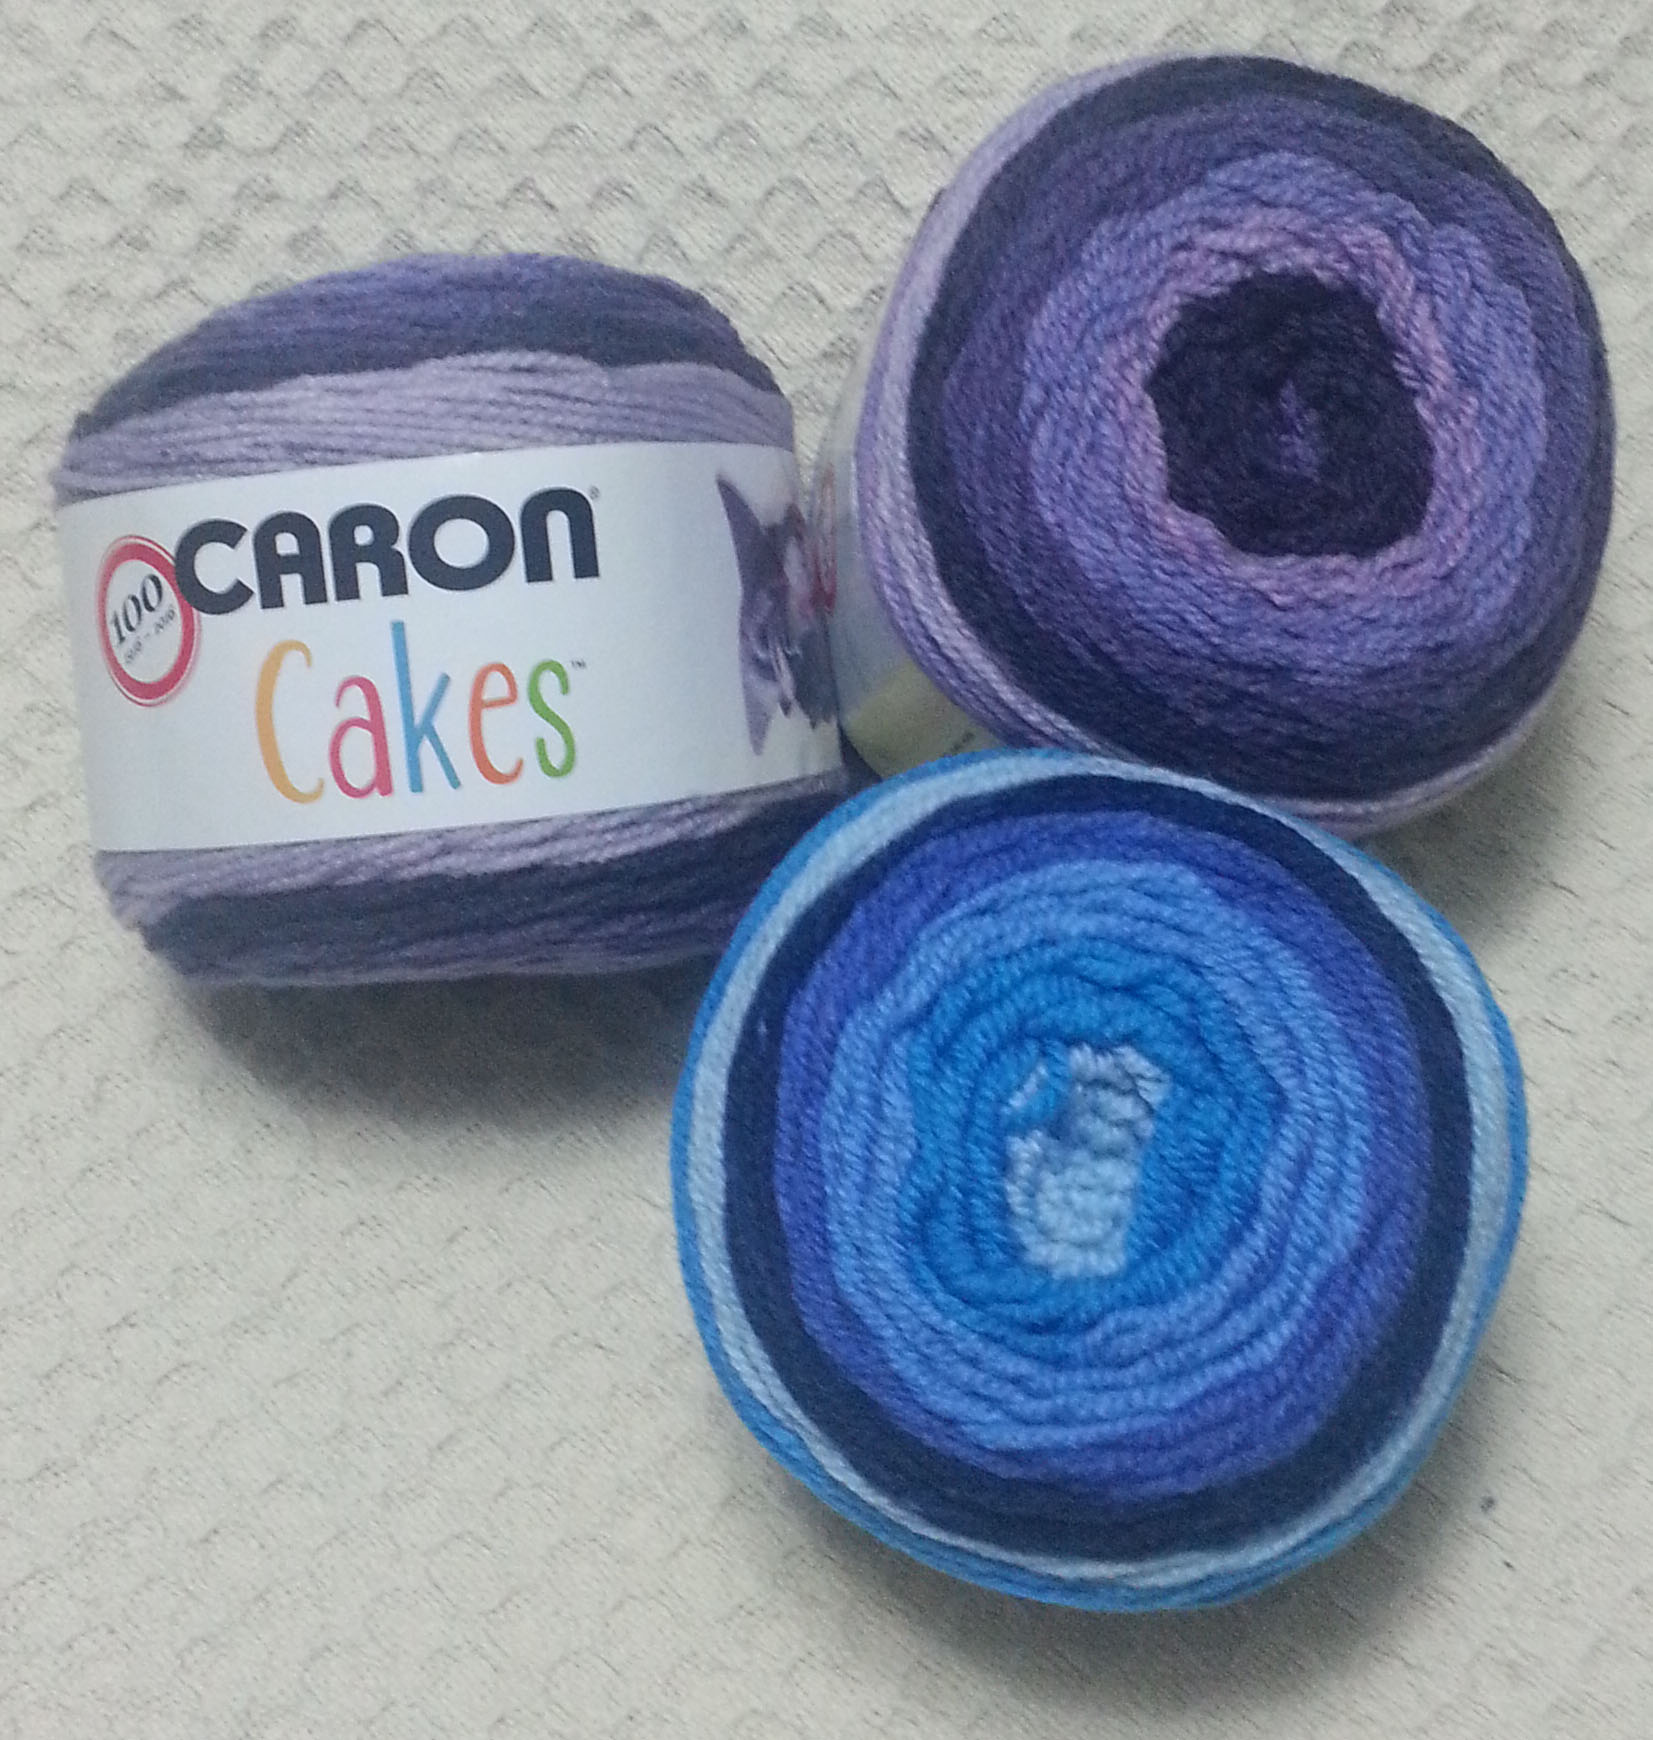
There has been a lot of posting in social media about Caron Yarn’s newest product “Caron Cakes”. They are only in Michaels stores from what I understand. They did have them online at the Michaels website, but as of this writing they are out-of-stock. You can take a look at the various colors online though and see if there is a store near you that carries them.
I wanted to see if I could find them in my local Michaels. The store I go to is located in Superior, Colorado in the same shopping area as my nearest Costco. I decided I had time for a stop in Michaels before heading to Costco for groceries. I was pleased to see the yarn there, though they had already sold quite a bit of it.
I had to adopt a few balls for myself. I decided on 2 balls of the purple toned “Bumbleberry” and 1 ball of the “Blueberry Cheesecake”. The yardage in each ball is very generous at 383 yards. It is a yarn that requires a bit more care, the instructions on the label say “Hand Wash. Lay flat to dry.” A little surprising as the fiber content is 80% Acrylic/20% Wool. The yarn is very soft in the ball and doesn’t have that slight scratchiness you sometimes get with wool blends.
I’m looking forward to working with this yarn and seeing what new designs it inspires for me. Meanwhile my good friend and fellow yarnie blogger Jessie has put together a Round-up of pattern suggestions for folks that are wondering what they can crochet with this yarn.
You can find Jessie’s suggestions and the links to the patterns on her blog: Jessie At Home. I was flattered that she included my C2C Basics Scarf in there. Some of my other patterns that could work up nicely in this yarn are:
Granny Fans Redux, this is one of my paid patterns that has detailed charts and the instructions for 3 different styles of neck wear. The long runs of color in the Caron Cakes would likely give you fans in each color.
You can see in the above photo how fun the color changes were using Red Heart’s Treasure. With the Caron Cakes the color stripes would be even more dramatic. The squishy loft of the Cakes yarn would make a very snuggly shawl, perfect for a gift for a dear friend or family member this coming holiday season.
Enjoy the rest of your week, and be sure to stop by on Saturday for another fun pattern and video.
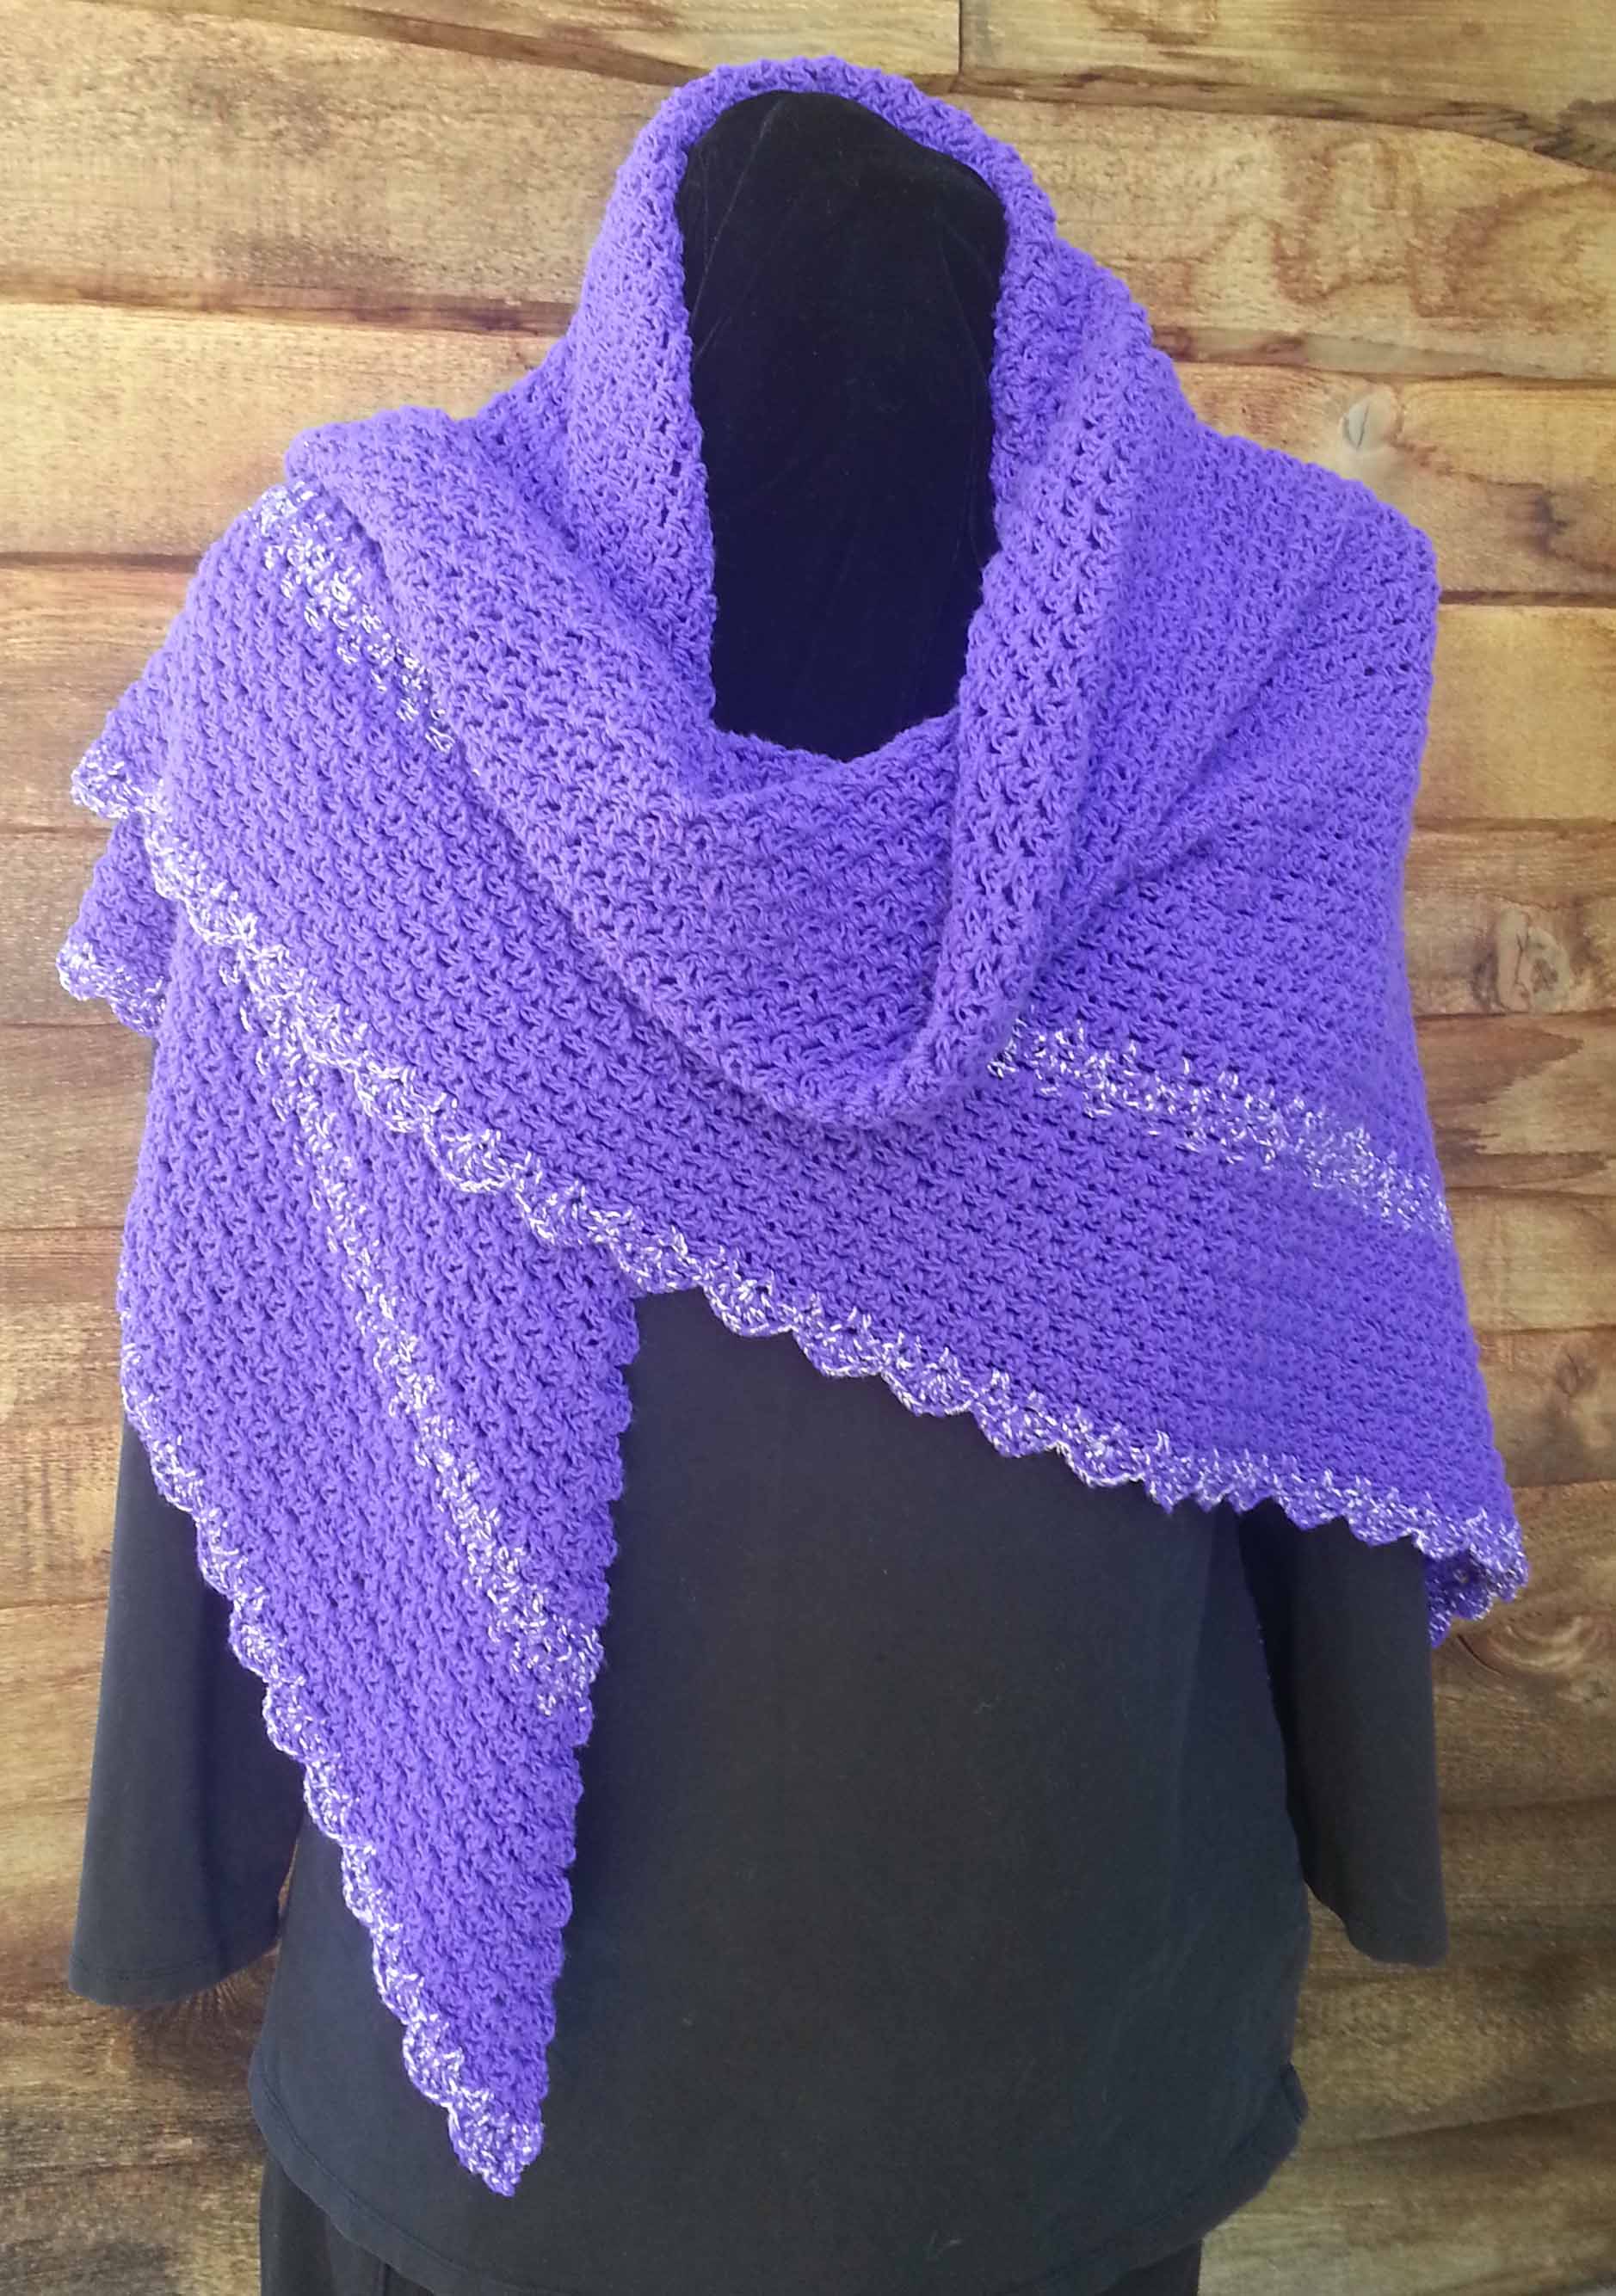
When I crocheted up my sample for my Mountain Top Beanie design, my older son tried it on and really liked it. This is the kid that wears a stocking hat almost all year long. He asked me if I would make him one, I offered the one I had made for the sample, but he felt the colors weren’t right for him.
Thus a plan was hatched to take him to the Longmont Yarn Shoppe to pick out the color he wanted. The yarn is Ella Rae Lace Merino Aran. It is a super soft and cushy 100% Superwash Merino and all the colors have that rich-toned hand-dyed look to them.
I thought we would make it down to the shop long before the summer break was over, instead we finally got there this past Wednesday during my monthly Causal Crochet get together at the shop. Thing 1 and I had been at his Middle School earlier that day for his locker assignment and to get his school photo and ID.
Once we got to the yarn shop he looked at the various colors in the Ella Rae and picked this fun one that combines purples and greens. Worked up in the beginning swatch the colors reminded me of a vineyard.
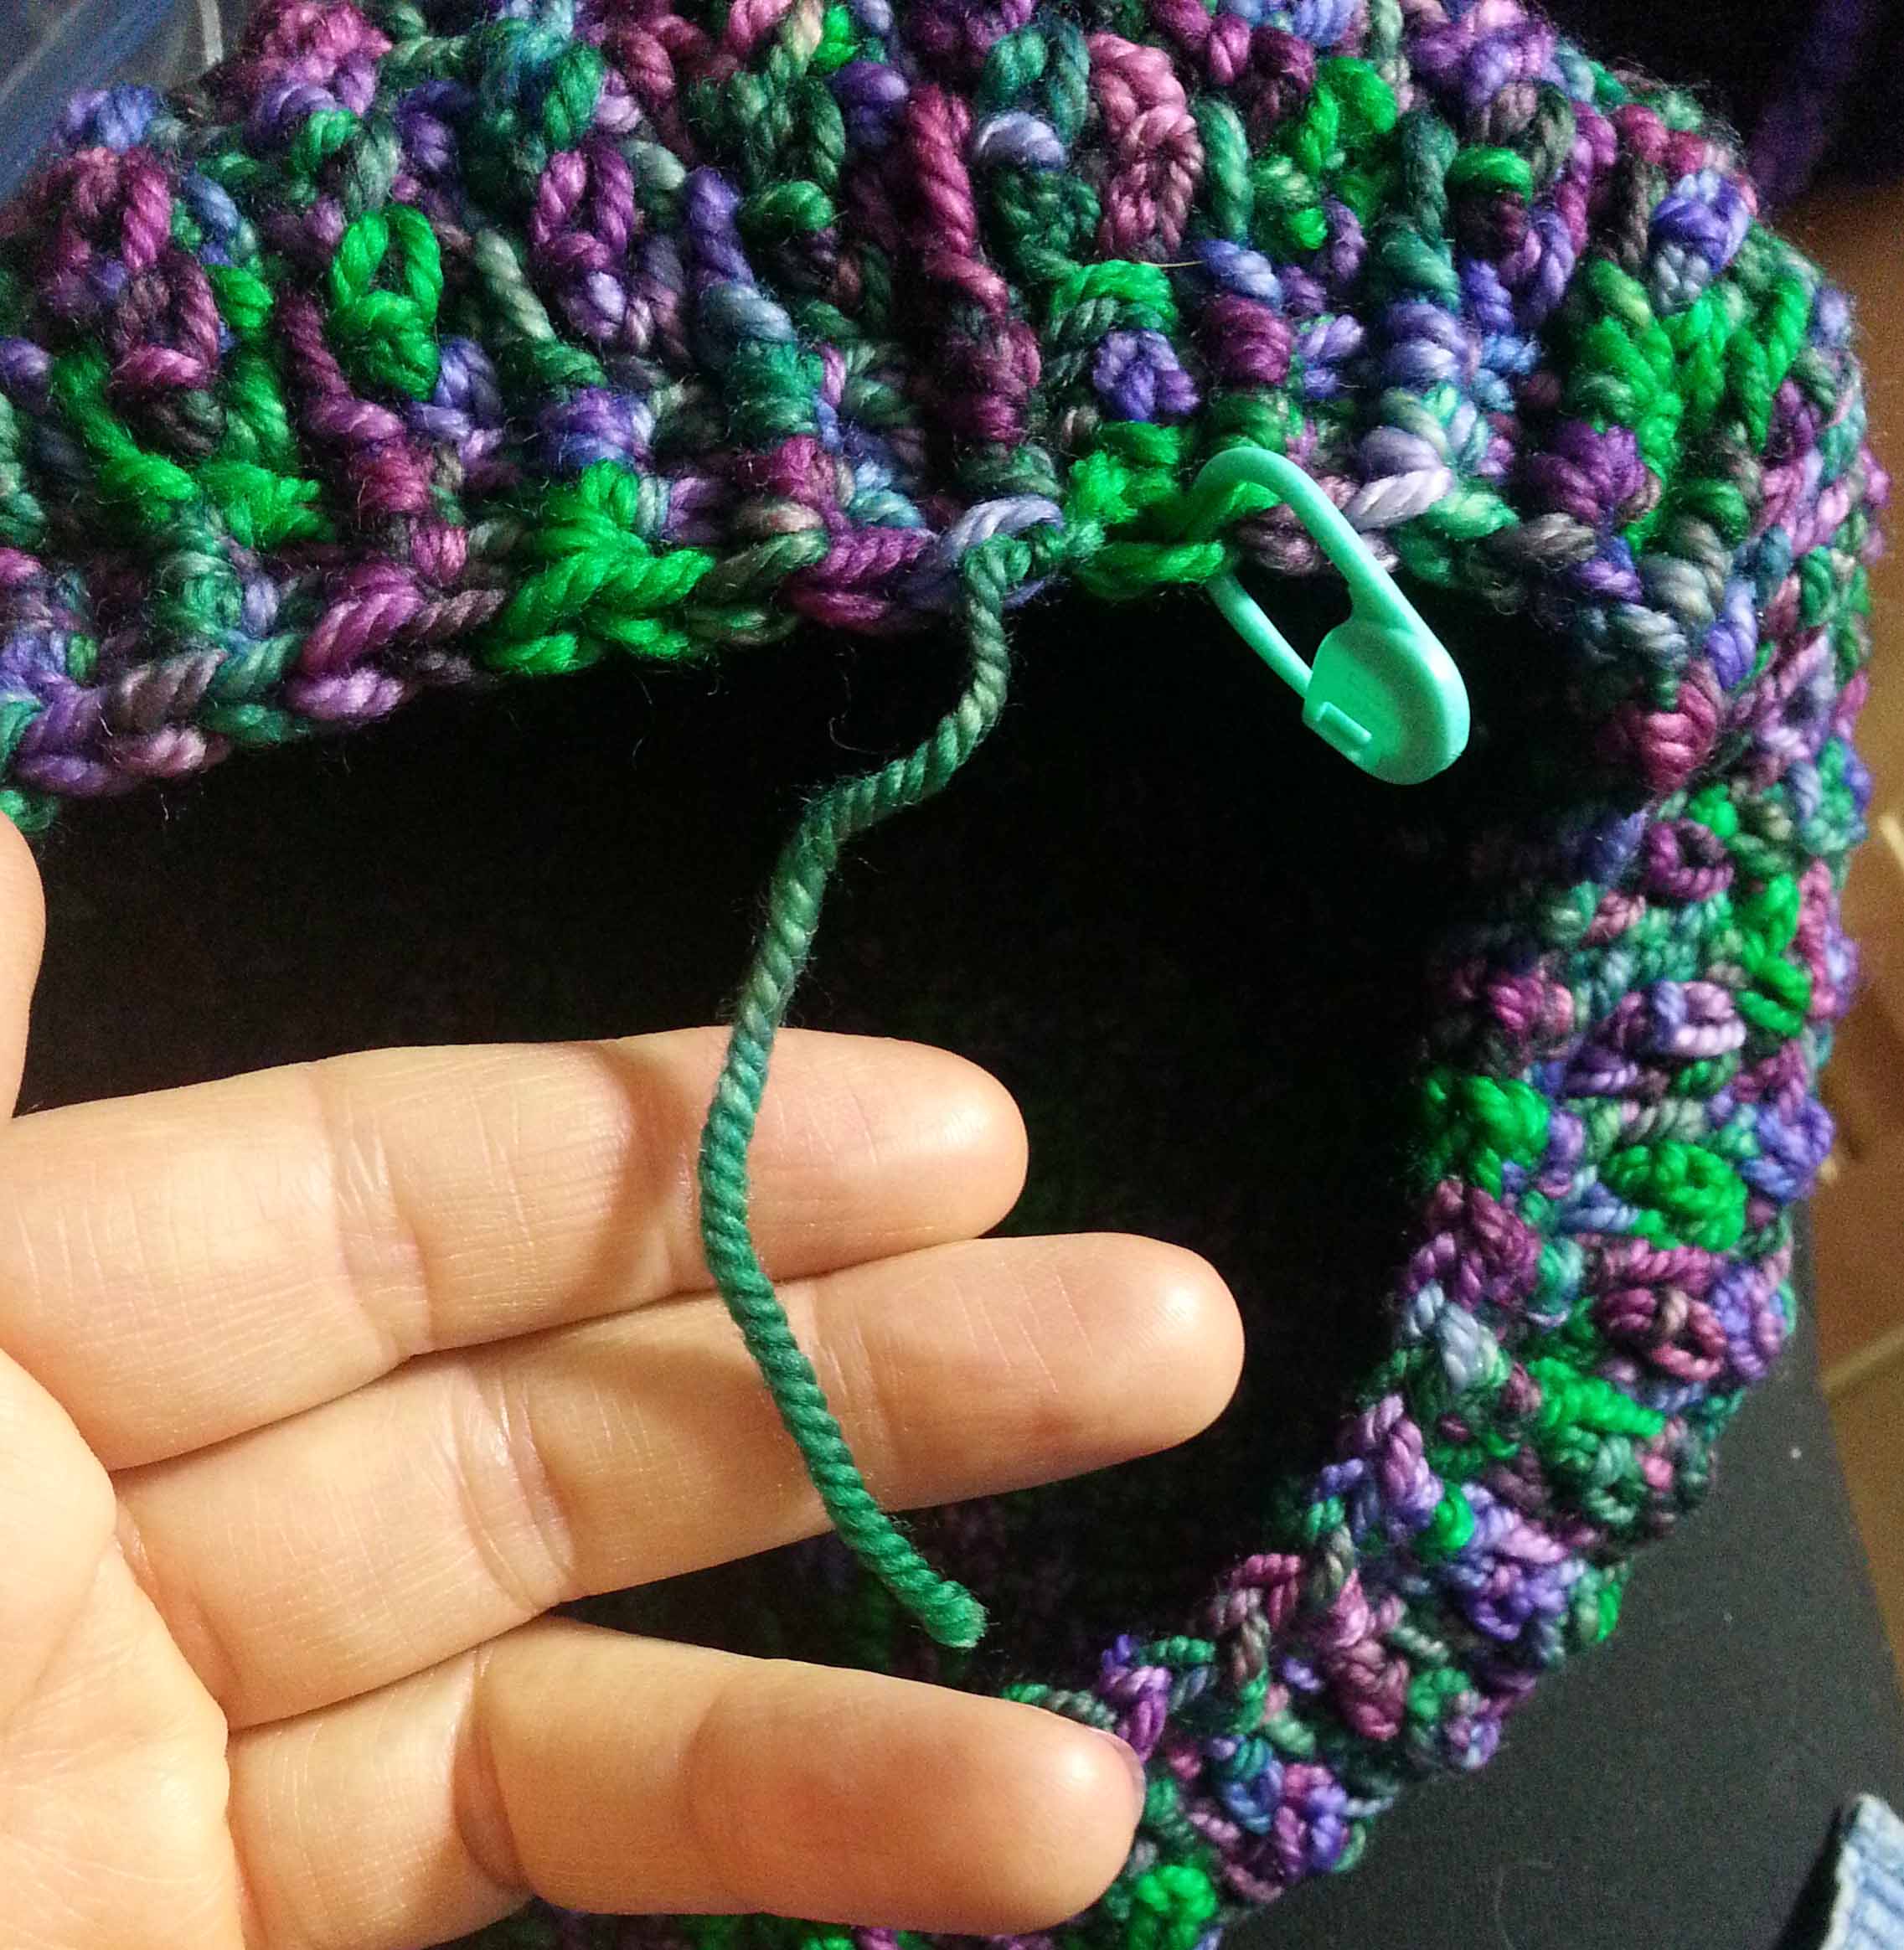
I’ve been working on this hat every time I had a spare moment for the past 3 days and finished it late last night. Overall I think it took me about 3 hours of crocheting time. That’s counting a couple of times when I had to pull out some of my work due to not keeping track of my stitches.
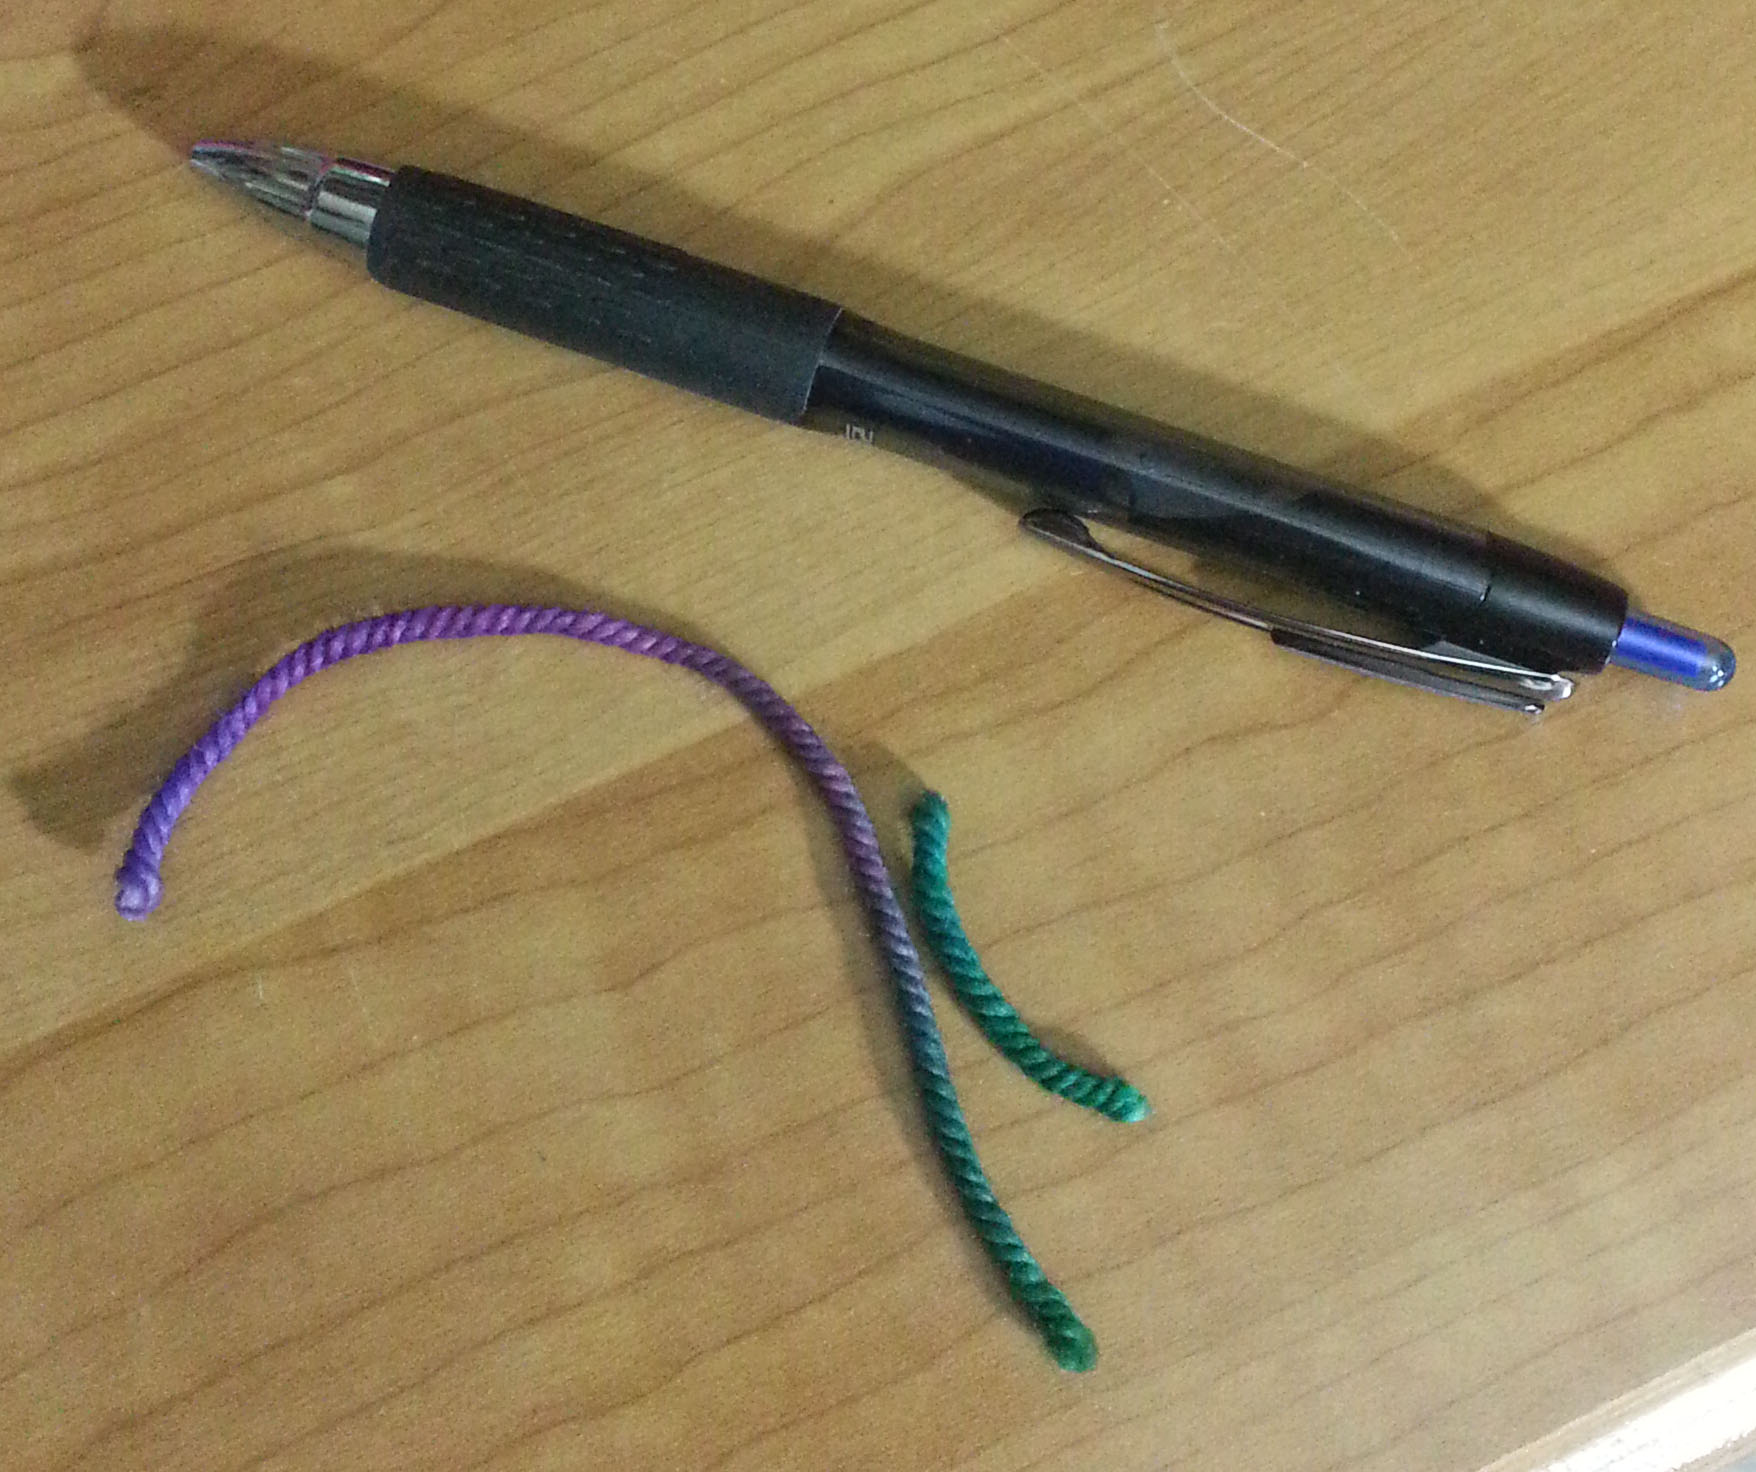
I almost ran out of yarn at the end. I actually had to fudge a little on the last stitch, but it still looks good.
These were all I had left after weaving in the tails.
I think he is very happy with his new hat. He is 13.5 years old and actually wears an adult size hat already. It’s a good thing my niece and nephew are both having babies this coming year, I need some little ones to crochet for again.
Now I have to make a hat for my poor husband, he was promised one for Christmas and it hasn’t materialized yet. Whoops.
If you want to make your own Mountain Top Beanie the pattern is available here in my Ravelry Shop. The pattern has detailed written instructions as well as 2 stitch charts for those that are more visual. The pattern also includes instructions for making a child-size or infant-size hat. I’ll also be teaching a project class for this hat at the Longmont Yarn Shoppe, Saturday, October 29th from 10 a.m. to 1 p.m. if you are in the area.
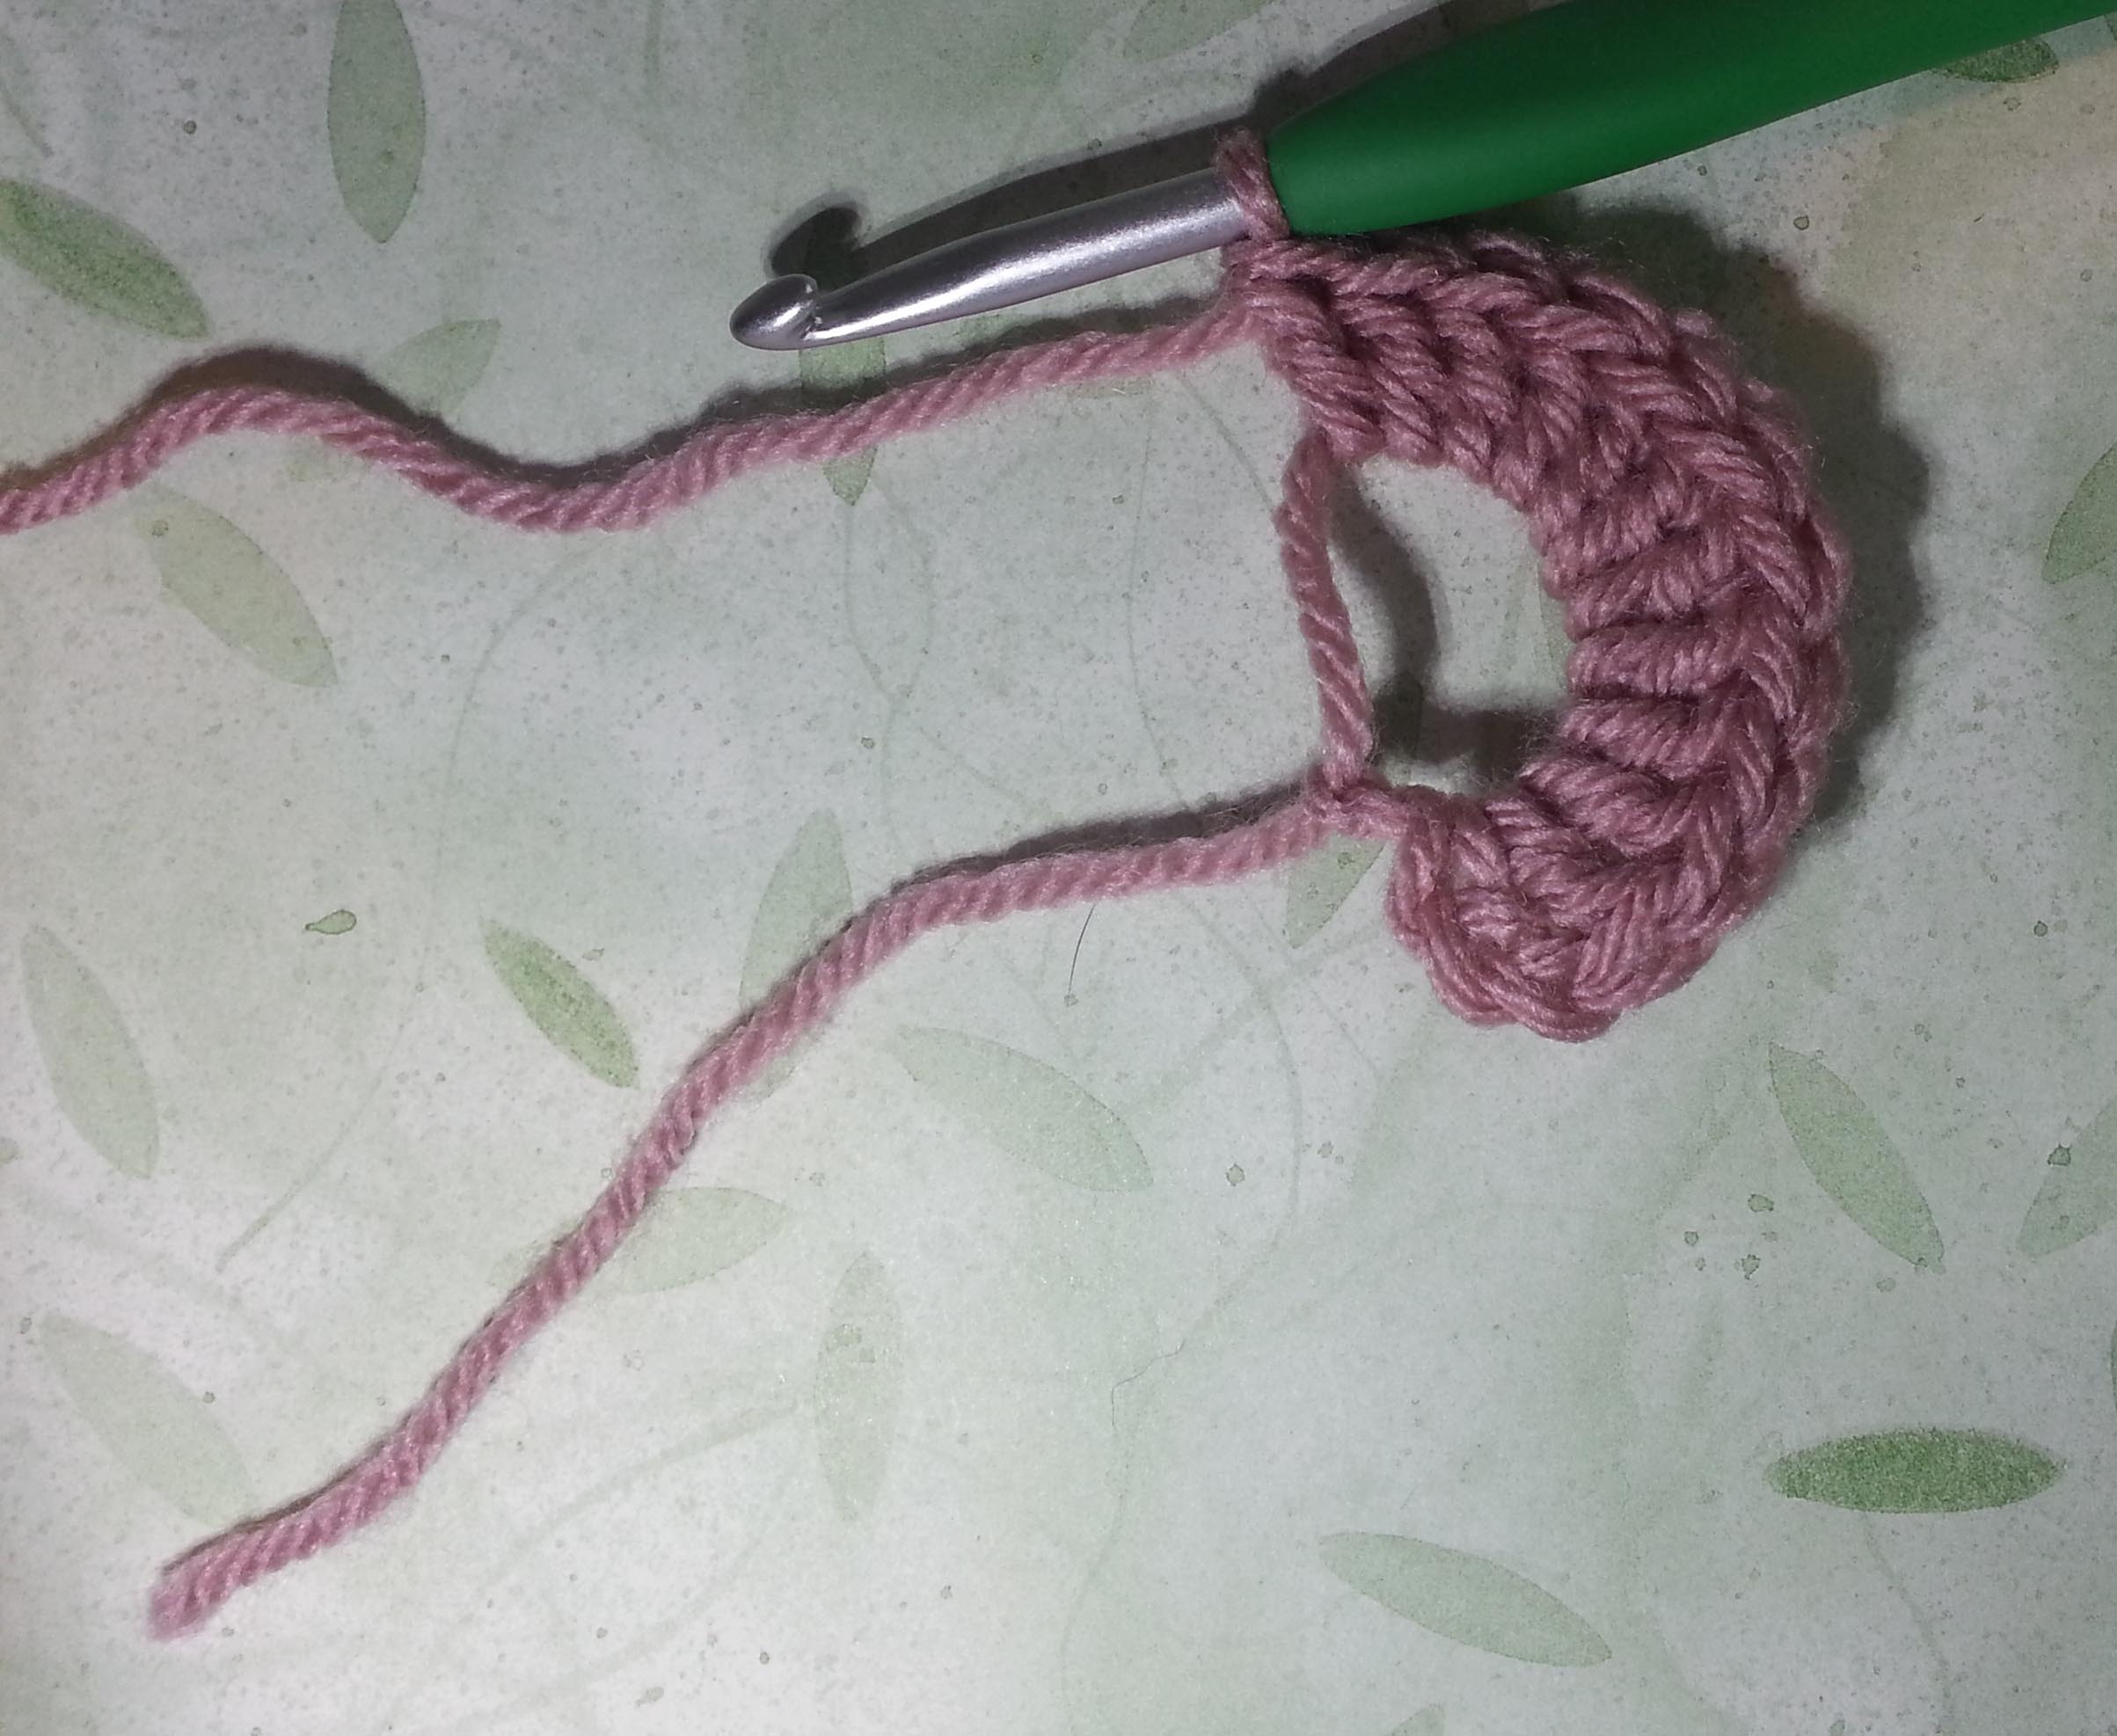
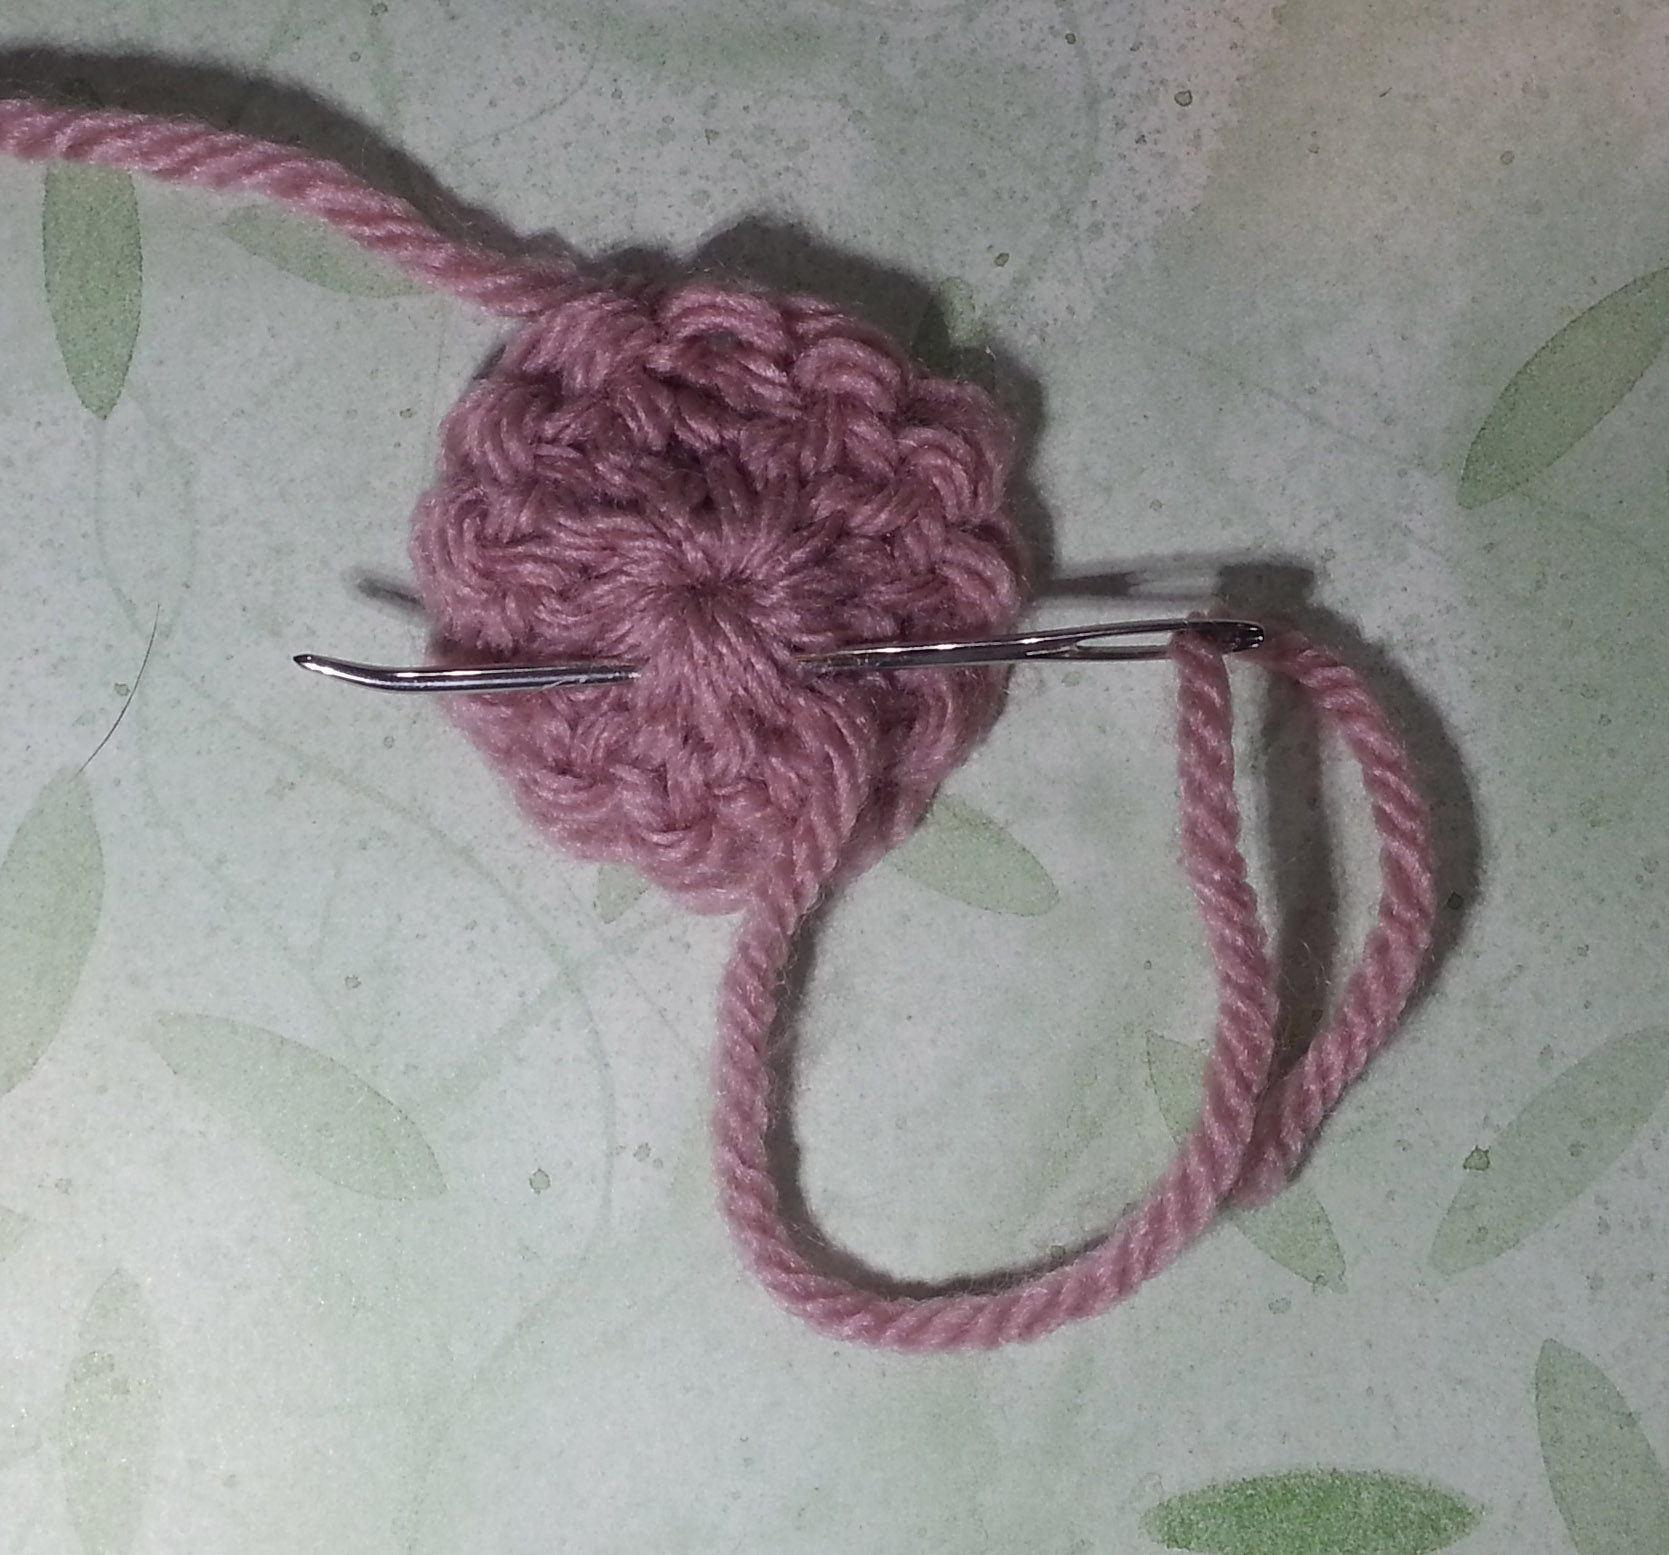
One of the easiest of scap projects is the humble crocheted yo-yo. I’ve always enjoyed these fun little circles of color and find them a terrific learning project for new crocheters. When worked in worsted weight yarn with a size I-9 (5.5mm) hook they use just under 2 yards of yarn each.
Beginning chain 4, arrow indicates 4th ch from hook.
I make my Yo-yos by starting with an adjustable slip knot, then chain 4,
11 double crochet in the 4th chain from the hook,
Tightening center, arrow indicates beginning tail.
Tighten the center of the stitches by pulling the beginning tail snug,
Insert hook in top of the beginning chain 4,
Slip Stitch to close round of stitches. Fasten off.
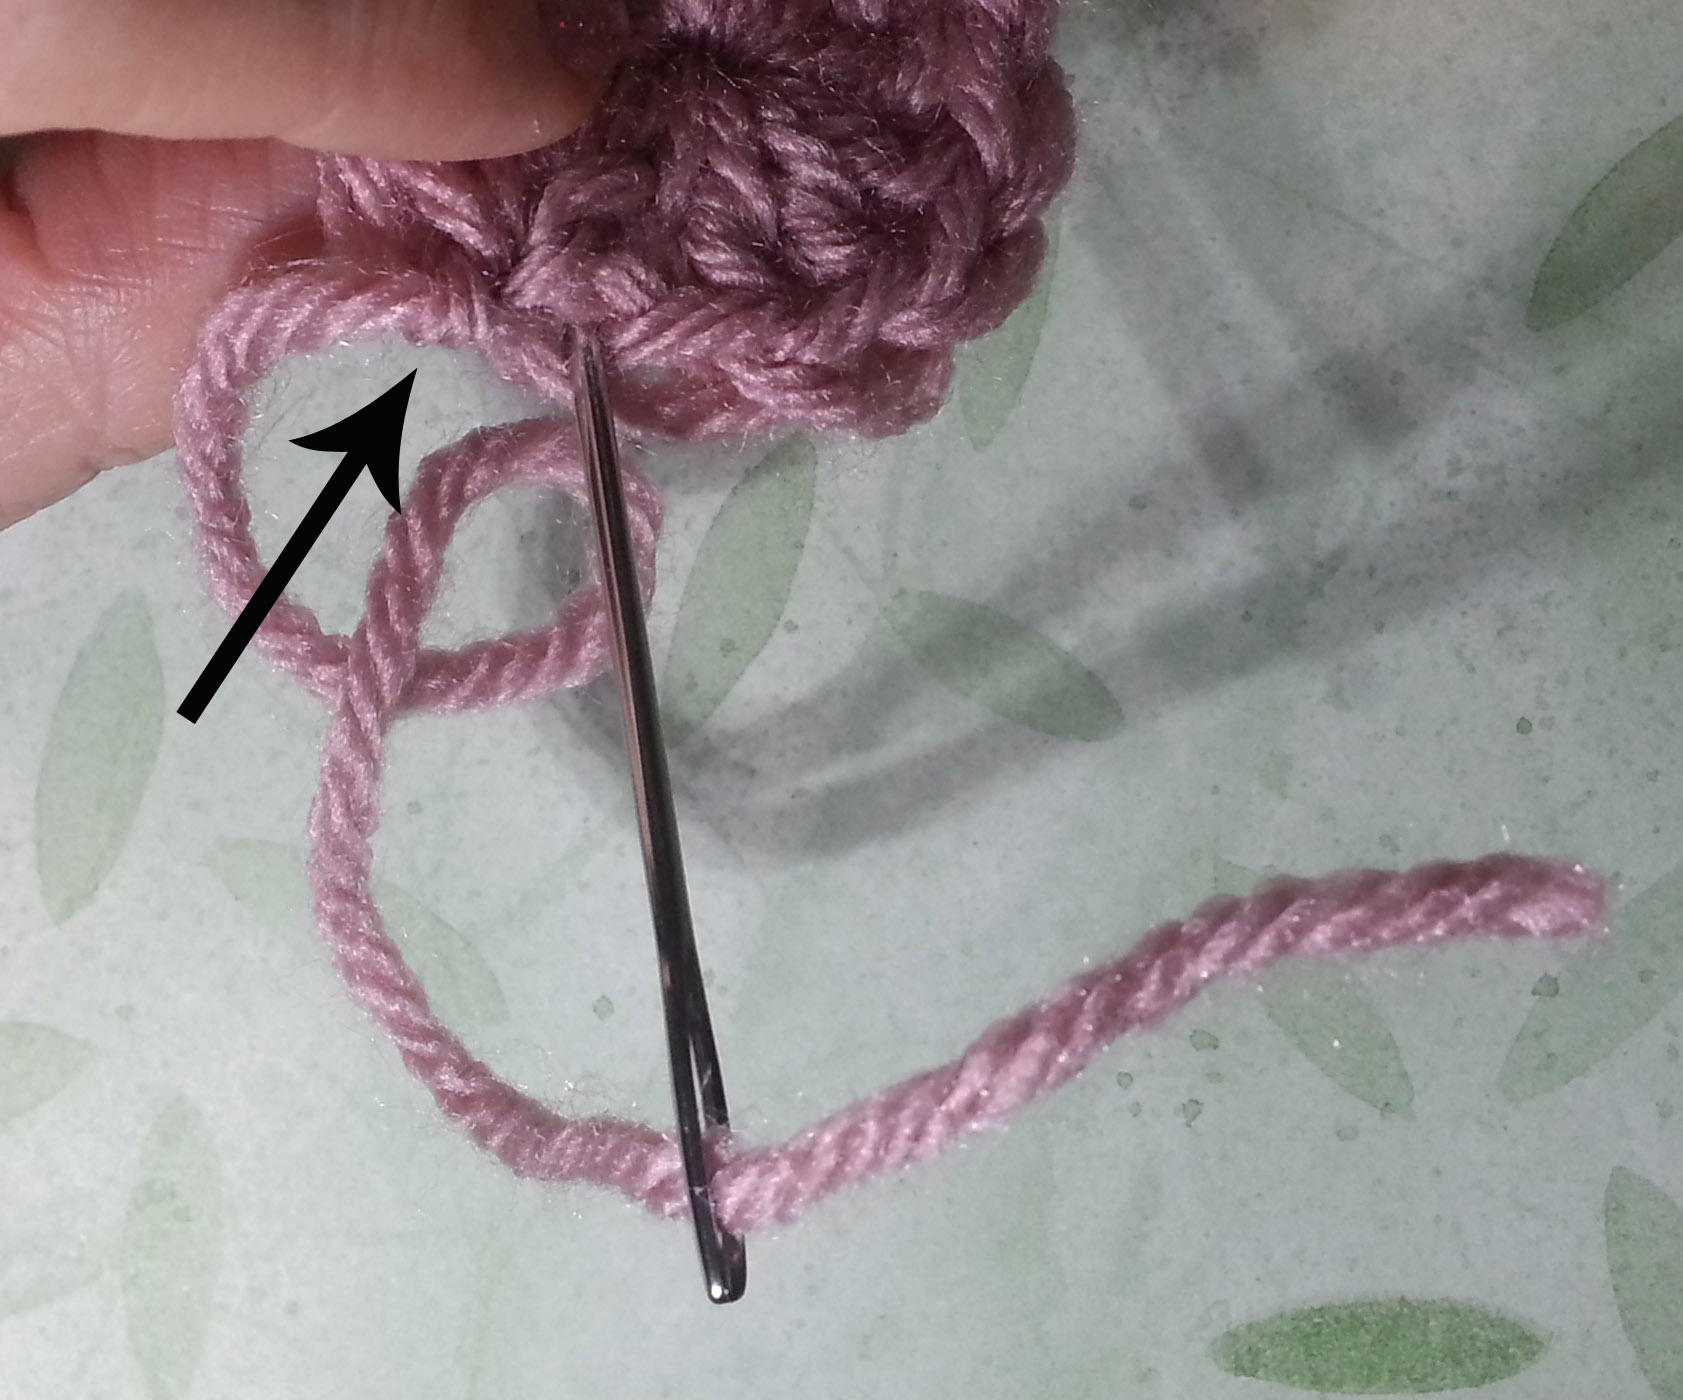
Weave in the beginning tail in the center. You can weave in the ending tail as well, or use it for sewing the yo-yos together. For my yo-yos I did weave in the ending tail, because I will be crocheting these yo-yos together.
Weaving in the ending tail. Arrow indicates the slip stitch.
To weave in the ending tail I like to insert my yarn needle thru the top of the chain stitch that I had slip stitched to.
Then I turn the yo-yo over and weave the tail thru the back bumps of that beginning chain and on around the center of the yo-yo. I pull this end gently when weaving it in so I don’t collapse the side of the yo-yo.
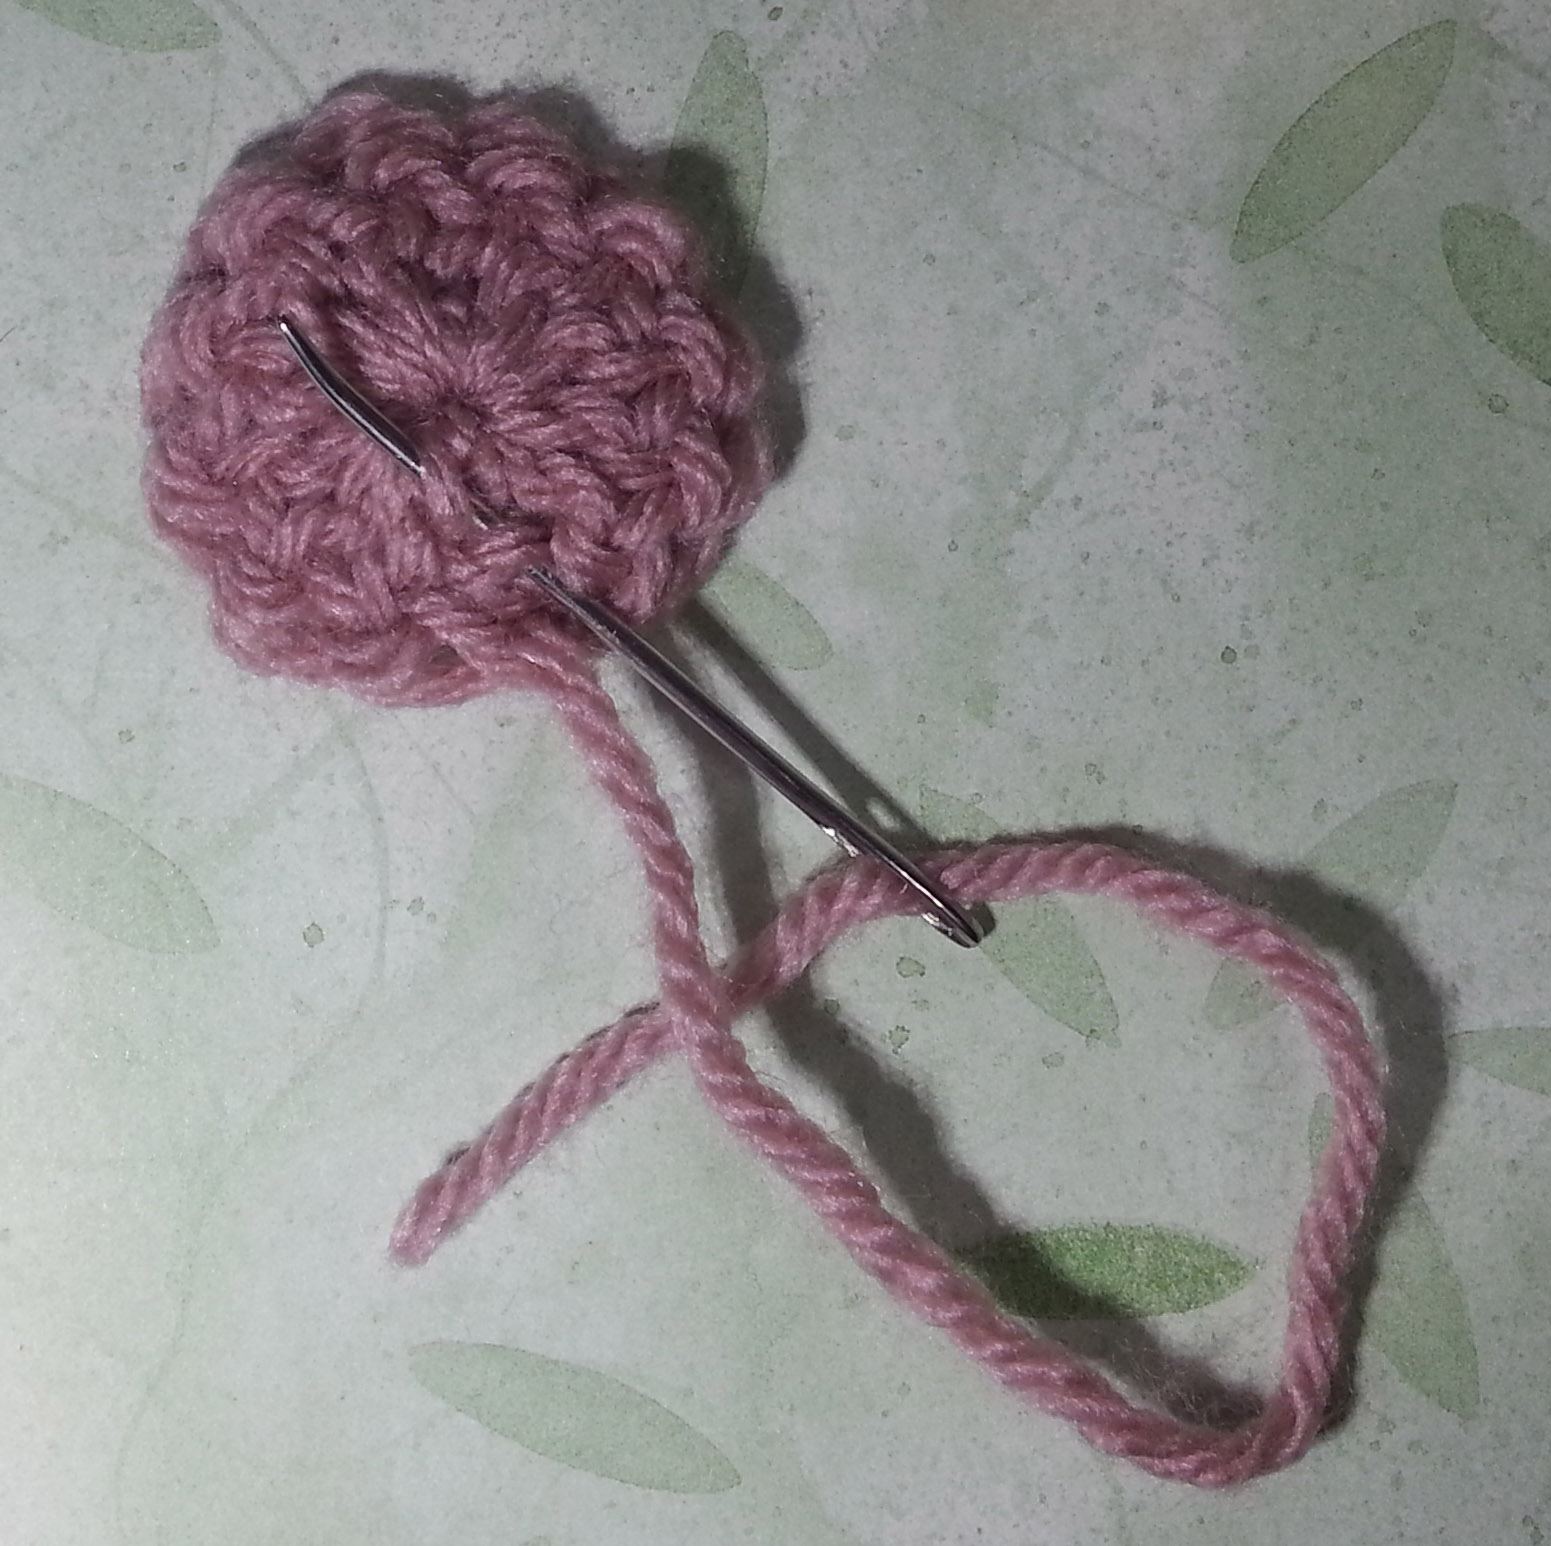
I trim off the excess yarn from the yo-yo and it is ready to join my other yo-yos. I will fill a bag with yo-yos until I have collected enough to make them into a project.
You can use yo-yos in any number of projects. My favorite is to make scarves with them. You can also make yo-yos in other yarns or threads. You will need to adjust the size hook you use to get a yo-yo fabric that you find pleasing.
This past week the weather has begun its swing back to cooler temperatures, at least up here on my mountain. It is getting us in the mood for autumn just as school is ready to start up again for my boys.
My youngest son is going into the 5th grade this year. It’s rather bittersweet as this will be his last year in elementary school. In our district 6th graders are in Middle School. So the Bean is looking forward to being one of the “big” kids this year. He also will have the opportunity to join band and learn to play an instrument. We will see if that happens. I’m trying to convince him that music is math, but he remains skeptical about it.
My oldest is going into 8th grade, his last year of Middle School. That means this year is going to be full of getting ready for his graduation at the end of the year and deciding what High School he’ll be attending for 9th grade. This will be the last year that I’ll be driving down or staying in town all day to pick them up after school. Starting next year they will both be able to take a bus home up to our little community after school.
For some reason our schools always start the new year with a short week. My youngest will be having his first day this coming Thursday and my other son’s will be that Friday. I went on a massive shopping trip this last Tuesday and got all the required items for their return to school. I stocked up for my design office supplies too.
Inexpensive 2 pocket file folders, I use these for corralling my design notes when I am crocheting a new design and writing the pattern.
A stack of spiral notebooks, still my favorite to keep with me for scribbling ideas in or design notes when I am swatching for new designs. They also are a sort of ‘catch-all” for anything I need to write down. I fill them up and weed them out as the year progresses.
A few nicer looking composition notebooks that I’ll use when I go to conferences. The slightly smaller profile lets them fit nicely into my bags I carry during the conference.
I also picked up a few new writing and drawing implements. Haven’t used these colored pencils from Pentel before and wanted to see how they compare to others, and one always needs more highlighters and black markers.
Between all the back to school stuff I have been working on swatching for new design projects. It has been a reminder that even with the best ideas and yarn, swatches don’t always come out the way I envisioned. Unfortunately I wasn’t happy with how the yarn I had picked was working with the hook I had chosen. I ended up starting and frogging around 10 times when all was said and done.
The good news is that none of that time is wasted. I always learn a lot when swatching and get to know the stitch patterns I’m working with. I have almost an entire notebook full of notes to work from that will become future designs. I also found out that this was an amazingly durable yarn to withstand being crocheted then pulled out so many times.
I was using the left-overs from a skein of yarn I purchased at the Estes Park Wool Market a few years back. Textiles A Mano’s “La Jolla” a 40% Silk – 60% Wool blend worsted/aran weight yarn. I don’t know if they are still around as I didn’t see them at the wool market this summer and couldn’t get to their website when I was writing this post.
I had used part of the hank to knit my first ever lace project. It was a very large hank with approximately 500 yards in it, and I had plenty left over for swatching. I have 2 other hanks of this same yarn in different colors that I want to make into designs, so the swatching was to develop those designs. I’m hoping to revisit those ideas later this autumn.
The next 7 days should be very exciting. My family and I will be getting in a few last-minute summer vacation activities before the school schedule hits us full force. Then it all starts with my oldest and I stopping by his school this coming Wednesday for his locker assignment and getting his school photo ID. After that he is joining me at the Longmont Yarn Shoppe for my Causal Crochet group from 10:30a – 12:30p.
He is going to be picking out the yarn for his new hat. He really liked my proto-type for the Mountain Top Beanie, but wanted a little calmer color. Hopefully I will get it finished for him before the cold weather gets serious with us. If you want to make your own beanie for yourself or as a gift for someone else you can find the pattern in my Ravelry shop by clicking on the highlighted name above.
I’ll also be teaching a class at the Longmont Yarn Shoppe for this project on October 29th at 10 a.m. You can sign up for the class on the LYS website or by stopping by the shop.
I know some of you may have more summer vacation time ahead of you yet, so I’ll wish you a lovely break. For those of you that are in back-to-school mode like myself, buckle-up and away we go.
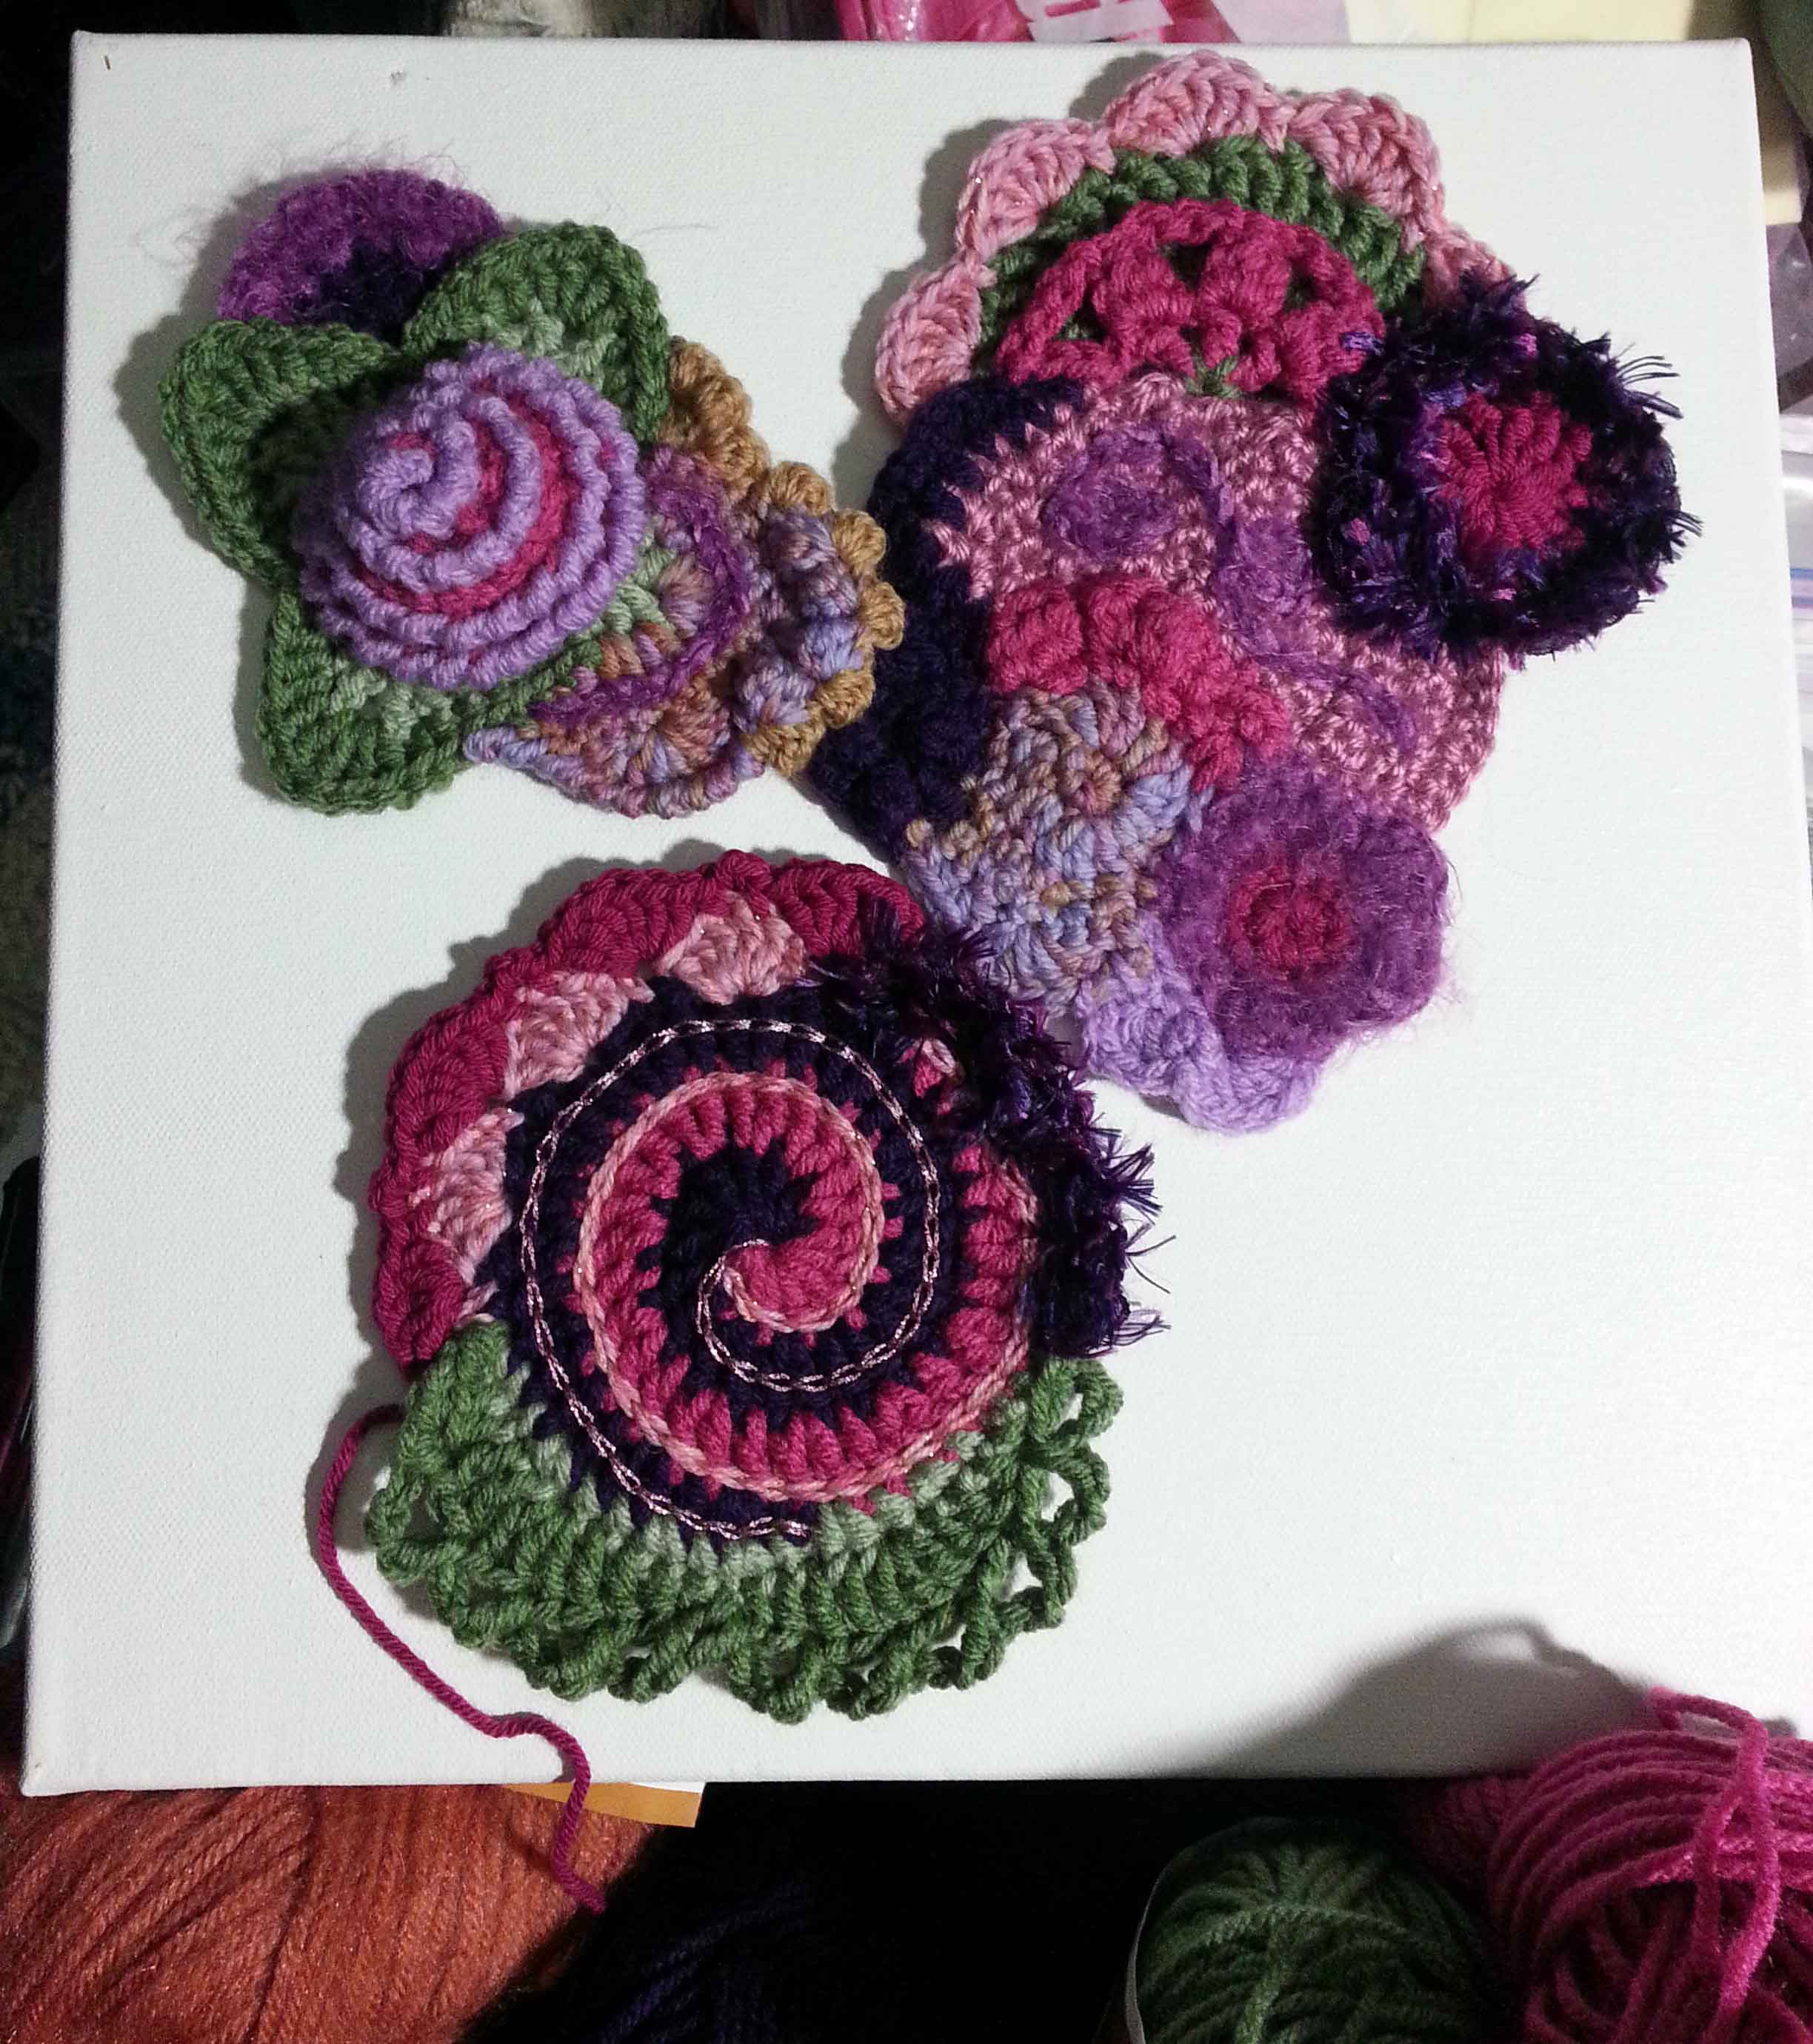
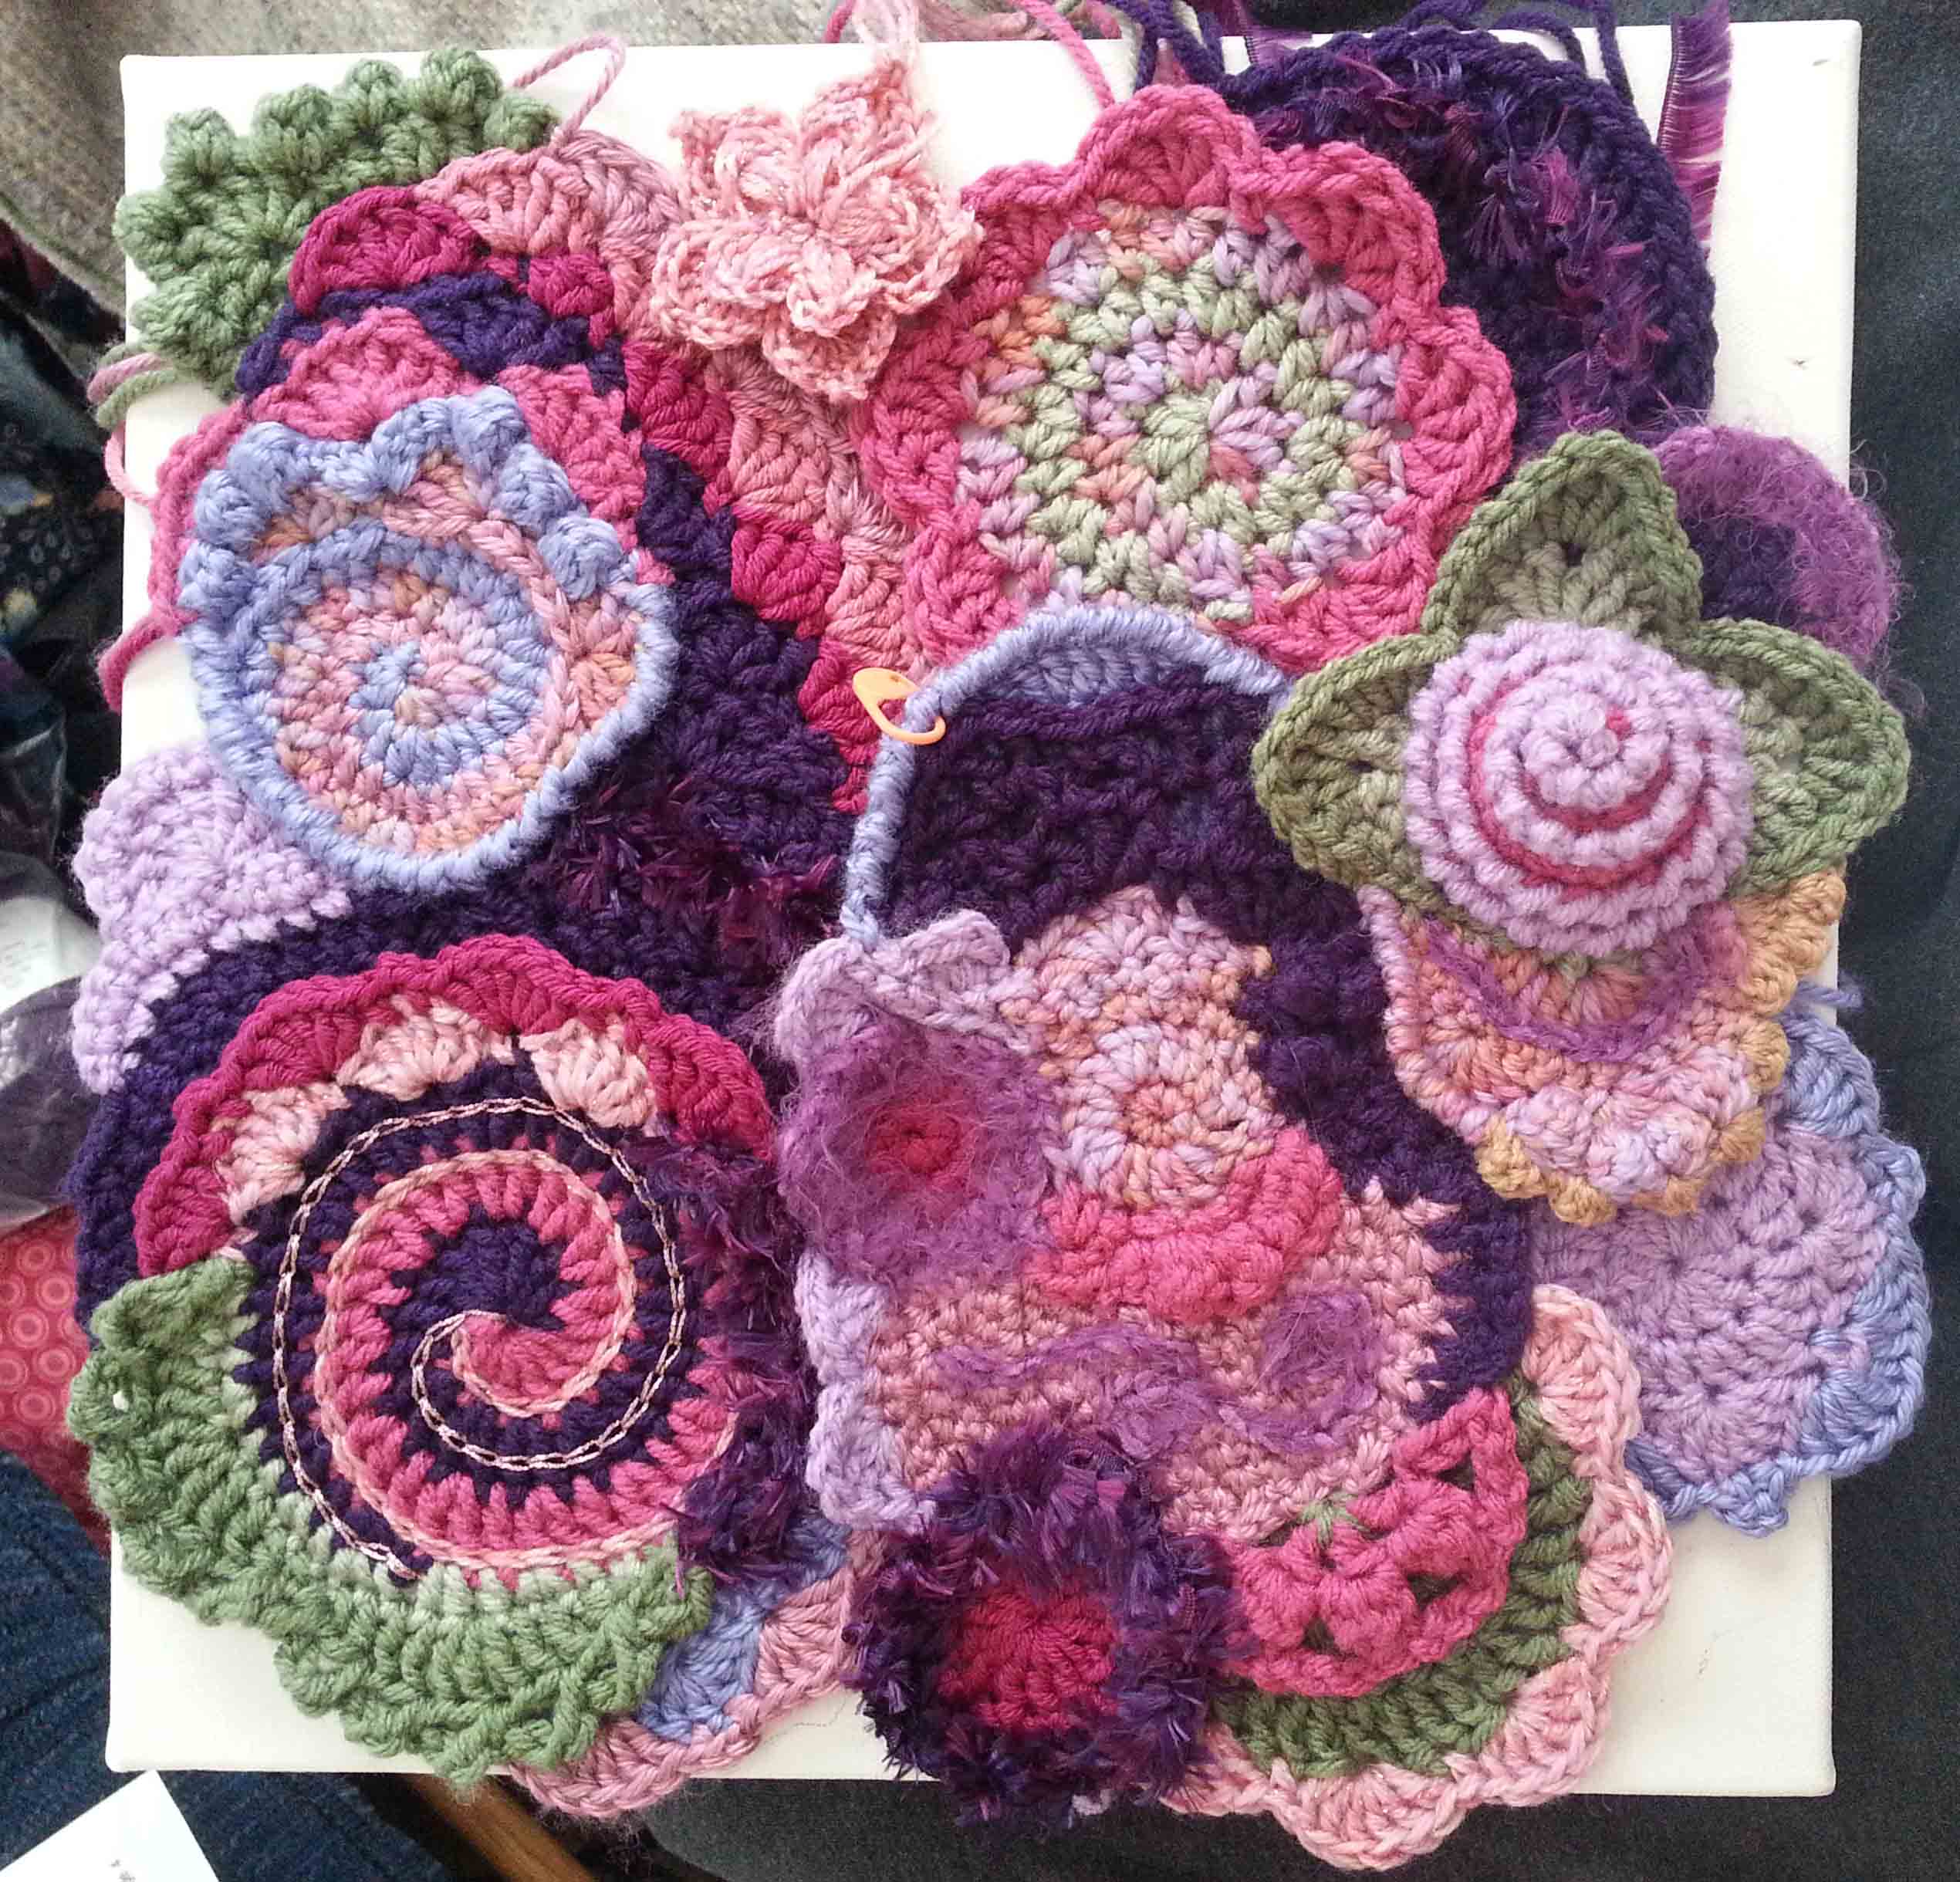
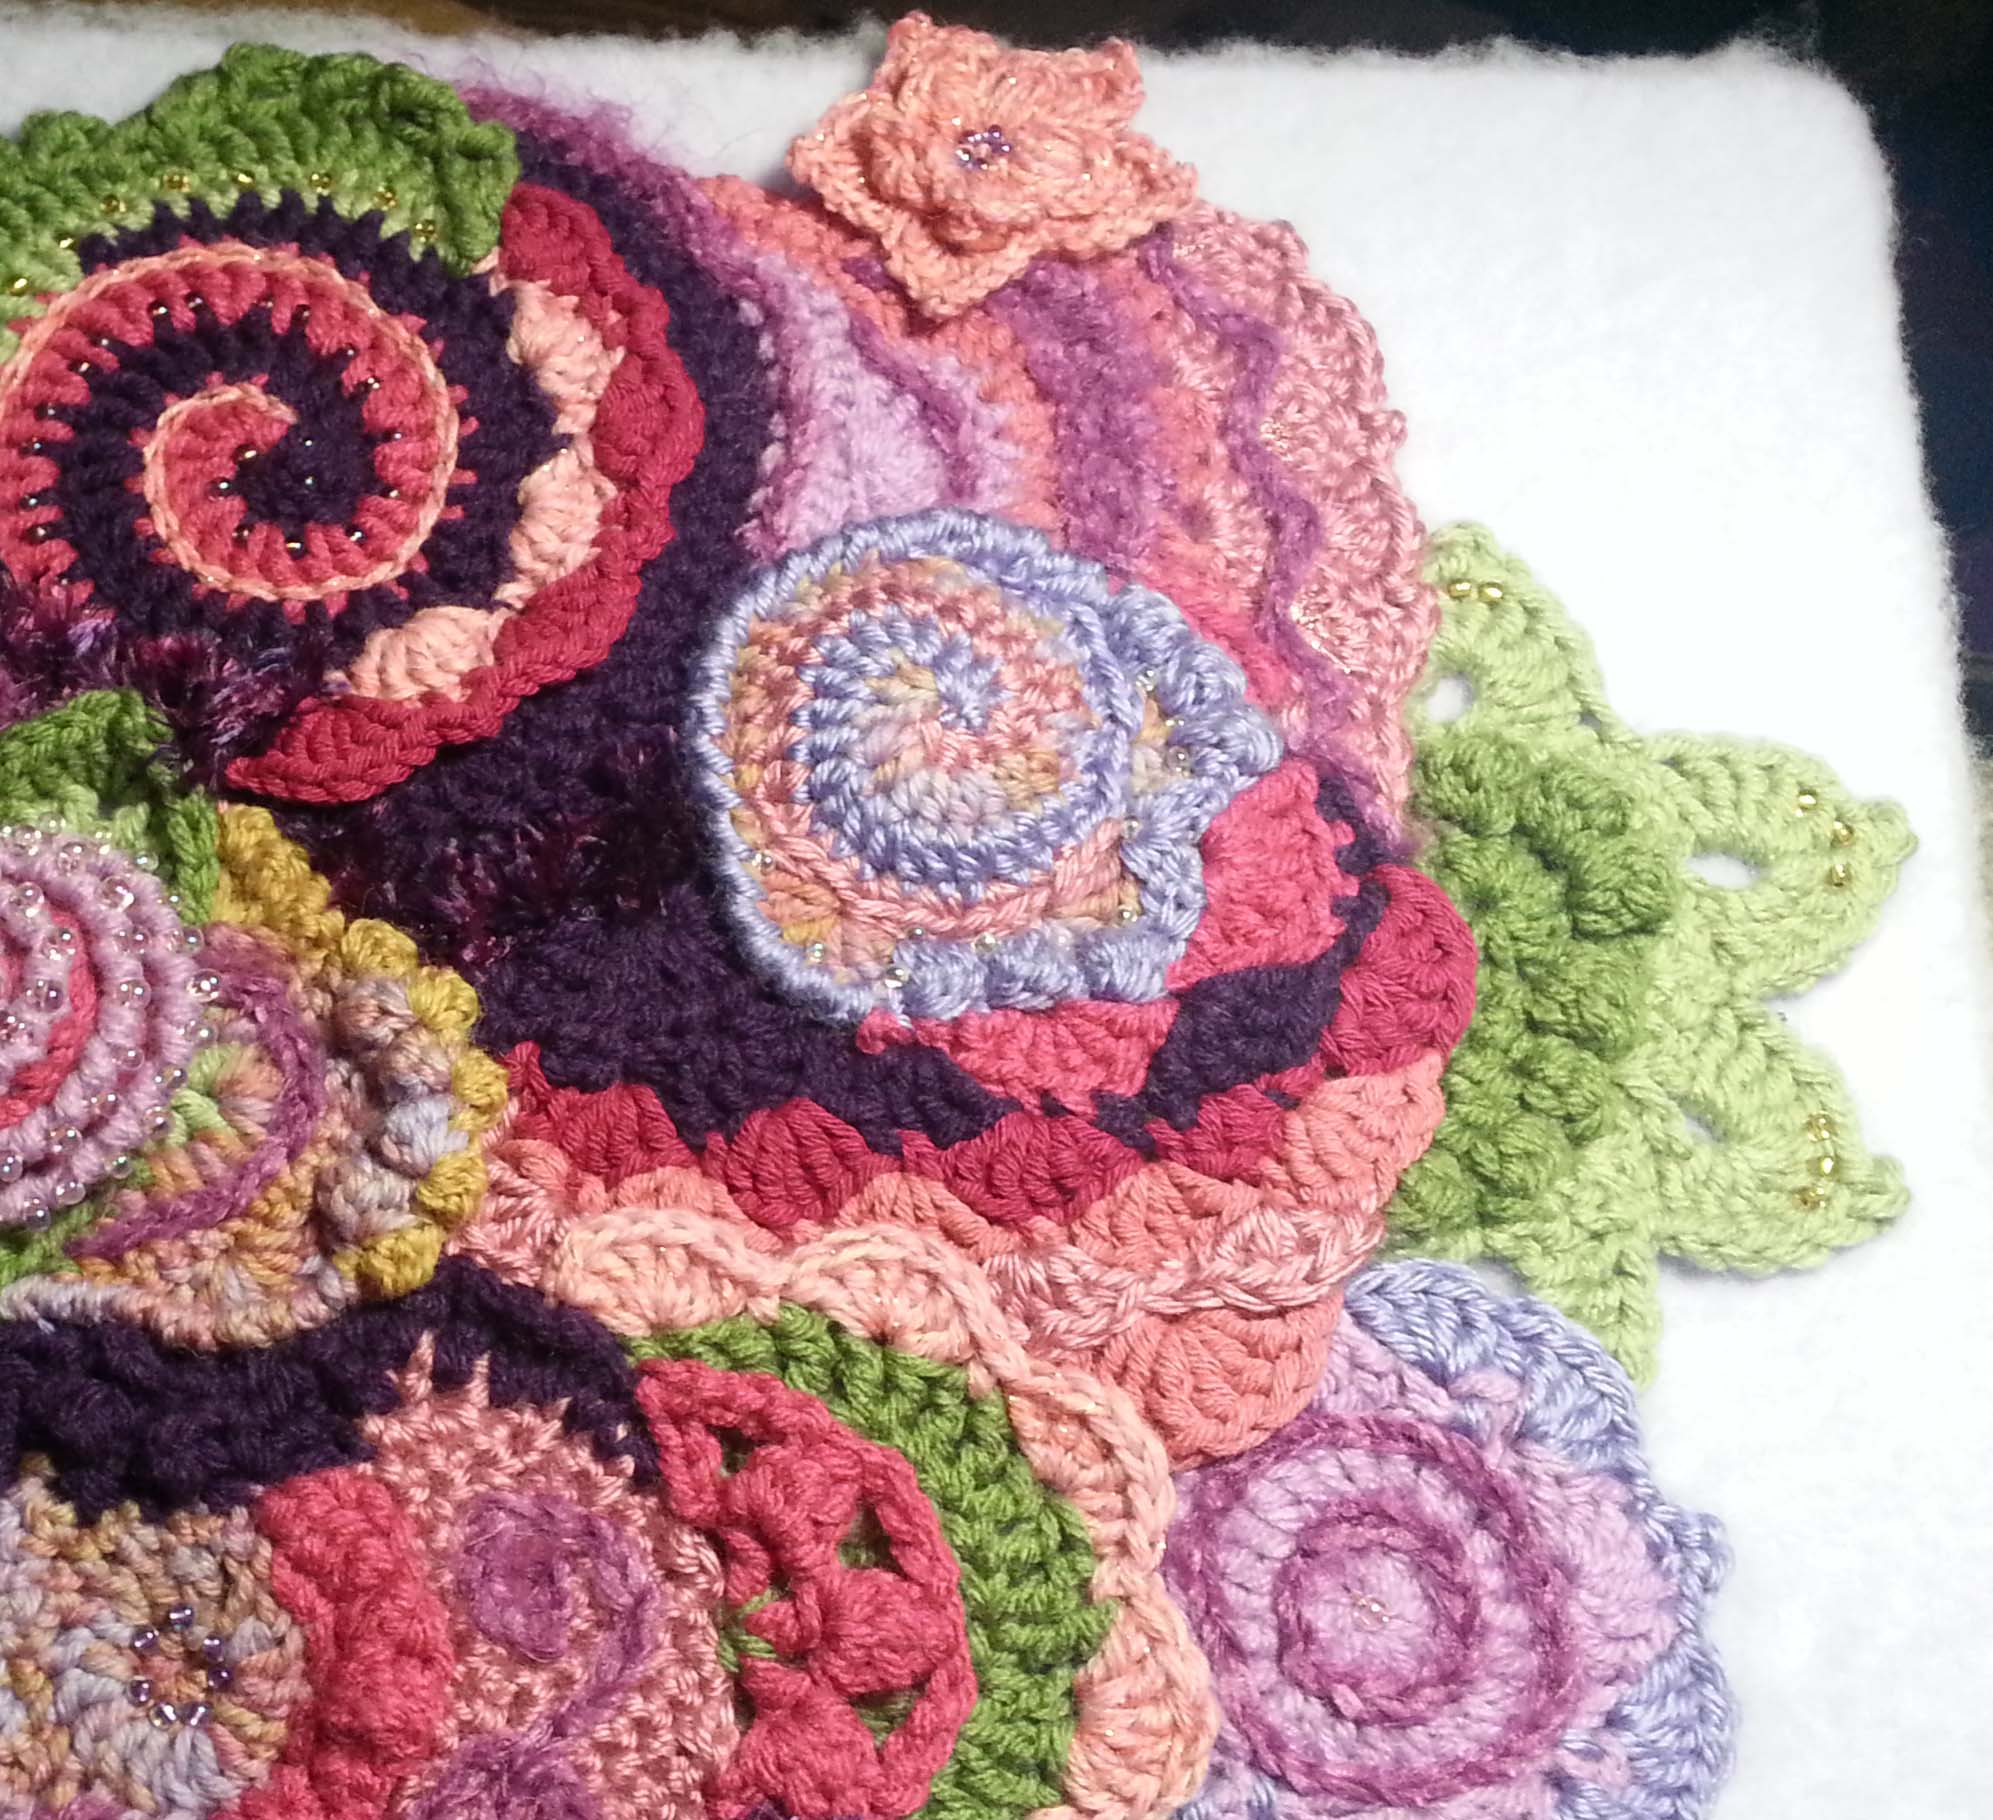
One of the things keeping me really busy the last couple of weeks was finishing a free form crochet piece for the Fiber Arts Show in Mitchell, Nebraska at the Pinnacle Bank. The show is running from August 5th thru September 2nd.
I had started the beginning of this piece ages ago. I even had created a bag full of small balls of yarn in the colors and textures I was planning on using. These were actually from a Free Form class I took a number of years back with Myra Wood at one of the CGOA conferences.
In free form crochet I often don’t know for sure where I am heading with an idea until I have worked a few scrumbles, that is the name many free-formers call for the smaller pieces created). I started this project with some scrumbles I created in my class with Myra. I knew I wanted to make a small piece that could be hung on a wall. Texture and 3 dimensional shaping were both in my mind as I began to create more pieces and add onto my existing pieces.
I had a couple of inexpensive small blank canvases in my art studio, 12×12 and 11×14 inches. Originally I was looking at using one of them for the backing of this piece. I kept adding to the scrumbles and making more to begin to fill the 12×12 canvas. I was over-hanging the canvas in a lot of places and wasn’t too thrilled with that.
I decided to try the 11×14 canvas. I left the plastic wrap on it so I could move the scrumbles around more easily. Still wasn’t completely happy with the way this looked.
This was my second attempt. Not quite working for me.
Maybe the third time will be the charm? Liking this a little better.
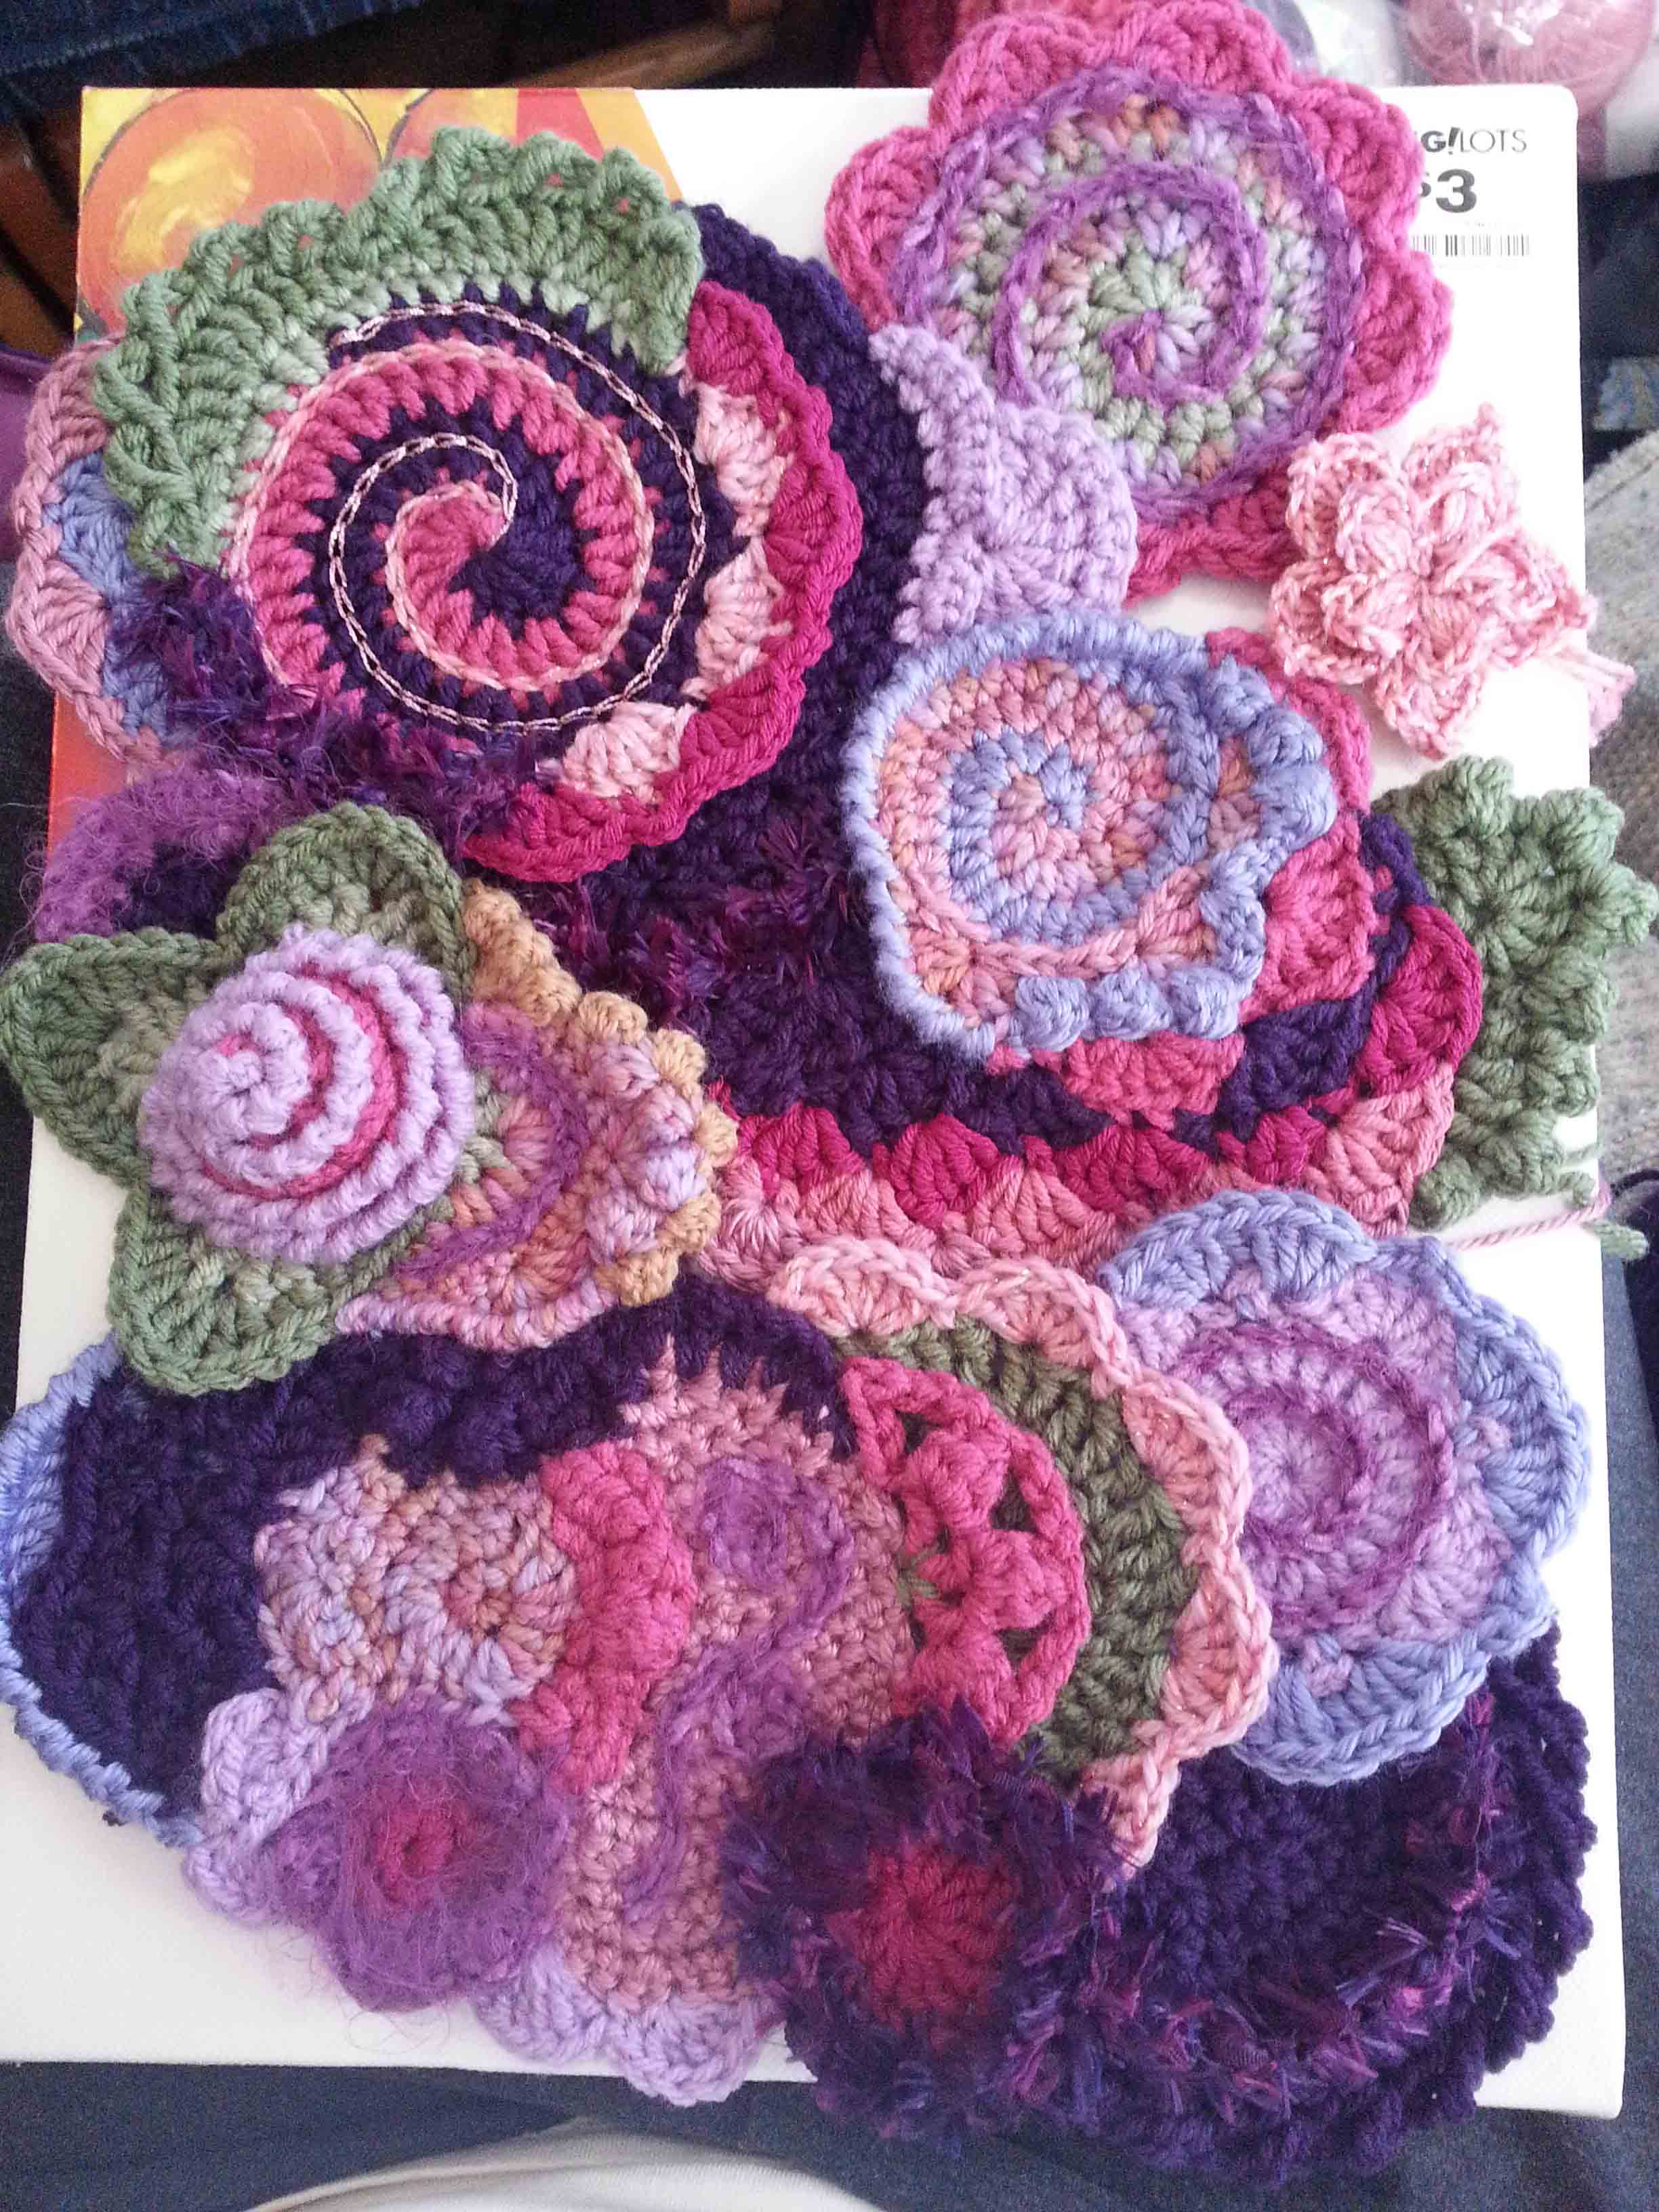
I started filling in some of the remaining open space on the piece.
Getting closer to my final choices for the finished piece. Still a number of spots that need more work. At this point I’m feeling the pressure to get this piece finished and sent off to the folks putting together the show in Mitchell, Nebraska. Because the deadline crunch was getting intense I have less photos of the process.
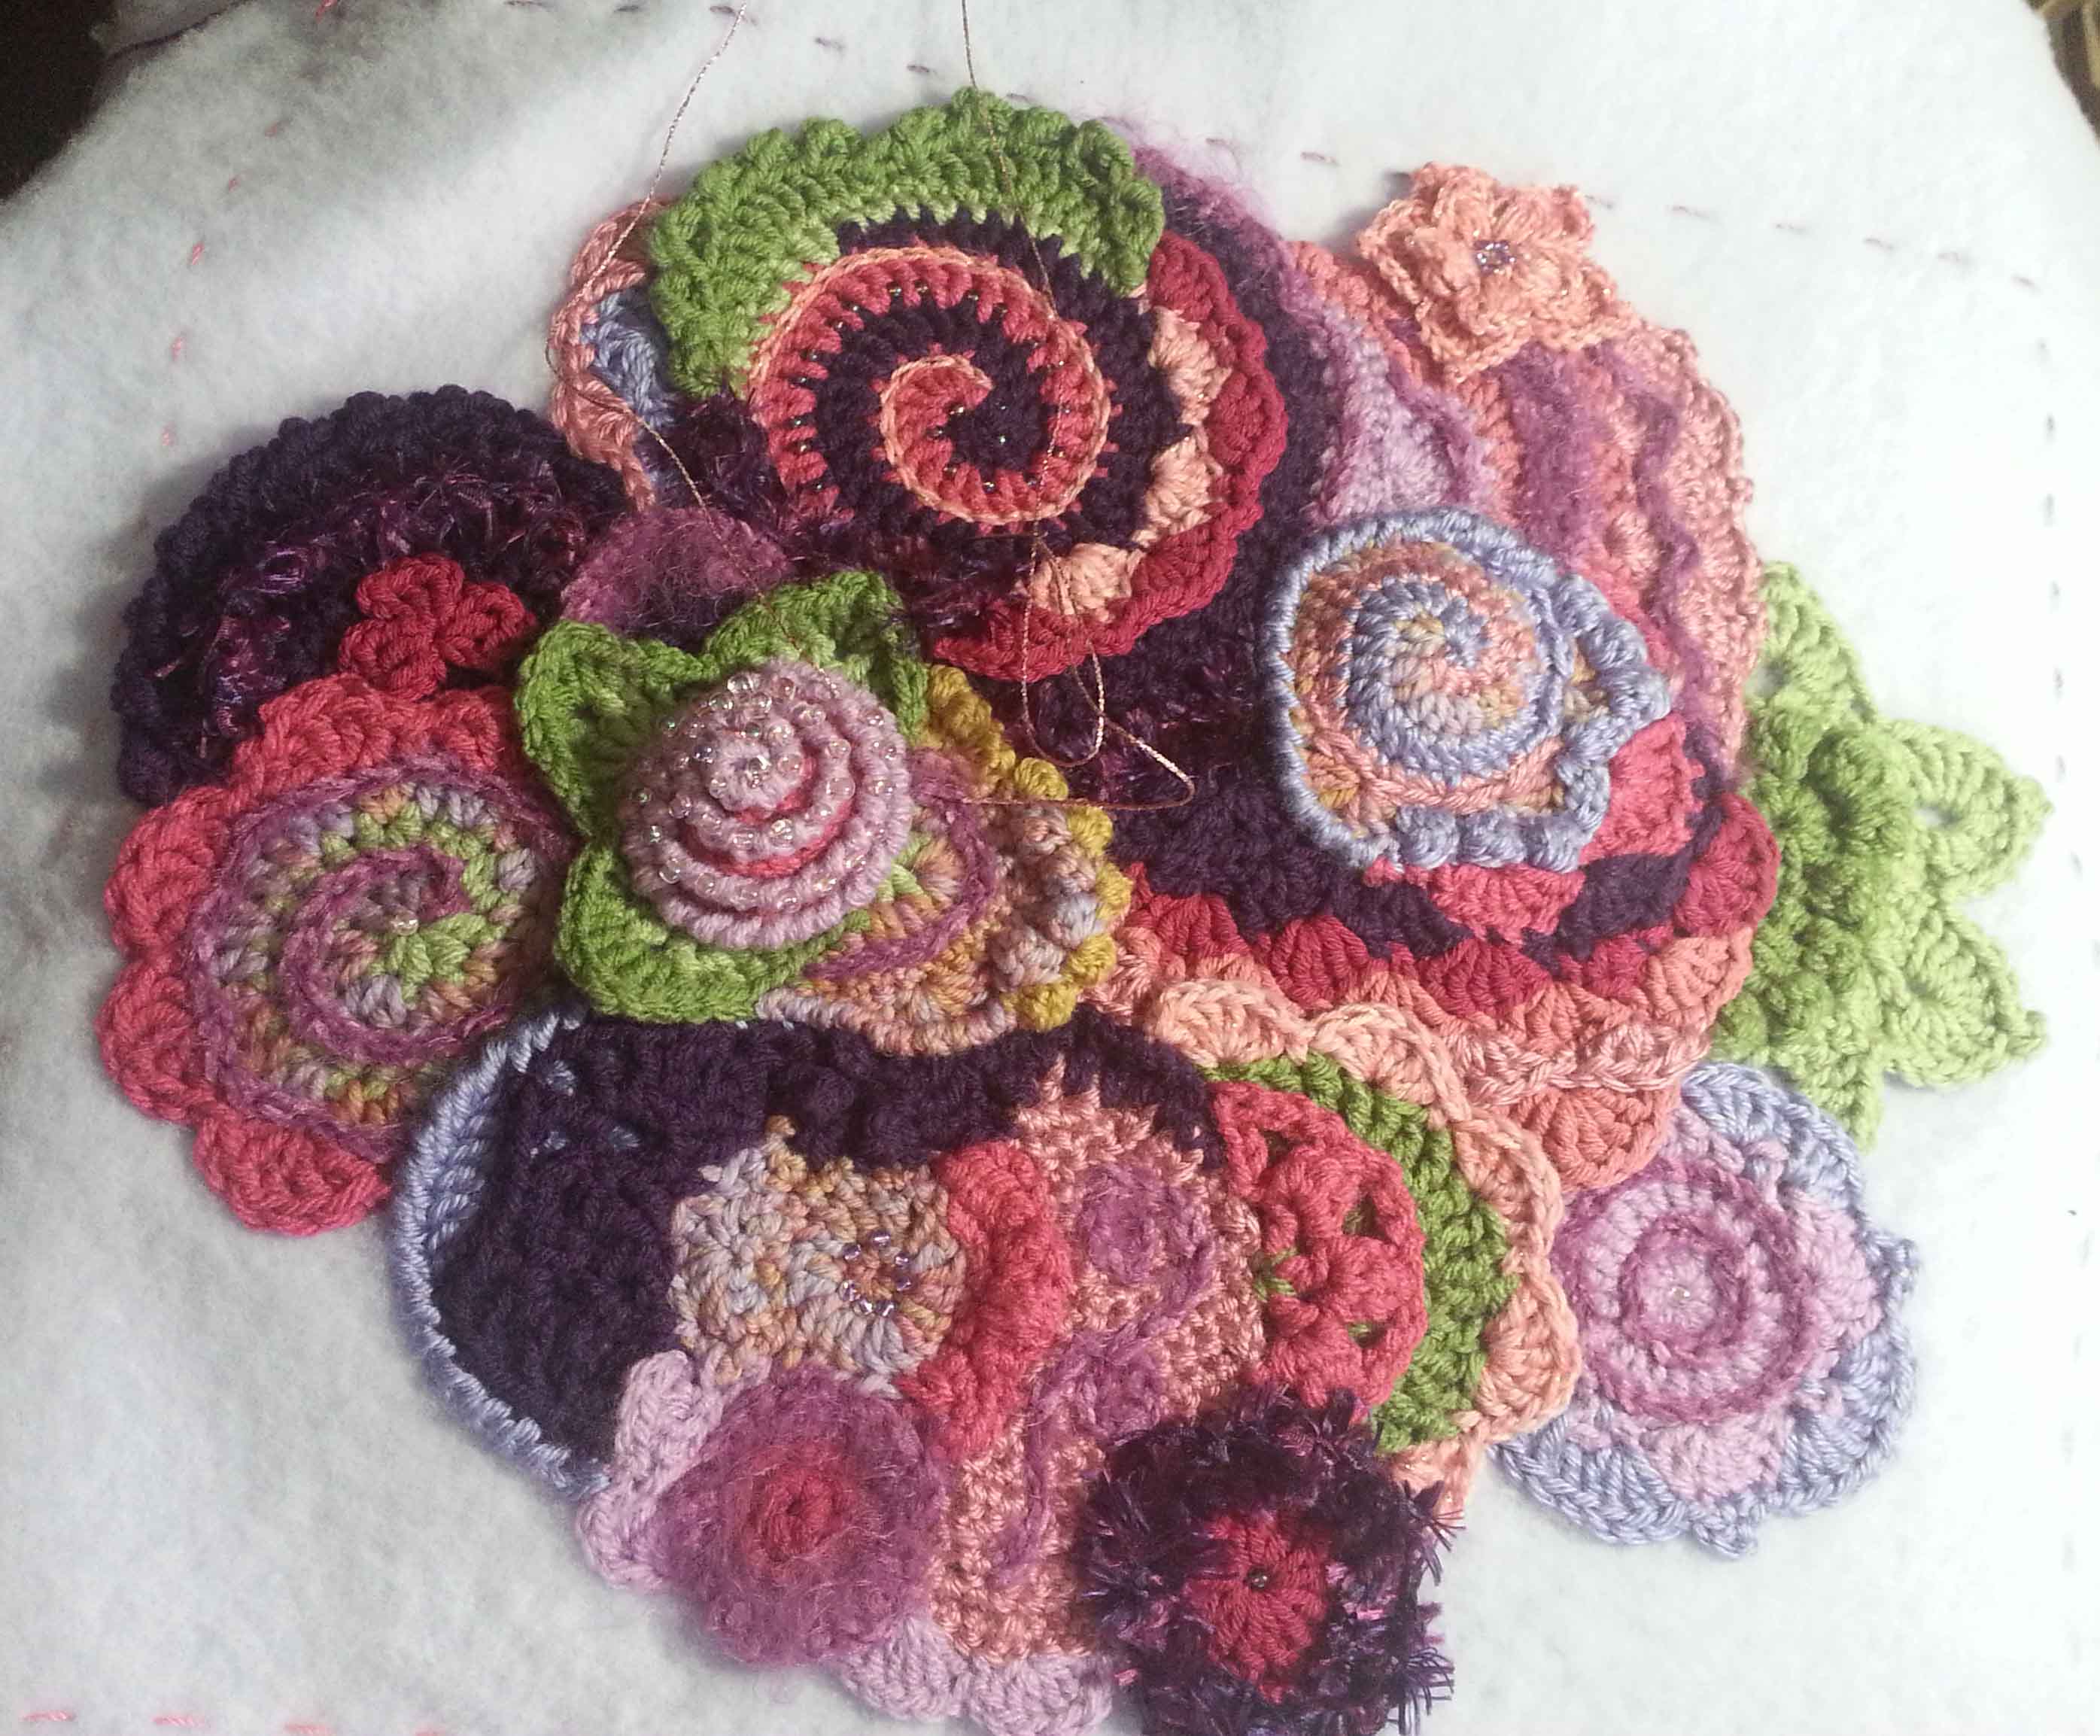
I finished up all the crocheting part and had sewn or crocheted the pieces together. Then I sewed the entire crocheted piece to the backing fabric. At this stage I had decided that I didn’t want to use either of my canvases, instead I cut out backing board in an 14×16 size to stretch my backing fabric around.
The final stage was embroidering with metallic threads and glass beads to further embellish the crochet textures. Once I was finished with the embellishment, I used my hot glue gun to attach the fabric to the backing board.
My boys helped me come up with the name for this piece. It is “Spiral Hills Island”. I picked the colors for this piece by taking my color cues from a variegated hand-dyed yarn. I used the colors in that to help me select my solid colors and then picked some darker tones of the purples to act as dramatic contrast. I also used some of my collection of novelty fluffy yarns in this project to further emphasis the textural aspect.
If you want to try your hand at Free Form there really are no rules. Find some colors and textures of yarn that you like the way they look together and begin crocheting. It is a meditative exercise and the best bit is there is no wrong or right, though that can sometimes be the hardest part.
I seem to start most of my scrumbles with a circular or spiral motif, but you can start with any shape you like. I do recommend starting small initially and continuing to work on your scrumble until it is about palm sized. Remember to play and have fun with it. I’m hoping to find time to make quite a few more free form art pieces in the coming year. I love painting with yarn.
My last post was all about the CGOA conference in Charleston, South Carolina. This post is all about Jan and I being tourists in Charleston. If you get the chance it is a city well worth visiting, though I would recommend visiting in the spring or autumn when the weather is not blistering hot.
When Jan and I were planning our trip to Charleston for the CGOA conference she recommended that we tack on a couple extra days for exploring the city. She had been there before when another close friend of hers had lived in the area.
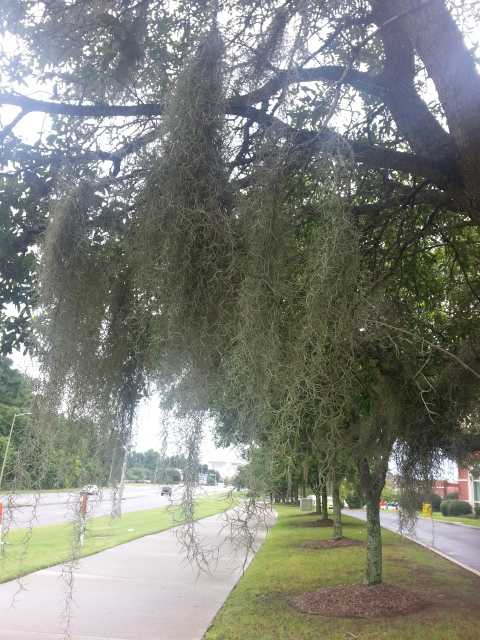
Spanish Moss in the trees along the sidewalk outside our hotel.
The conference ended Saturday evening so we were leaving on Tuesday afternoon. That gave us 2 full days to explore and enjoy Charleston. Unfortunately the weather wasn’t going to cooperate with us on Sunday. The day didn’t see much sunshine as it was over cast and heavy rain all day long.
Instead we spent the day hanging out with other CGOA friends in the hotel atrium as they slowly began their leave-taking for flights and drives home. Both of us had crochet projects to work on. I even helped Jan with untangling a ball of yarn that had decided to misbehave on her earlier in the week.
One of the few photos I took with a friend at the conference was this one of Tracee Fromm that Sunday before she left to catch her flight home.
It was fun to see our friends old and new. Some were actually leaving on Monday, so we were all enjoying a decompression day. That evening Jan and I walked over to Bonefish Grill one more time. After dinner we worked on getting a good start on packing up our suitcases. Neither of us stayed up very late that night, as we both wanted to get an early start on touring the city the next day.
After getting breakfast in the hotel we walked over to where we could catch an express bus to the visitor center in down-town Charleston. Our timing was great as a bus came about 3 minutes after we got there. Once we arrived at the visitor center we got some maps and picked up tickets for a carriage tour of the city.
I had been told by a Colorado friend that has family in South Carolina, to be sure to go by the Market to see the ladies weaving sweet grass baskets. In the Visitors Center was a display about these baskets as well as a lady weaving and selling her baskets right there.
Charleston has great transport for their city. Little Trolleys with routes that take you around to a number of the high points. Jan and I caught the one that would take us to the City Market where we could walk over to catch our carriage tour.
The folks at Old South Carriage had permitted the CGOA to yarn bomb one of their carriages during the week of the conference. Unfortunately Jan and I were too late to see that carriage, but we were able to get our discount on the tour package. When we got to the stable our names were added to the list and they told us our tour would be leaving in about 45 minutes.
Jan and I decided to go explore the City Market sometimes referred to as the Slave Market. We had overheard one of the Old South Carriage guides telling some other folks about the name “Slave Market”. It wasn’t where slaves were sold, it was where the slaves did the shopping for the households they worked in. In fact, the family that deeded the land to the city for the market to be built on, had stipulated that no human beings were to be bought or sold in the market or the land would revert back to the original family.
The market is still a busy place of commerce with lots of shops and stalls selling everything you could think of. It is a roofed building that stretches along 4 blocks of the city and has streets on the north and south of it. Appropriately those streets are called North Market and South Market. The photo above is the west end of the market. I managed to take this photo during our carriage ride, you can see it was a bit wet as a light rain storm had rolled in.
Jan and I explored the market for a little while, then headed back to the stable to begin our carriage tour. This is our carriage, I hadn’t realized how far off the ground the carriage put us until we finished the tour and I took this photo. We actually boarded the carriage inside the stables where we walked up some steps and entered the carriage from a platform.
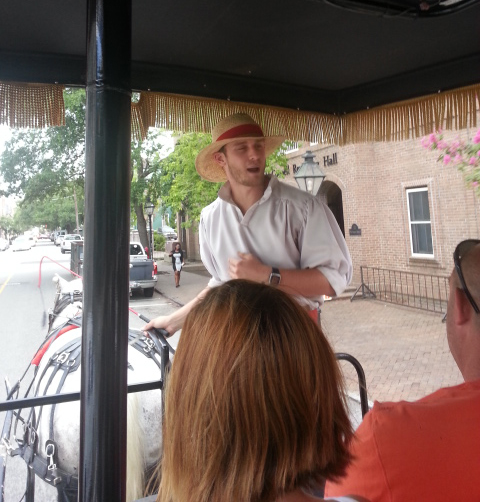
Our guide and the driver of the carriage was Elliot. He was very entertaining and informative about the history of Charleston and the buildings we were seeing.
This was our horse that pulled our carriage. His name is Bill 2, but he was called Bill by Elliot. He liked to splash the water from his trough, so I had to be quick to get this photo. Part of the information Elliot shared with us was Bill’s history and capability. Basically being a carriage horse in Charleston is a pretty good gig for these horses. Our carriage fully loaded was actually one quarter of the weight that Bill could pull, and had pulled at the beginning of his life when working as a draft animal on a farm.
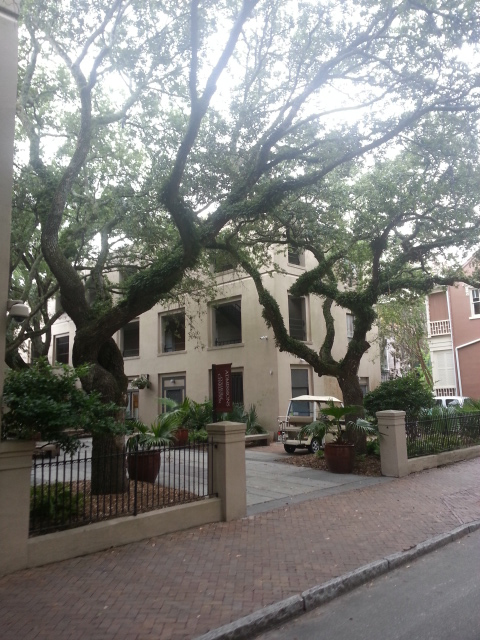
Our carriage tour took us around the area of the College of Charleston and then back along the Market. I was sort of inconsistent in my photo taking. Partly because being on the move made it trickier and sometimes there wasn’t a clear shot. I loved all the tree-lined streets.
I especially enjoyed the moss-covered branches weaving overhead. The vegetation in the area is so different from what I am used to here on the mountain and even down in the plains of Colorado. There is a lushness that goes along with all that humidity you just don’t see here in the West.
Elliot told us that Charleston is considered the 2nd most well preserved city in the world. First place goes to Rome, Italy. He said since Rome has over 2000 years on them, 2nd place isn’t too shabby. Everywhere we looked during the tour, and afterward when Jan and I were exploring on our own, there were interesting things to see. I particularly loved all the gorgeous ironwork gates.
The palmetto trees were everywhere along with flowering trees that I can’t recall the name of. I do remember that the ones called “white” had pink and purple blossoms, which was very confusing and amusing. Elliot told as about how Ft. Sumter was originally built from Palmetto trunks. The thinking being that the sponginess of the trunks wouldn’t break under the impacts of canon balls. When the revolutionary war happened the theory was tested and proved true. The soldiers in the fort came out and gathered up the British canon balls and, “Very kindly returned them to the British ships.”
After our tour was over Jan and I headed back to do some real shopping at the City Market. I wanted to get some sweet grass baskets and find gifts for my boys. The day was heating up a bit and we made a stop at a stall that was selling fresh hand-made lemonade. It was delicious and entrancing to watch the lemonade being made. Jan had watermelon lemonade.
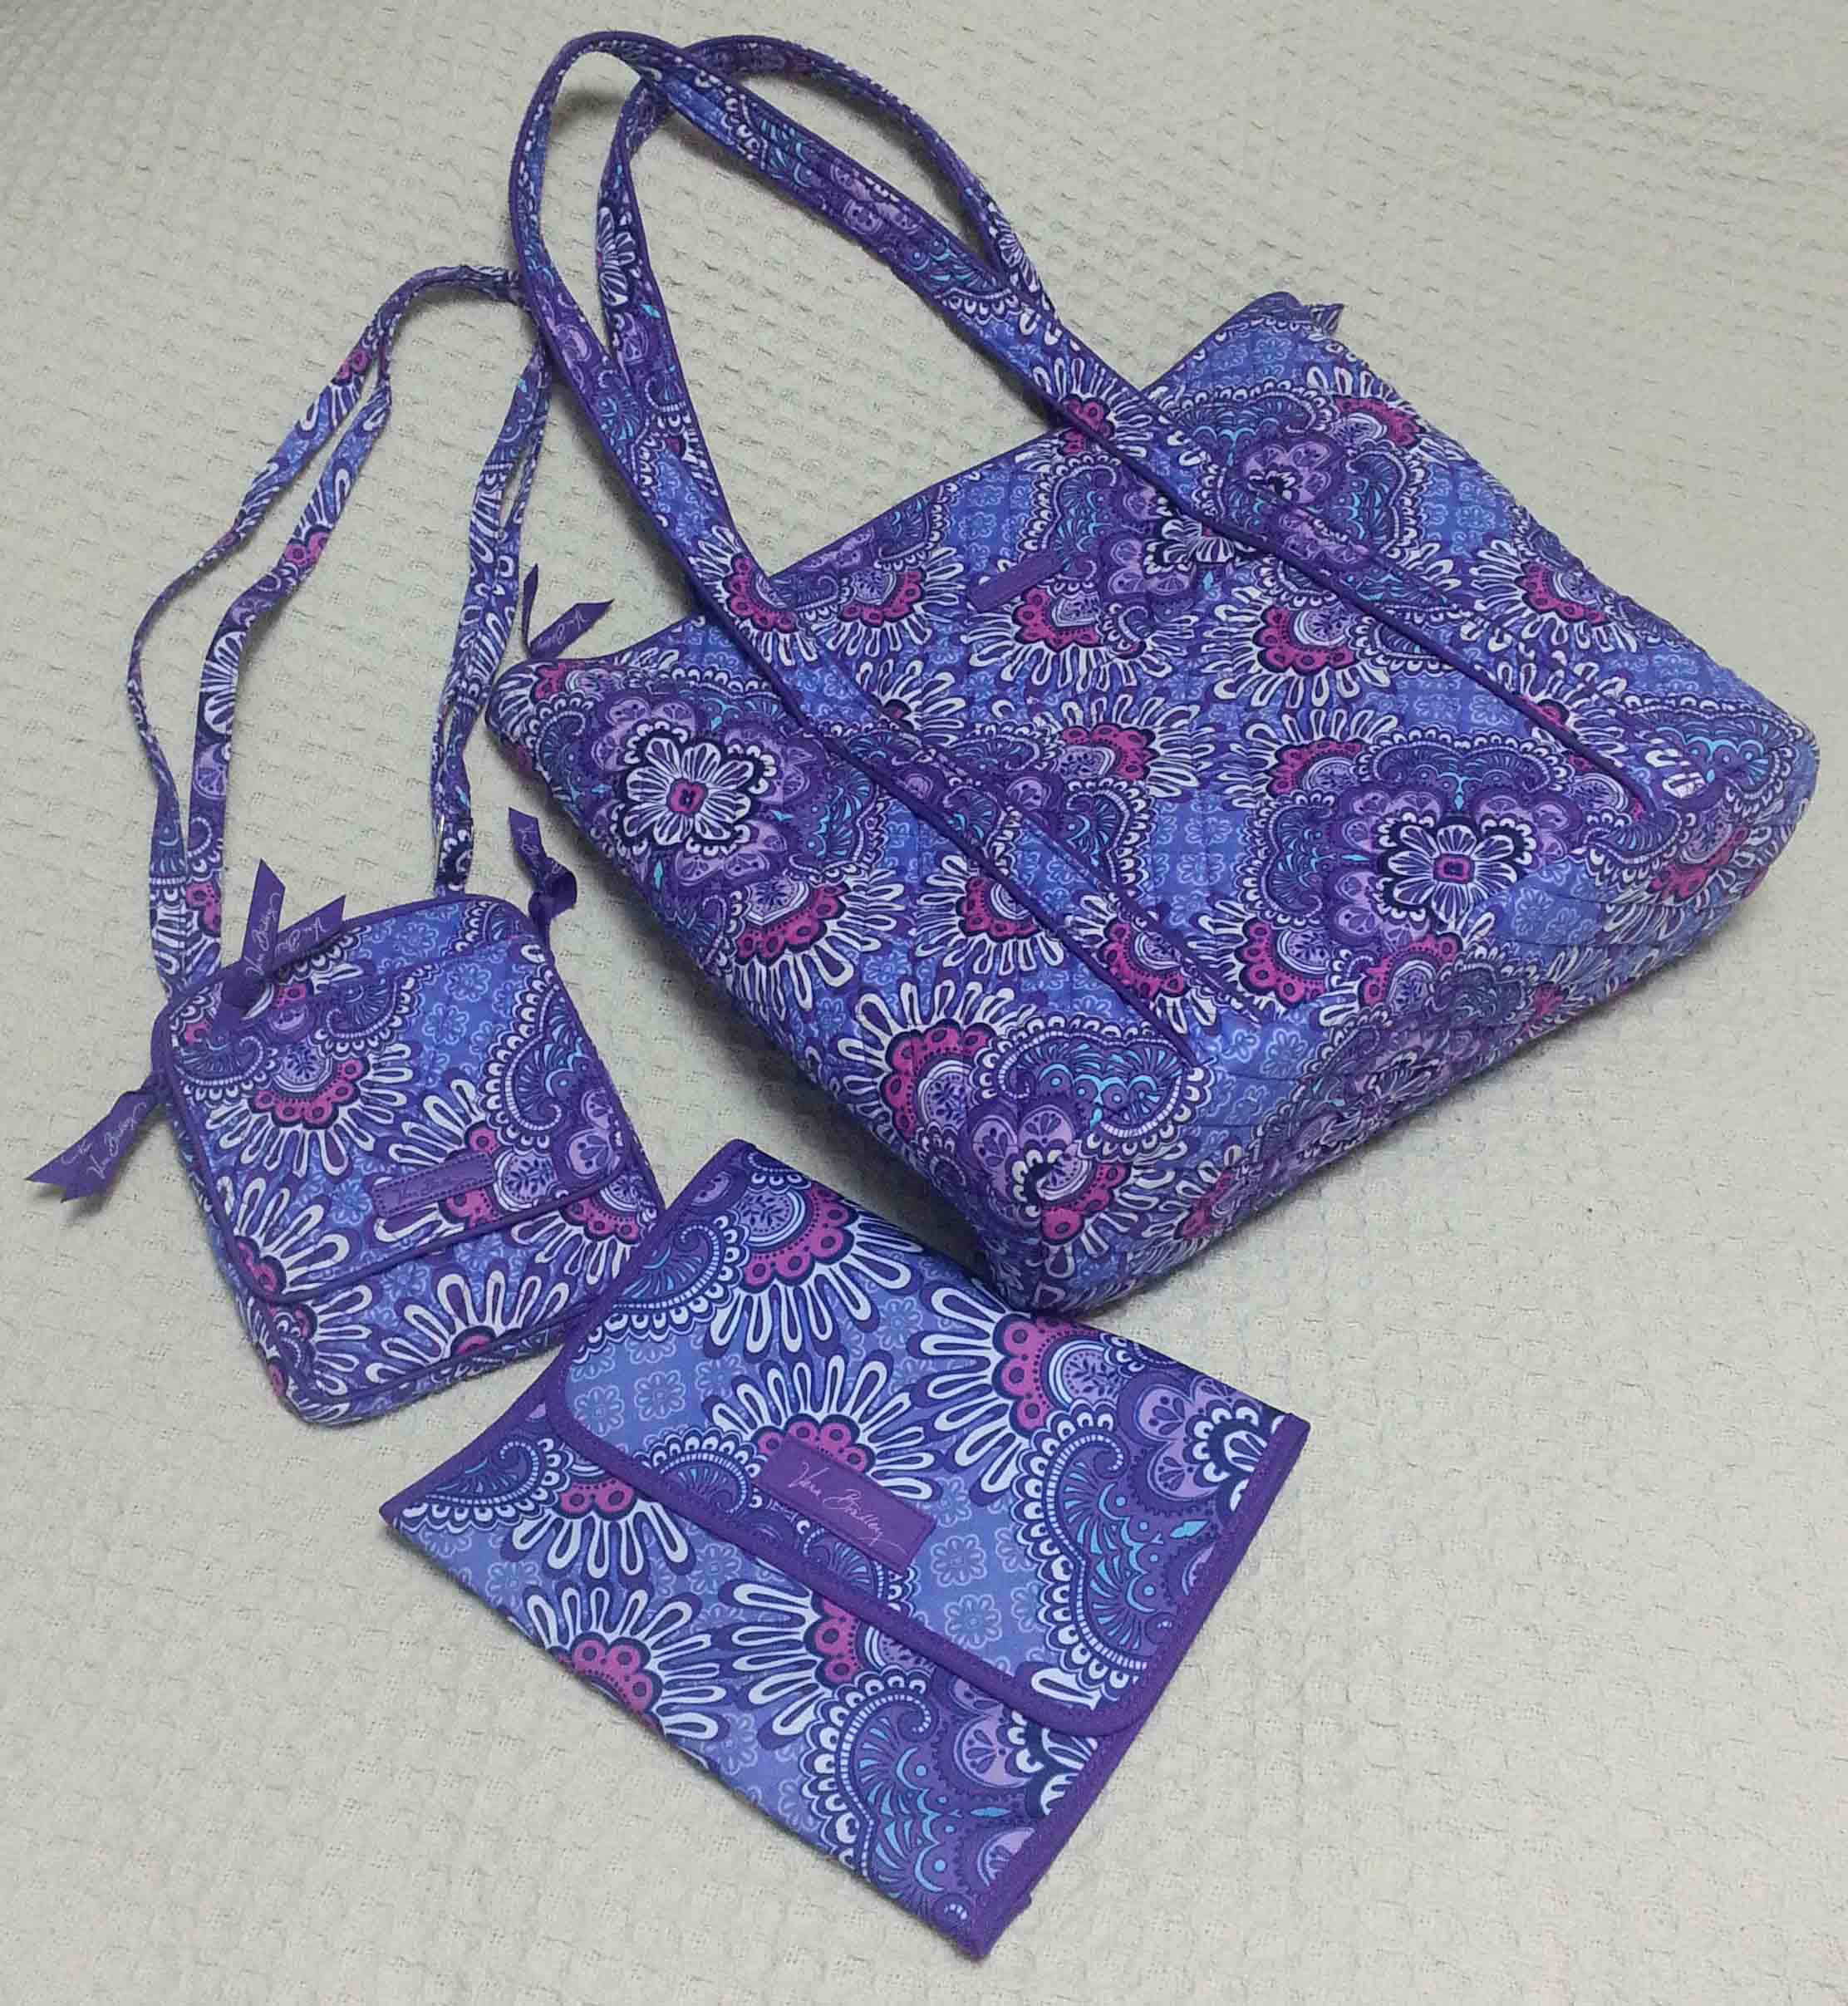
Different sections of the market were air-conditioned and in the first of these Jan and I spotted a little shop that had wonderful Vera Bradley bags and accessories. I fell in lust with this purple pattern as soon as I saw it. Turns out it was a brand new fabric release that week called “Lilac Tapestry”. The lady running the shop was very nice and was also a yarn wrangler.
Jan and I were discussing that the large bag would be great as a project bag, and the shop lady showed me the organizer that I could get when I spent $100 or more. I was hooked especially when she pointed out how well the organizer would work for holding stitch markers and all the other accoutrement that we yarn folk need.
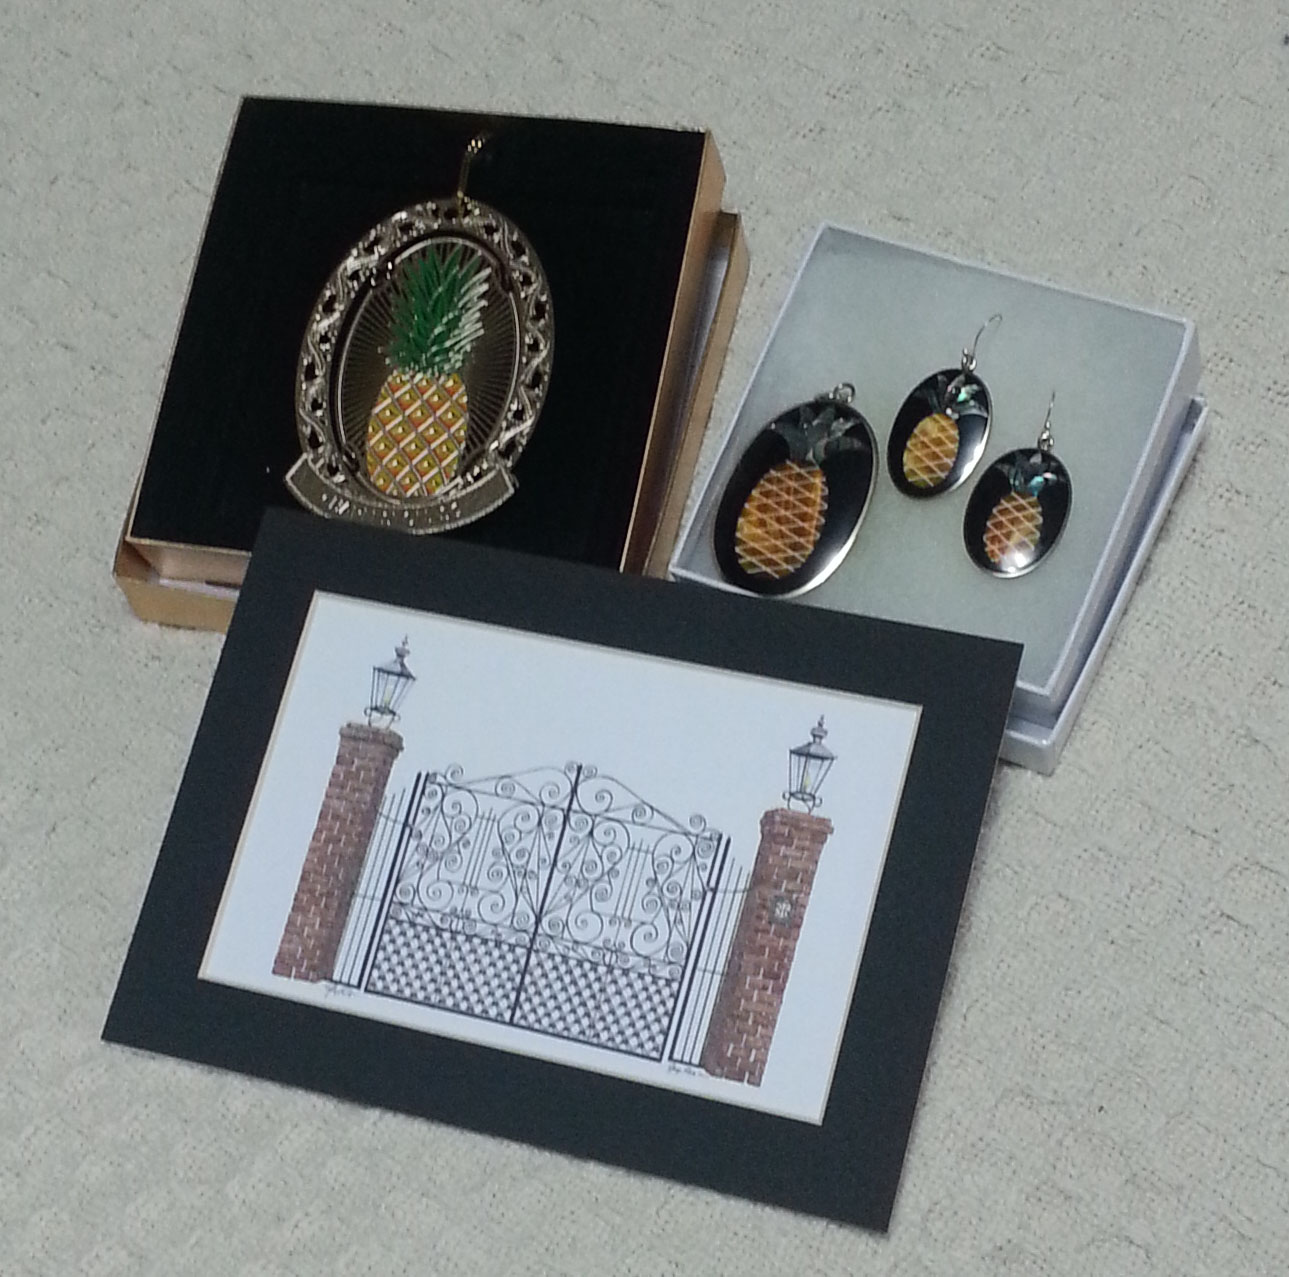
There were lots of stalls selling tourist items in the market. I spotted a stall that had lots of different T-shirts and decided to get one for each of my boys, plus one for myself. I also wanted to find a piece of jewelry that had pineapples on it. Pineapples are the symbol of hospitality in South Carolina and they were the theme for our conference there.
I finally found the pineapples I wanted at the Historic Charleston Foundation store. I really liked that the profit from these purchases would also help fund their organization. The pineapple ornament will look great on my Christmas tree this year and will remind me of the lovely city. The pendant and earrings were surprisingly light-weight and I loved the glimmering pau-shell that was used to make them. Last of all I purchased the small print of one of the beautiful ironwork gates in the city.
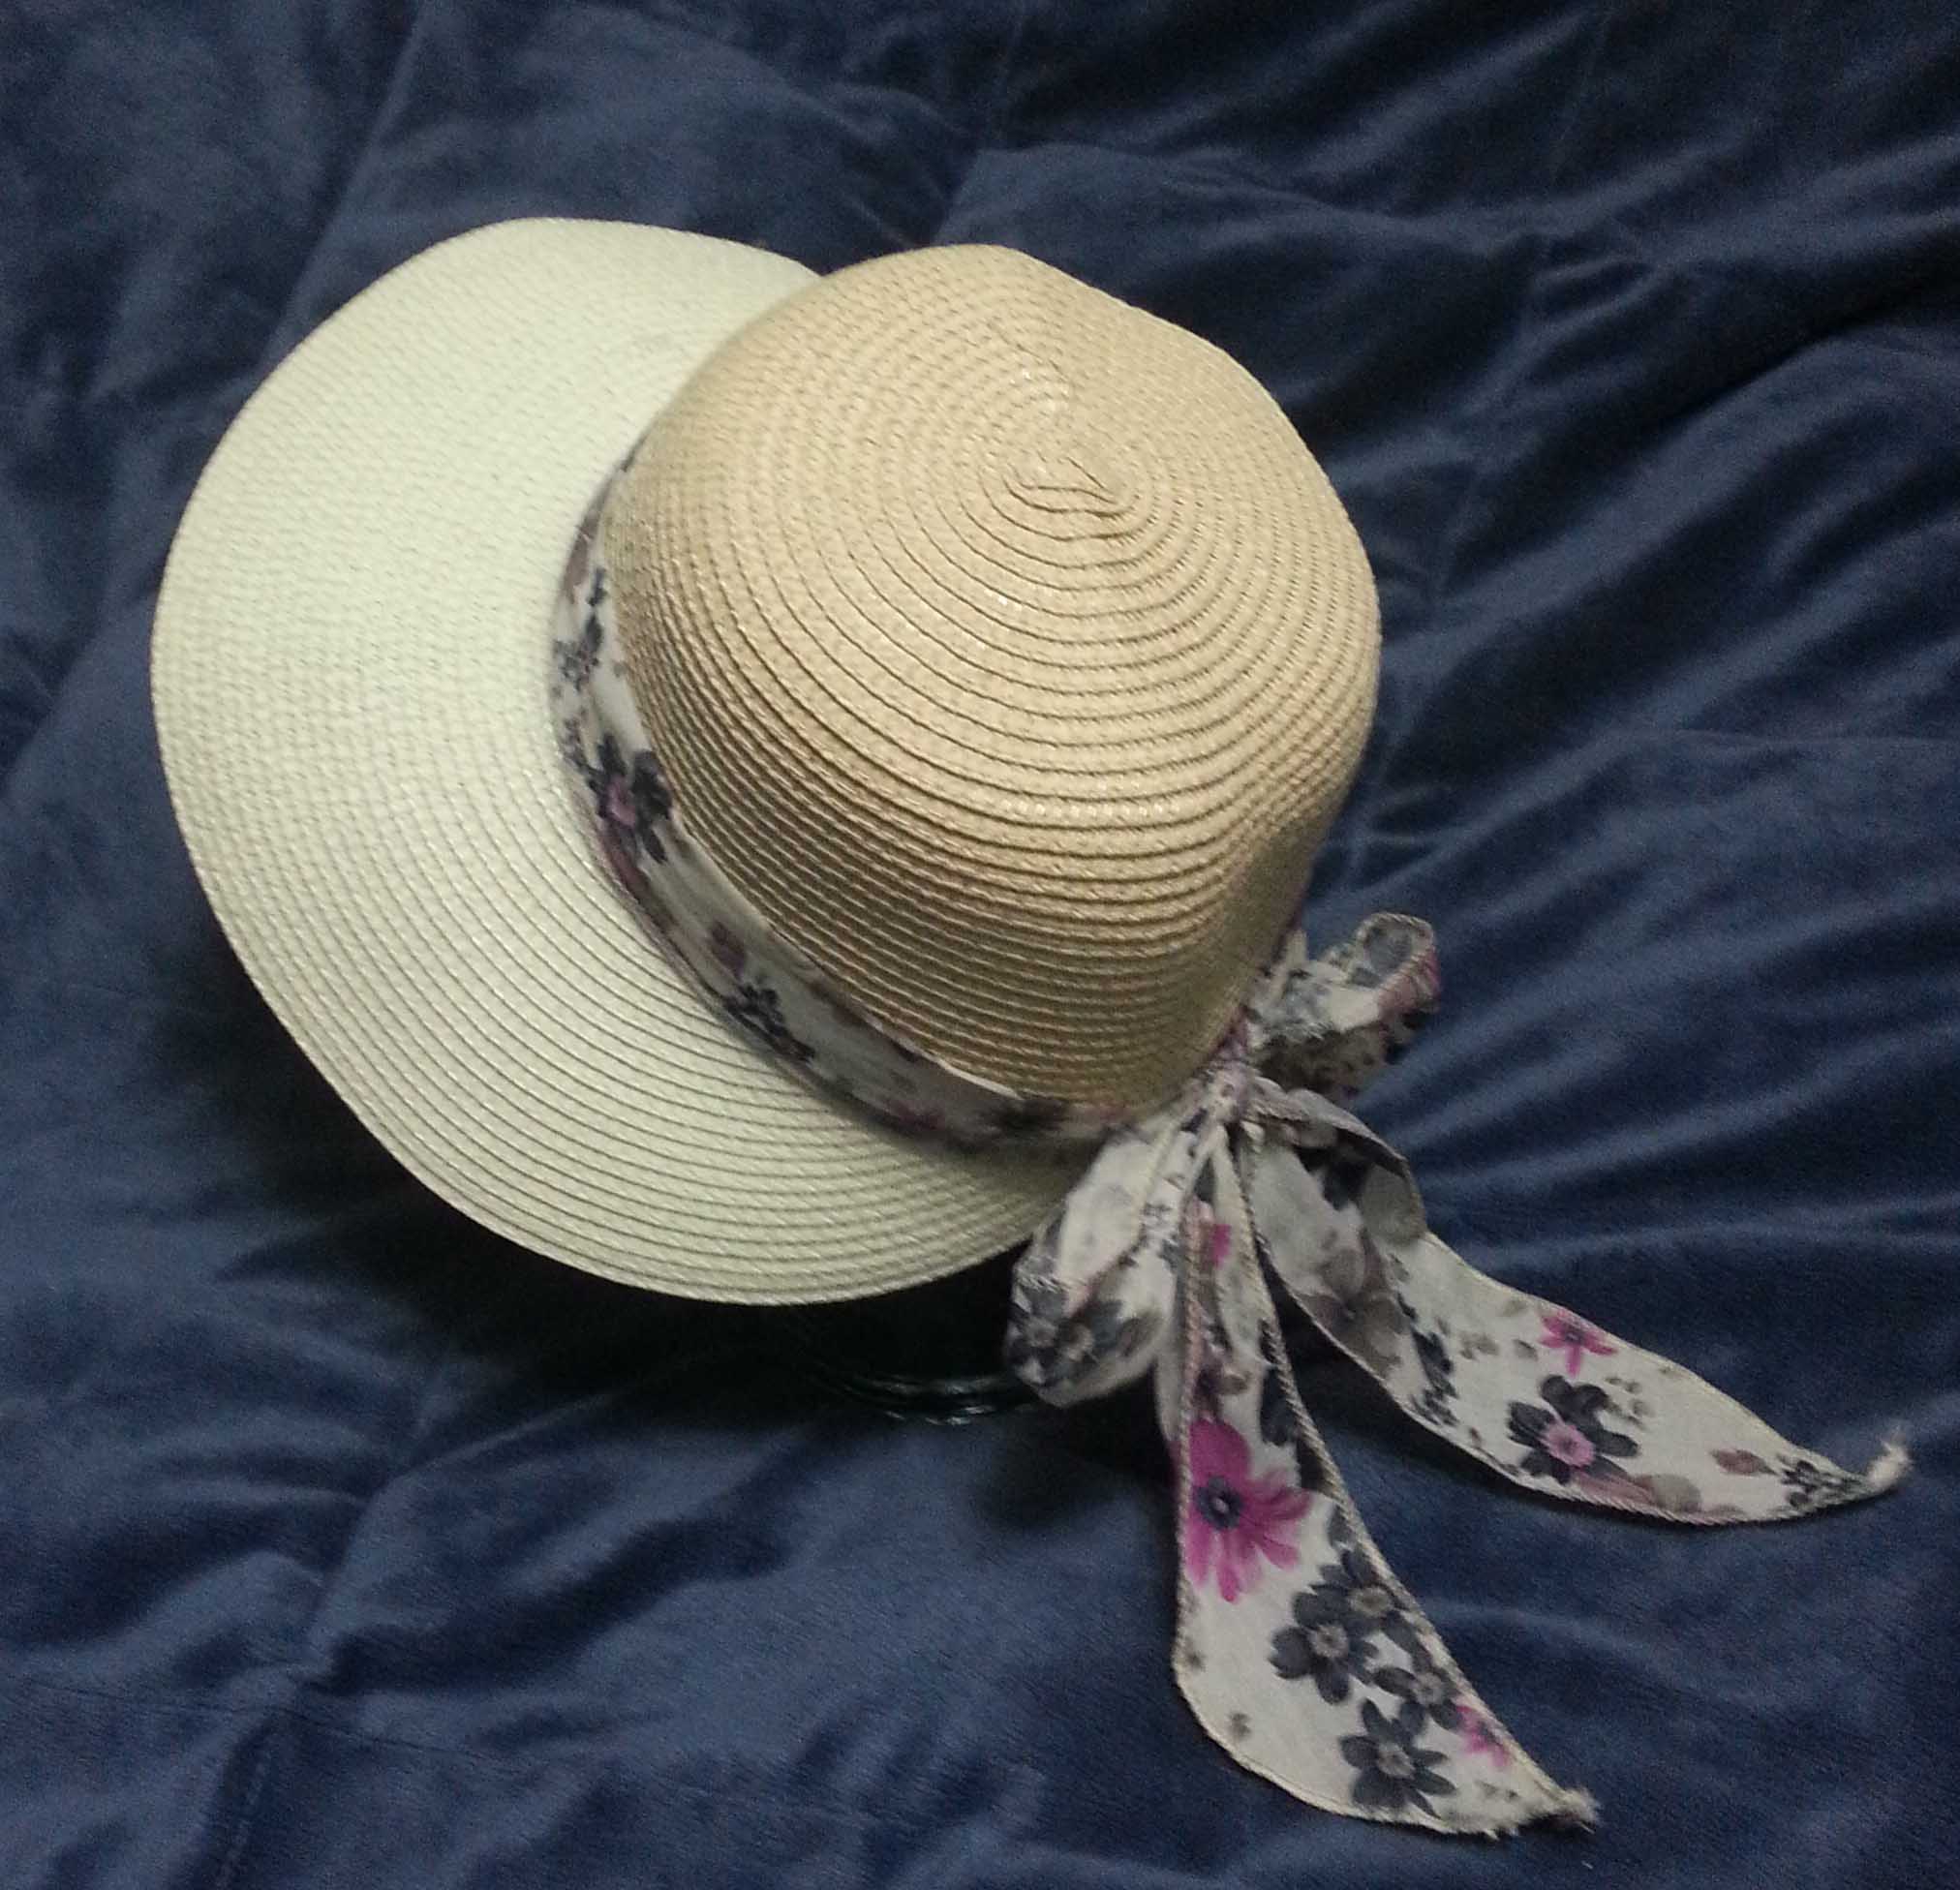
Then Jan and I decided we needed to finish up with the shopping part of our day and grab a late lunch. I still needed to purchase some sweet grass baskets so we headed back to my favorite shop we had found earlier. On the way there I was captivated by a stall that was selling hats. This bonnet style one made me think of 1920s style cloche hats, at $10 I couldn’t resist.
Finally we made it to the baskets again. I picked out a couple of small ones, some would be gifts for friends back home in Colorado. I loved a lot of the larger ones, but the price and the logistics of getting them back on the airplane kept me from adopting any. My favorite thing about them was the scent of the sweet grass and while I am writing this one sits on my desk holding paperclips and smelling sweet.
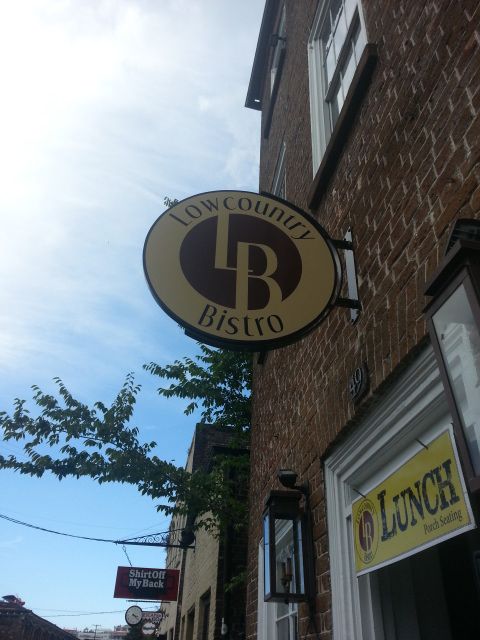
At this point Jan and I were definitely hungry so we went hunting for a local restaurant that would fit the bill. One of the very pleasant surprises on this trip was the number of restaurants that had lots of gluten-free options on their menus. We decided to go to the Low Country Bistro. Some other friends at the conference had eaten there and recommended it, and our Elliot from the carriage ride had too.
The air-conditioning when we walked in was quite welcome and our server kept us well supplied with cold drinks as we ate a delicious meal. My favorite part of my meal was the home-made potato chips. I did share with Jan, but it was a near thing.
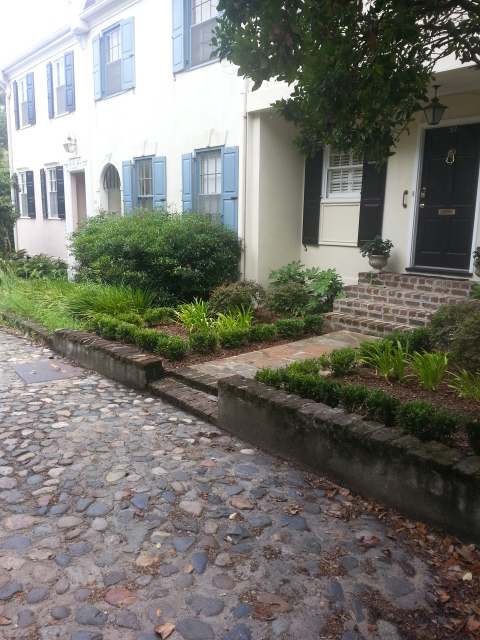
Old cobblestone street
After lunch we decided to do some exploring before we needed to head back to our hotel. Jan wanted me to see Charleston’s version of “painted ladies” which they call “Rainbow Row”. The folks at the Historic Charleston shop got us headed in the right direction. I wasn’t really able to get a good photo of them, but I took lots of other photos as we walked around enjoying the city.
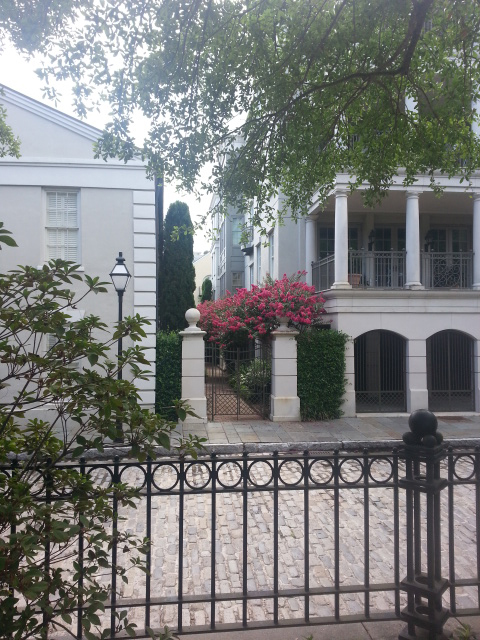
So many of the nooks and crannies in the city were intriguing like this gate to a little garden behind a building.
The historic touches were fun too, like the working gas lamps that framed this impressive doorway.
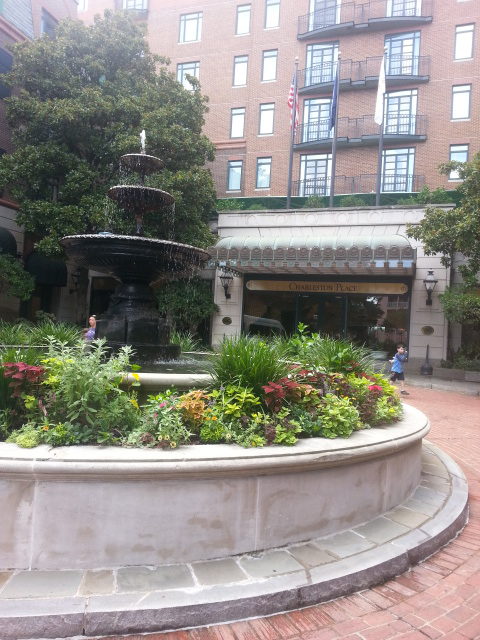
I really loved this beautiful fountain with flowers in front of the Charleston Place Hotel. We had seen it while on our carriage tour and managed to stumble upon it again while walking around the city. I couldn’t tell you what street it was on though.
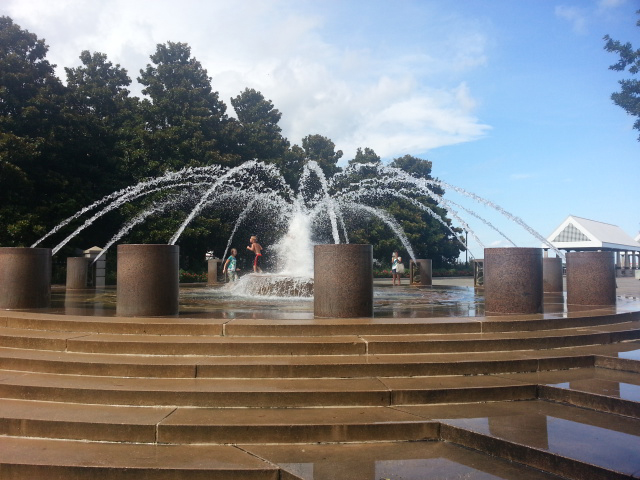
We ended our day in Charleston at the Waterfront Park. A beautiful area with lots of shade and fountains.
Jan and I walked out to the end of the pier to see Ft. Sumter better. That pink circle is around the island where I think it is located. It was difficult to really see and I hadn’t brought along binoculars.
We began walking along the Waterfront park path where we could see some fountains.
Even in the shade we were very warm, but it was preferable to the bright sunshine. I did like the look of the contrast in this photo though.
There were lots of beautiful gardens alongside buildings on the street beside the park pathway.
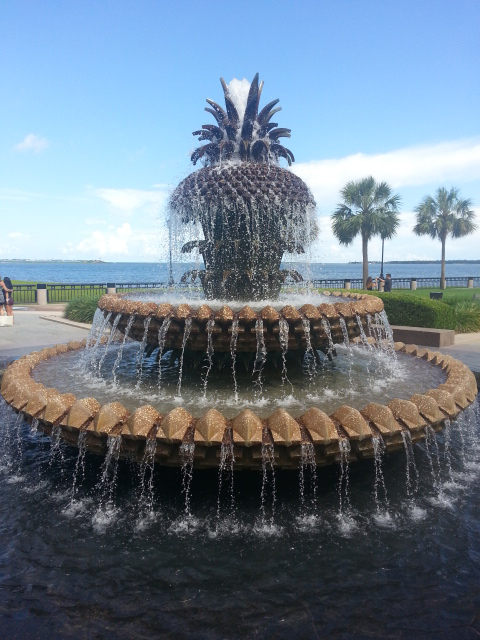
Of course I had to have a photo of the big Pineapple Fountain.
The whole Waterfront Park area seems to be designed with families in mind. This fountain in particular was popular with children running in and out of it. If I had been dressed appropriately for it I might have joined them as I was very hot at this point in our wanderings.
My last photo before we caught our trolley ride back to the Vistor Center was this lovely gate with a Crane on it. I hope you enjoyed seeing some of the highlights of Jan and I’s adventures in Charleston.
I’ve been a busy gal since my return to Colorado. The boys are headed back to school in less than 2 weeks and suddenly our summer break seems to be speeding by. I’m also getting ready for teaching at the Scotts Bluff Valley Fiber Arts Fair in early September.
As part of that I’ve been working on a Free Form Crochet art piece for the Fiber Arts Show that is on display in Mitchell, Nebraska for the month before the fair.
With all this stuff keeping me busy I’ve been having a difficult time getting back into my twice a week posting here on the blog. Hoping to correct that in the next week. Thanks for stopping by.