Hello my dear readers. May has been zipping by and I can’t believe there are only 2 weeks left of the school year for my kiddos. This summer is already beginning to look very busy. Between fiber arts conferences and family trips I’ll be on the go pretty much non-stop.
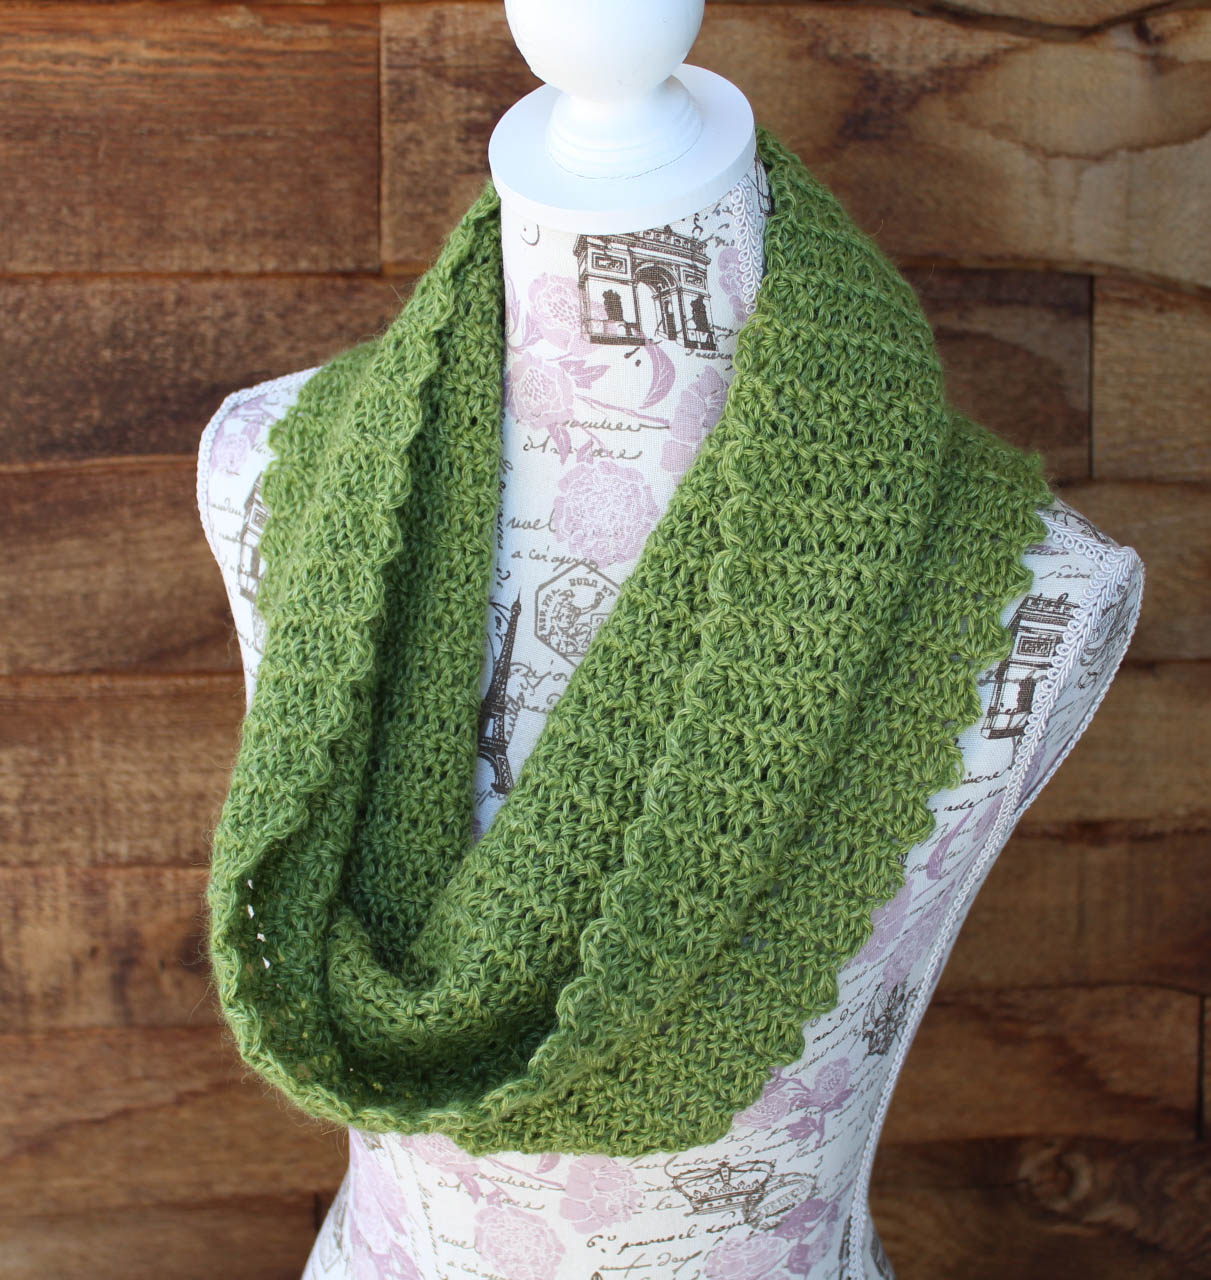
This is my newest design the “2 by 2 Cowl”. I wanted to start the summer off with a fun pattern for everyone that doesn’t take a lot of yarn and is relatively small to have in your hands or lap when the temperatures start to rise. It uses only 1 skein of Lion Brand’s “Heartland” yarn with a size J hook.
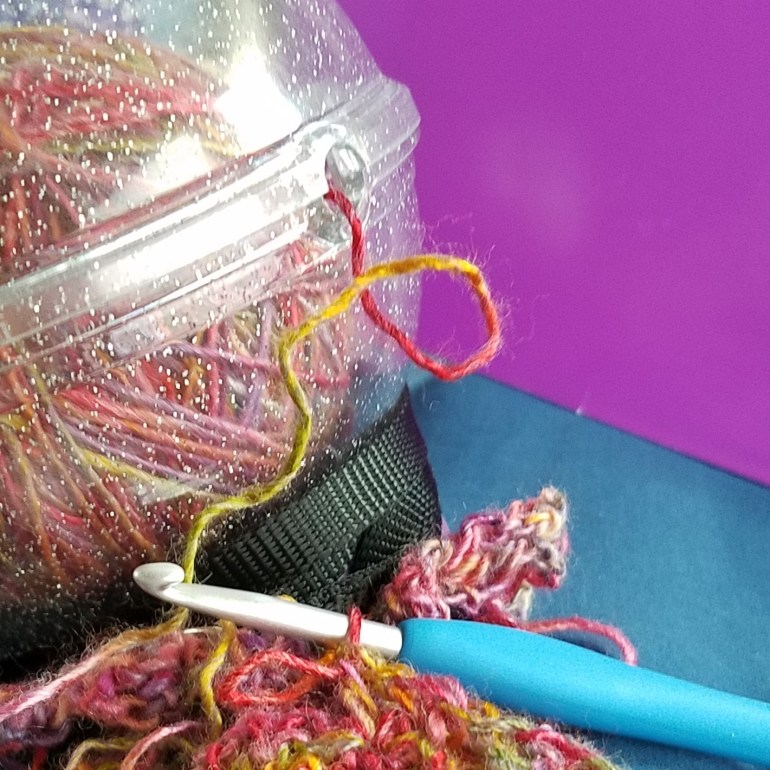
This was all that was left of my skein of yarn when I finished the sample, just 5 grams or a little under 9 yards.
I start this cowl with my favorite foundation: Stacked Rows. If you need a little help with understanding how to work a stacked rows foundation I created a video to help you. You can find it here on my YouTube Channel. For those of you that are ready, let’s jump right into the pattern.
2 by 2 Cowl
Designed by Andee Graves
Skill – Easy
Stitches you need to know: Chain (ch), Double Crochet (dc), Single Crochet (sc), slip stitch (slip st)
Finished size: Approximately 14” wide x 34” around (35cm x 85cm)
Materials
Yarn: Lion Brand Yarns “Heartland”; 100% Acrylic, 142 grams/5 oz, 230m/251 yards. (sample was made with 1 ball of color #147 Hot Springs)
Hook: J-10/6mm, or size needed to obtain gauge
Blunt yarn needle
Gauge:
6 rows and 16 stitches in pattern = 4” (10cm)
Pattern Notes
Foundation is worked in stacked rows to create a scalloped and elastic circle that the rest of the cowl is built off of.
Body of the cowl is worked in joined rounds off the straight side of the stacked row foundation. Look for the hole at the base of the double crochet rows to find the single crochet row to work into when crocheting Round 1.
Instructions
Foundation:
Row 1: Ch 2, sc in 2nd ch from hook.
Row 2: Ch 3, turn, 2 dc in sc.
Row 3: Ch 1, turn, sc in first dc.
Rows 4 – 65: Alternate repeating Row 2 and Row 3
Row 66: Repeat Row 2, join strip of rows into a circle without twisting, slip st to base of Row 1. {33 Scallops, 33 sc rows}
Body of Cowl:
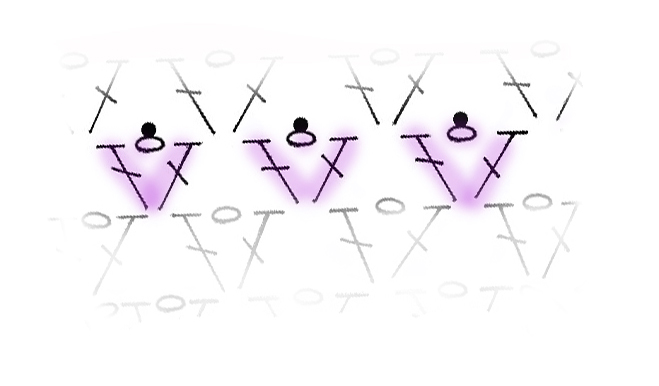
Rnd 1: Turn to work along straight side of foundation rows, ch 3 {counts as dc here and thru-out pattern}, dc in side of first sc row, *skip next dc row, ch 2, 2 dc in side of next sc row; repeat from * until work in last sc row of foundation, ch 2, slip st to top of beginning ch-3. [66 dc, 66 ch-2 sp]
Rnd 2: Turn, (loosely slip st, ch 3, dc) in first ch-2 sp, skip 2 dc sts, ch 2, 2 dc in next ch-2 sp; repeat from * until work in last ch-2 sp of previous row, ch 2, slip st to top of beginning ch-3. [66 dc, 66 ch-2 sp]
Rnds 3 – 21: Repeat Row 2.
Rnd 22: Do Not Turn, ch 1, *sc in first dc, ch 2, 2 dc next dc, skip next ch-2 sp; repeat from * until work in last dc of Rnd 21, slip st to top of first sc of Rnd. Fasten off
Weave in all loose tails. Gently block if desired.
I’ve been spending about half my crafting time with needle felting lately and discovered that some of the fiber I purchased from Brown Sheep looked like pencil roving. I’ve crocheted with pencil roving before, and thought this might be a good way to create some felted fabric that could become part of one of my felting projects.
The last time I felted crocheted pencil roving I made this little bowl. After felting it I embellished it with some novelty yarn around the opening and added beads.
It was crocheted in the round with single crochet. For this experiment I wanted to make a flat piece of felt.
I used one of my favorite crochet stitches, the Half Double Crochet (hdc), with my largest Clover Amour hook (size P/Q 15mm). I’ve found the hdc to be one of the best stitches in crochet to felt. I decided to work it in continuous rounds to allow for the fabric to contract evenly as it is felted.
I like the way the hdc looks from the back as well. In the continuous rounds the back bar on the hdc stitch creates a pleasing spiral. The size hook I was using worked well with the size of roving that I had found in the bag of fiber. But I had to create a bit more “pencil roving” to finish the fourth round as I was crocheting. My finished circle was just a little under 10″ in diameter.
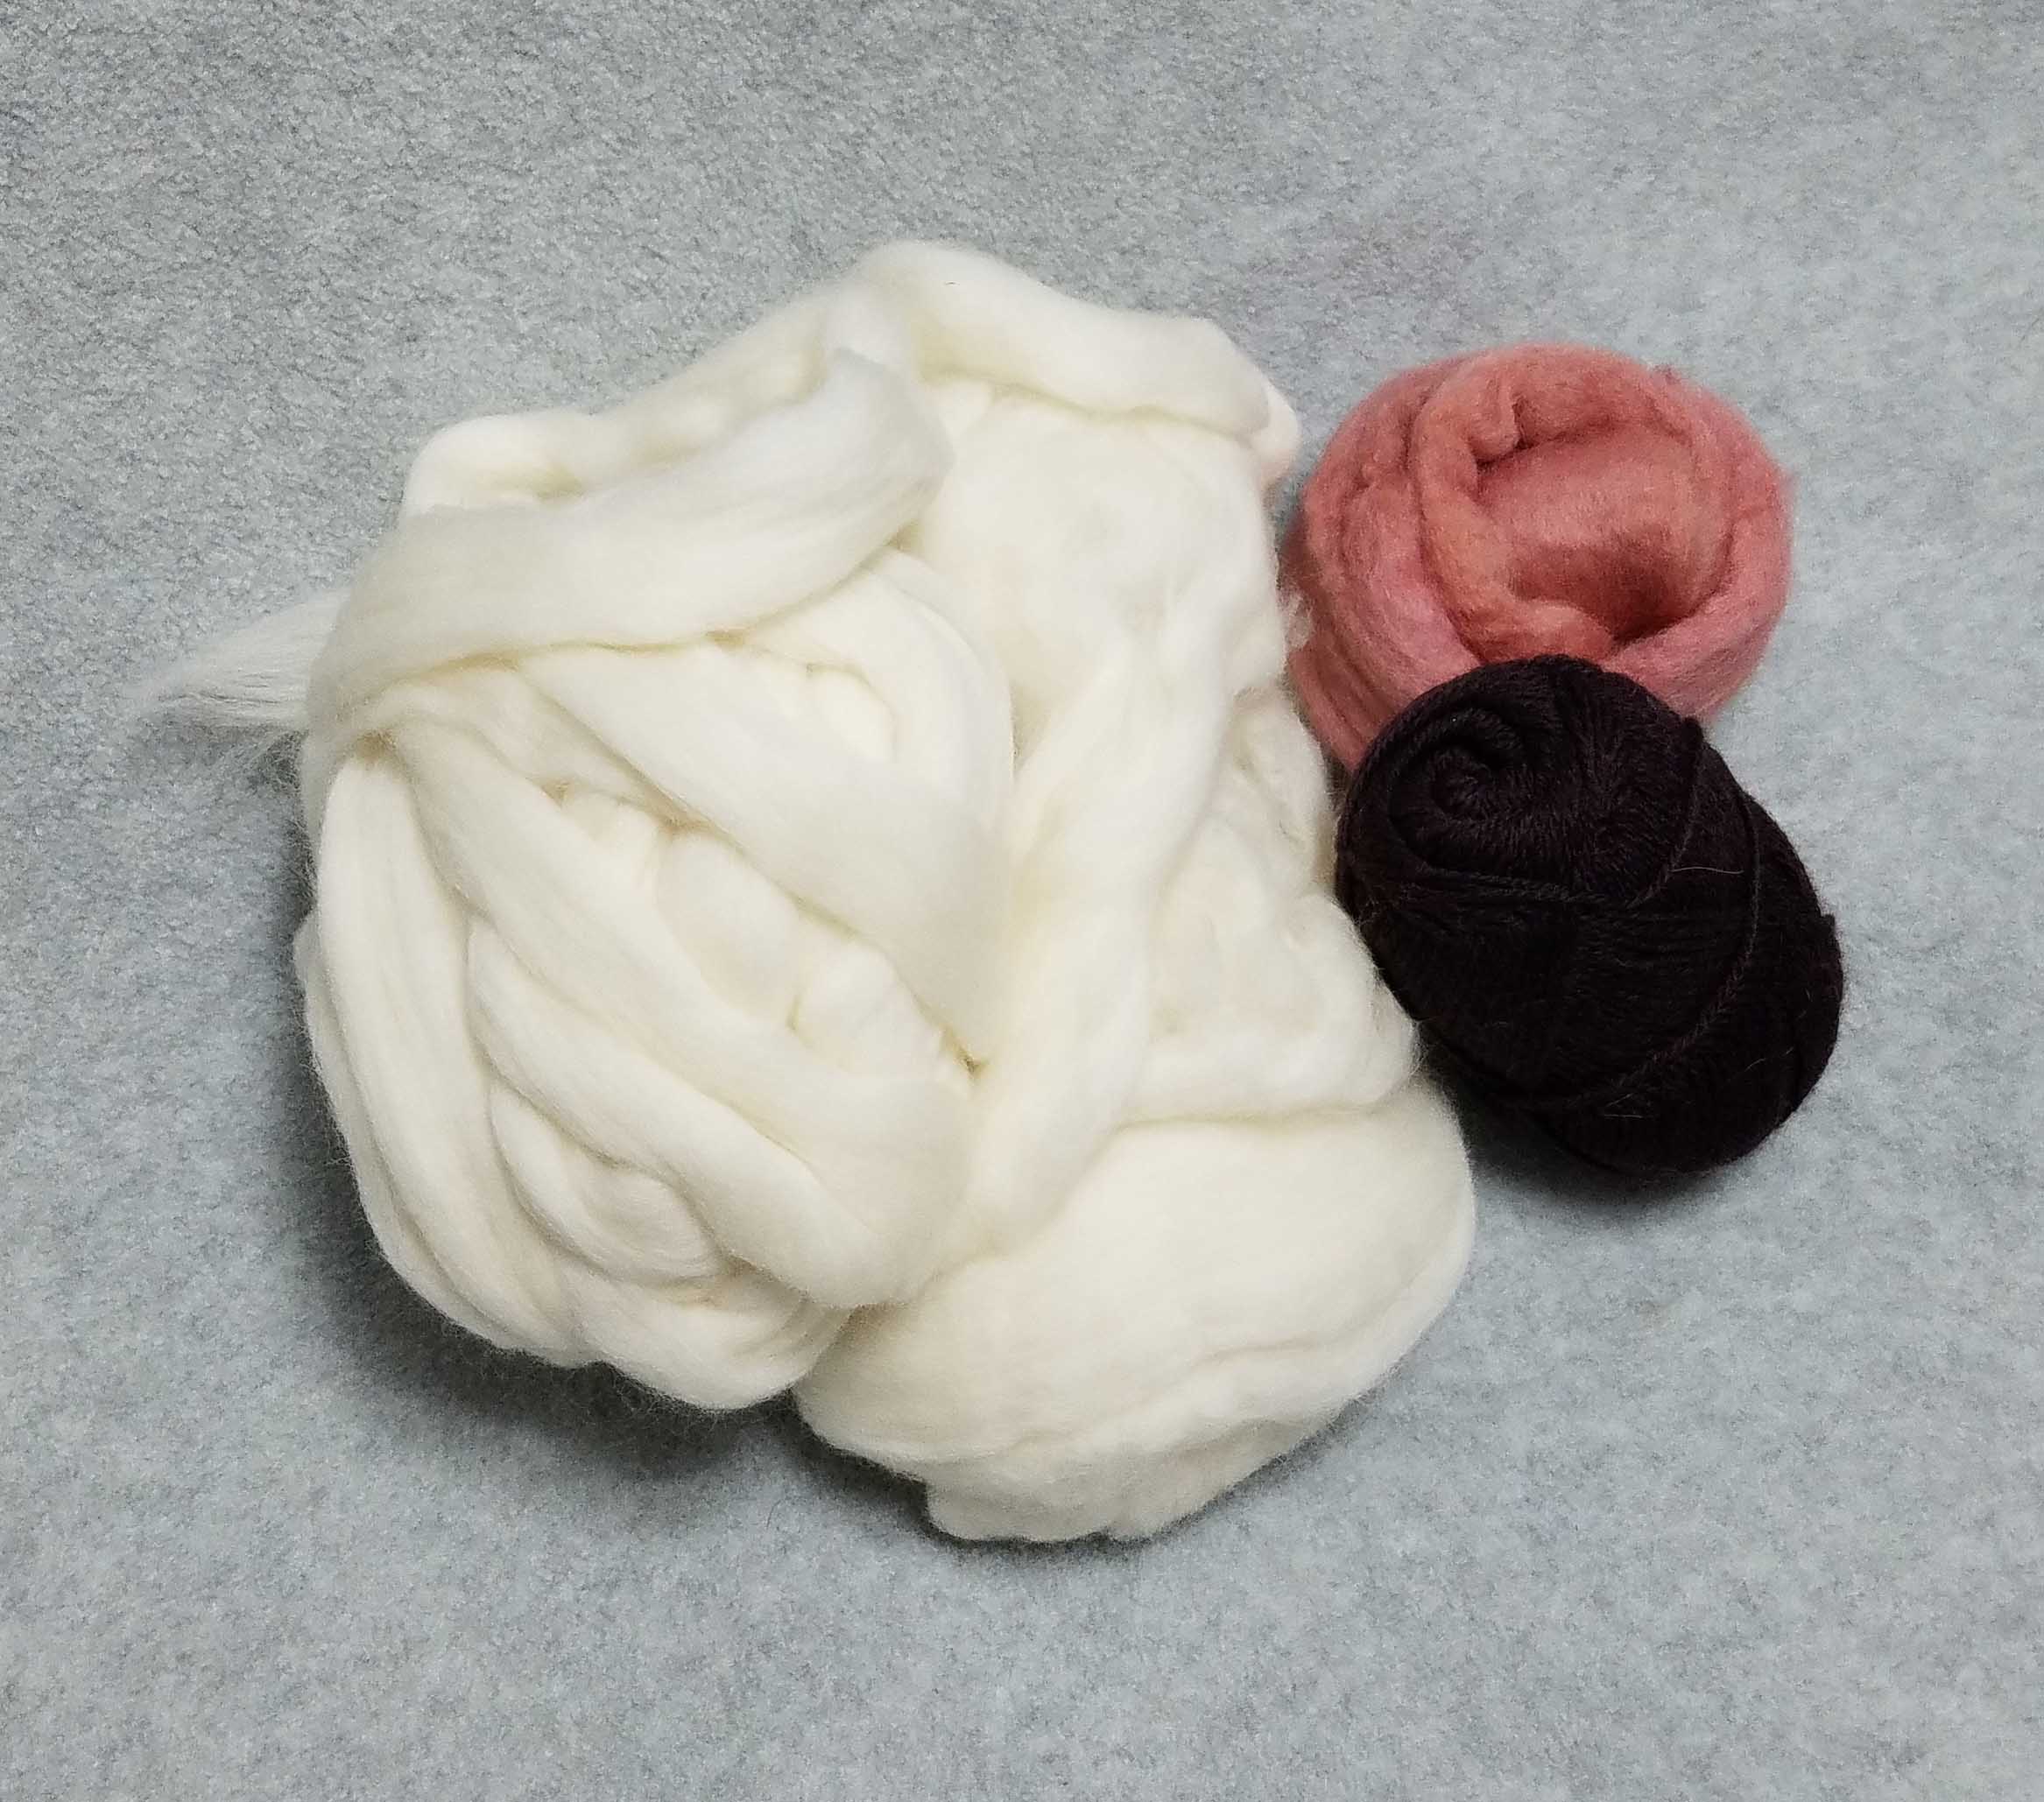
This is the ball of wool top pencil roving that I was working with for the bowl. I used about half this ball to make the bowl. That gives you an idea of how quickly you can use up your pencil roving.
Crocheting with roving is an interesting process, there is no twist to the strand so the act of crocheting actually creates the twist. If you are wanting to crochet with pencil roving and not felt it, I recommend that you use the smallest hook you can comfortably crochet your fiber with.
Working with a smaller hook when crocheting roving means that your finished fabric will be more durable. If I didn’t felt the circle I had made it would not have stayed nice for very long. I loved the squish factor of the finished fabric, but the twist I had created would not have stood up to normal use.
I do have a dream of making some really cushy house slippers crocheted from pencil roving. Just need to acquire enough yardage of roving to experiment with. I think with wearing, the roving would felt a bit, so I might need to make the soles double or even triple thickness. I may need to make the first pair of slippers for one of my great nieces or nephews, they have much smaller feet than anyone else in my life currently.
I’ll share a bit later with you about my experiments with felting my crocheted pencil roving circle. Things got a little bit messy and a whole lot of crazy.
The last time I wrote about crocheting with plarn was nearly 7 years ago. I had made the basket pictured above using the green bags that our local newspaper was delivered in. That was my first experiment with working with Plarn. Then life got busy with designing crochet patterns for magazines, books and yarn companies and I didn’t re-visit the Plarn experiments I had hoped to do.
For those of you that may not have ever heard of Plarn, it is yarn that is created by using loops or strips from plastic shopping bags. But it can be created or upcycled from other plastic materials.
This past weekend was super busy at my house. My youngest son was celebrating his birthday by having a bunch of his friends come up for a Nerf Gun Battle on our property. For those of you that are visiting my blog for the first time, I live in the mountains of Colorado and our property is about 2.5 acres of vertical land with lots of Lodge-pole and Ponderosa pine trees. A great place for a bunch of 11 year olds to romp and play.
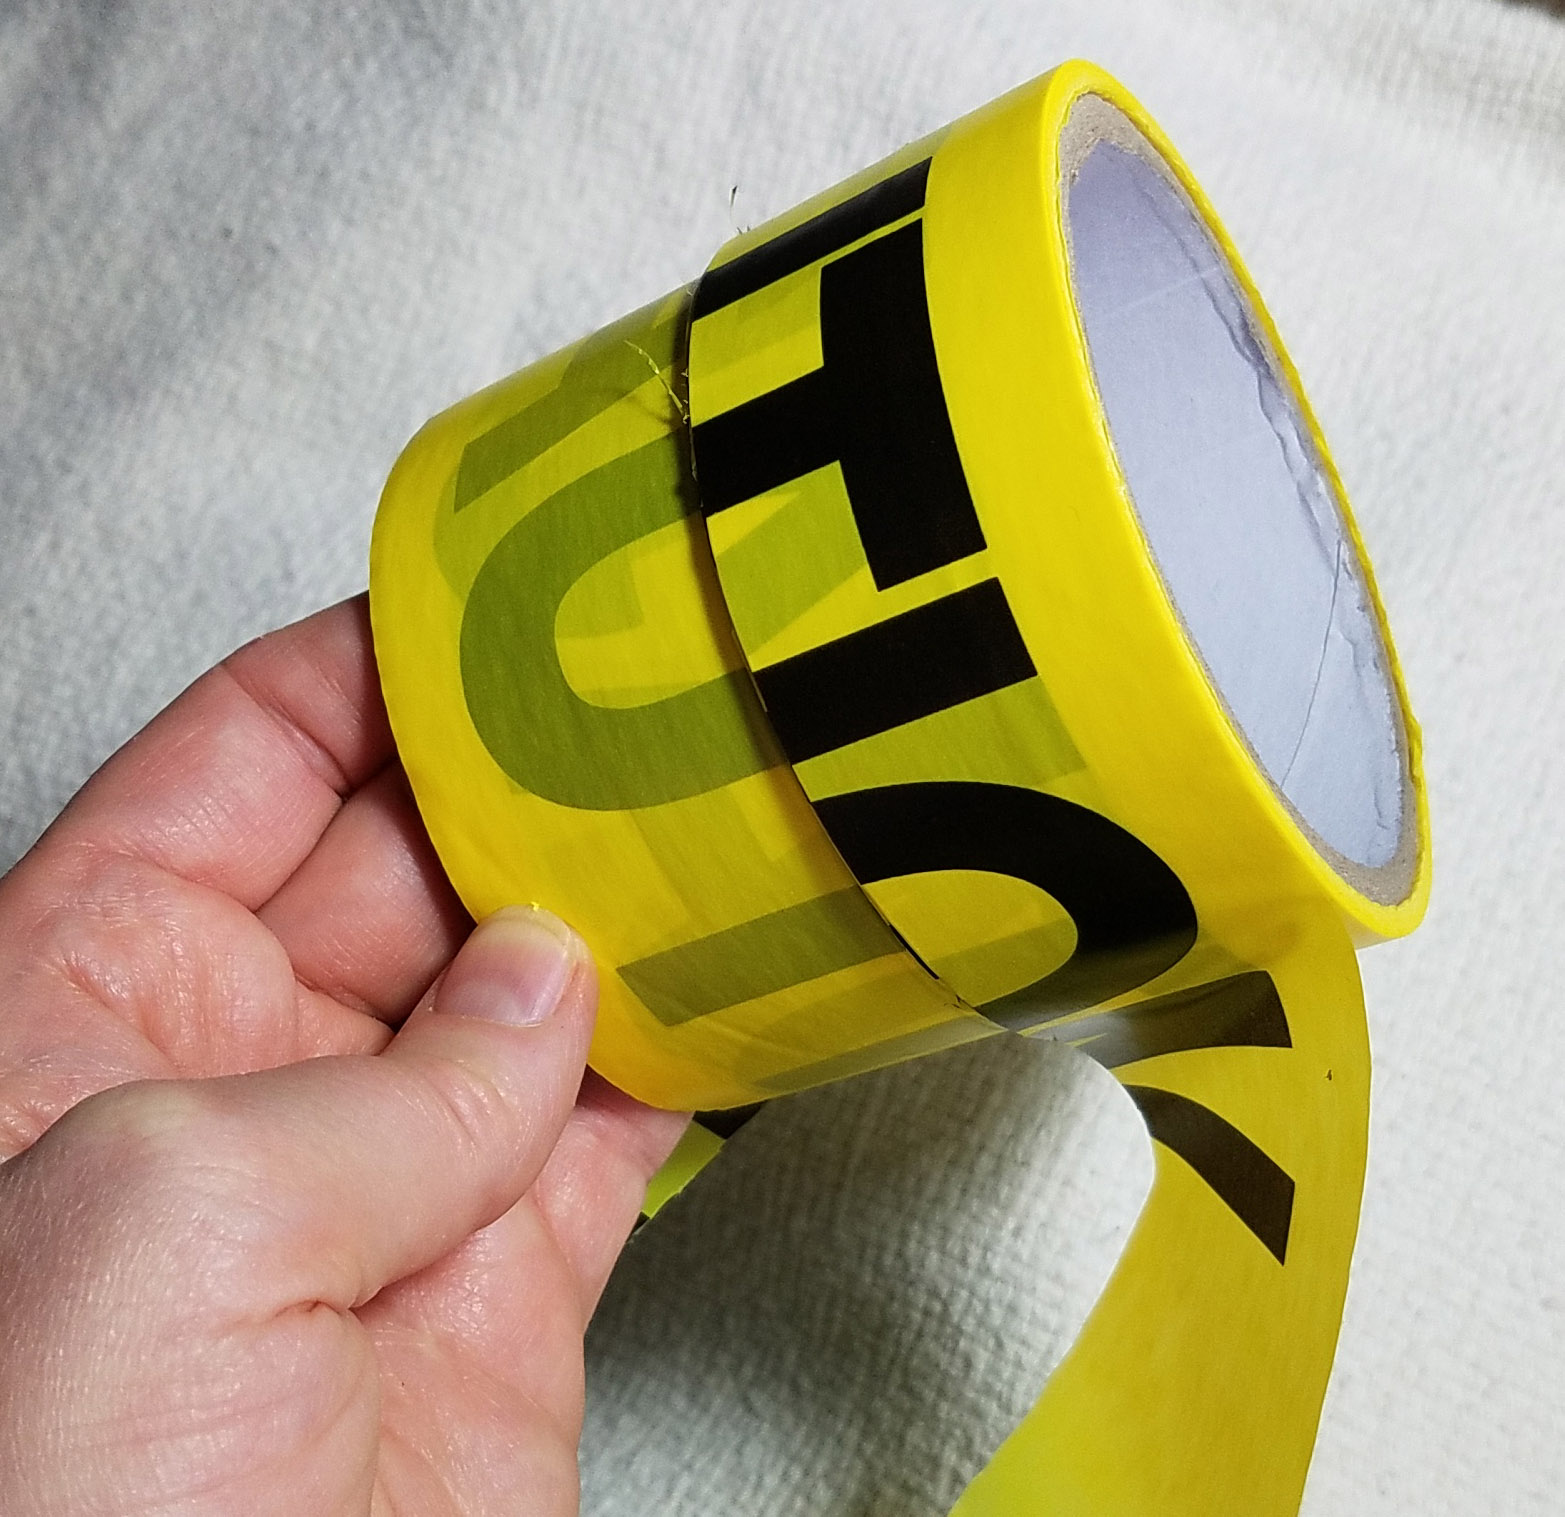
Our property is bounded on 3 sides by the county road, but our wooded boundary is a little less defined. As a courtesy to our neighbors in that direction we put up a “Caution” tape barrier to remind the kiddos not to pass that. The birthday boy and I spent the morning putting up the tape. After the party I went out to take down the tape.
As I began walking along unwrapping it from trees and winding it into a big ball, I found myself looking at it and thinking, “This would be interesting to crochet with.” I also hated the idea of putting it in the trash to be more plastic in the landfill.
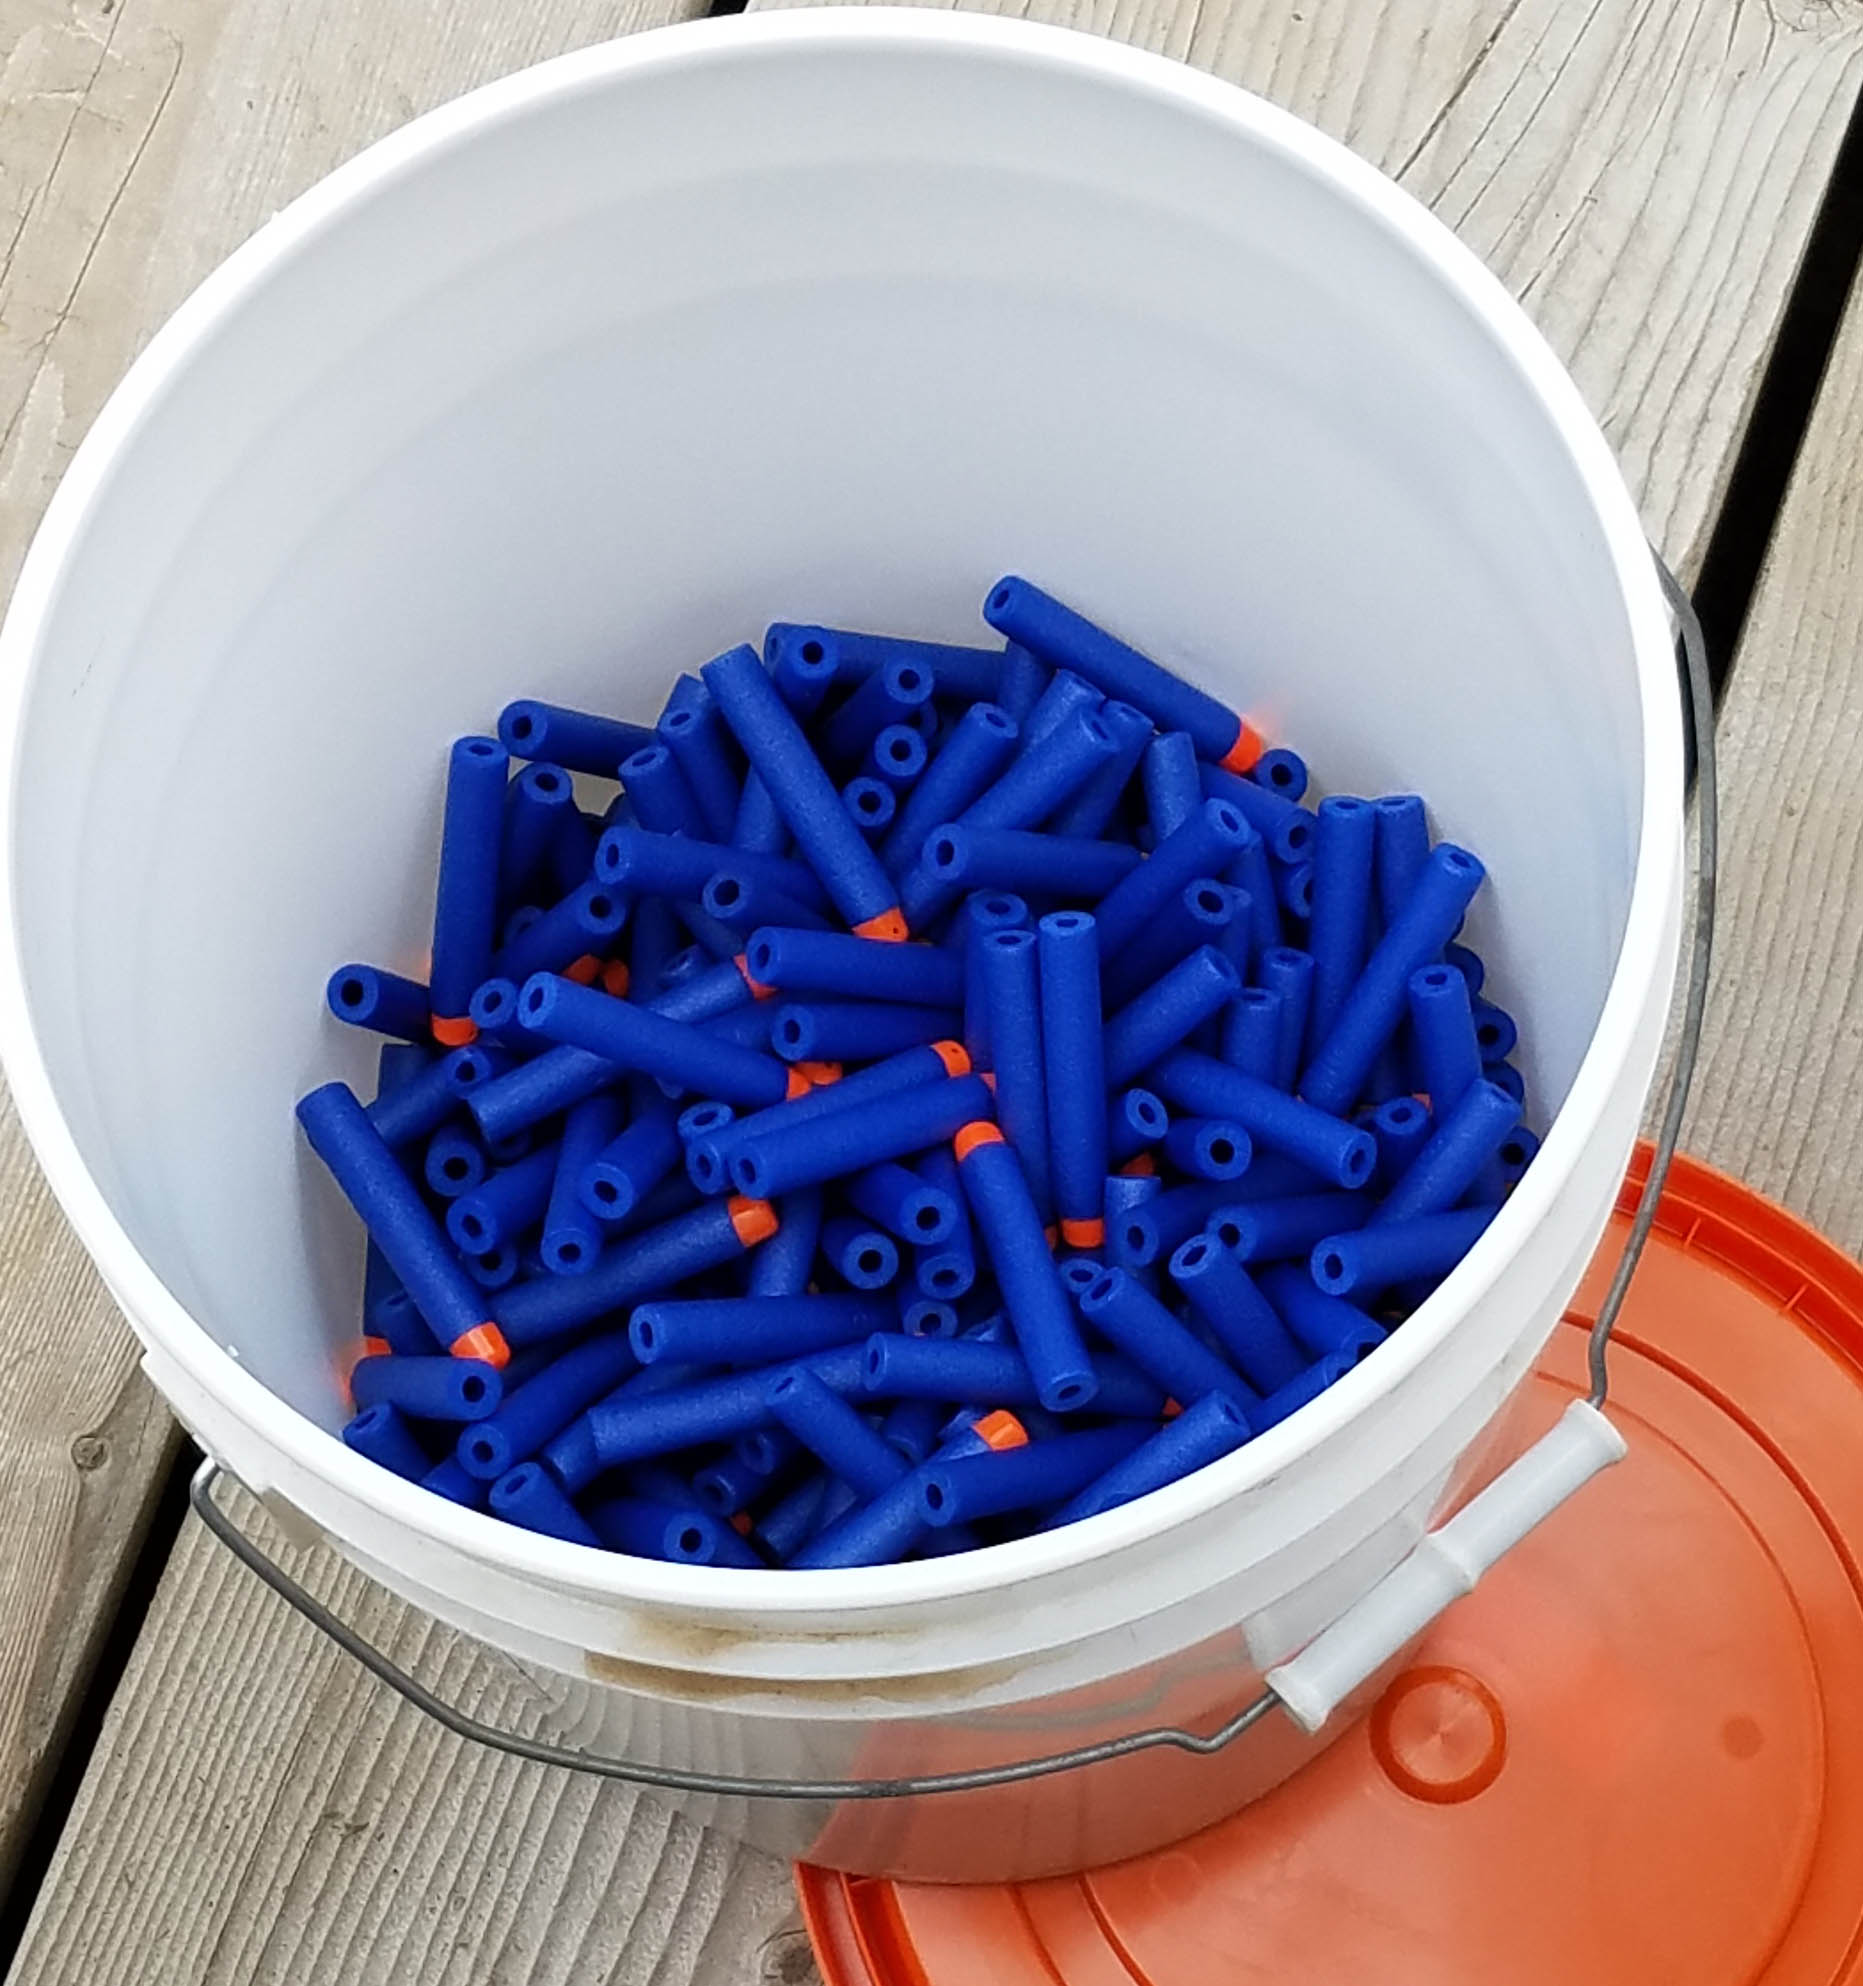
Part of the party set-up was that my husband purchased a bunch of the Nerf “Elite” darts for everyone to use. We now have a LOT of darts at our house. During the party I had tossed all of them into a 5 gallon bucket from a construction supply store. Frankly it’s a lot more container than is really needed. Lightbulb moment… I could crochet an awesome container for them from the used “Caution” tape. You saw that coming, didn’t you?
The tape is 3 inches wide and very thin, just like most of the plastic shopping bags out there. I have 2 pieces of it. One from the long stretch in the woods and a much shorter strip that was used for marking off a hazard area on the property that we wanted the kids to steer clear of.
I’m planning on working with the shorter strip first to see if I want to split the tape lengthwise. It will add a lot more work to the project, but may save my hands in the long run. In my first experiment with plarn I found the thicker strips to be more challenging to crochet, partly because of the larger hook size needed. I also discovered that I did better with a wooden hook, as the metal or plastic hooks I had tended to “grab” the plarn.
Looks like I’ll be doing some “swatching” with my plarn before I am neck deep in this experiment. I want to create a wide bottomed tote with large handles integrated into the top edge. The kids can then carry it easily, or even hang it up by one handle as a “target”. The best bit about that? They will be putting the darts away when they hit the target. Maybe that will make them want to clean-up more? Well, a mom can dream.
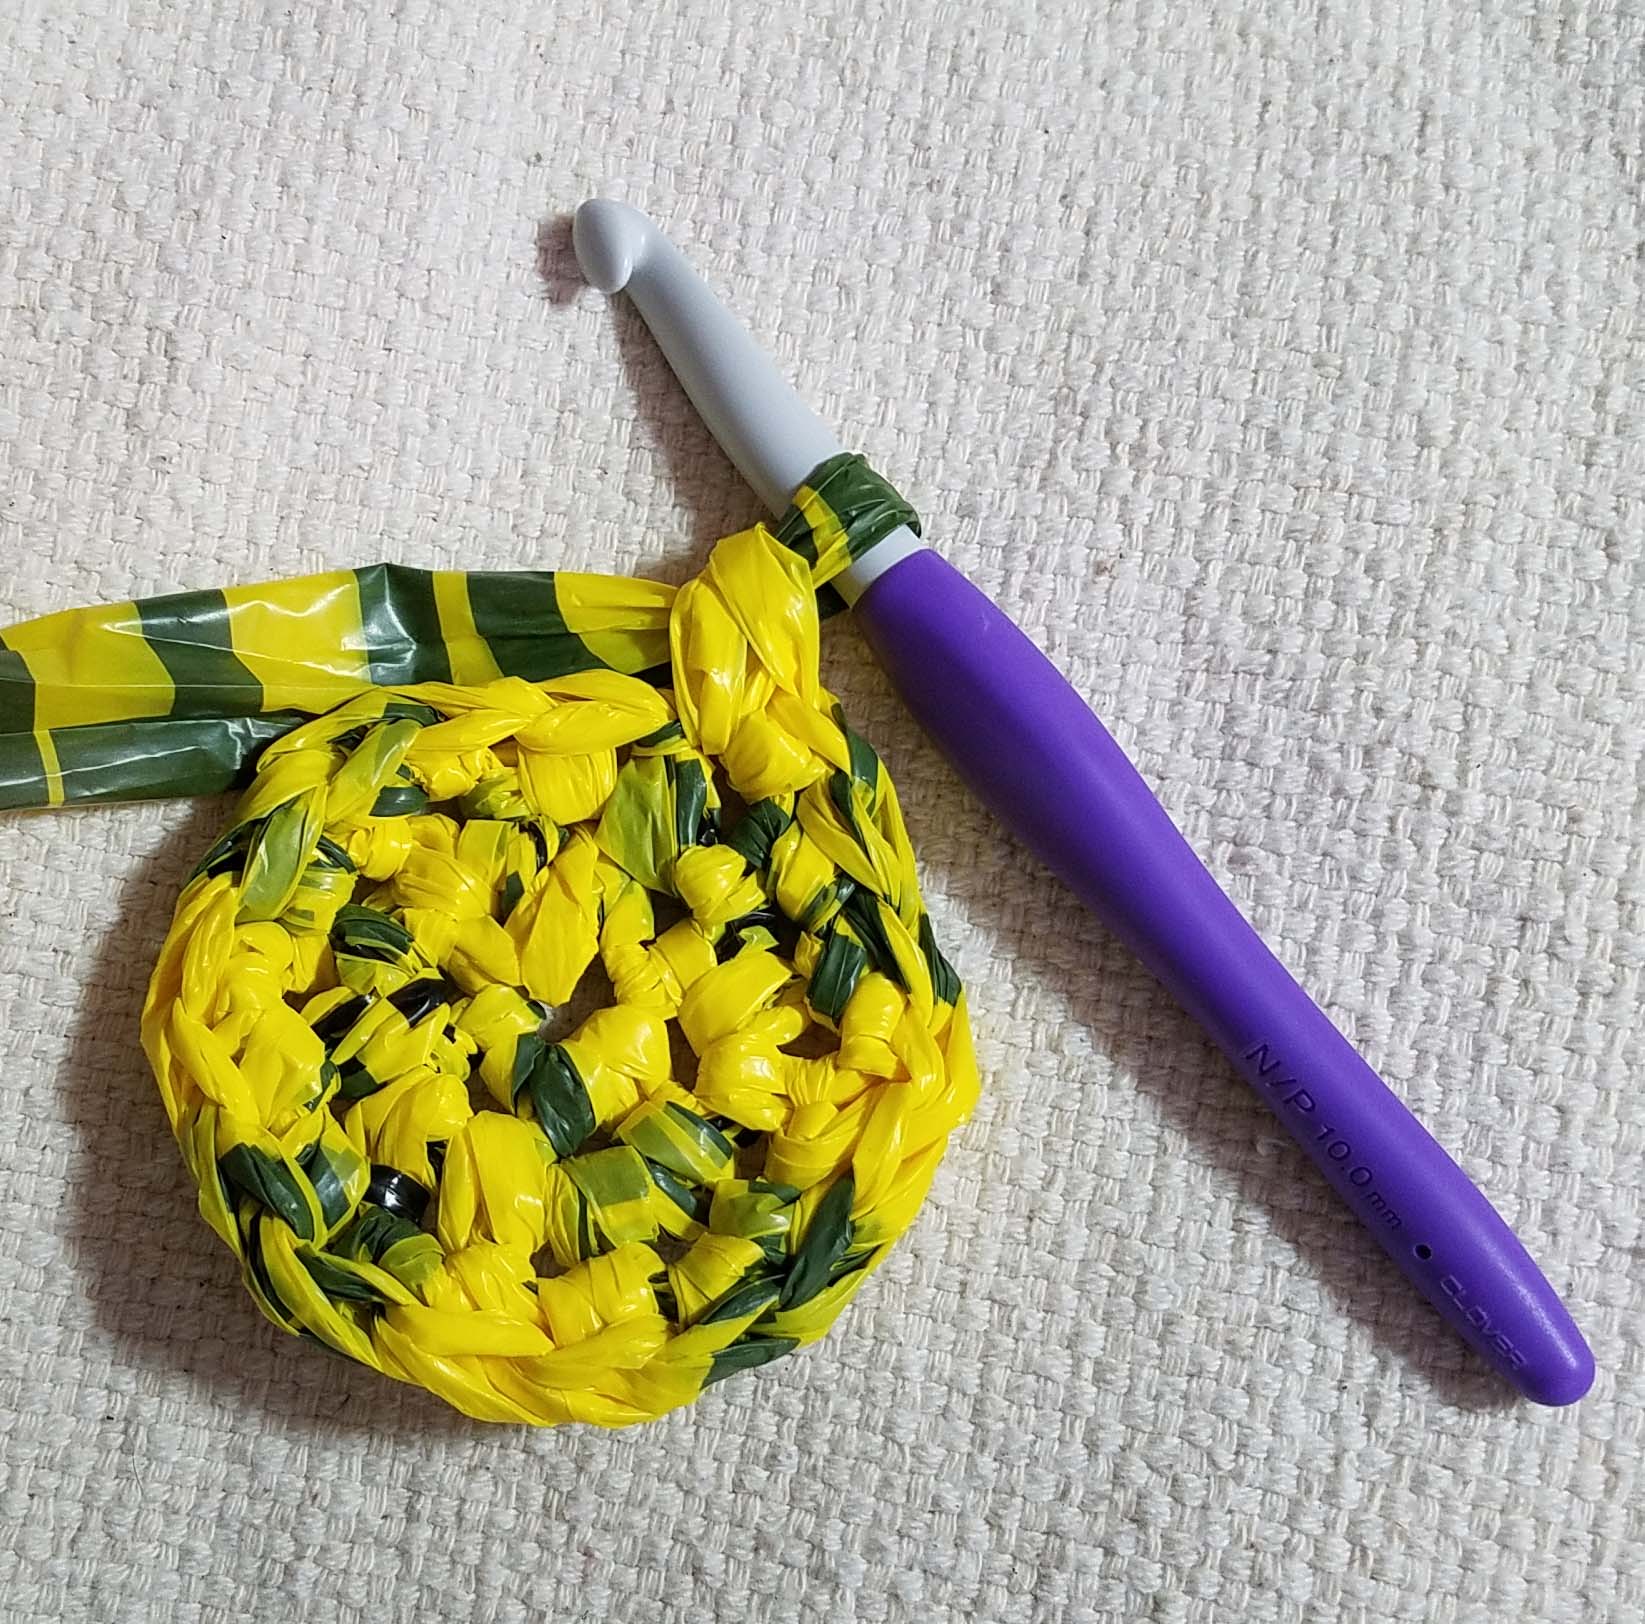
Experimental Swatch #1
I worked with the tape 3 inches wide, the size it comes off the roll, and crocheted with a 10mm size wooden hook (Uncle Cy’s Woodshop hook). I loved how cushy and thick this fabric came out, but I really felt like I was fighting with the plarn and the hook. I was only working 3 rounds for these swatches and by the time I had 3 finished for this one I was wiped out.
Experimental Swatch #2
I split the tape to 1.5 inches wide and used my size 6mm metal hook (Clover Amour). This hook worked great with the plarn and cutting the tape to half its original width definitely made it easier to crochet. The metal Clover Amour hook is so smooth it was like Teflon, it slid thru the plarn with ease. But…I felt like the fabric was too thin for what I want the tote to be. It was also really tedious to cut it in half.
I used scissors to cut the bit I used for the swatch.
I also experimented with the idea of cutting the tape while it was on the cardboard roll that it came on when I purchased it. There was some left-over on the roll. I used a utility knife to cut thru it. That worked okay, but re-winding all the tape in the big ball did not hold a lot of attraction for me. I might play around a bit more with the left-over tape to crochet a wearable pouch that the kiddos can use to carry extra darts in when they are running around.
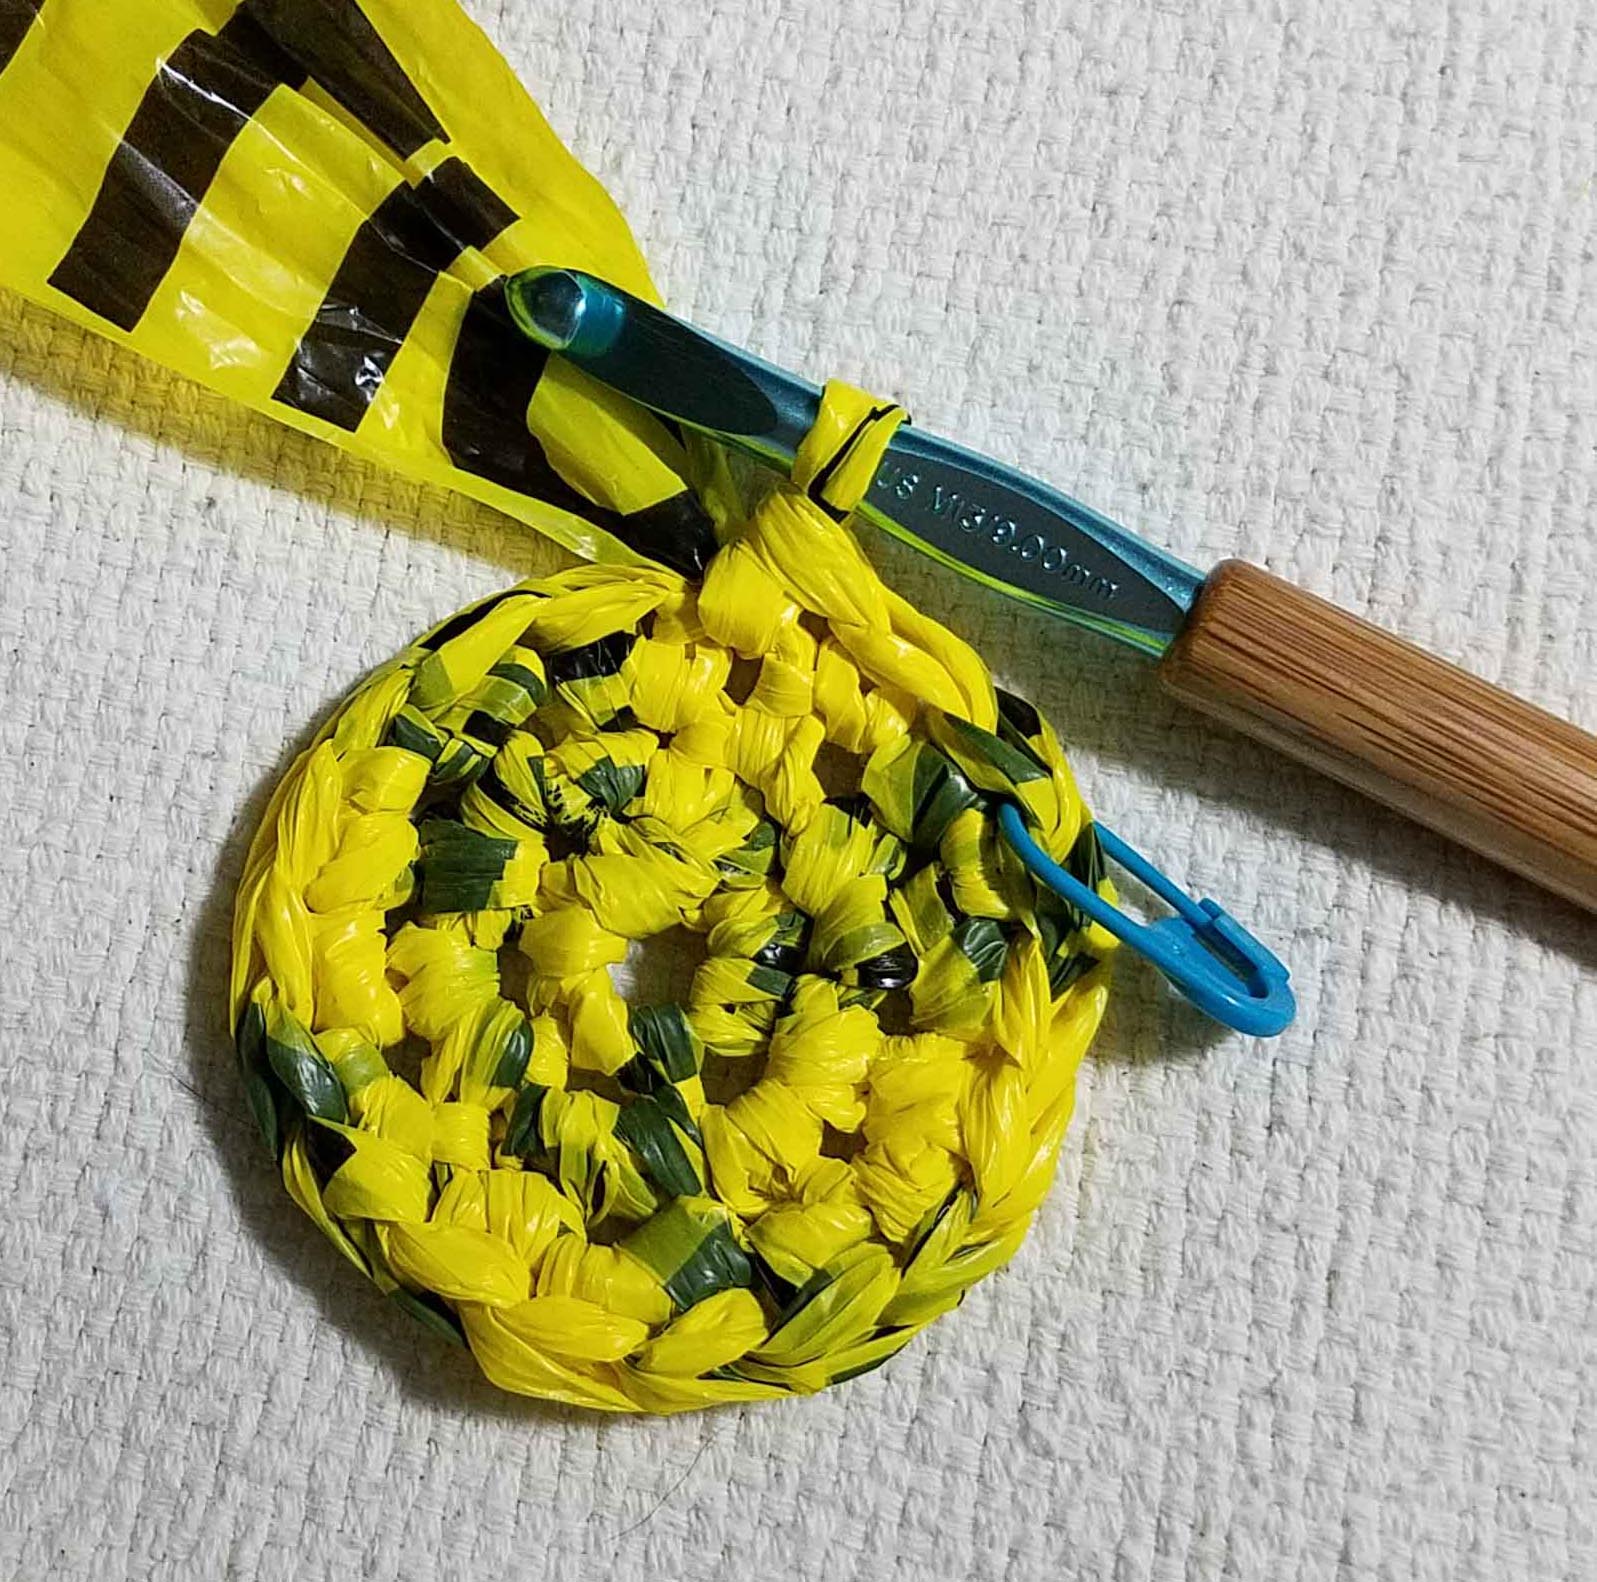
Experimental Swatch #3
Went back to the wider tape again. This time I used a 10 mm plastic hook (Clover Amour). I was hoping the larger Clover Amour hooks in plastic might have a similar smoothness to the smaller metal ones. The hook was much less “grabby” than some of the acrylic hooks I had worked with in my first plarn experiment. Unfortunately it was still a bit of a fight. I really felt I was having the best result with the metal hooks or maybe it was the smaller sized hook?
The photo above is Swatch #3 and Swatch #2. You can see the difference in size for these 2 swatches. I really wanted to work with the tape at it’s original size. For one thing, it would mean fewer rows to crochet the size of tote I had in mind. The thicker fabric would also be more durable with the amount of use I’m figuring this tote will get.
I messed around with trying to crochet with my J/6mm metal hook and the wider tape. It was a lot of work and I had to keep reminding myself to pull all my loops out bigger than the hook shaft size. I tend to be more of a “rider” style crocheter so I keep my loops pretty close to the size of the hook shaft and it’s a hard habit to break. I really needed a metal hook in the larger sizes, like 9mm or 10mm. This is when it comes in handy to be an avid collector of crochet hooks.
Back in 2014 I took a trip to visit Jan and the 2 of us met up with a bunch of friends at the Lion Brand Yarn Studio in NYC. Both of us purchased sets of the Hiya Hiya crochet hooks there. The majority of the hooks in the set are metal including the larger sizes: 8mm, 9mm and 10mm. I dug this set out of my “hook drawer” and decided to give the 8mm and 9mm a try. Metal and smaller, but not so small it would be a fight.
Experimental Swatch #4
Well the 9mm size hook was good, but the hook shape was still a bit of a fight. The bulb like point and tapered throat of the Hiya Hiya hooks is very similar to the Boye hooks, but not ideal for this project. I did like the size of my stitches and the metal was definitely easier with this plarn.
Experimental Swatch #5
Time for a bit more digging in my hook drawer. Ah ha! I found I had some of the larger metal hooks in the Bates Bamboo handled style. I even had a 9mm one. We have a winner! This hook worked the best with the plarn and gave me the size stitches I wanted without fighting.
It’s still a bit tiring to my hands to crochet with the plarn, even with the best hook for the job, so I’ll be working on this project a little bit each day to save my hands (and my sanity). Once I get it further along I’ll show you what I came up with. I’m just hoping I’ll have enough plarn to finish the job. I do have a back up plan if I run out though.
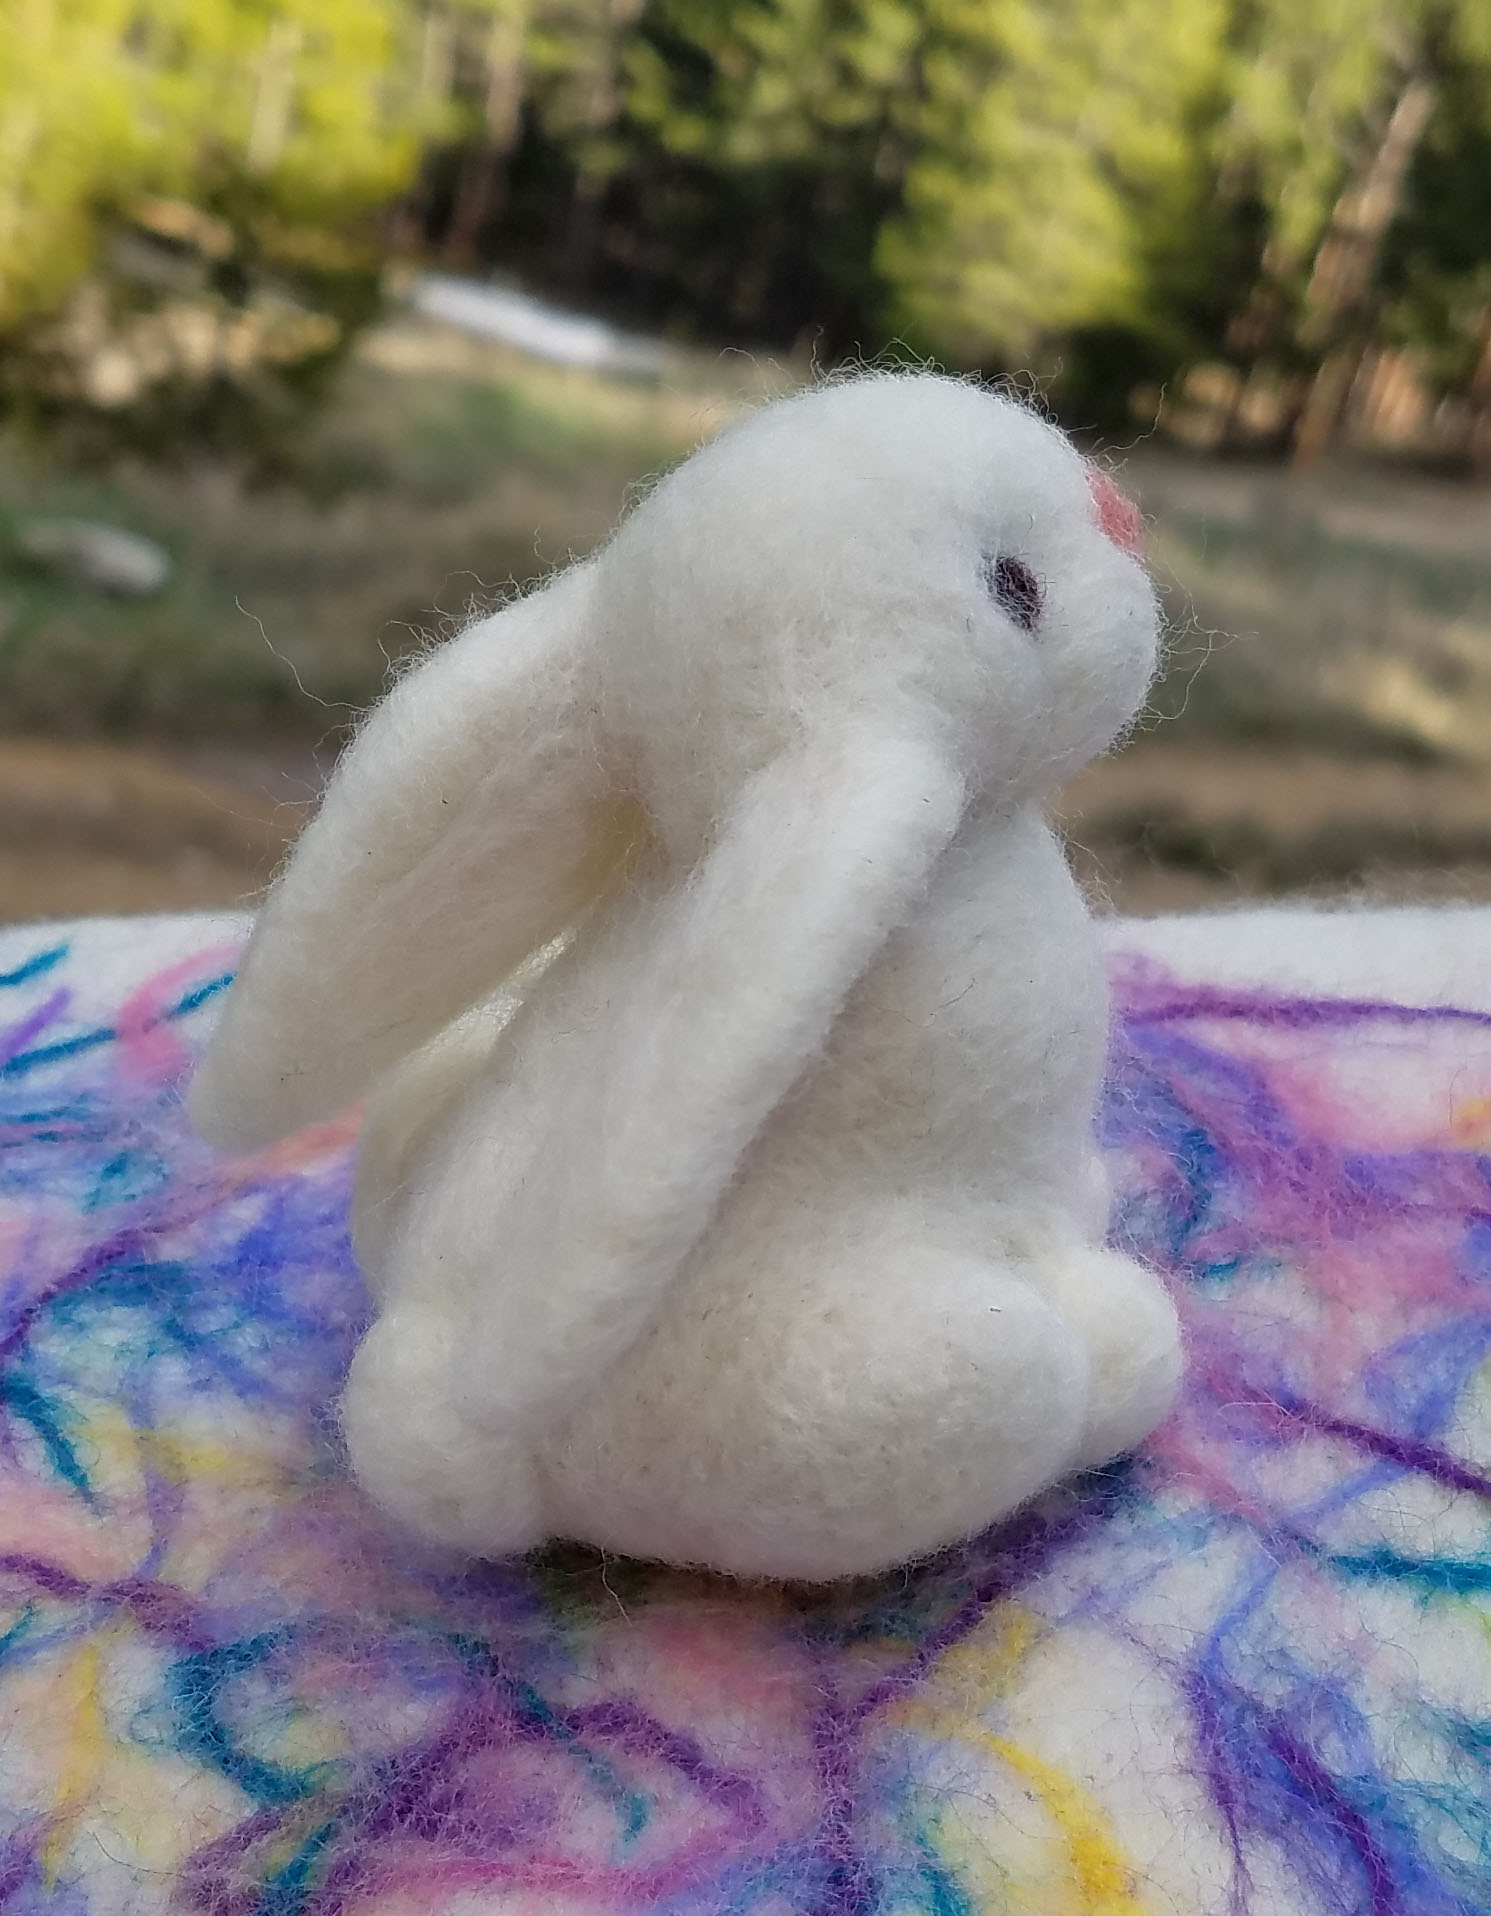
As you can tell, I’ve been having way too much fun with needle-felting lately. Since tomorrow is Easter I thought it very appropriate to create a sweet little bunny this week.
I didn’t take photos of each step during his creation because I wanted to see how quickly I could make him. I started him about 7:30 in the evening and he was finished by 11. I had a number of interruptions from the family while I was working on him, so my estimate is that he took me about 2.5 to 3 hours to make.
I wanted to create him using the natural colored wool fiber with just a few touches of added color. I used some dark brown yarn for his eyes, and a little bit of pink roving for the color inside his ears and for his nose.
Don’t despair though, I’ve not abandoned crochet entirely for the sharp needles. In fact, I’ve been crocheting on a bunch of samples. Unfortunately they are all freelance pieces I’m doing for magazines, so they are still in the super secret stage.
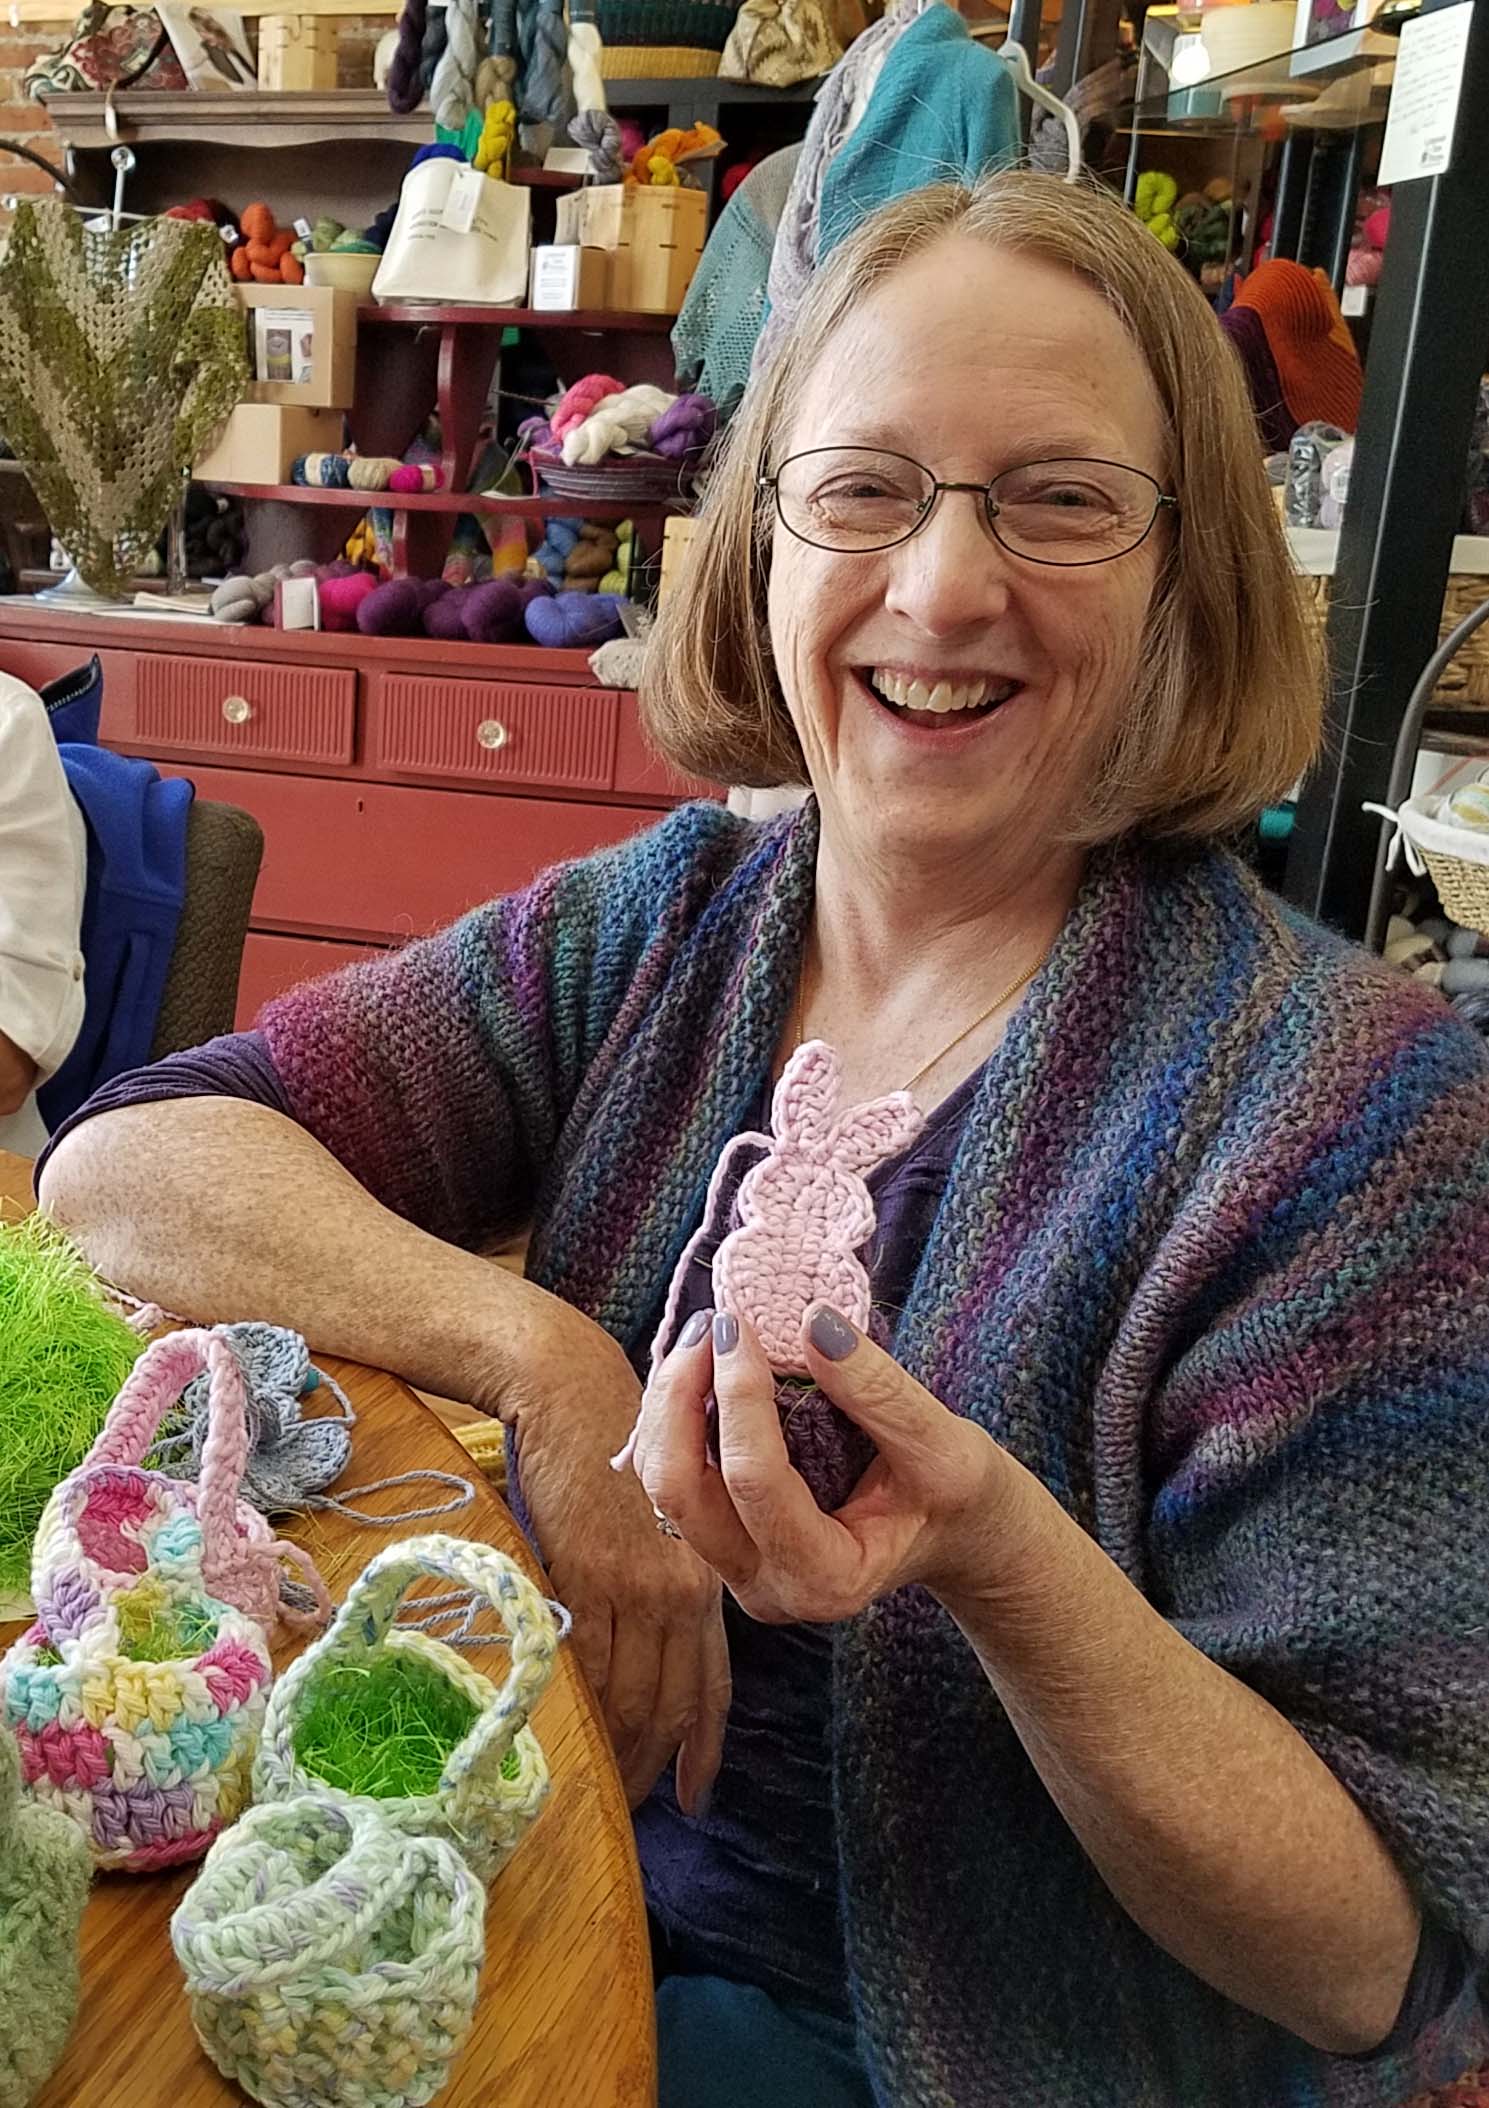
This past week was Casual Crochet at Longmont Yarn Shoppe. My friend Karen was busily crocheting goodies for her grand-kids’ Easter celebrations. Aren’t they cute? I loved the little baskets she made, the “grass” in the baskets is even crocheted out of bright green fun fur. She had heavily modified a pattern she found to make the baskets.
I think the little bunnies are the “Easter Marshmallow Bunnies” free pattern on Ravelry. They are super quick to work up and Karen was having a blast making them during the meet-up. I decided to try my hand at making some when I got home. I’m going to put one in each of the kids’ Easter baskets.
I modified mine. I only crocheted 2 layers of the head and body, making ears on the front layer only. It made the ears curl a bit, which I liked. I also didn’t stuff the bodies, I liked the flat squishy of them just 2 layers sewn together.
Now I’d better get on the ball with getting the baskets ready for my family. At least I’m not doing the wild trip to the shops to get chocolate bunnies this year. I actually purchased these 3 before we left on our Spring Break trip. Since I didn’t procrastinate I found the dark chocolate bunnies without any trouble.
Well, it’s been a bit of a hectic re-entry to life in our “normal” routine. We have had lots of snow and some very cold temperatures since our return, not what one would think of for Spring weather, though fairly typical for our springtime. I had quite a few things scheduled for this week, which would have been fine if I hadn’t had the wild 4 weeks preceding this one. I’m slowly chipping away at the mutant To-Do list though.
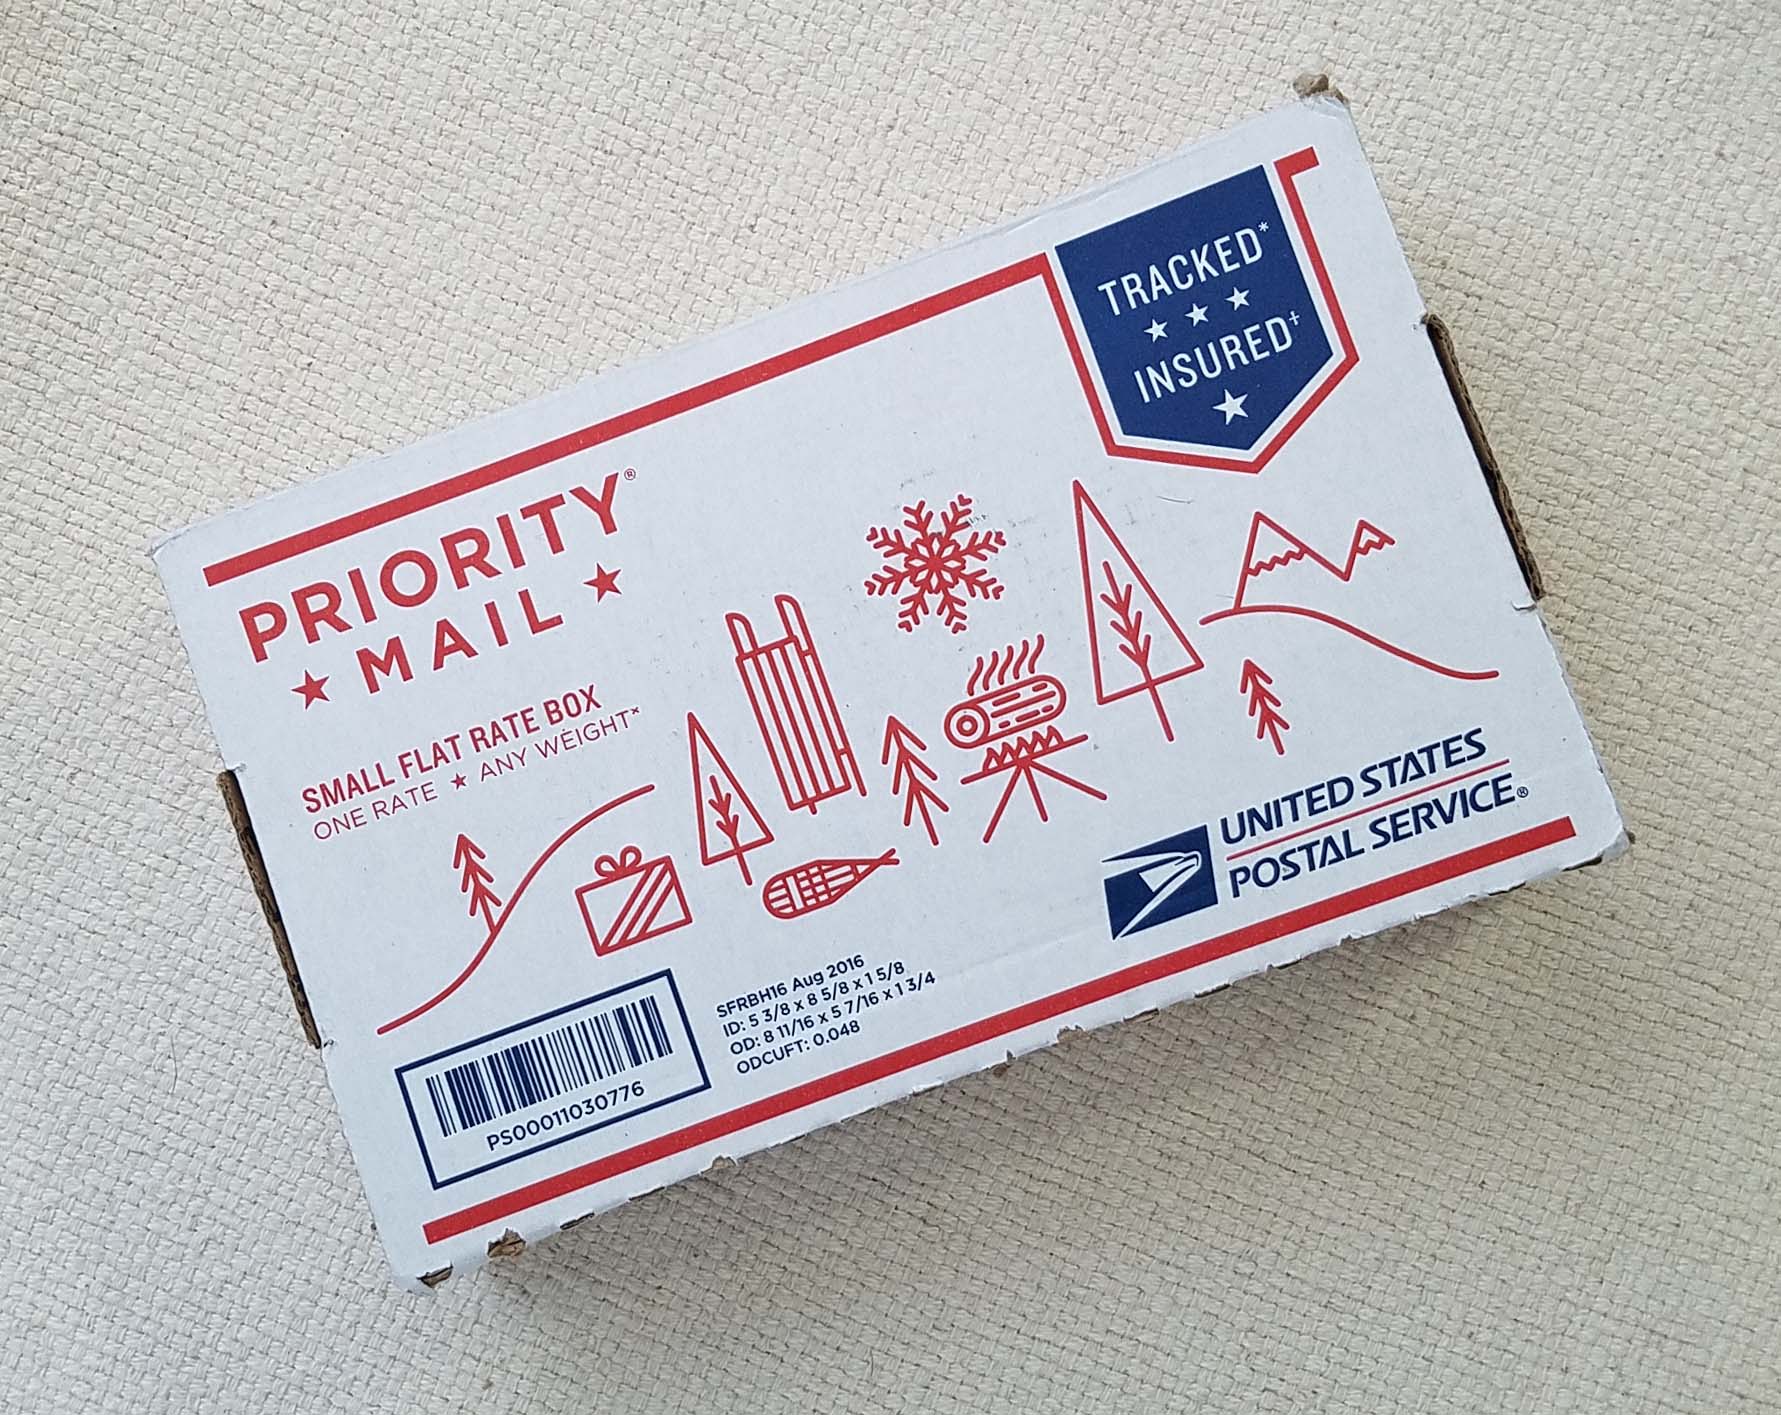
One of the best things about coming home from Spring Break was picking up our mail. This nifty little box was waiting for me from my dear friend Bonnie Pierce.
I met Bonnie and her husband Bill at the first ever CGOA conference I went too. She was wearing one of her gorgeous Free Form crochet capes and I practically attacked her to look at it closer. I was completely on my own at that show, but Bonnie and Bill took me under their wing and included me in many of the group events they were involved in.
They even rescued my hook case that I had left laying on the table one afternoon. Bonnie and I chuckle about it every time we get together. But it has been far too long since I last got to spend some in-person time with Bonnie. Fortunately we stay in touch online thru social media and messaging.
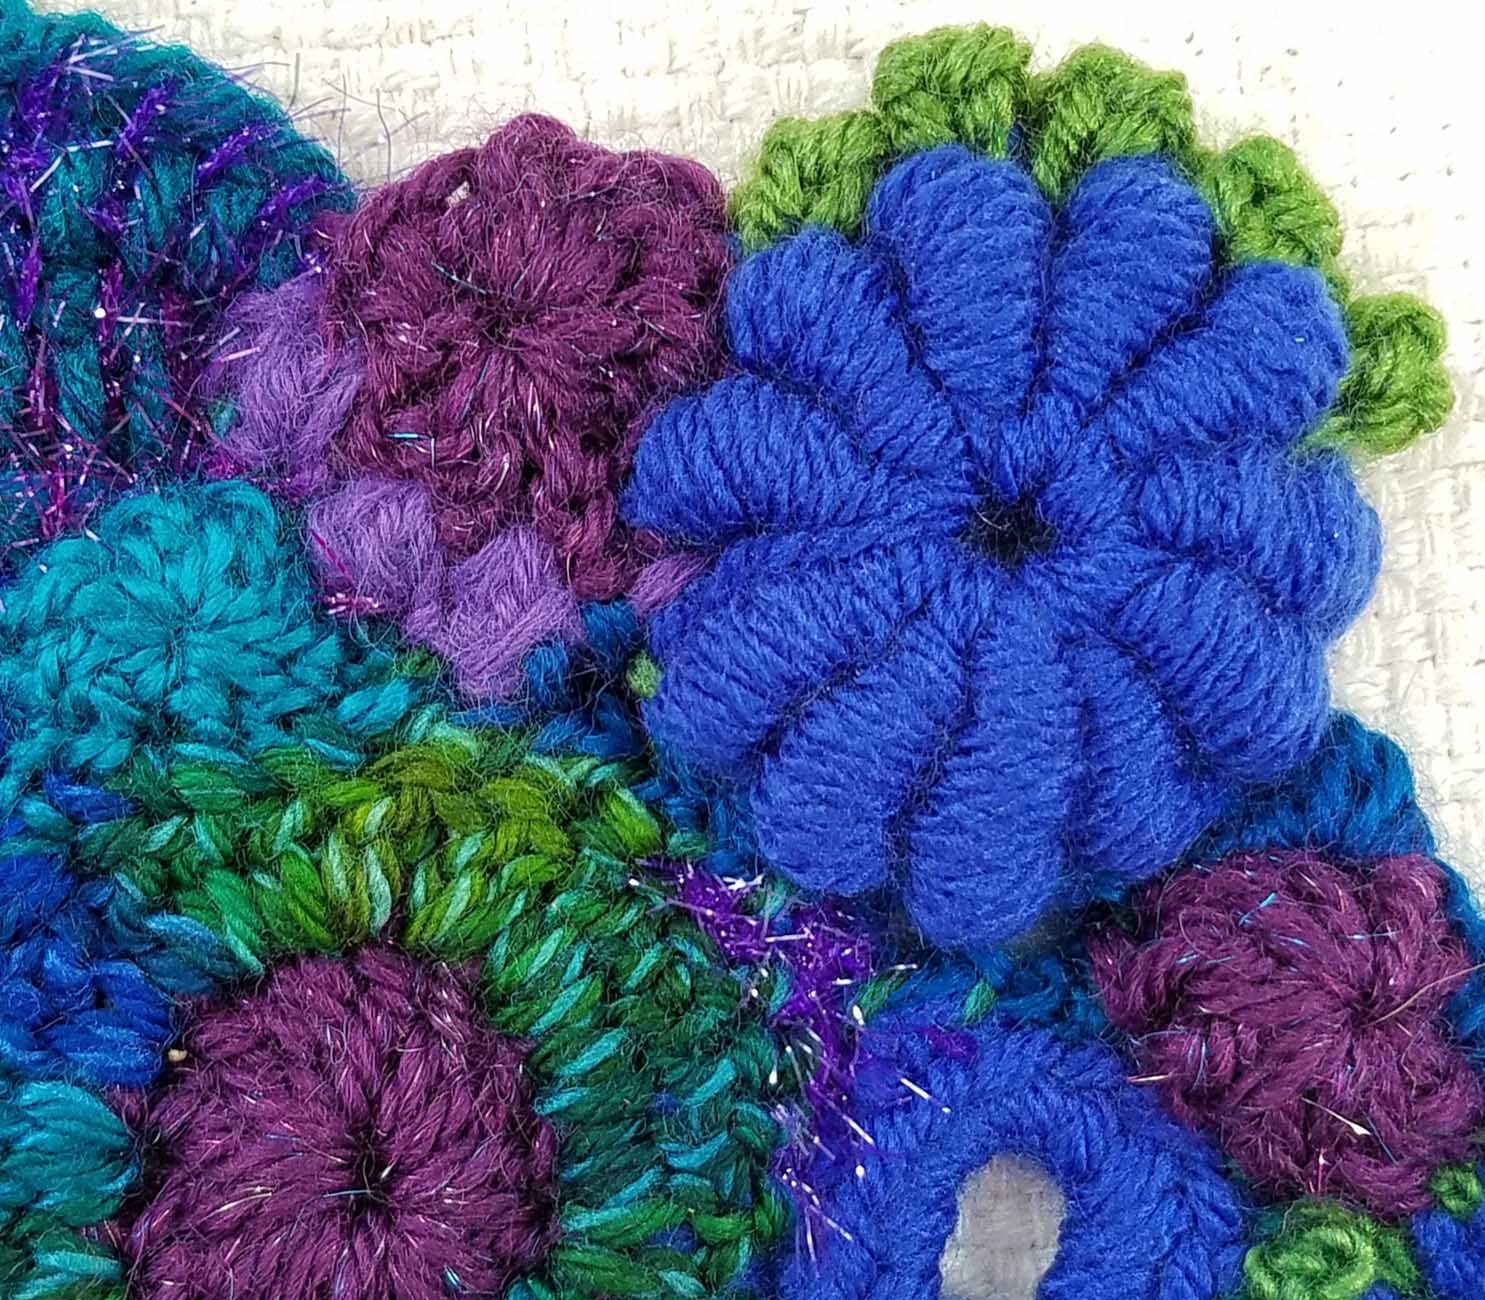
Recently Bonnie and I decided we needed to have a piece of each other’s work. These 2 drop-dead gorgeous scrumbles are what Bonnie sent me. I’m so inspired by her work, though a little chagrined at how clunky and chunky my own Free Form efforts look. Bonnie is truly a talent with her Free Form artistry.
She is well known for her bullion stitches. Which she had tried to teach me numerous times with limited success.
This flower with the sparkly embellishment is currently my favorite bit on this scrumble. But every time I look at them I see something that delights me.
When Bonnie and I met in Portland in 2008, one of the things we bonded over was Chocolate. We both have a love of wonderful dark chocolate. She told me about a Portland chocolate company called “Moonstruck” and shared some that she had with her. It is marvelous stuff and whenever I find the brand I purchase a few bars, but it is rather scarce in Colorado.
So it is very fitting that Bonnie included some delicious chocolate in the package too. I’ve got to get my piece finished to send to Bonnie now and will have to hunt down some special Colorado chocolates to include. This might require me attending the Chocolate Festival again, sigh, the sacrifices I make for my friends.
I’ve been busy with working on developing classes since our return from our big trip. This cute little needle-felted sheep is one of them. I’m finding the needle-felting quite addictive, I think the total attention that is required is a great form of meditation. That’s been very good for me as I process everything the last 4 weeks has thrown at me and my family.
I hope you are all having a beautiful springtime. April is looking to be another fast-moving and busy month. I’ll try to keep up with the blog and (fingers crossed) to have some more videos for you very soon.
Well today involved some crocheting as we are on the road again. I do have Willie Nelson’s song playing in my head (if you don’t know the song you can check it out on YouTube {Warning – You may have it stuck in your head after listening}).
I’d hoped to do some drawing during our stops along the way. I’ve had a couple ideas percolating around in my head for awhile and would love to get them on paper. I managed to leave my drawing pens at home so I had to make a quick trip to Michaels last night to get some replacements. I was so excited, for once I actually had my coupon with me in my wallet. I picked out these Staedler pens partly because I loved the little case they came in. Things to keep the pens corralled together are always a good plan in my book.
I haven’t gotten much drawing time today so far, though I will do more tomorrow once we are at Nana’s house. I tend to take a back-seat and let Nana have full reign with the kids. It’s fun for everyone.
I enjoy creating moebius style cowls but decided to challenge myself with designing a simple tube style cowl with this design. I wanted to create a crocheted cowl that would have a very graceful drape and would be a lovely accent piece to wear indoors, but could also serve nicely as a warm layer under a coat or jacket.
First order of business was chosing a yarn, I picked Berroco’s “Folio” yarn. This luxurious yarn is an Alpaca/Rayon blend that feels like cashmere, with marvelous drape and warmth. I paired the yarn with a simple mesh stitch pattern to allow the yarn to really shine.
Collette’s first modeling gig
Next I gave some serious thought to how I wanted to work the foundation and how to finish the opposite end of the tube to compliment the foundation. I usually like everything to be very precisely matched. It’s probably the math part of my brain dictating terms. I decided to give myself permission to have the finishing edge be different from the foundation.
Freedom!
Funnily enough, the 2 edges don’t look all that different. But never fear, I will be playing with this some more and there will be some very different edges in the future. I just wanted to get my toe wet this time around. I have definitely found a new fascination. Throwing out the idea of precise matching has stirred up all sorts of creativity in my brain.
I used my stacked row foundation to start this cowl, then the rounds of mesh stitch are worked off one side to the desired length. In this pattern I have written the instructions, and worked the sample to be 31 inches around and 13 inches wide from foundation to finished edging. I’ve also included instructions on how to modify the pattern to make a wider cowl (deep enough to be pulled up as a hood), or a longer cowl that makes it more like an infinity scarf.
You can use a different yarn than I chose for the sample, but I would strongly recommend a yarn with a large percentage of fine alpaca fiber or rayon. You want the yarn to be very fluid to get the fantastic drape you see in the photos.
Whenever I talk about Free Form Crochet to other crocheters, they all bring up the dread part of yarn work: Tails!
They are correct, there are a lot of tails to contend with when doing Free Form work. I am not terribly fond of weaving in tails myself. Years of working as a designer have taught me some patience with the task.
Way back in the mists of time I remember learning to embroider and my Grandmother telling me that the back of your work should look as neat as the front. Seemed like an impossible task at the time, but it became something I strove for with all my making. Whether I am embroidering, sewing, crocheting or knitting.
I actually find crocheting to be the easiest to create a tidy back to my projects. As a rule the fabric creation has enough body to it that there are always good places to tuck away the tails. When I weave in ends I always pick one side of the project to be the “right” side and look at that side after I’ve woven in my needle to be sure it doesn’t show. I use a bright silver colored needle because it is easy to see a glint of it on the right-side if I’ve woven wrong. I also try to weave my tails in different places on the scrumble so I don’t create a stiff or thick spot.
In Free Form there is also the option of using the tails to sew pieces together. In the scrumble above I wove in all the ends, but left 2 of the longest at the edges to use later when I am joining them to others in my final project.
This photo is the same scrumble from the back after I finished weaving in my ends. This is also the same scrumble that you see from the back in the very first picture.
I was left with quite a pile of tails after I finished the weaving in for all 3 of my little scrumbles. I save these bits to use as stuffing for dimensional projects. When they are wool or mostly wool I also save them as filler for my needle-felting projects, or to use to add color to the outside of those projects.
Other ways I’ve seen Freeformers deal with tails: Tie them together using knots and cut off close to the knot (You want a good tight surgeon’s knot if that is what you chose), or bring the tails to the front of their work and use them as design elements in the finished project.
There really are a lot of choices in Free Form for dealing with tails, they don’t have to be a terror. I hope you will give Free Form a try, for me it is the pinnacle of “Zen” crochet. A bit like coloring with color pencils.
I’ve made some progress on the page I was coloring in Franklin’s “I Dream of Yarn” book. For those of you that have asked, you can purchase this wonderful coloring book online or in some brick-n-mortar stores. When I Googled: “Franklin Habit, I Dream of Yarn” I found it available thru Target, Barnes and Noble, Amazon and Knitpicks. You also might want to check your local yarn shop to see if they are carrying it.
I’ve also been doing a little coloring with yarn this week. I’ve been playing with some Free Form crochet. Some of these are going to a new home with a yarnie friend, once I figure out which ones make the cut. The others will become a pillow for my big comfy papasen chair in my design office. A few of you may recognize the yarn from my post about picking colors for Free Form.
Tomorrow I’ll show you what I do about the mess of tails that is part of the Free Form creative process.
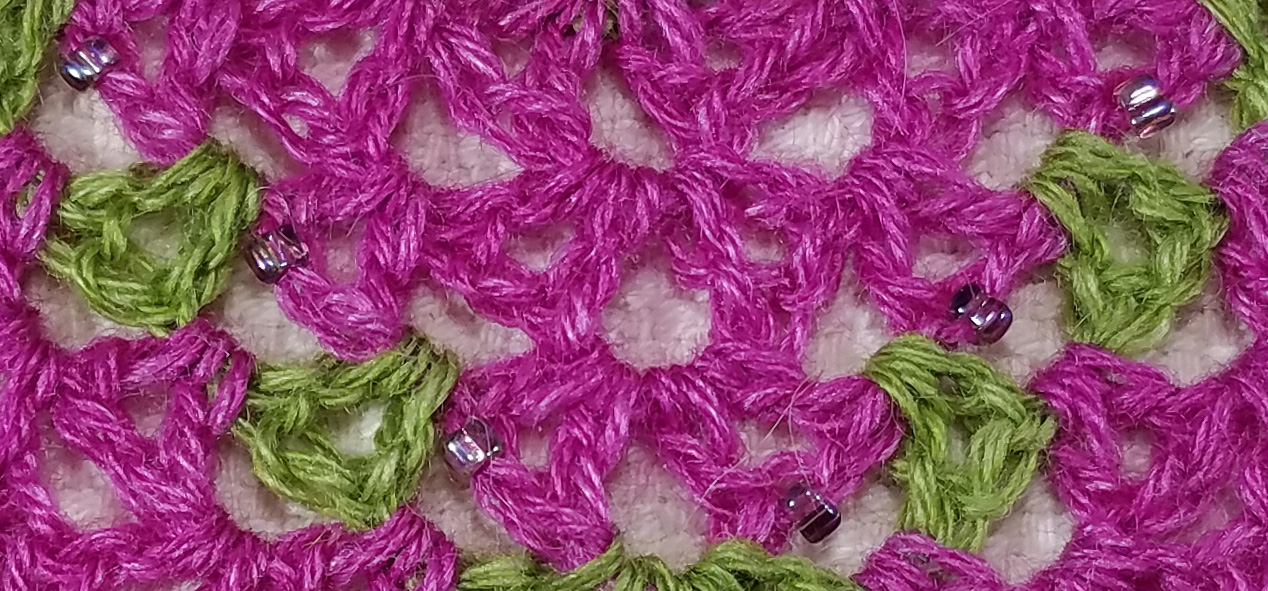
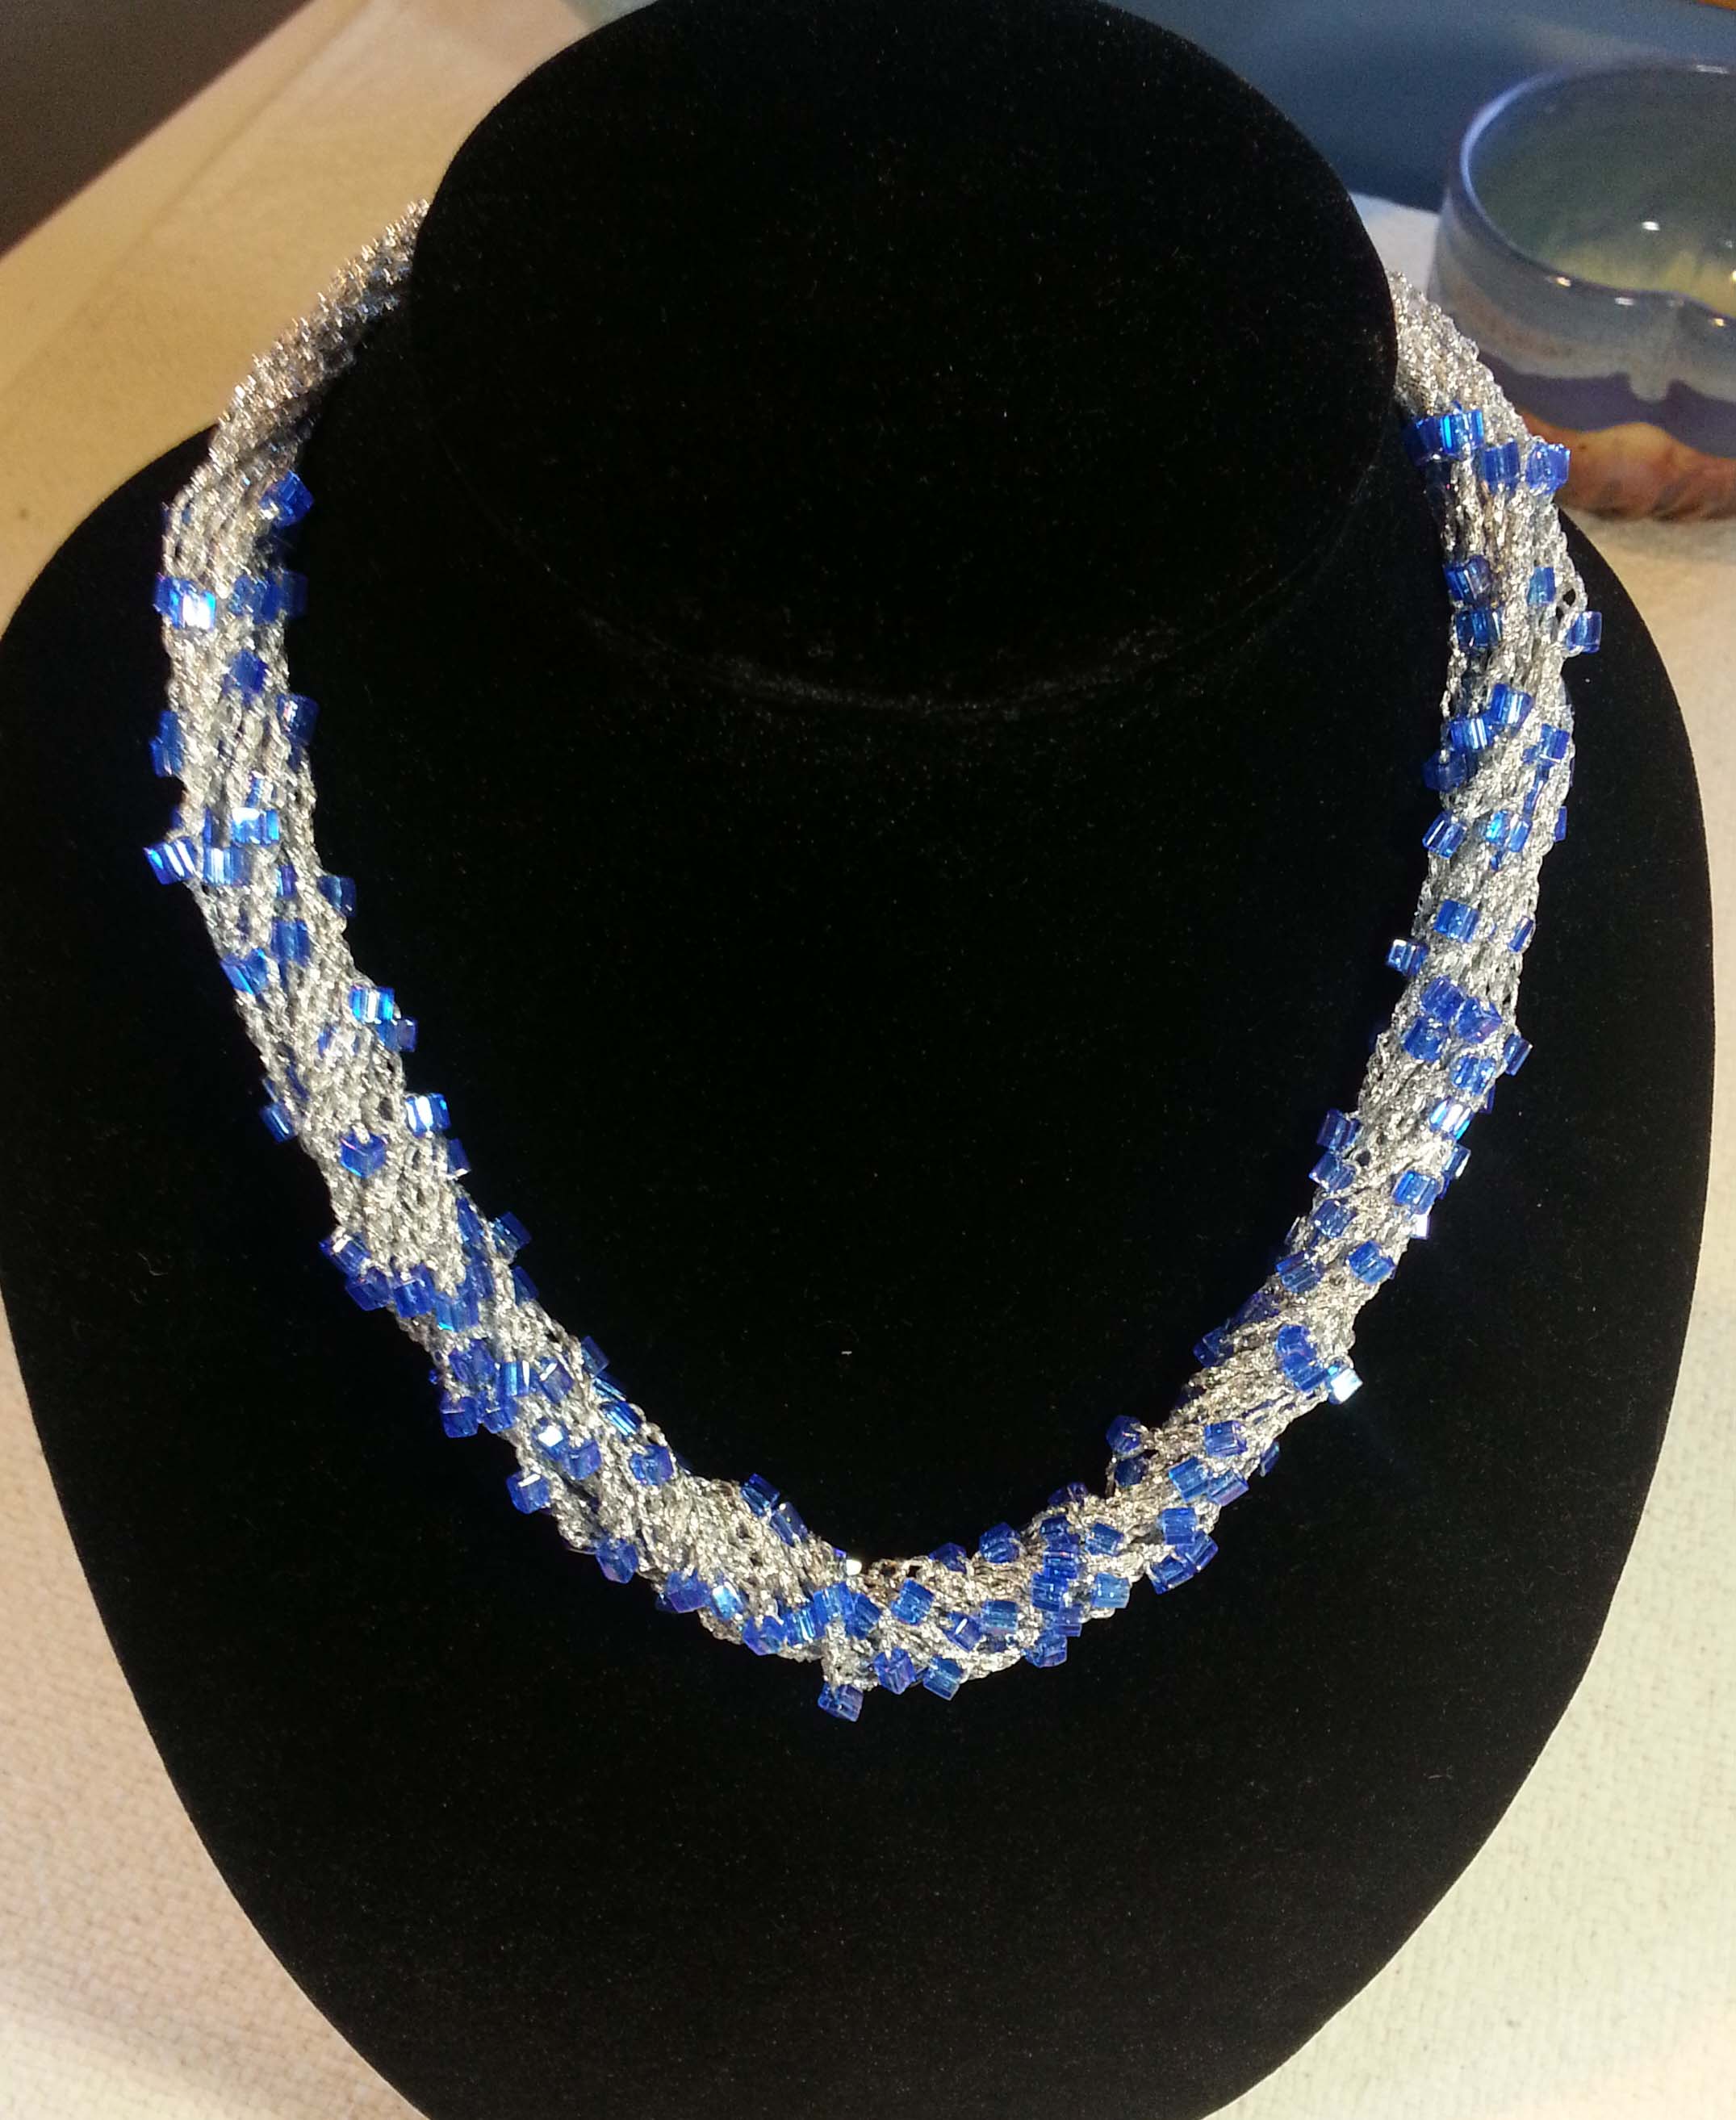
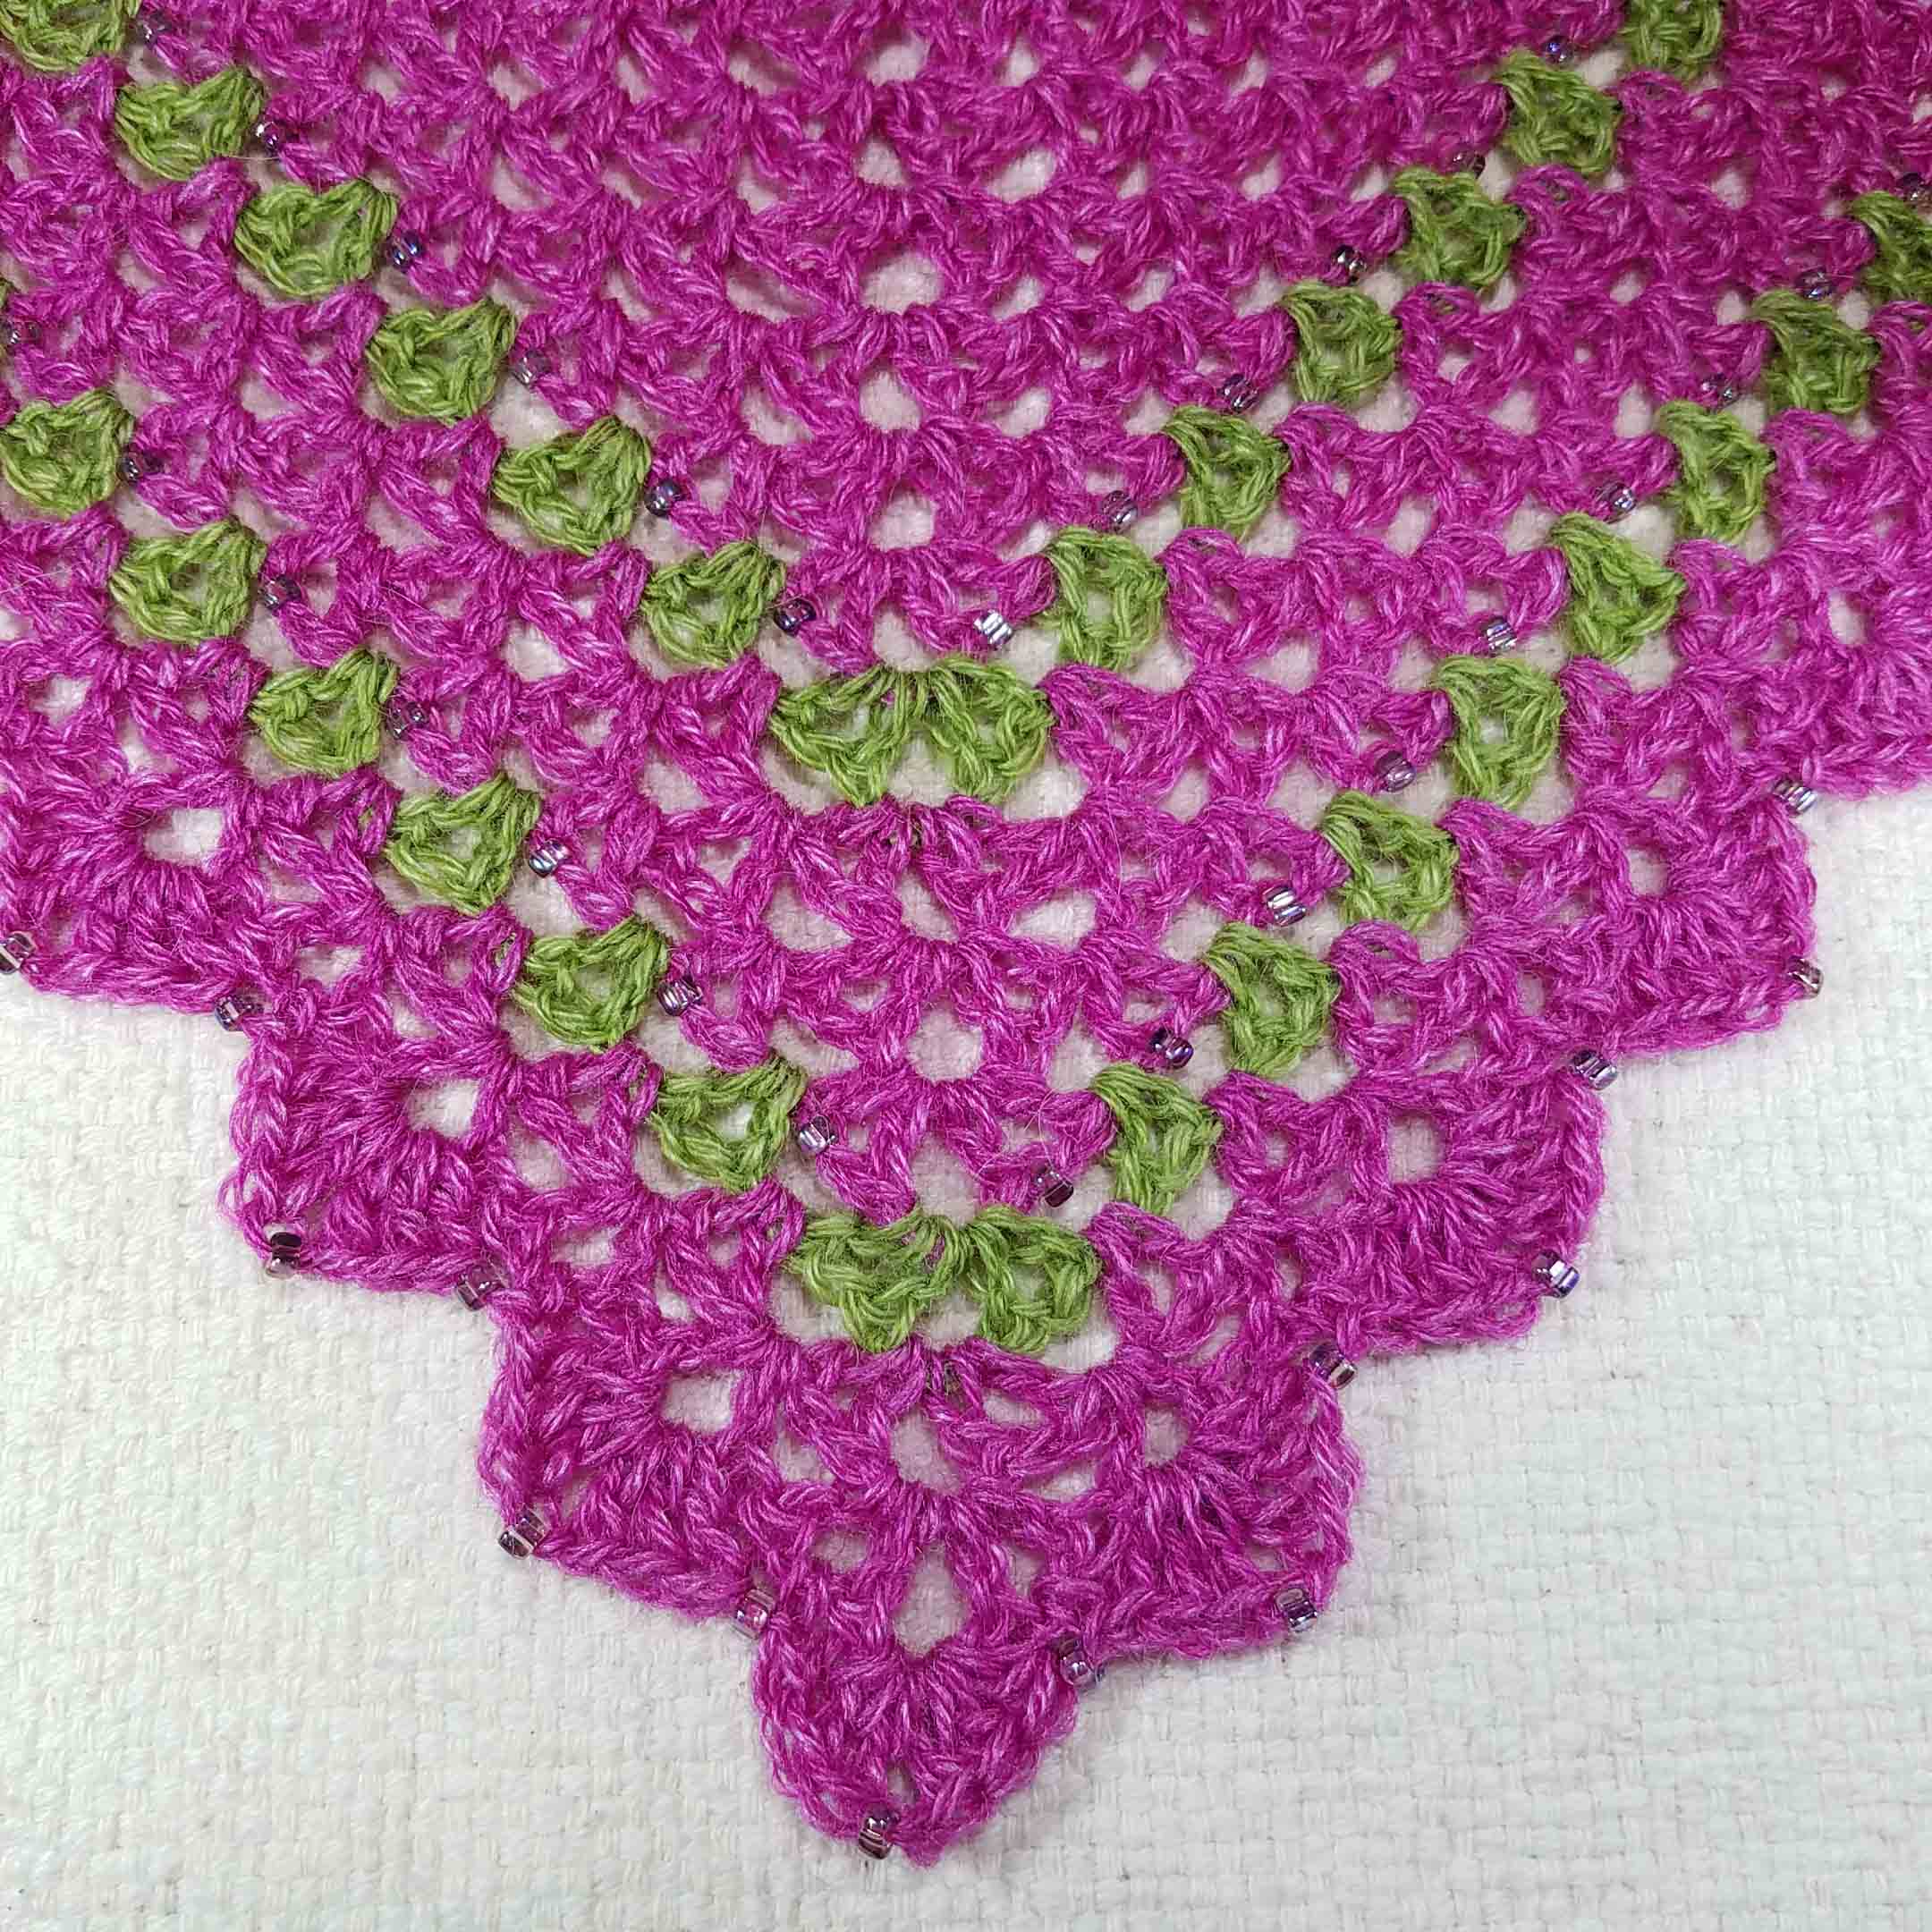
I love adding beads to my crochet projects, both large and small. They add wonderful sparkle and give the fabric a lovely fluid drape.
Sophisticated Simplicity Necklace
Here on the blog, I’ve shown you beads strung on your yarn (or thread) then crocheted;
I’ve shown you beads “hoisted on” to embellish the edging of an earring, headband or shawl;
Springtime Cowl – Small PWT Shawl
Most recently I have shown you beads “hoisted on” within the fabric of a shawl, as well as on the edging.
When deciding on bead placement into the body of your fabric, think about where your next row (or round) of stitches will connect with the beaded row. You don’t want the bead to be covered or obscured by another stitch.
You also want to consider if the bead will be visible from both sides of the fabric. I like to place my beads in the fabric so they are framed in an opening in the stitch pattern. This helps make them show up no matter which side of the fabric is worn as the “right-side”.
In my latest project, the little PWT Shawl that I’m calling Springtime Cowl, I made sure that all my beads were on an even number row. Crochet stitches bias slightly, this isn’t as noticeable when working in rows, but it makes a difference in how the bead sits on the top of the stitches. By adding my beads to the even numbered rows I was specifying those as the “right” side of my fabric.
You can add beads to any crochet project, it’s up to you to decide which will be the “right” side of your project for showing off your beading. If you are adding beads to a pattern that didn’t include them, you will want to be sure that the beads are added to rows that correspond with the “right” side of the fabric as written in the pattern.
I hope this inspires you to try adding beads to some of your crochet projects. If you need help with the “hoist-on” method of adding beads hop on over to my blog post: “Making a Pendant” for a photo tutorial on using the “hoist-on” method.


 Body of the cowl is worked in joined rounds off the straight side of the stacked row foundation. Look for the hole at the base of the double crochet rows to find the single crochet row to work into when crocheting Round 1.


 Well today involved some crocheting as we are on the road again. I do have Willie Nelson’s song playing in my head (if you don’t know the song you can