The Luck of the Irish

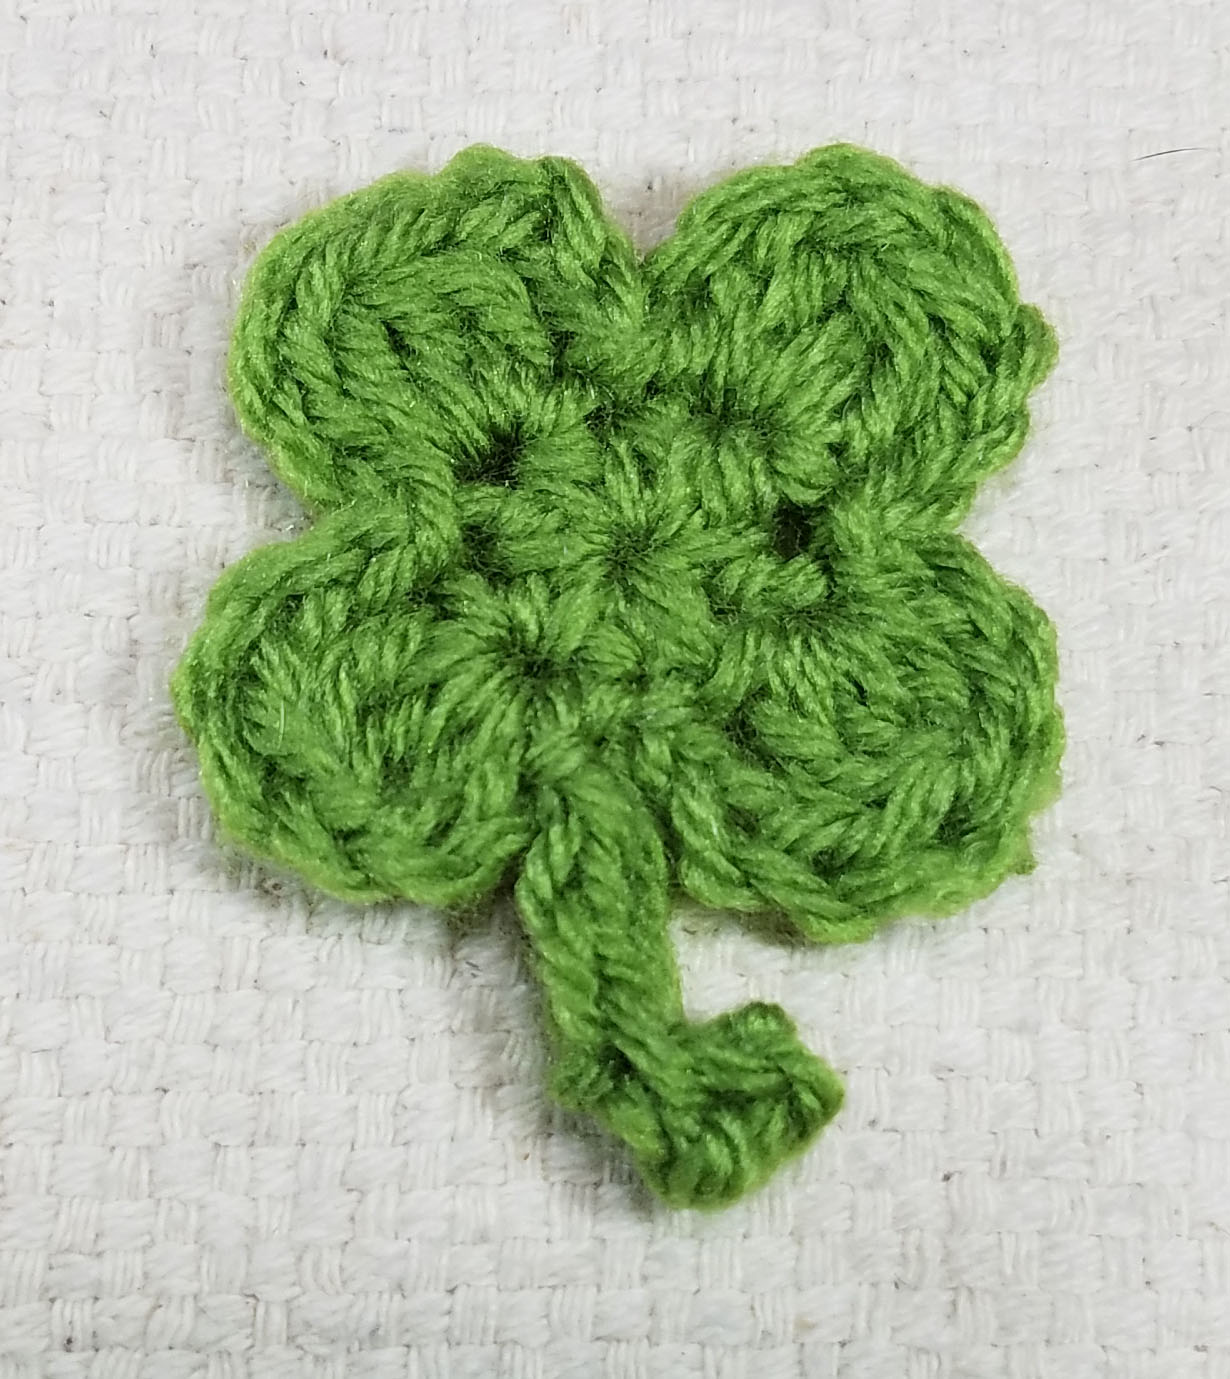
Today is Saint Patrick’s Day, and my family has a little Irish heritage (we are a classic American family with a big mixture of ancestry from all over Northern Europe and the British Isles), so I thought I would come up with a fun little crochet pattern for making a lucky 4 leaf clover.

Funny enough, none of us have much in the way of green clothing, every year I think that I really should at least get the kiddos some green clothing. That thought has not translated to my shopping brain yet. I tend to purchase whichever shirts are on sale, since both of my kids are a bit rough on their clothes.  Instead I crocheted up lucky clovers and made them into pins they could wear.

For those of you that are wondering about Shamrocks versus 4 Leaf Clover. The typical Irish symbol is the 3 lobed clover and is called a shamrock. 4 lobed clovers are much rarer and are not “officially” considered a symbol of Ireland or Saint Patricks day. The shamrock with it’s 3 lobes is said to have been used by St. Patrick to demonstrate the holy trinity of Christian faith. The 4 Leaf Clover is said to symbolize luck because they are so rare.

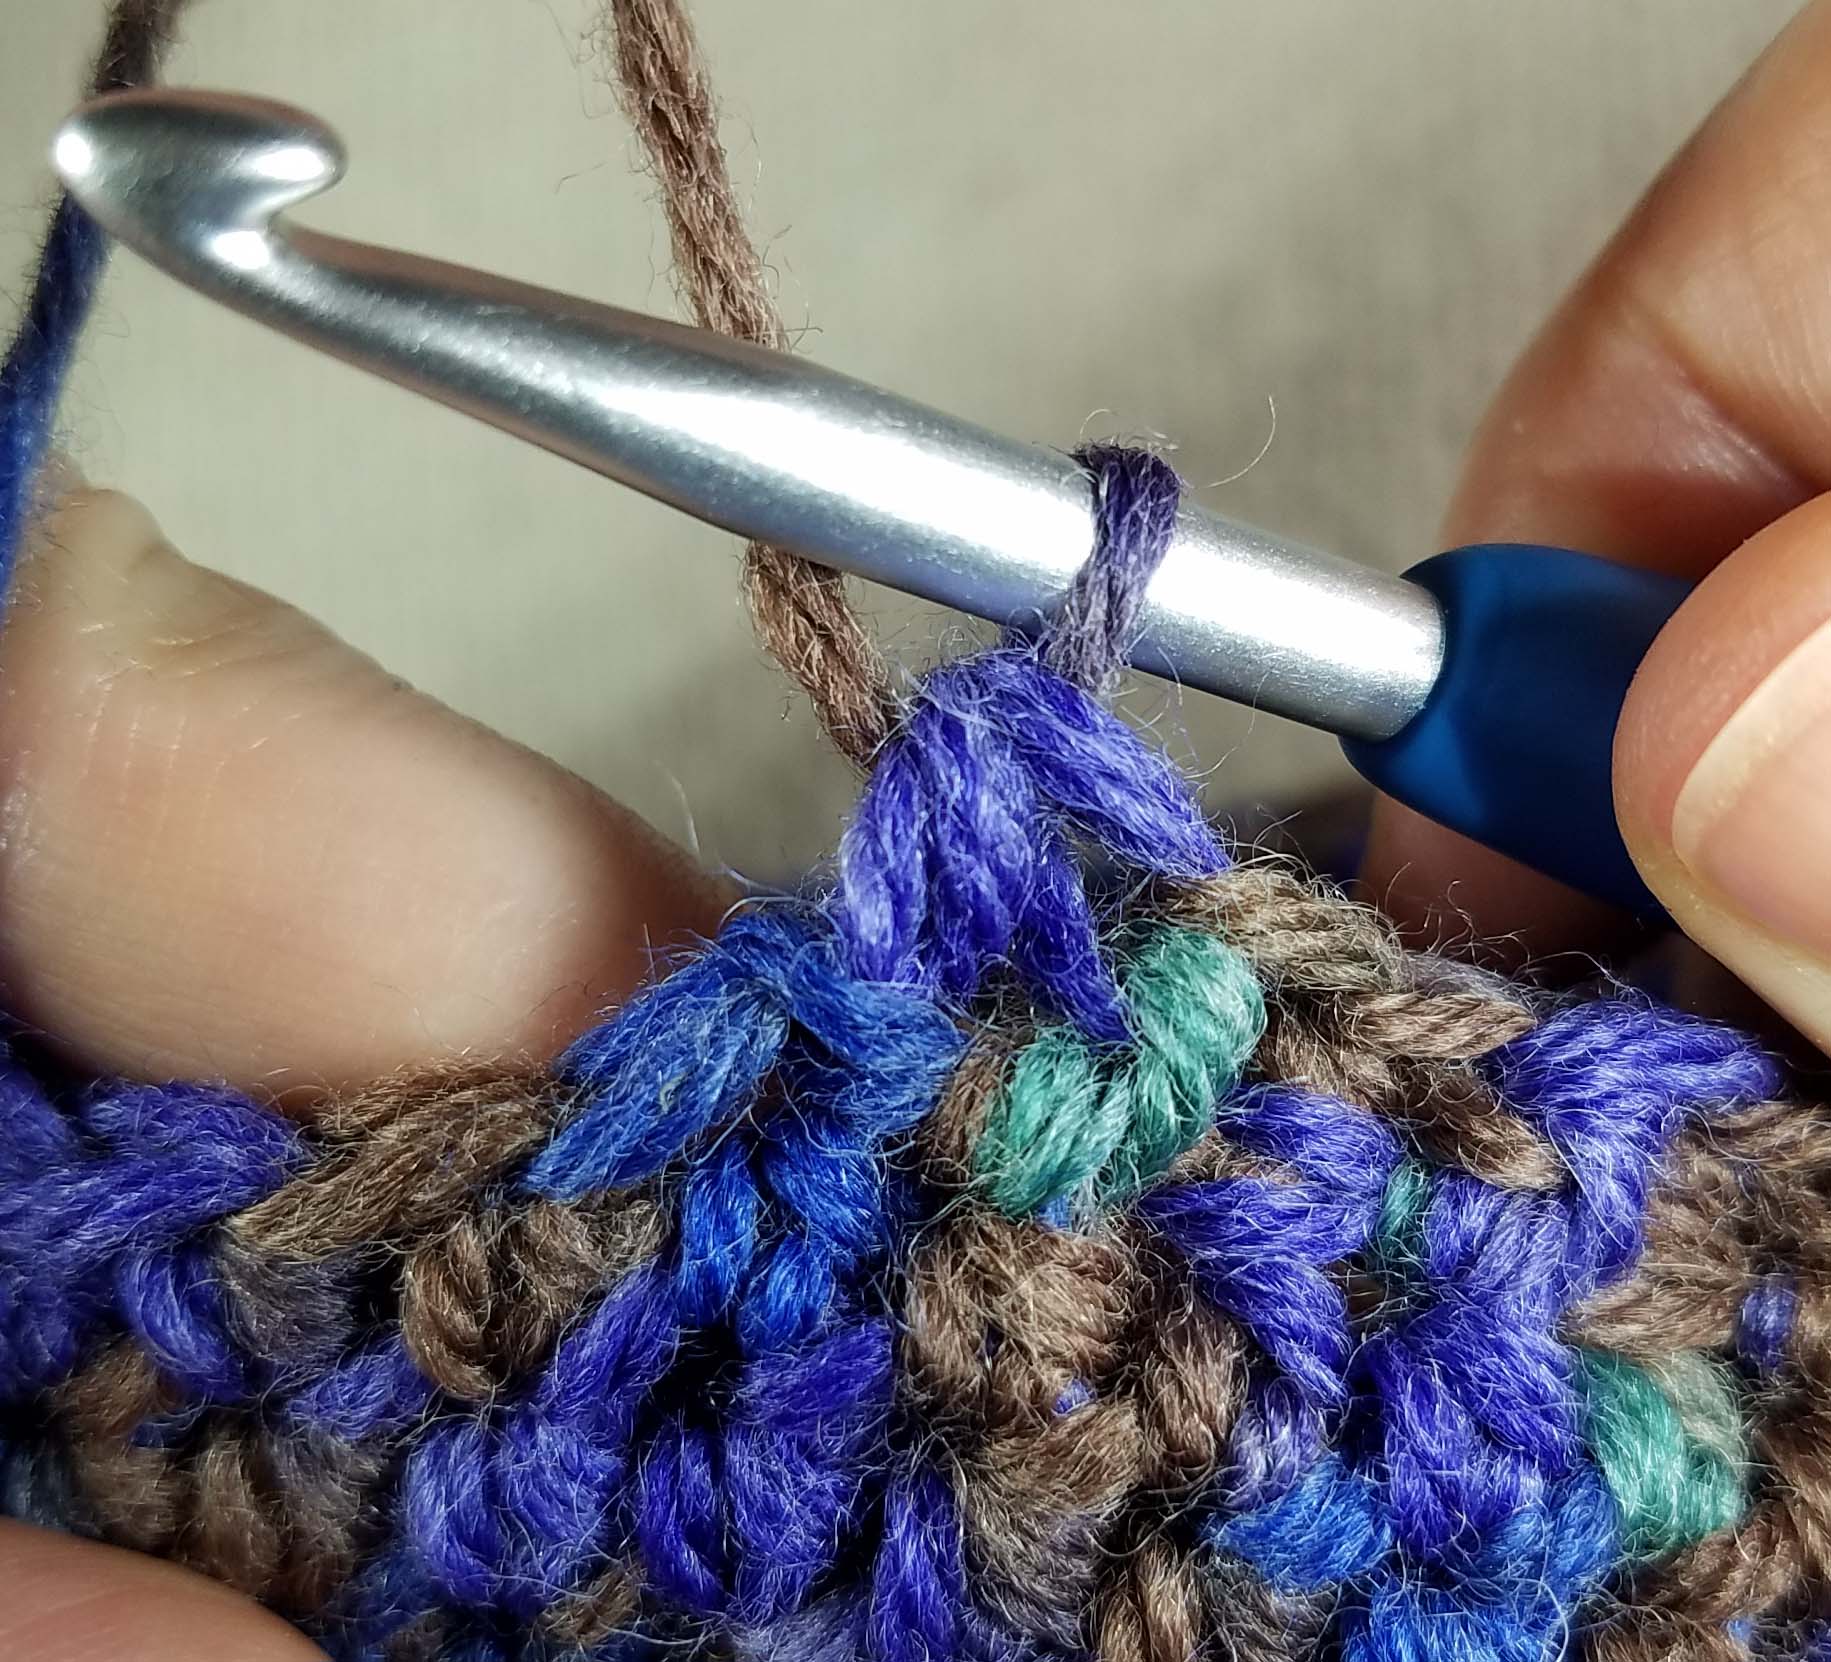
I had a lot of fun playing with a way to create a 4 Leaf Clover that could be worked in just 2 rounds. This project is rated at the intermediate level, because I used some more advanced techniques like Clusters and working in the back bump of chains.  If you need help with working clusters I have a photo tutorial in the Special Stitches section of the pattern.

Luck of the Irish Clover

Design by Andee Graves

Skill level: Intermediate
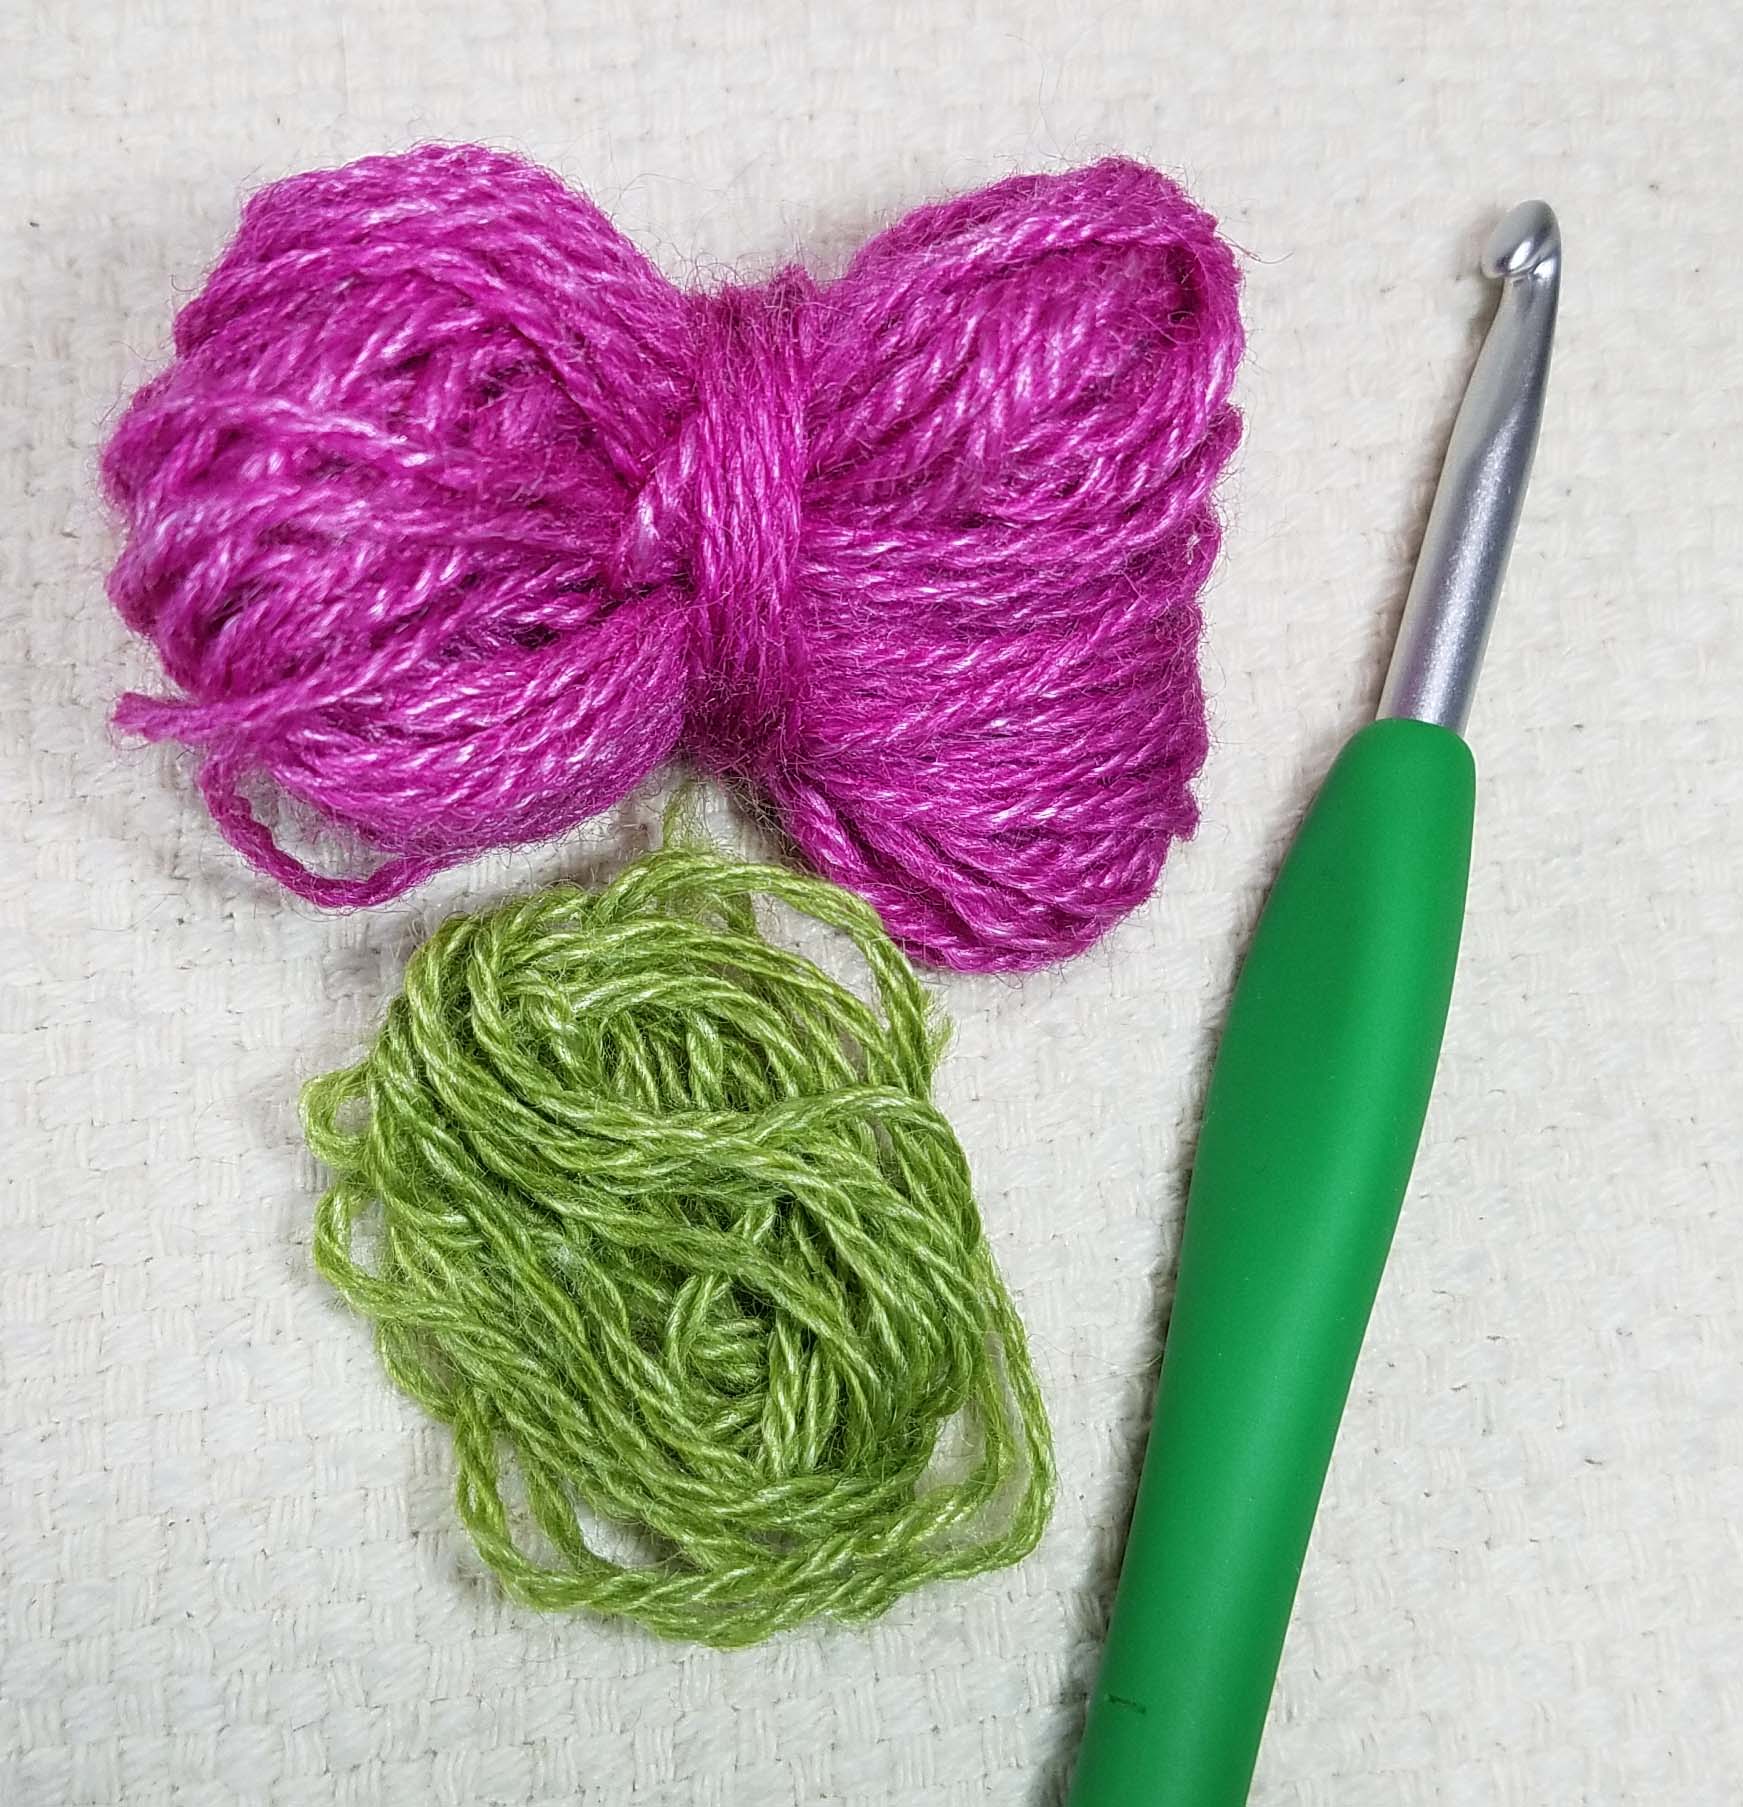
Materials:

Yarn – Lion Brand “Vanna’s Choice”, 100% Acrylic (3.5 oz/100g, 170 yds/156m) Color #171 Fern

Hook – I/9 – 5mm hook

Pin back or safety pin to attach to back of clover.

Special Stitches

3 DC Cluster (Cl):

Photo A

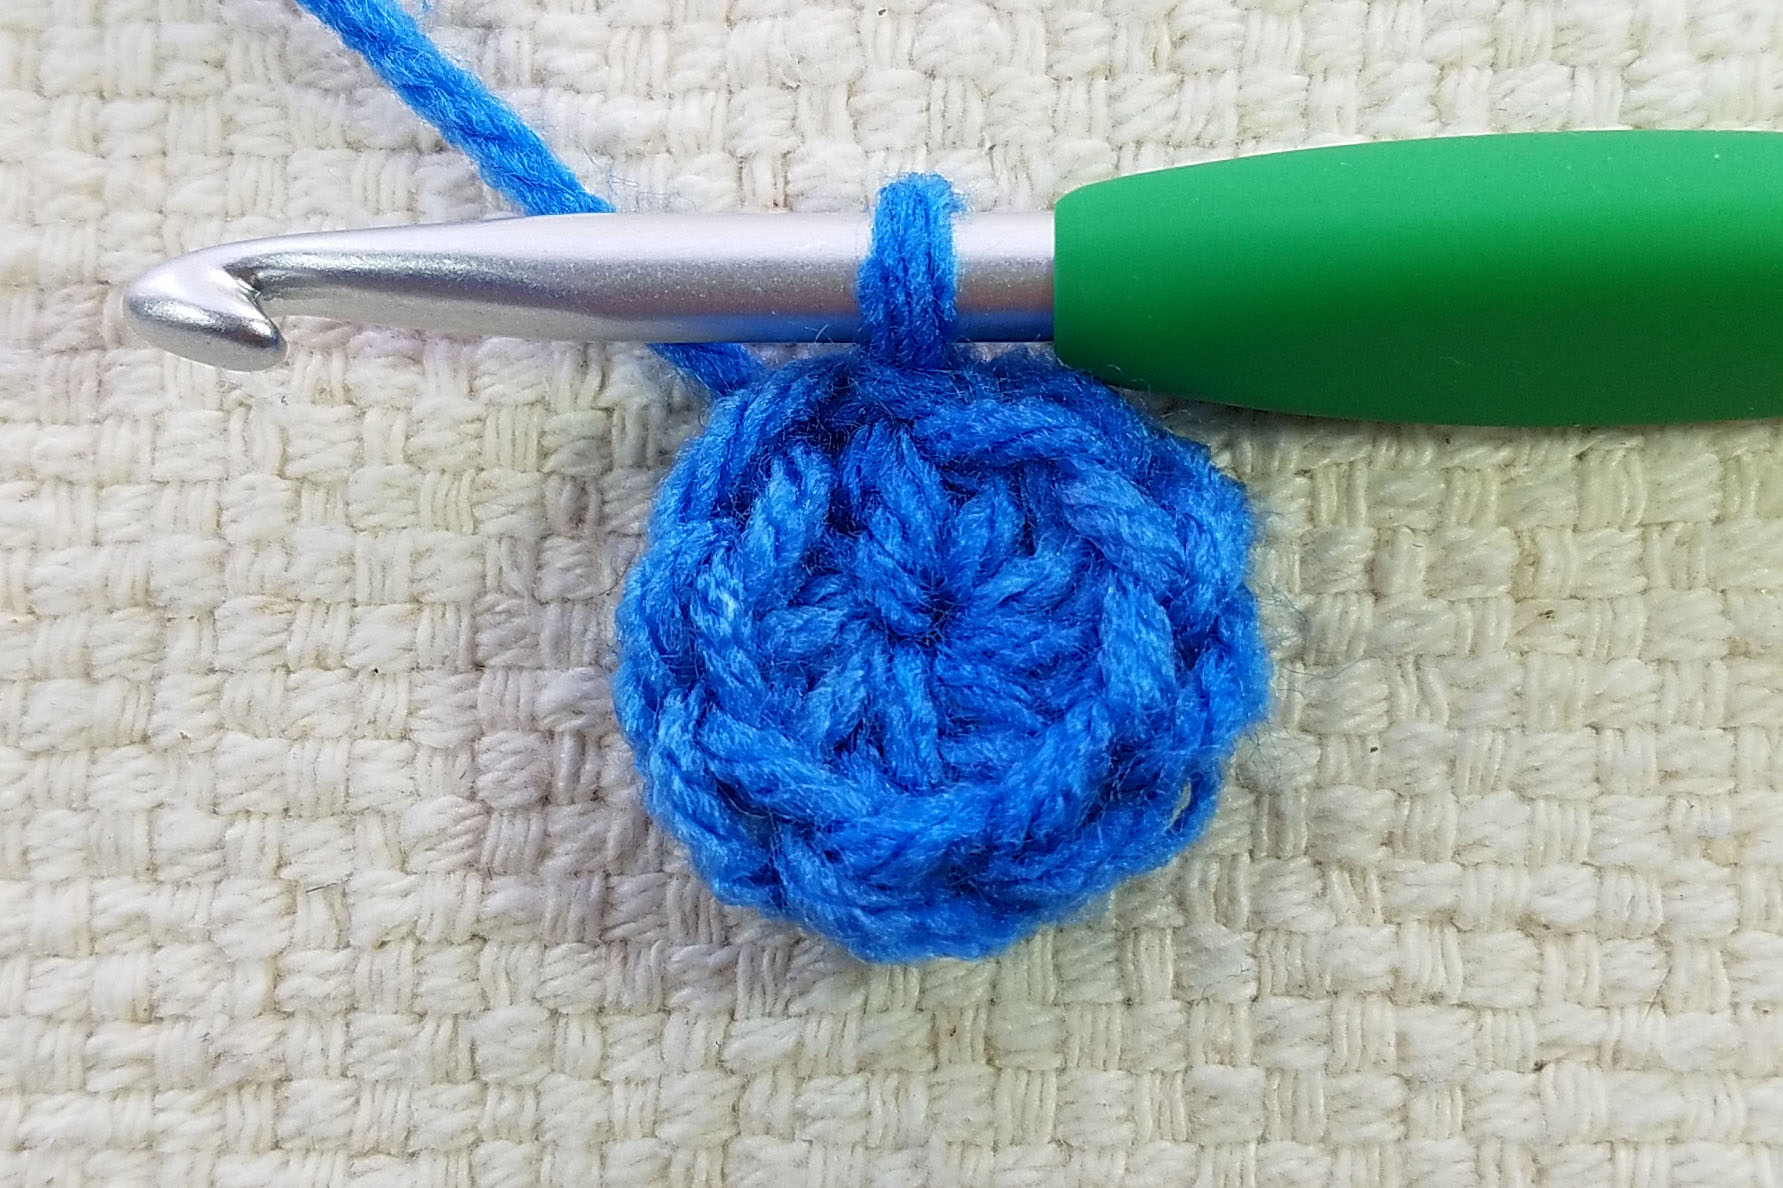
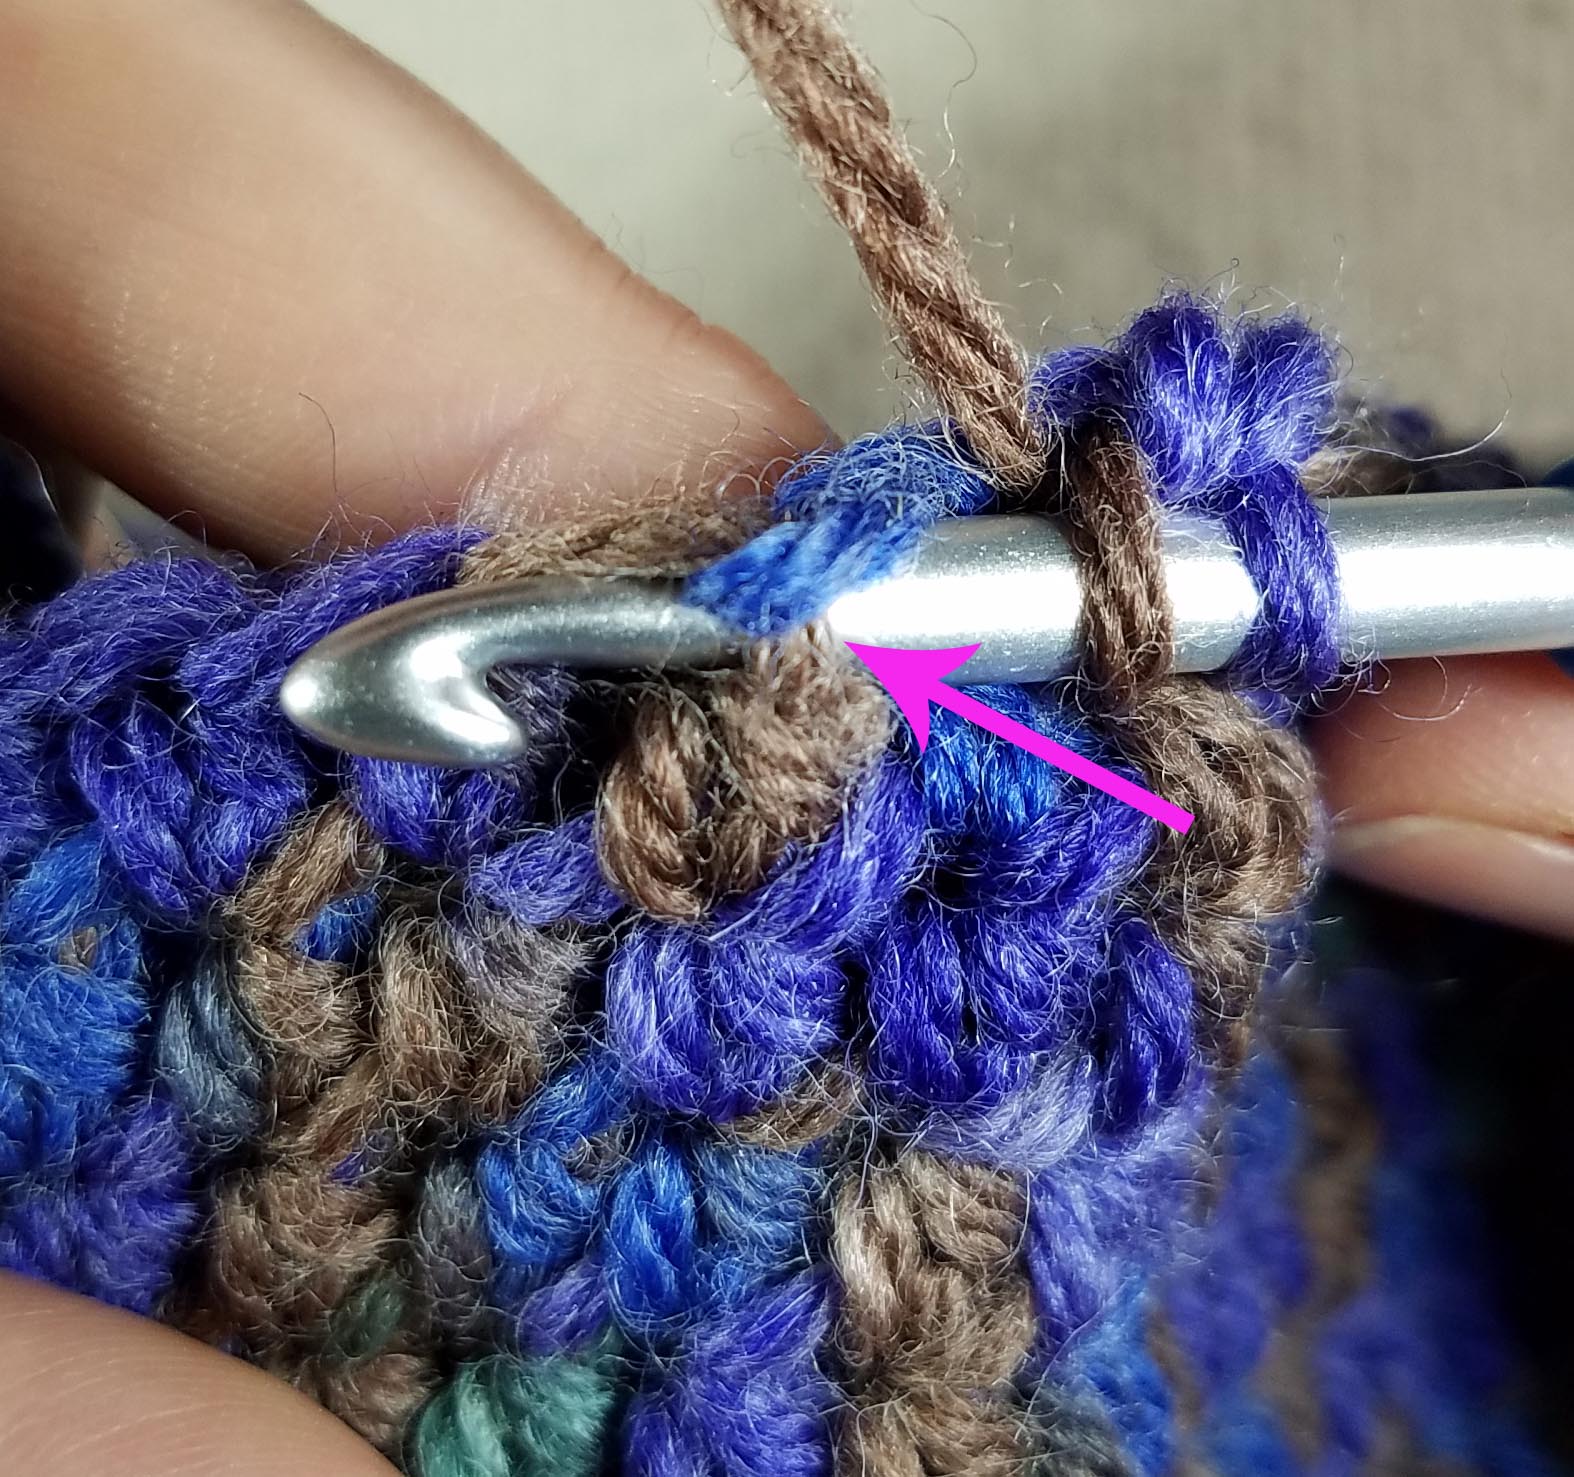
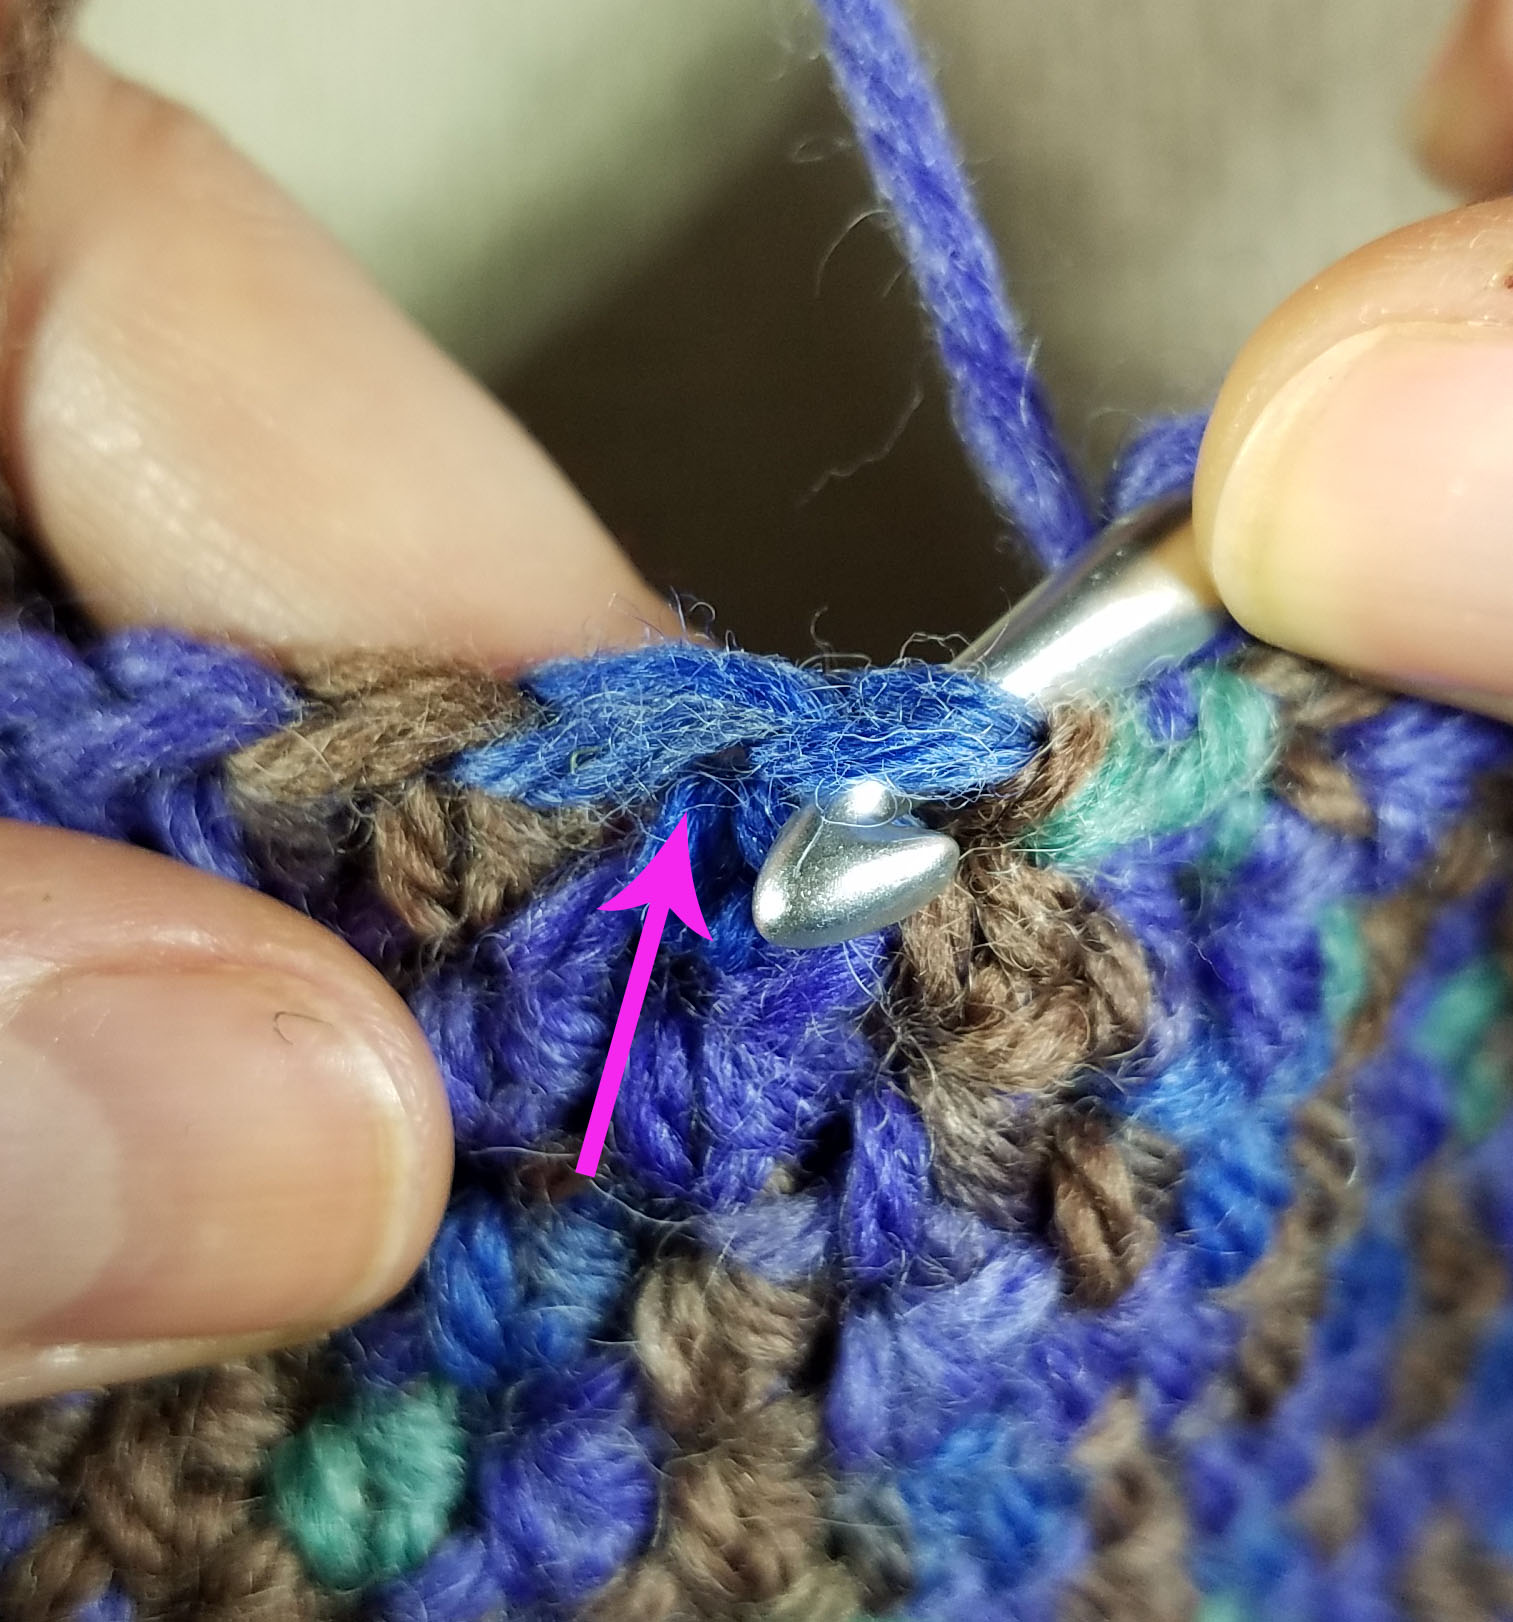
To make a 3 dc cluster st, yarn over (yo) like making a dc and insert in st or sp, yo, pull up a loop (3 loops on hook), yo {Photo A},

Photo B

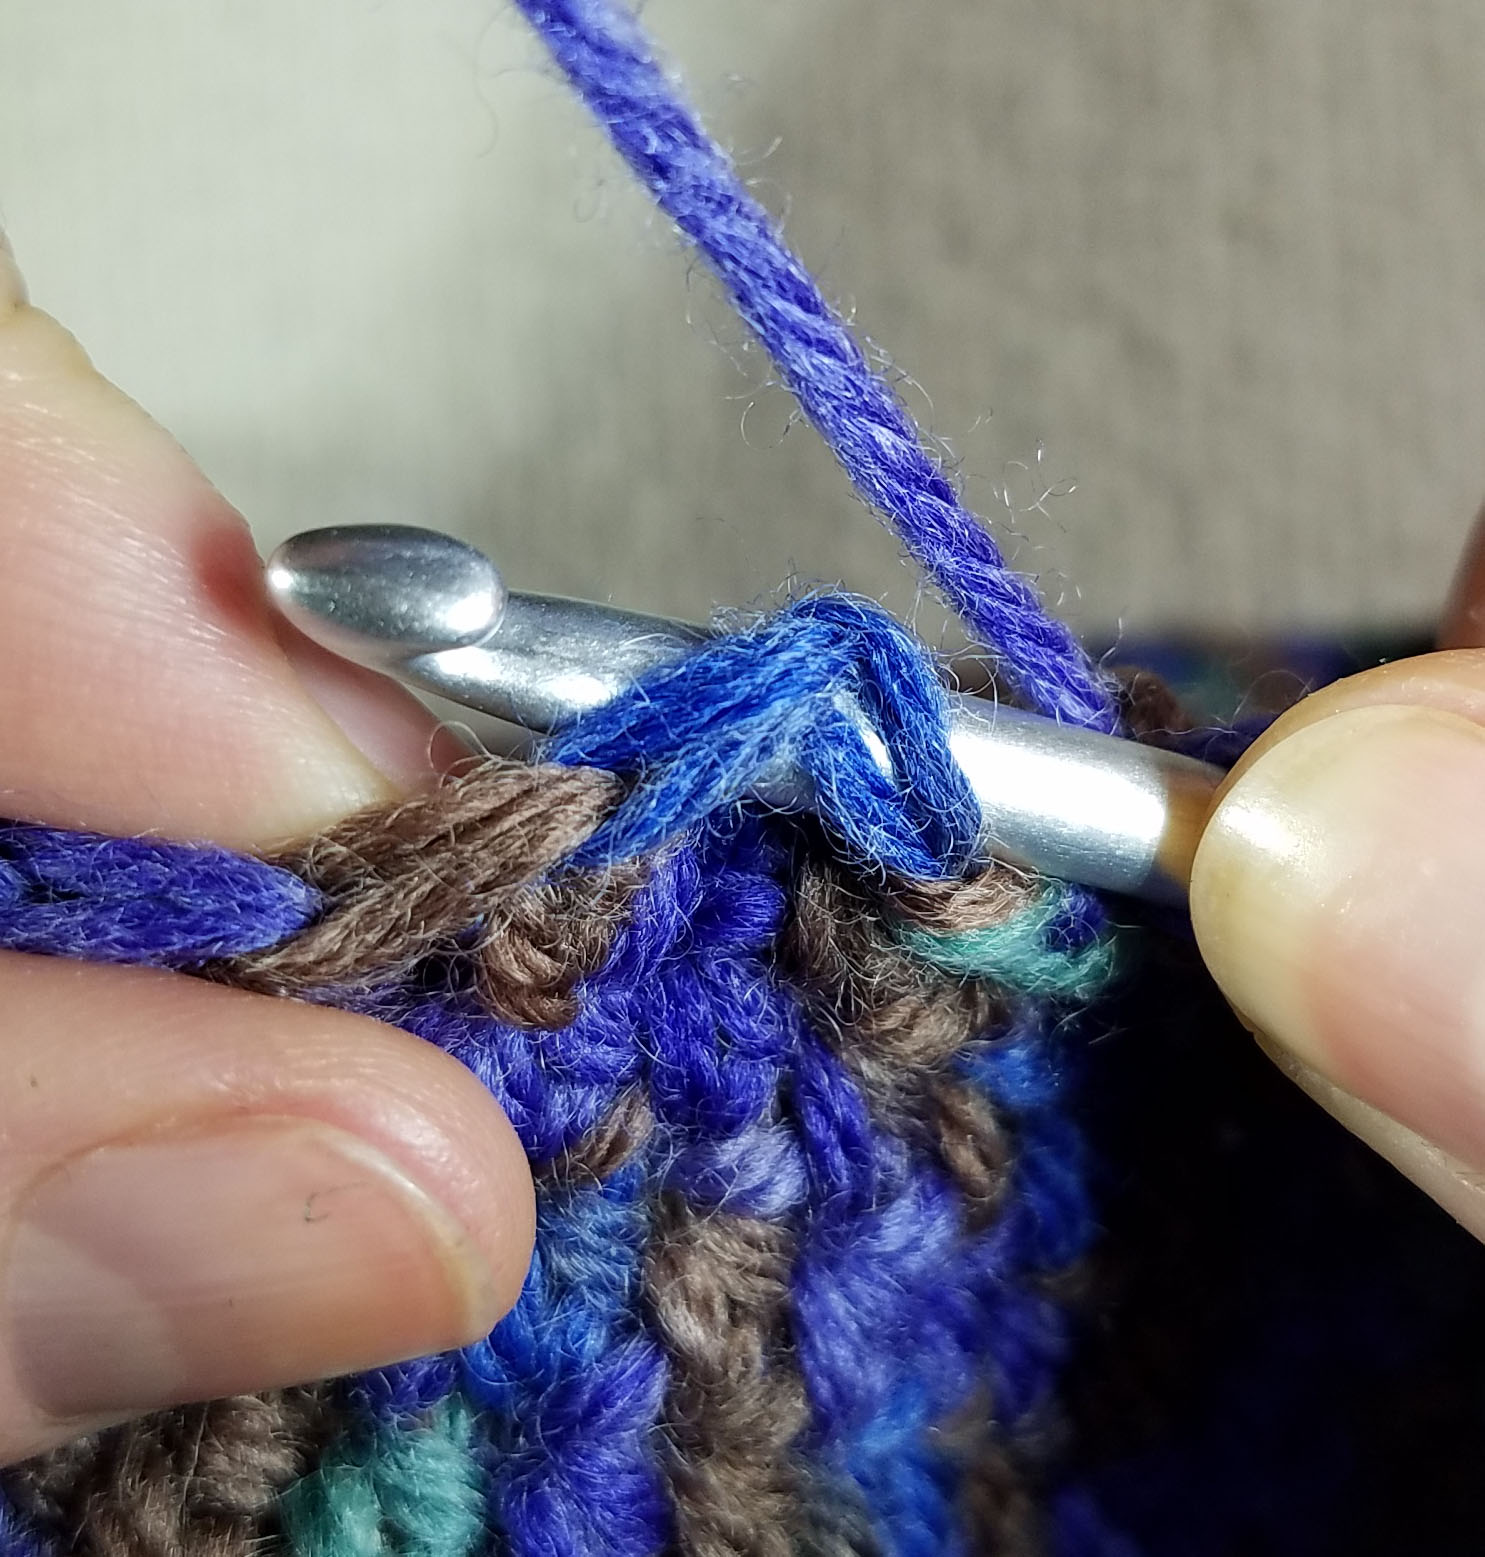
pull thru 2 loops on hook (2 loops remaining on hook, 1st base made), yo, insert in same st or sp, yo, pull up a loop (4 loops on hook), yo {Photo B},

Photo C

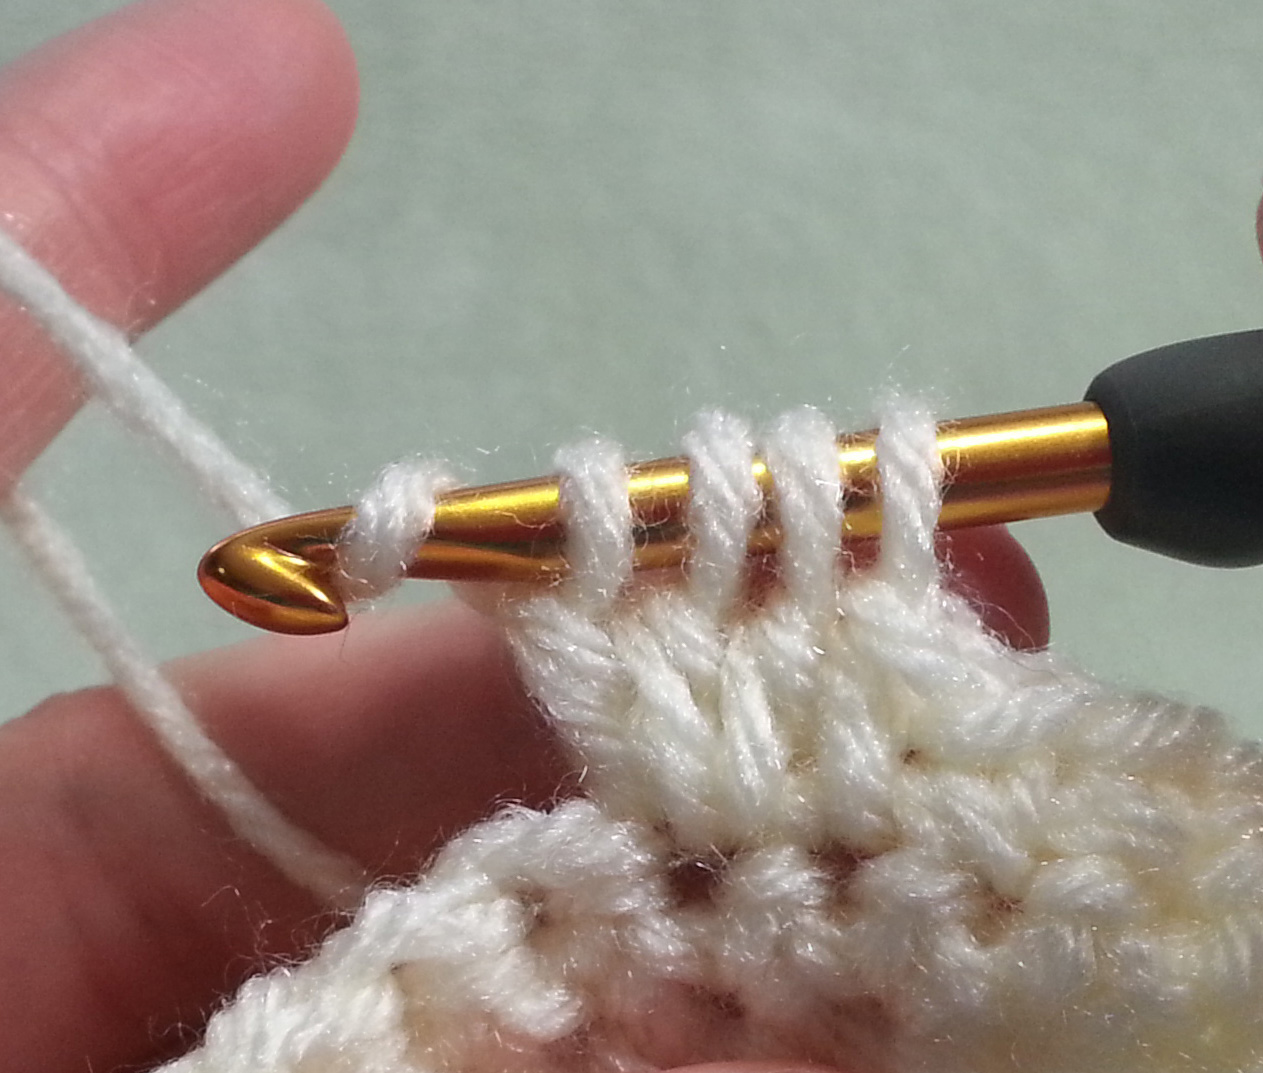
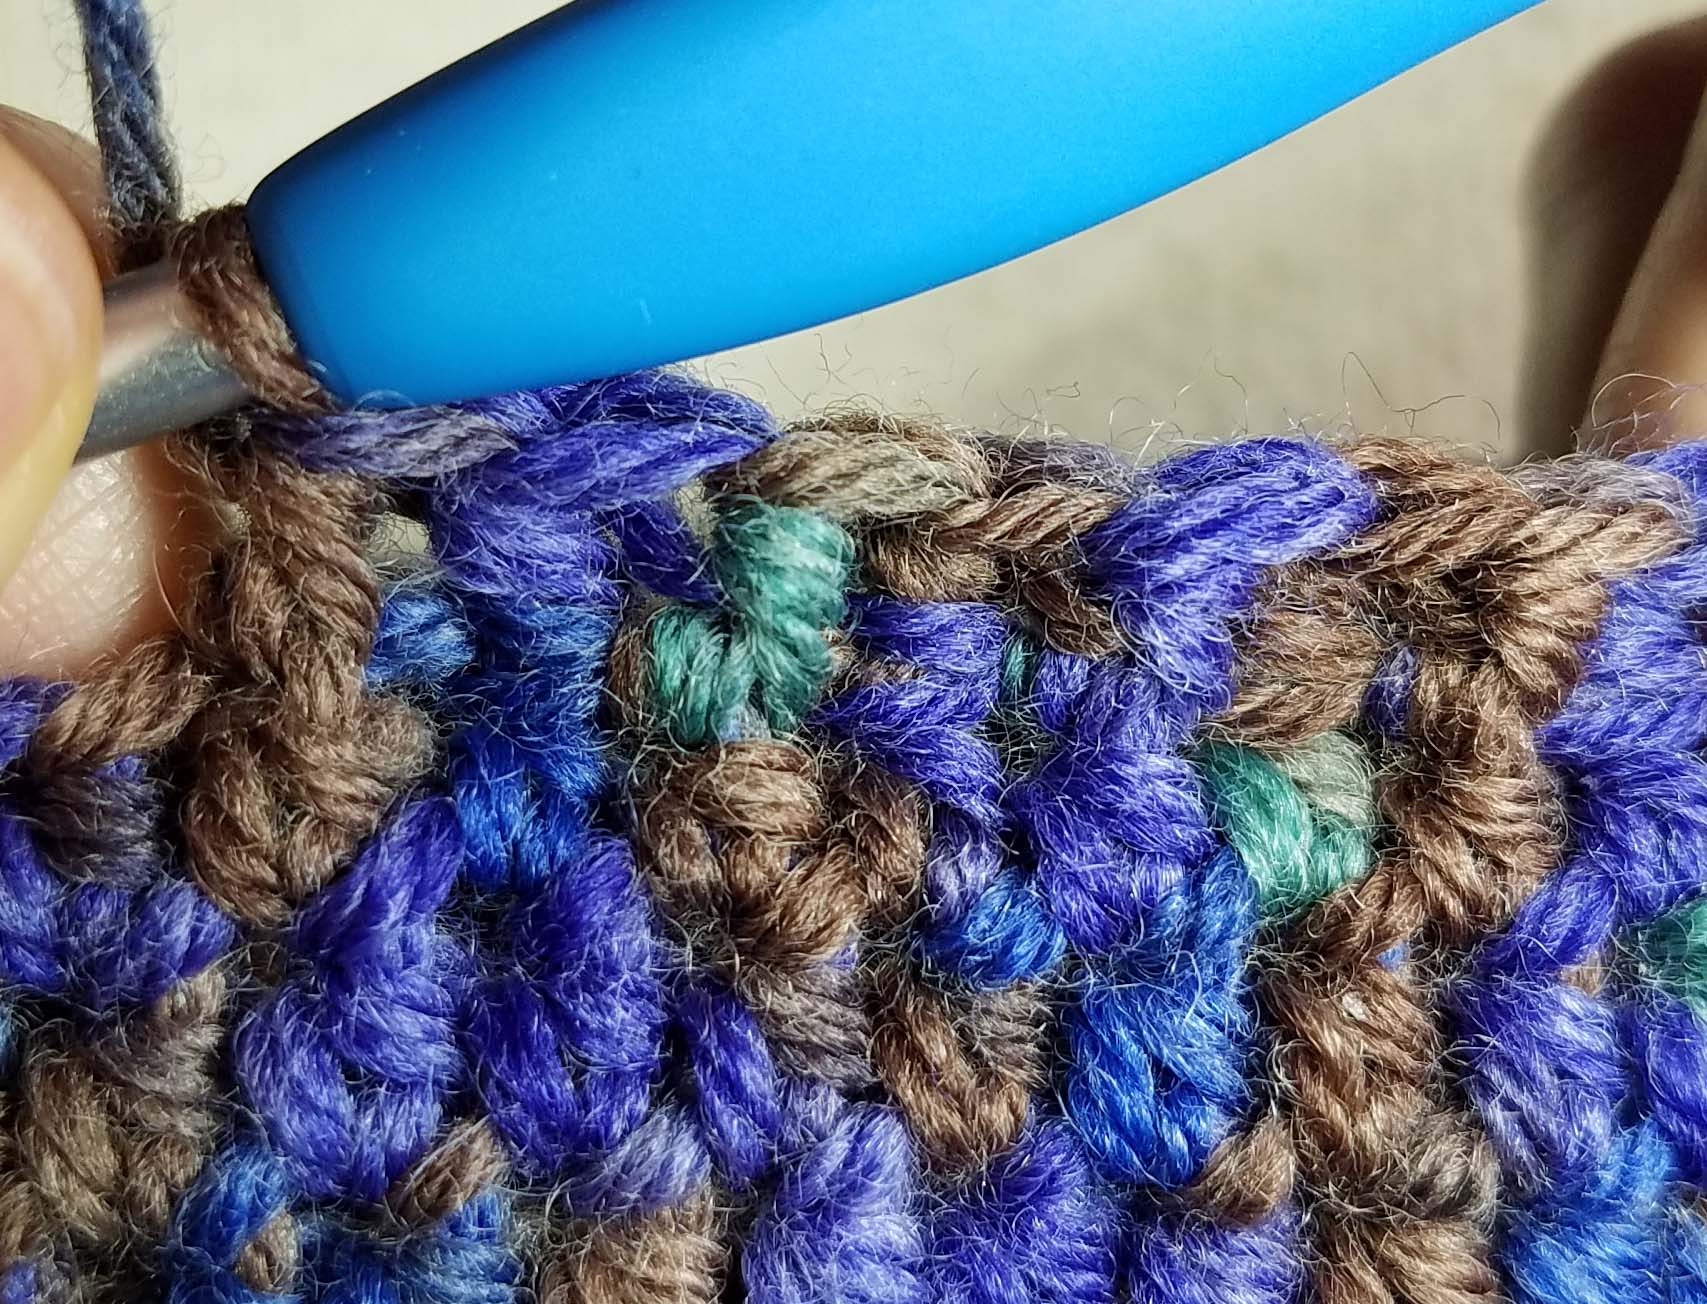
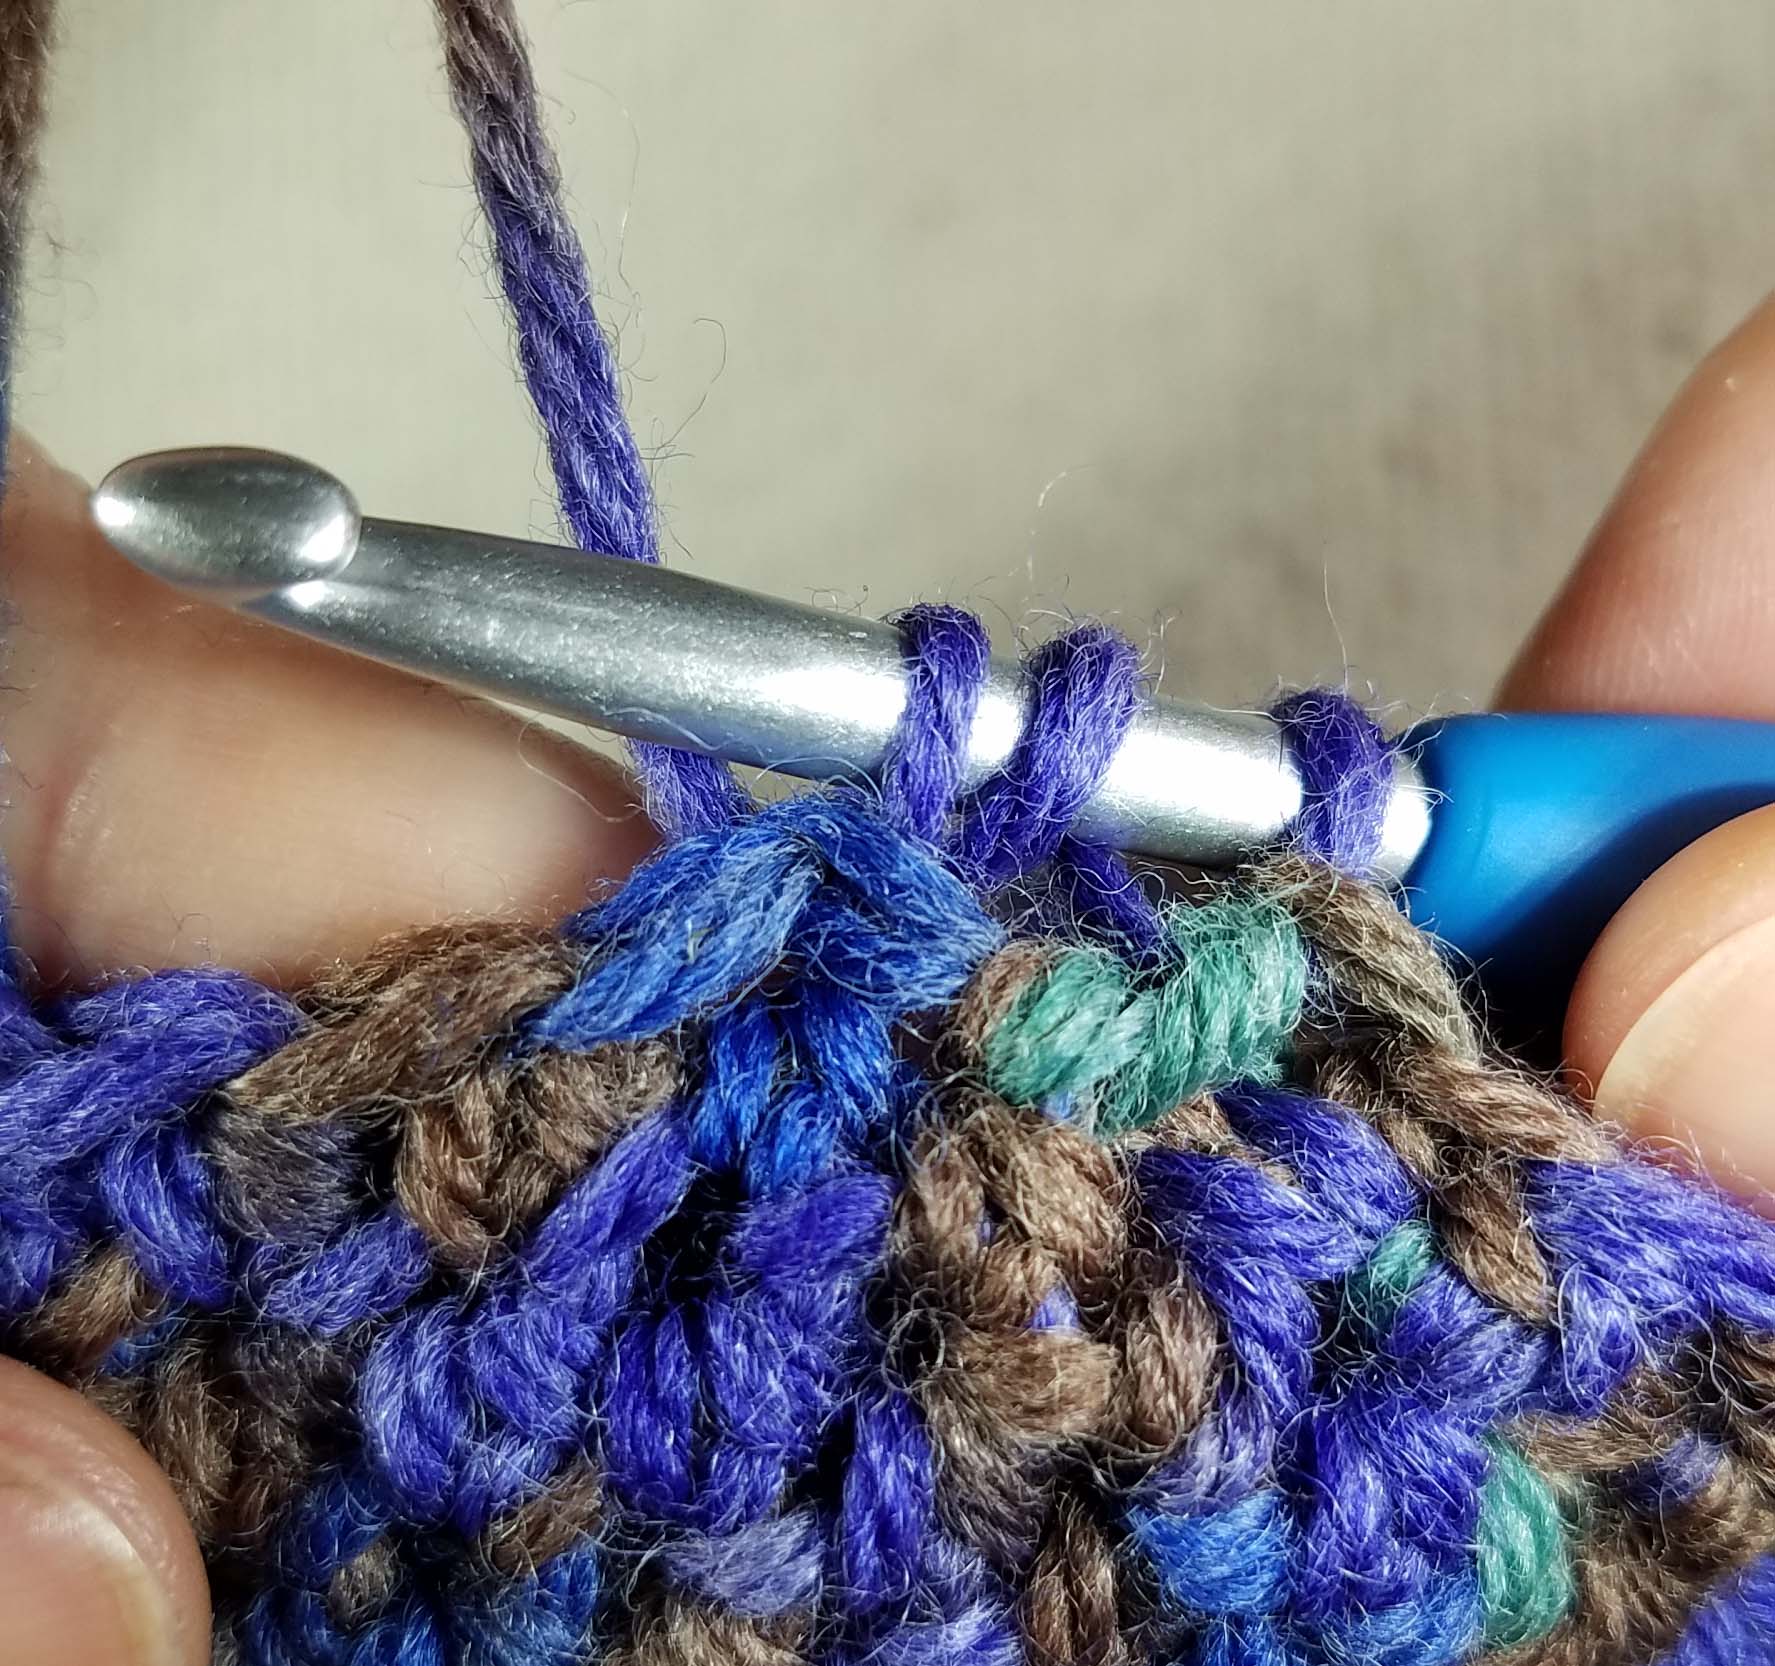
pull thru 2 loops (3 loops remaining on hook, 2nd base made), yo, insert in same st or sp, yo, pull up a loop (5 loops on hook), yo, pull thru 2 loops (4 loops remaining on hook, 3rd base made), yo {Photo C}, pull thru all 4 loops on hook.

Instructions:

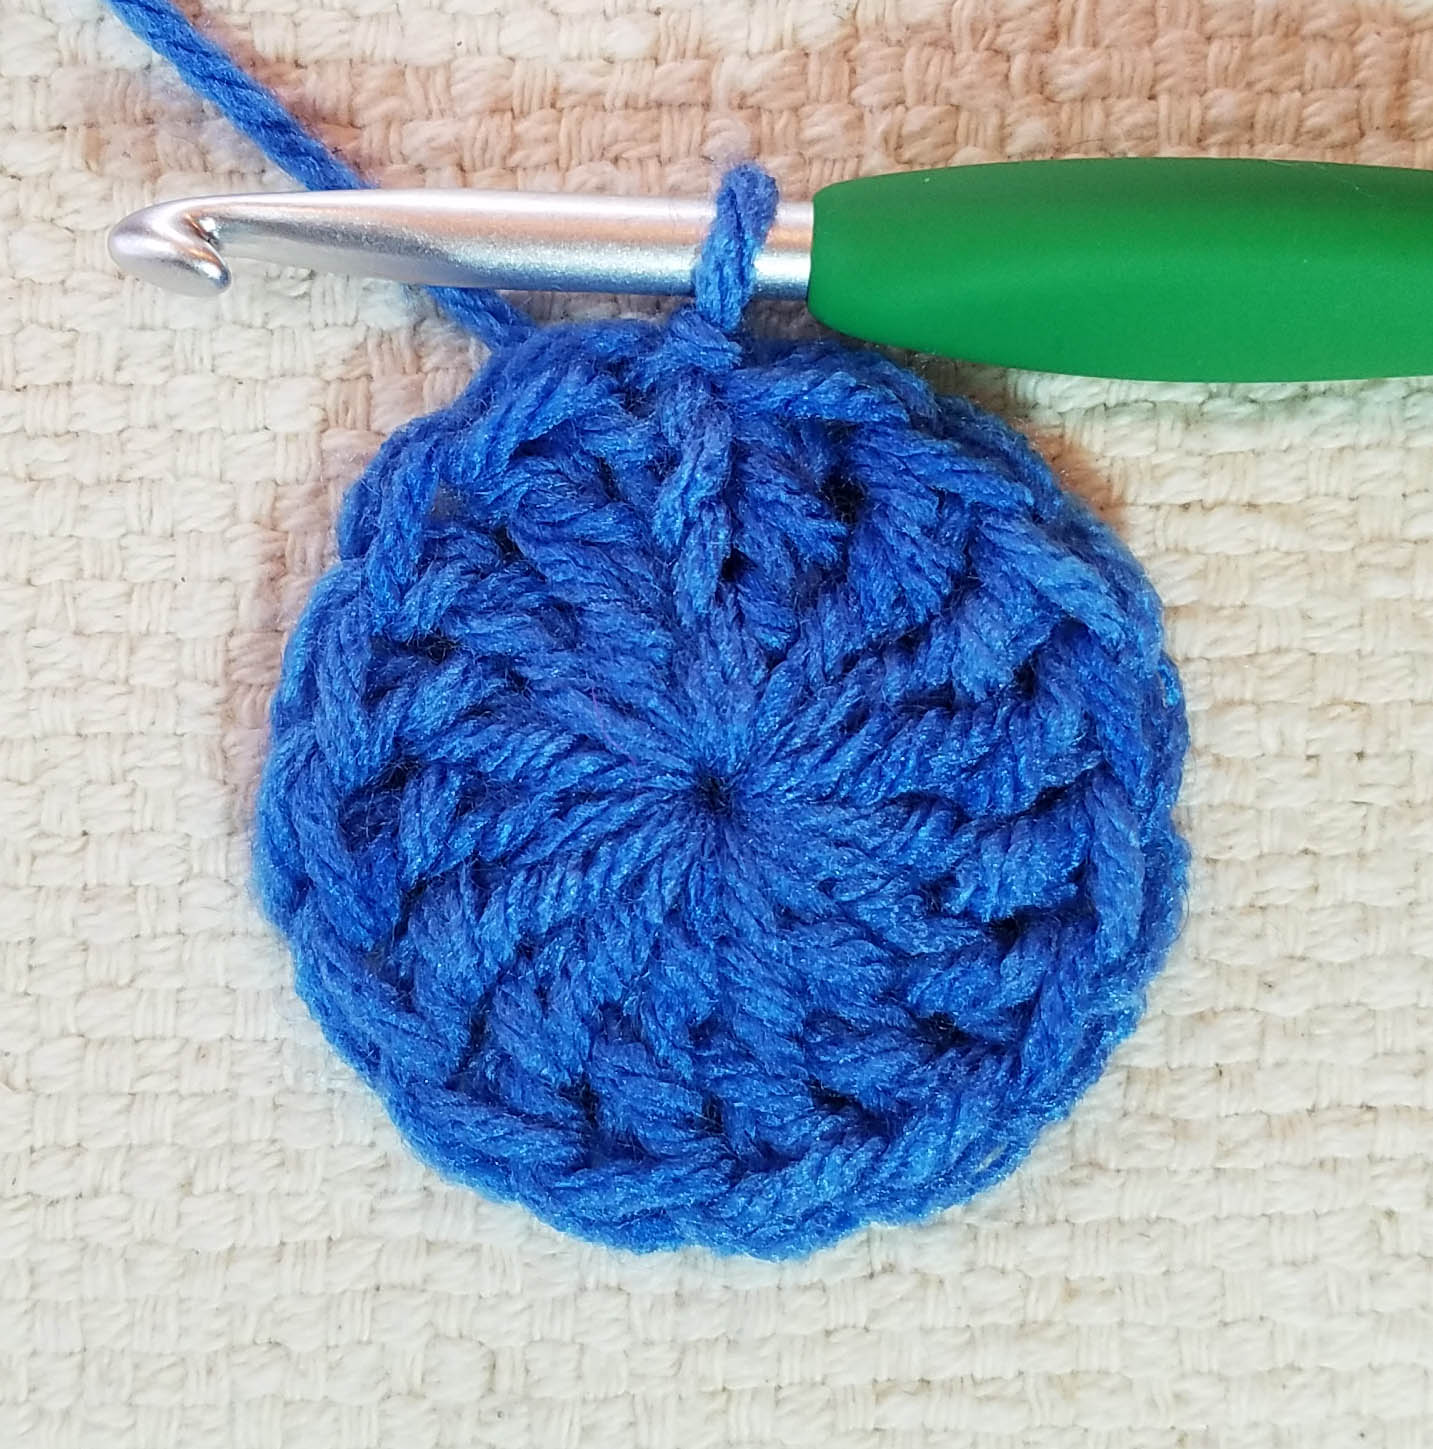
Round 1: Start with an Adjustable slip knot, ch 3, 7 hdc in 3 ch from hook, gently pull beginning tail to close center,

slip st under 2 loops (the “V” front of the ch st) at top of beginning ch-3 to join the round.

Round 2: {Thanks to Edith for the correction.}  Ch 3, *(Cl, ch 3 and slip st) in next st,** (slip st, ch 3) in next st*;

Repeat from * to * 2 times, Repeat from * to ** once,

Stem: Ch 6, working in back bumps, sc in 2nd ch from hook and in next 3 ch sts, slip st in last ch, cut yarn with 4-5 inches of tail. Stem will curl, it is supposed to.

Weave ending tail toward center, use tails to sew on a pin backing.

I hope you have a very lucky Saint Patrick’s Day, and some fun wearing a 4 Leaf Clover.

It’s Finished!

It is always so exciting to finish a project, even when it is a small one. This is how my newest little Playing With Triangles shawlette worked out. I’m very happy with it. It is 34 inches wide across the top and 17 inches long at the point. I haven’t blocked it yet, and may only do a very gentle blocking, since this yarn is largely alpaca fiber it may grown quite a bit if I block it aggressively.

This is all I have left of the yarn I started with for this project. I did some careful calculations to use up as much yarn and get the largest triangle possible. You can look at my original post “Some Pretty Crochet”, to see how much yarn I started out with for this project.

I also used 145 beads in this project. The arrows in the photo above point to some of the beads on the first row I beaded.

When I added the beads I used my handy new tool, the Fleegle Beader, to do the “hoist-on” method. I purchased this tool at the Longmont Yarn Shoppe. It works the same as the tiny crochet hook, the difference is that you can fill the whole shaft of the beading tool with beads, so you don’t have to have an open container of beads while working. In my small house, where there is lots of activity (busy kids, crazy cat and ditzy dog), an open container of beads can be a disaster waiting to happen.

I also really liked that I could load the tool up with beads, cap it with the red stopper, pop it in the tube and bring it along in my project bag when I am on the go. Then, each time I want to add a bead to my project it is ready, without the usual juggling act.

The little notch at the end of the tool (close-up inset in photo) acts like the hook on a tiny crochet hook for holding your yarn while sliding the bead from the tool onto the working loop. The creator of this tool doesn’t recommend it for thicker than “heavy fingering weight” yarn. But I am going to experiment with some heavier yarns and see if it will work for me. Since I have used the same size steel crochet hook for putting beads on a variety of weights of yarn (including a heavy worsted) I think it may work fine.

Though as my mom would say, “You have to hold your mouth just right.” That’s a family saying for the funny faces most of us seem to make when learning something new or tackling a finicky task.

This morning was my Casual Crochet group at Longmont Yarn Shoppe, and I only had a little bit of crocheting left to do on this shawlette. I finished the crocheting, got all my tails woven in and added a pretty mother-of-pearl button to one end for lots of styling options.  Even had my picture taken for the shop’s Facebook page. That was a busy 2 hours.

Another Pi Day Celebration

Wow! It’s Pi Day again already. Today is March 14 or 3/14 as we Americans like to write it. Pi is 3.14, so some clever mathy person decided that March 14 should be celebrated as Pi day. Being that I am a math geek I’m totally into that.

I use Pi to figure out the geometry for a lot of my design work, especially when I am designing hats and determining how (or IF) my gauge is going to get me the size hat I want. This particularly applies to working crown down hats that involve creating a flat circle to start.

Today I thought we should take a look at crocheting circles. No Pi calculations needed, though you can if you really want.

I don’t recall when I first learnt about the “rules” for getting circles to come out flat in crochet. But I have used those as a guideline in much of my design work over the past 10 years, even before I was designing professionally.  Here are the “rules” with some additional thoughts.

To create a circle, especially when worked into an adjustable slip knot (or magic circle if you prefer), you need to consider the height of your stitches. You also need to consider your stitch tension and consistency. Working circles is one technique that will really show you if you are deforming your stitches. Either making them too tall, too short, too wide or too thin, you are looking for the ultimate “Goldie Locks” zone of your stitch tension to get your circles to come out Just Right.

I’m demonstrating today using the 4 most common stitches in traditional crochet: Single, Half-Double, Double and Treble.

Making a circle using Single Crochet stitches: The magic number is 6, you want to have 6 sc stitches in your first round and you will add 6 stitches to each consecutive round. Round 2 will have 12 stitches, Round 3 will have 18 stitches, Round 4 will have 24 stitches.

Making a circle using Half-Double Crochet stitches: The magic number is 8, you will have 7 hdc and a ch-2 (that counts as a hdc) in your first round and you will add 8 stitches to each consecutive round. You will start each round with a ch-2 that will be counted as a hdc stitch for your end of round counts. Round 2 will have 16 stitches, Round 3 will have 24 stitches, Round 4 will have 32 stitches.

Making a circle using Double Crochet stitches: The magic number is 12, you will have 11 dc and a ch-3 (that counts as a dc) in your first round and you will add 12 stitches to each consecutive round. You will start each round with a ch-3 that will be counted as a dc stitch for your end of round counts. Round 2 will have 24 stitches, Round 3 will have 36 stitches, Round 4 will have 48 stitches.

Making a circle using Treble Crochet stitches: The magic number is 16, you will have 15 Tr and a ch-4 (that counts as a Tr) in your first round and you will add 16 stitches to each consecutive round. You will start each round with a ch-4 that will be counted as a Tr stitch for your end of round counts. Round 2 will have 32 stitches, Round 3 will have 48 stitches, Round 4 will have 64 stitches.

I hope these rules will help you with crocheting circles and that you have a great Pi Day. Maybe celebrate with some crocheted circles and some Pie.

“A Garden of Shawls” book

Today I’m excited to share a review of a fabulous new book from my friend and colleague, Karen Whooley. As many of my long time visitors know, Karen was my mentor when I got started as a designer 8 years ago. The photo above was one of our first attempts at a “selfie” back at the 2014 CGOA conference in Manchester.

Copyright Karen Whooley – Photo by Anne Podlesak

Karen and I have always shared a love of designing wearables, especially wraps. In her new book “Garden of Shawls” Karen has created 12 beautiful wrap designs worked in lightweight yarns. She has a great eye for creating fun balances of lace work and solid fabric that will have you grabbing your hooks and yarn to get started on these shawls.

I love the lay-out of this book. Each project has stitch charts and super clear schematics as well as concise written instructions. This means you can have a very clear picture from the start of your project to the end about how your shawl should work out.

If you are like me, you likely have been to a fiber festival where you just couldn’t resist purchasing a couple of gorgeous hanks of lace or fingering weight yarn. Karen has designed most of these shawls using 1 or 2 hanks of yarn so you can finally take those lovely hanks out of your stash and turn them into a beautiful wrap that you will wear for years.

I had a hard time deciding which of the 12 Shawls in the book were my favorites. Currently I’m voting for these four…

Photo taken by Anne Podlesak

Breeze – This shawl is the style I associate with Karen the most. She has a knack for end to end construction that creates a lovely border on the one side of each row. You reach the end of the rows and your shawl has a gorgeous border all done. So clever! Many of the wraps in the book use this technique.

Photo taken by Anne Podlesak

Solar – This shawl just struck me with its happy color choices, but even in another color series it would be lovely. The radiating spokes of the top-down construction combined with the eyelets that showcase the “ripple” style patterning are eye-catching and entertaining to crochet.

Photo taken by Anne Podlesak

Drift – Another top-down shawl that uses gradient changing colors for a dramatic border. I love the textural interest Karen created in this shawl by including post stitches.

Photo taken by Anne Podlesak

Ecliptic – a more traditional top-down Triangle shaped shawl with graceful columns of shells ending in a soft scalloped border.

Print copies of this book will become available in Apirl, but you can pre-order your copy. She has a couple of ordering options, you can get an Ebook version only or a print version + a free Ebook. You can place you order here on her website.

Best of all, if you live in the USA  and place an order during the month of March you will be entered into a drawing to win one of these awesome Goodie Bags from Karen. You can find out more about those by clicking here to visit her blog.

I hope you get a chance to check out Karen’s book and that you decide to add it to your library. It is definitely a good investment. If you would like an opportunity to win a complimentary Ebook copy of the book leave your name in the comments on this blog post by Sunday March 19, 8 p.m. Mountain Time and I’ll announce the winner on March 20th here on the blog.


Some Pretty Crochet

Today I decided to make a little PWT shawlette for myself.

I love this “Folio” yarn from Berroco Yarns and had a little bit of green left over from another project. I thought it would go nicely with some raspberry colored that I also had.

I made a swatch and did the calculations to figure out how big a shawlette I could make. Looks like this will be about 32 inches wide and 16 inches long at the point.

I’m going to add some beads to the next to last body row and to the border for some bling. This little shawlette will be more like a necklace than a shawl. I’ll show you the finished project tomorrow. I’m hoping to wear this to my class I am teaching or I may use it to demonstrate adding beads to our shawl projects.

Swatching Experiments

Today I have been making swatches for my Playing with Triangles Shawl class this weekend at the Longmont Yarn Shoppe.  These are to show my students what a difference changing the size of hook can make to your fabric. I used Ella Rae Cozy Worsted for my swatches.

Swatch #1 I used a 4.5mm size hook. Swatch #2 I used a 5.5mm size hook. Swatch #3 I used a 6.5mm size hook.

I think I will make a fourth swatch, since I wasn’t completely happy with how the fabric came out in swatch #3. I’m actually going to go down half a millimeter in size to see if I like that fabric better.

Playing with Triangles Class

Today was my Casual Crochet group at the Longmont Yarn Shoppe. We had 8 people there, counting myself, there was lots of fun showing off finished projects and those that are still in progress.

Margie had one of her “Frida’s Flowers” afghans with her.  She is making 2, one in pastel colors and one in bright jewel tone colors. She had the bright one with her today. I just loved the black background motifs.

I also found out today that my class this Saturday has 3 students already. That means I have room for a few more students. If you are in the area and want to learn more than you thought there was to know about crocheting a top-down triangle shawl come join me for my “Playing with Triangles” class this Saturday.

The class starts at 12 noon and goes until 3 p.m. It will be 3 full hours of the basics and beyond of working triangle shawls with any yarn and hook combination that appeal to you. You can sign up for the class online at the Longmont Yarn Shoppe website, or call or stop by the shop.

Speaking of classes. Today registration opened for the Chain Link – CGOA Conference in Chicago this July 26-29. You can sign up for classes and get your tickets for all the fun events. Online registration is open until July 20, 2017.


Notice Something New?

After a lot of thinking about it and talking with some friends I decided it was time to change the name at the top of the page for my blog. “Two Hands Healing and Creative Arts” is rather long and diffuse. Instead my blog will simply be “Mamas2Hands” from now on. It is in keeping with my URL, which is mamas2hands.com. “Two Hands Healing and Creative Arts” will remain my primary company name.

I’ll be making some other changes over the next 3 months as I re-align my business with my goals for 2017 and onward. We will talk more about that next month. For now, it’s time to continue enjoy crocheting and NatCroMo.

Today I spent my morning with my good friend Val crocheting. She is making a bunch of hats, some for little kids and some for American Girl Dolls. I was working on a new hat design. It’s still in the early stages, but I’ll share more about it once I have it all worked out.

I chose to work this preliminary hat in some Premier Yarns Deborah Norville Collection “Everyday Worsted”. It’s a nice anti-pill yarn so holds up to the repeated frogging that is often part of working out a design. Of course, having prepared for lots of frogging, I ended up getting the stitches right the first time. I think that might be a corollary to the rule about “Carry an umbrella and it doesn’t rain”.

Another Hat for Thing 2 – part 4

Last night I finished Thing 2’s hat. It was just in time as the weather took a turn toward freezing cold temperatures again. This morning he happily wore his new hat to school, though getting a clear photo of him wearing it was a bit of a challenge.

The only part I had to finish yesterday evening was the ribbed band at the brim of the hat. This gives the classic ribbed look around the face, but it also acts to draw in the fabric of the crown and sides for a snug fit around the ears.

For my ribbing I use post stitches. For those of you that have never worked post stitches, their name comes from the fact that they are worked around the “post” of a stitch instead of under the top 2 strands of a stitch. This gives them much more of a textured look and changes how the fabric behaves.

With a taller stitch like the double crochet it is quite easy to see the “post” of the stitch and to work around the center of this post when working post stitches. For a stitch like the Half Double or Single crochet that becomes a bit more fiddly to find.

The first time I tried using post stitches for my ribbing I decided to do what I call “skinny” post stitches. Instead of working down into the stitch, I use the very top of the post just under the “v” that makes the top of the stitch (the bit of brown yarn the arrow is pointing to in the photograph above). This creates a slimmer looking stitch because the base of the post stitch isn’t stretched around the thickest part of the other stitch.

For the ribbing affect I alternate my post stitches, so I needed an even number of stitches. I generally start with a FPhdc, and end the round with a BPhdc. The first round of ribbing is the trickiest.

Once you have finished that round it just becomes a matter of working FP stitches into FP stitches and BP into BP.

For a Front Post half double crochet (FPhdc): Insert the hook from front to back to the right of the post you want to work around, then bring the hook from the back to the front under the top of the stitch to the left of the post (indicated by arrow in photo above).  Yarn over and pull up a loop thru all the stitches, yarn over and complete your hdc. The post of this new stitch will be sitting on the front of your fabric.

For a Back Post half double crochet (BPhdc): Insert the hook from back to front to the right of the post you want to work around, then bring the hook from the front to the back under the top of the stitch for the left of the post (indicated by arrow in photo above).

Yarn over and pull up a loop thru all the stitches, yarn over and complete your hdc. The post of this new stitch will be sitting on the back of your fabric.

Finished BPhdc.

Once I finished the ribbing for Thing 2’s hat all I needed to do was weave in my beginning and ending tails. The tail at the crown is fairly easy to weave in, I’m just careful not to pull the tail too tight and create holes in the crown. For the ending tail at the brim, I want to be sure the tail is woven in so that it doesn’t create a tight spot in the fabric. I weave on the inside of the hat and keep my weaving restricted to 1 “column” of stitches.

I’m always careful with my end weaving to be sure that the tails are well secured. Hats get lots of handling and I want to be sure that this hat doesn’t become un-raveled. The very final step for me was to make an identifying tag that has our family name and phone number, just in case this hat gets misplaced. Hopefully the contact info will insure that the hat makes it back to us.


Another Hat for Thing 2 – part 3

Yesterday I had finished the crown of Thing 2’s new hat. The next step was to crochet “even” rounds until I had reached the length I wanted for the sides of the hat. Crocheting even means that I work 1 stitch in each stitch. But how do I know what length I wanted the sides to be?

I had taken 2 measurements when I was getting ready to crochet this hat originally. One was the circumference of Thing 2’s head, the second one was the “depth” of the hat. Thing 2 likes his hats to cover his ears well. He has short hair and wants his ears well covered.  When I took the depth measurement I placed one end of my measuring tape below his ear and took the tape over the top of his head to the matching spot under his other ear. That measurement was 16 1/2 inches.

When I am working on the hat though, it is less cumbersome to measure the depth by placing the end of the tape at the top center of the crown and read the tape at the bottom edge of the hat. Which means I divide my original measurement in half. My target length for the depth of Thing 2’s hat is 8 1/4 inches.

hat-folded-in-4ths-andee-graves-m2h-designs

As I get closer to the depth I want my hat I fold it in quarters and measure the length to see how many more rounds I need to crochet.

measuring-hat-depth-andee-graves-m2h-designs

I’m going to want about an inch of ribbing at the opening of the hat, so I know I need to work even rounds until my measurement from the crown is 7 1/4 inches. Then I will switch to working Front and Back post ribbing.

My favorite stitch for hats is the half-double crochet. It’s a great stitch for combining flexibility and density. It also makes for an awesome ribbing using post stitches. I’ll show you all about post stitches and how I make my ribbing for my hats in tomorrow’s post.