Behind the Curtain

For some yarn crafters the world of designing seems mysterious, so I thought I’d give you a peek behind the scenes when I am designing. In particular some of the math that I use when designing a triangle-shaped top-down shawl.

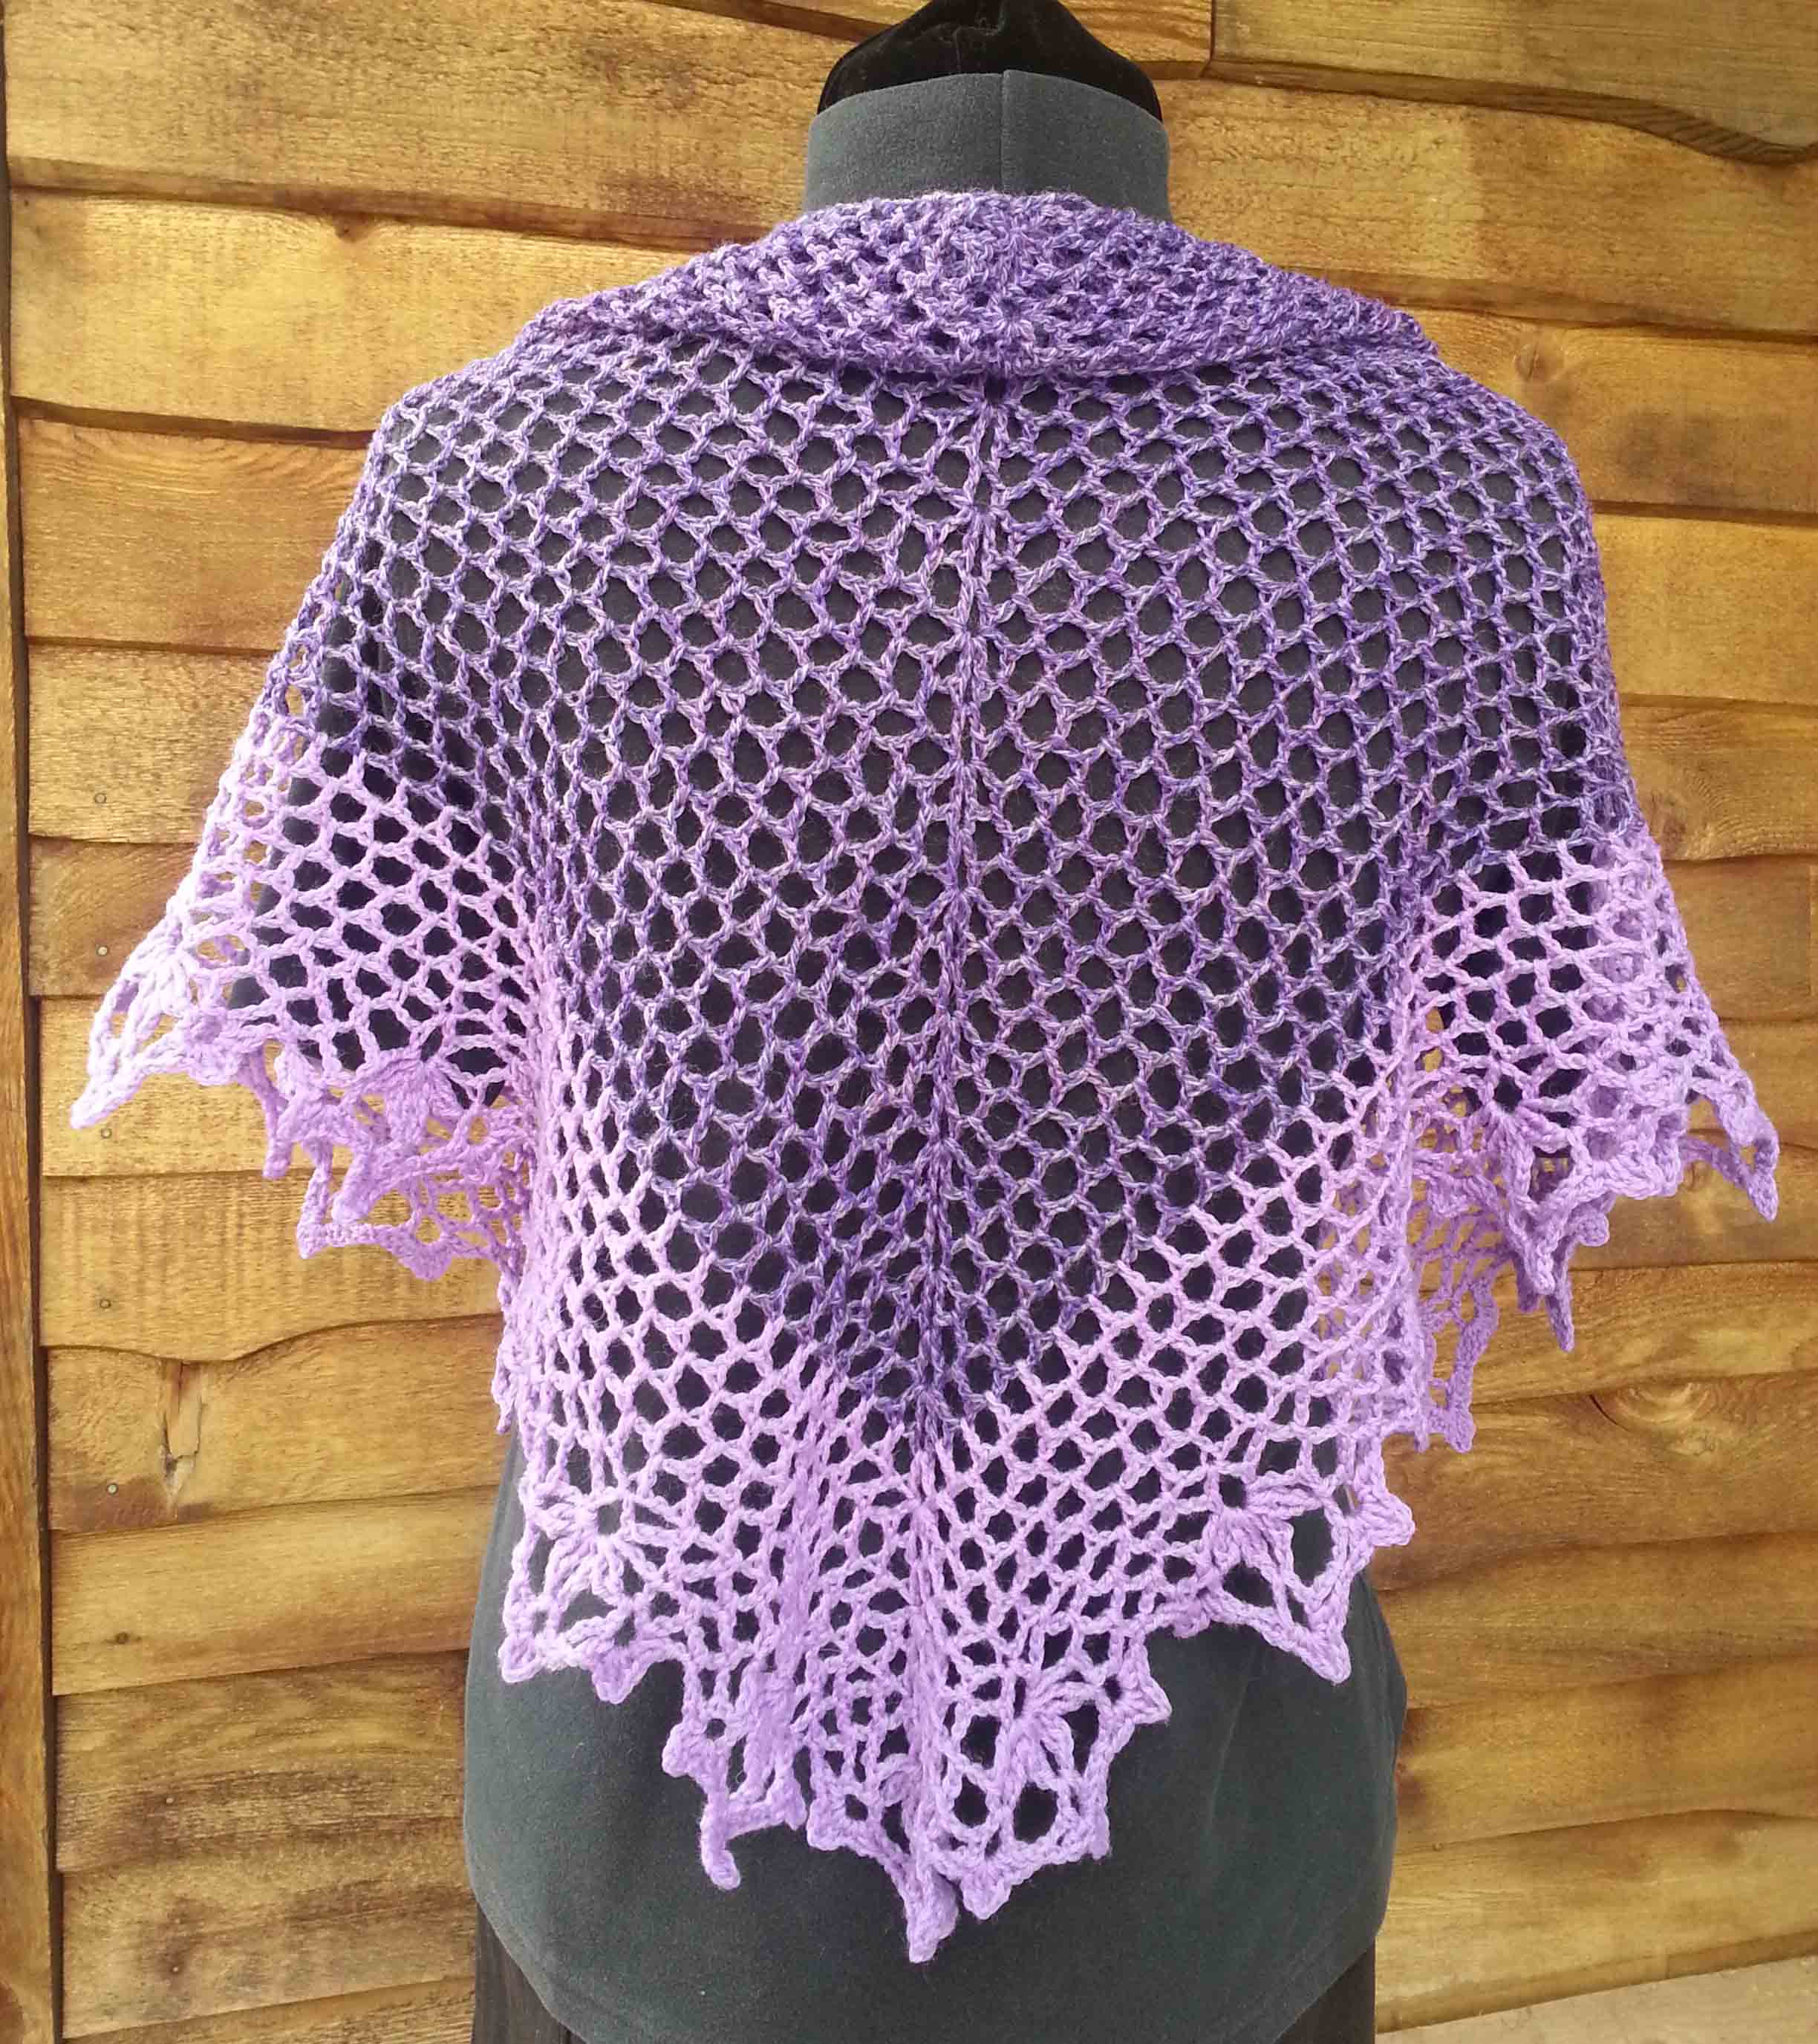
Triangles are popular for shawls because they can be worked top-down either with decreases on the ends or increases at the ends and center. There are triangle-shaped shawl patterns out there that are created from the bottom point upward. I don’t like to work that way so haven’t ever designed a shawl using that method.

Eleonora Shawlette / M2H Designs

My “Eleonora Shawlette” is an example of a triangle shape worked top down with 3 increase points.

Mountain Whisper Shawl / M2H Designs

So is my “Mountain Whisper Shawl”.

The great thing about a triangle shape is that it is relatively easy to figure out the amount of yarn needed for the shawl (or shawlette). The same math can be used to figure out how big a shawl you could make from the yardage you have on hand.

Deciding dimensions

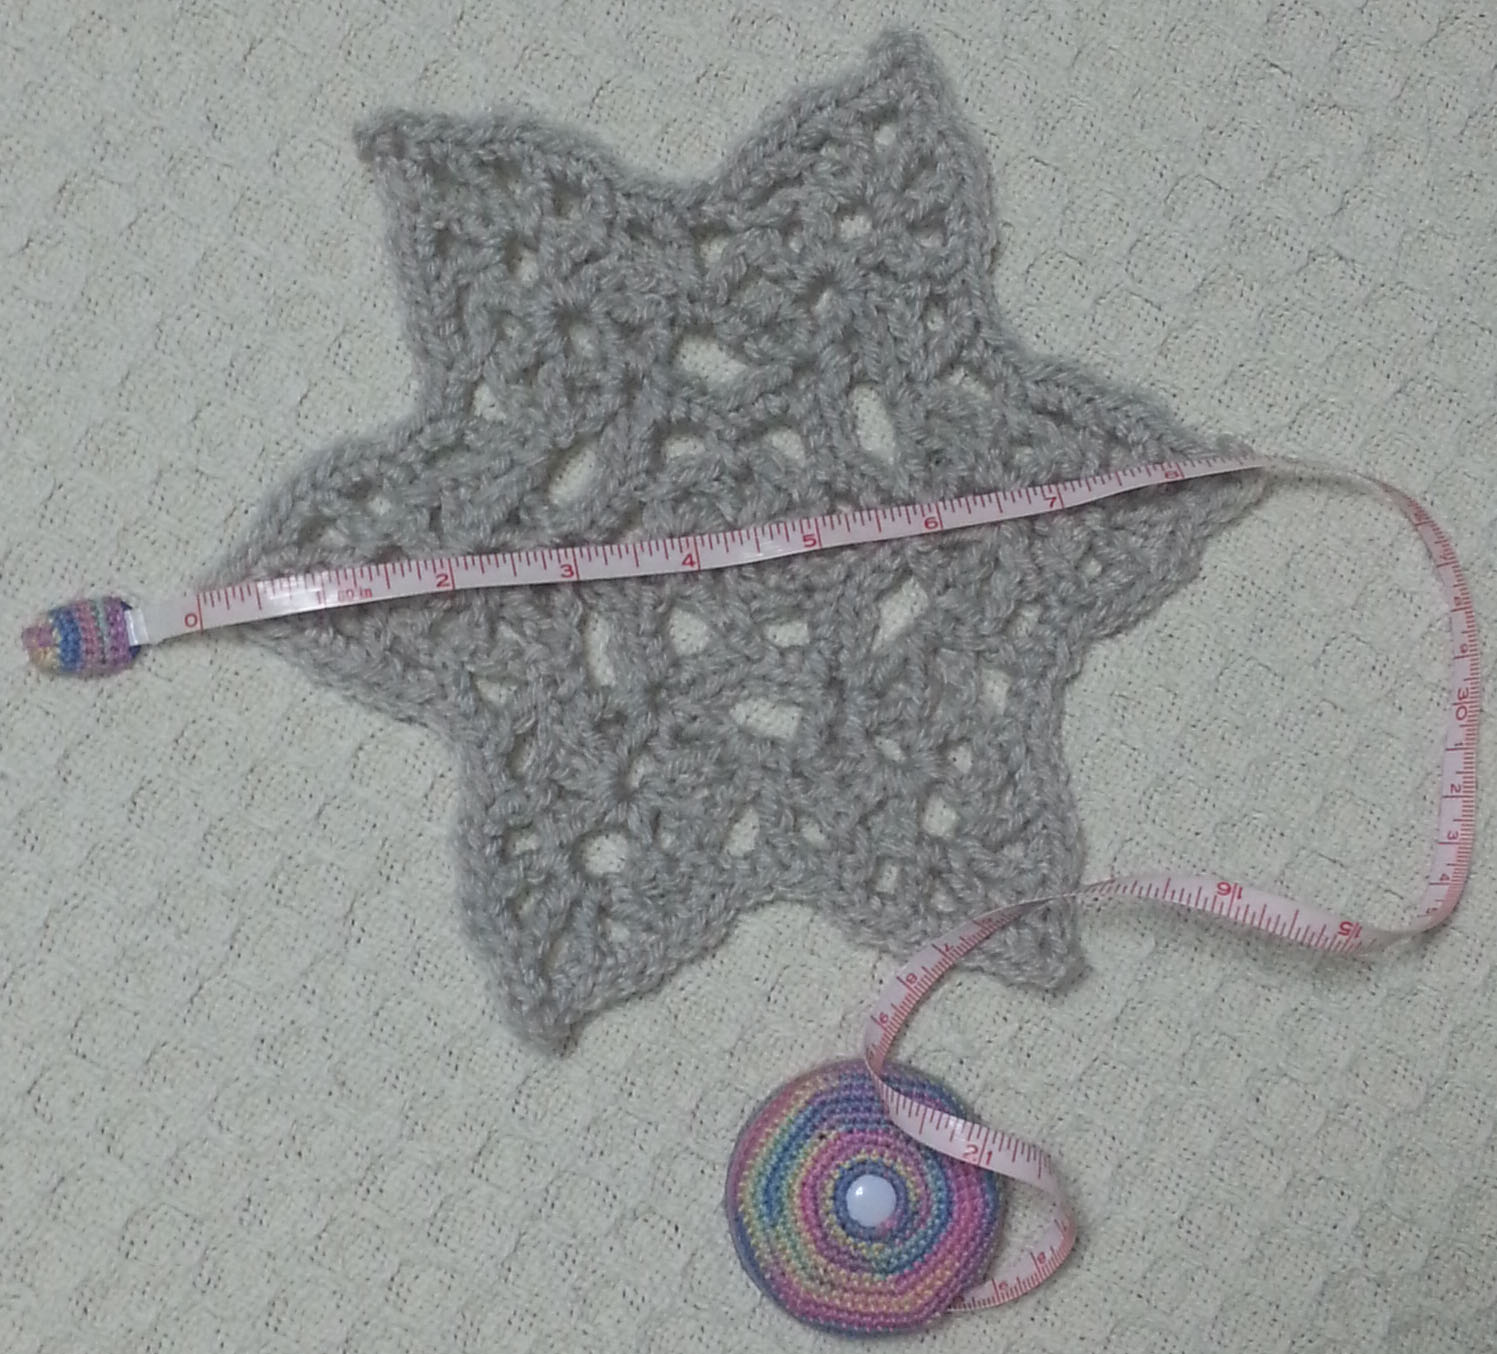
First decide on the dimensions for the shawl you want to make. I’m using an isosceles triangle for this shawl and the center point (pink line) is half the length of the base (blue line). Now it is time to work a swatch.

Usually I make a miniature version of the shawl. This works very well as I can also use that swatch as the beginning of my shawl if I want. I want my swatch to be at least 6 inches long at the center point. I let the swatch rest for a while, at least 2 hours if not over-night. If I plan to aggressively block my finished shawl and I’m using a fiber that will change a lot with the blocking, I will block my swatch over-night instead of letting it rest.

Measuring swatch

The next morning I measure and weigh my swatch.  I take the same measurement lines that I had marked out for my shawl dimensions. The broad base (blue line) of the triangle  and the length of the center point (pink line). I’ll use these measurements to figure out the square inches of my swatch.

Digital Postage Scale

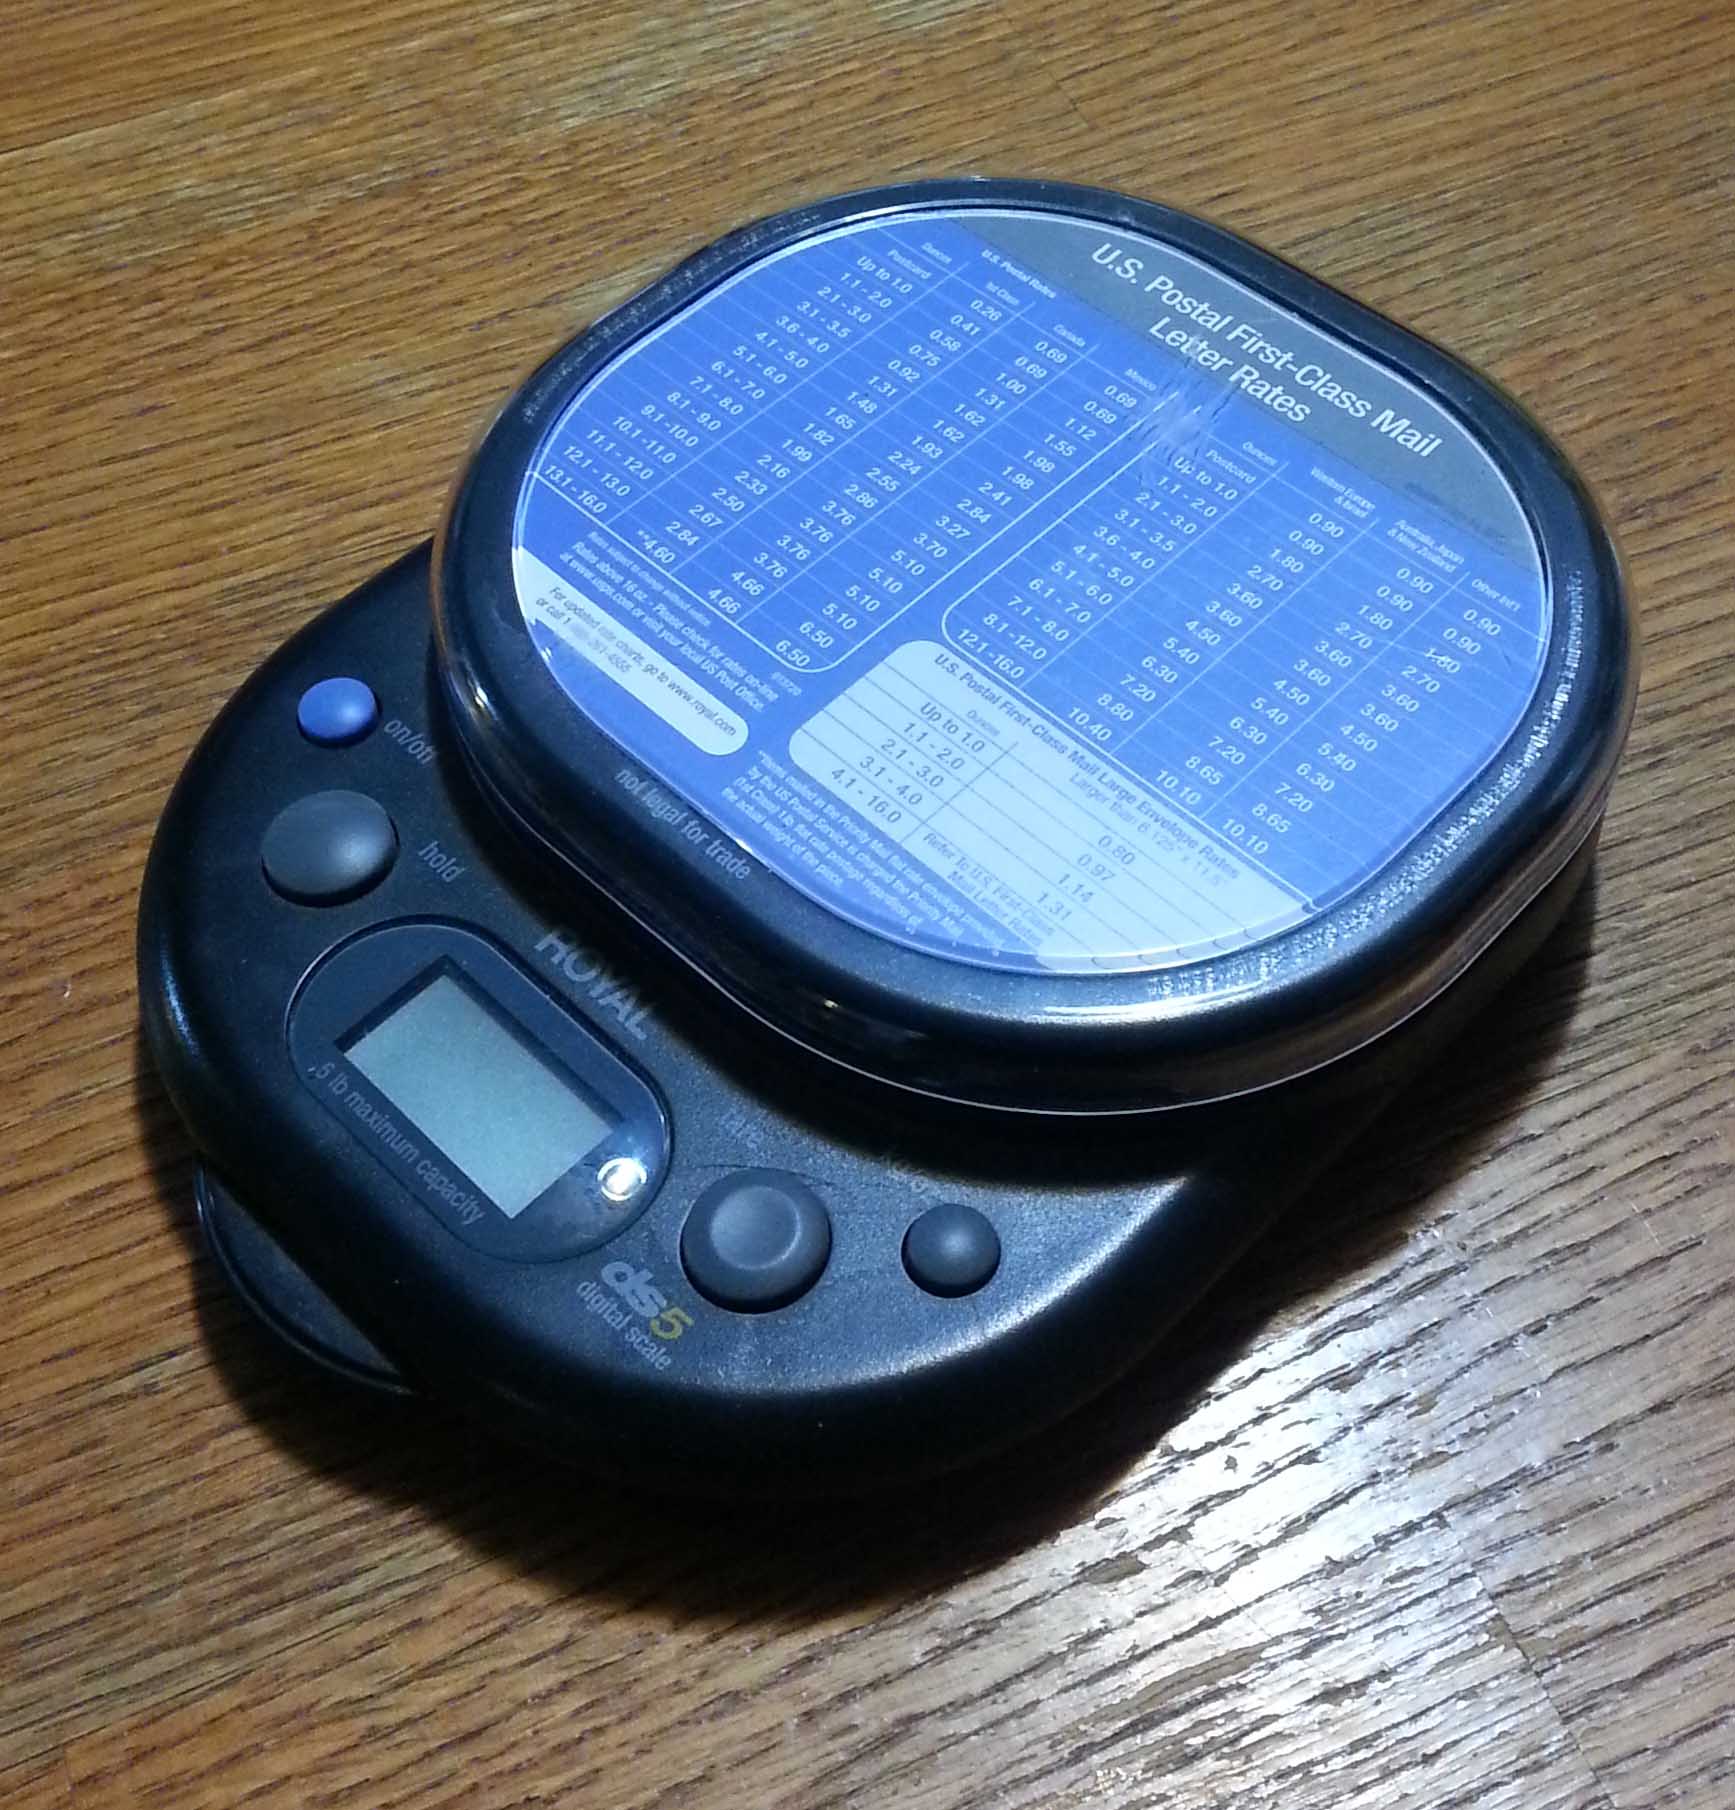
I have a handy digital scale that I use to weigh my swatches and projects. It can measure in ounces or grams. I prefer to use grams as they are a smaller unit of measurement and that helps me with accuracy. It also helps when using yarns from companies that do not list the weight in ounces.

Most ball bands will tell you the weight and yardage contained in the ball/skein/hank. Here’s where the math starts.  Take the number of yards and divide it by the number of grams on the ball band. This gives you the number of yards per gram.

Ball Band info

For example, this ball of “Mochi Plus” has 95 yards in a 50 gram ball.

95 divided by 50 = 1.9 yards per gram.

If my swatch weighed 10 grams, then I know that it took 19 yards.

Now it is time to figure out the square inches in my swatch and the square inches for my planned dimensions of the shawl. This is actually not that hard. As my geometry teacher taught us in high-school, all triangles are half of a rectangle. This gives me 2 ways to find the square inches of my swatch and shawl.

Either take the measurement from the base and multiple it by the measurement from the center point, then divide that number in half.

Or my favorite way: Divide the base in half, then multiple by the measurement from the center point.

Turning 1 Tri into 2

For some of you it might be easier to visualize this as changing your 1 triangle into 2 triangles.

2 Triangles 1 square

Then moving one of the triangles to make a rectangle (or in this case a square). A square is always a rectangle but a rectangle isn’t always a square.  In this case my planned shawl will be 1,225 square inches (35 x 35).

I can use the same equations to figure out the square inches of my swatch. Let’s say in this case that my swatch was 12″ at the base and 6″ at the center point. That works out to 36 square inches for my swatch.

Now I divide the square inches for my planned shawl by the square inches of my swatch.

1,225 divided by 36 = 34.0277777778 times that my swatch will fit into my planned shawl.

Obviously I don’t want to be fighting with such a long decimal in my figures, so I will round up to the next whole number. I always round up, because I don’t want to run out of yarn when I am working on my project.

Now we have to figure out what this means for yardage needed. Remember earlier I said that my swatch weighed 10 grams and used 19 yards of yarn? It’s time to plug that number into our equation.

35 x 19 = 665 yards needed to make my shawl.

So how many balls of “Mochi Plus” do I need for this shawl?

665 divided by 95 = 7 balls.

When I purchase my yarn for a project I usually purchase 1 extra ball to be on the safe side. It’s really a bummer when you run out of yarn just short of completing your project.

Now if all this math scares you a little, the good news is that most patterns are going to have the yardage information you need. Because the designer already did all the math for you.

These equations are handy though if you aren’t meeting the gauge or are substituting a different yarn. Sometimes it is fun to see what you can come up with making a few changes.


Getting Started on a Thread Earring

This week I’m finishing up a big project that is still in the super secret phase. But I managed to squeeze in some time playing with a few small thread design ideas.

Finished Earrings

I love Size #10 Crochet Cotton Thread for making small sculptural pieces. Especially jewelry. So I dug out a ball of Aunt Lydia’s metallic thread that I had in the stash for this earring idea.

Split Rings

I had acquired these split rings at my local hobby/craft store a while back. I like using a light weight ring to crochet around to lend a bit of stability to my earrings. These rings are 20mm, which is sort of a Goldilocks range in diameter size for jewelry.

I’ve experimented with a variety of ways to attach the thread to my rings over the years and my favorite method is to capture the ring in the beginning slip knot. If you are using a split ring this is super easy.

Start on Ring1

Start your slip knot by forming your “knot” loop and pulling thru your first working loop, but don’t tighten up the “knot” loop completely.

Start on Ring 2

Slide the opening of the “knot” loop unto your split ring and

Start on Ring 3

keep sliding it until it is around all the wire of your ring.

Start on Ring 4


Tighten up the “knot” loop, and snug the working loop on the shaft of your hook, you are ready to start your project.

Next Tuesday is the start of National Crochet Month and we are going to be having a really fun month all about crochet, including a couple of new patterns on the blog and in my Ravelry shop. Starting with the pattern for these earrings.


Crocheting the Double Crochet Stitch

The double crochet stitch (or treble if you are using UK terminology) is a very useful stitch. Once you have gotten comfortable with this stitch you can make a lot of the more advanced stitch patterns in crochet. The double crochet stitch is usually the 3rd stitch most of us learn when we learn to crochet.

For those of you who haven’t tackled this stitch yet or who might need a refresher, I’ve made a photo tutorial of crocheting the Double Crochet stitch.

DC St 1

To start a double crochet you wrap the yarn over the hook once, creating 2 loops on the shaft of your hook: The working loop and the wrap.

DC St 2

Next insert your hook into the space or stitch indicated by your pattern.

DC St 3

Wrap the yarn over the hook again

DC St 4

and pull that loop thru the stitch or space you inserted your hook into.

DC St 5

Now you have 3 loops of yarn on the shaft of your hook.

DC St 6

Wrap the yarn over the hook and pull that loop thru 2 of the loops on the shaft of your hook.

DC St 7

That loop you pulled thru is now on the shaft of your hook, which give you 2 loops on the shaft.

DC St 8

Wrap the yarn over the hook once more and pull thru the remaining 2 loops on your hook.

DC St Complete

You’ve completed your double crochet stitch and the loop remaining on your hook is your “working loop”.

Once you have the chain, slip stitch, single and double crochet stitches in your skill set there is a whole wide crochet world open to you. If you add the foundation single crochet and the half double crochet to that list there isn’t much that can stop you.

If you would like to practice your Double Crochet stitch you can make a scarf from my “Warming up Winter Simple DC Scarf” pattern available here on my blog. All the stitches you need for this scarf project are Chain, Single and Double Crochet.

Being Lucky

Today went a bit differently than planned. I got up and after the normal morning tasks loaded the kids and my gear in the car to take them to school. As many of you know, I live on a mountain, so driving the boys to school can take 30-45 minutes or occasionally longer.

The weather was beautiful the past couple of days so there really wasn’t much to deal with as far as snow and ice and we made it down the mountain in good time. I dropped off both boys and then headed back up the mountain to my friend Val’s house.

Val and I get together most Tuesday mornings to work on crochet projects and visit. Today’s plan was to block a couple of new designs that I have due soon. Val has a nice big workspace, so she had volunteered her floor for this.

Unfortunately the universe had different plans for me. I was just about half way up the first big hill heading up into the mountains when my car suddenly began to seriously misbehave. Seemed like every warning light that is on my dash lit up. There was also a horrible burning rubber smell, not something one wants to smell while driving a vehicle.

I wasn’t sure what was happening, but I knew I needed to get off the road quickly and safely. So I pulled off and shut the car off.

Next, I checked my phone to see if I had any cel service where I was. I had a very low signal, but was able to call Val to let her know I was having car difficulties and wouldn’t be able to make it up to her house. Next I tried to call my husband, but the phone wouldn’t let me call out. Instead I got a message that said, “Emergency calls only.”

Things didn’t seem dire enough to call 9-1-1 though, so I got back in the car to look for my roadside assistance info. When I tried the phone again I was able to call my husband, then the roadside folks.

It took awhile to get them all the info they needed to send a tow vehicle to me, and we got cut off in the middle of the call. Fortunately my husband was able to text me, so I wasn’t completely on my own. Though I was wondering how in the world I was going to make all the appointments I had planned for the afternoon.

I decided to try texting my contacts that the appointments were with, and happily it worked. So that was one worry off my mind, now I just needed to get the roadside assistance folks moving.

By this time my engine had cooled down enough I decided to look under the hood to see if there was any way to drive the car back down the hill. But I discovered that the problem was the belt had broken and tangled in the engine. No way was I going to attempt driving my massive car without power-steering.

I sat there for a while and had a talk with myself about how lucky I was despite this inconvenience.

Point 1) I was super lucky that the belt hadn’t broken when I was driving at speed. Going uphill at 30 mph was a much better and safer situation than on the highway at 55 or 65 mph.

Point 2) At least I had some cel service, I could have been a lot further along the mountain or even in the canyon when this happened.

Point 3) The boys were already at school before the car pooped out.

Point 4) Neither of my afternoon appointments were life and death, and I would definitely have something resolved by the time the boys needed to be picked up from school.

Point 5) I was only about 3-4 miles from my favorite car repair place, so if I had to, I could walk there.

Then the phone rang, it was the roadside assistance folks calling me back. They had been trying for a while, but kept going to Voice mail because of the poor signal. Luckily they had kept trying. We got a tow truck lined up and they told me I would get a text once the tow company was on its way.

The text came thru, but it was only a confirmation and a URL to monitor progress. There definitely wasn’t any internet access where I was. So I texted the URL info to Himself. He was able to check on the status and let me know what was happening. Text service was patchy, but working a bit better than voice.

Finally all I had left to do was wait for the tow service to arrive. I am always prepared for a wait though, I had 3 different crochet projects along with me (as well as my computer).  I crocheted and worked on pattern editing while I waited. Now you knew there would be crochet somewhere in this story. Unfortunately I can’t show you what I was crocheting on since it is all hush-hush until it is published.

Car ready to tow

About the time I was starting to worry that the tow service driver had gotten lost he pulled up. In just a few minutes he had my car all trussed up like an oversized turkey and we made the short drive to Super Rupair.

Goose Friend

The folks at Super Rupair were super as always. They got me set up with a loaner car. Again I was lucky, they were having a slow day and would be able to fix everything by the end of the day. I took the loaner car and headed out to my appointments. While waiting for my second appointment I had a conversation with a goose.

After I was all finished with my appointments I picked up my boys after school without any problem. I took the boys to Subway for an early dinner, then we went to Super Rupair to get my car. They had just finished up with it and 10 minutes later we were on the road home.

Things I learnt from today’s adventure:

Always carry my hiking boots in the back of the car, even if the weather is unusually warm and I don’t think I’ll need them. I would have been more up for a hike down to the garage if I had my boots with me instead of wearing loafers.

It’s good to have snacks with me in the car, just in case.

And confirmation of my rule about always having a crochet project along with me. I would have been much more stressed if I didn’t have my crochet to focus on.

I hope all my readers are having a good week so far and this story will be a reminder to you than no matter what, there is always a bit of luck.

A Headband for Walkies

The weather is warming up a little up here on the mountain. But with my new short hairstyle my ears can get quite chilly when I am out for walks with my dog.

Photo courtesy of Beatrice Ryan Designs

So I decided it was time to try this fun headband pattern designed by my friend Elena at Beatrice Ryan Designs. You can find the pattern over on her blog “Whimsical Warmth Headband”.

Finished Headband on Model

I thought it would look really nice in a yarn with long gradual color changes so I decided to use Red Heart’s Boutique “Treasures” in the Watercolors colorway.

I made a few changes when working this pattern. I used a foundation single crochet for the foundation instead of working a chain and then working into the chain.

Inside of Headband

I also didn’t want to cut the yarn and re-attach to the bottom of the foundation. Instead I used chain and slip stitches to work down along the inside seam of the headband after I completed the reverse single crochet edge on the top edge of the headband.  Then I completed the reverse single crochet edging along the base of the foundation.

I really like the way this headband came out, and it’s going to be my favorite to wear on my walks this spring.

Making a Pendant

Finished Heart Pendant

My weekend post was about Valentines Hearts, but I’m not finished yet. This pendant is a bit more complex than the projects I showed you in my last post, so I’m going to walk you thru how I made it.

2 hearts to start with

I used Kreinik #12 metallic with a 1.75mm steel hook. I made 2 “Crocheted Love” hearts, and 1 “Simple Sweetheart” heart. I attached the Simple Sweetheart to the front of one of the larger hearts.

I crocheted my larger hearts together with single crochet stitch border and used a “hoist-on” method to place beads along the border.

Hoist on Bead 1

For the “hoist-on” method I worked the last stitch before the stitch I want to place my bead on. Then extend the working loop and remove my hook from the loop. I then use a smaller steel hook to pick up a bead and insert that hook into the working loop.

Hoist on Bead 2

I slide the bead from the shaft of the hook onto the working loop.

Hoist on Bead 3

Then re-insert my hook that I was crocheting with to complete my stitch. This leaves the bead sitting on the top of the stitch.

Along the curve at the top of the heart I made 1 single crochet stitch working thru the tops of the stitches on both hearts, then placed a bead and chained 1 before making a single crochet in the next stitch. This created enough ease to curve around the curved section of the heart without causing the fabric to cup.

When I reached the straight edges of the heart I made my beaded chain 1, then sc2tog to keep the border from becoming ruffled.

Lavender buds

Before completing the sc border I poured some dried lavender buds inside the 2 large hearts. When worn the warmth from the body will release the fragrance of the lavender.

Back of Pendant

I left long enough tails to weave them back up to the top of the heart. Then I used the tails to sew a split ring to the back of the heart to string it on a necklace.

Necklace on Model2

A reminder, if you haven’t had an opportunity to take the TNNA Fiber Arts 2016 Survey at https://www.surveymonkey.com/r/fiberarts16 you still can.

This survey is part of a major study of U.S. knitters, crocheters, needlepointers, cross-stitchers, weavers, and spinners. The survey will only take about 10 minutes to complete, and the more folks that complete it the better we designers and other yarn industry folks can understand your needs.

By taking this survey you will…
– Help fiber arts organizations and businesses serve you better
– Tell retailers and brands what you want
– Explore your fiber arts life
– Get the chance to win one of five $100 fiber arts store gift cards


You Gotta have Heart

It’s that time of year again, full of snow and cold, February has come blustering in here on the mountain. But my heart is warm because that means Valentine’s Day.  For me it’s a holiday that really works as a reason for Chocolate (that’s capitalized on purpose).

Chocolate Hearts

I managed to make an early stop to the aisle at my grocery store where all the seasonal stuff is. I indulged in a number of bags of my favorite Dove Dark Chocolate heart candies, they tend to sell out fast here. There is just something about the little heart shapes that makes these individually wrapped candies extra special.

Over the years in my design career I have created a number of crochet patterns that involve hearts. Some are ones that I have offered here on the blog as free patterns. Others have been created for magazines or yarn companies.

Photo Courtesy of Red Heart Yarns

I created the “Valentine Heart Coaster” for Red Heart a few years back. It’s a quick project to work up and you can use it as a coaster, or sew it onto a bag or blanket as an embellishment.

Bag staged w env.s

I also created the “Here’s My Heart” gift bag. This project takes a bit more of a time commitment, but makes a lovely gift bag for someone special in your life. This is a bit more complex pattern as well, so a fun challenge for those with more crochet experience. The lace edged heart on the front is actually a pocket, so a great spot to put a special note.

Both of these patterns are available for free at Redheart.com, just click on the link in the pattern names above.

I’ve also put up a number of free heart patterns here on the blog over the years. My top 3 favorites are:

Crocheted Love Sample photo

Crocheted Love

Spiral-in-a-heart

Spiral in a Heart

Sweetheart-in-hand

and Simple Sweetheart.

Candy in Heart

I like to play with these designs and use the hearts as embellishments or elements for projects. My favorite way to use the “Crocheted Love” and “Simple Sweetheart” is to make 2 hearts and sew them together leaving an opening at the top to insert a note or chocolate (often a little Dove heart, since that fits perfectly). You can read more about how I made the little pocket above on my 2014 Valentines Day post.

Pocket Heart

Last year I used my “Crocheted Love” heart pattern to make this fun little pocket to hold some chocolate and a note for my dear husband.

Hearts Necklace

This year I decided I needed some jewelry to wear for Valentine’s Day. So I crocheted up some of my “Simple Sweetheart” and “Spiral in a Heart” using Kreinik #12 Metallic Braid in hot-pink and pink colors. For the necklace pictured above I used a 1.75mm steel hook to create a nice firm fabric that didn’t need additional stiffening.

Spiral Heart in K

I also modified my “Spiral in a Heart” pattern to create a more symmetrical appearance to the heart shape.  The modification is simple if you want to try it. When you get to the end of Round 3, ch 1, then sl st into side of last hdc, sc next sc, loose sl sts in next 3 sts, fasten off and weave in ends.

My “Crocheted Love” heart has also been rather popular with other crochet bloggers. They have come up with fun ideas on ways to incorporate it into their projects.

Heart Baskets

You’ve seen Cintia’s little baskets. The photo above is my experiment with that idea, came out very cushy and they made great containers for chocolates.

Photo by Laura Murray used with permission

Check out this fun project from Laura Murray over at Paper and Pin. She used my “Crocheted Love” hearts and turned them into sweet little conversation heart pillows. I think it’s a toss-up on my favorite one she made, though the “hug” heart is very sweet.

I’ll have a few more ideas for Valentine’s Day for all my dear readers next week, but hopefully these will spark something for those of you looking for ideas for gifts for your loved ones.

Getting the Most from a Pattern

As a designer and particularly as an indie-designer, I spend a lot of time thinking about what information a pattern needs to include. Clarity is vital for a pattern to be easy to follow and for stitchers to be able to replicate the original design.  After all, that is the main purpose of a pattern. To provide all the information that a crafter will need to get the same result that the designer did.

Interestingly enough, a lot of folks have a hard time being able to follow a pattern. So today’s post is all about the anatomy of a pattern and how changes can make or break your final project.

Patterns can be broken into 4 parts: Materials, Metrics, Pre-Instructions, Instructions. Changes in any of these areas can change the resulting finished project significantly from the sample the designer created for photography. Which can be exactly the result you want, it’s just good to be aware of how your changes will affect the finished object.

Materials

Materials

This is where the pattern lists the yarn, hook size and any other materials or tools that you will need to have on hand to complete the project.

If you decide at this point in the pattern to use a different yarn than was used in the design this is where things can change a great deal. Yarn substitution is tricky. Sometimes the listed yarn is no longer available or difficult for you to get hold of. So when looking at substitution it is a good idea to look at not only the weight, but fiber content and even the amount of twist in the yarn originally used as well as in the yarn you wish to substitute.

Metrics

Metrics

This is where the pattern tells you the sizes the pattern can be used to make as well as the gauge measurements.

If you change the hook size that was listed in the Materials you will very likely have some changes in this area. Gauge swatches can be your friend if you have made changes. Working that swatch will give you an idea of how close you will be to the measurements given.

If your pattern is for something like an afghan or scarf, where gauge isn’t that critical, you still want to have an idea of what the size of your finished project is going to be. If nothing else, to be sure you have enough yarn.

Pre-Instructions

This area is one of the most often skipped areas in pattern reading and can lead to the biggest tangles when working a pattern. It generally includes things like the “Special Stitches” and “Pattern Notes”.

This area of a pattern often gets ignored by stitchers until they run into a snag while working the pattern. This is often very important information for working the pattern smoothly.  Special Stitches will explain non-standard abbreviations for stitches. Pattern Notes will give you a heads up about things in the pattern to pay particular attention to.

Instructions

This is the “meat” of the pattern. In the instructions you will get the exact directions on the order and placement of stitches to create the finished object. Sometimes the instructions will include stitch charts, schematics and photo tutorials.

If the pattern is for a complex project, like a garment made from multiple pieces, it will often have the instructions broken out for the various pieces. Sleeves, collars, ribbing, etc.

With longer or more complex patterns it can also be helpful to use post-it notes or some other movable marker to help you keep track of your place in the pattern as you are working. If you miss a repeat or line of the pattern the result can be a bit frustrating.

For crochet patterns that have written text using standard abbreviations you need to be sure if they are using US or UK terminology. If the pattern also includes a stitch chart that can often help you decipher whether the pattern is written in US or UK terms.

Another way to spot if a pattern is US or UK terminology is if it uses the half double crochet stitch (and calls it that). US terminology says Half Double Crochet where UK terminology says Half Treble Crochet. UK doesn’t have any stitches called the Half Double Crochet stitch and US doesn’t have any stitches called Half Treble Crochet.

Now it’s time to grab one of those patterns that have been intimidating you and make a try at it. Hopefully some of the tips in this post will help you triumph.