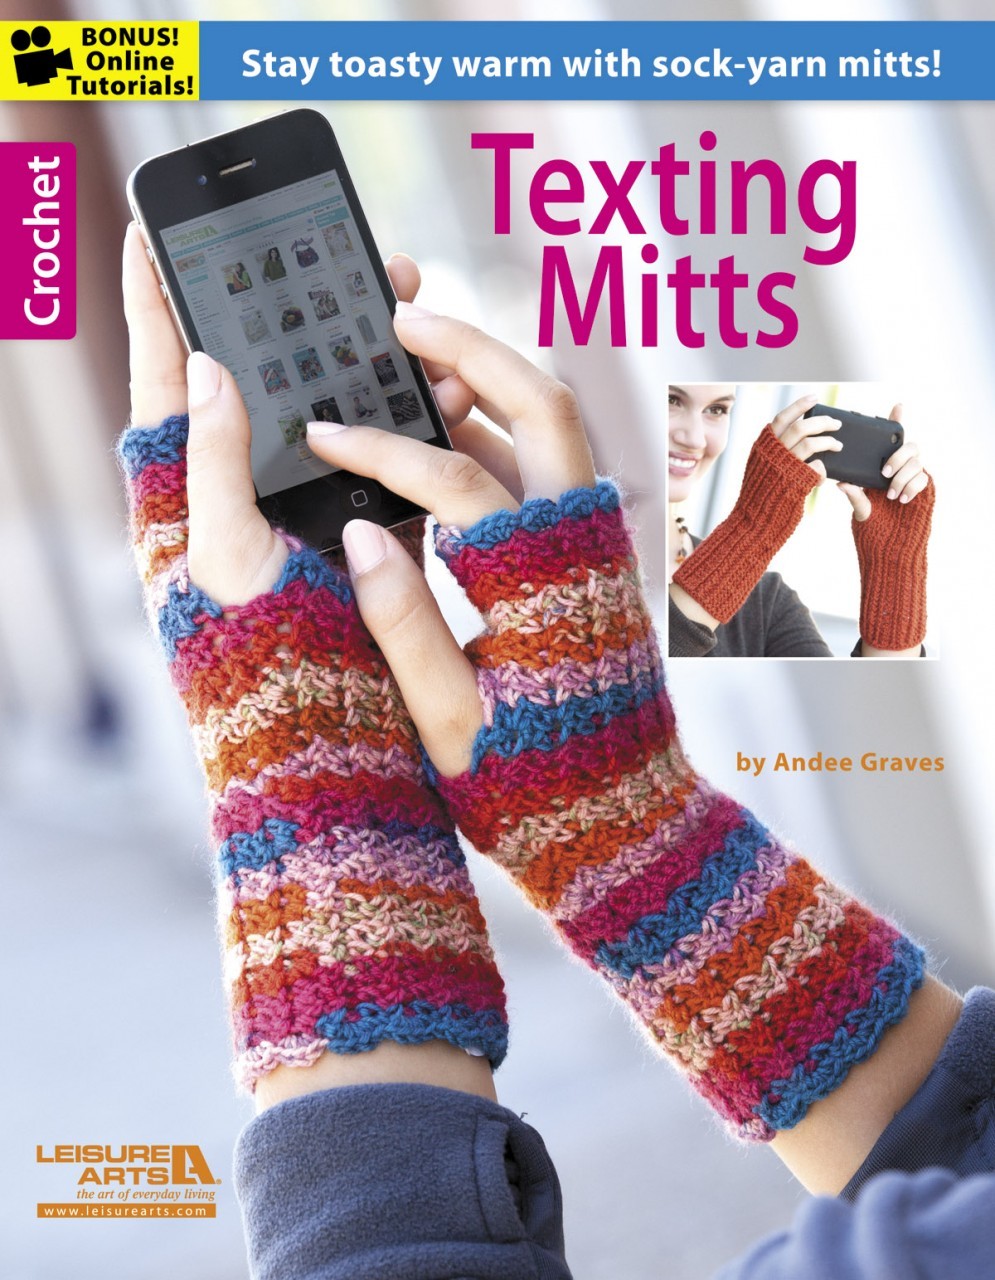
My “Texting Mitts” booklet is available in Jo-Anns stores now, a few stores will be getting it on their shelves in the coming week.
Photo courtesy of Leisure Arts Publishing
In celebration I’m having a blog “tour” with some of my online crocheting friends. Each day I’ll have a post with a link to the tour blog of the day, but if you want to check out their blogs before then the links are below.
As additional celebration of the booklet being in stores I am going to be giving away a signed copy to one lucky winner. Just leave a comment on this post before Noon (Mountain Time) on February 16th and I’ll announce the winner on February 17th. Unfortunately I do have to limit this prize to folks in the United States.
Funny thing about being a crochet designer, sometimes you find yourself being asked to design in a medium that you haven’t work with in ages.
Such is the case with me and thread work.
Long long ago when I was a shiny new penny, back when mammoths still roamed the world (so think my boys), I dabbled with thread crochet. My maternal grandmother had an antique store full of gorgeous vintage thread crochet and other wonders. I could kick myself for not paying closer attention then.
Photo courtesy of Annie’s
Recently I have been designing in thread quite a bit. I just finished 3 designs for Coats and Clark that are scheduled to be unveiled later in 2013. My most recent published thread design was “Maurine’s Angel” in the Crochet World December 2012 issue.
Photo courtesy of Red Heart Yarn
Earlier this fall my “Day of the Dead” earrings were published on the Red Heart website. Thread is great for making jewelry because of the small-scale of the stitches, and tighter stitch work possible especially with cotton thread.
Size #10 cotton thread is offered in a number of beautiful colors, so really lends itself to fun projects. Like my crocheted cover for my tape measure.
I love using both size #10 and #3 thread in my art pieces. Adding crochet to my mixed media pieces allows for interesting dimension and texture that I enjoy.
Like all the detailed leaves, flowers and butterflies on my bird house last spring.
My favorite projects to make in thread are Snowflakes for decorating my Christmas tree, or sending as gifts with Christmas cards. I have family and friends all over, so it’s nice to be able to send a pretty crocheted gift that will travel flat. I offered a pattern for the little snowflake on the right last December here on my blog.
5 Snowflakes – Universal Yarn
I even designed a set of 5 snowflakes in Nazli Gelin thread for Universal Yarns. You can purchase the pattern leaflet for these snowflakes on the Universal Yarns website. One thing I love about this pattern leaflet is that there is both text and stitch diagrams for the instructions.
If you haven’t crocheted with thread for a long time, or ever, one thing to keep in mind is that it is a bit different that working with most larger yarns. The 100% cotton threads have no “give” to them at all, so remember to rest your hands often. Who knows you might find yourself becoming a “threadie” before long.
Finally getting a chance to post about my oldest, J’s, Halloween costume. J had a pretty clear idea early on what was wanted, so I only needed a few more bits to make it happen on Halloween day.
After I finished the little guy’s Ninjago outfit there was not a lot of time left. So I had to abandon my earlier ideas on how to finish the cape that J wanted.
The base of the costume was a black micro fleece pull-over and pants for the first layer, so my big concern was that with all that dark fabric my kid would be visible in the dark. Granted our small town doesn’t have a lot of traffic, but I consider it betting against the odds to send anyone out at night in dark clothing.
J really liked the sparkly green fabric that looked a bit like reptile scales. I was thrilled because the metallic reflective nature of it would increase visibility.
So I did some quick measurements for length and width, then cut out basically a U shape with the top edge of the U being the selvage on one side. Sat down at my serger and created a blind hem style casing along the selvage edge. Threaded a 14″ length of 1/4″ elastic thru the casing and tied a knot.
Presto, first layer of cape. And a scrap off one of the corners from the remnant as an “eye patch” since the fabric is fairly sheer.
J also wanted an over layer made from the holey fuzzy black fabric I had bought. At this point I’m down to about 35 minutes til they need to leave for the Halloween party.
Grab the fabric, black corded elastic, toggle closure, and the ever handy safety pins.
There are 2 yards of fabric and J is only 4 1/2 feet tall. Okay, fold it nearly in half. Run the elastic thru the holes in the fabric (handy that). Gather up fabric on elastic and slide toggle into place. Knot ends of elastic so the toggle doesn’t fall off.
Place the double layered cape on J over the green sparkly cape.
Pull up top layer and drape about head and neck to create a hood. Use safety pins to secure into place.
With 10 minutes to spare, J is good to go. Mom is a hero again. Yay!
“You are the best Mom ever!” – My payment.
My husband took the kiddos out to the party and then trick-or-treating whilst I stayed home to greet goblins at our door. He said J wore the entire cape for the party, but the top black layer was too heavy (hey that is 2 yards of fabric) once they were outside.
So big win! J was even more visible, because the green cape was on the outermost layer of the costume. That works!
This weekend is a lucky time for all my Northeastern stitchy friends. Many of them are going to the Mecca of Yarnieness: The New York Sheep & Wool Festival a.k.a. Rhineback.
Before I joined Ravelry I had never heard of Rhinebeck, but now it ranks up there with 1/2 carat diamond solitaire earrings on my wish list (and is more likely to happen).
Honestly, I don’t really know what happens at Rhinebeck or what all is available to do there. But I’ve heard stories that make me want to go exploring.
There have been words like Sheep, Alpaca, Hand-spun, Hand-dyed and Garlic Artichokes used. Someday I am going to Rhinebeck, I mean Garlic Artichokes people! Wow!
In the meantime, all my stitchy pals that have made it to Rhinebeck this year. Pet a sheep and/or alpaca, purchase some gorgeous hand dyed hand-spun and enjoy the Garlic Artichokes for me.
Well today is nearly over, so I need a quick post. Here is a funny picture my dear Jan and I staged after the Banquet Fashion Show. I was pretending to be crocheting on the skirt of my Evening Seaside Gown. Which really wasn’t far from the truth, as I finished the last bit of stitching Friday night of the show.
The gown was a success on the runway during the Fashion Show and I even managed not to trip on the hem as I walked up the stairs to the stage. There will not be a pattern for this dress, though I will be using a lot of what I learned making it in future designs.
I’ve been crocheting for a very long time. And I’ve used many a slip stitch. They are a vital part of seamless construction and working in the round. Two of my very favorite techniques in crochet.
But shortly after I joined Ravelry I started hearing about a technique called “Slip Stitch Crochet”. A fellow raveler and designer, David Burchall, was at the forefront of many of these conversations. He crocheted, and he wanted to crochet “masculine” fabric that he would be comfortable wearing. He liked the look of many knit fabrics but had not had good success with learning to knit. So David began to experiment with Slip Stitch crochet as a way to create the fabric he wanted.
About the time I was hoping to experiment with learning these new slip stitch techniques David went thru some big changes and disappeared from the Ravelry world for a while. So I put that pursuit on the back burner, and then life got busier for me as my “part-time” work as a designer turned into “full-time”. Once David was back and providing information on slip stitch again I was too hectic.
Then the classes for the 2012 Knit & Crochet Show came out. Vashti Braha was teaching Slip Stitch classes. I wasn’t able to take the classes in Manchester because they were offered on my busiest day with the CGOA Design Competition. But they were first on my list for the Reno Show.
I was so excited for the class to begin and Vashti did not disappoint. I’m generally pretty slow in class working on the swatchs, but I didn’t mind as Vashti touched upon each technique and provided a comprehensive 3 page handout that gave me all the information I needed to keep practicing.
Back Loop Sl St – Uber Stretchy fabric
Even though my tension was a bit wonky with the swatch I really liked the stretch of this fabric. Had a cushy feel that was really nice, I’m thinking my husband may be getting a hat for Christmas made with this stitch technique.
Bosnian Sl St /Back loop and Front loop
I loved the curl of the fabric with the Bosnian front loop sl st, reminds me of the rolled edges for neck and cuffs on many knit sweaters. (If you are wondering what that yummy yarn is in my photos, it is “Unforgettable” from Red Heart in the Tidal colorway)
I’m really looking forward to playing with this technique more and am hoping that Vashti will be offering more slip stitch classes at next year’s shows. Meanwhile you can visit Vashti’s website and subscribe to her wonderful newsletter to learn more about this enticing technique.
When I design a project I think about the yarn a lot. All yarns are not created equal. By that I don’t mean that some are inferior to others, but some definitely work better for certain projects or effects than others.
An example:Worsted weight kitchen cotton rarely makes a nice garment, it tends to bag and sag with wear and can be very heavy. It’s ideal though for dish cloths, bath scrubbies or even a sturdy market or beach bag.
The things I look at when choosing a yarn for a design often happen long before the design is even conceived.
Yarn for Design Swatching
I frequently purchase a single skein/ball/hank of yarn to try it out. I’ll play with different stitches and stitch patterns with various hooks to see how the yarn behaves and how the fabric looks. If I like any of those swatches, or if I think I might like them, I’ll wash and block the swatch to see what happens next. How much does it grow or shrink? Does it look better or worse?
Lately this experimenting occurs as part of my search for a yarn to use in a design I want to publish or that I want to propose to a magazine or yarn company. I know what I want the yarn to do in the design, so I search for a yarn that will do that. OR I know what a yarn will do and I come up with a design that I know will showcase that yarn well.
The road from this creative process to a published design can often be rocky. Sometimes I will sell a proposed design, but the publisher wants to change the yarn I will use. That can lead to some interesting juggling if the preferred yarn responds differently to the stitch work of the proposed design than the original yarn.
Often it requires some re-calculations of the math to make the design come together. Since this all happens at the beginning of the creative road it doesn’t distort how the finished design looks to the pattern using public.
What happens though when the pattern using public decides to substitute a different yarn than the one used for the original design?
Almost everyone decides to substitute yarns at one point or another. It’s quite understandable. For some of us it may be that we have yarn in our stash that we feel would work nicely or we like the color of. For others the specified yarn may not be easy to obtain where they live, or may be outside the reach of their budget. But substituting yarn can be quite tricky.
Sometimes the resulting project is even nicer than the original sample that was pictured with the pattern. Unfortunately the opposite can happen to varying degrees. I’ve seen instances where stitchers have substituted a different yarn that changed the gauge significantly, they then adjusted the math of the pattern…but are unhappy with the finished object.
All this is understandable, and it can even be entertaining as a stitcher to play with a pattern in that way. But what yarn will you choose?
Four points to keep in mind when you want to substitute a yarn:
1) Pick something that has a similar fiber content.
If you are horribly allergic to animal fibers like wool and have fallen completely in lust with a pattern that was originally designed in a wool or wool blend yarn you may have some difficulties. You might be able to find a yarn that looks somewhat similar, but your finished object is going to block and wear quite differently from the original. If you are okay with that result, go for it.
2) Stay with the same size yarn.
Meaning if the pattern calls for DK weight yarn and you substitute a Bulky yarn you are going to have some BIG changes in your finished object (no pun intended). I’ve seen some stitchers decide to work a pattern in a heavier yarn without changing the size hook or needles they are using. Then they are unhappy because their project doesn’t have the drape or flow of the original.
If you are going bigger or smaller than the recommended yarn you need to change hook or needle size accordingly, and you need to figure out how your gauge will change to adjust the pattern.
3) Try to match the twist and elasticity of the original yarn.
This is a bit harder to do, because you need to be able to observe both the original yarn and the yarn you wish to substitute. Yarns using the same fiber content and of the same weight can still have a big difference in “give” due to the way they are created.
Take a close look and touch different yarns in your local yarn store and big box craft stores. You will see that some are much more elastic than others, even if they don’t have elastic thread added to them (there are a few sock yarns that do have elastic nylon added to create a very stretchy sock fabric).
If the original yarn in a pattern is very “cushy” or elastic and you substitute a tight non-elastic yarn the finished project will be much less stretchy and, in the case of garments, may not give you the fit you want.
One quick test for similarity in elasticity is to measure the yarn resting and stretched. Best case scenario is if you can compare a couple of yarns you are considering to the original yarn. Shopping at your LYS you may be able to use the knowledge of the shop employees to help you find a good substitute.
4) Swatch!
Yes, I know many of you hate to swatch. But when substituting yarn it really is critical. It is far better to put in 20 minutes or less swatching, than to have worked days and weeks on a project to discover the gauge or yarn performance is completely off.
Once you finish a swatch let it rest before making any measurements or evaluating the fabric. During the process of crocheting (or knitting) the warmth of your hands and the manipulation of the yarn can change the fabric.
I tend to lay my swatch out flat on my work table for at least an hour (sometimes overnight) before taking any measurements and evaluating the fabric. If the finished piece will be blocked I block my swatch, this is particularly important if the yarn is natural fibers like cotton, silk or any animal hair/fur.
Another thing to consider is growth of the project. The weight of the yarn can change the fabric you create when the piece is large. One way to evaluate that from the swatch is to hang it with weights on the bottom edge. I use clothes pins.
I hope these tips and this glimpse into my design process are helpful to you. Play with your yarn choices and patterns to find the mix that gives you what you want. “Play” is the key word there, just have fun with it. Afterall, it’s all playing with yarn.
You may have heard of Blue Heron Yarns. The description you’ll get from most folks that have worked with these yarns is “yummy”. The colors they offer it in are eye pleasing. The drape and fluidity of the fabric, whether it is knit or crochet is delightful.
My 2 hanks of Blue Heron Yarn
When I knew that Blue Heron was going to be one of the vendor booths at the Reno Knit & Crochet Show I made immediate plans to swing by to check out the lovely colors and pick up a few hanks to play with. The yardage in the hanks is very generous, so I knew I would have a great time creating some wonderful crochet designs.
Demian and Miguel
It was fun and interesting visiting with the 2 gentlemen at the booth. I’m sure these fellas were wondering what they had got themselves into. Neither of them crochets, though Miguel said he was learning. Demian’s Mother started Blue Heron Yarns and he gets to go to all the various shows and sell their yarns. If you can’t make it to a show where they are selling their yarns, you can purchase them thru their website: YarnJunky.BlueHeronYarns (a great name for a yarn website).
I did get a bit of a giggle from Demian when he was surprised that I would be looking to crochet with their bamboo lace weight yarn (that’s the gorgeous pink and coral colored one in the first photo). Of course I’m always amused when folks think that certain yarns can’t be crocheted with. It’s wild how crochet’s hey-day of Irish lace work has been replaced in most people’s minds by the 1960-1970’s Granny Squares. Don’t get me wrong, I adore granny squares. It’s just that crochet is so much more.
Clearly I’ll have to create something gorgeous out of this yarn soon and get the pictures out there. Even if I worked simple granny squares in these yarns though, they would look amazing.
Even after 42+ years of crocheting, I am always amazed and thrilled at all the new things there are for me to learn. I have tried over the years to get the hang of Hairpin Lace, but I always ended up with a tangled mess.
Unfortunately the timing never seemed to work out for me to take one of her classes at the Knit & Crochet Shows, or they were sold out. When I registered for the Reno Show I decided I would fit in her Saturday classes on Hairpin Lace.
The morning class started at 9 a.m. and was all about learning how to make the strips of lace on the loom. I told Jennifer right from the start that this could be tricky for me, but would be no reflection on her teaching abilities. I was astonished by the end of the 3 hour class to actually feel very competent working the strips. Jennifer has awesome tips for success with the techniques and a lively humorous teaching style that kept me from tossing the loom across the room.
The afternoon class was the “Hairpin Lace Joining Workshop”. The idea was all the students would arrive with 6 strips of lace ready to join. The class project was a sweet little evening bag. We would get to practice all the various joins Jennifer was teaching us while making the bag.
Yeah, don’t think that I’m getting a bag out of these shorties.
Unfortunately, though I had got the hang of making the strips in the morning class, my strips were a little short to make the bag.
Still I felt very happy with my progress and that I’d gained the information needed to work with the techniques independently. I even went so far to purchase one of the beautiful hairpin lace looms crafted by Ed Jenkins that Jennifer had available for sell. Now I just need to find time in my busy schedule to practice this technique more.
Who knows, I might start designing a few things in hairpin lace myself.
Unfortunately, despite my love for their beauty, roses make me sneeze violently. Being the artsy creative gal I am, I decided to seek out some way of creating some non-sneeze inducing blooms.
Being Crochet is my main expressive art form these days I first looked to this beautiful “Irish Rose”. I found this particular stitch pattern in my well-loved copy of “The Harmony Guides, 220 more Crochet Stitches, Volume 7”.
I used some Size 3 cotton thread I had in my stash and my D-3 /3.25mm Etimo hook. I stopped with the 9th round because I liked the way it looked. It reminded me a bit of the wild primroses that grow up here on my mountain. But I wanted a rose more like the densely petaled beauties in my first photo.
This crocheted rose was quite simple to make. I used a very fluffy wool blend yarn from my stash (Paton’s Soy Wool Solids – unfortunately discontinued).
Leaving a long beginning tail, I chained a length then worked a sc, hdc and dc in the 2nd chain from the hook, then 4 dcs in each chain until I’d reached the original beginning of the chain.
Afterward I flattened the spiral then used the beginning tail to sew the chain into the spiral shape. I think one reason this Rose worked well was I crocheted with a larger hook than usual for the size of the yarn.
I’ll keep experimenting with making more crocheted roses. I want a more ruffled look to the spiraled rose, and I’m thinking there has to be a better way to create the base for it. Maybe I’ll create a crocheted rose-bush.