Today was our local CGOA Chapter meeting and I brought in my nearly finished bear. I facilitate the meetings, so I wanted to demonstrate how I sew my bears together. I had filled the arms and legs and head with stuffing and brought stuffing for the body. By the end of the meeting I had finished the bear and given him to my friend Kathy that is organizing this effort. My friend Margie wins the prize for the most bears completed. She brought in all these bears. She said she cheated a little as these were bears she had made on a knitting loom and were just waiting to be finished with stuffing and bows. Kathy and I both said, they still count and will be very appreciated. Before my little bear left the shop, he had a cuddle with some wonderful Malabrigo. I am feeling very inspired with ideas about how I want to design my bear. Hopefully I will have a prototype worked up by Christmas time.
I can’t believe it, but another birthday has come and gone. Now it really feels like Fall.
It was a great birthday, I spent the day with my family. We went to a photo studio and had some really nice pictures taken of the 4 of us, as well as a couple of just the boys. Next we headed down to the Denver Museum of Nature and Science. We explored the new Whale Exhibit and saw the Imax movie “Journey to the South Pacific” which had some awesome under water footage. Afterward we headed home and stopped for dinner at a nice restaurant.
Now Halloween is just around the corner with the Thanksgiving and Christmas holidays not far behind. That has me thinking about my gift list and sending off Christmas/New Years cards and letters.
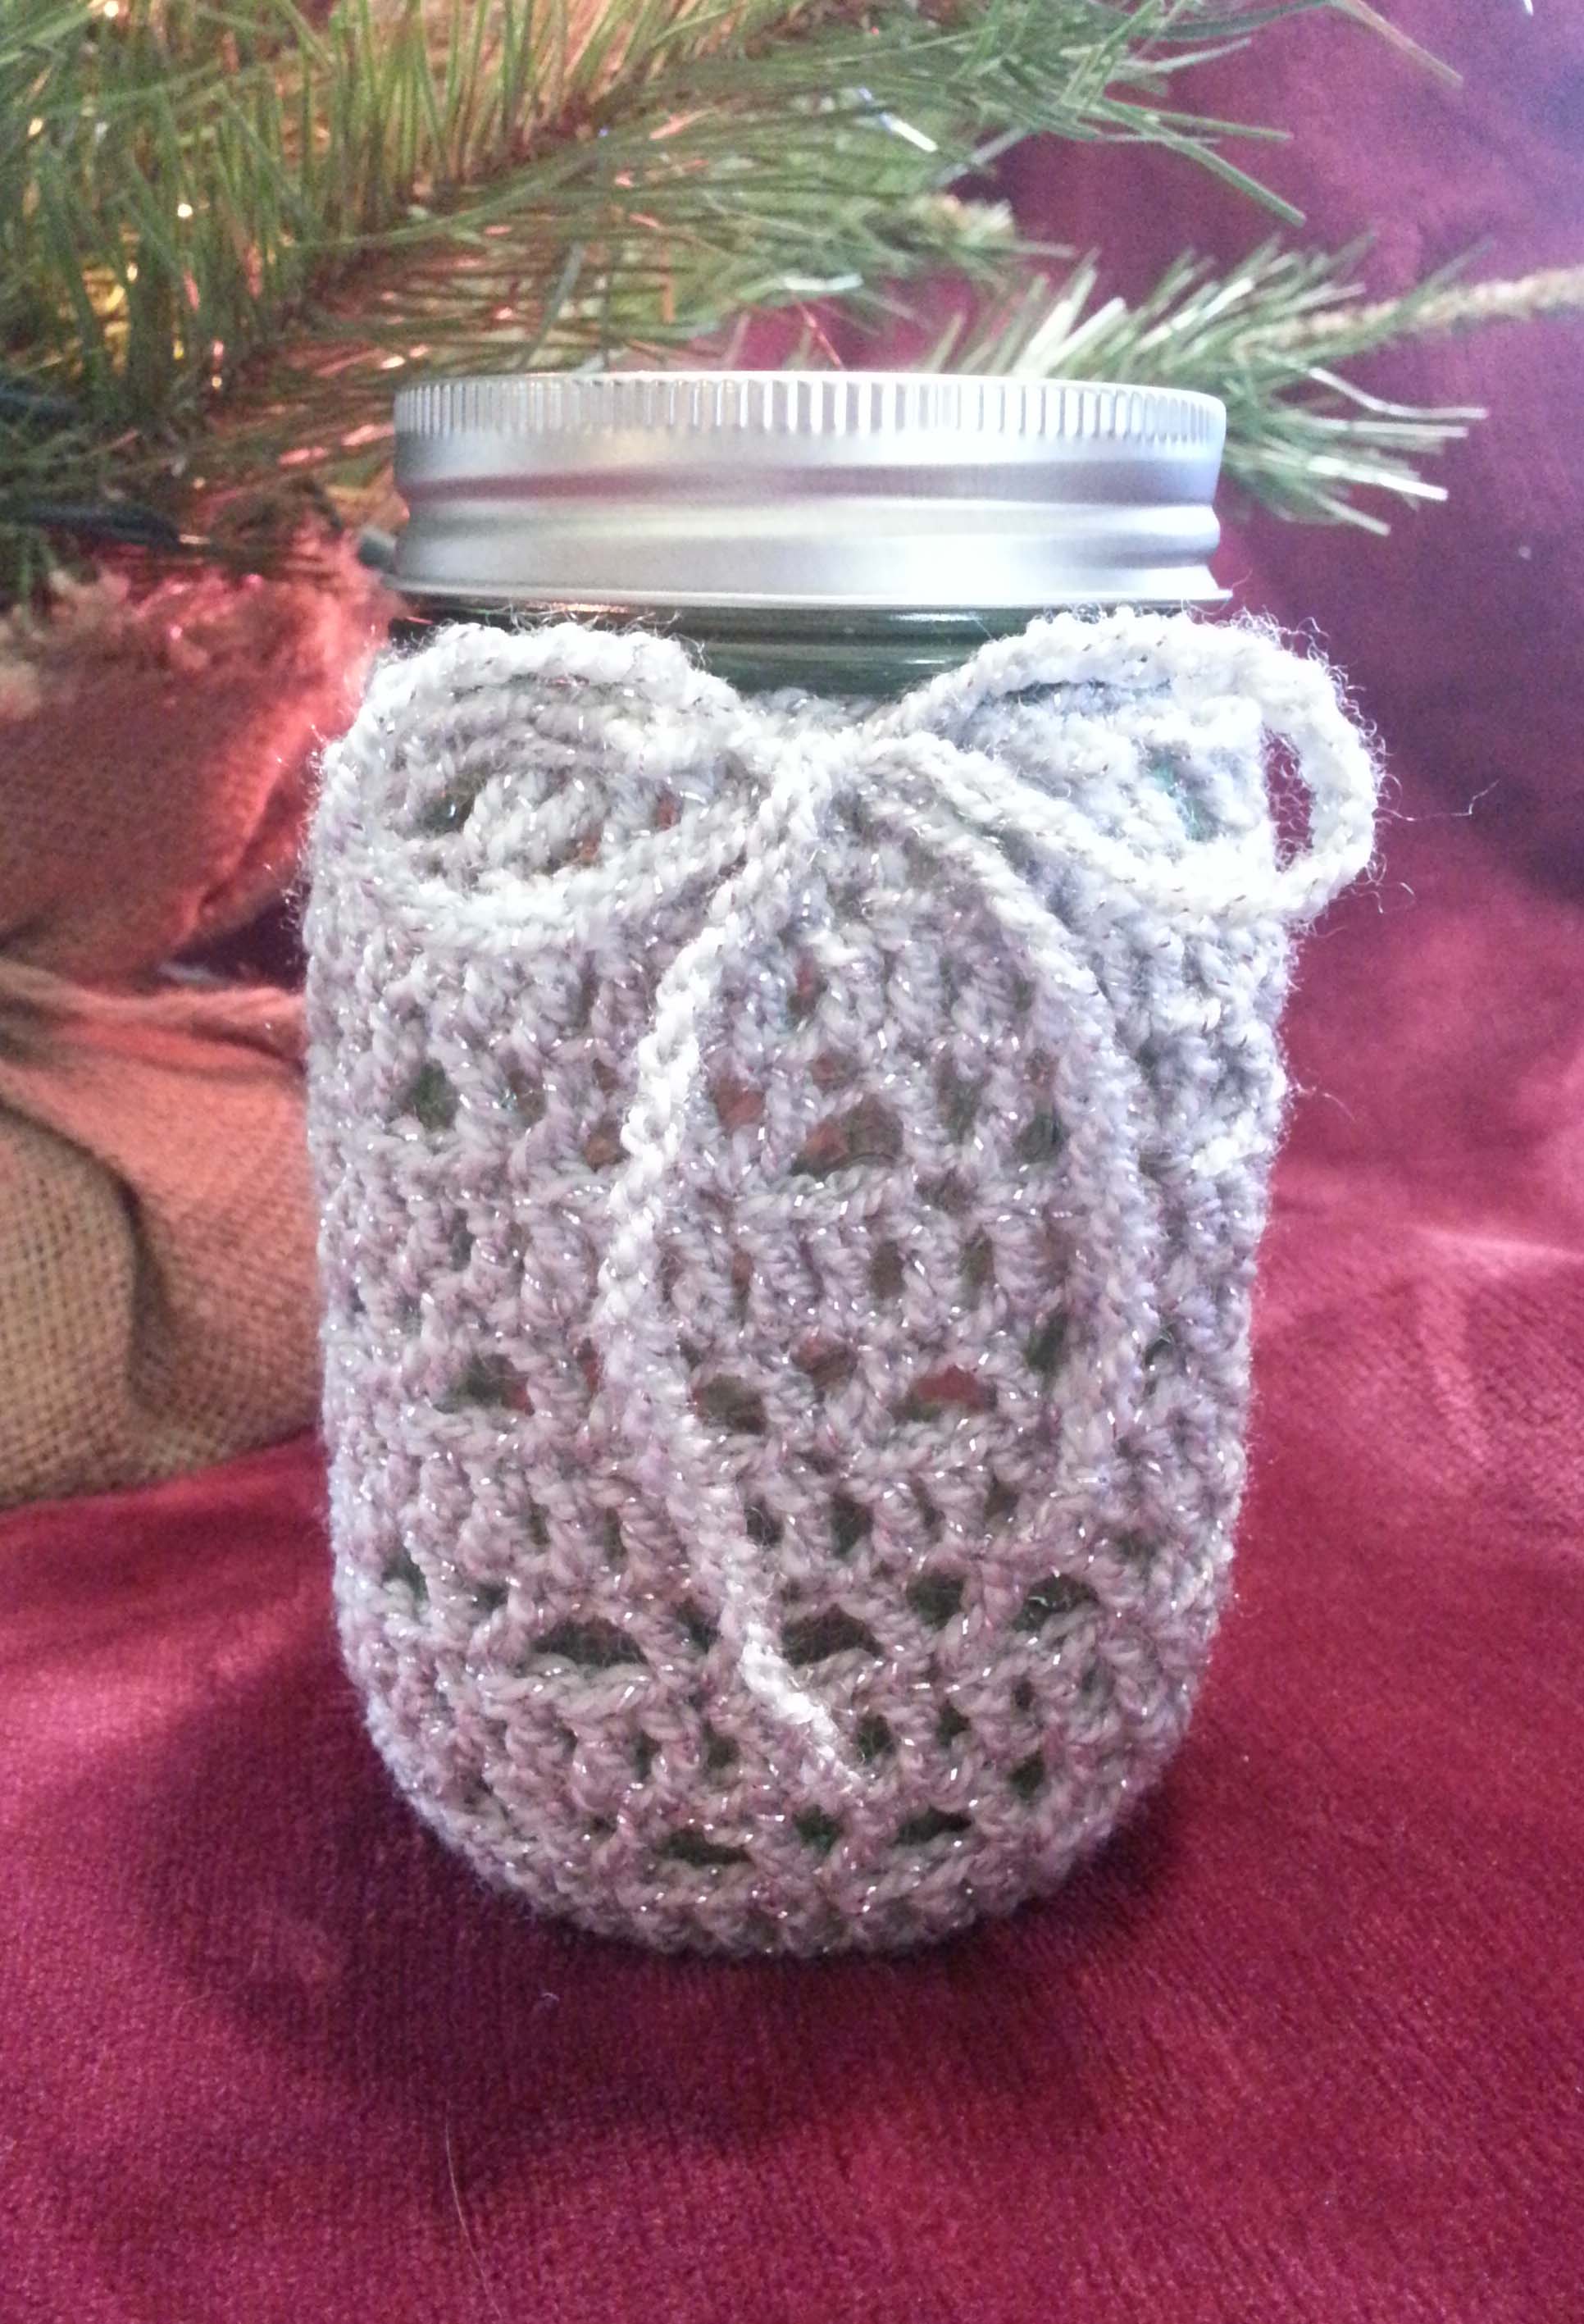
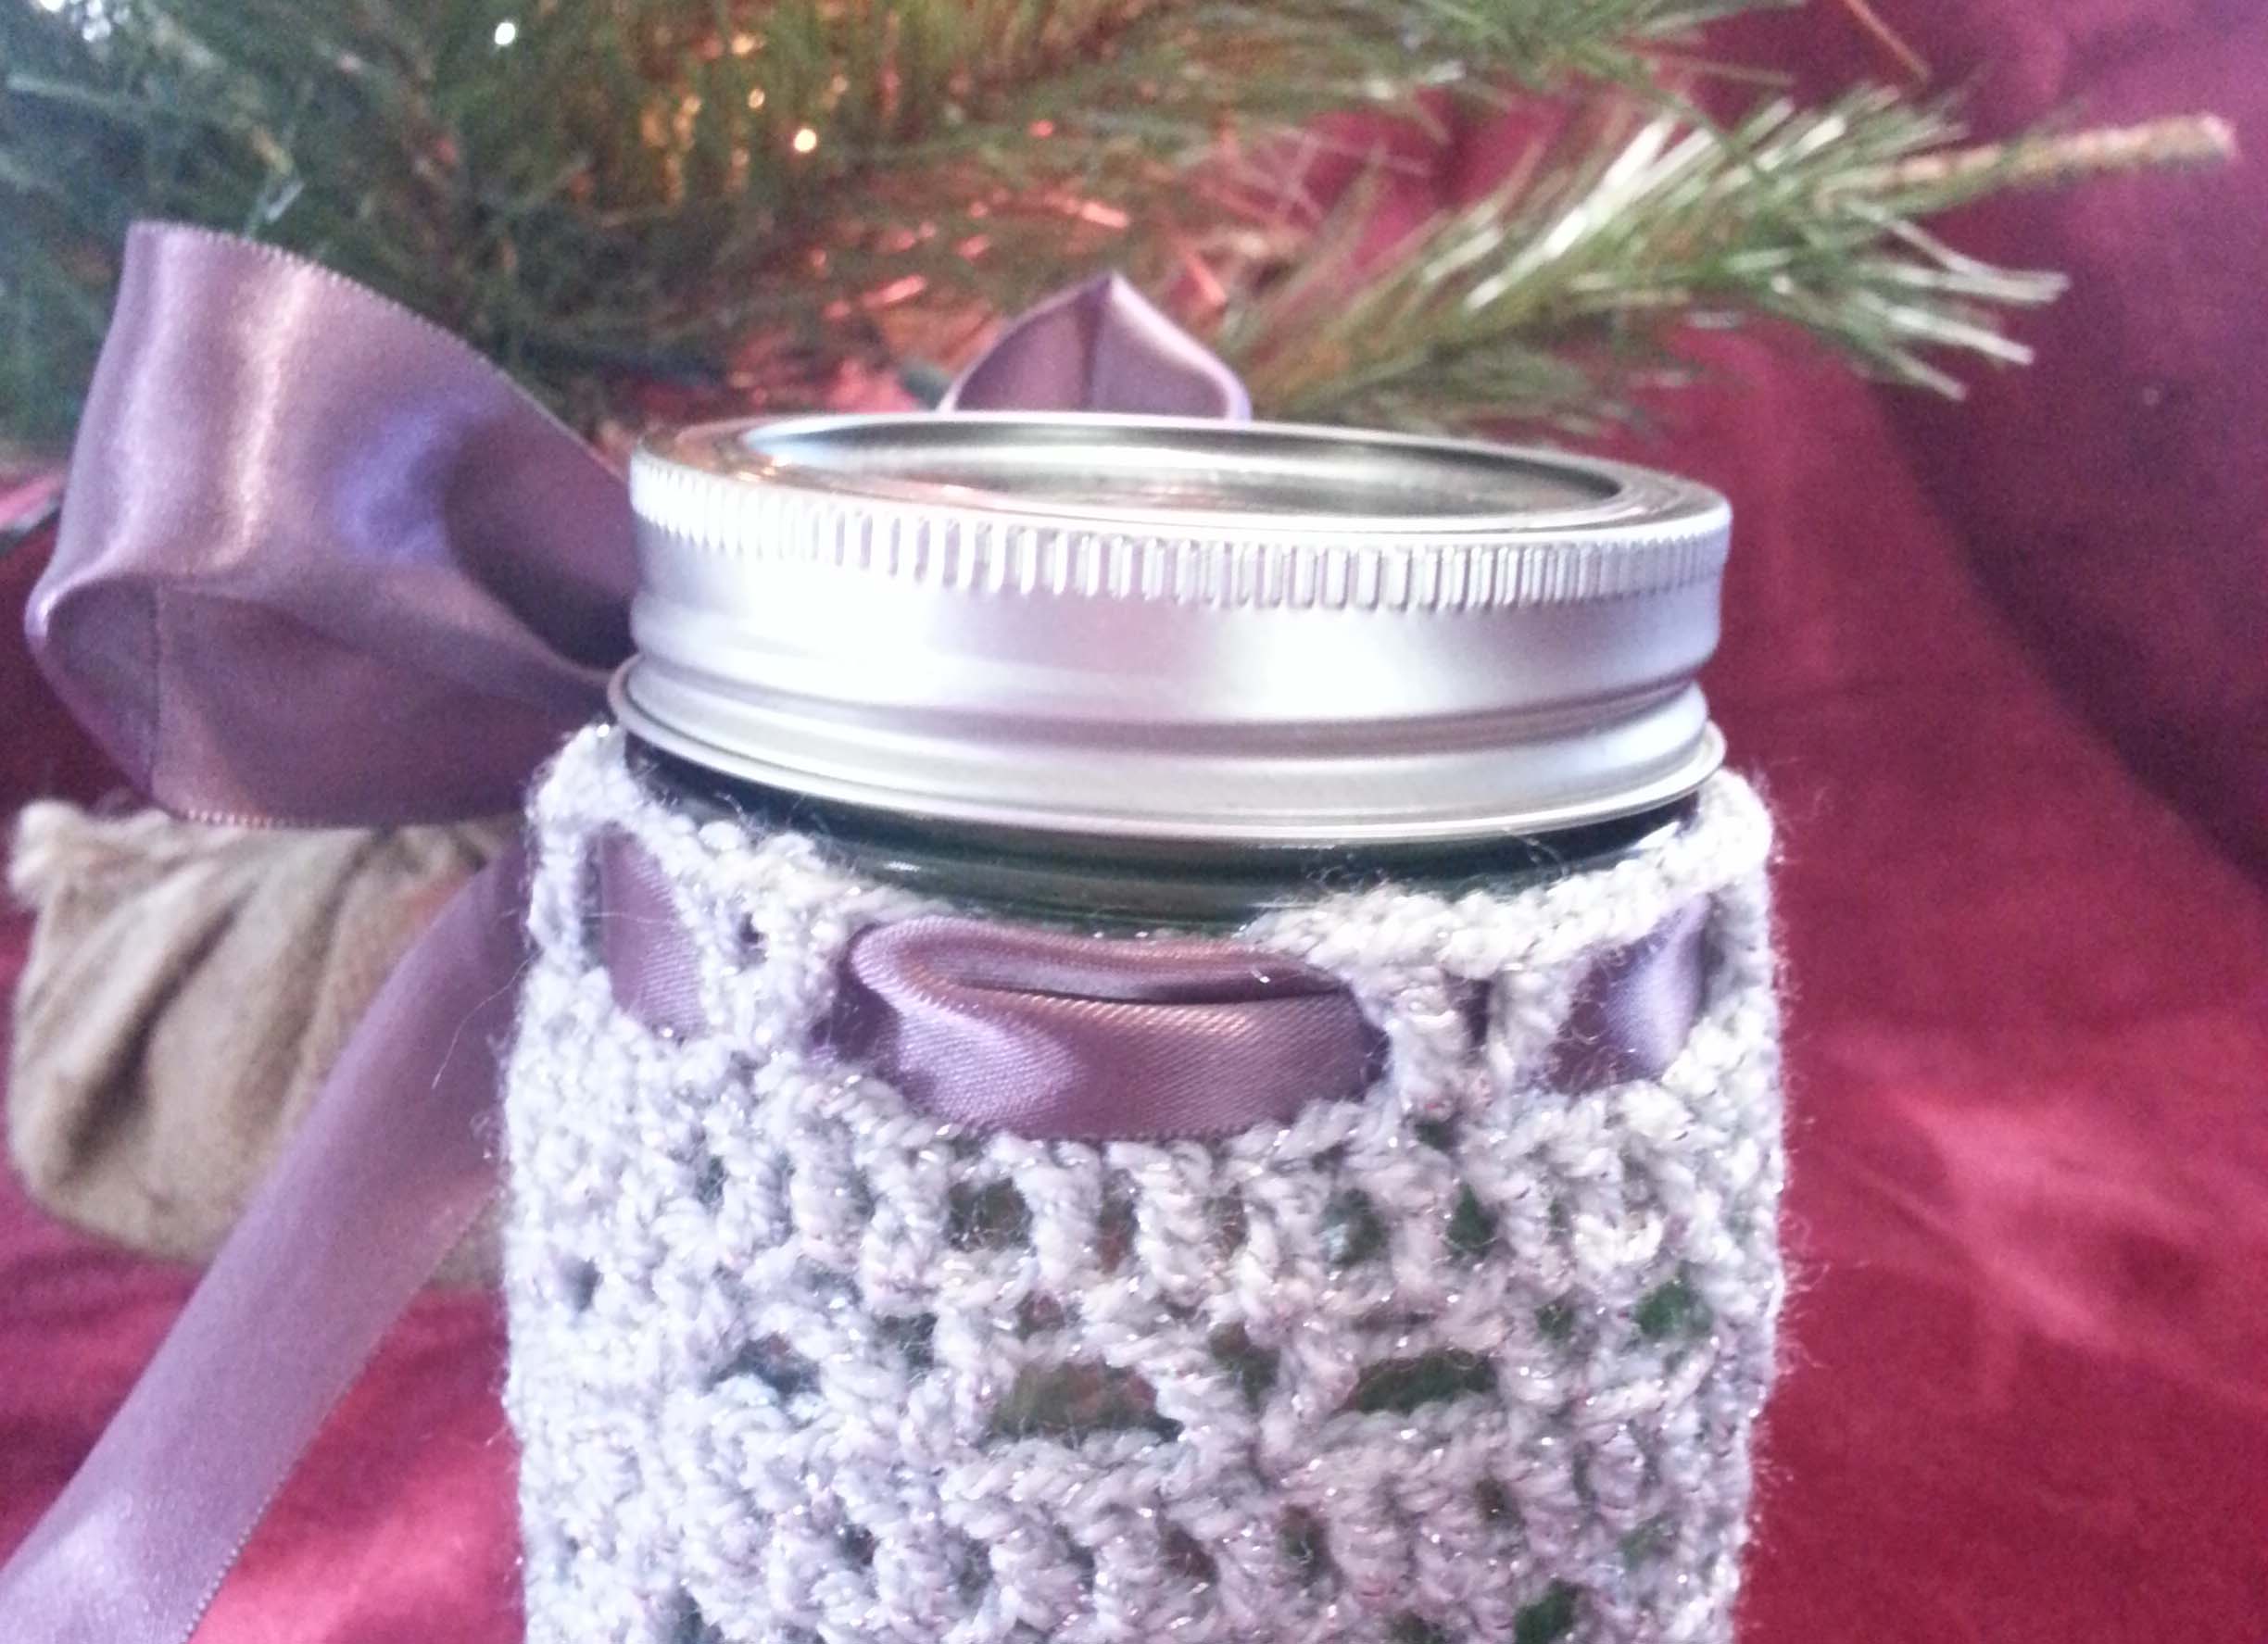
If you are making gifts for folks this year you might find the following pattern helpful. I love getting homemade jams and jellies at Christmas time, and I’m always impressed with the various presentations. Got me thinking though about ways of creating a gift that would still serve a purpose after all the yummy stuff is eaten.
I came up with a jar cover. Once all the jam or jelly is gone you still have a pretty jar that can be used to send out your own home-made goodies, or you can remove the little cover and use it as a bag.
The tie for the cover can be crocheted or you can dress it up further by using a satin ribbon. In this example I used a 32 inch length of 1 1/2 inch wide ribbon.
SPARKLY JAR COVER
FINISHED MEASUREMENTS
Jar Cover is 9”/ 22.5cm around x 5 1/4“/13.125cm long.
Color used for sample is: #150 Platinum, approximately 12g/49 yards were used for sample
CROCHET HOOKS
Size US G=6 / (4mm) or size needed to obtain gauge
ADDITIONAL MATERIALS
Stitch markers
Yarn needle
Pint Mason Jar
Optional:
GAUGE
First 3 rounds of pattern = 2.5” in diameter
SPECIAL STITCHES
V Stitch (V-st): (Dc, ch 1, dc) in indicated st or sp.
INSTRUCTIONS
Rnd 1: Ch 4 (counts as 1st dc and center), 11 dc in 4th ch from hook, sl st to top of beg ch-4. [12 dc]
Rnd 2: Ch 3 (counts as dc here and thru out), dc in same spot as join, 2 dc in next 11 sts, sl st to top of beg ch-3. [24 dc]
Rnd 3: Ch 3, 2 dc next st, (dc next st, 2 dc next st) 11 times, sl st to top of beg ch-3. [36 dc]
Rnd 4: Ch 1, sc in same spot as join, sc next 5 sts, 2 sc next st, (sc next 5 sts, 2 sc next st) 5 times, sl st to first sc of rnd. [42 sc]
Rnd 5: Ch 1, sc in each stitch around, sl st to first sc of rnd. [42 sc]
Rnd 6: Ch 3, dc in next 41 sts, sl st to top of beg ch-3. [42 dc]
Rnd 7: Ch 4 (counts as dc and ch-1), dc in same st as join, (sk 2 sts, V-st in next st) 13 times, sl st in 3rd ch of beginning ch-4. [14 V-sts]
Rnds 8 – 15: (Repeat Rnd 6 then Rnd 7) 4 times.
Tie (Make 1)
Ch 100 and fasten off
FINISHING
Weave in tails.
Thread the tie (or ribbon) thru the openings in the last round. Slide the jar into the cover, tie a bow. Tie knots in the ends of the tie, cut off excess yarn.
Today has been declared “I Love Yarn Day”. A celebration that I can truly get behind, since I really do love yarn.
As many of my readers know, since the start of the school year I’ve been spending my Wednesdays at the Longmont Yarn Shoppe. It’s one of my favorite places to hang out. Surrounded by yarn and other folks that love to play with yarn the hours go flying by, and inspiration always strikes.
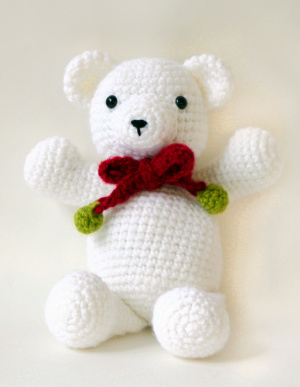
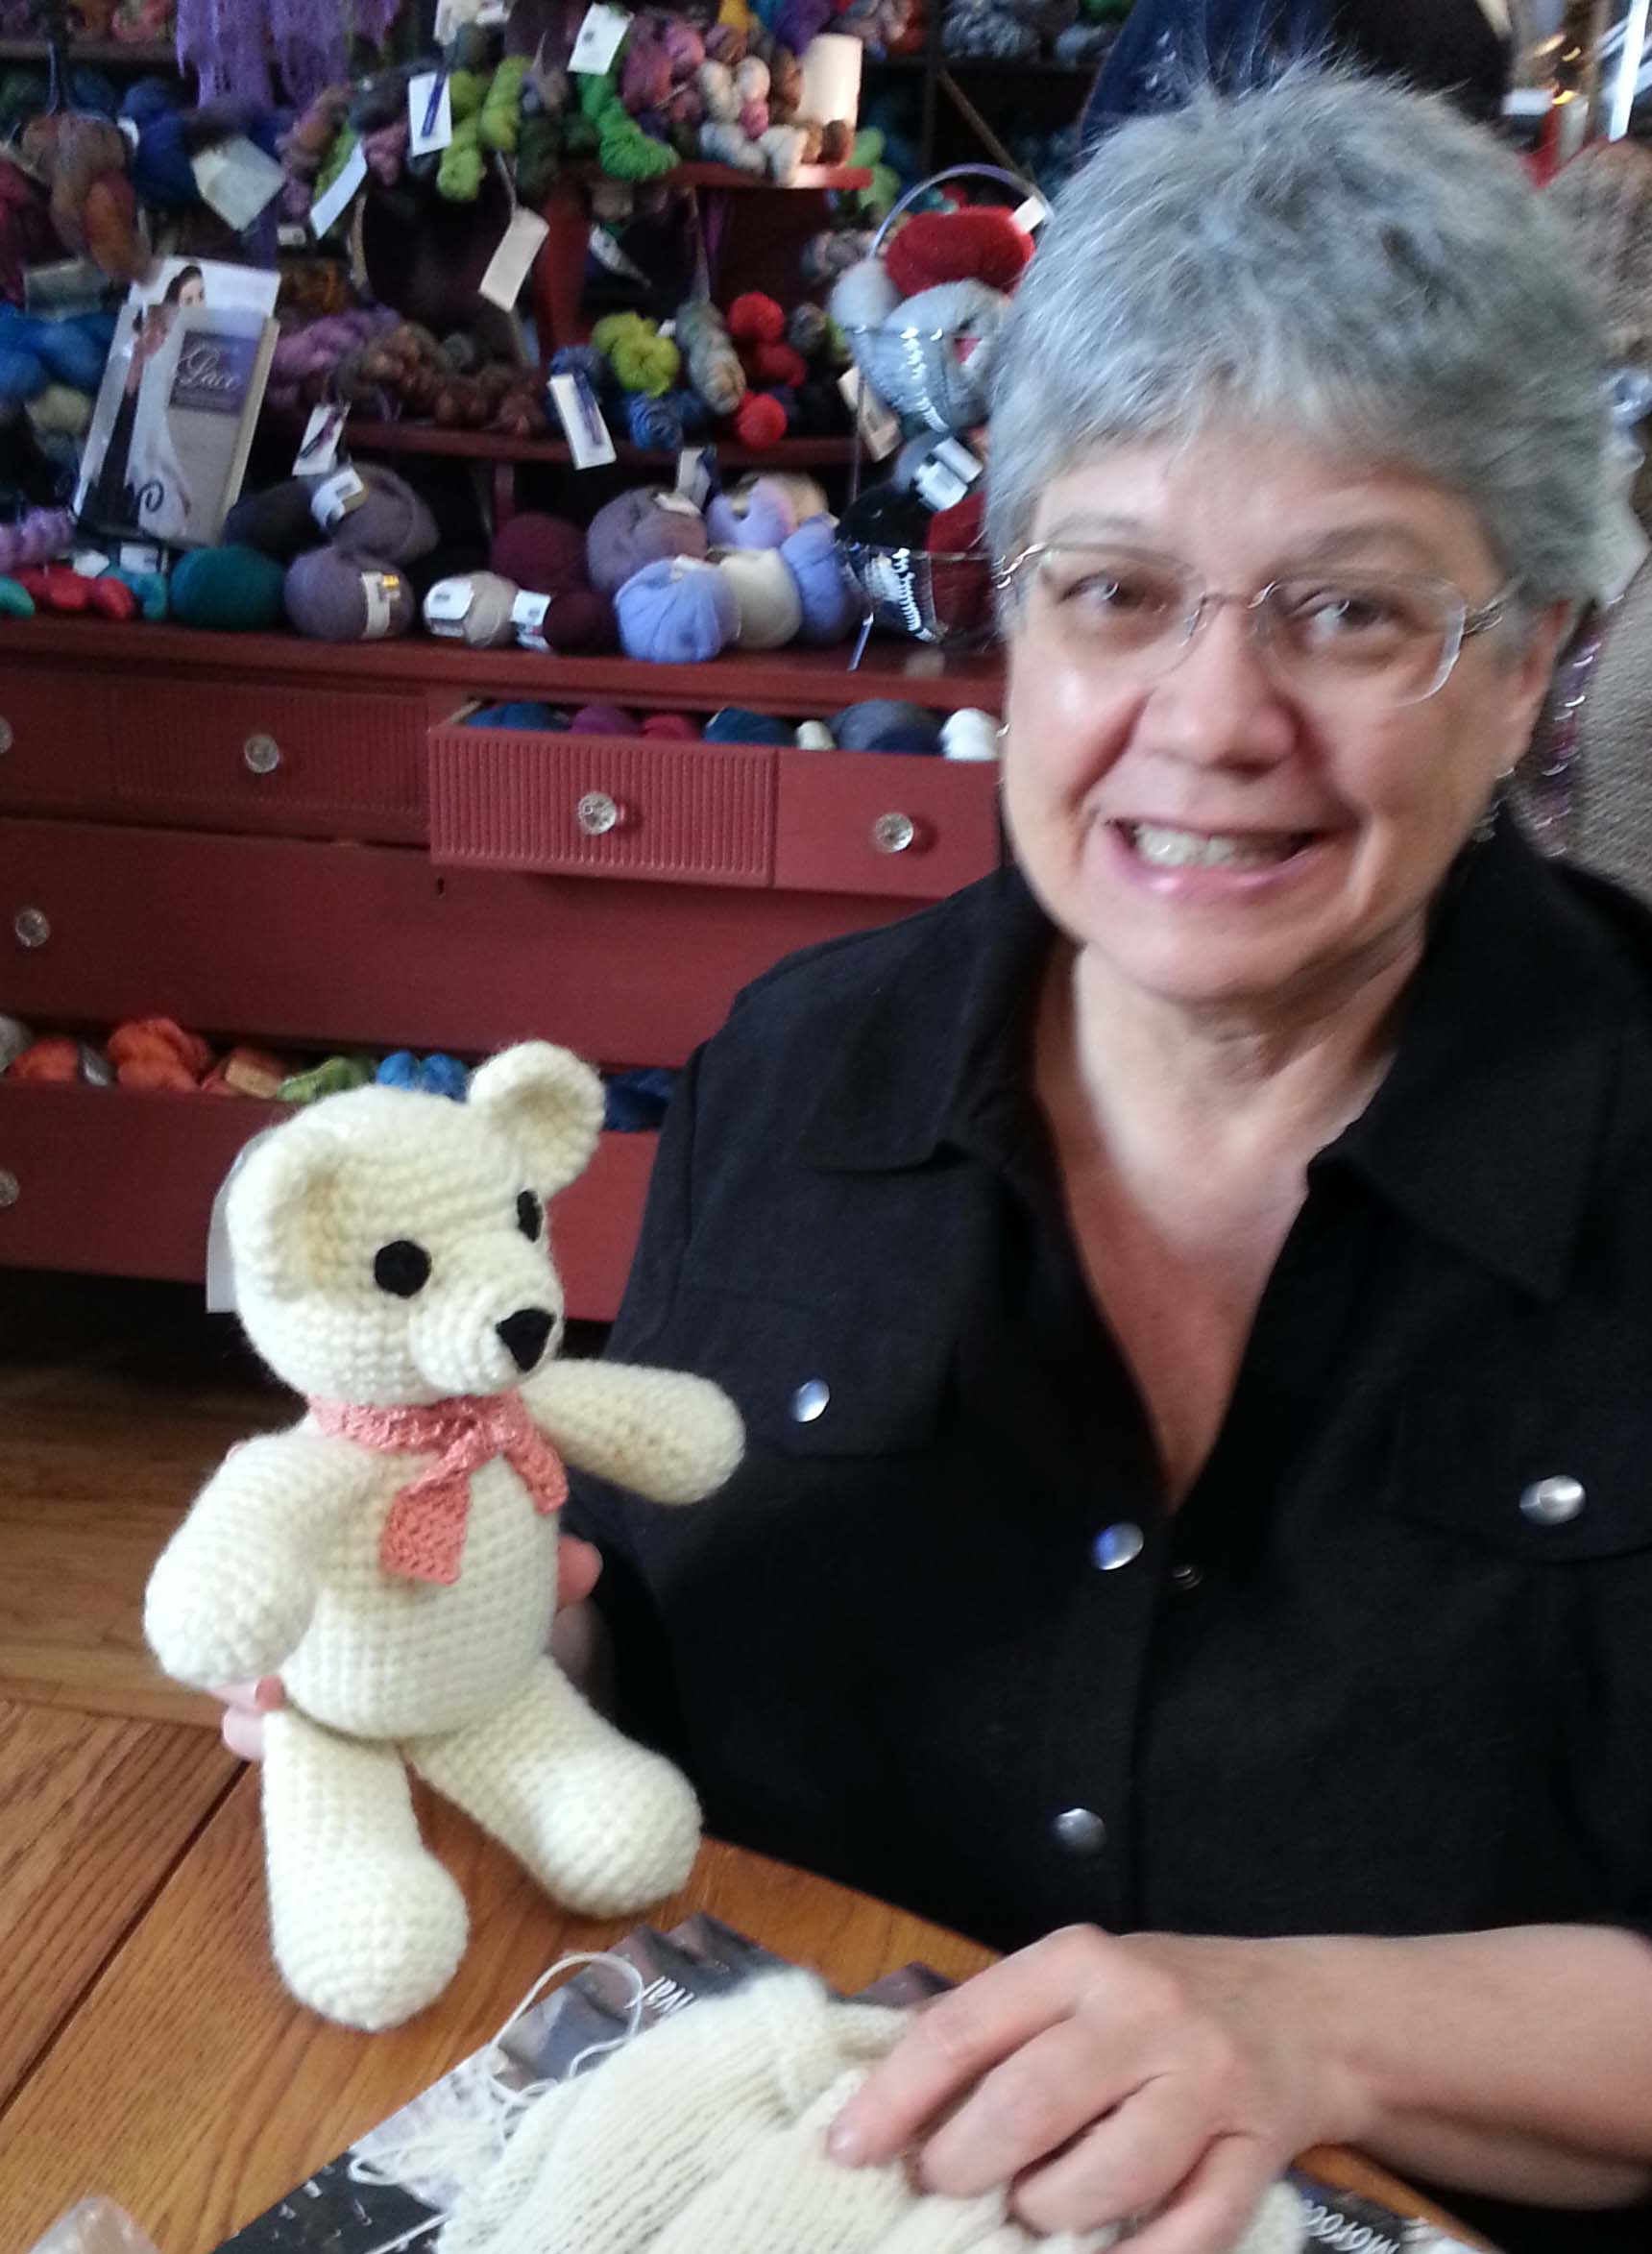
Some of the great activities at LYS are all the charitable stitching being done for various organizations. My friend Kathy comes in most Wednesday with another friend and we all sit around the table working on our various projects. Lately Kathy has been working on knitting a Teddy Bear, she is making toys to give to graduates from the Front Range Community College’s Early Childhood Education program.
She asked me if I thought any of our local CGOA Chapter members would like to crochet some bears. Deadline for this project is November 1st, so not a lot of time. Fortunately there were chapter members up for the challenge. I brought some of my leftover yarns to donate to the effort and hunted down some patterns for bears. Both Red Heart and Lion Brand have some patterns available for 12 inch tall bears.
Before I got so busy designing and writing I used to crochet lots of charity projects. Blankets for Project Linus and premie hats for Save the Children were some of my favorite projects. I decided that I wanted to make some bears too, at least they are quicker projects than blankets.
So I’ve started with the bear from the Lion Brand website and I’ll be making the one from the Red Heart website next. It’s been really fun crocheting a project from someone else’s pattern for a change. I just have to follow along and pretty soon I’ll have a bear finished.
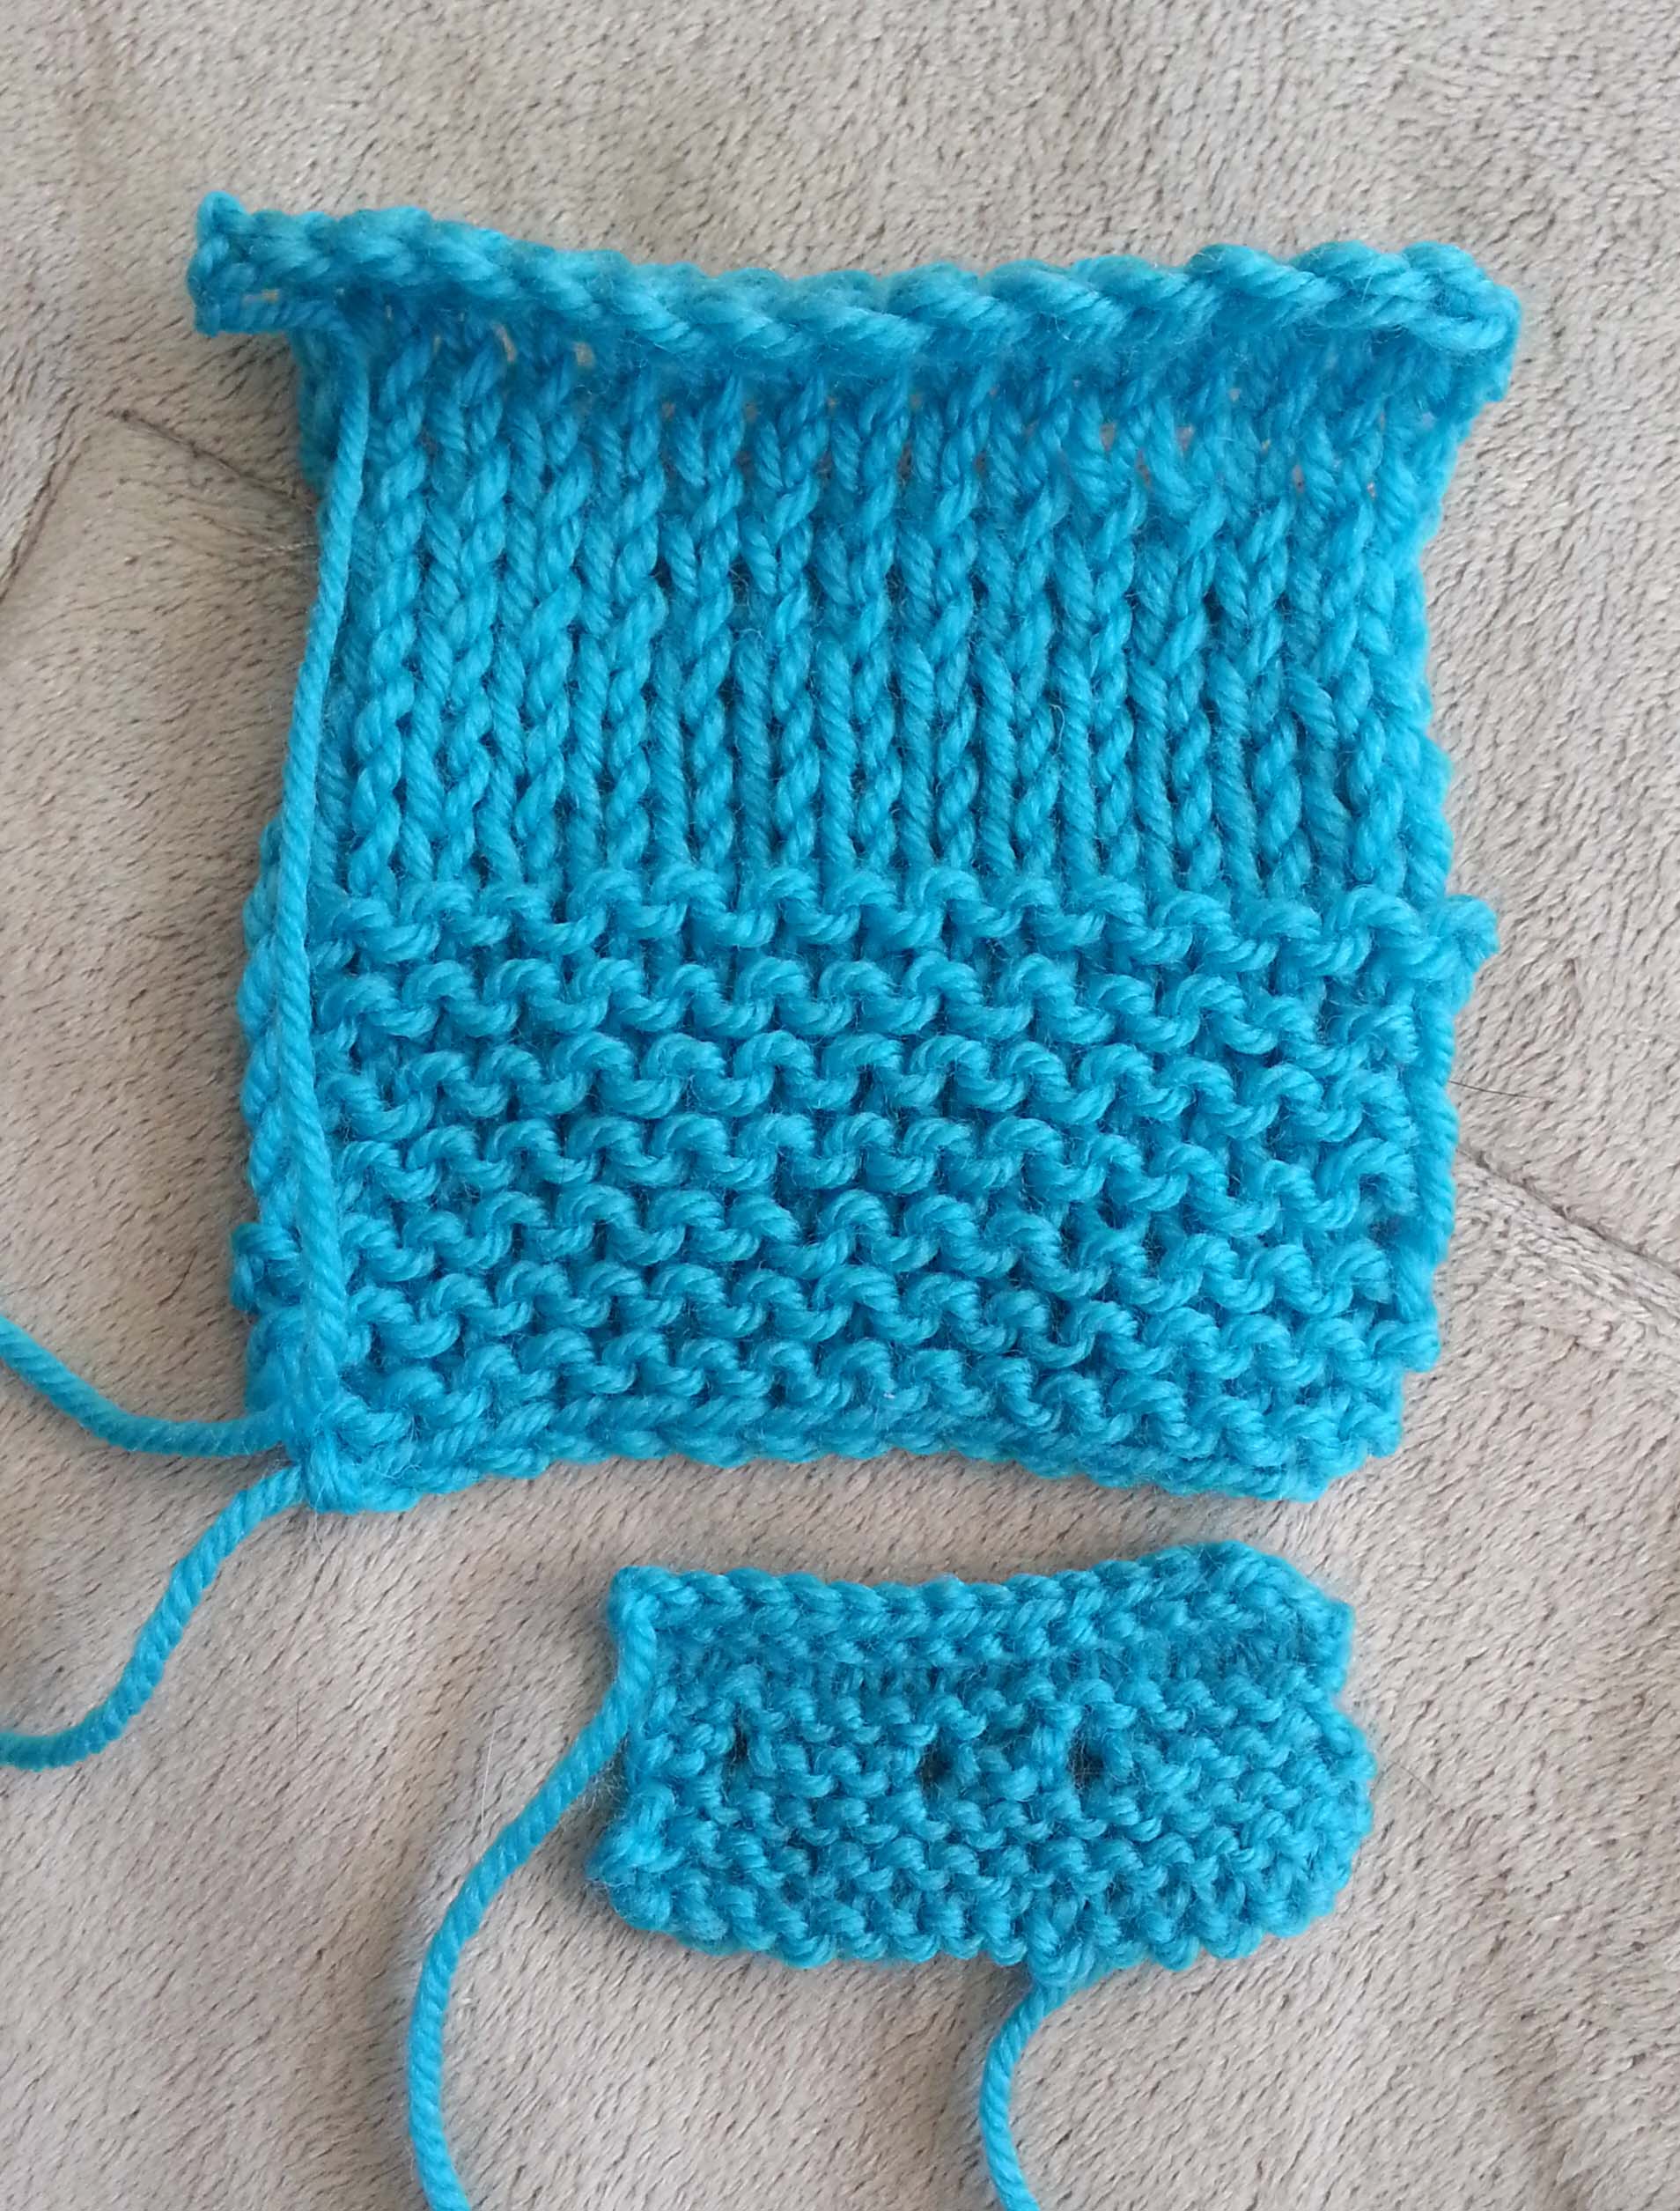
Above is a photo of my progress so far, I’m finished crocheting all the pieces except his body.
I’ve actually been surprised at how quickly the crocheting for this project has gone. Of course, I had to tweak things a tiny bit. I’m crocheting his eyes and nose from size #10 cotton thread then sewing them on firmly, instead of using safety eyes and embroidering the nose. These bears will be in the hands of little ones, so I’m upping the cautious factor. Plus the crocheted eyes will be more washable than plastic eyes.
I’m also coming up with something a little different for his “scarf”.
A Bear for All Seasons Photo courtesy of Annie’s/Crochet World
Working on my bears made me realize that I need to design a teddy bear of my own. I’ve designed a little bear that was published in Crochet World in their December 2012 issue. But that bear is much smaller, I think my next bear needs to be snuggly size.
Okay, back to work on this bear. Hopefully I will have a photo of the finished bear very soon. Though I am reminding myself that it takes nearly as much time to put all the pieces together and stuff the bear as it does to crochet the bear.
Seems like this last month has gone screaming by. I’ve been adjusting to my new routine with the boys going to school in town. We are starting our mornings bright and early, this past week we were up before the sun was and it will be trailing us more as the Autumn moves forward.
I’m still exploring my options for getting work done while I’m down off the mountain. One of my new routines is spending my Wednesdays from 10a – 1:30p at the Longmont Yarn Shoppe.
My little spot at the table.
It is a very appropriate space for me to hang out, surrounded by yarn and inspiration, as well as the lovely company of the owner, Gail and her lovely “shop dog” Kit.
Shop Dog Kit (who doesn’t like to sit still for photos)
Classes Corner
Gail has the shop set up beautifully. Here is the class section, where there are samples of the various class projects for the myriad classes that will be taught this Fall at the shop.
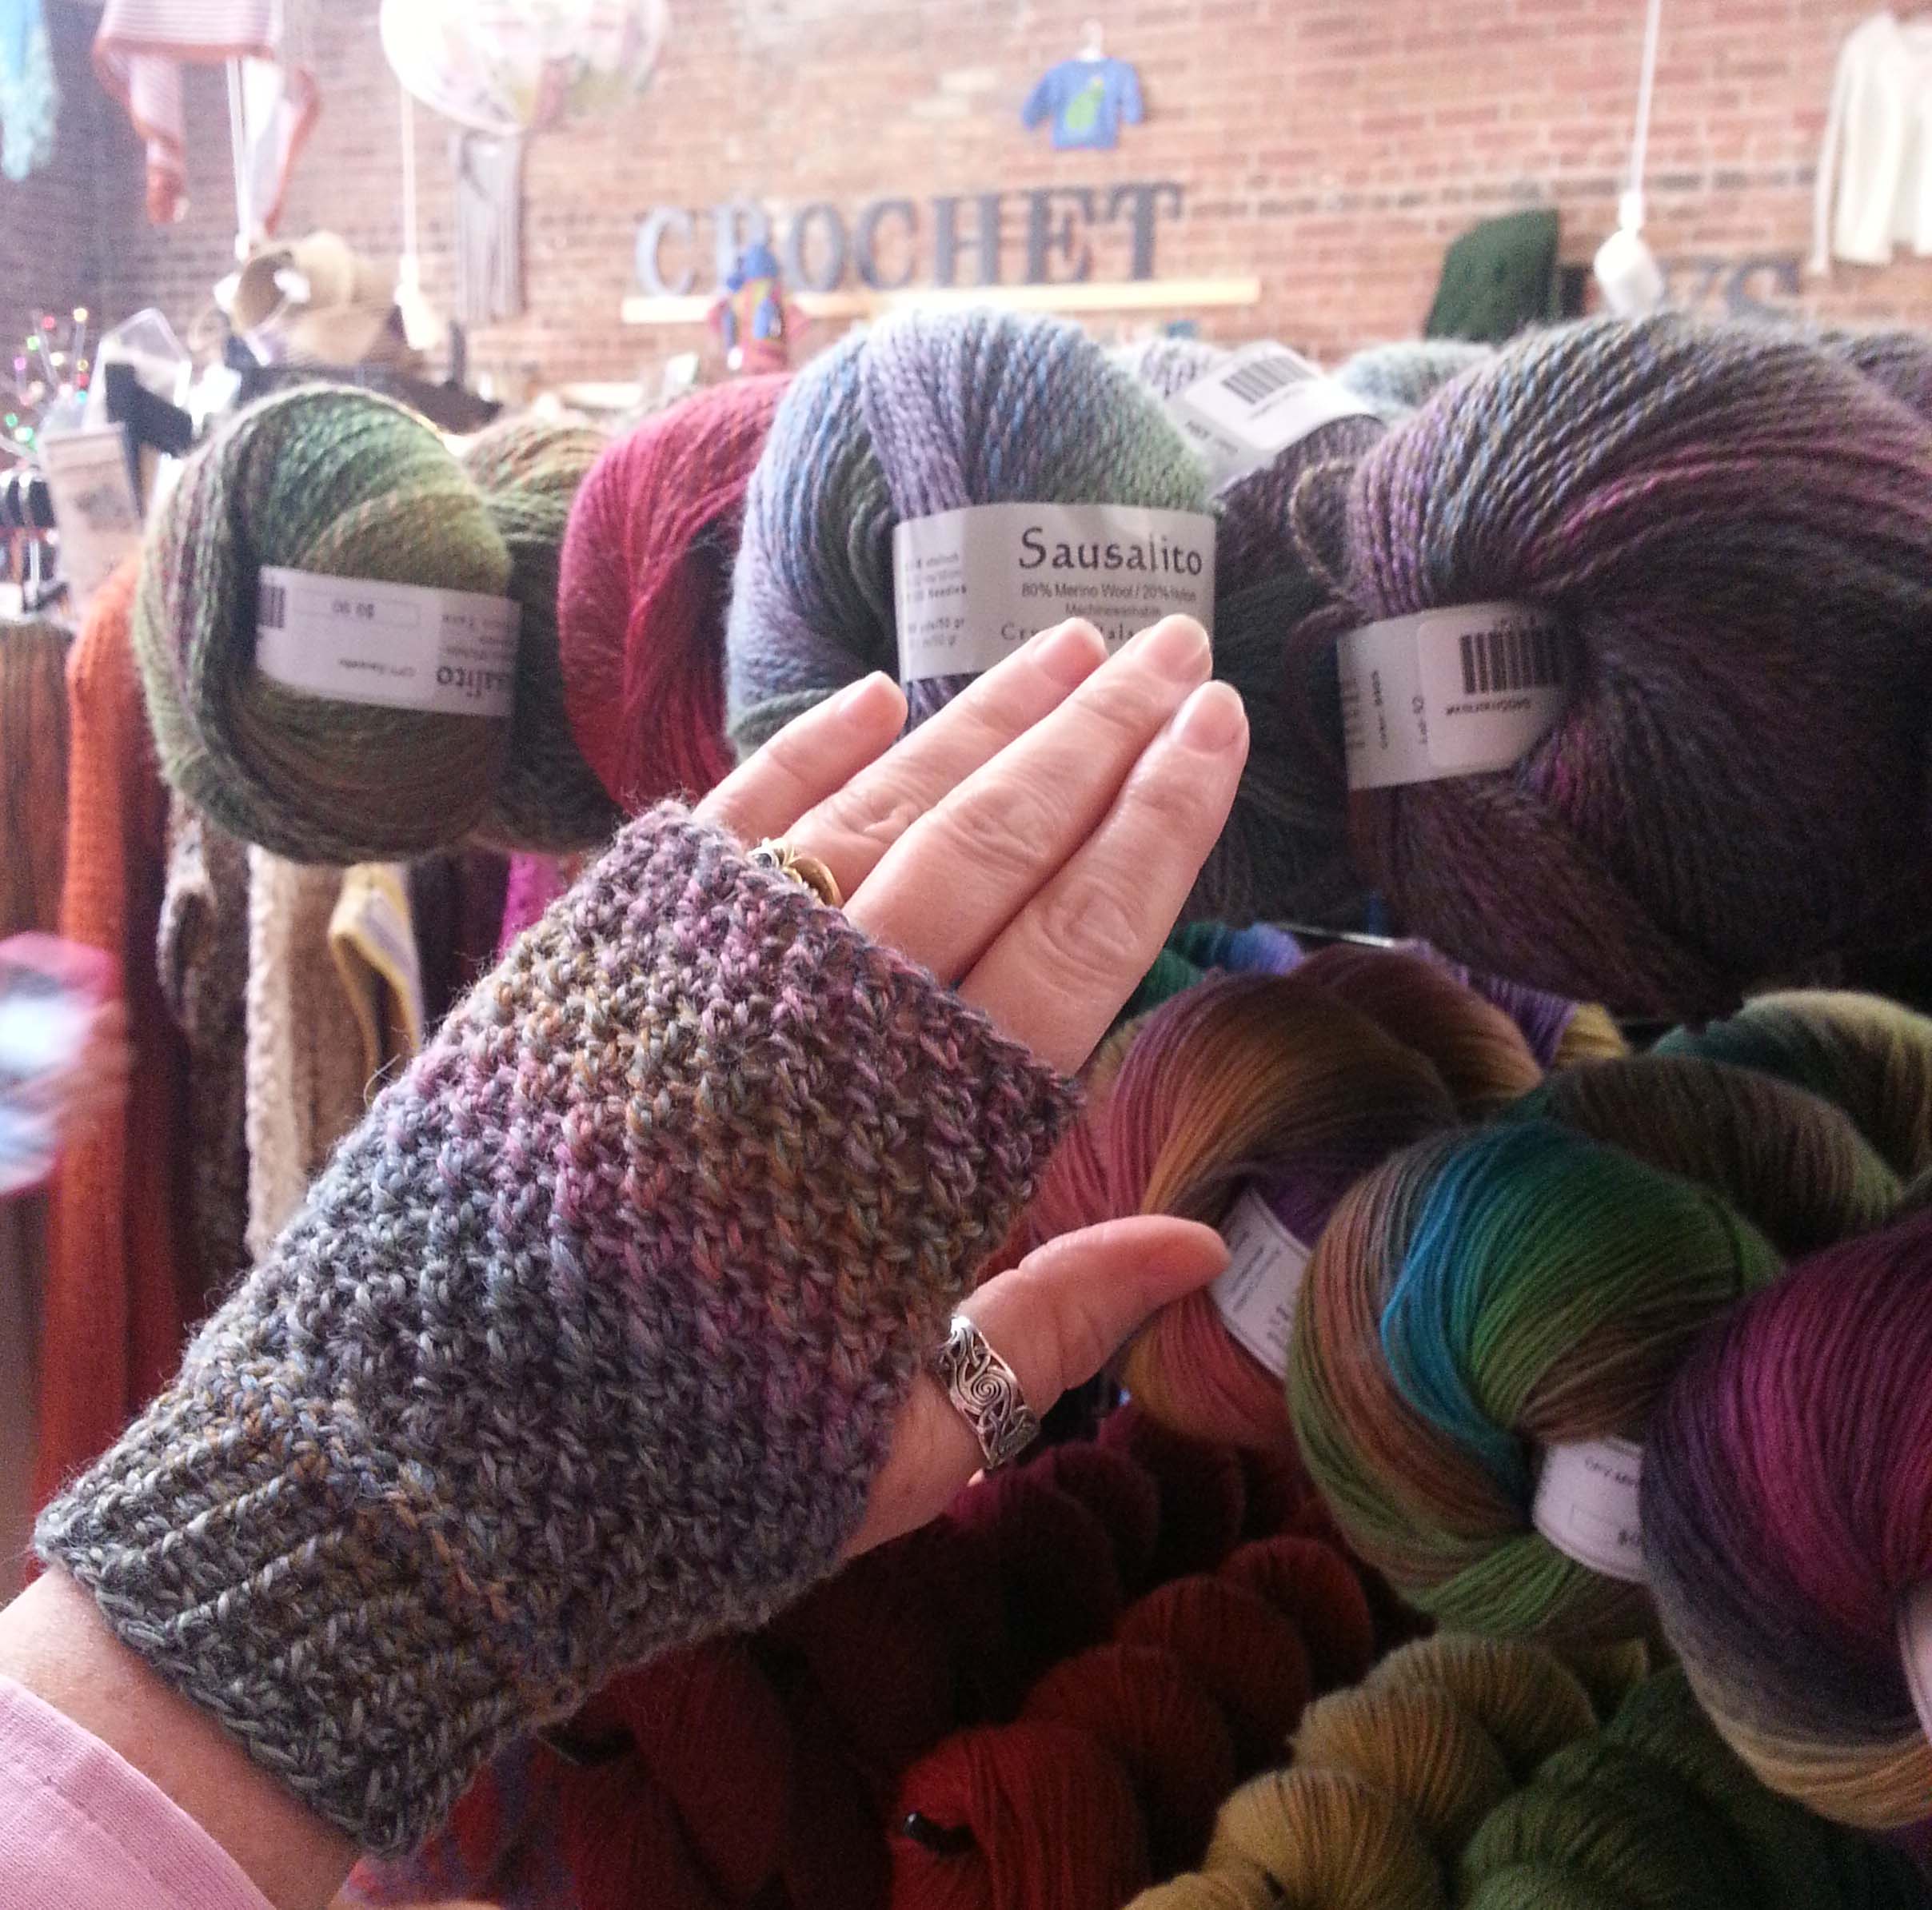
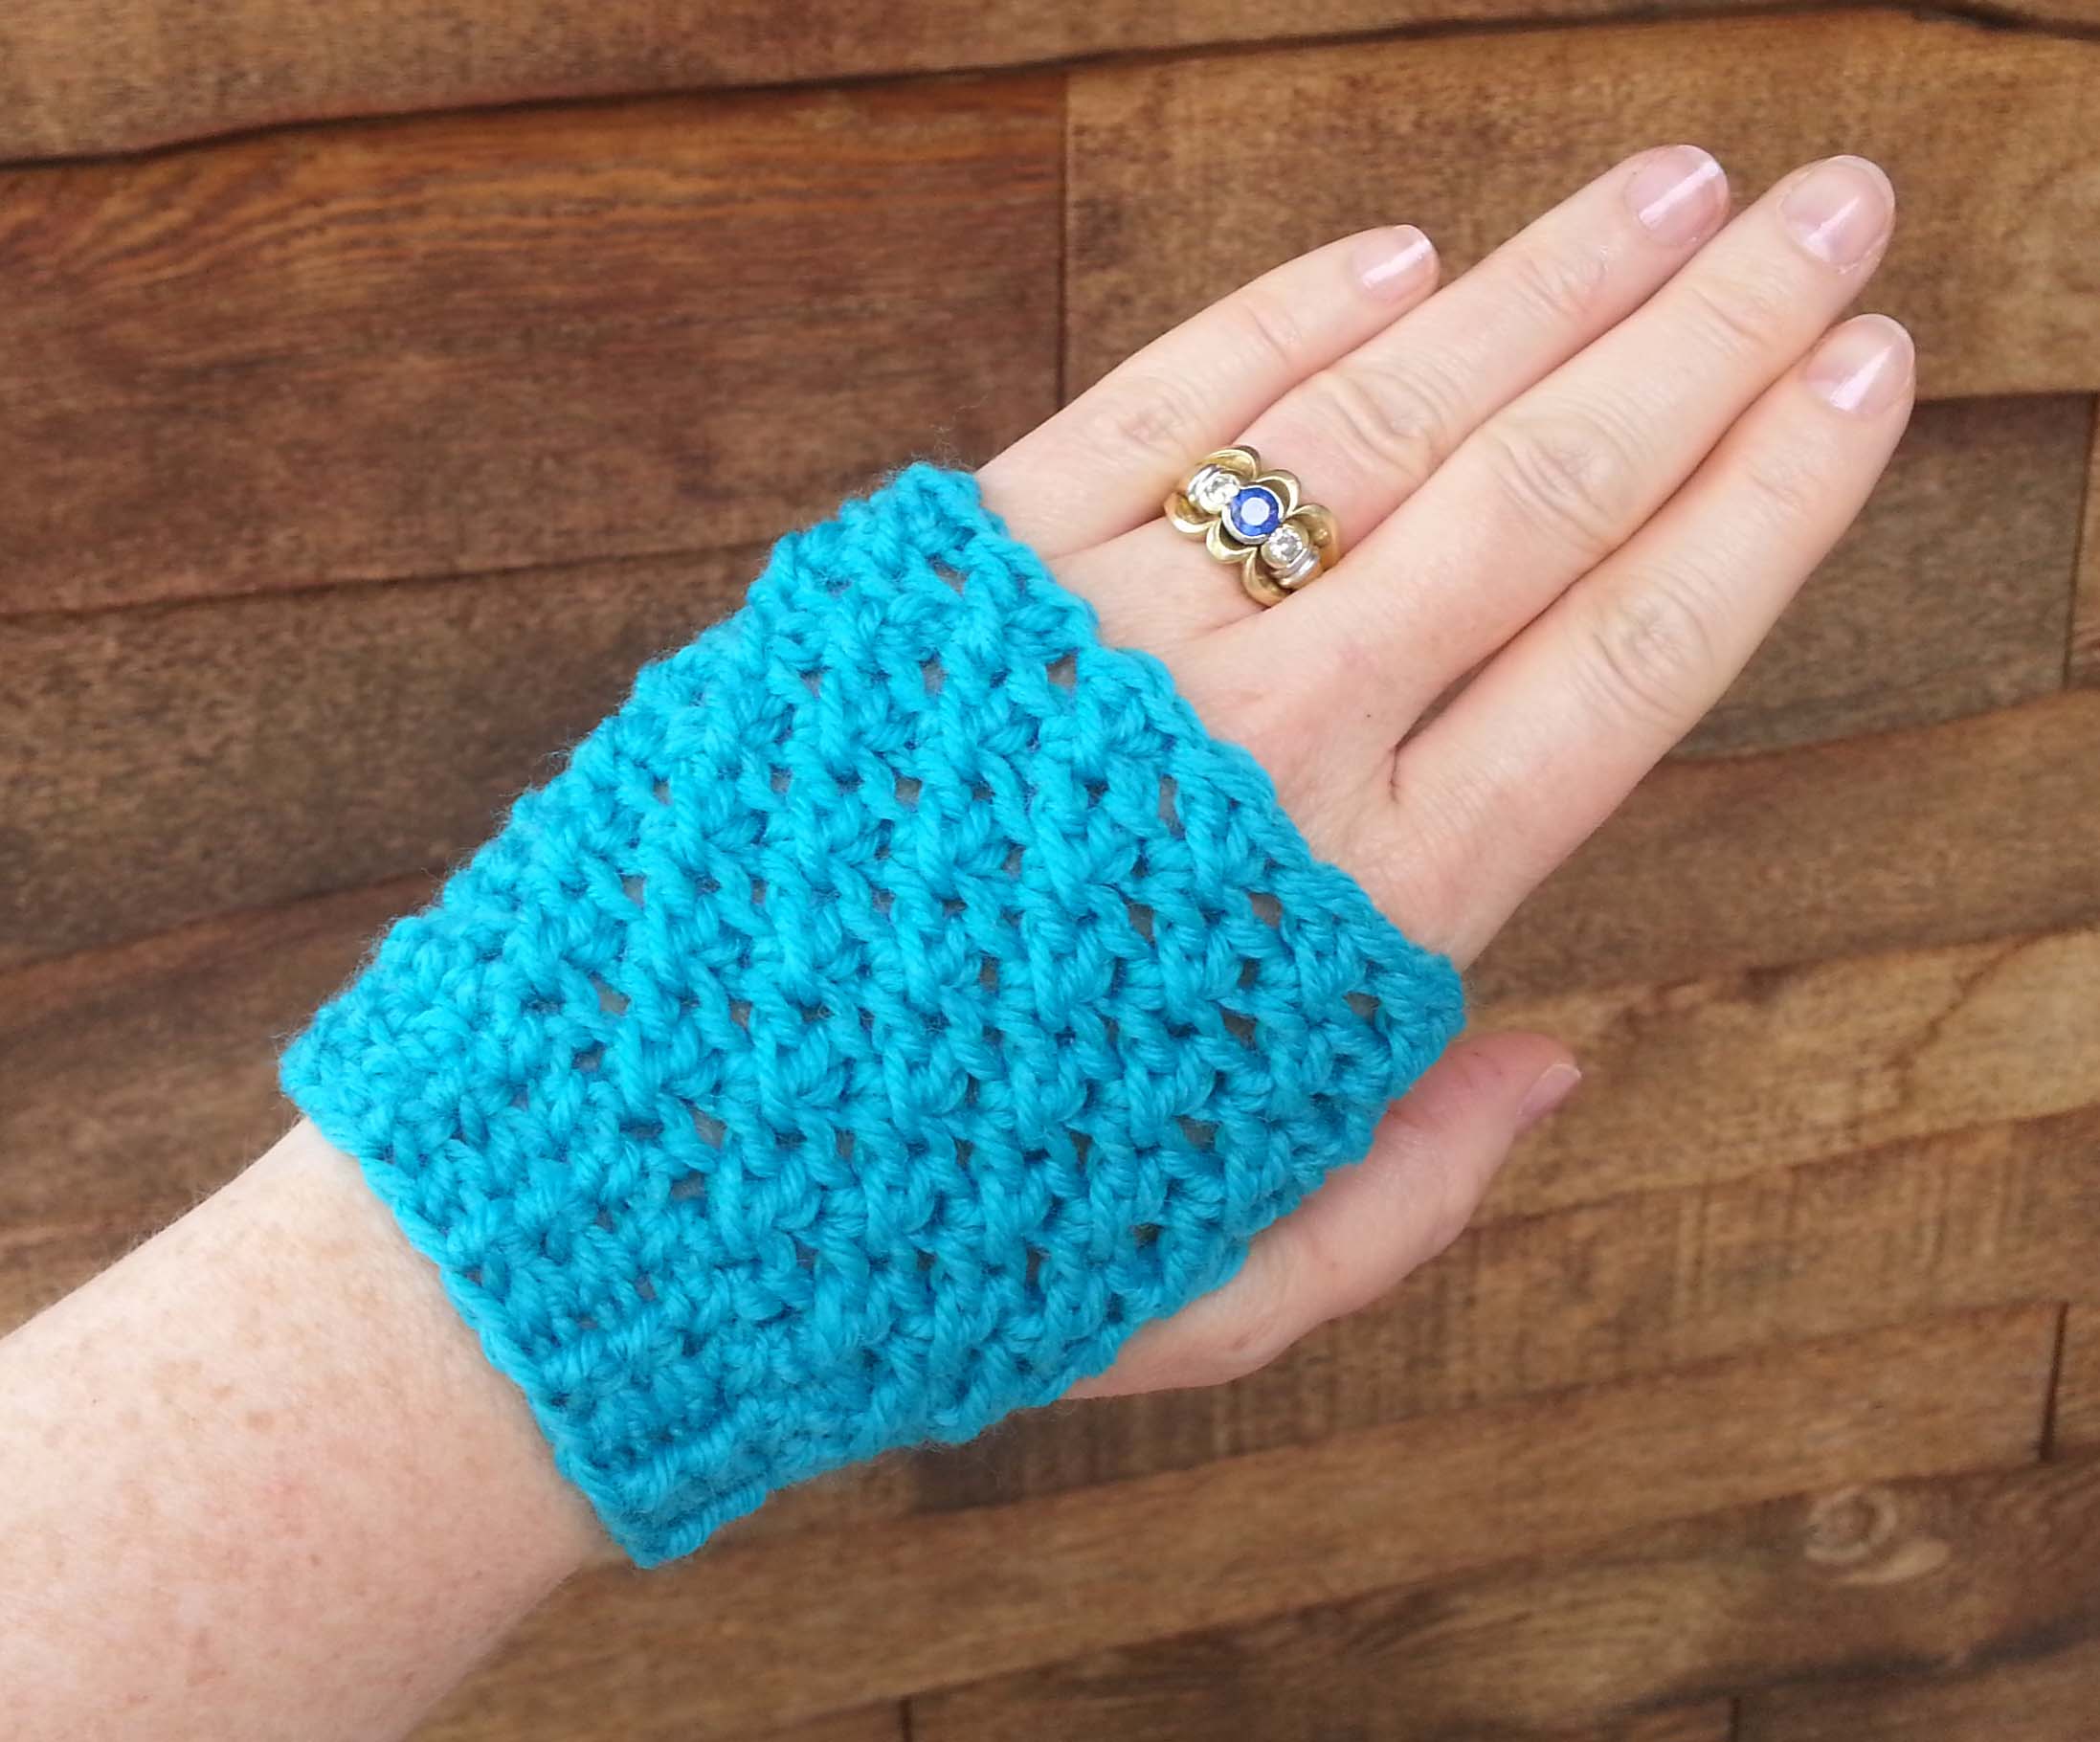
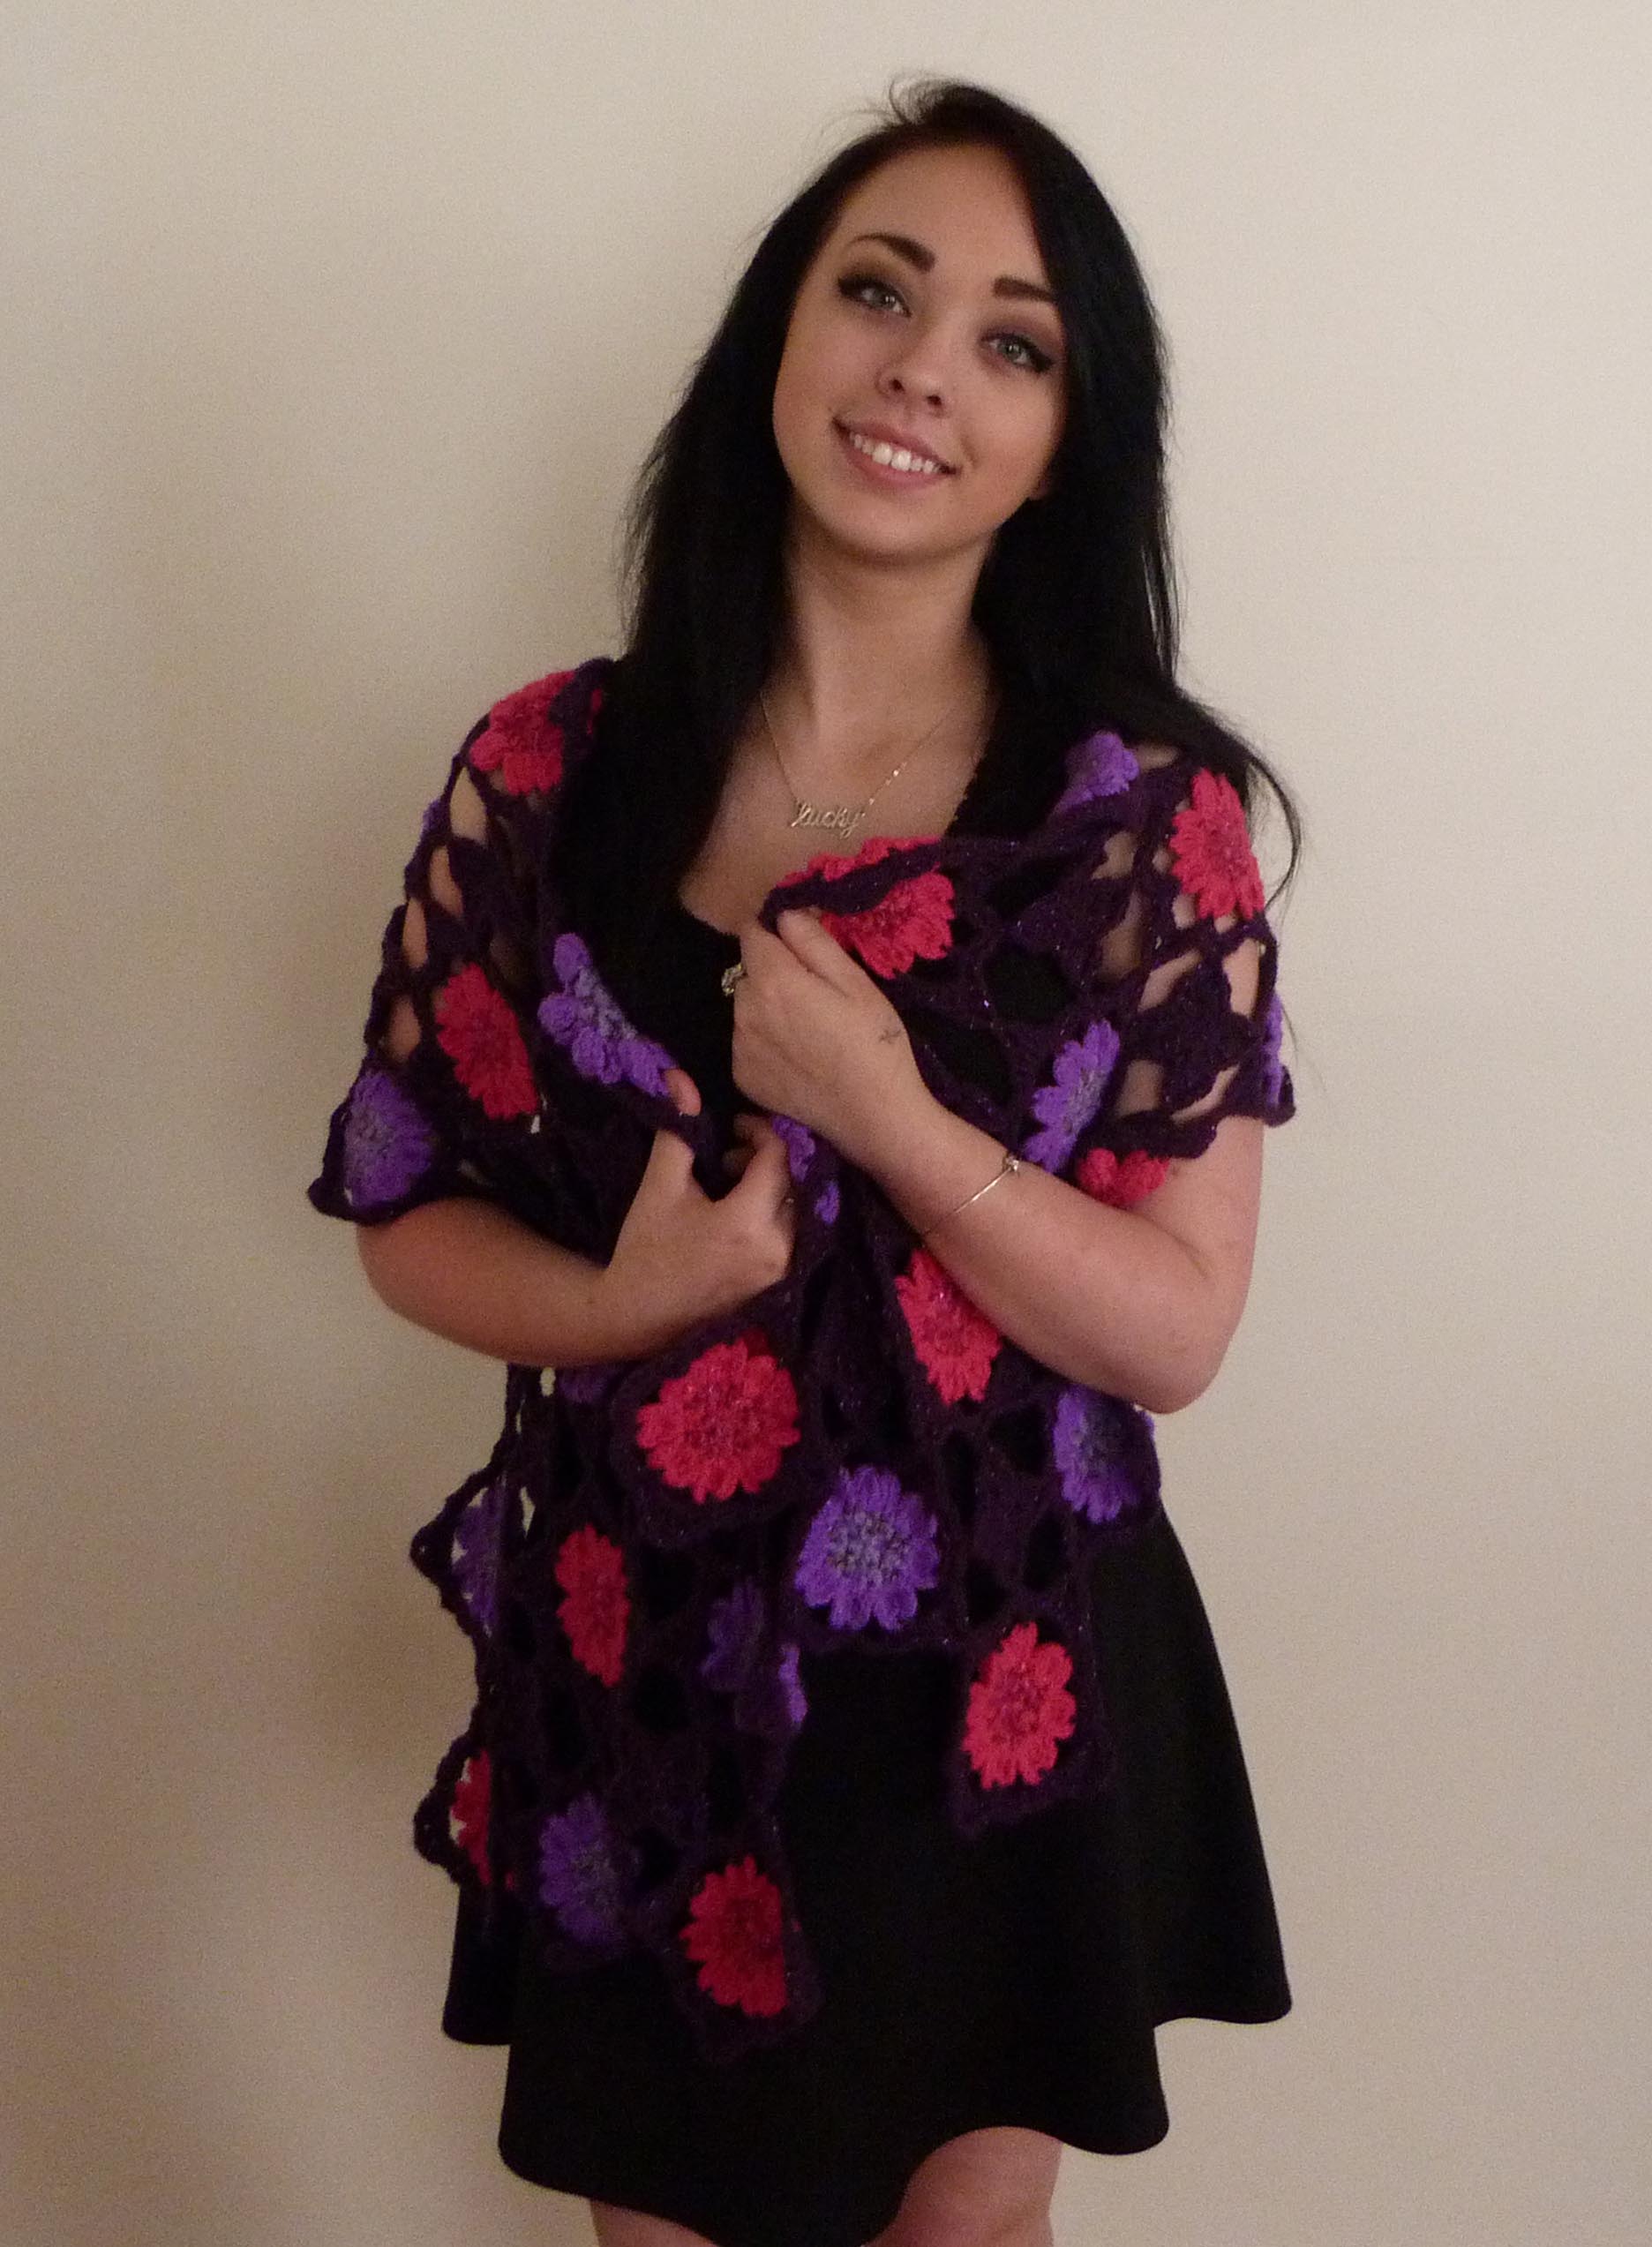
I’m modeling my little wrister cuff that my students will be making this Saturday afternoon (September 13th, 1p-4p) in my Crochet Wristers class. The students will learn all the techniques they will need to make the wrister cuff and will go home with the pattern for my “Spiraling Crosses Gauntlet”.
The Gauntlet was designed in Crystal Palace Yarns’ Sausalito sock yarn. I love this yarn, the gradual and subtle color changes make for interesting striping effects. There is still room in the class if you are in the area and want to join us. Just call the shop at (303) 678-8242 or stop by at 454 Main Street in Longmont, Colorado and they will get you signed up.
Today is chilly and wet, so I’m hanging out at the Boulder Public Library. Not as quiet as I had hoped here, there is a big construction project underway, but it is warmer than sitting in my car. This might be an option later on as the school year goes along, but I don’t think I’ll be utilizing the library as a work place until the construction is done. I may do some investigating to see if I can find a corner in a friend’s office to rent for a few hours each day.
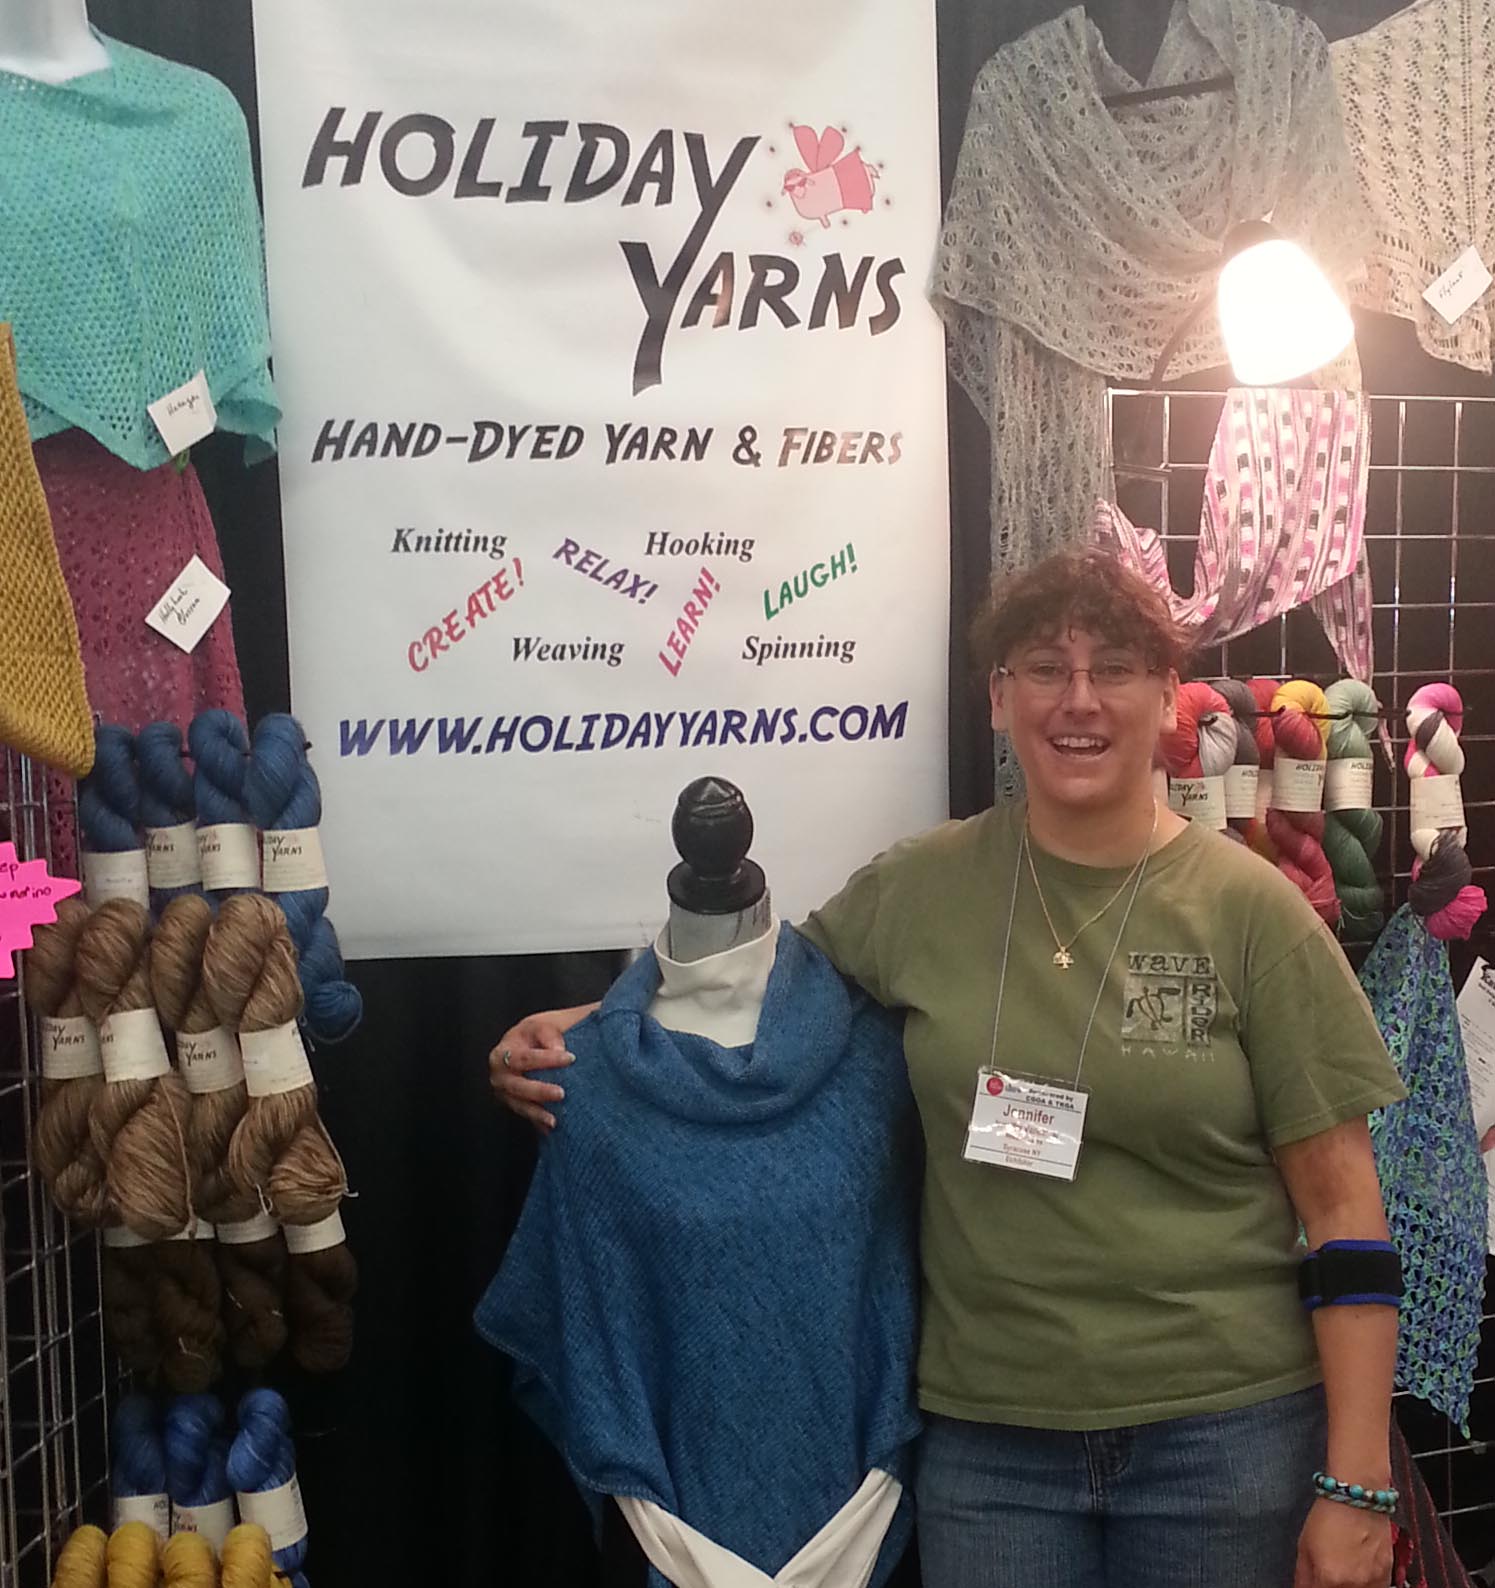
At the Knit and Crochet Show I saw one of my yarn company friends that I had just seen at the TNNA trade show in May. Jennifer from Holiday Yarns. Jennifer dyes yarn and her booth is always a visual feast for the eyes.
We have been talking about me creating some crochet designs using her lovely yarns and decided that there was no time like the present. After some conferring we settled on a simple cowl design worked up in a bulky yarn.
4 hanks of yarn and a lovely ball of sparkly pencil roving from Holiday Yarns.
As you can see in the above photo, I bought a few hanks of her lovely yarns for my own enjoyment. She also sent me off with a hank of her Bea-Ewe-tiful Bulky to design the cowl from. Of course the big challenge would be to see if I could get the pattern written, tech-edited, the sample crocheted and sent off to her in time for her to have it in her booth at Stitches Midwest. Challenge Accepted!
I spent most of my time on the flight home to Colorado swatching. I tried a couple of stitch patterns but finally found myself returning to an old favorite: The V-stitch. Of course I had to make this a moebius.
It’s getting to be that busy time of year, just a little less than 18 weeks until Christmas. If you are planning on making your holiday gifts, then you know it’s time to get started.
Cover of October 2014 issue : Image courtesy of Annie’s Publishing.
Fortunately the folks at Annie’s Publishing know that we are all on the hunt for ideas for lovely gifts that won’t take forever to make. They have just published a special issue magazine: “Crochet! presents 70+ Crochet Gifts in 1-2-3”.
Wrap with a Shawl pin fastener – Image courtesy of Annie’s Publishing
You can find loads of wonderful gift ideas in this issue, including my new design “Winged Columns Wrap”.
Back view of Wrap – Image courtesy of Annie’s Publishing
The wrap is worked outward from a central back foundation in 2 parts and requires no finishing other than weaving in a few ends. It only takes 2 skeins of yarn, 1 skein for each half. The lacy stitch pattern makes for a lot of fabric without a lot of bulk.
Wrap worn as a Scarf.
Because the fabric isn’t bulky it can also be worn as a scarf.
I really love this stitch pattern, the shapes within the columns put me in mind of migrating flocks of birds. Thus the name, Winged Columns.
I hope you get yourself a copy of this Crochet! Special issue. Then you’ll be all set for making gifts for the upcoming holidays. It is currently available on newsstands, or visit their website to order a copy for yourself.
I decided to take this class with Karen Whooley on a bit of a lark. I was curious about knooking and I love taking classes with Karen. As a teacher myself, observing other teachers’ class room styles is very educational to me…and Karen is a fabulous teacher. But this class turned out to be so much more for me than I had expected.
My issue with knitting has always been that I feel like the needle in my right hand is lacking something. That’s right, it needs a hook! So this knooking thing was way cool for me. Finally, everything I understood about knitting could be applied to a craft that used a hook. The fabric created with knooking is true “knit” fabric, the tools to create it are just a little different.
Leisure Arts very kindly supplied the kits for all the students in Karen’s class. So that made it easy for us all to get started. The kits held 3 hooks of different sizes, 3 satin cords and a handy sized booklet with everything you needed to know to begin knooking. Having taken my knitting class the day before also helped me. I was rocking along very quickly with my knooking and having a great time.
I got a lot further along with my swatch in this class than I had in my knitting class.
Didn’t bind off very well though, the top of my swatch had a serious curling problem.
One thing I’ve always struggled with in my knitting is twisting stitches and if I pull out a needle accidentally I often put the stitches back on the needle wrong. What I was really enjoying about knooking was I wasn’t struggling to keep stitches from slipping off the needles when making them and could focus more on what was happening with them.
I think knooking is going to be the “doorway” craft for me to improve my knitting skills. In fact Karen said that lots of folks that take to knooking eventually end up feeling more comfortable knitting with 2 needles. She helped me see how the way I was wrapping my yarn would make a difference in my knit stitches and whether they would “twist”.
As you work each row in knooking the cord holding the previous row of stitches allows you to correct the new row (if needed) without making a mess of the previous row. Somewhat like using “life lines” in lace knitting. I think it is easiest to knook with a hook that has a fairly pointed hook end, especially since you are working into stitches that also have a cord in them. I actually have some wooden hooks that have very pointed tops I’m considering modifying so I can knook with them. Just need to make the tail-end of the hook a little flatter and put a hole in it.
Karen has also published a book with Leisure Arts called “Easy Knit Projects”. It’s geared toward kids, but is really great for crocheters that don’t knit and want to try out knooking. In the back of the book are 8 pages that have illustrations and information reviewing the basics of knooking. It contains 9 fun projects to try out once you have the hang of knooking.
After taking this class I can highly recommend it to anyone that has ever wanted to learn to knit, but found 2 pointy sticks to be too intimidating.
This year at the Chain Link conference I decided to challenge myself and take classes that really stretched my yarn crafting boundaries.
My first 2 classes were on Thursday with the talented Vashti Braha. “Tunisian Eyelet Meshes: How to turn TSS into Lace” and “Tunisian Filet Lace: Skill Building Basics”. I’ve always struggled with Tunisian crochet but thought that taking a class with Vashti could change that.
2 years ago I took her “All About Love Knots” class and finally felt I had a basic mastery of a stitch that had always mystified me. In fact Vashti made the love knot seem incredibly easy in that class, so I hoped for the same result taking Tunisian classes with her.
I was not disappointed.
Once again Vashti presented the work in such a way that it really made sense to me, and though my “Ah Ha!” moment took a little longer this time, by the end of each 3 hour class I felt confident in my ability to re-create the techniques she was showing us.
The only homework we had for either class was to review the Tunisian Simple Stitch (TSS). I hadn’t really gotten a chance to do that and I’ve never been all that happy with my TSS fabric. Fortunately Vashti got us started with our class swatch doing TSS, and that helped.
My dear friend Jan was taking the class as well, and she was able to point out some simple tricks that improved my TSS, so I was ready to tackle the techniques that Vashti was introducing. I confess there was a little time there that I began to think Tunisian crochet and I were never going to make friends.
One of the funniest moments in class happened when Vashti was talking about the lovely vest she was wearing. She told us that it was made with 1 ball each of 2 very expensive yarns. She wasn’t sure how large a piece of fabric she was going to be able to make. So she made a length of fabric, then cut the armholes for the vest. The entire room gasped in tandem, and Vashti giggled. She assured us that it wasn’t as drastic as it sounds.
From this adventurous experiment was born the “Maze Vest” and the pattern is available in the 2014 Summer Issue of Interweave Crochet Magazine. You can see photos of the vest from the magazine and find out more info on Ravelry.com.
The afternoon class was “Tunisian Filet Lace: Skill Building Basics”. It was really fun seeing all the ways Vashti had applied her ideas of using Tunisian style crochet to create traditional filet stitch patterns. She had loads of swatches to show us and some beautiful designs as well. Check out her “Aero” wrap.
I worked successfully on my swatch in class, but have to admit I’m not sure how I did it now. One of the best things about taking a class with Vashti though is that she always provides a good hand-out that helps jog my memory once I am re-covered from “conference brain” and I get a chance to sit down and play with the techniques again.
My Swatches, hooks and yarn from Vashti’s class.
Vashti very generously shared “Lotus Snacks” with her students, these were 80 yard balls of her new “Lotus” yarn from Designing Vashti. This yarn has a Z-twist making it ideal for crochet with terrific stitch definition. The yarn comes in 14 colors and you can order it on Vashti’s Website. I ended up with 2 balls since I took 2 classes, I picked the “Rose Red” colorway. It was the most popular color in the class. I really liked the color as it is a cool red shading more into the violet spectrum than orange.
She also handed out a Tunisian hook in each class. These were provided by ChiaoGoo which was very kind of them. Vashti showed us a wonderful thing about Bamboo hooks is you can adjust the shape of the hook easily with an emery board if you want.
If you get an opportunity to take a class with Vashti I highly recommend doing so. She is a talented teacher who continues to explore the boundaries of crochet and share that with her students. 2015’s Chain Link Conference (aka The Knit & Crochet Show) will be held in San Diego, California July 22nd thru 26th and there will be lots of wonderful classes to take.
I took 4 awesome classes at the conference this year. 2 with the amazing Vashti Braha; “Tunisian Eyelet Meshes” and “Tunisian Filet Lace”. My other classes were knitting and knooking. The knitting class was “Russian Style Continental Knitting” with Galina Khmeleva. My Saturday morning class was the eponymously named “Knooking” with my good friend and enthusiastic teacher, Karen Whooley. I’ll be posting more about all the great stuff I learnt in these wonderful classes soon.
The main reason education is on my brain right now is that in less than 2 weeks I will be on the adventure of having a middle-school student. This also means either my husband or myself will be driving the boys down to Boulder every school day. That is anywhere from a 35 minute to hour-long drive. Just found out yesterday that my youngest’s school day will start at 7:50 a.m. Ouch! This means we will have to be on the road by 6:50 a.m. every morning.
Now to some of you that might not seem such a big deal. Clearly you are morning people. I can not be described as such and neither can my oldest son. Himself and the youngest do a little better with mornings, but even they enjoy a later start to the day. This means I am giving a great deal of thought to the best ways to organize myself. The goal being to make mornings the least painful for all involved.
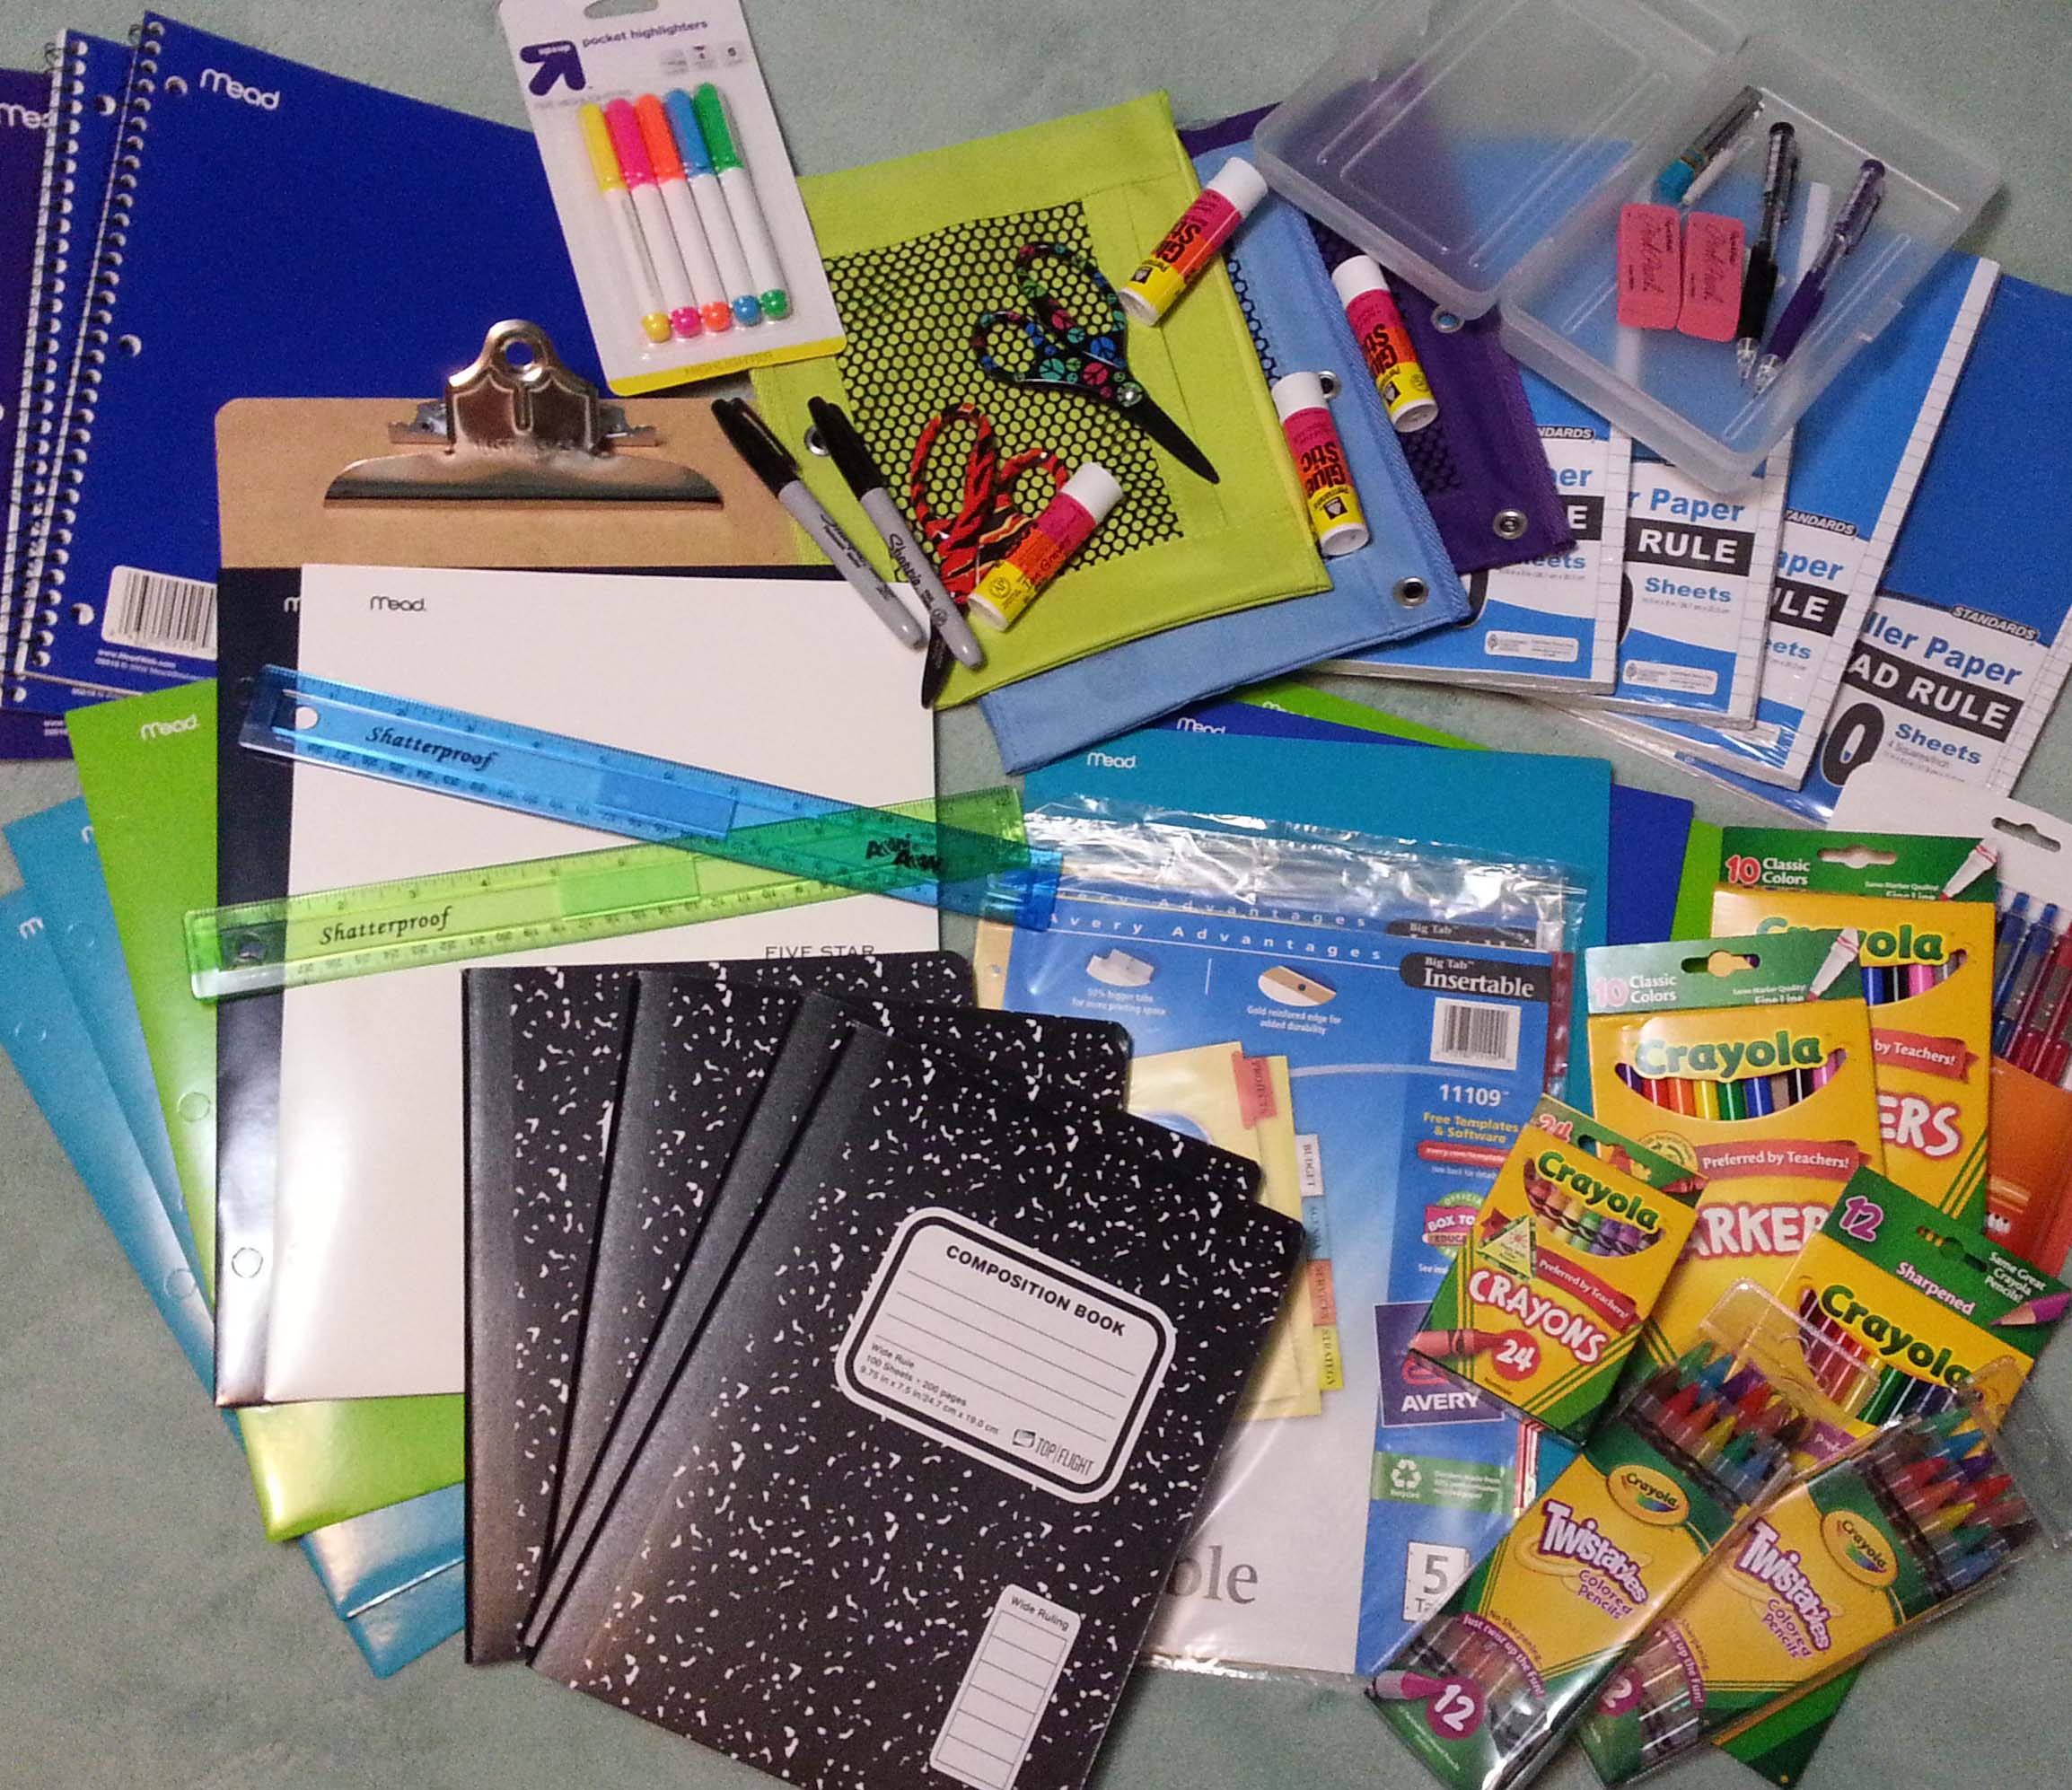
There is a fun bit to all this back-to-school madness though. Going shopping for school supplies. We’ve acquired pretty much everything on the lists provided by the boys’ schools. I’m thinking I might need a trolley to convey it all to the schools on the first day.
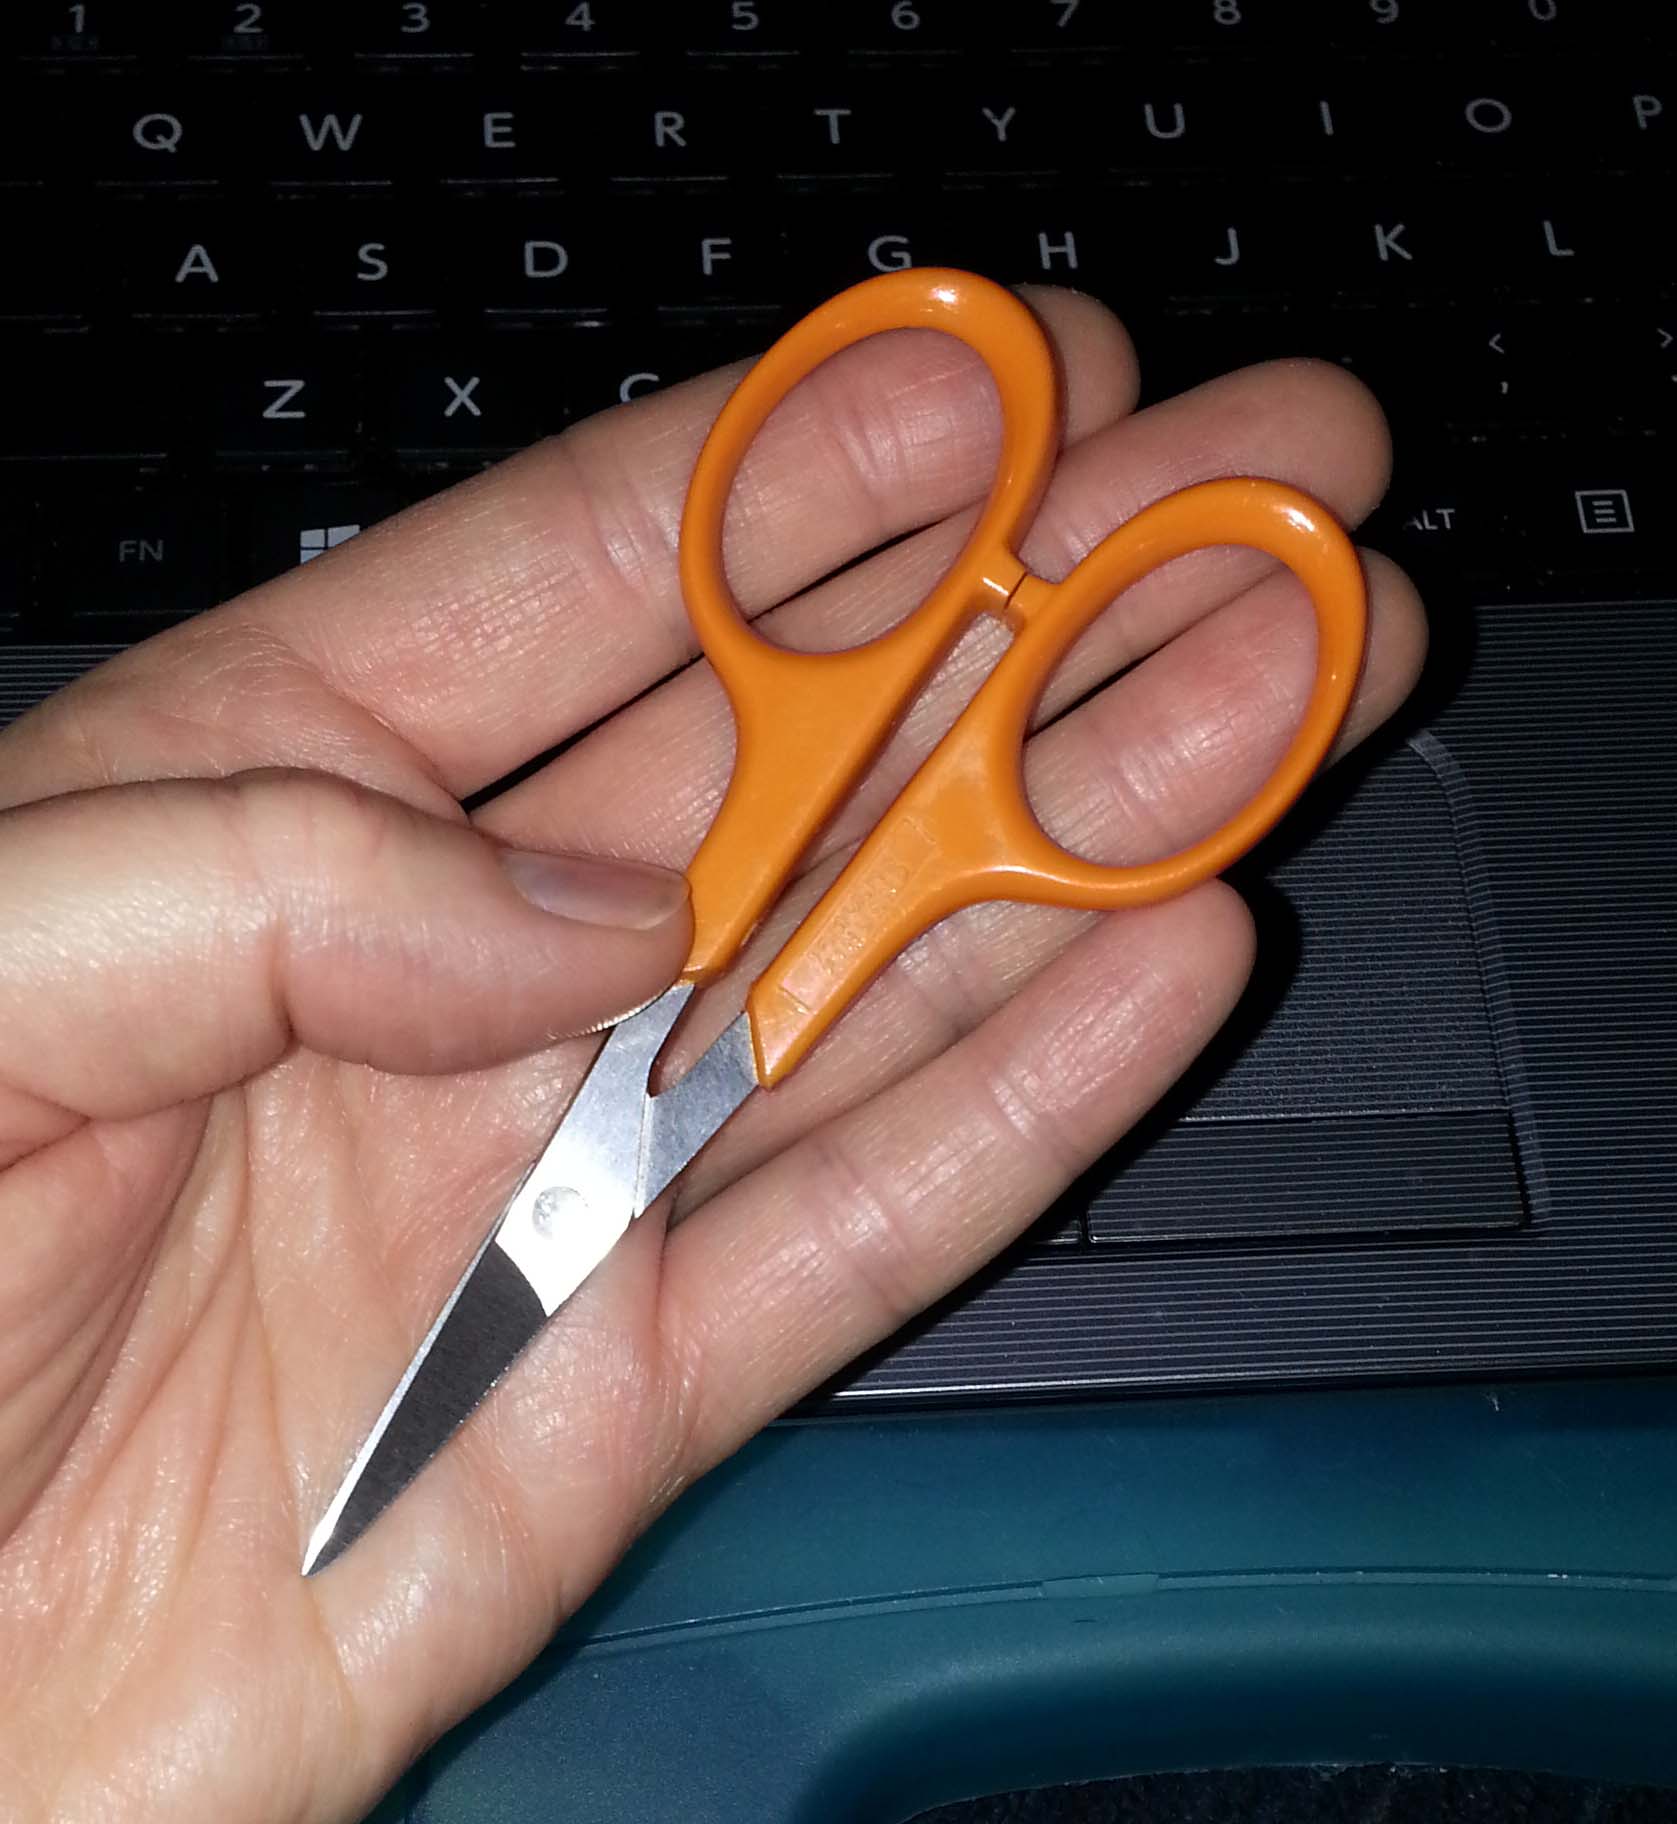
As always when the back-to-school sales are happening I acquire a few supplies for myself. I especially like to get small scissors that I can take with me when I’m out and about and especially for air travel.
My Favorite Fiskars
Then if TSA decides to take my scissors I won’t weep because they are my favorite Fiskars.
I will be learning a great deal along with my boys. Both of their new schools are going to be a huge change for them as well as me. Afterall, going from a school with a total enrollment of 25 students (at its largest) to one with anywhere between 500 – 650 students is going to be an adjustment.
I’m hopeful that having this more regulated schedule will contribute to me being more productive. One of the benefits of being down off the mountain so frequently; I will be able to spend more time at my favorite local yarn store, Longmont Yarn Shoppe. I’m planning on being there most Wednesdays during the school year from 10a – 2p. I’ll be teaching some classes on Wednesday’s as well as facilitating the daytime CGOA Chapter meetings on the 4th Wednesday of each month.
More information about the classes available at Longmont Yarn Shoppe can be found at the website: LongmontYarn.com. I’ll be teaching 4 classes, 2 will be offered on Wednesdays and 2 will be offered on Saturdays.
Saturday, September 13th; 1p-4p: Crochet Wrister
Saturday, October 11th; 12p-3p: Perfect Fit Crocheted Hat
Wednesdays, November 5 & 12; 10a-12p: Eleonora Shawlette
Wednesday, November 19; 10a-1p: Lovely Crocheted Lace Border
So if you are local to the area, come join me for some fun classes or just stop by Longmont Yarn Shoppe. And if you aren’t local but want to take a class with me, plan a trip out to Colorful Colorado and have some crochet fun while enjoying my beautiful state.
Okay, I love this design, but I might love it even more because of the name Michele Maks (the owner of MainlyCrochet.com) and I came up with for it. One of the very fun things about doing design work with Michele is she has the same zany hippie-chick sensibility as me.
My original swatch for this design was using a combination of Red Heart’s “Heart & Sole Sock Yarn” with their “Stardust” yarn. Both yarns are light-weight “fingering/sock” type yarns, so I knew the effect would be very delicate in the finished design. And of course, Stardust has sparkle which is always a win with me. Michele wanted to use all one type of yarn, and that decided us on the Stardust, since Michele likes some sparkle in her yarn as well.
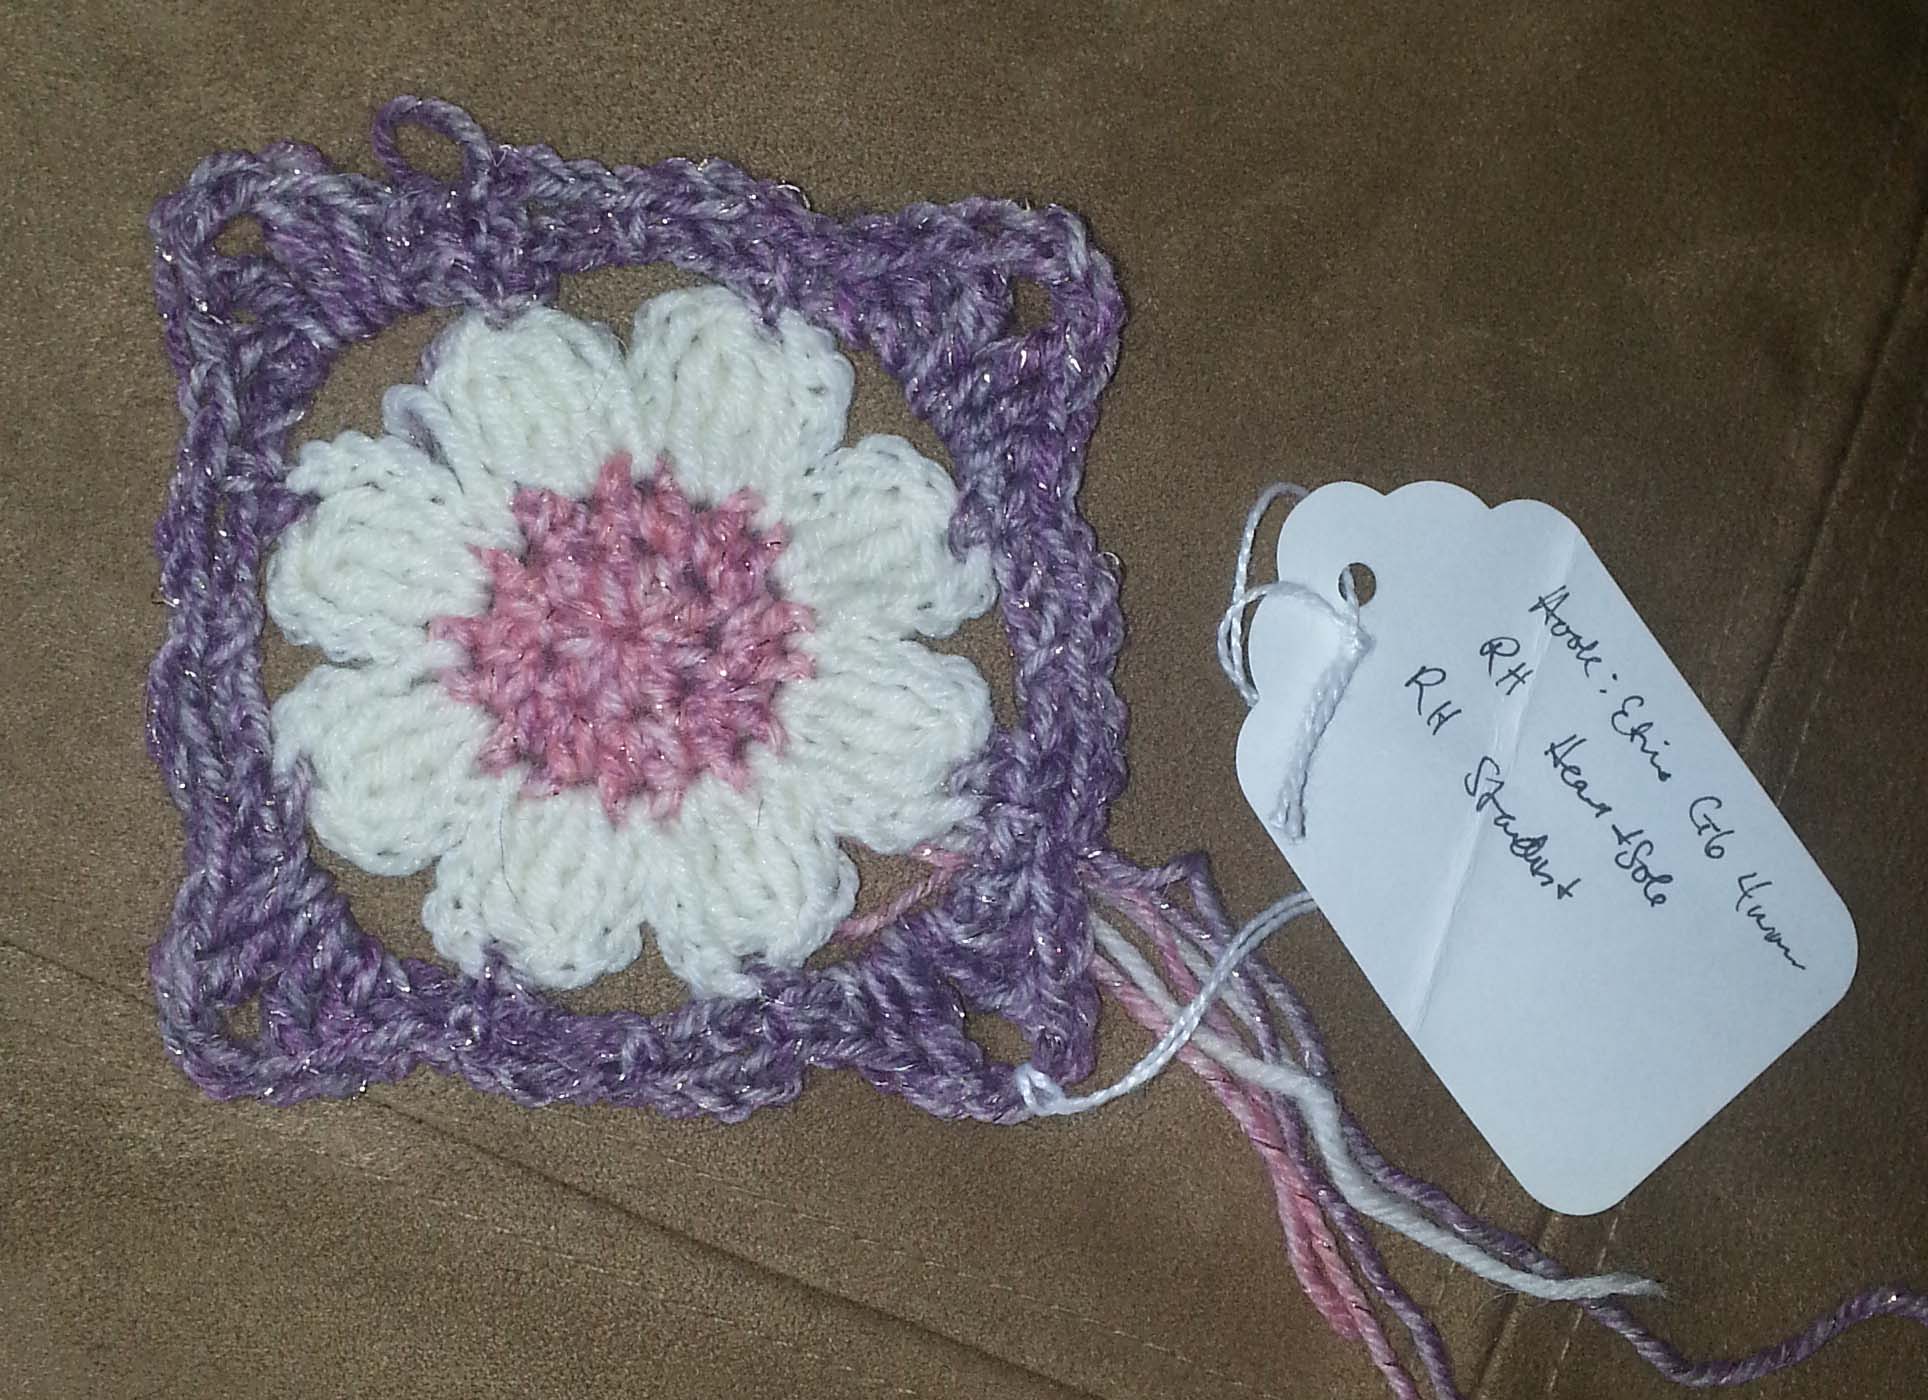
My “test” flowers for color.
Michele picked out the colors and once the yarn arrived I began working on the piece. I played around with the color to check with Michele before I began the project in earnest. I wasn’t too sure about the 2 colors we had for the flowers, so wanted to be sure Michele was happy with the way they looked. Of course the finished design ended up looking wonderful, another lesson in trusting Michele’s color sense.
Photo courtesy of MainlyCrochet.com
The first version of this design used 52 flower squares in 3 different colors and 36 filler motifs in the green color. What this meant was 384 ends to weave in once the crocheting was done. Yikes!
This is exactly the type of project I have always avoided, though I love the look of colorful multi-motif designs. My entire reason for avoidance was a deep dislike of end-weaving. So of course the universe was going to find a way to make me face this dreaded task and make peace with it.
Whenever I have been faced with an overwhelming task I remember my Dad’s little saying, “How do you eat an Elephant? One bite at a time.” Yes, my Dad is a very funny guy, and he was right. I needed to figure out how to break this project down into manageable bites.
I realized that one way to make the end weaving less painful would be to do it as I completed each step of the project. I decided to take an “assembly line” approach to this problem. Of course I was the only worker on this assembly line.
I organized myself with yarn, hook and plastic sealable baggies. Each of my bags was a “stage” along the line. First on the agenda was crocheting 26 centers in each of the “flower” colors. Since each center is only a couple of rounds I quickly had a pile of them finished. I put the centers with dangling tails in a quart-sized plastic baggie, then as I wove in tails I moved them to a 2nd baggie.
Once I started adding petals to the centers I would move them to a 3rd baggie where they waited to have their tails woven in, after the petal tails were woven in they were moved to their final bag. I was finding all this a bit tedious, but the baggies allowed me to hop around in the project so I didn’t get too bored with one stage of the design. As I neared the completion of all the flowers I separated them by color into 2 bags to make the next step easier.
About the time of the PJ Jam in August I had finished all the crocheting of the centers, but still had a lot of tails to weave in. This is the motif project I was referring to in my “Zen and the Art of Weaving in Tails” post back in October, 2012.
Finally all the flowers were finished and it was time to join them together using the green color. This step was a join-as-you-go method, I found it easiest to work on a flat surface. I would join together a row of flower squares, and then work the filler motifs in the open space. Every few rows I would stop and weave in the tails for the green.
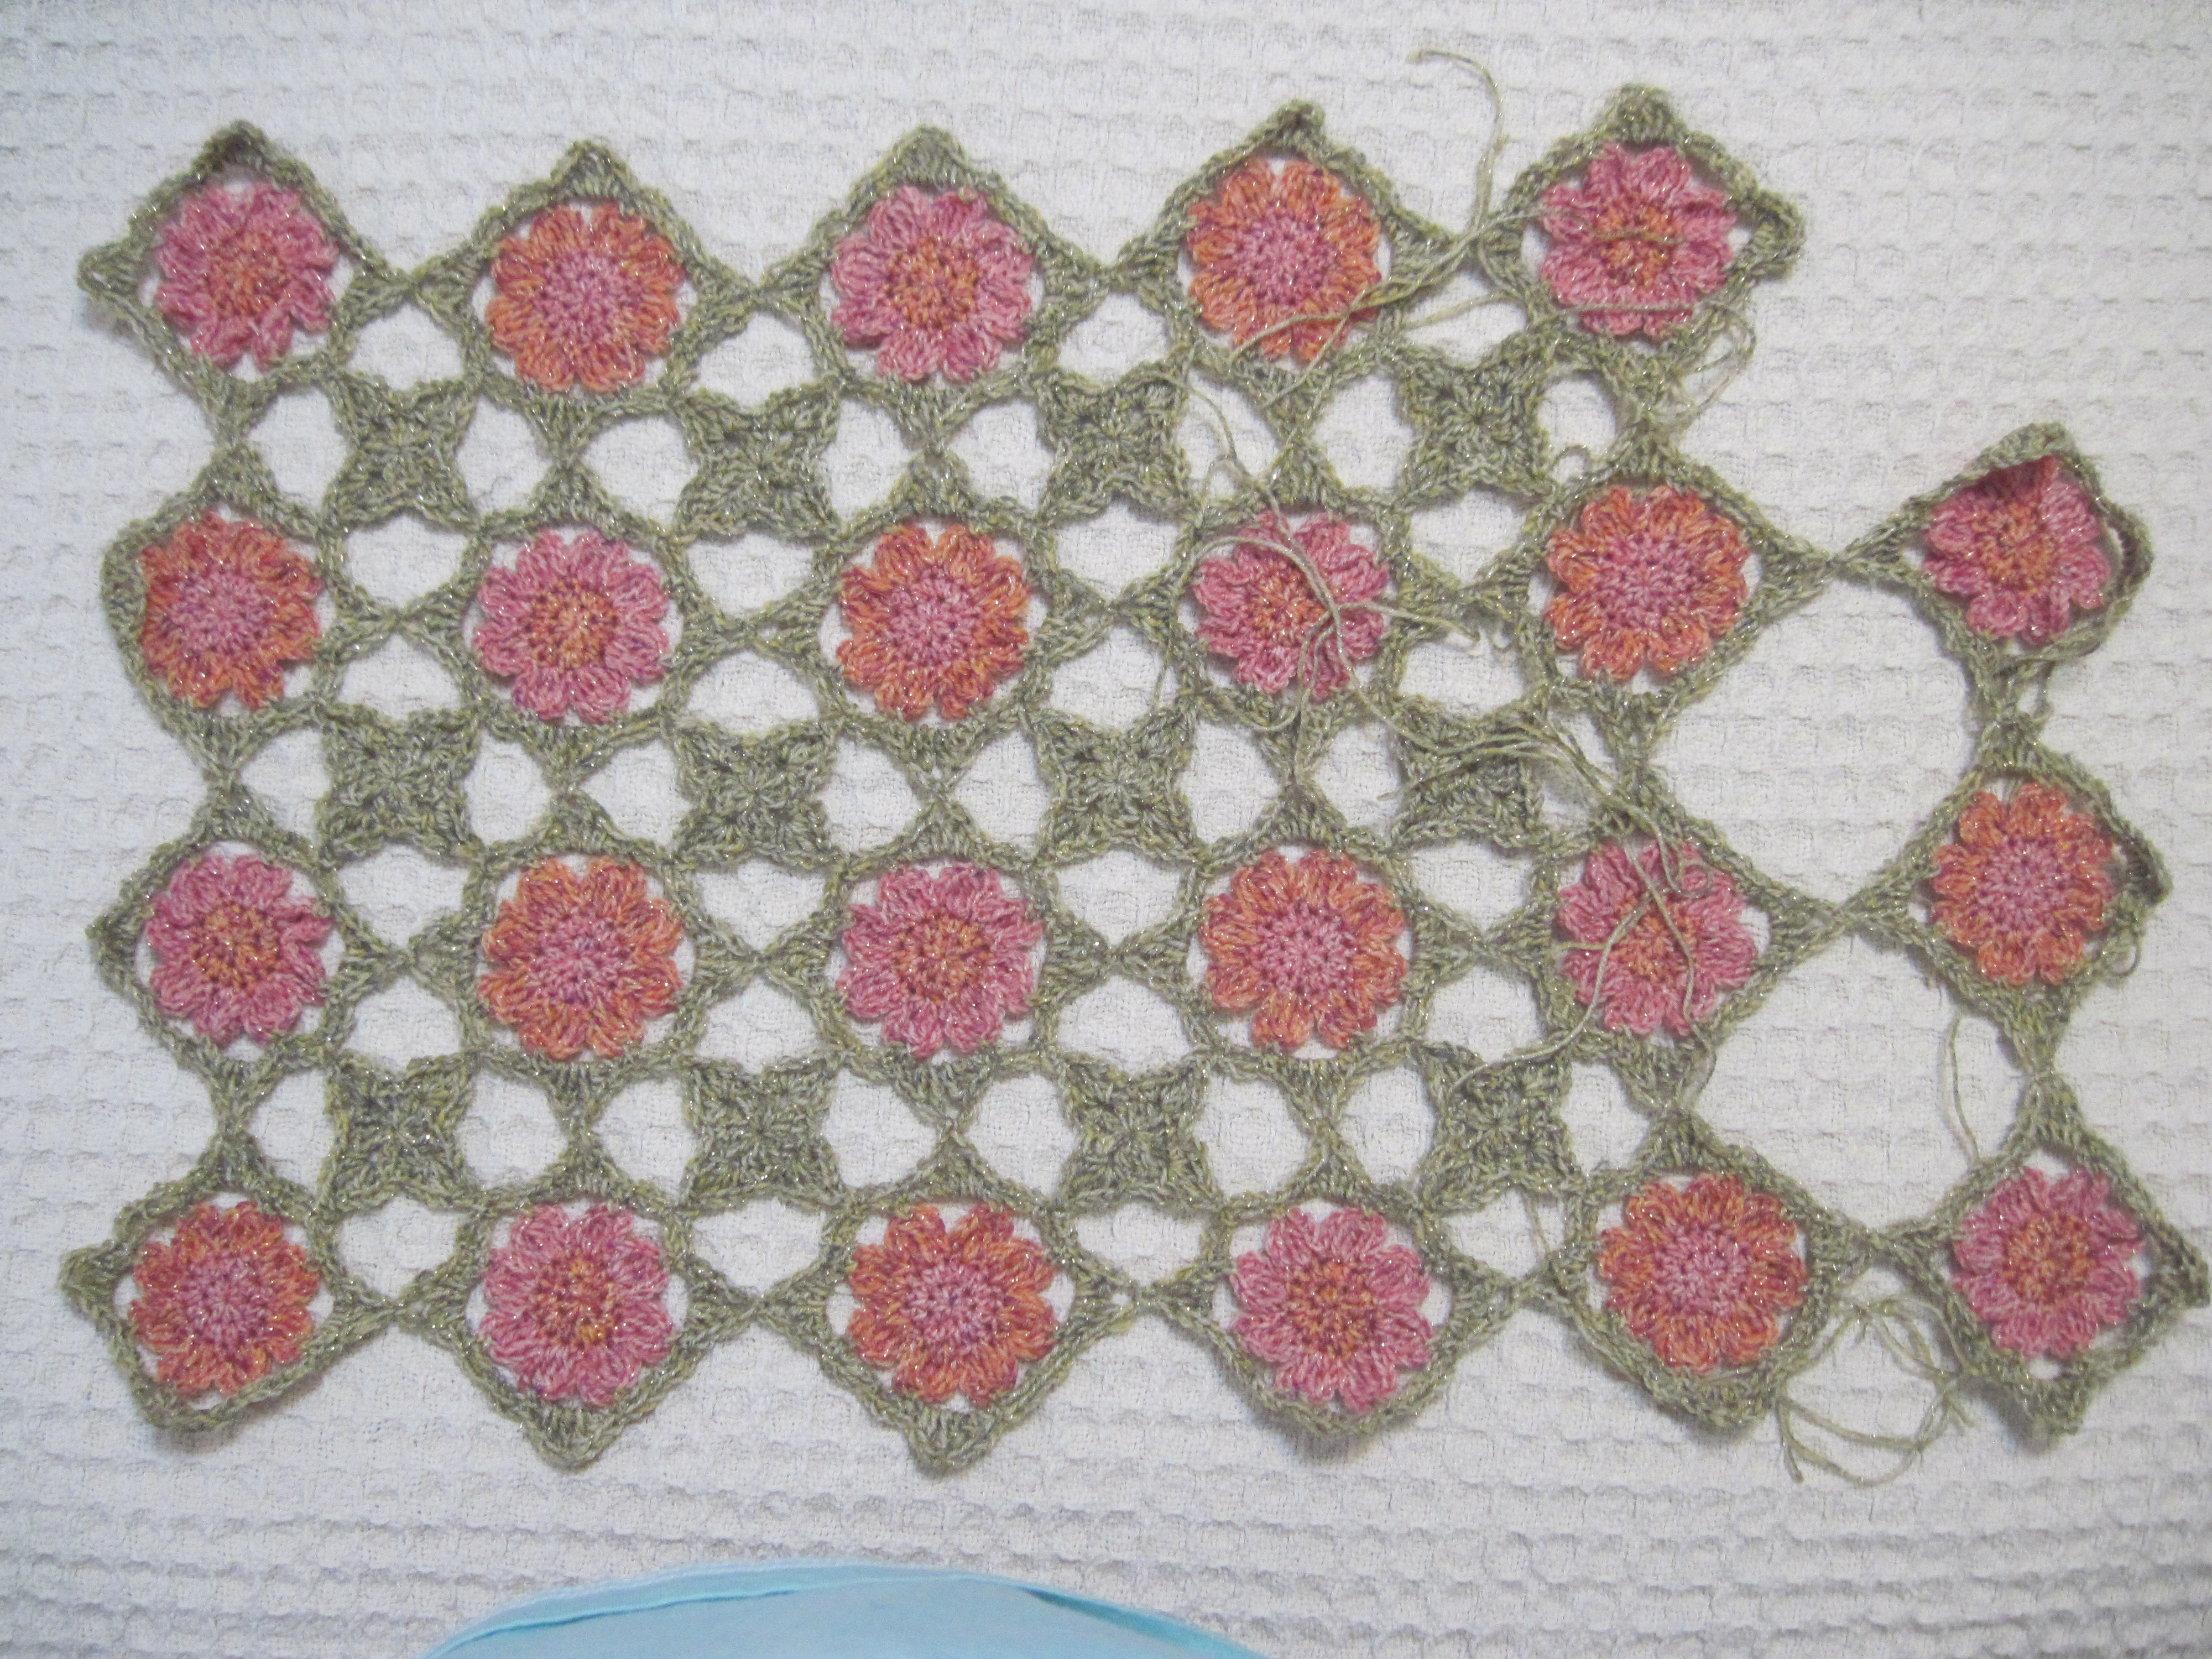
Photo courtesy of MainlyCrochet.com
When all the motifs were completed I blocked the entire piece. You can see how it opened up nicely. I sent the project and pattern off to Michele and waited for it to be put up on the website. The plan was for a Spring release of it, this was back in Spring 2o13. Unfortunately, as can happen, the yarn we had chosen was discontinued about that time.
Michele returned the original sample to me at the show in North Carolina that Fall, but we weren’t sure what we wanted to do.
Both of us really liked the sparkly yarn for this design and it got me thinking about other yarns we could use. At first I was really stuck to the idea of using a fingering or sock weight yarn. Then I stumble upon the idea of working with a slightly heavier weight yarn. I sent off an email to Michele suggesting that we use Red Heart’s “Shimmer” yarn. The colors would be more intense, but we would still have the same sparkle.
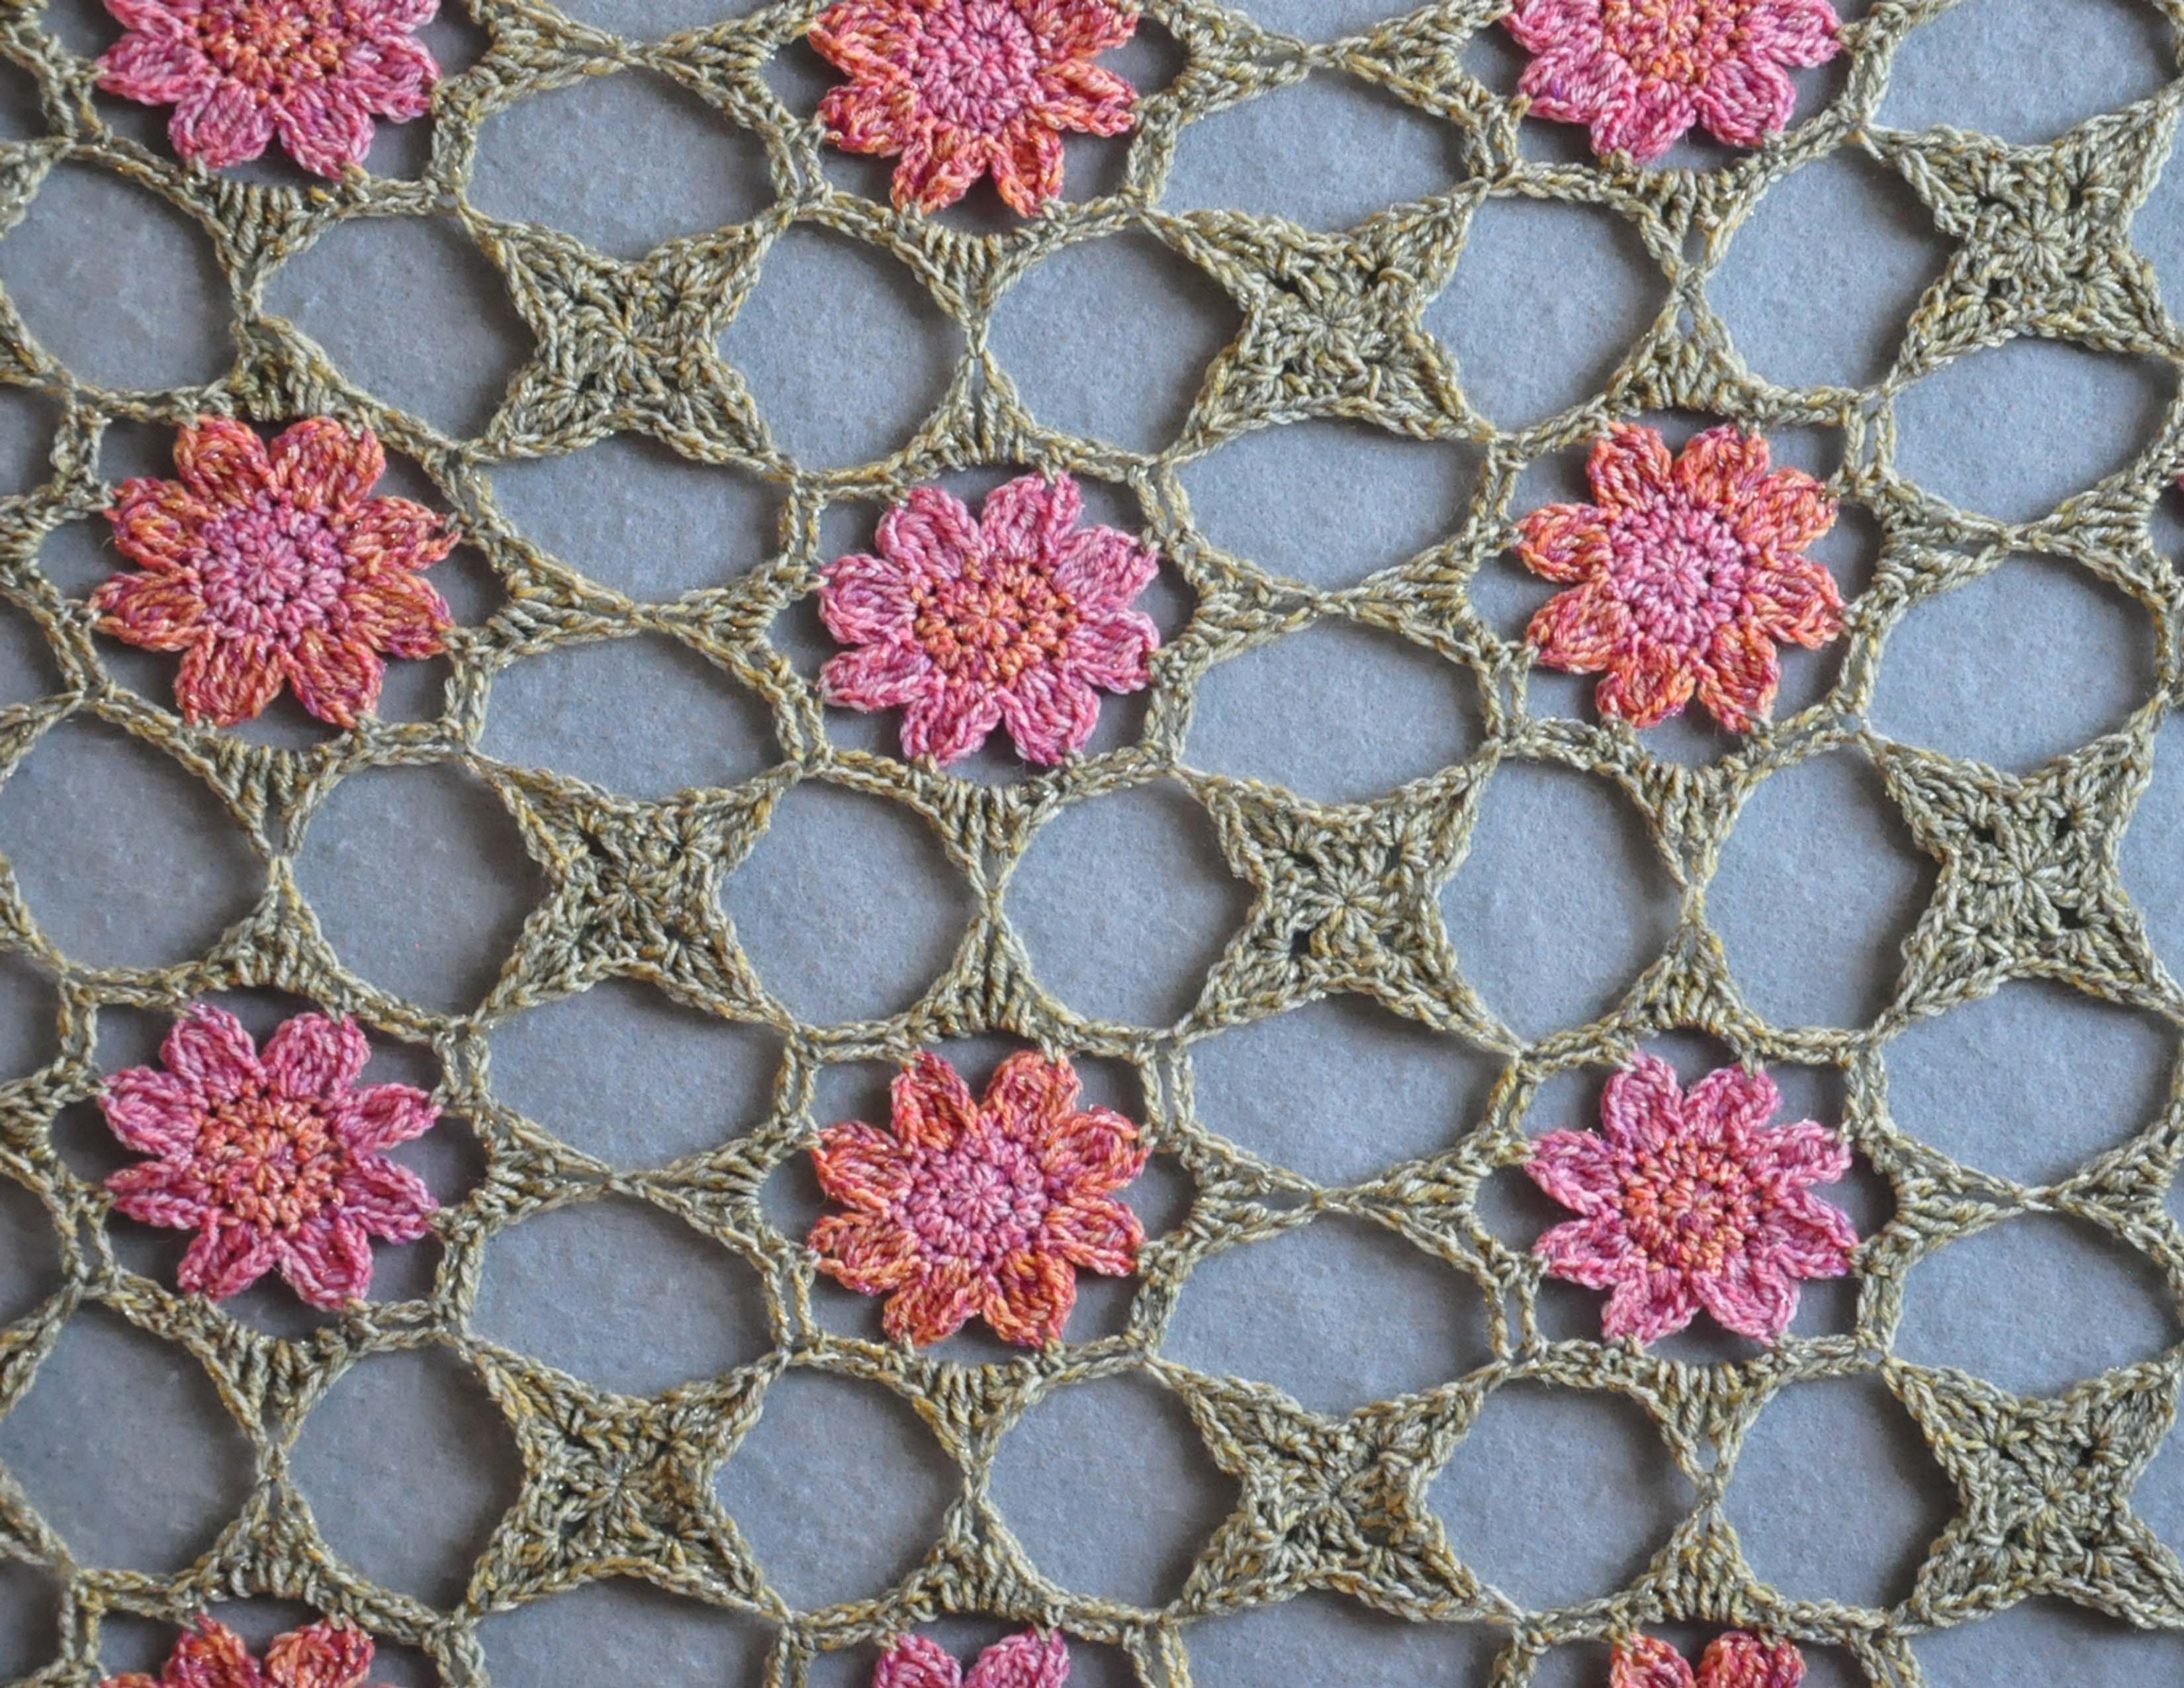
Photo courtesy of MainlyCrochet.com
Because the motifs would be a bit larger I had to modify the original pattern. One thing that helped was there would be fewer motifs, so fewer ends to weave in. Hooray!
This version of the design has 33 flower motifs and 20 filler motifs, so is much quicker to crochet up. We also changed the way the colors are mixed together. The centers of the flowers are a multi-colored yarn and the petals are a solid color in the same tone. Then we picked a dark plum to frame out the flowers. I was really pleased with the way the flowers “pop” in this version.
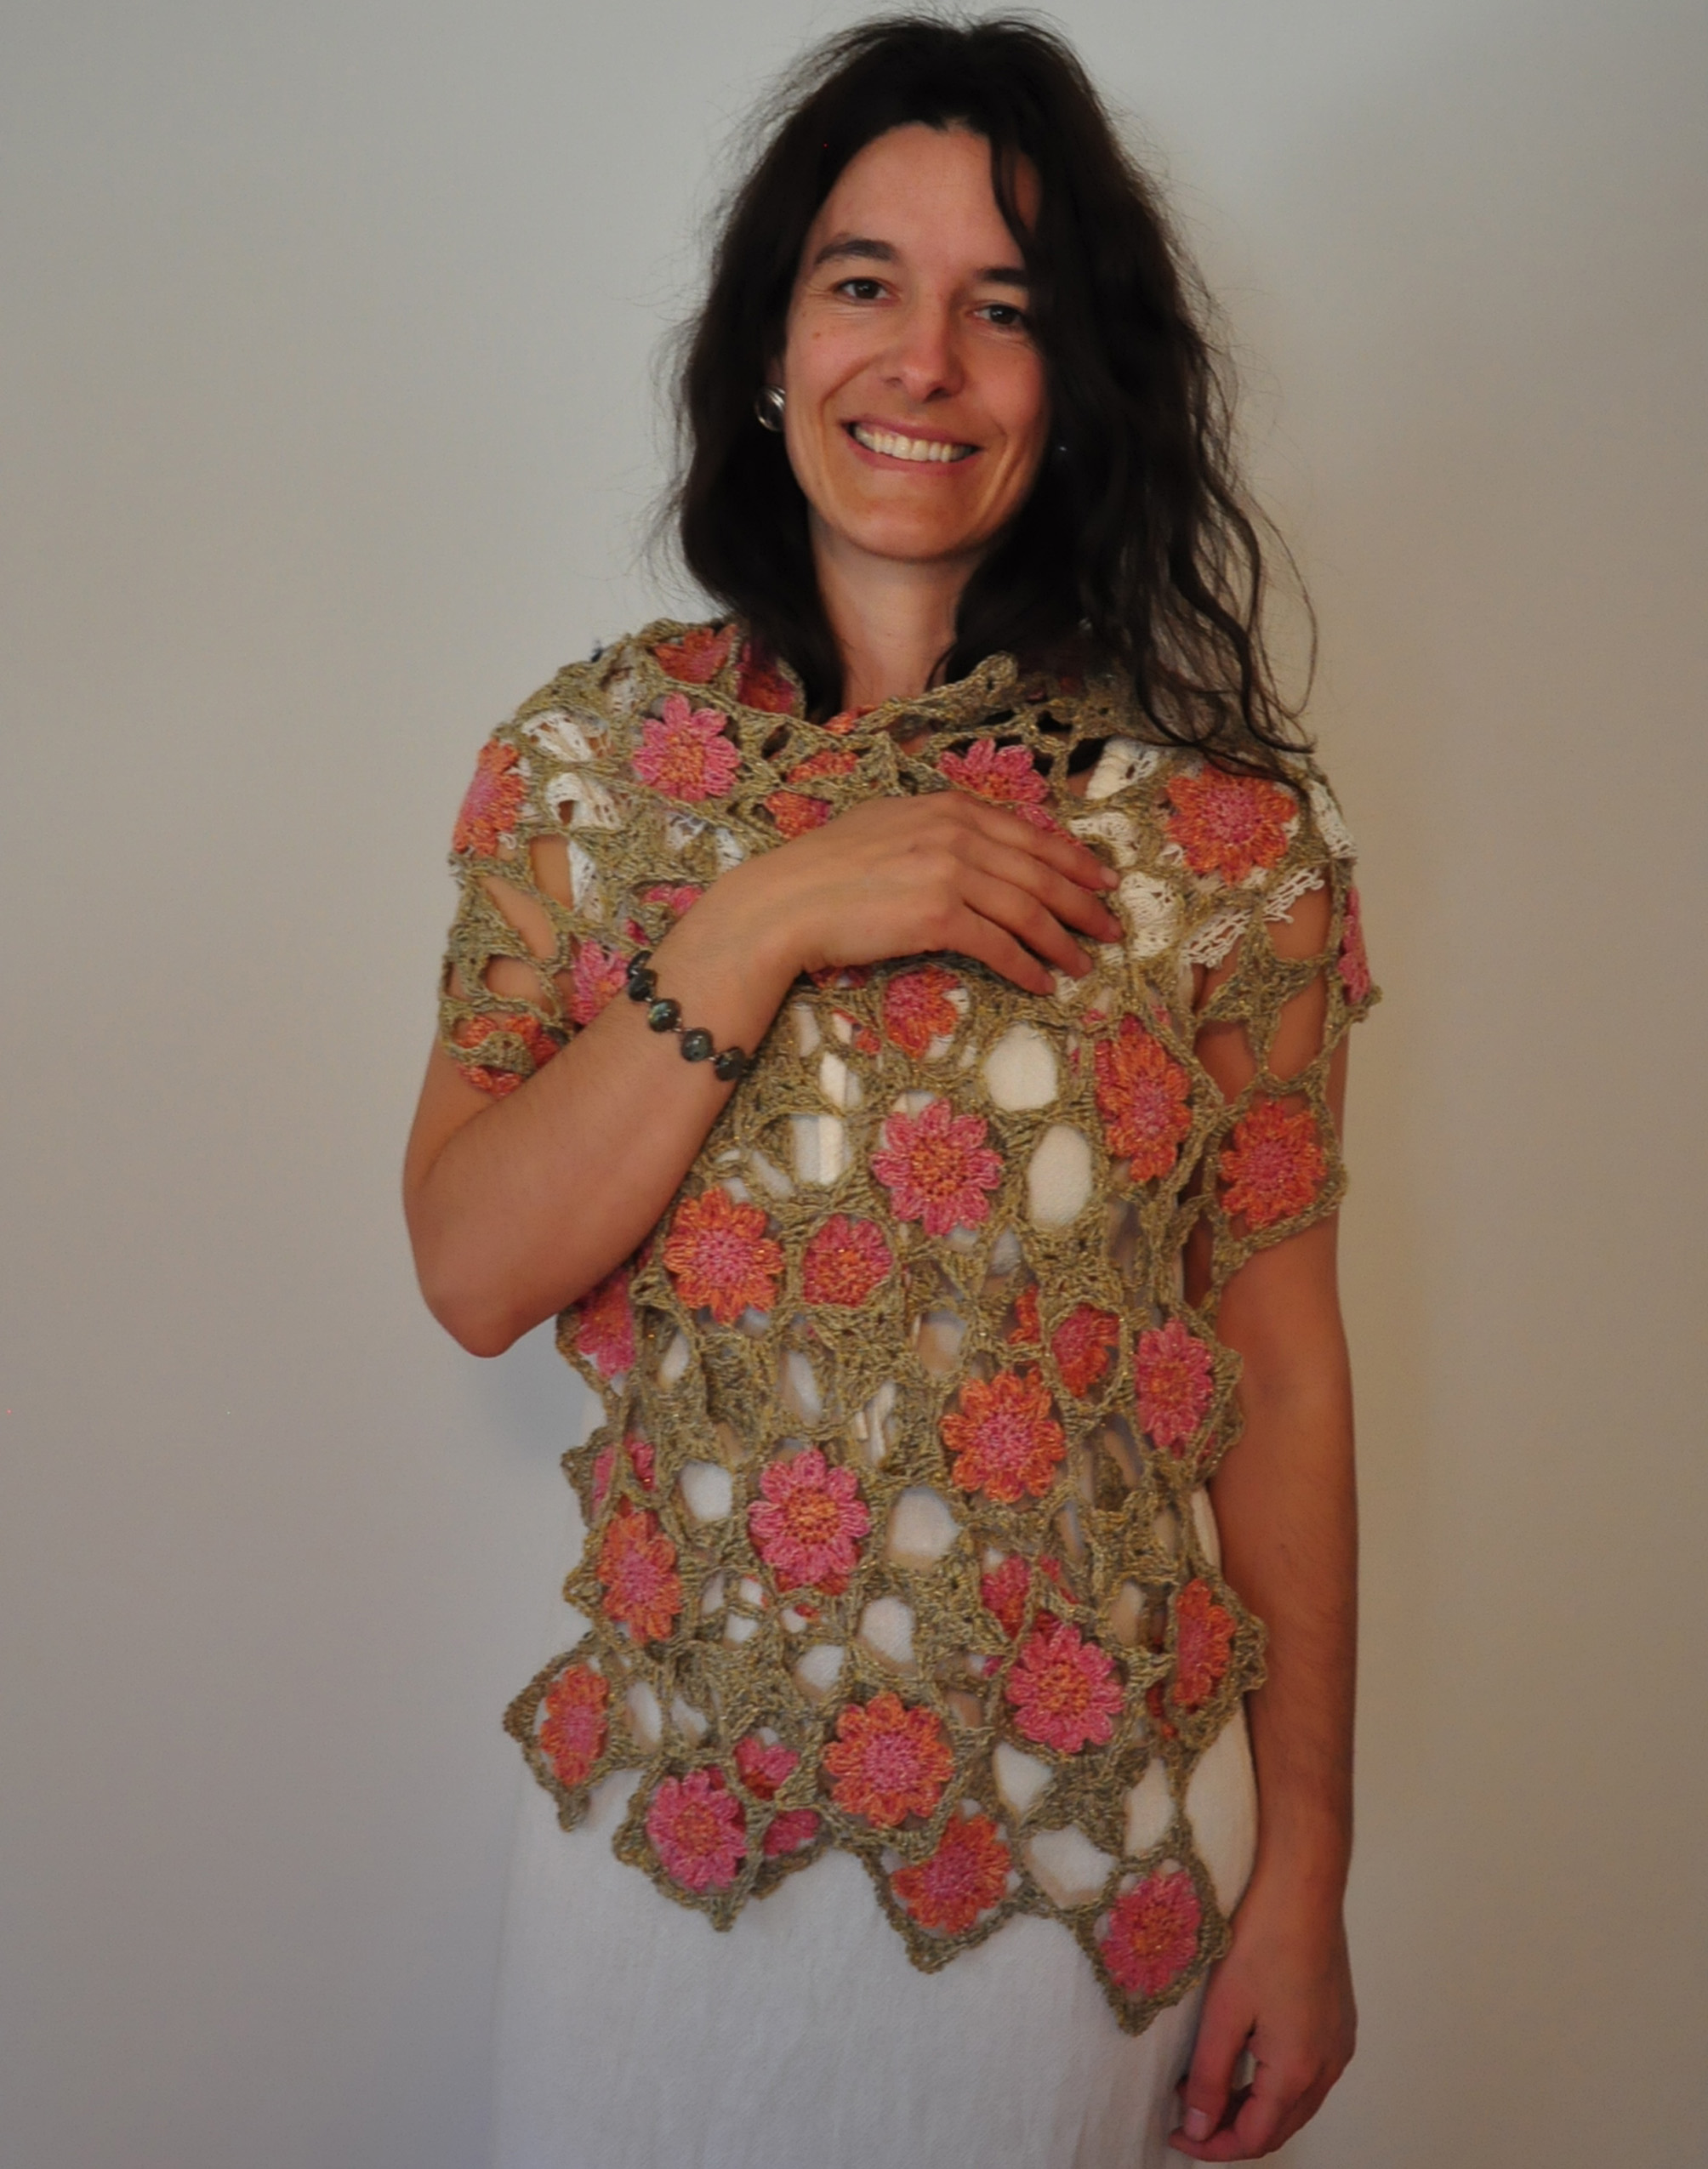
If you are coming to the Knit and Crochet Show this week you may spot me wearing the original version of the Flower Power Stole, or you can see the “Shimmer” version at the MainlyCrochet.com Booth. Be sure to stop by and see all the wonderful projects that are on the site. If you aren’t at the show you can still go visit MainlyCrochet.com and subscribe to have access to all the lovely patterns.
I’m writing this blog post from Jan’s house in New Jersey. Tomorrow we load up the car and drive to Manchester, New Hampshire for the Knit & Crochet Show. Hope to see many of my yarnie friends there and for those that aren’t there I’ll try to have some posts about our adventures as soon as I can.
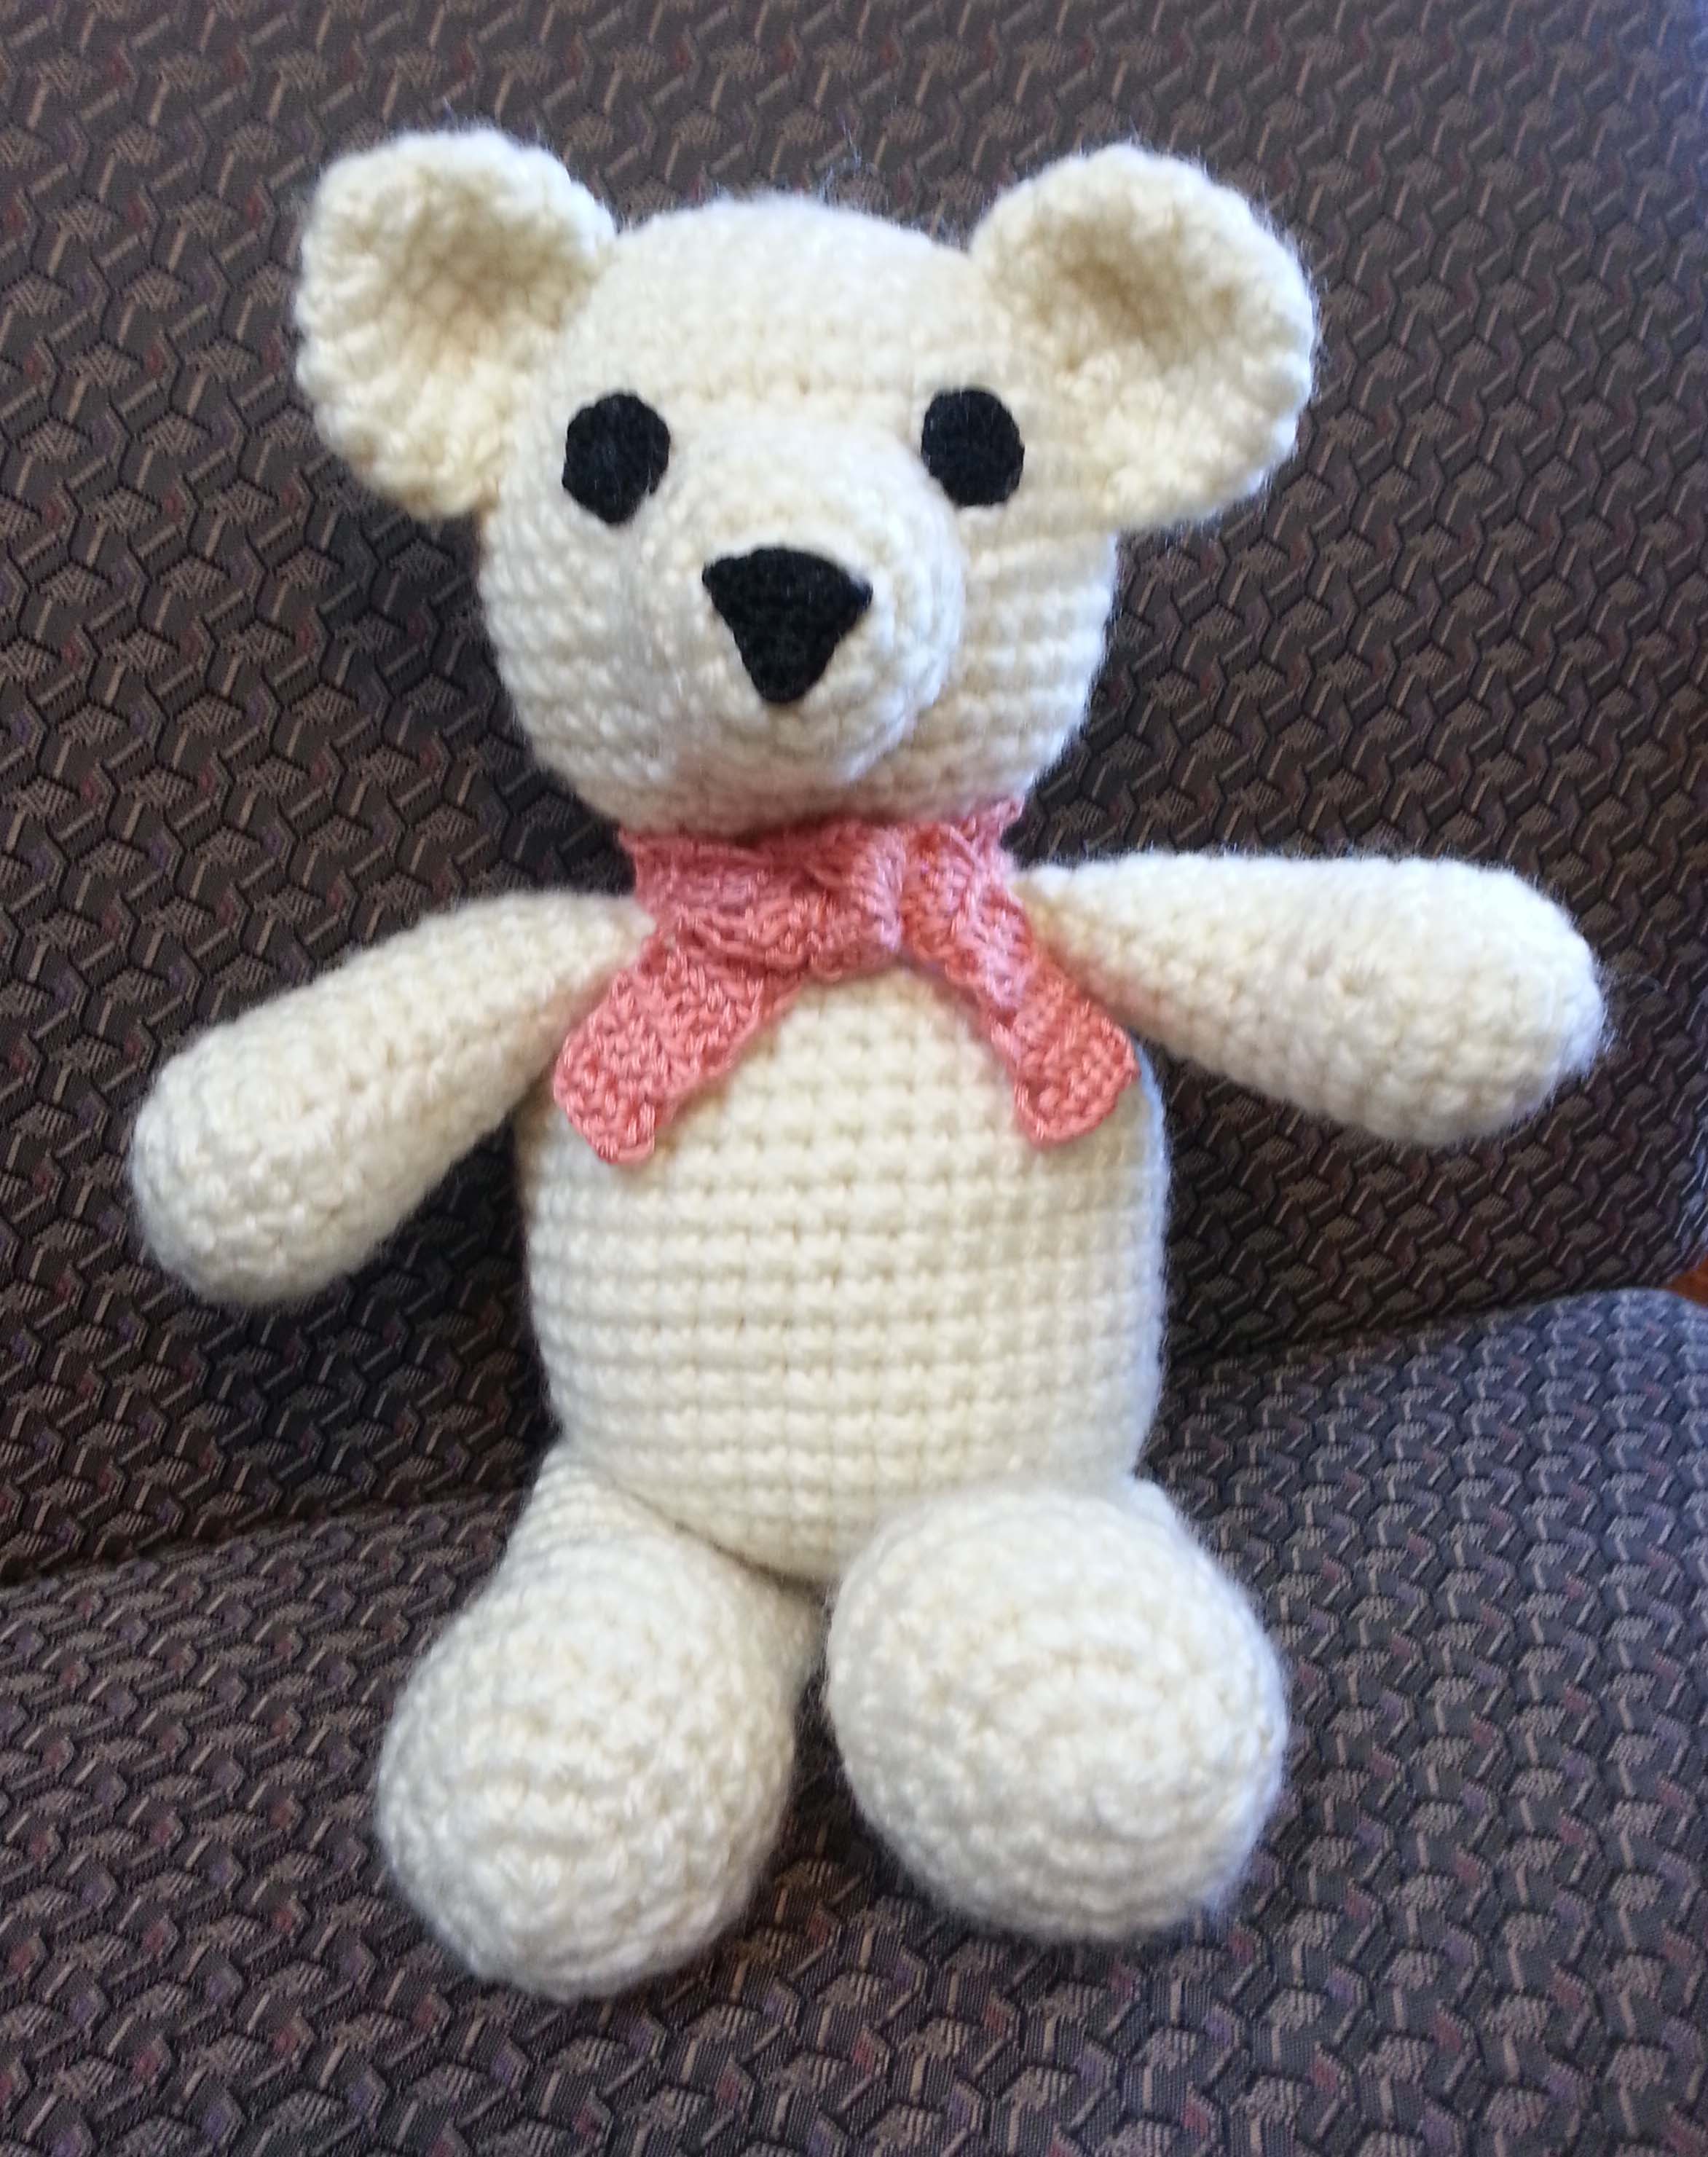
 I had filled the arms and legs and head with stuffing and brought stuffing for the body. By the end of the meeting I had finished the bear and given him to my friend Kathy that is organizing this effort.
  My friend Margie wins the prize for the most bears completed. She brought in all these bears. She said she cheated a little as these were bears she had made on a knitting loom and were just waiting to be finished with stuffing and bows. Kathy and I both said, they still count and will be very appreciated.
  Before my little bear left the shop, he had a cuddle with some wonderful Malabrigo. I am feeling very inspired with ideas about how I want to design my bear. Hopefully I will have a prototype worked up by Christmas time.