The summer-time fun is in full force here at Casa Graves. My boys have been keeping me on the run. Which is why there is only one blog post this week. We have a lot going on, including visits with family. Loads of fun, but doesn’t leave a great deal of time for blog post creation.
Today I wanted to address some crochet basics. For some of you this is going to be review, but you may find it helpful for when you are teaching new crocheters.
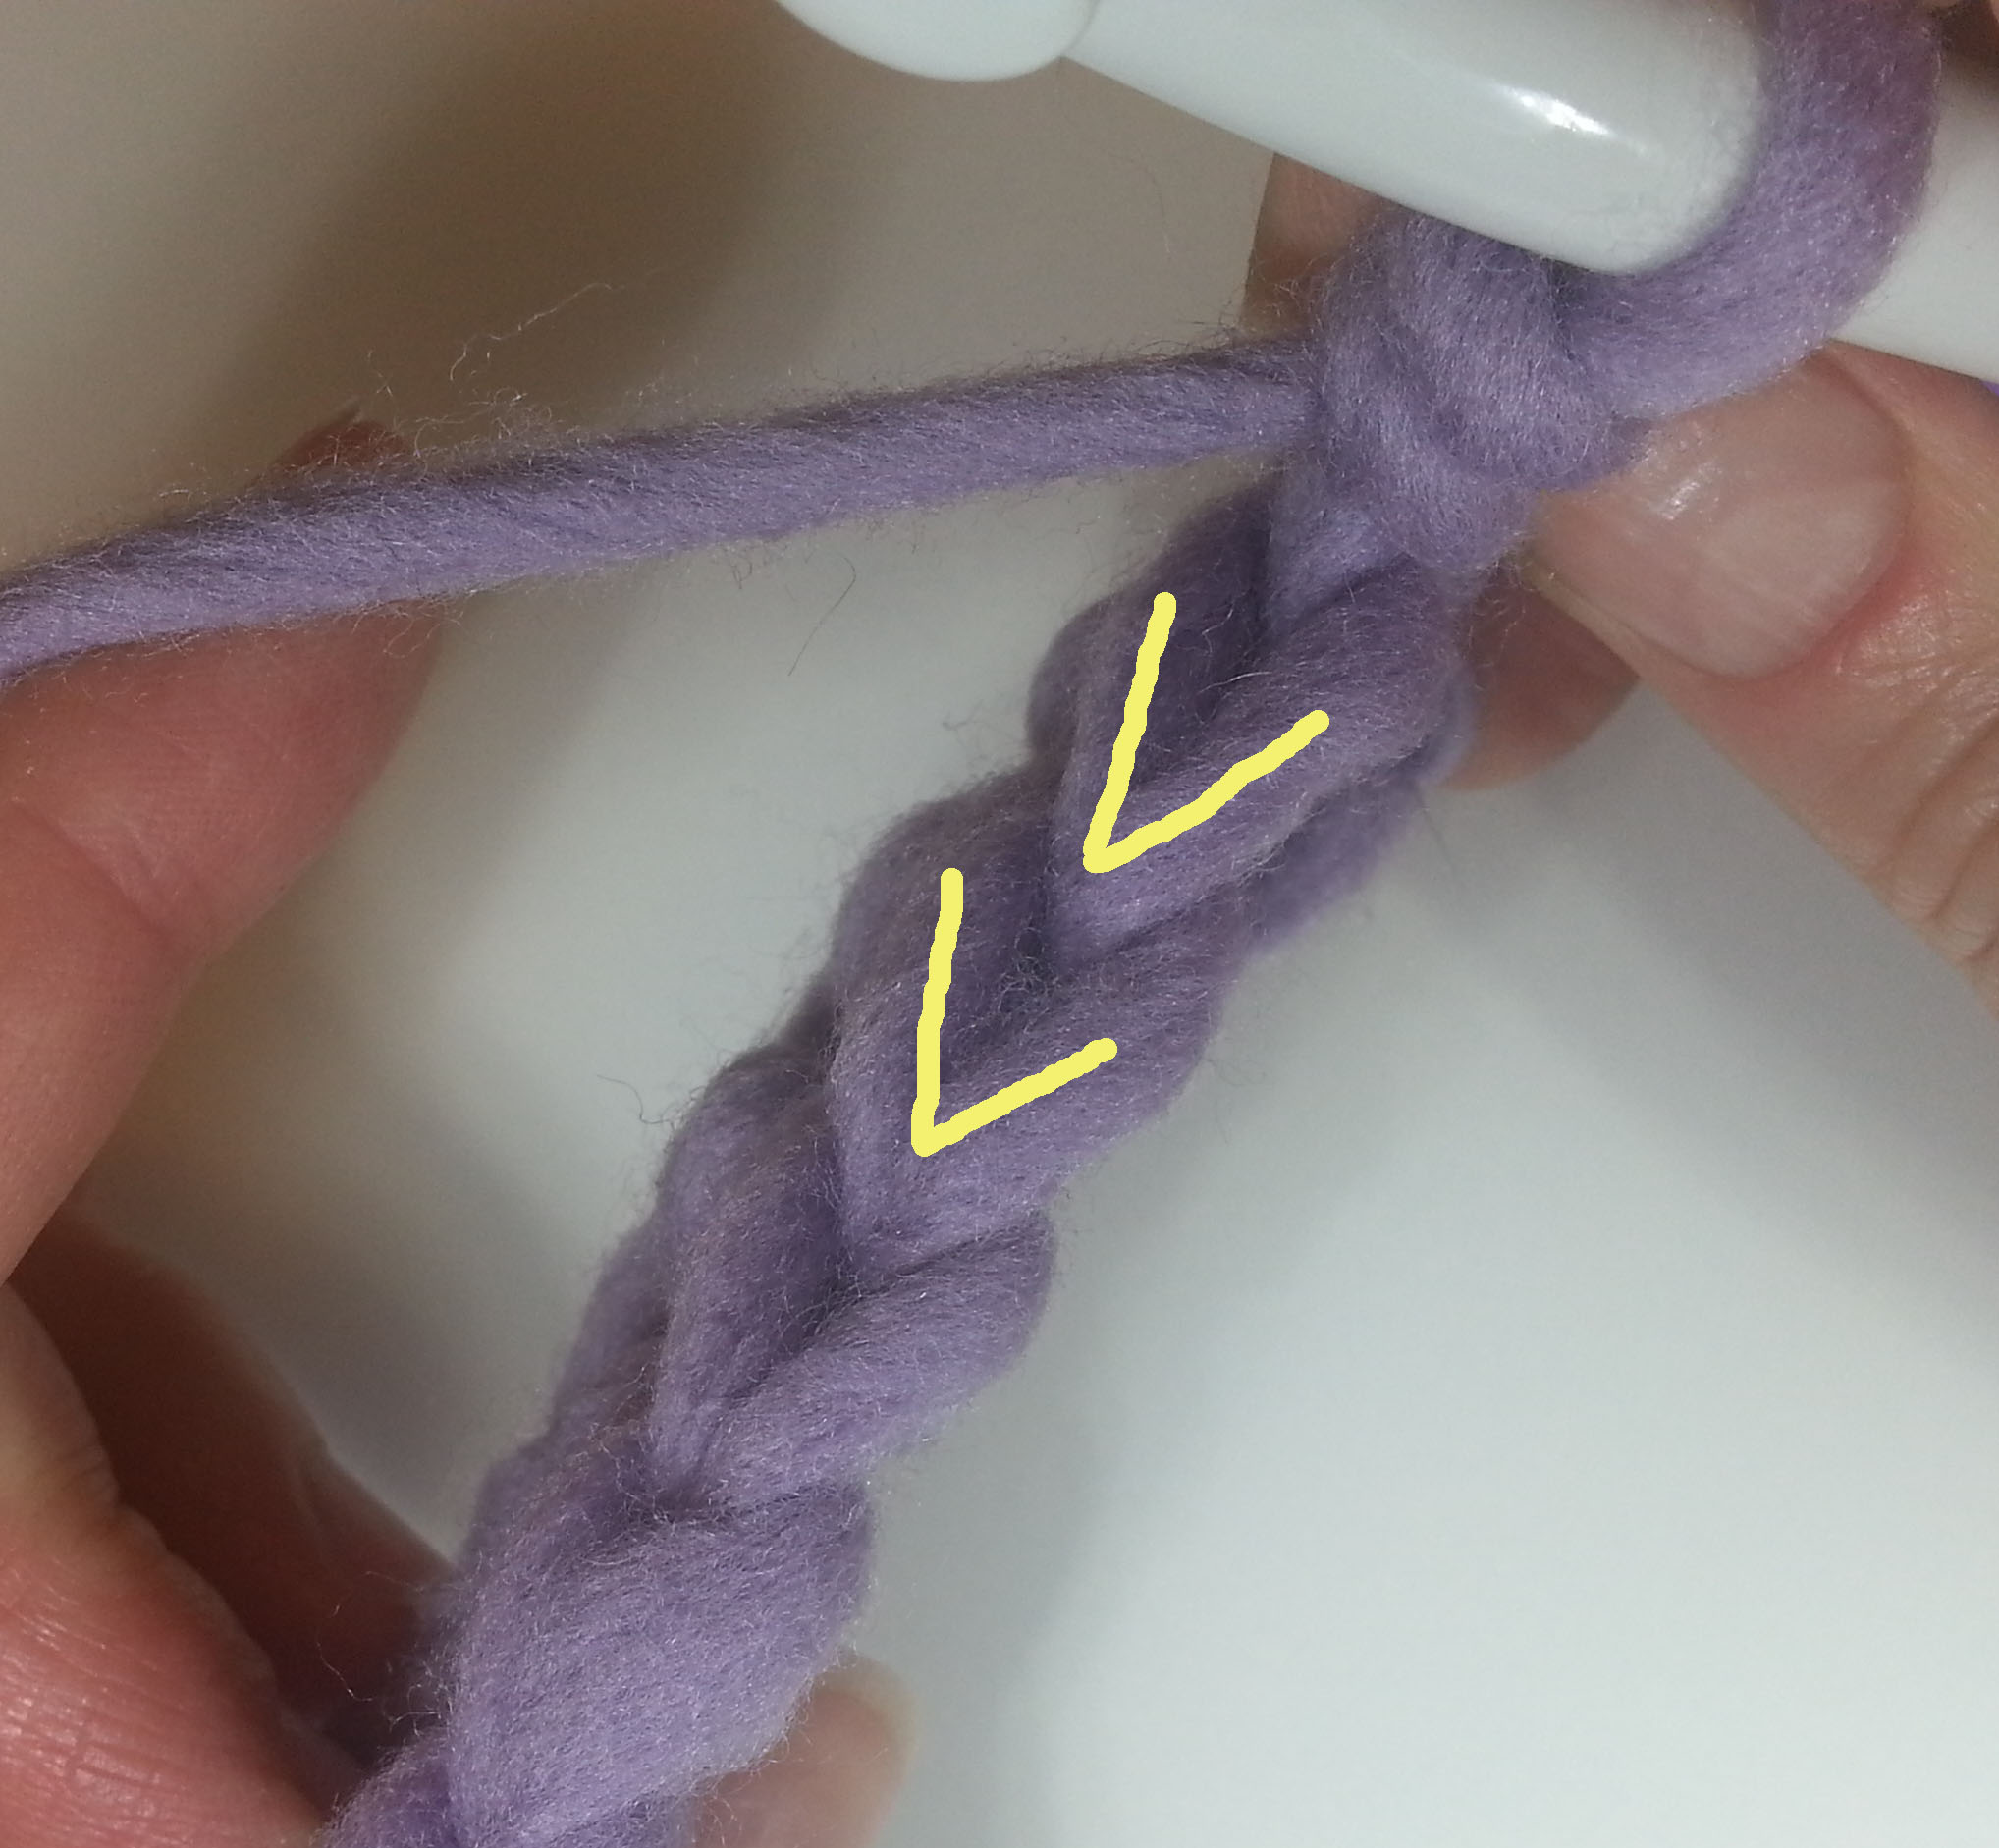
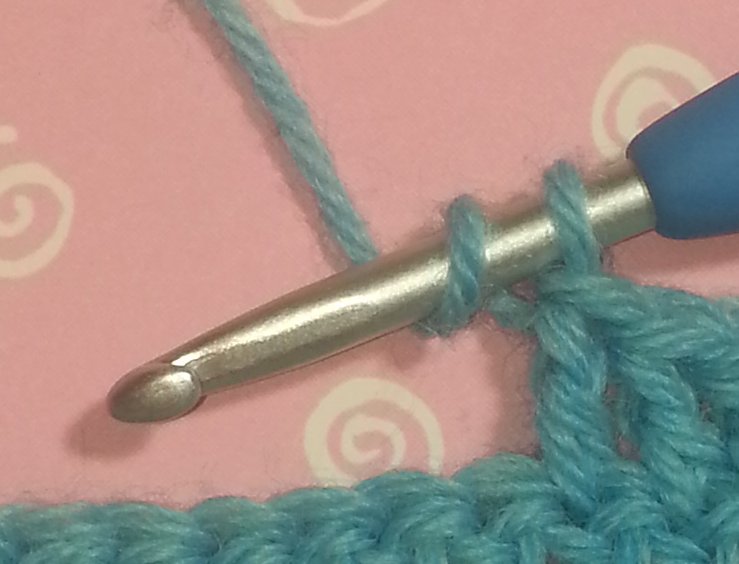
One of the questions I get asked by a lot of beginning crocheters is how to tell where the top of the stitch is. Spotting the top of your stitches and being able to identify which loops to work into or under is key to mastering crochet patterns.
Where is the top of the stitch?
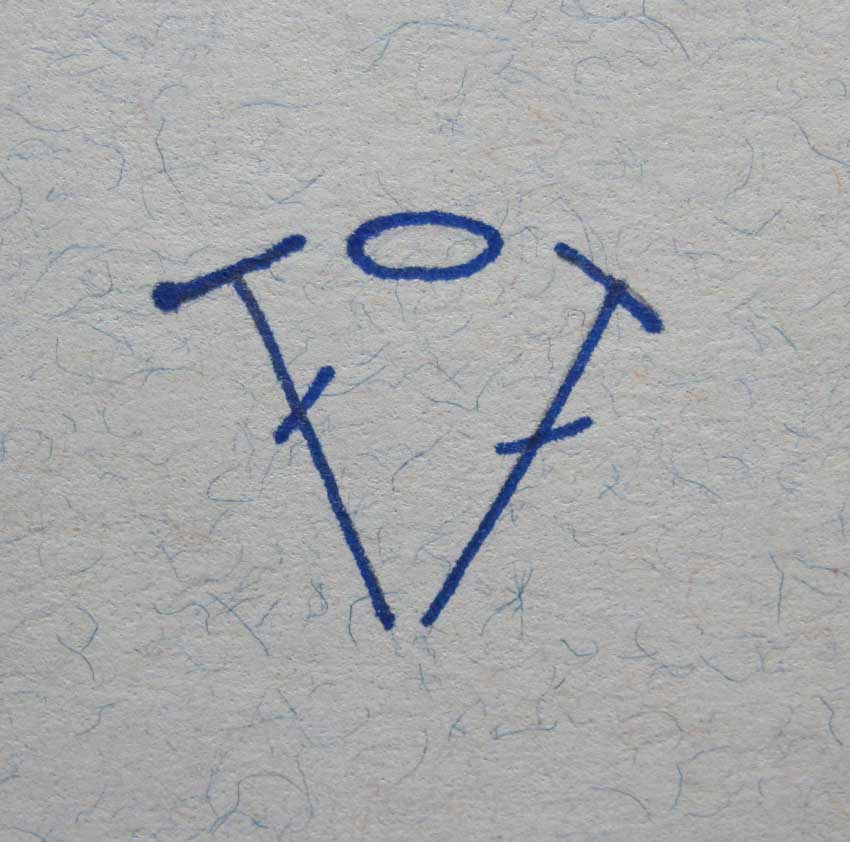
The simple answer, for most stitches in crochet, is the top of the stitch looks like a V. I often have new crocheters stop and hold their work so they can see those Vs stacked. As long as you don’t remove your hook from your working loop you can manipulate your fabric without losing any stitches.
How is the top of the stitch created?
For me, understanding that question really helped me read my crocheted fabric. When you finish a stitch you have a working loop of yarn on your hook. That loop becomes the top of the next stitch you make.
Am I working in the right direction?
Once you can identify the top of your stitch it becomes a lot easier to tell if you are working in the right direction.
If your pattern tells you to turn at the end or beginning of a row, then the Vs of the stitch tops of the row you are working into, should be pointing away from your hook.
If you are working in the round without turning at the end of each round, then the Vs of the stitch tops of the row you are working into, should be pointing at your hook.
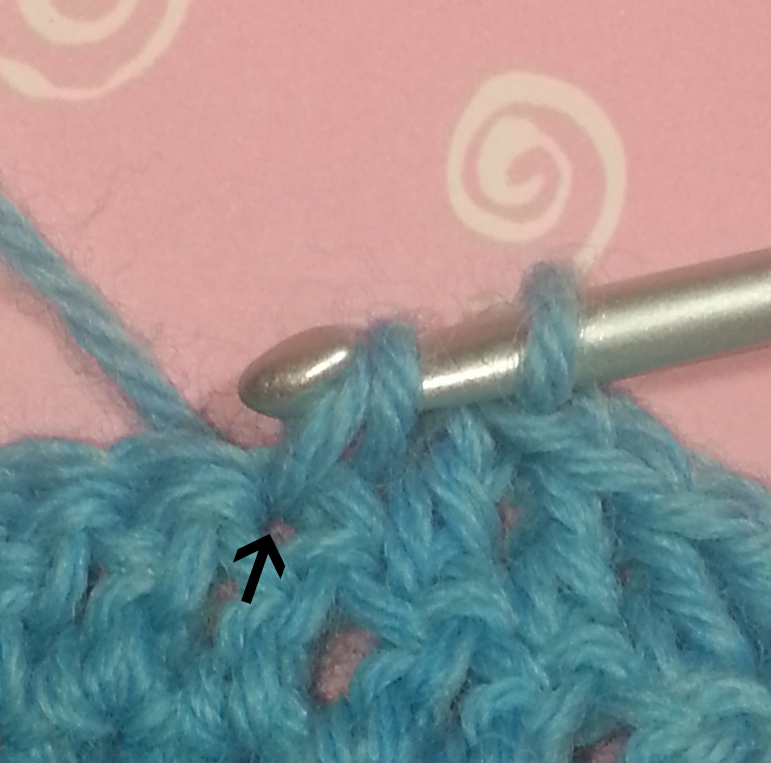
Where do I insert my hook in the stitch?
For your typical standard crochet pattern you are going to insert your hook under the 2 legs of the V in the top of your stitch.
To avoid splitting your yarn look for the little gap on the side of your stitch just under that V.
Some patterns will give you special instructions about where to insert your hook to create different textures in your fabric.
If your pattern instructs you to work in the back loop of your stitch. This is generally referring to the back leg of the Vs after you’ve turned your work to begin your new row.
The same is true for working in the front loop or your stitch. You would be inserting your hook under the front leg of the Vs after you’ve turned your work to begin your new row.
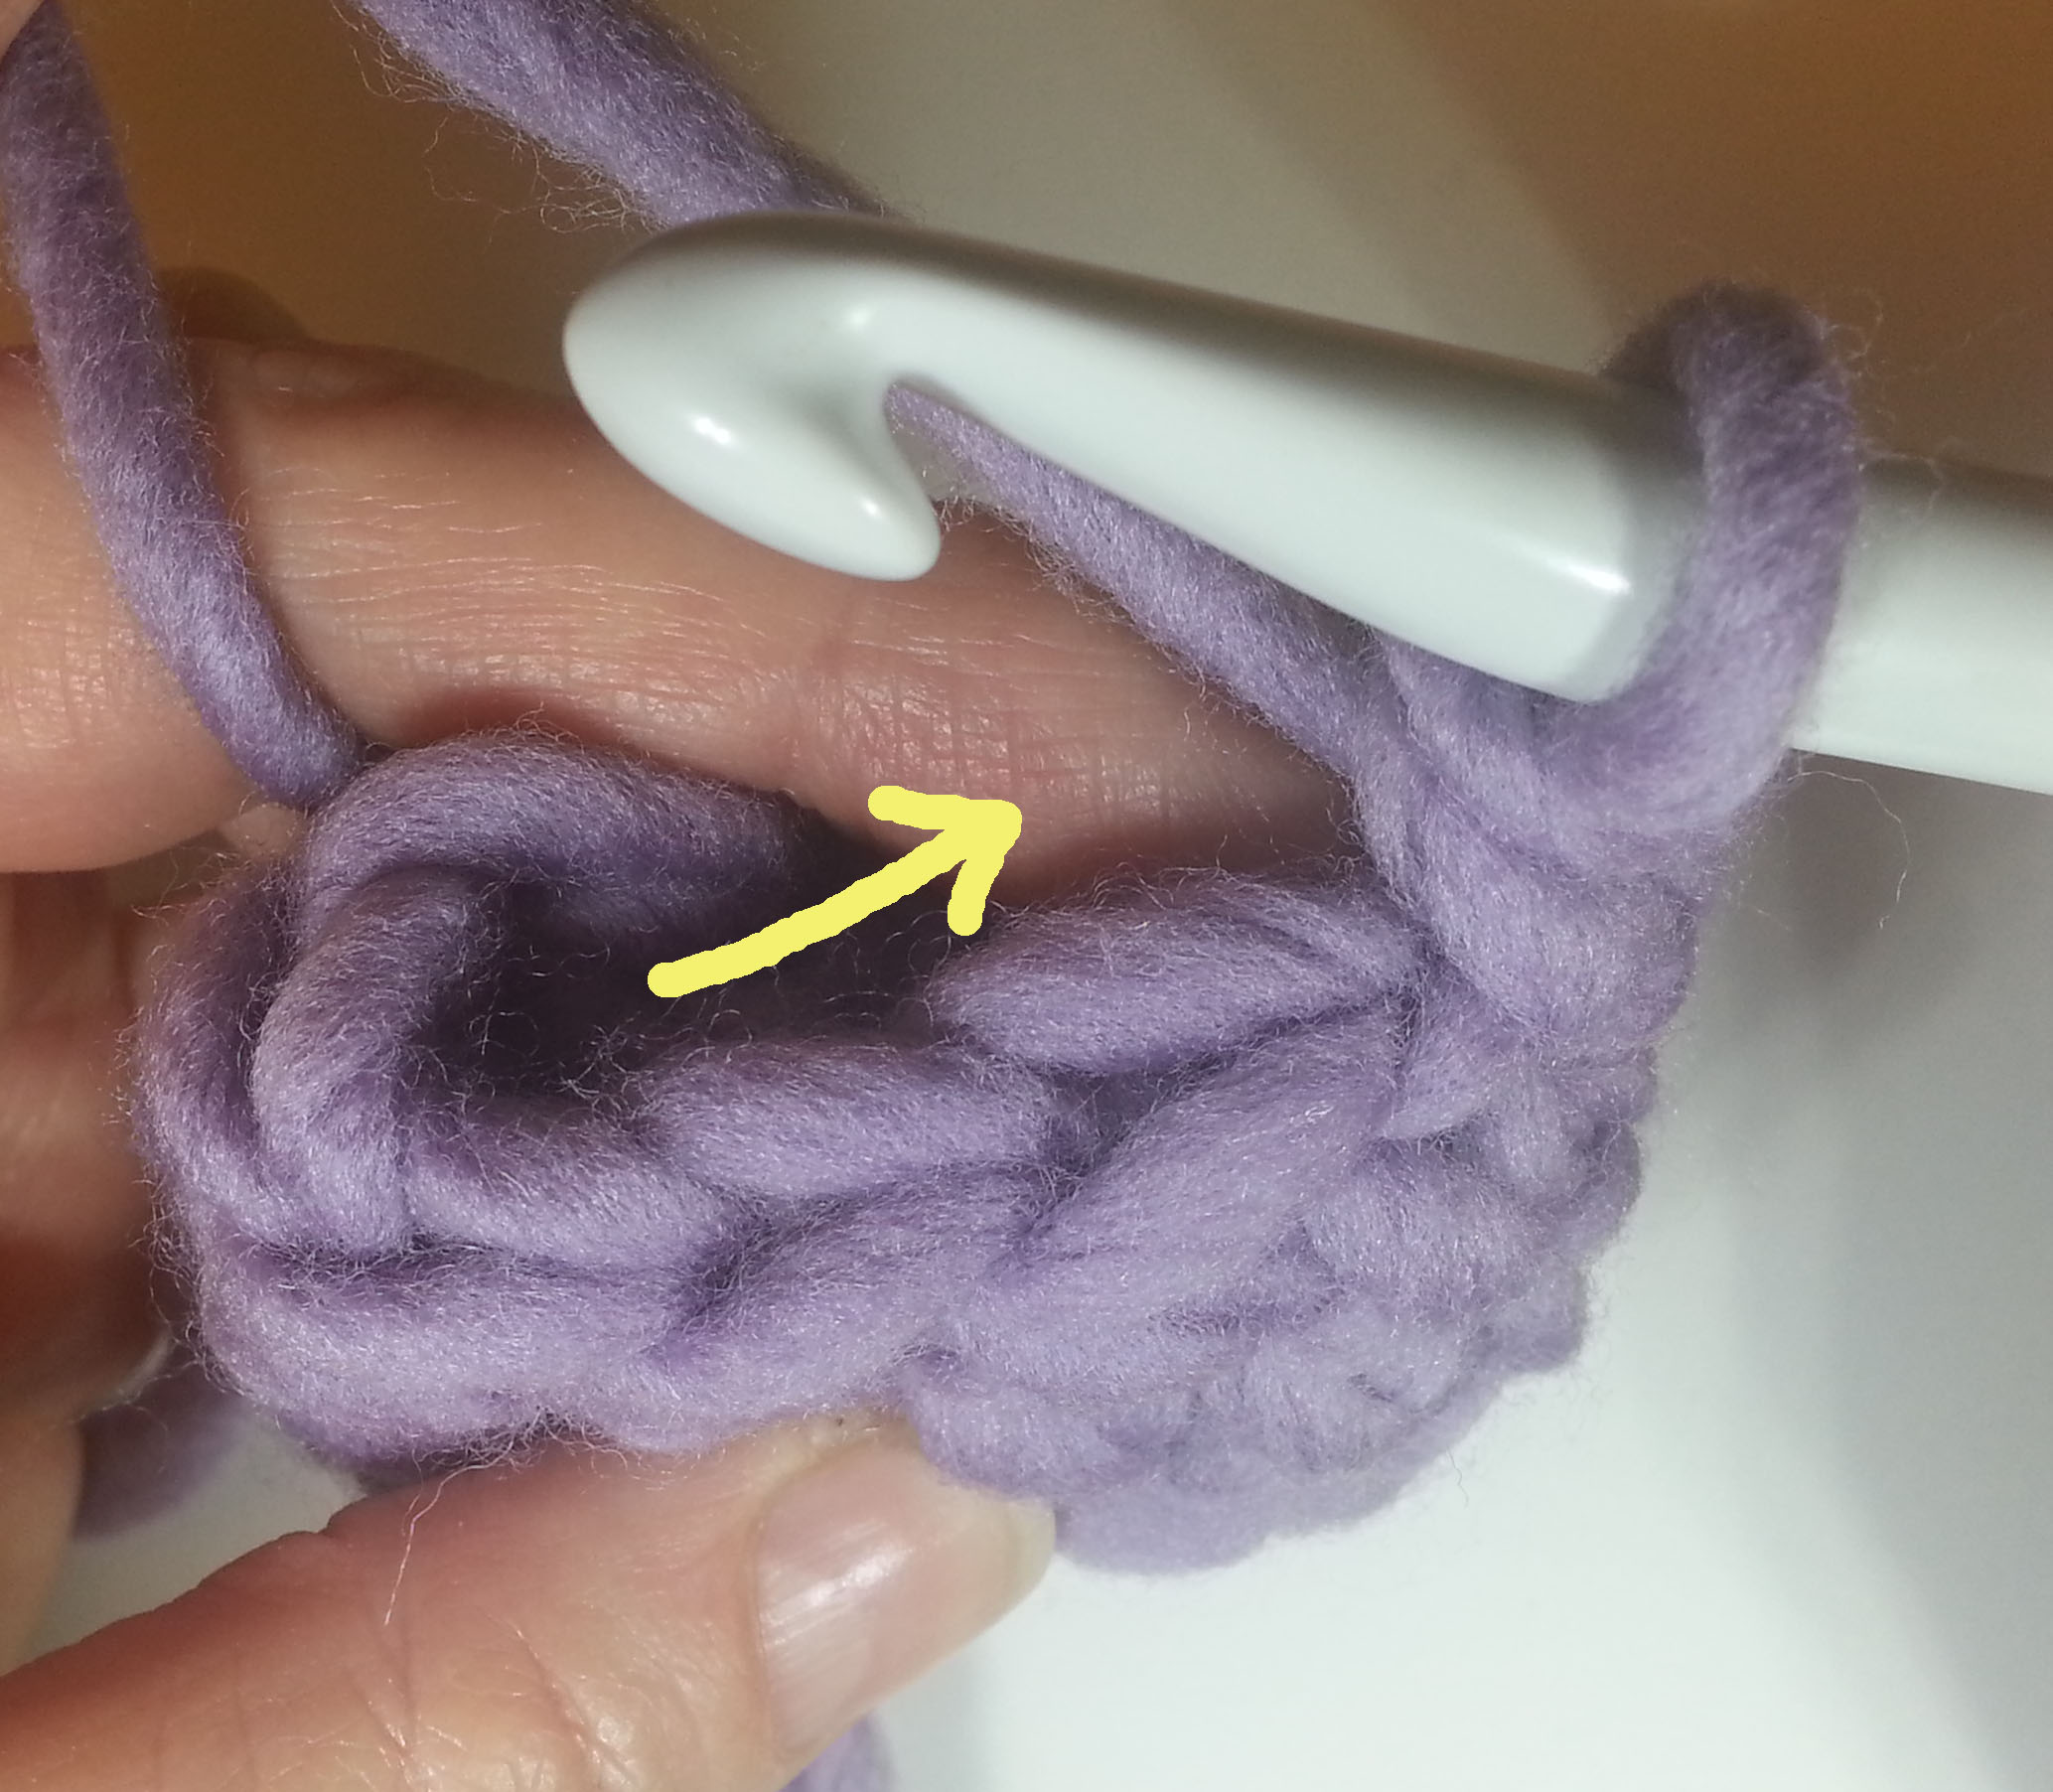
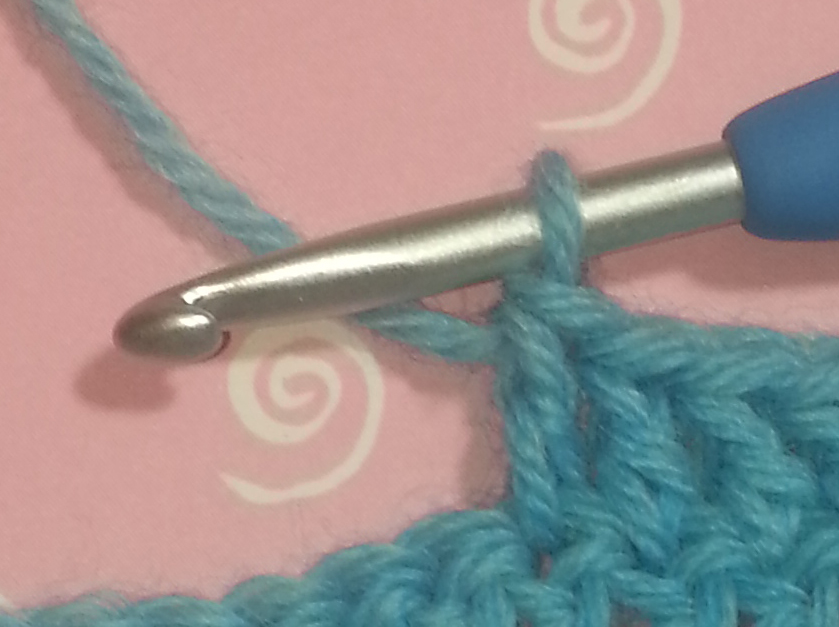
What if I need to work more than one stitch in the same stitch?
This can be tricky when you are new to crochet. Especially once you work the first stitch your V is obscured. My favorite trick involves manipulating the fabric.
If you gently pull up on the stitch just made it becomes easy to see where the base of that stitch goes into the previous row.
Next time I’ll address the Half Double Crochet stitch. One of the trickiest to read properly in your fabric.
Most of my reader’s are experienced crocheters, but today I wanted to address the needs of those of you that want to learn to crochet. These instructions assume that you already know how to make a slip knot and have placed your yarn on the hook shaft. If you need help with making a slip knot click here to see a post that will help you.
One of the things I like to emphasize when I am teaching new crocheters, is holding your yarn and hook so that your hands are comfortable. After all you are starting on a new crafting adventure and you don’t want it to end prematurely due to injury.
Crochet is a craft that utilizes both hands. For most folks it is easier to hold the hook with your dominant hand and the yarn is held in your non-dominant hand. The majority of crochet project samples you will see in magazines and on yarn company sites show projects worked with the hook in the right-hand. When the hook is held in the left-hand the stitches will look slightly different because they will slant in the opposite direction from stitches made with the hook in the right-hand.
Some left-handed crocheters hold their hook in the right-hand and the yarn in the left-hand. They use a crochet technique where they manipulate the yarn more than the hook when making stitches. If you are left-handed you can experiment to see which technique works best for you.
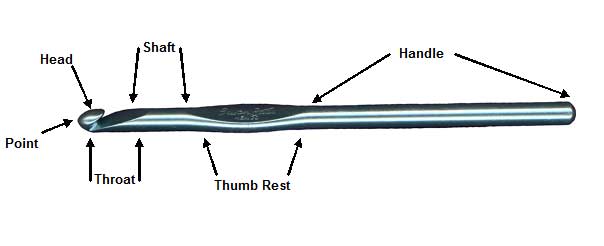
Anatomy of your Hook
Holding the Hook
There are 2 common ways to hold your crochet hook: Knife Hold, sometimes called the “toothbrush hold” and Pencil Hold. Either is fine depending on which is more comfortable to you. You need to grasp the hook so that the shaft, throat and head of the hook are un-obstructed. Most important is not to hold the hook too tightly. I generally hold my hook using a Knife Hold.
Tensioning the Yarn
Right-handed Tensioning of Yarn
“Tensioning the yarn” is just another way to say “holding the yarn”. You want to hold the yarn in such a way that it isn’t too tight or loose. Your “tension” makes a big difference in the uniformity of your stitches when crocheting. The wrap of yarn shown in the above photo is my favorite method. I have very dry smooth skin, for folks with less dry skin you might want to eliminate the extra wrap about the pinky.
Left-handed Tensioning of Yarn
Making a Chain Stitch
Step One
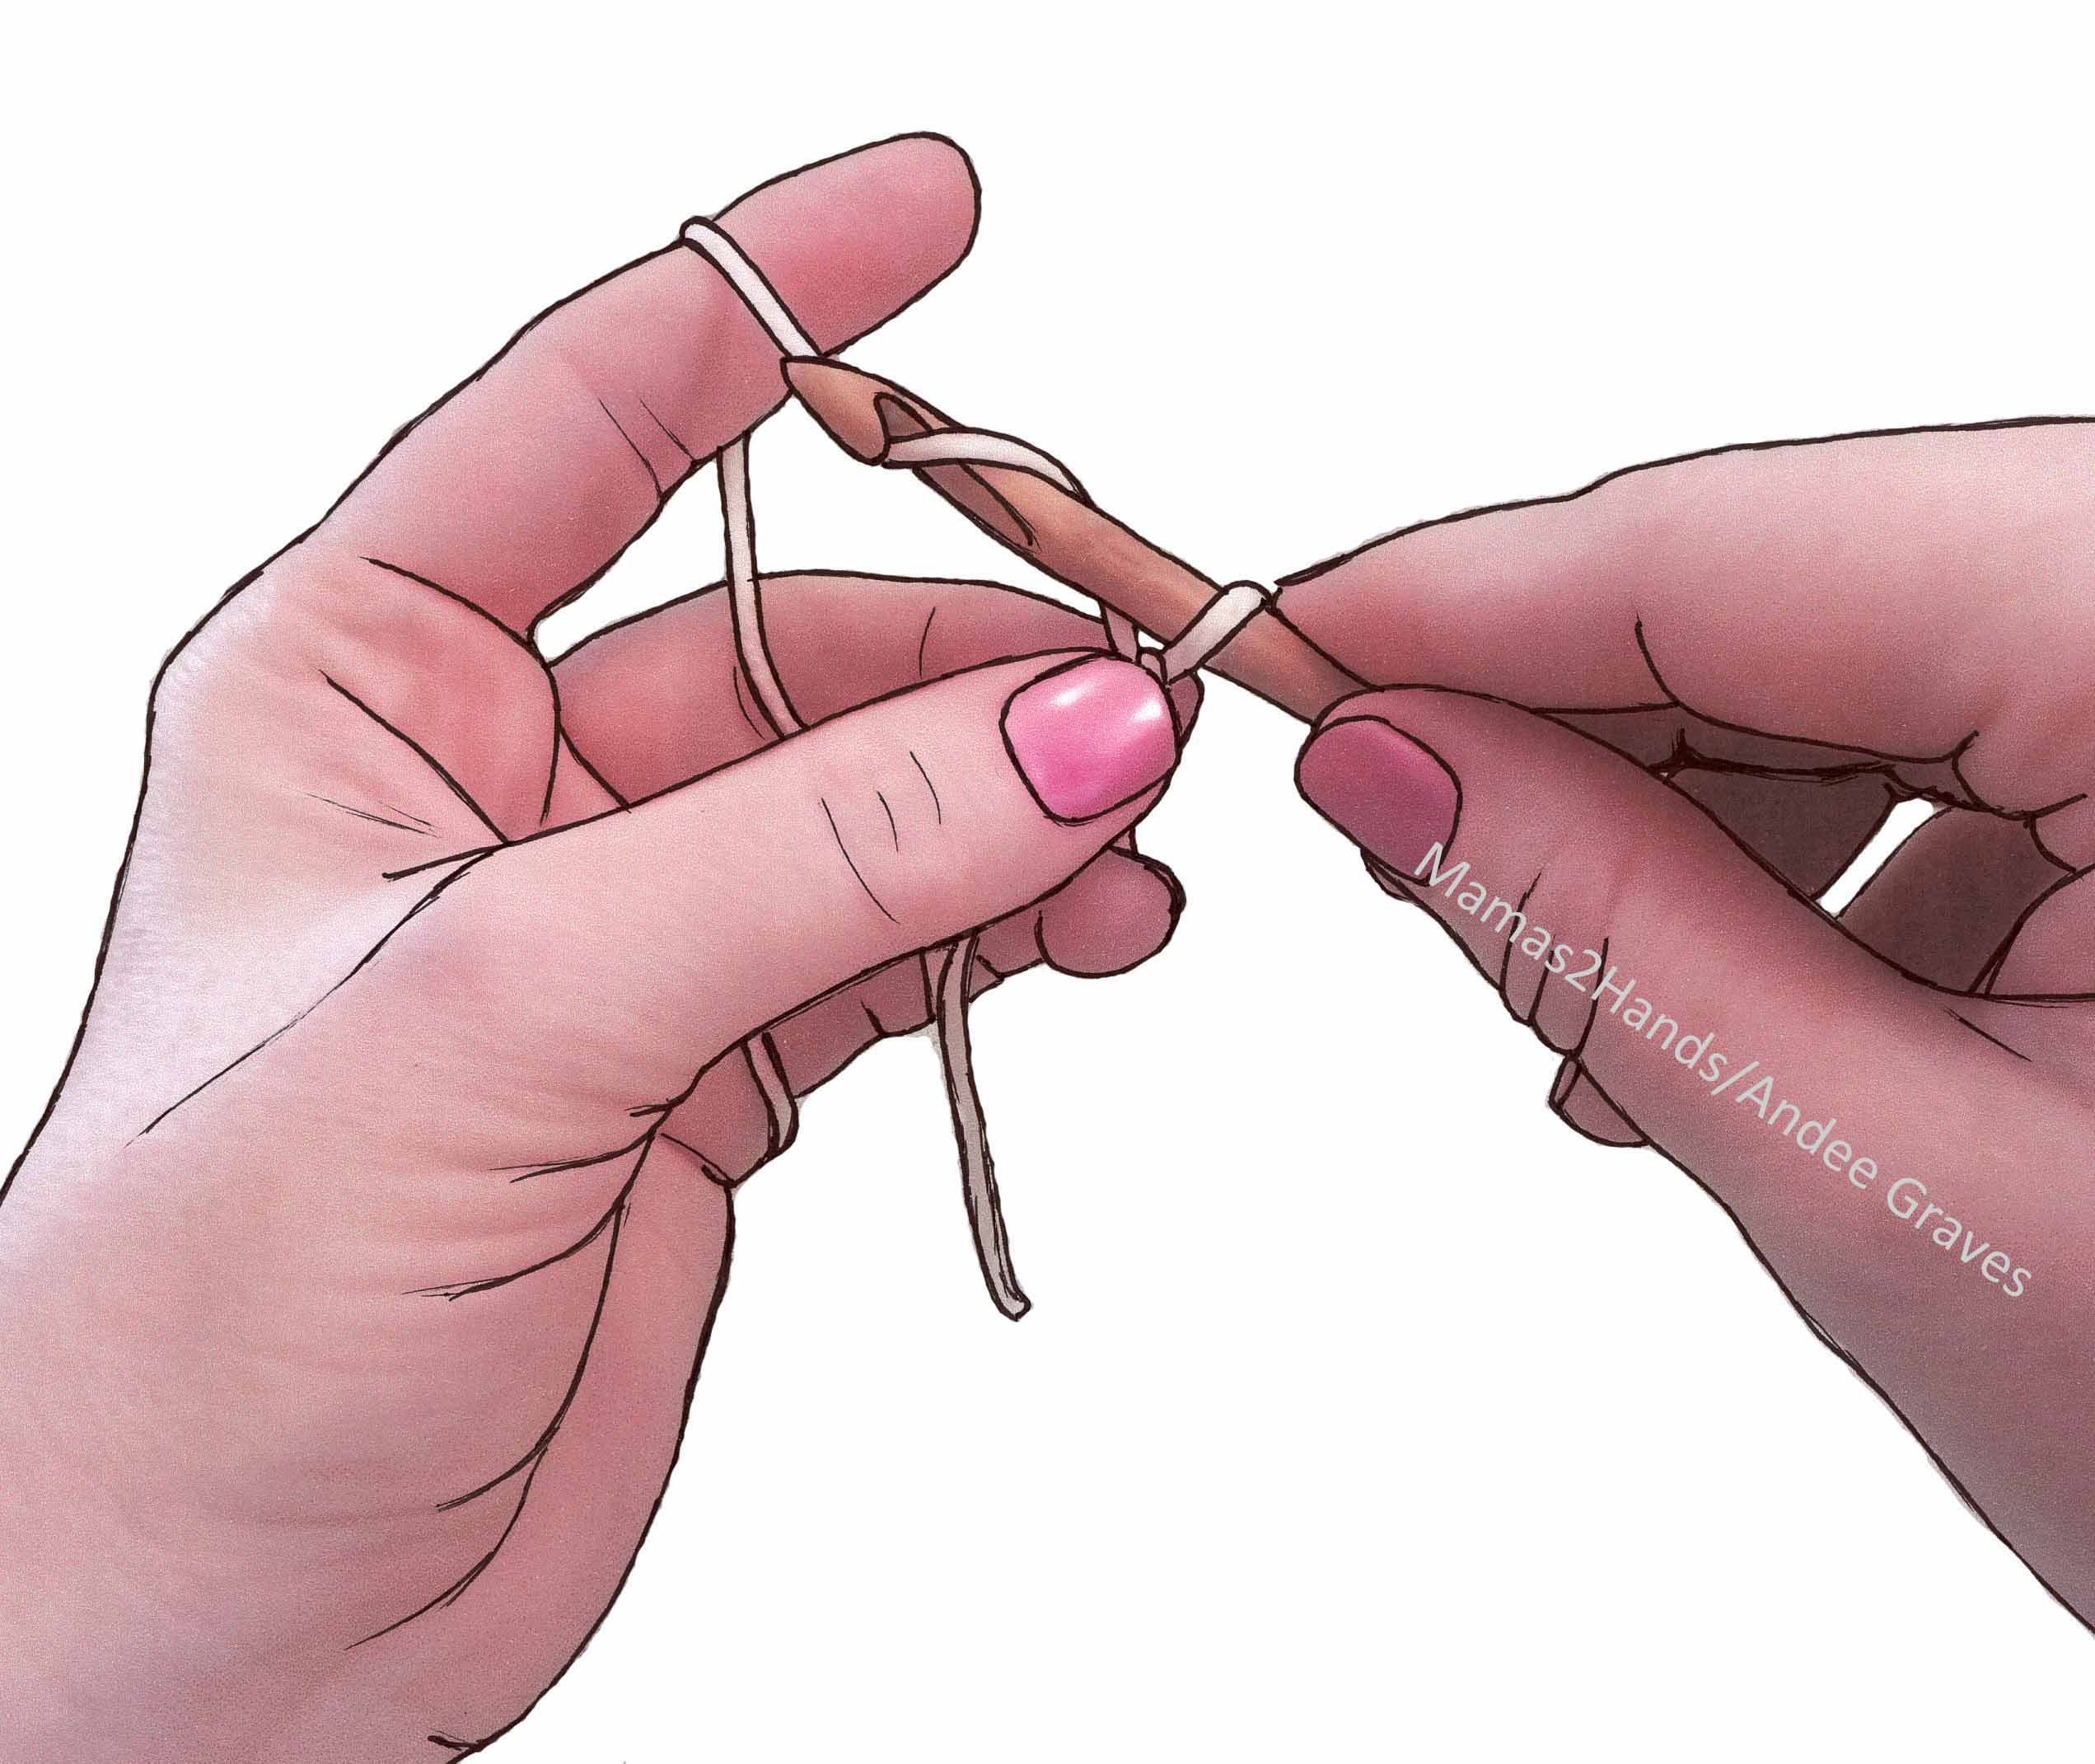
Right-handed grasp of Working Loop
Once you have chosen your hook hold and have the yarn tensioned use your non-dominant hand to grasp the base of the loop on your hook (called the “working loop”) with your thumb and middle finger. This creates a strand of working yarn for your hook to move around freely.
Left-handed grasp of Working Loop
Wrapping the Yarn
Step Two
Right-handed Yarn Over
You want the yarn to wrap around the shaft of your hook from back to front. So scoop the head of your hook in front of the working yarn strand and then behind it. This is called a “yarn-over” in crochet. Catch the yarn strand with the throat of your hook and let your forefinger move toward the working loop as you pull the yarn thru it.
Left-handed Yarn Over
You have now pulled up a loop and you need to slide that loop to the shaft of your hook and grasp the base of that new loop with your thumb and middle finger. Let the working yarn slide through your tensioning hand as you return your fore-finger to the original position it was in.
Continue to repeat steps 1 & 2 until you have the number of chain stitches or length of chain that you want. You can use pretty yarns to create lengths of chain to use as ties for packages or other decorative purposes. You can also add beads to your yarn and make beaded necklaces using the simple chain stitch.
Click here to visit my blog post about working beaded chain stitches and for more details on getting started crocheting.
In this video I’m using a rather primitive animation technique. I took photos of almost every stitch I made working the swatch above. Then I edited them together with music and instructional text for this 1 1/2 minute long video.
Take a look and see what you think. The text pattern with photo tutorial is in my first “Playing with Triangles” post.
I’m off tomorrow to visit the Marketplace at the Interweave YarnFest and to spend some time with friends from out of town. I’m going to try to behave myself and not purchase too much yarn. But I do know I’ll be coming home with some loose wool fiber to practice my needle-felting with.
Hope everyone has a fabulous weekend, and gets some crochet time in.
This past week has been a busy and fun one. My boys were on Spring Break and we made a quick trip to Kansas to visit some of my family. Got to have a good visit with my Dad and brothers, but the highlight of the trip was taking my niece and her 2 little ones to Kansas City for a fun-filled day at LEGOland, as well as an entertaining dinner at Fritz’s where toy trains deliver your food to your table.
We were supposed to head back to Colorado on Wednesday, but the weather forecast looked like we would end up stranded with highway closures. We stayed an extra day in Topeka and drove home on Thursday. Once we got to Colby, Kansas on Interstate 70 we could see that it had definitely been the right decision. Now we just need to dig out our driveway and deck from the approximately 2.5+ feet of snow that fell here on the mountain.
Our Easter bunny is going to need snow boots to deliver eggs, especially since more snow is expected thru the weekend. I may just be curling up in front of a nice fire in the wood stove and crocheting. I’ve got a couple shawl projects on the hooks and that fits with today’s post.
Recently we had a little math lesson here on the blog for figuring out the yardage for making a triangle shawl. Today I thought I would give you the tools for starting your own triangle shawl. I’m going to walk you thru this pattern, hopefully that will make it easy for even our newer-to-crochet folks to follow.
As I’ve said before, my favorite way to design is using what I call “Small Starts” for a project. To me the first 2-3 rows or rounds of a project are often the most fiddly, so I like to get them out of the way quickly so I can get to the “good” stuff. Nothing makes me happier than being able to write the beginning instructions of a pattern as “Chain 2 work in second chain from hook, . . . ”
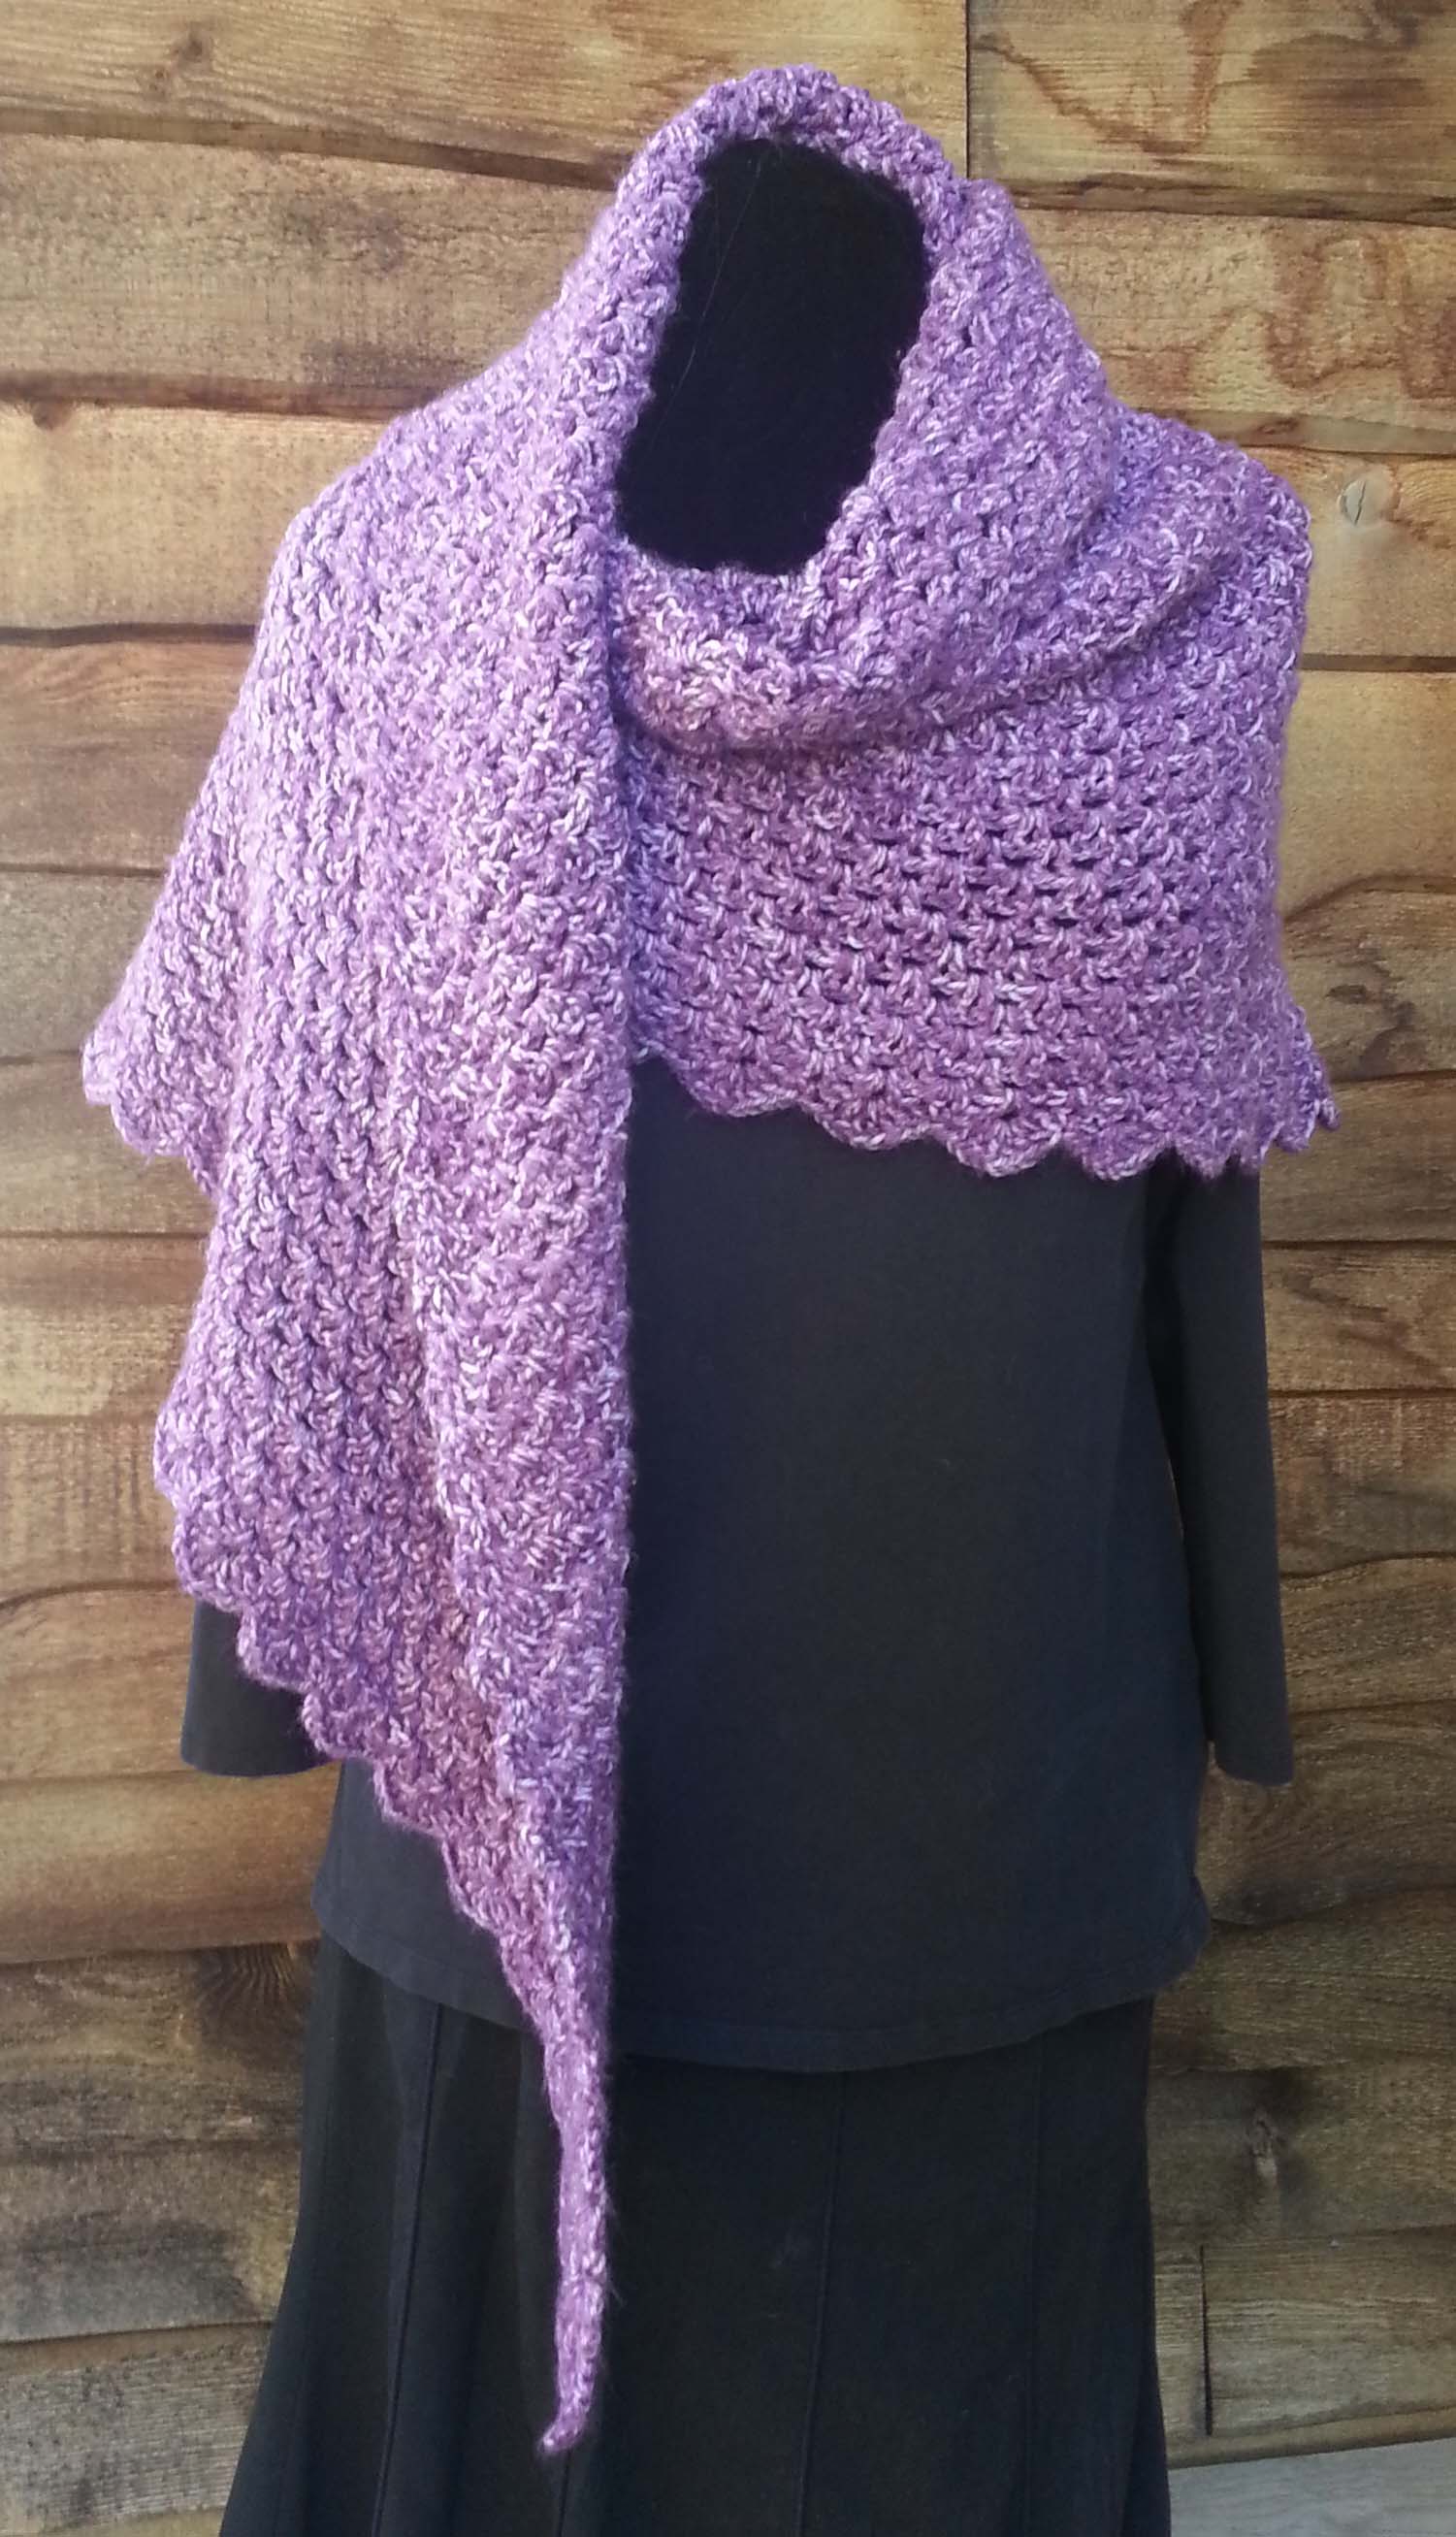
For this simple shawl I wanted a pretty scalloped edge along the top as the rows were completed and I wanted the rows to be a simple Zen-like stitch that didn’t require a lot of thought to work on. These types of shawls are terrific relaxing projects to work on watching telly in the evening or for Prayer Shawl group meetings.
One of my favorite Zen-like stitches is the V-stitch. It is simple to make with just enough variety not to become completely boring.
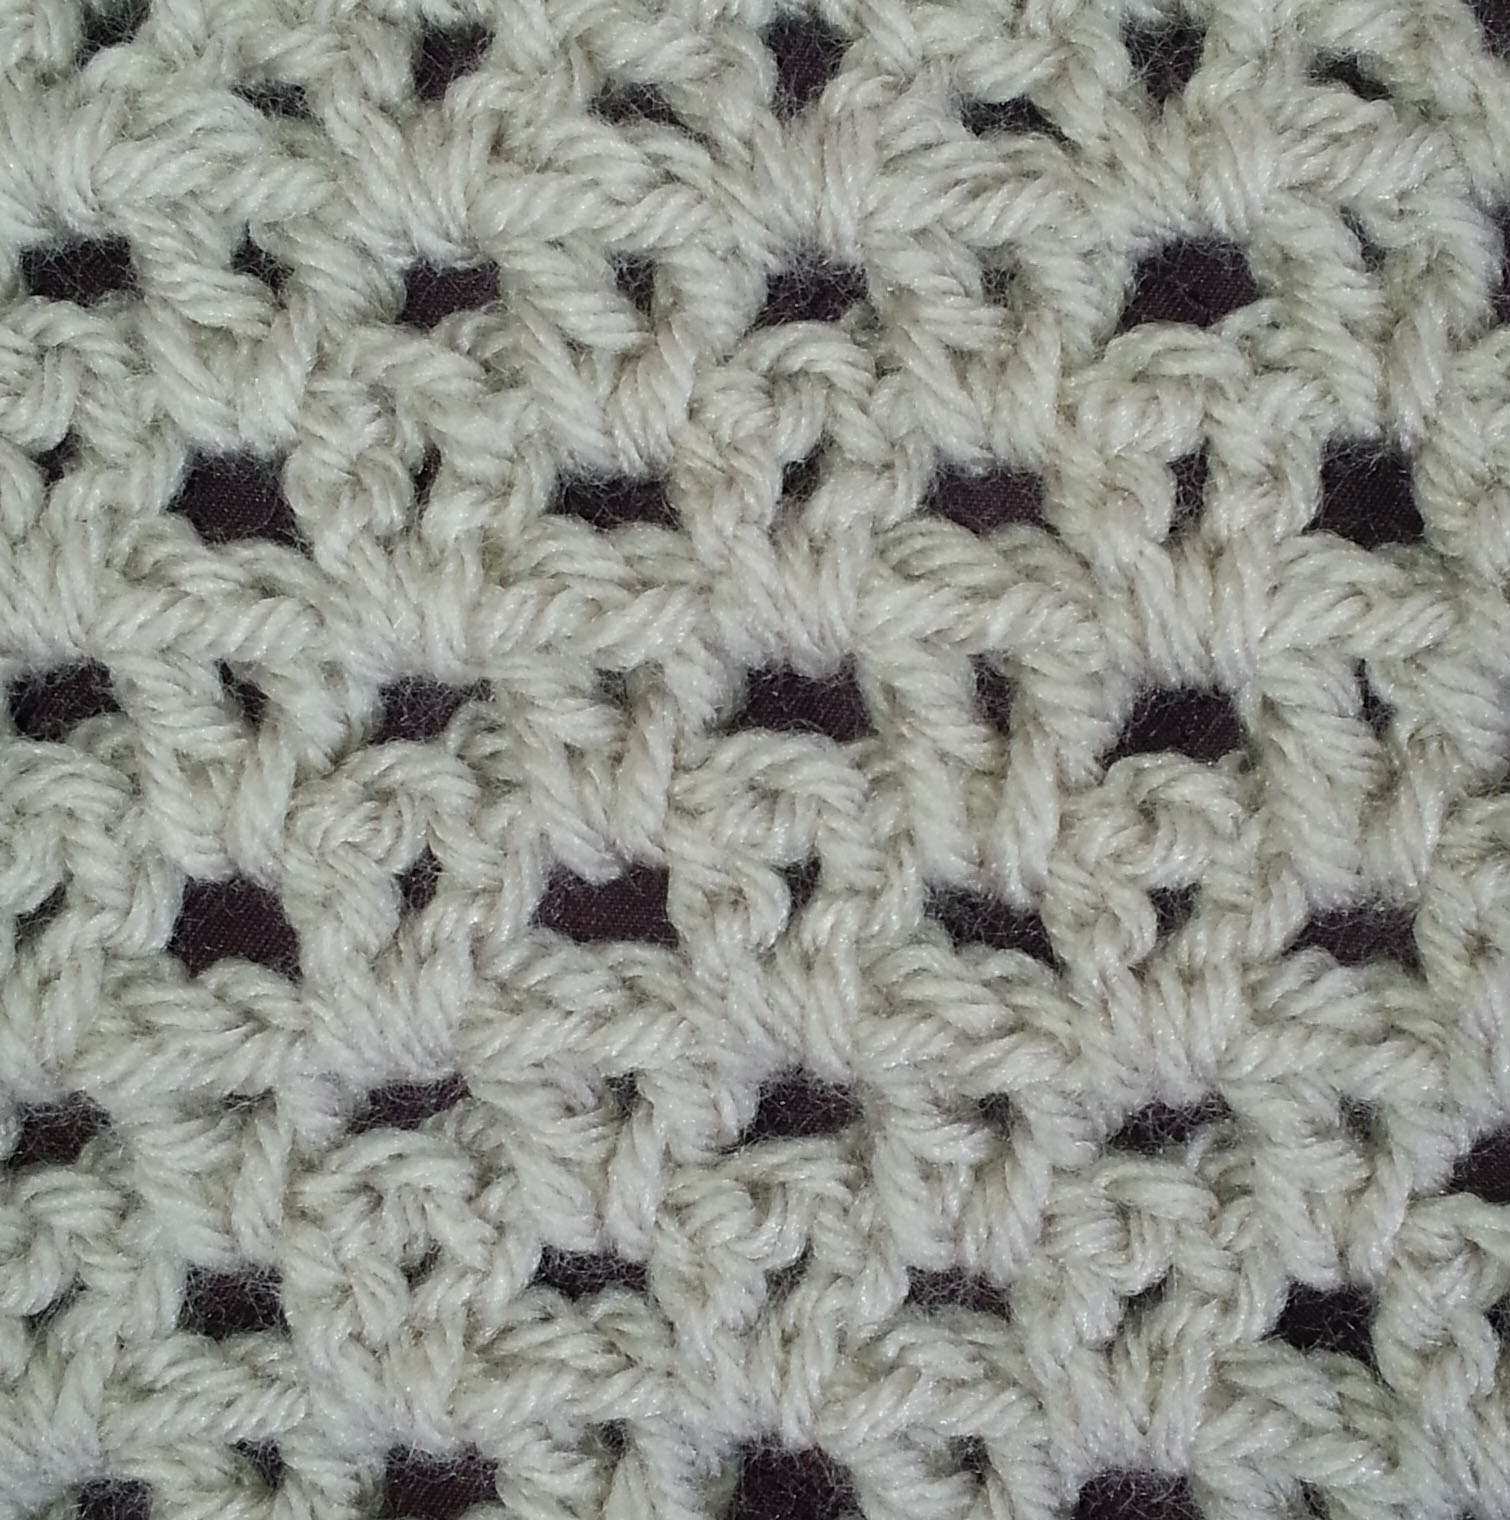
Photo A: Stacked V-Stitches
I’ve used this stitch both in stacked construction and staggered.
Photo B: Staggered V-Stitches
Now that I knew what stitch I wanted to use it was time to play with constructing the shawl. For my initial project I decided to use Lion Brand’s Vanna’s Choice. It’s a good sturdy acrylic worsted weight and I have it in lots of colors in my stash. I used a J (6mm) hook with this yarn as I wanted to keep my stitches loose.
You can use any weight yarn you want with the size hook that gives you a fabric you like. That might involve a bit of experimenting to decide on the right combination of yarn and hook. Because this shawl is worked from the top center with increases at the center point and at each end of the top edge you can just work as many rows as you like until you reach the size you want, or until you run out of yarn.
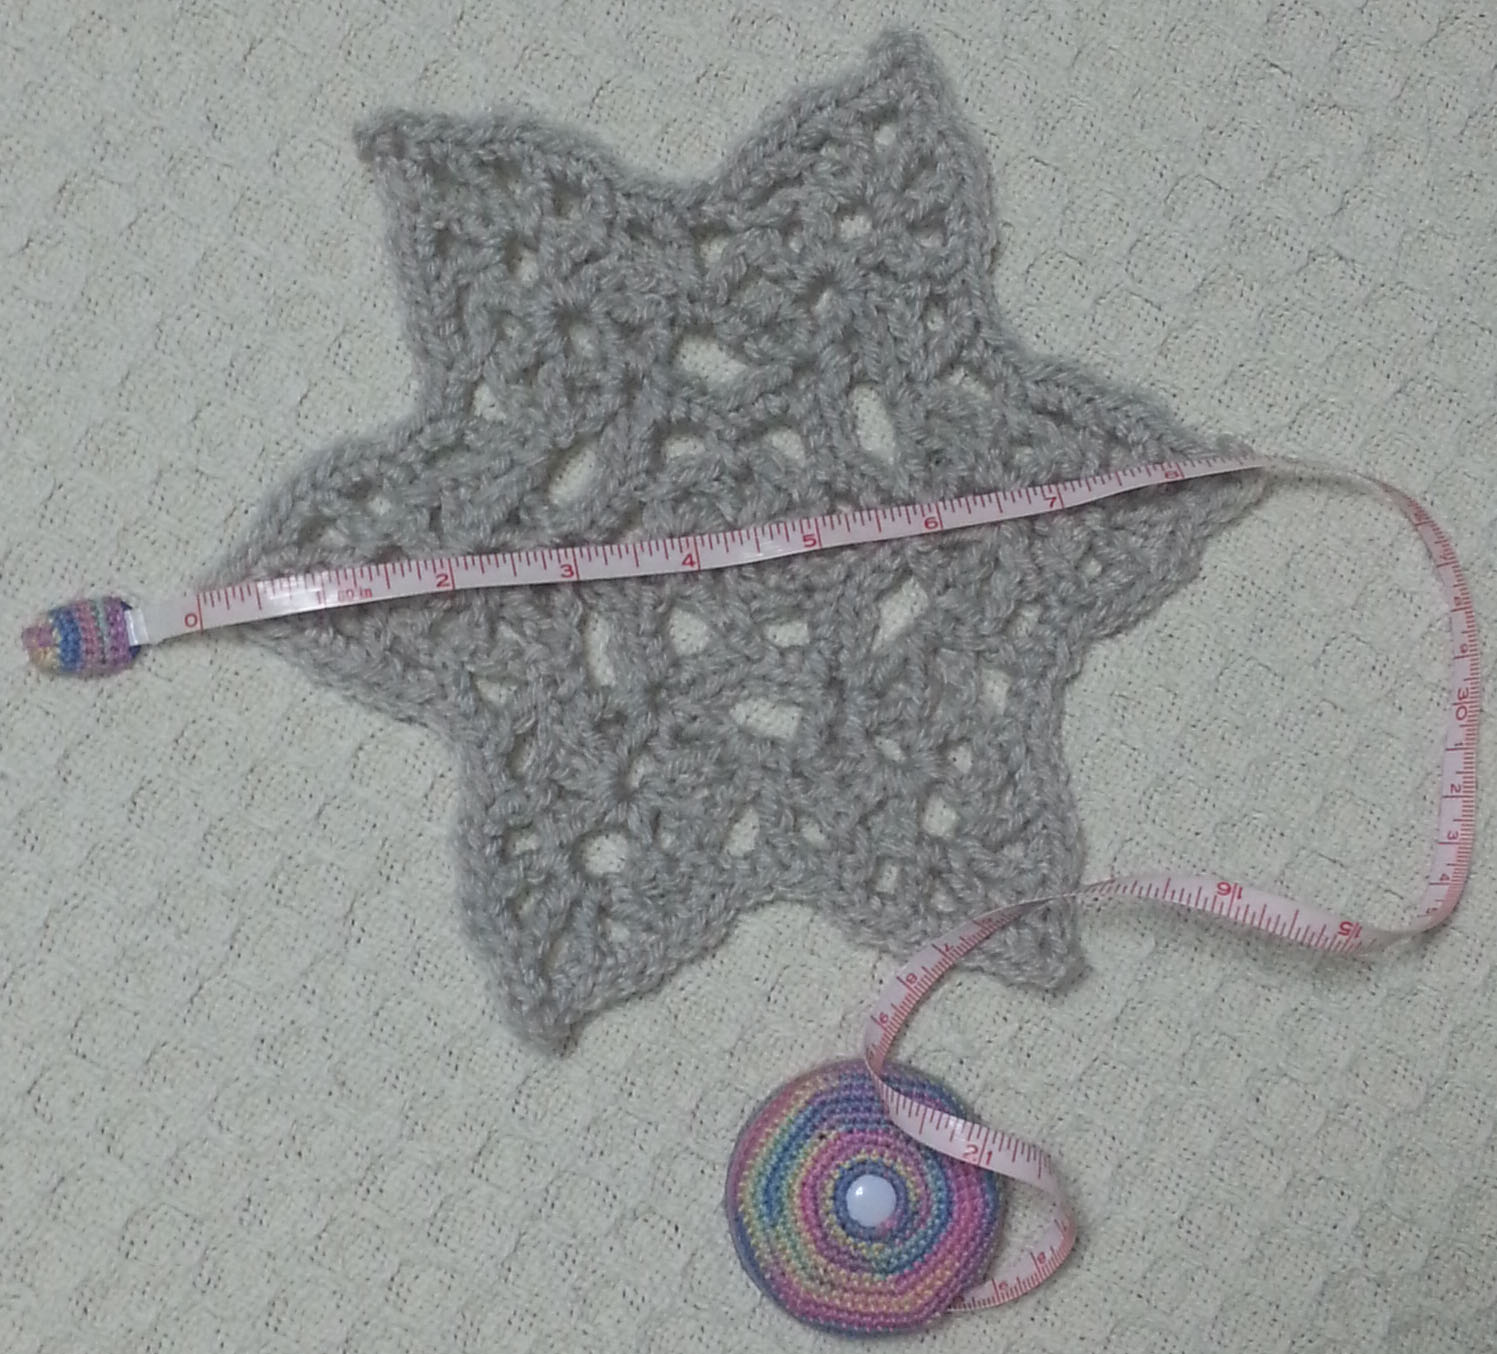
After making the swatch above I calculated for my Vanna’s Choice version of the shawl I would need approximately 6 skeins of yarn (870 yards). That would make a shawl that is 60 inches across the top and 30 inches long at the center point. I worked 6 rows of the body stitch pattern and then the border for this swatch to get my numbers.
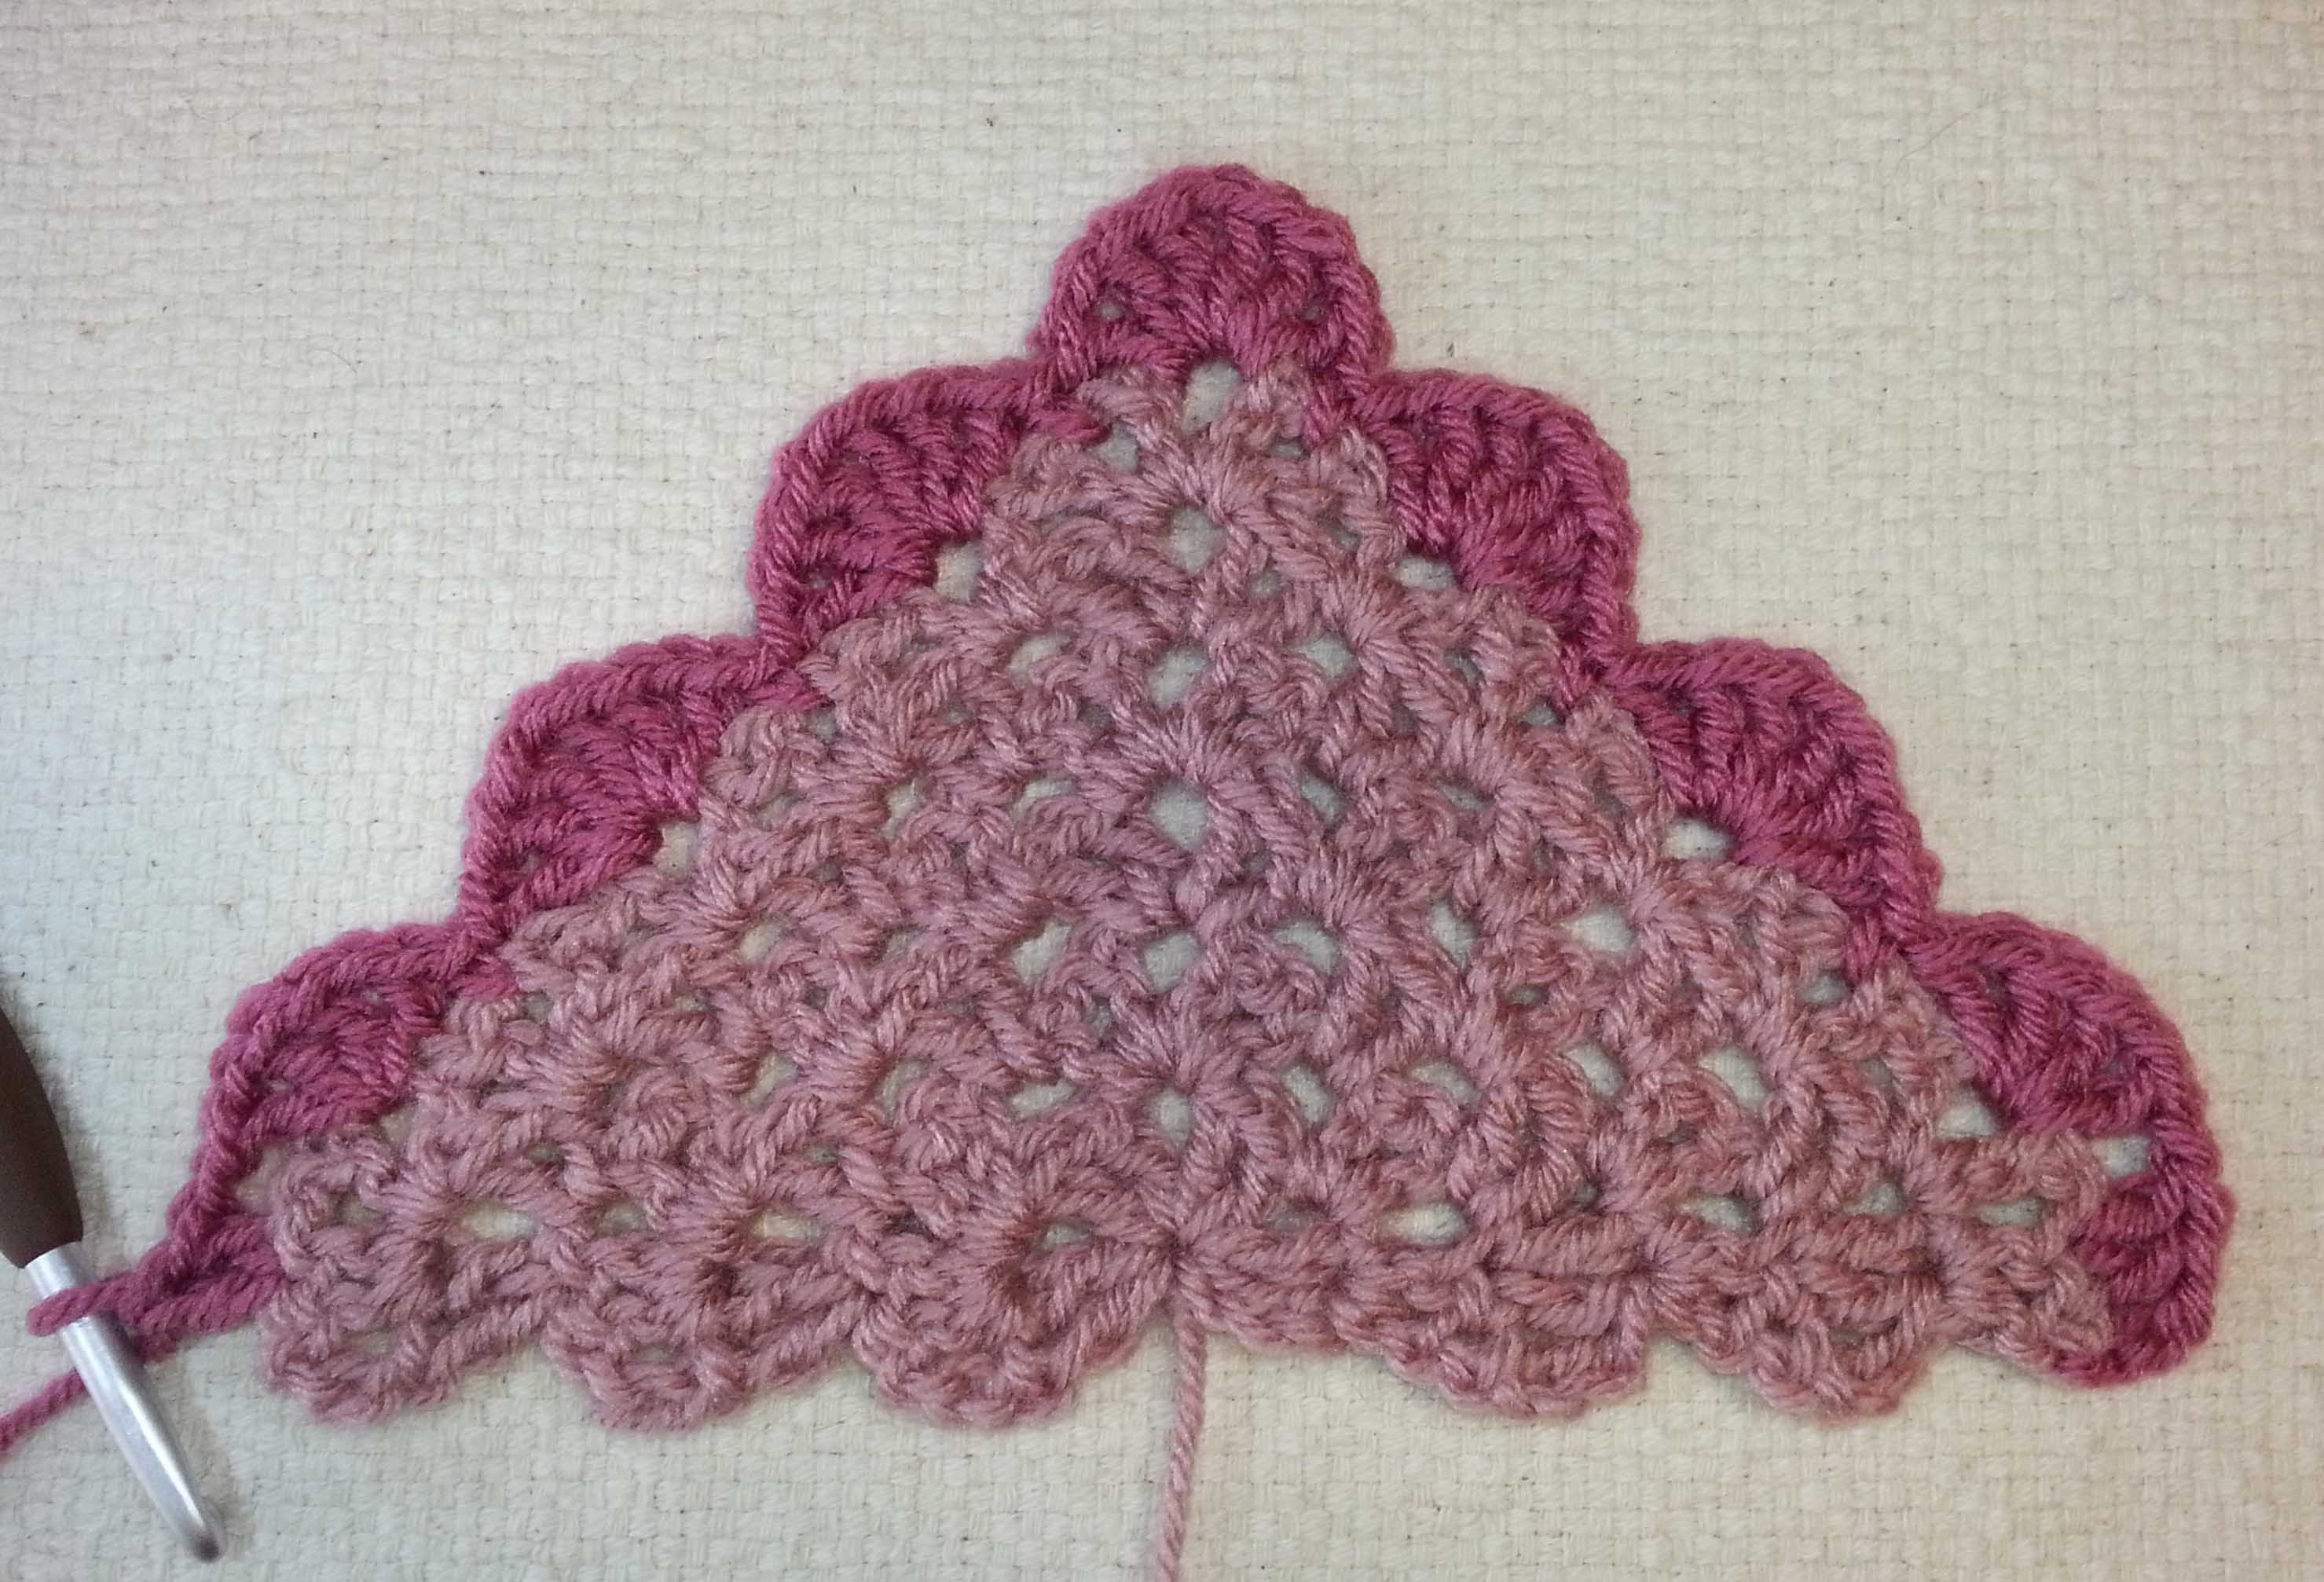
My first finished Playing with Triangles Shawl.
Playing with Triangles Shawl
Designed by Andee Graves
Skill – Beginner
Stitches you need to know: Chain (ch), Double Crochet (dc), Single Crochet (sc), Slip Stitch (sl st)
V Stitch (V-st): (dc, ch 1, dc) in indicated place
Materials
Yarn in weight and yardage you want to use for your preferred size of Shawl.
Hook in size appropriate for the fabric you want from your yarn.
Stitch markers (at least 3)
Pattern Notes
The majority of the body of this shawl is worked in staggered V-stitches. This means the 2 legs of the V-st are worked in the space between two V-stitches. Like you see in Photo B above the pattern instructions.
Each chain stitch counts as a single stitch for skipped stitches, ie… the top of a V-st would count as 3 stitches.
Instructions
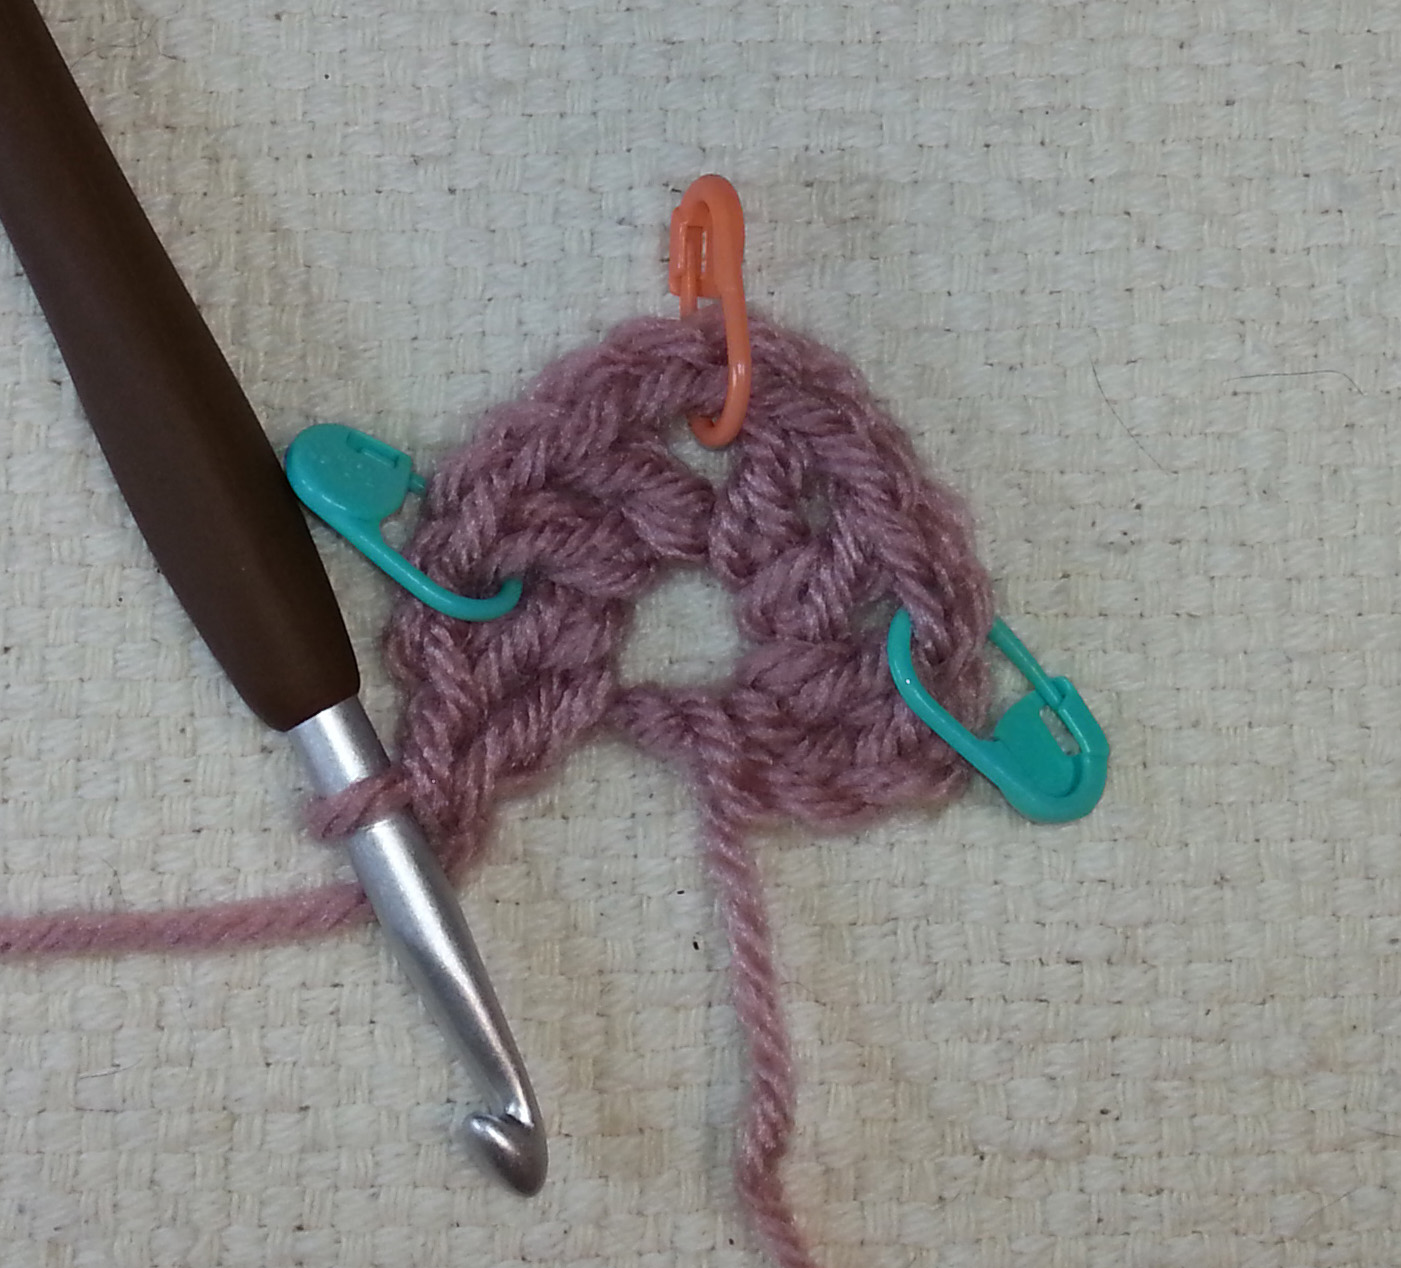
Row 1 completed
Row 1: Starting with an adjustable slip knot Ch 4 (counts as dc and center), ({dc, ch 1} 2 times, dc, ch 2, {dc, ch 1} 2 times, 2 dc) in fourth ch from hook. Place st markers in first and last ch-1 spaces, and in ch-2 sp. (4 ch-1 sp, 1 ch-2 sp, 8 dc)
Row 2 completed
Row 2: Ch 3, turn, sk first st, 2 dc next st, ch 1, V-st in marked ch-1 sp, move st marker to first ch-1 sp just made, sk 3 sts, (V-st, ch-2, V-st) in marked ch-2 sp, move st marker to ch-2 sp just made, sk 3 sts, V-st in marked ch-1 sp, ch 1, 2 dc in next st, move st marker to second ch-1 sp just made. (4 V-st, 4 dc, 2 ch-1 sp, 1 ch-2 sp, 1 ch-3)
Row 3 completed
Row 3: Ch 3, turn, sk first st, 2 dc next st, ch 1, V-st in marked ch-1 sp, move st marker to first ch-1 sp just made, sk 3 sts, V-st in space before next V-st, sk 3 sts, (V-st, ch 2, V-st) in marked ch-2 sp, move st marker to ch-2 sp just made, sk 3 sts, V-st in space before next V-st, sk 3 sts, V-st in marked ch-1 sp, ch 1, 2 dc next st, move st marker to second ch-1 sp just made. (6 V-st, 4 dc, 2 ch-1 sp, 1 ch-2 sp, 1 ch-3)
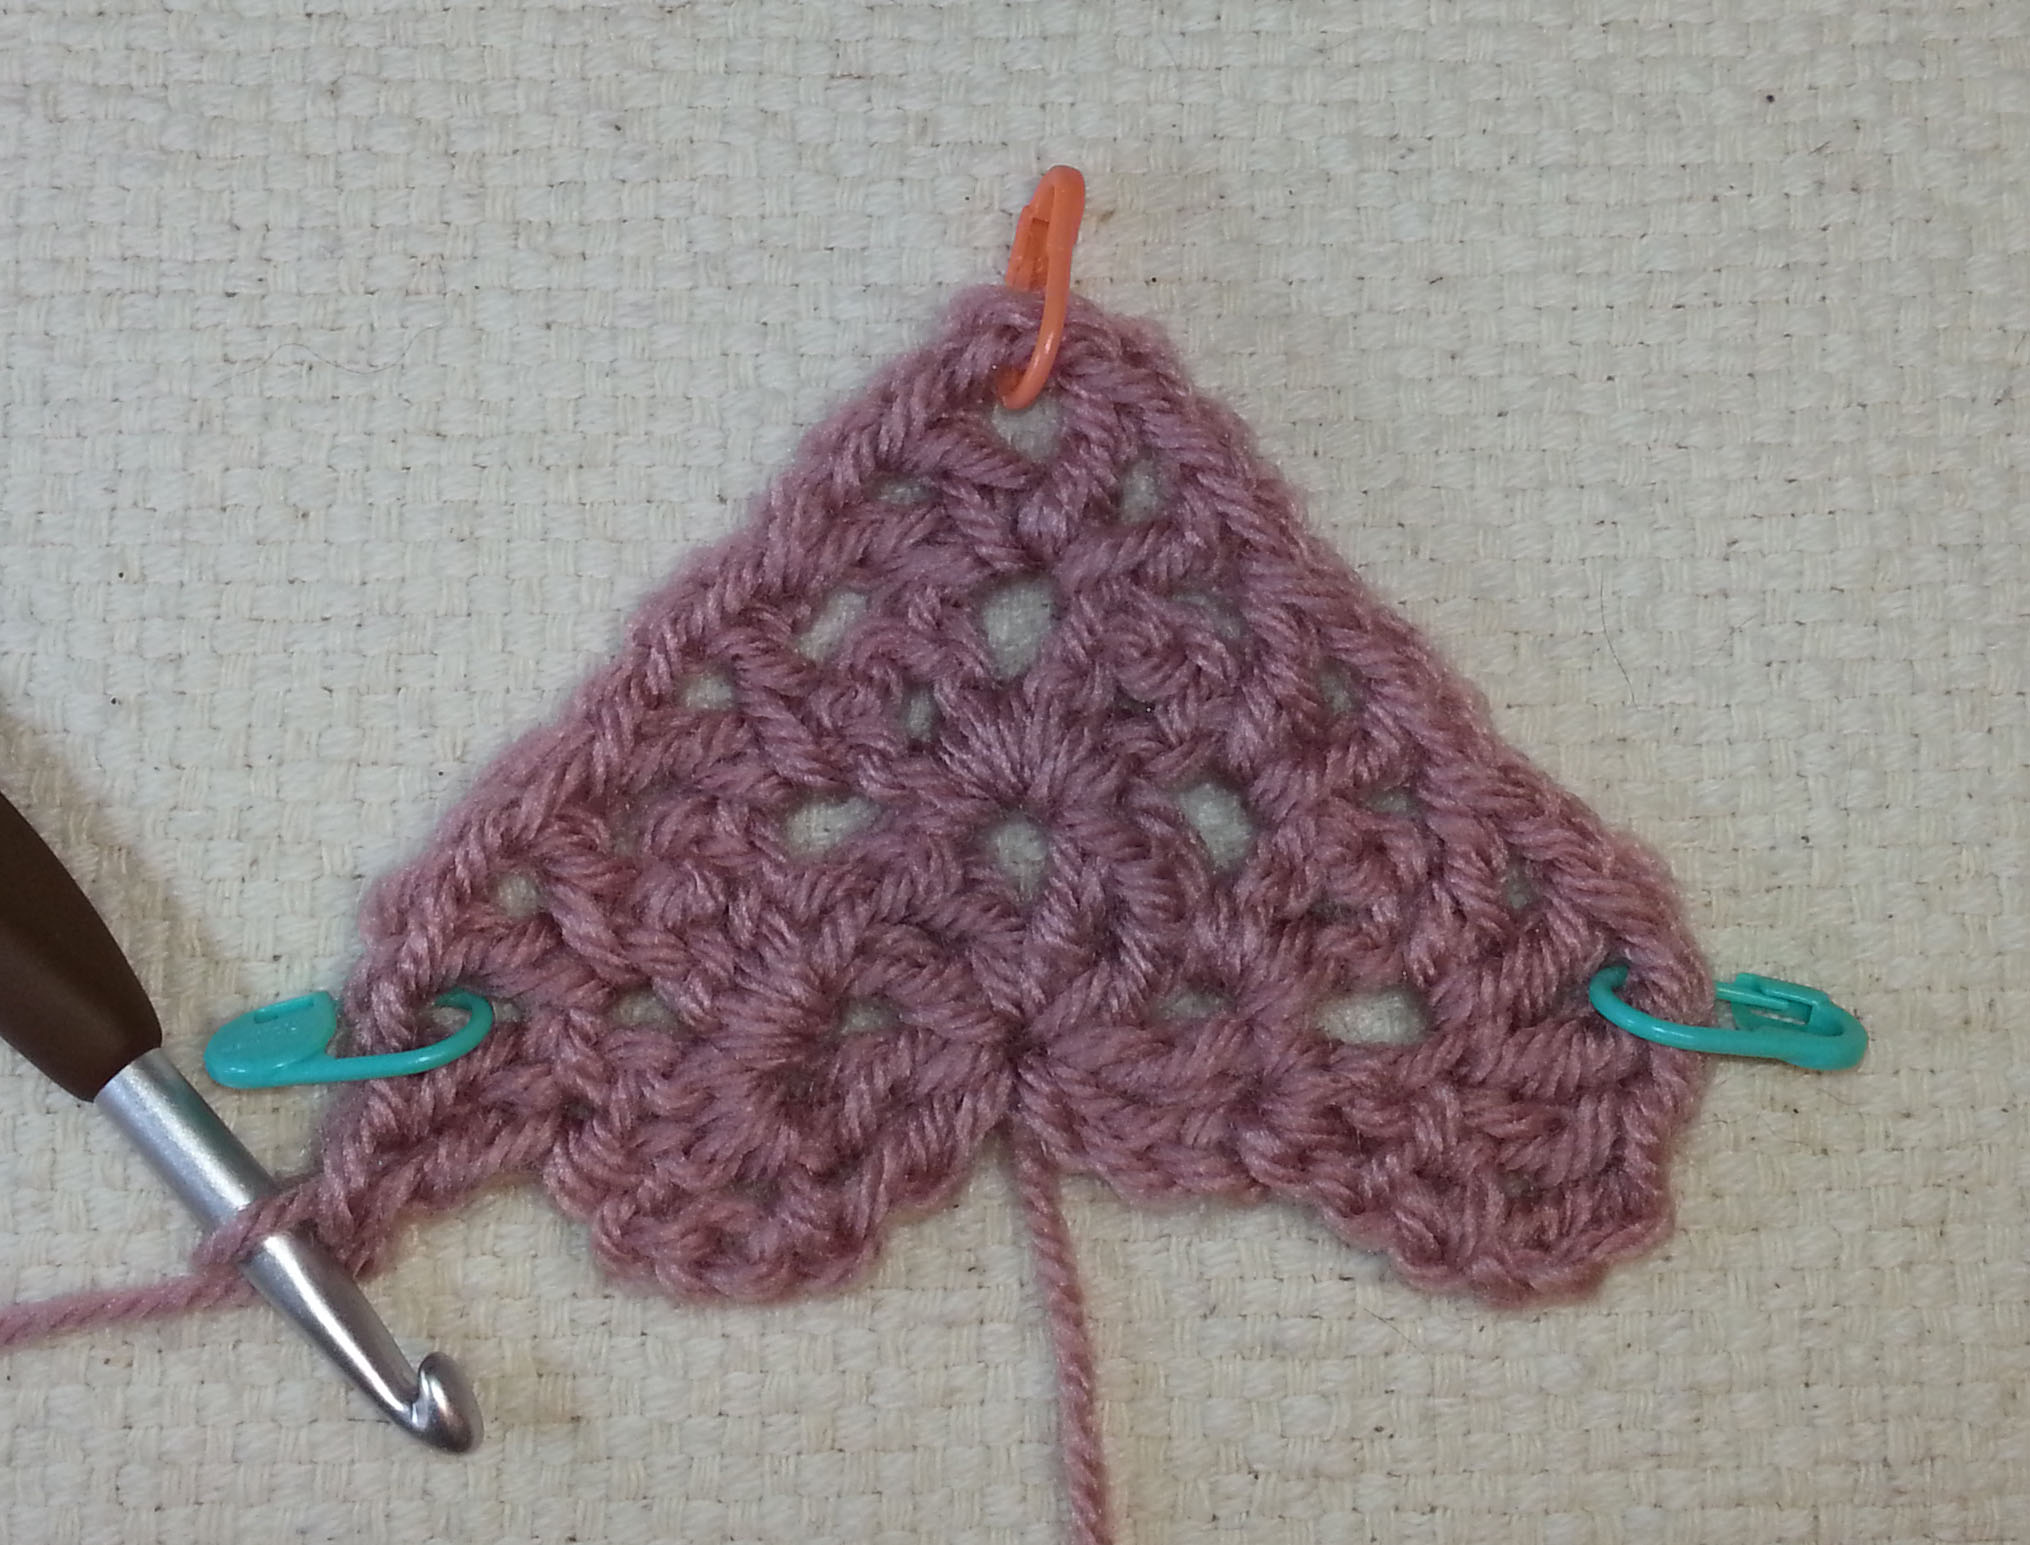
Row 4 completed
Row 4: Ch 3, turn, sk first st, 2 dc next st, ch 1, V-st in marked ch-1 sp, move st marker to first ch-1 sp just made, *sk 3 sts, V-st in space before next V-st*, repeat from * to * until reach V-st before marked ch-2 sp, (V-st, ch 2, V-st) in marked ch-2 sp, move st marker to ch-2 sp just made, repeat from * to * until reach V-st before marked ch-1 sp, V-st in marked ch-1 sp, ch 1, 2 dc in next st, move st marker to second ch-1 sp just made. (8 V-st, 4 dc, 2 ch-1 sp, 1 ch-2 sp, 1 ch-3)
Repeat Row 4 until reach the desired length, you will need to end on an even numbered row to set up for the scalloped border.
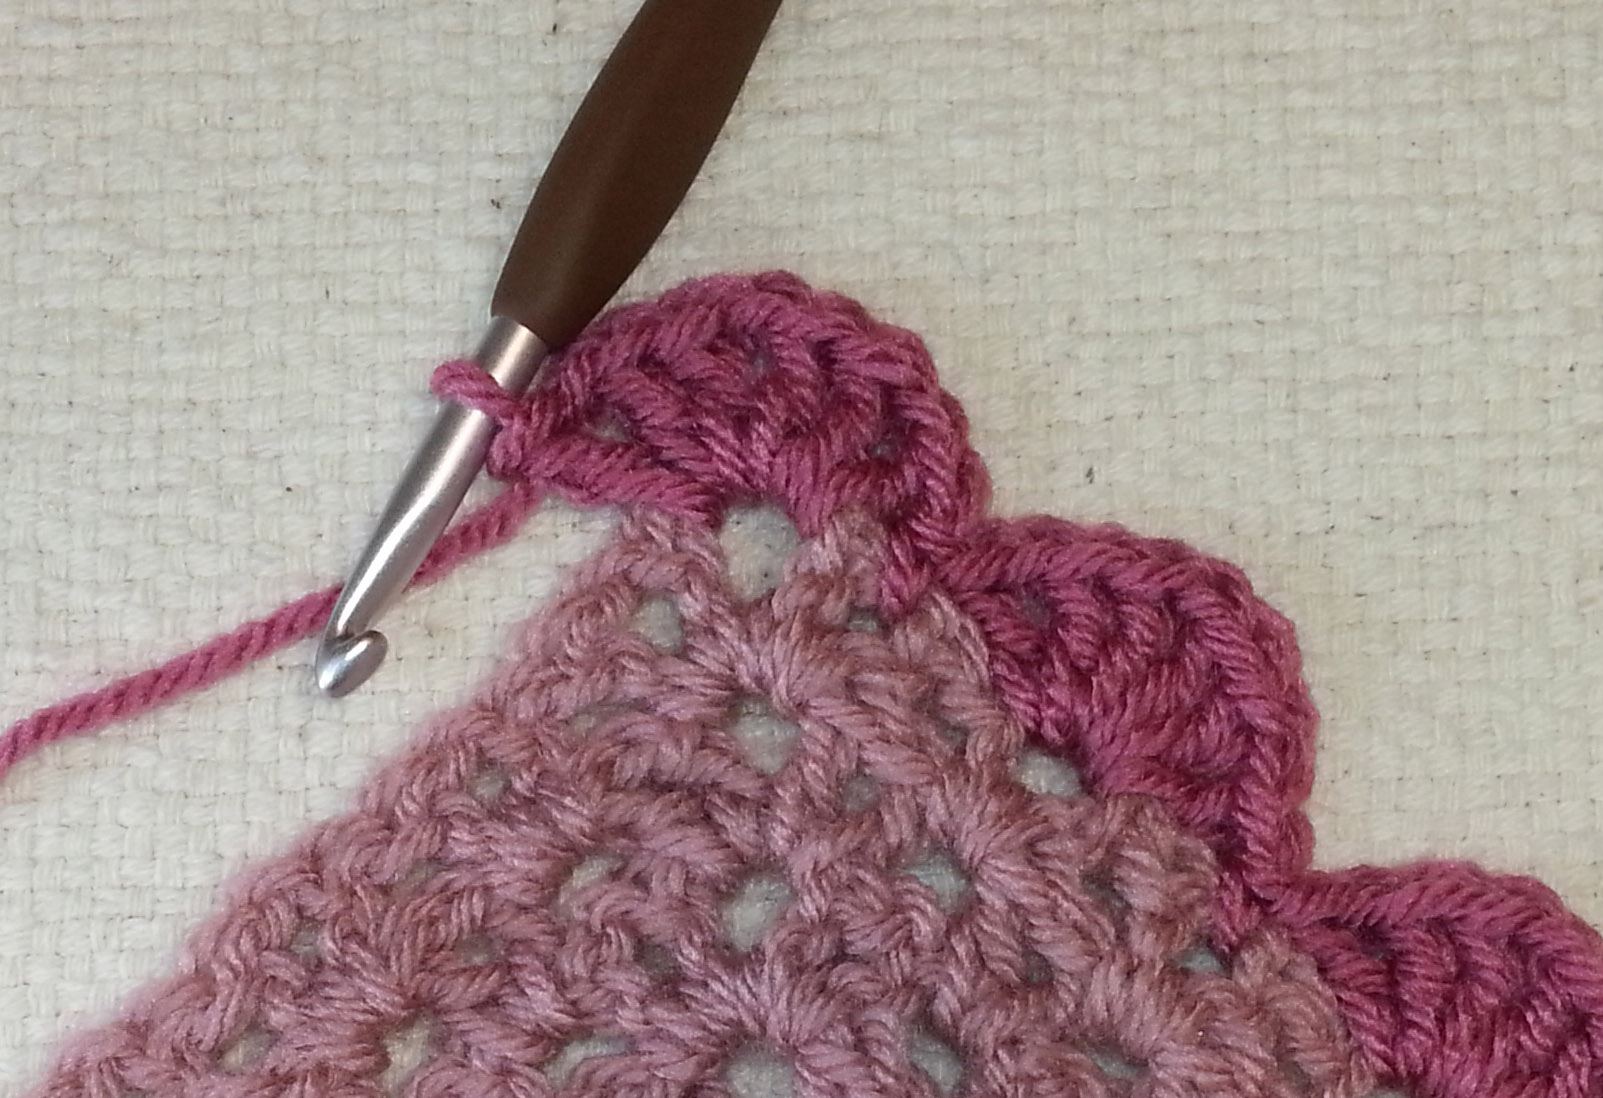
Border: I’ve shown the border worked it a different color to make it stand out clearer in the photos, you can continue in the same color as the body of the shawl or use a contrasting color.
Ch 3, turn, sk first st, 2 dc next st, ch 1, sk 2 sts, 2 V-st in next ch-1 sp,
* sk 2 sts, **sc in next ch-1 sp, sk 2 sts, 3 V-st in next ch-1 sp*,
repeat from * to * until one V-st remains un-worked before marked ch-2 sp,
sk 2 sts, sc in next ch-1 sp, sk 1 st, 3 V-st in marked ch- 2 sp, sk 1 st, repeat from ** to * once,
repeat from * to * until 2 V-st remain un-worked before marked ch-1 sp at end of row,
sk 2 sts, sc in next ch-1 sp, sk 2 sts, 2 V-st in next ch-1 sp, ch 1,
sk 2 sts, 2 dc next st.
Fasten off. Weave in tails. Gently block if desired.
I also have a video available for this pattern on my YouTube channel. Click here to see it.
Now it’s your turn to get creative. Have fun experimenting with different textures and weights of yarn to create a shawl that is just right for you. Check thru your yarn stash and see if you have a mixture of similar weight yarn in harmonizing colors that you could combine in your shawl.
One of the things that I have always felt challenged by when crocheting is adding in new yarn when I reach the end of my working ball of yarn. After years of fiddling with it I have picked my favorite way to join new yarn, and I’m going to show it to you today.
Many folks will tell you to only join yarn at the end or beginning of a row of stitches. That is great advice and often times you can get it to work out. But if you are frugal like myself, you want to use every inch of yarn you can in the project and having excessively long tails left over can be frustrating. Not to mention that you can end up running short of yarn at the end of your project.
The method of joining I like does take a little finessing. My mom would say, “You have to hold your mouth just right.” Basically I join the yarn thru a stitch.
This works especially well if you are joining the same color yarn in the middle of a row. I generally want to pick a stitch that has a regular stitch before and after it, instead of a chain stitch. This gives me a good spot to weave in the tails afterward. Of course sometimes you don’t have that that option because your stitch pattern is lacy with a lot of chain spaces. If that is the case try to pick a spot that has a good place to weave in ends. You want to approach the problem a bit strategically.
When I am looking at how I’ll weave in my ends I think about how I want my fabric to move. If I’m making a bag or sculptural piece with solid dense stitches, fabric movement isn’t all that vital. But if I am making a hat or fingerless mitts I don’t want to restrict the stretch of my fabric. For garments I think about how the fabric will move with the body.
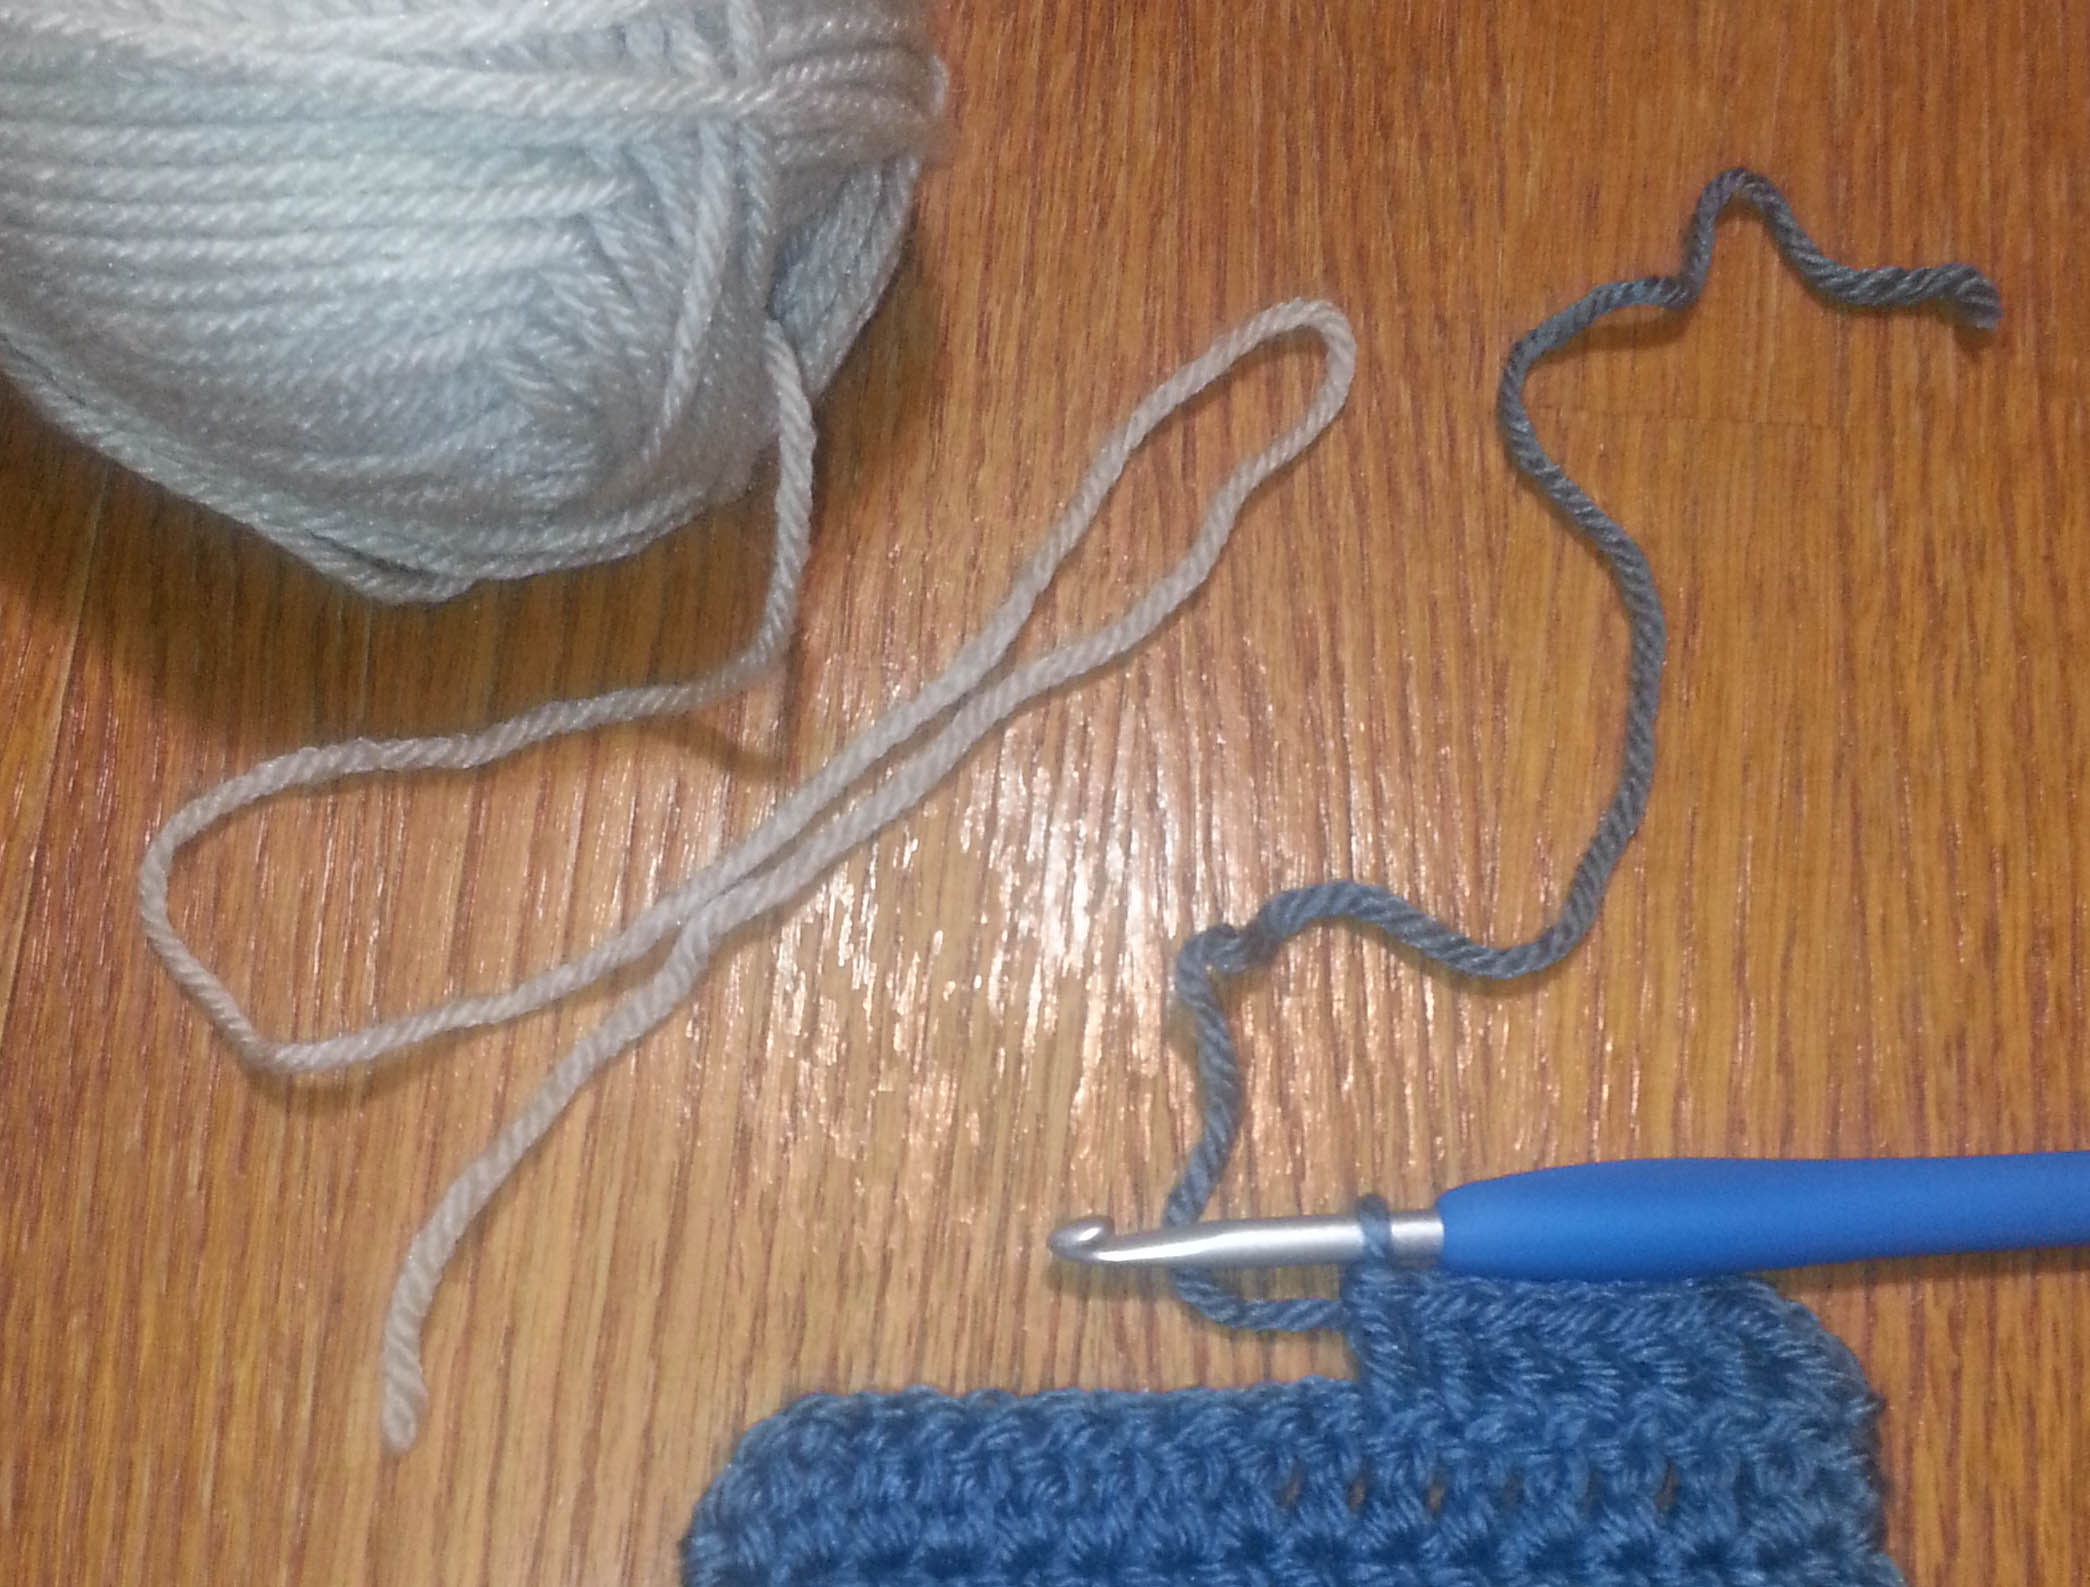
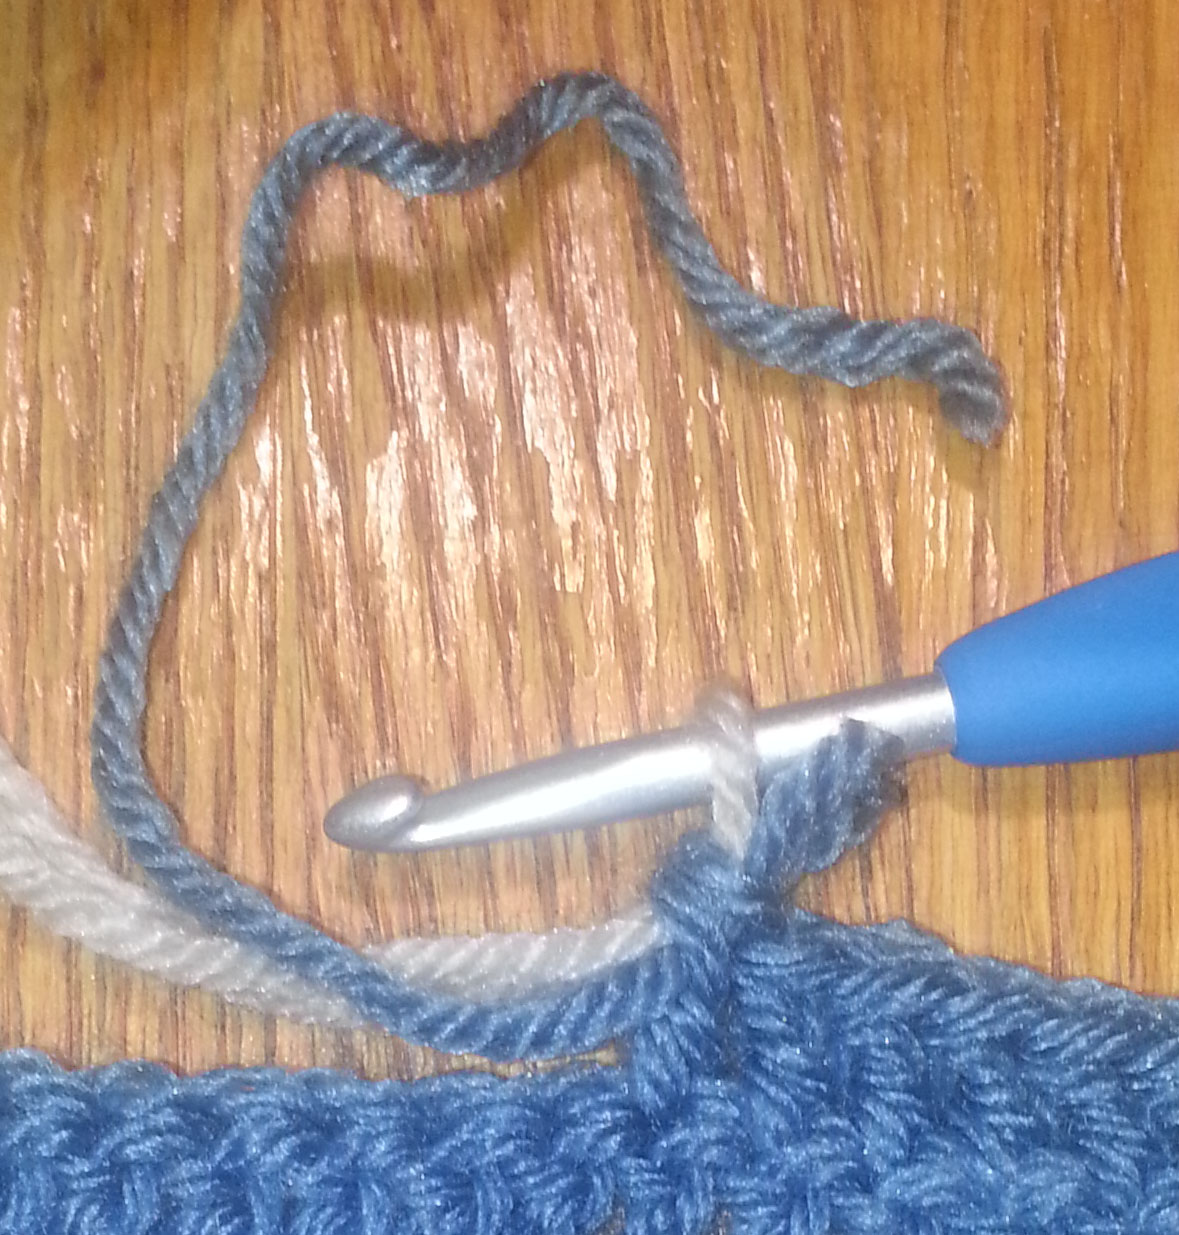
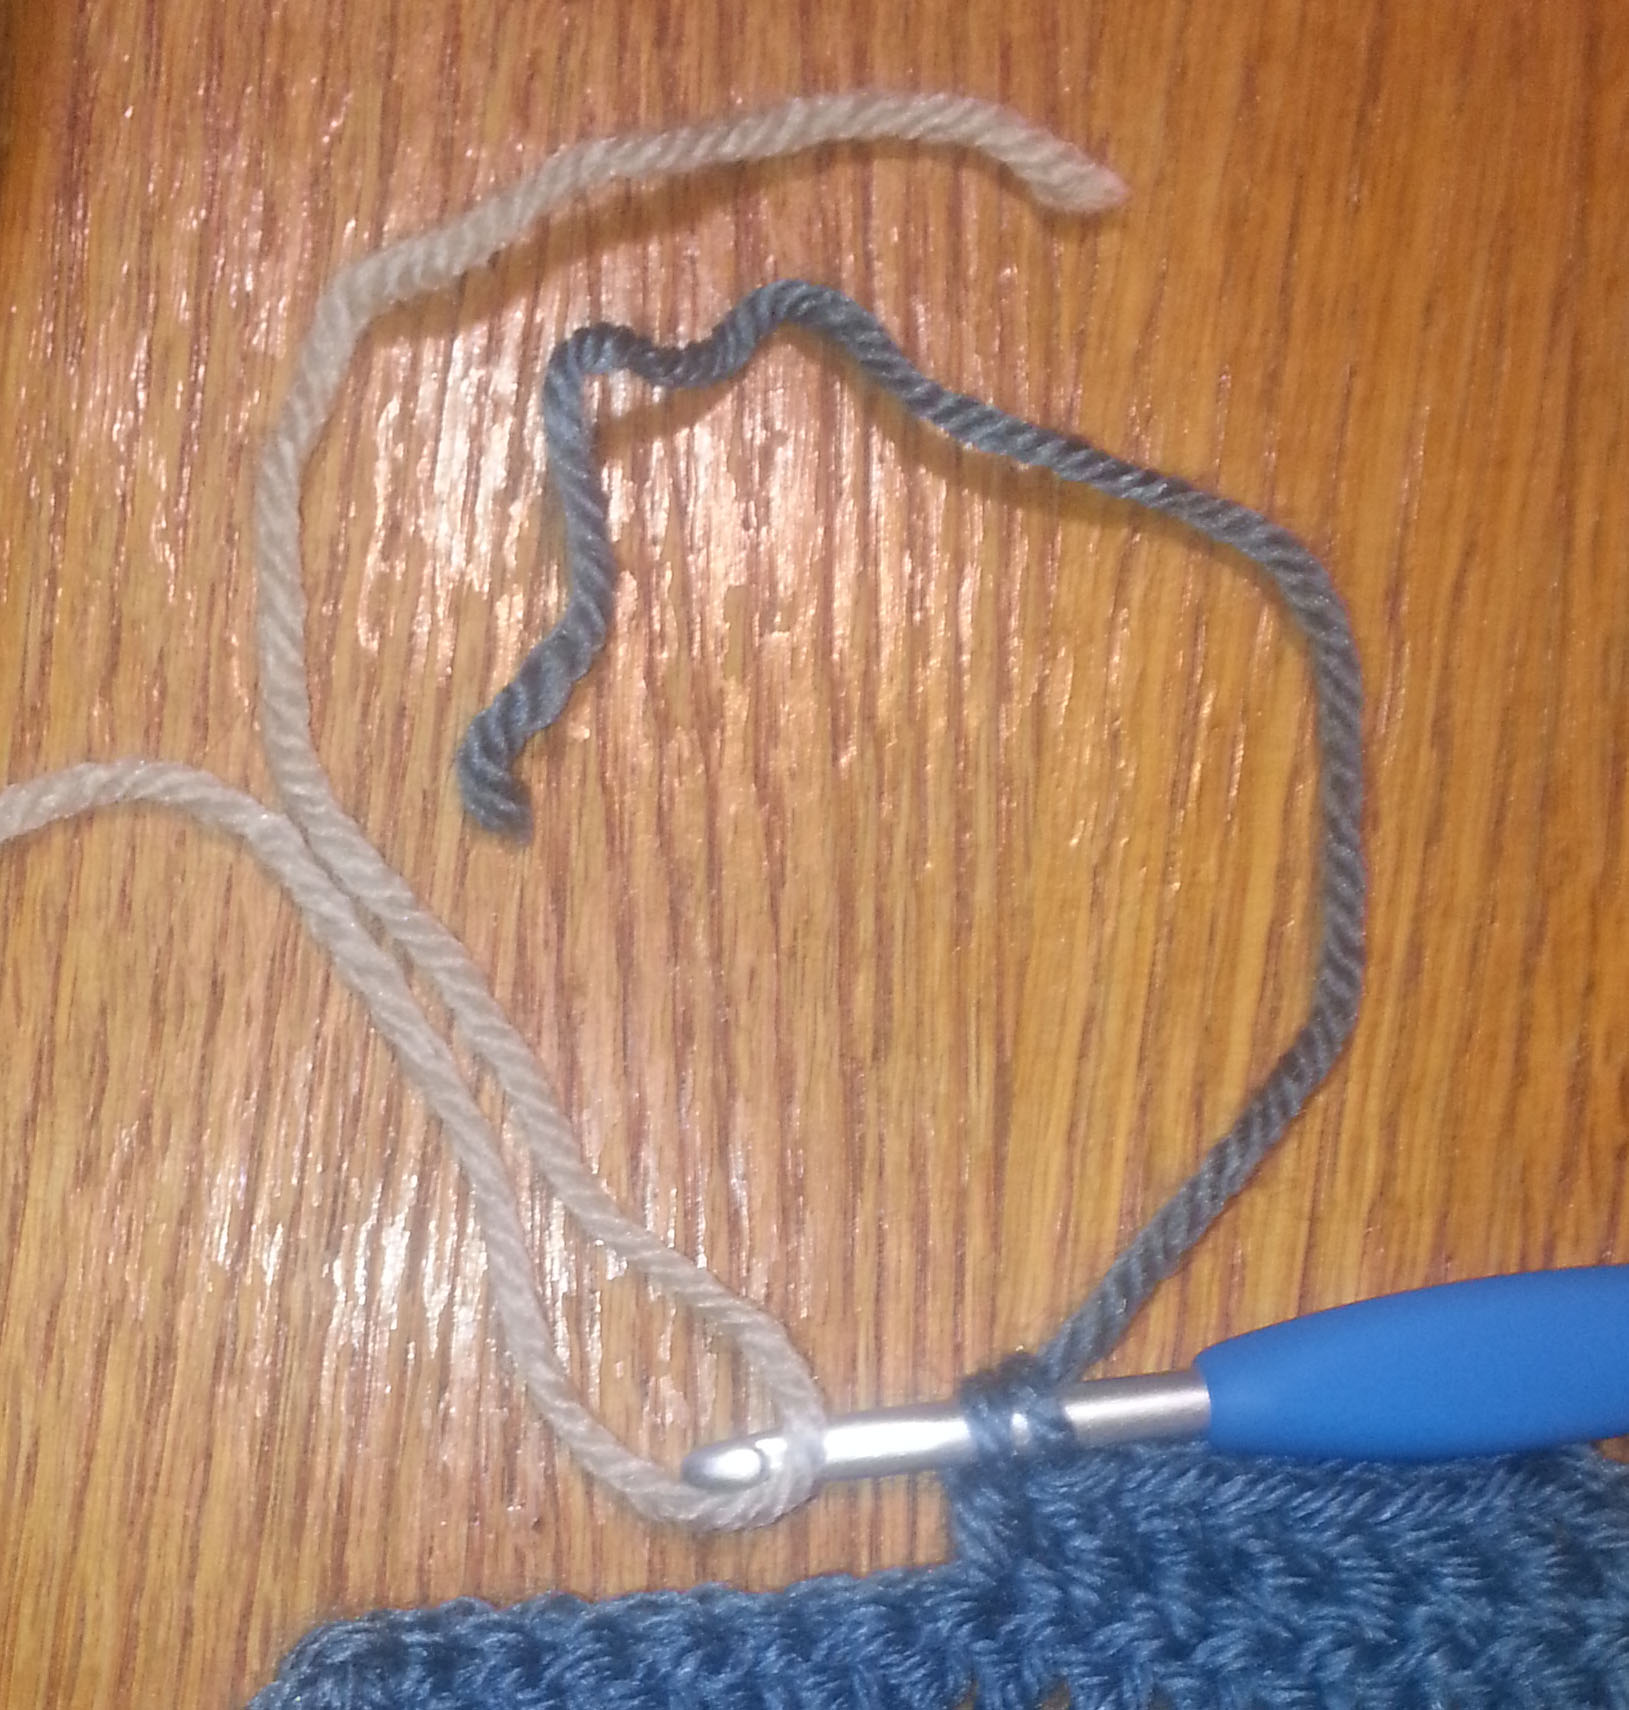
So now we’ve figured out where we want to place our join in our stitch pattern. It’s time to learn this join. I’m using 2 colors for these photos to make it easier to see the join. If you prefer seeing this demonstrated in a video check my “Joining New Yarn” on my YouTube Channel. In the photo above I’ve crocheted into my row of double crochet stitches until I have about 8-10 inches of yarn left.
I have 2 options of how to complete this join. Both ways involve the same start. Fold the end of your new yarn so that there is a 6 inch tail before the fold. Six inches is my standard tail length I leave, that gives me enough to weave in without fuss, yet short enough I don’t have a lot of waste.
I start my next double crochet stitch with my ending tail. Yarn over, insert in next stitch, Yarn over, pull up a loop, yarn over, pull thru 2 loops on hook, yarn over, (here’s where the fun starts) lay the fold in the end of your new yarn over the hook behind the loop nearest the throat of your hook,
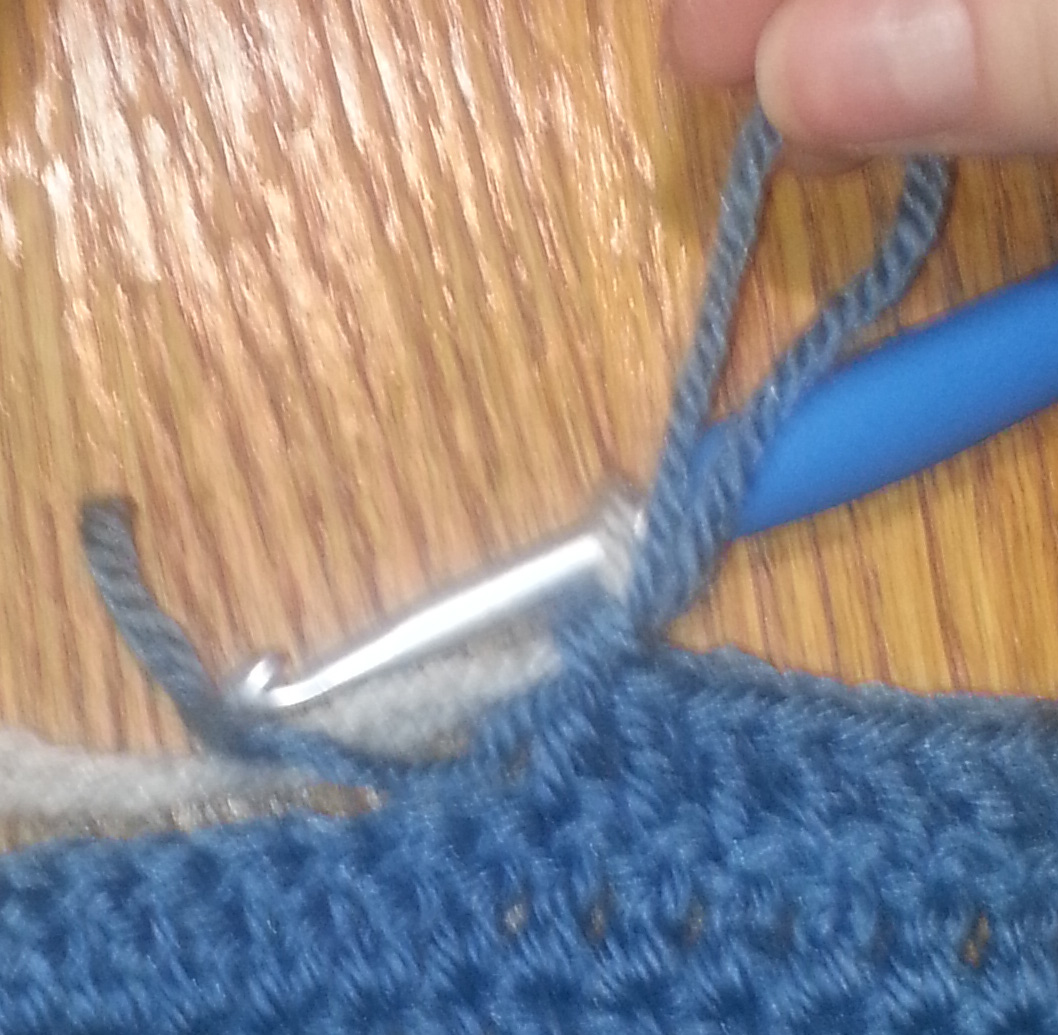
Pull your last yarn-over and the new yarn thru the final 2 loops on your hook, this is the part where you have to hold your mouth just right. You’ll have 2 loops on your hook once the double crochet stitch is completed. If you’ve pulled the yarn thru right the back loop is your old yarn and the front loop is the new yarn.
Extend the loops and remove hook
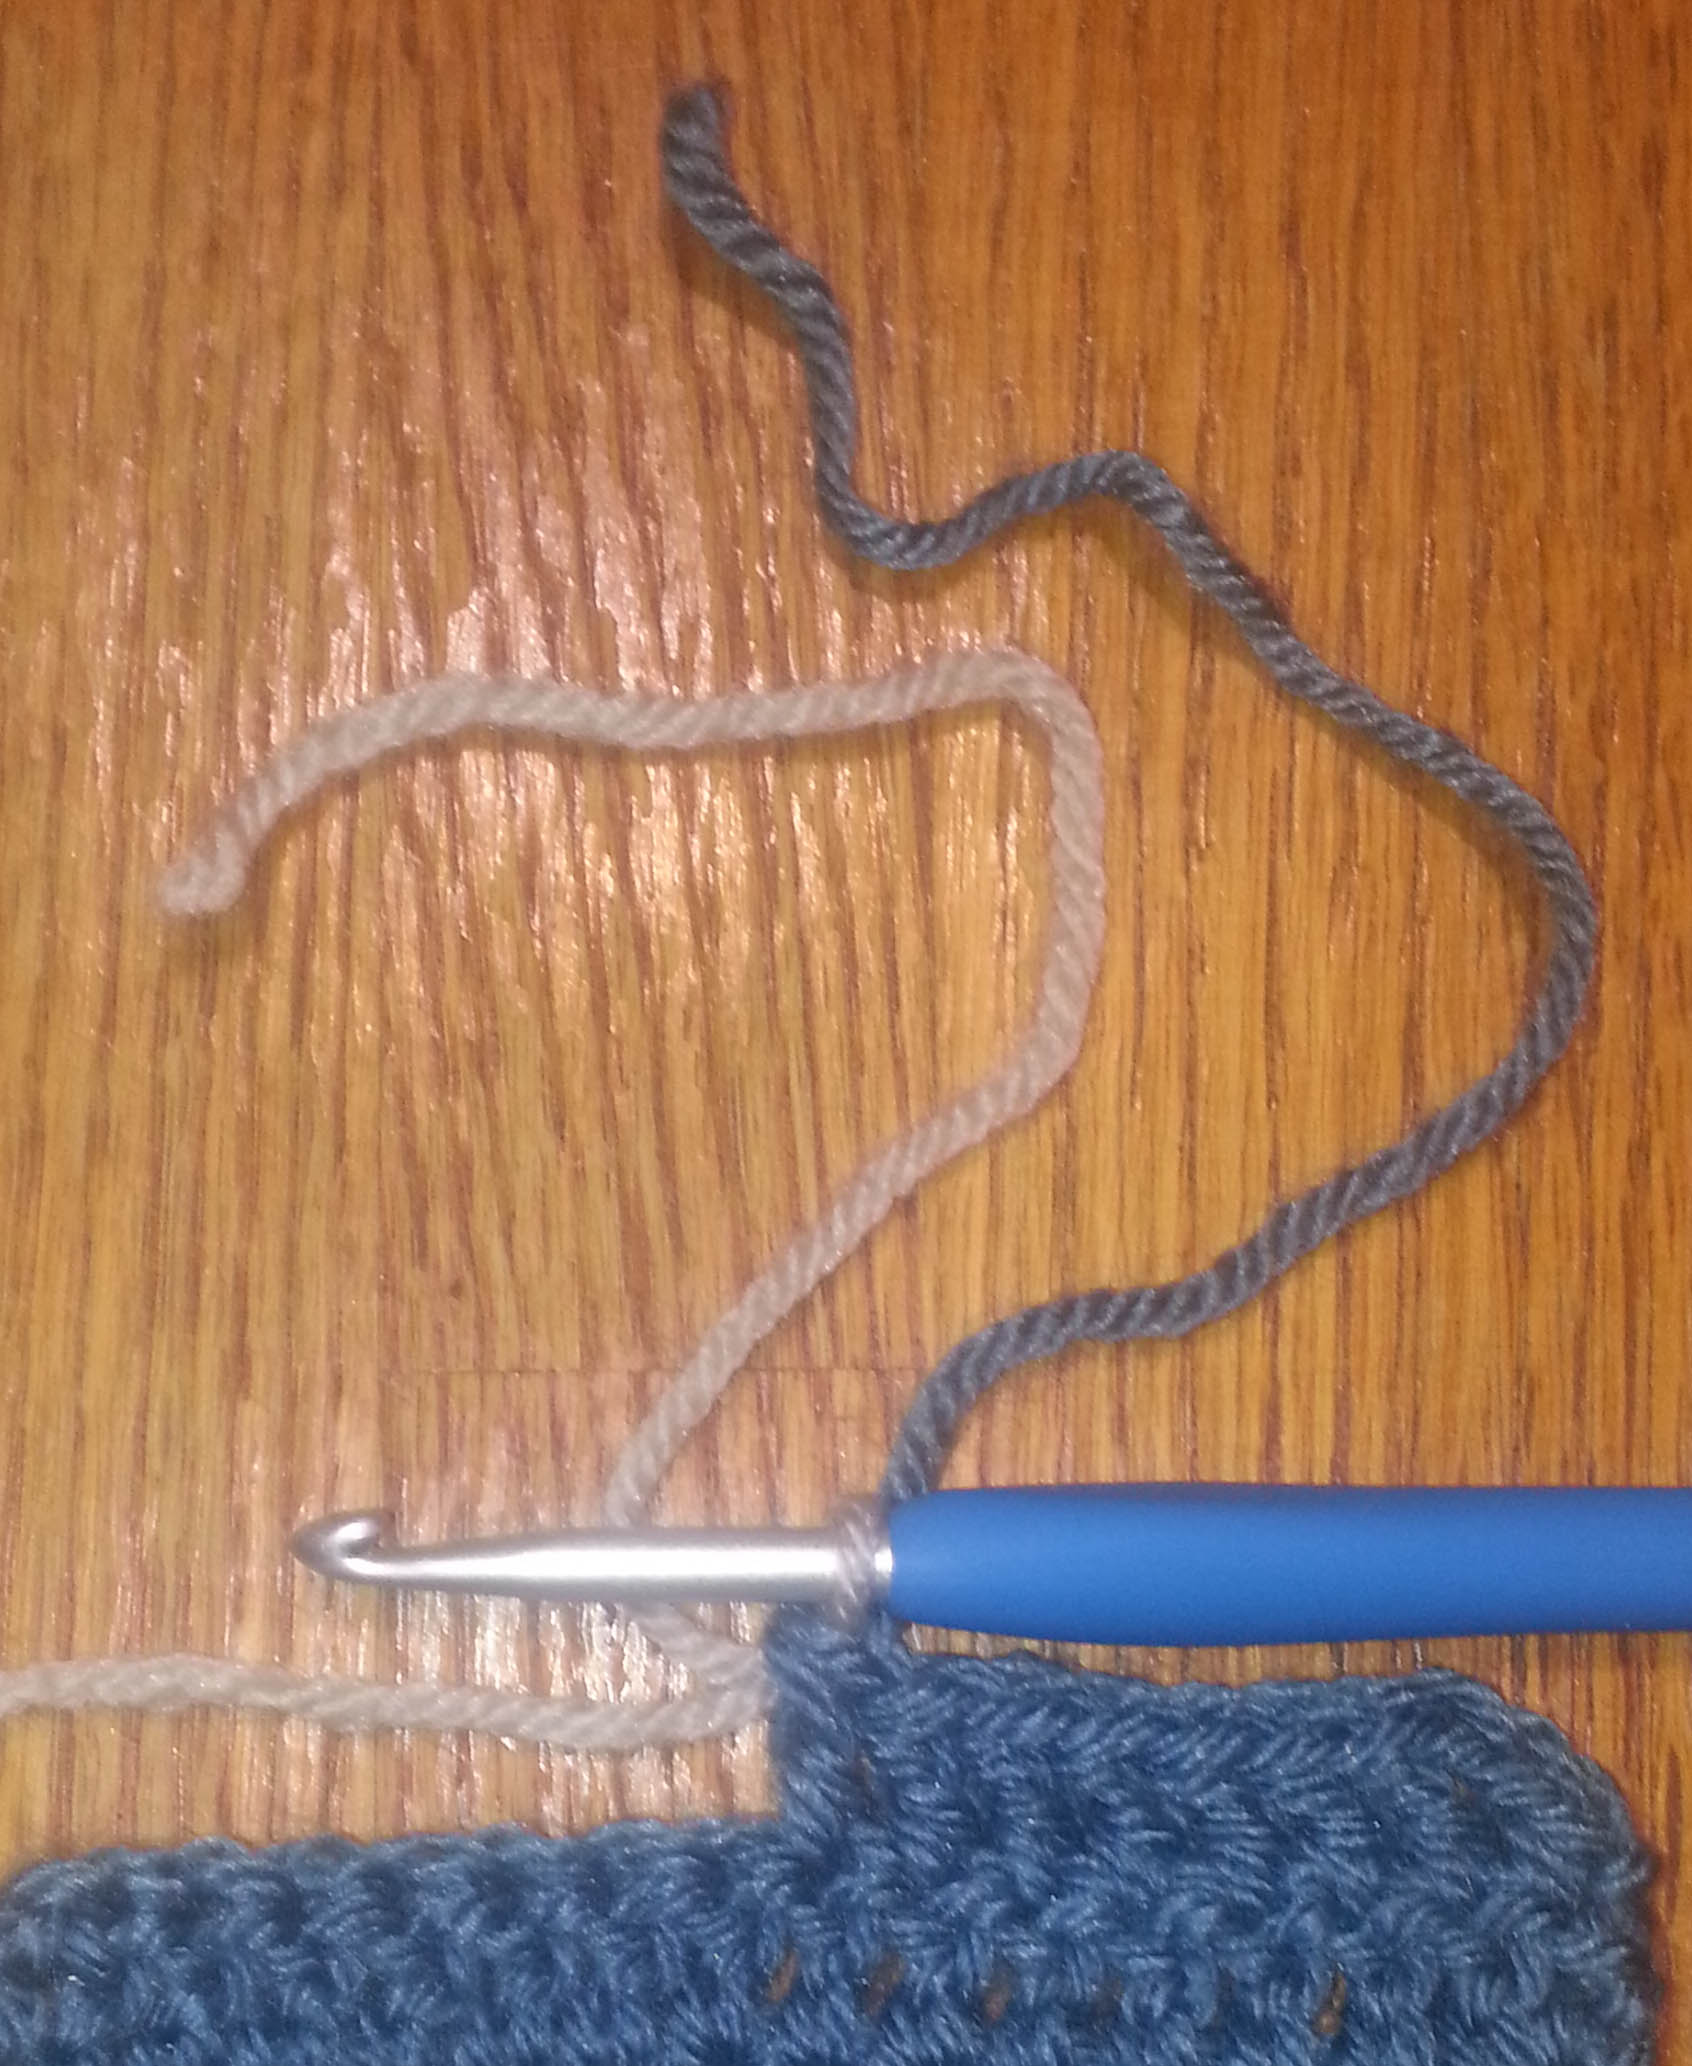
Replace hook in new yarn loop and
Pull up old yarn loop until end comes thru top of stitch.
Move the old yarn tail to the back of your work and gently pull the new yarn tail to snug the loop on the hook.
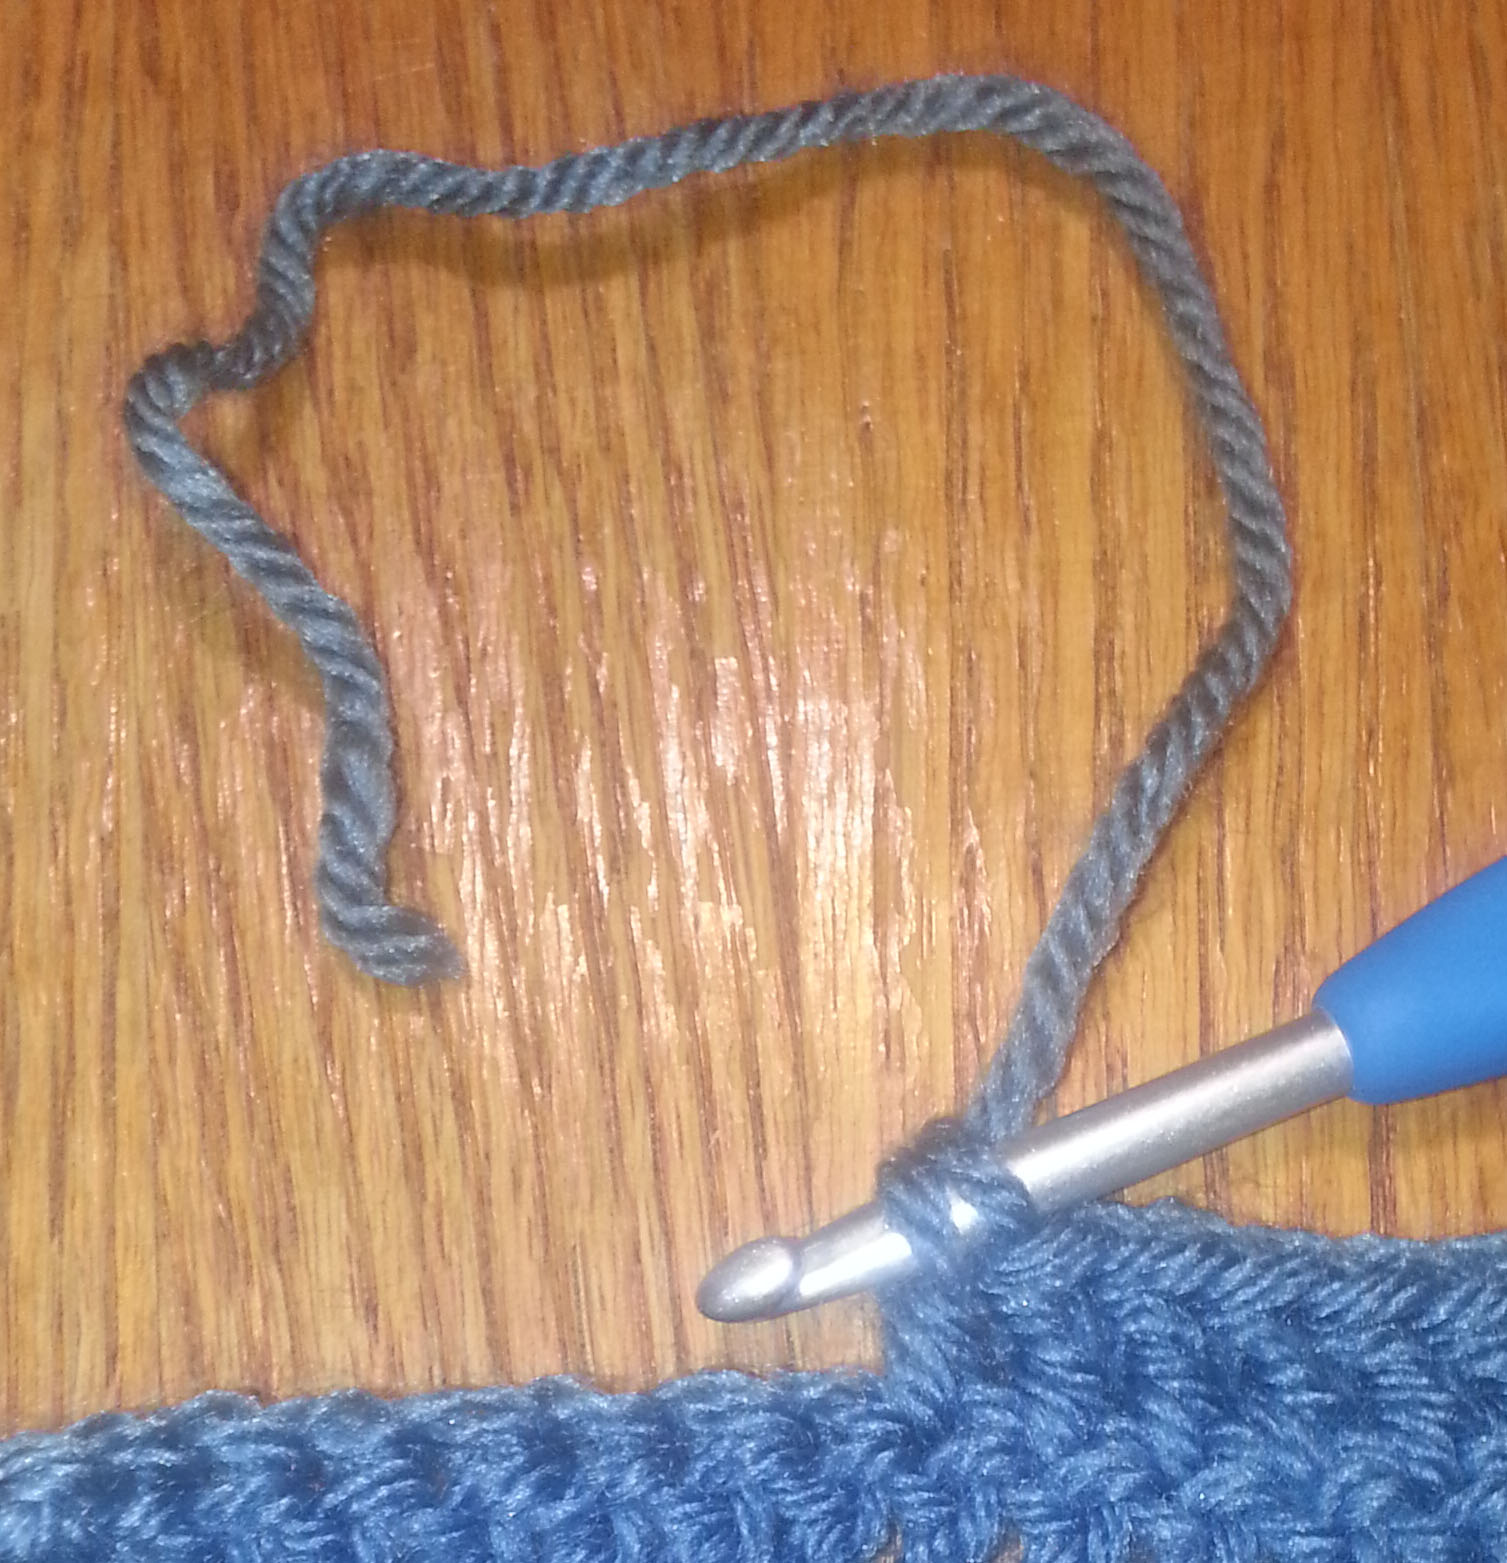
Hold the new yarn tail and the old yarn tail out of your way as you begin crocheting with the working yarn from the new ball of yarn. I hold the tails with my hook hand to keep even tension on the yarn as I work.
A modification of this join is to re-insert you hook into the top of the stitch you are joining thru. First complete the last stitch in the old yarn, pulling the last yarn over thru the last 2 loops on your hook and continue pulling that loop until the tail comes out the top of the stitch. Re-insert your hook thru those last 2 loops again.
Then place the new yarn on the hook and pull thru a loop. Move the tails to your hook hand and you are ready to crochet with the new yarn.
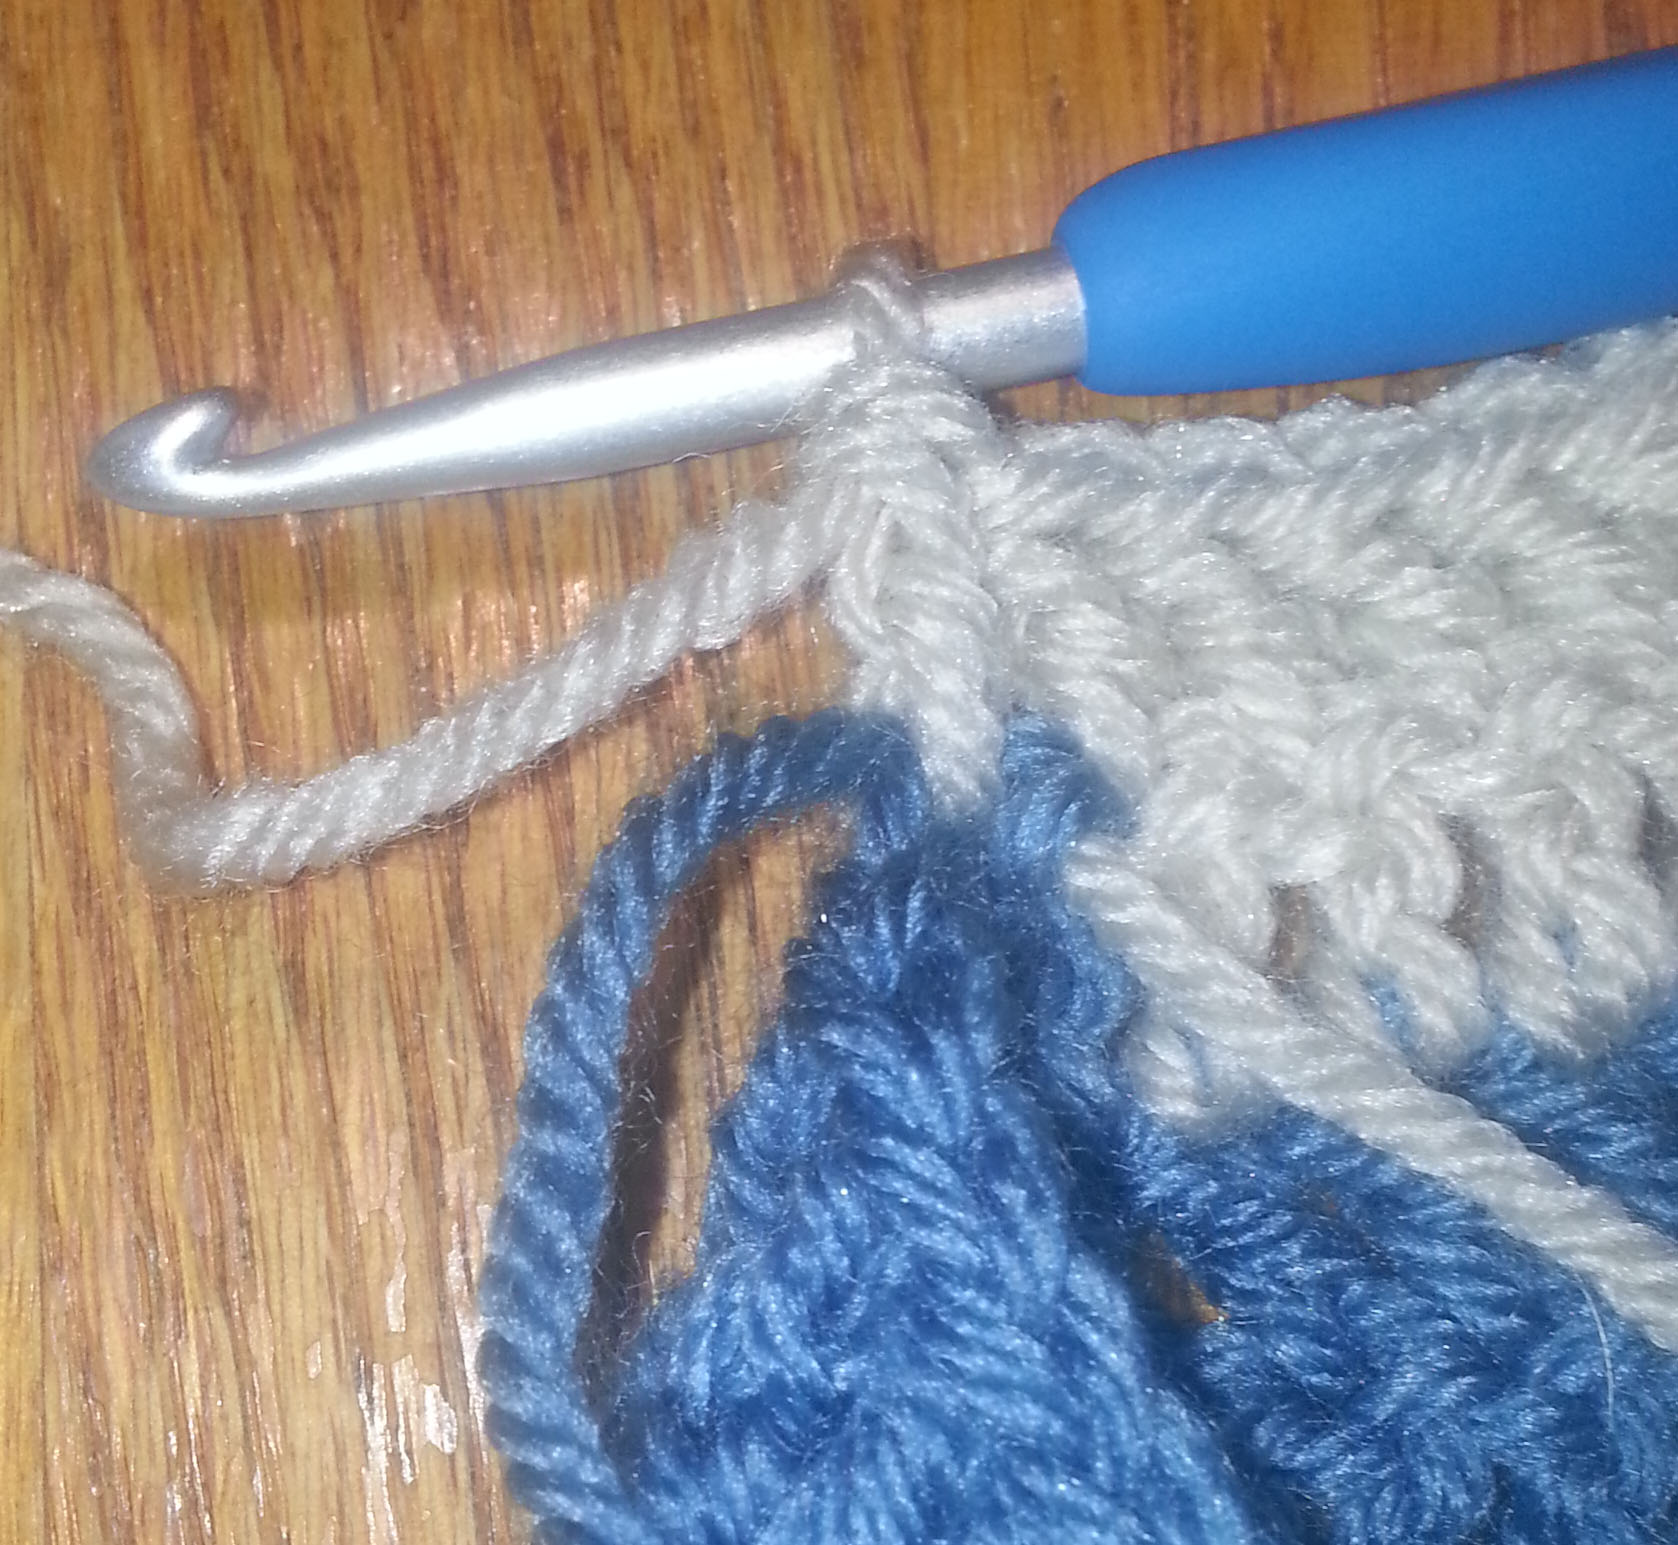
Once I have crocheted back to where I joined the new yarn I like to catch the old yarn tail with the stitch worked into the joining stitch.
I lay the old yarn tail across the top of the stitch and work into the top of the stitch and over the tail. If my fabric doesn’t need to be very flexible I may work a couple of stitches over the tail.
Typically though, I only work one stitch and then weave the tail up the next stitch (A) when I weave my tails. I weave the new yarn tail up thru the stitch before (B) my “catching” stitch.
That is my favorite joining method when adding new yarn of the same color to a project. I’m sure I didn’t invent this join and some of my readers may have come across it before. There are many ways to join yarn in a project, this one just works best for me. Give it a try and see what you think.
This week I’m finishing up a big project that is still in the super secret phase. But I managed to squeeze in some time playing with a few small thread design ideas.
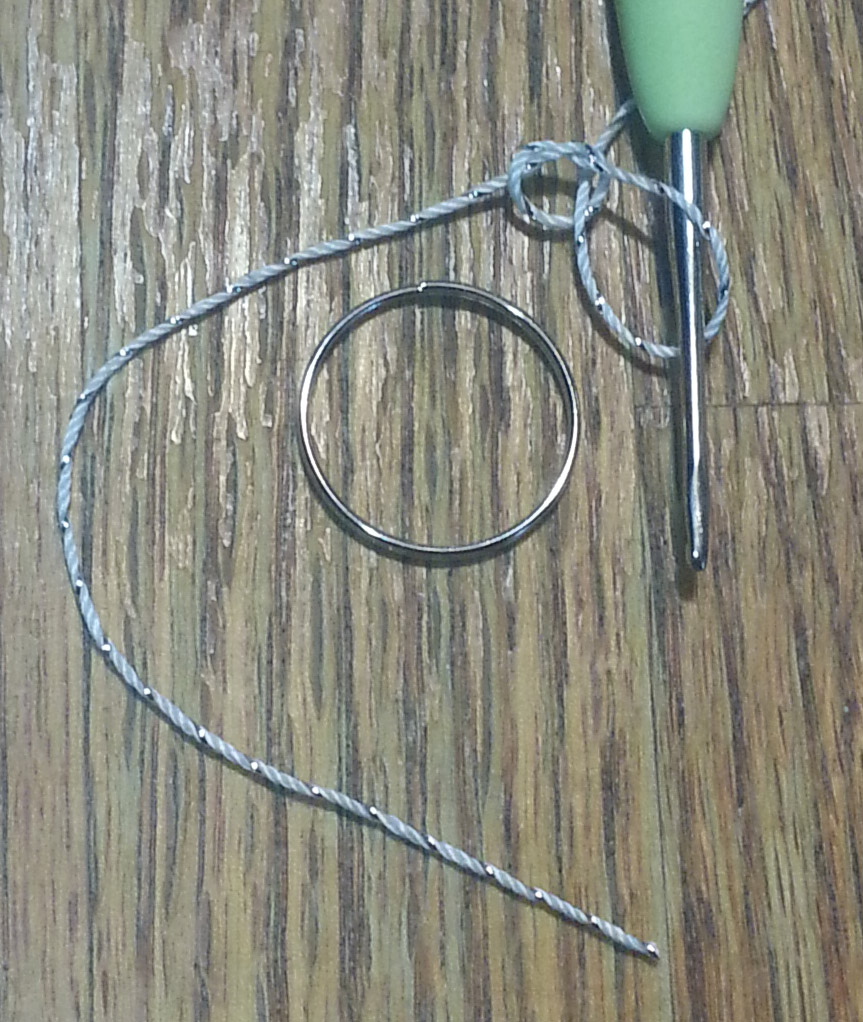
I love Size #10 Crochet Cotton Thread for making small sculptural pieces. Especially jewelry. So I dug out a ball of Aunt Lydia’s metallic thread that I had in the stash for this earring idea.
I had acquired these split rings at my local hobby/craft store a while back. I like using a light weight ring to crochet around to lend a bit of stability to my earrings. These rings are 20mm, which is sort of a Goldilocks range in diameter size for jewelry.
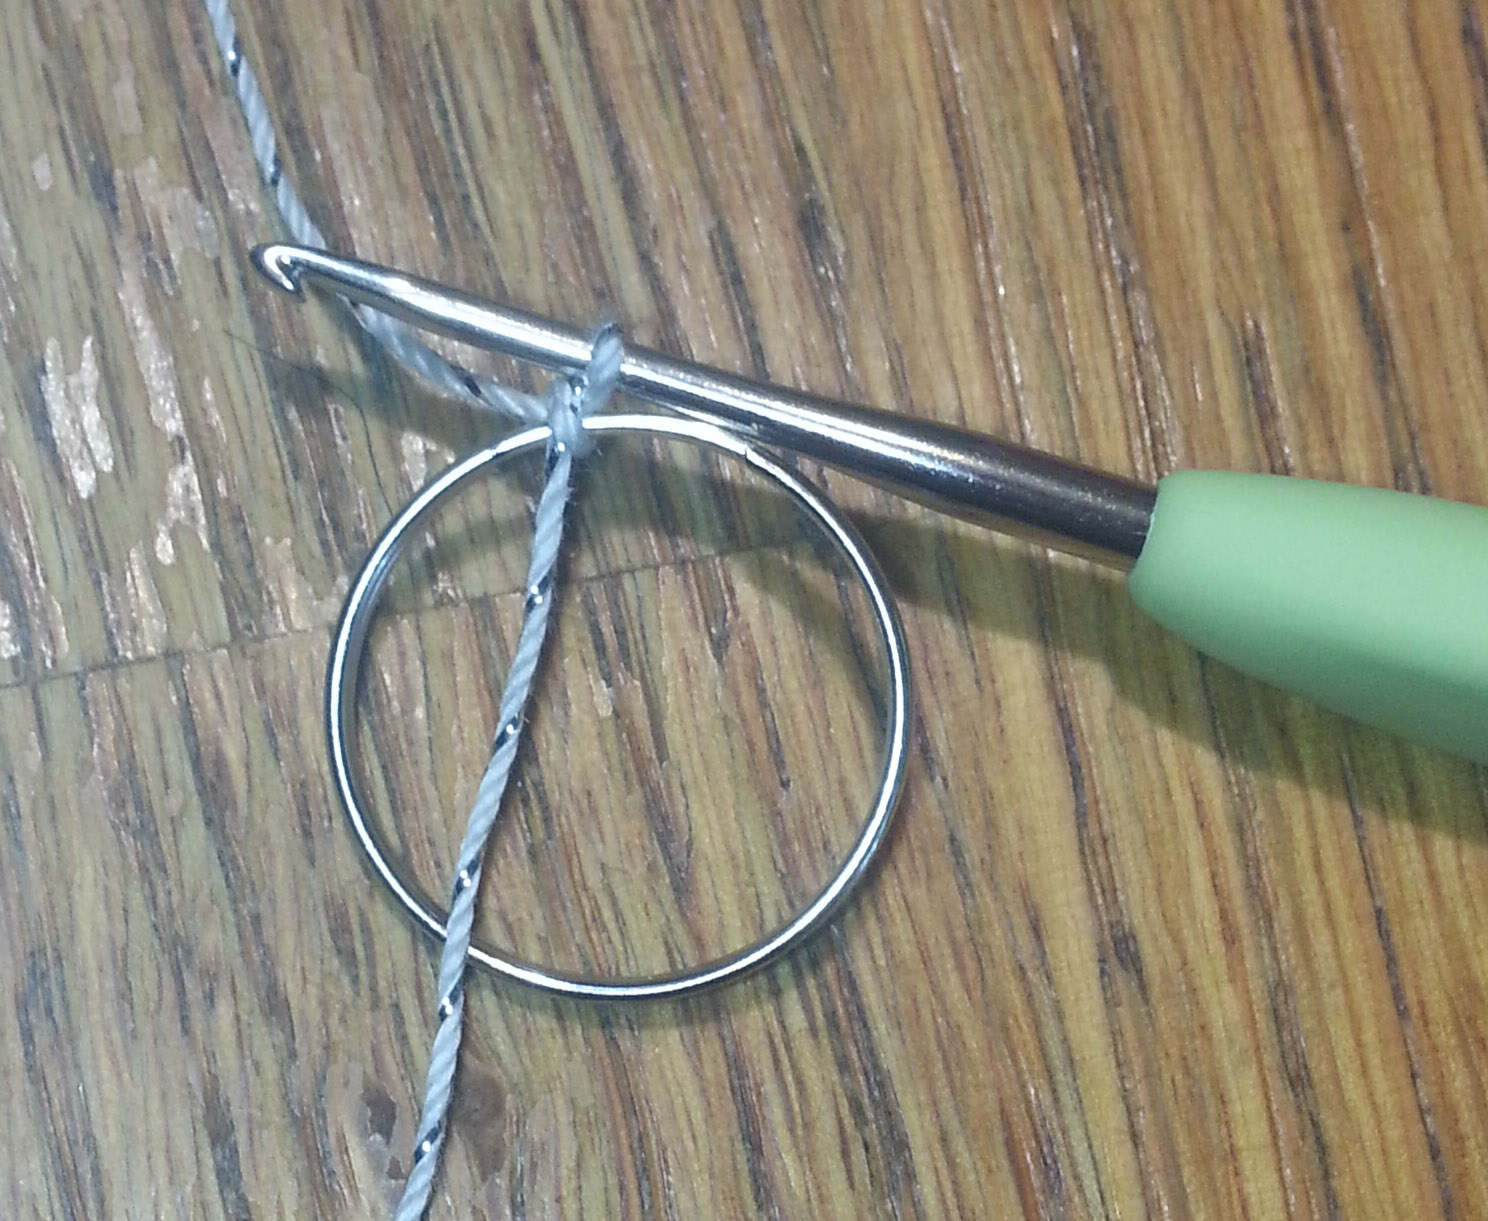
I’ve experimented with a variety of ways to attach the thread to my rings over the years and my favorite method is to capture the ring in the beginning slip knot. If you are using a split ring this is super easy.
Start your slip knot by forming your “knot” loop and pulling thru your first working loop, but don’t tighten up the “knot” loop completely.
Slide the opening of the “knot” loop unto your split ring and
keep sliding it until it is around all the wire of your ring.
Tighten up the “knot” loop, and snug the working loop on the shaft of your hook, you are ready to start your project.
Next Tuesday is the start of National Crochet Month and we are going to be having a really fun month all about crochet, including a couple of new patterns on the blog and in my Ravelry shop. Starting with the pattern for these earrings.
The double crochet stitch (or treble if you are using UK terminology) is a very useful stitch. Once you have gotten comfortable with this stitch you can make a lot of the more advanced stitch patterns in crochet. The double crochet stitch is usually the 3rd stitch most of us learn when we learn to crochet.
For those of you who haven’t tackled this stitch yet or who might need a refresher, I’ve made a photo tutorial of crocheting the Double Crochet stitch.
To start a double crochet you wrap the yarn over the hook once, creating 2 loops on the shaft of your hook: The working loop and the wrap.
Next insert your hook into the space or stitch indicated by your pattern.
Wrap the yarn over the hook again
and pull that loop thru the stitch or space you inserted your hook into.
Now you have 3 loops of yarn on the shaft of your hook.
Wrap the yarn over the hook and pull that loop thru 2 of the loops on the shaft of your hook.
That loop you pulled thru is now on the shaft of your hook, which give you 2 loops on the shaft.
Wrap the yarn over the hook once more and pull thru the remaining 2 loops on your hook.
You’ve completed your double crochet stitch and the loop remaining on your hook is your “working loop”.
Once you have the chain, slip stitch, single and double crochet stitches in your skill set there is a whole wide crochet world open to you. If you add the foundation single crochet and the half double crochet to that list there isn’t much that can stop you.
If you would like to practice your Double Crochet stitch you can make a scarf from my “Warming up Winter Simple DC Scarf” pattern available here on my blog. All the stitches you need for this scarf project are Chain, Single and Double Crochet.
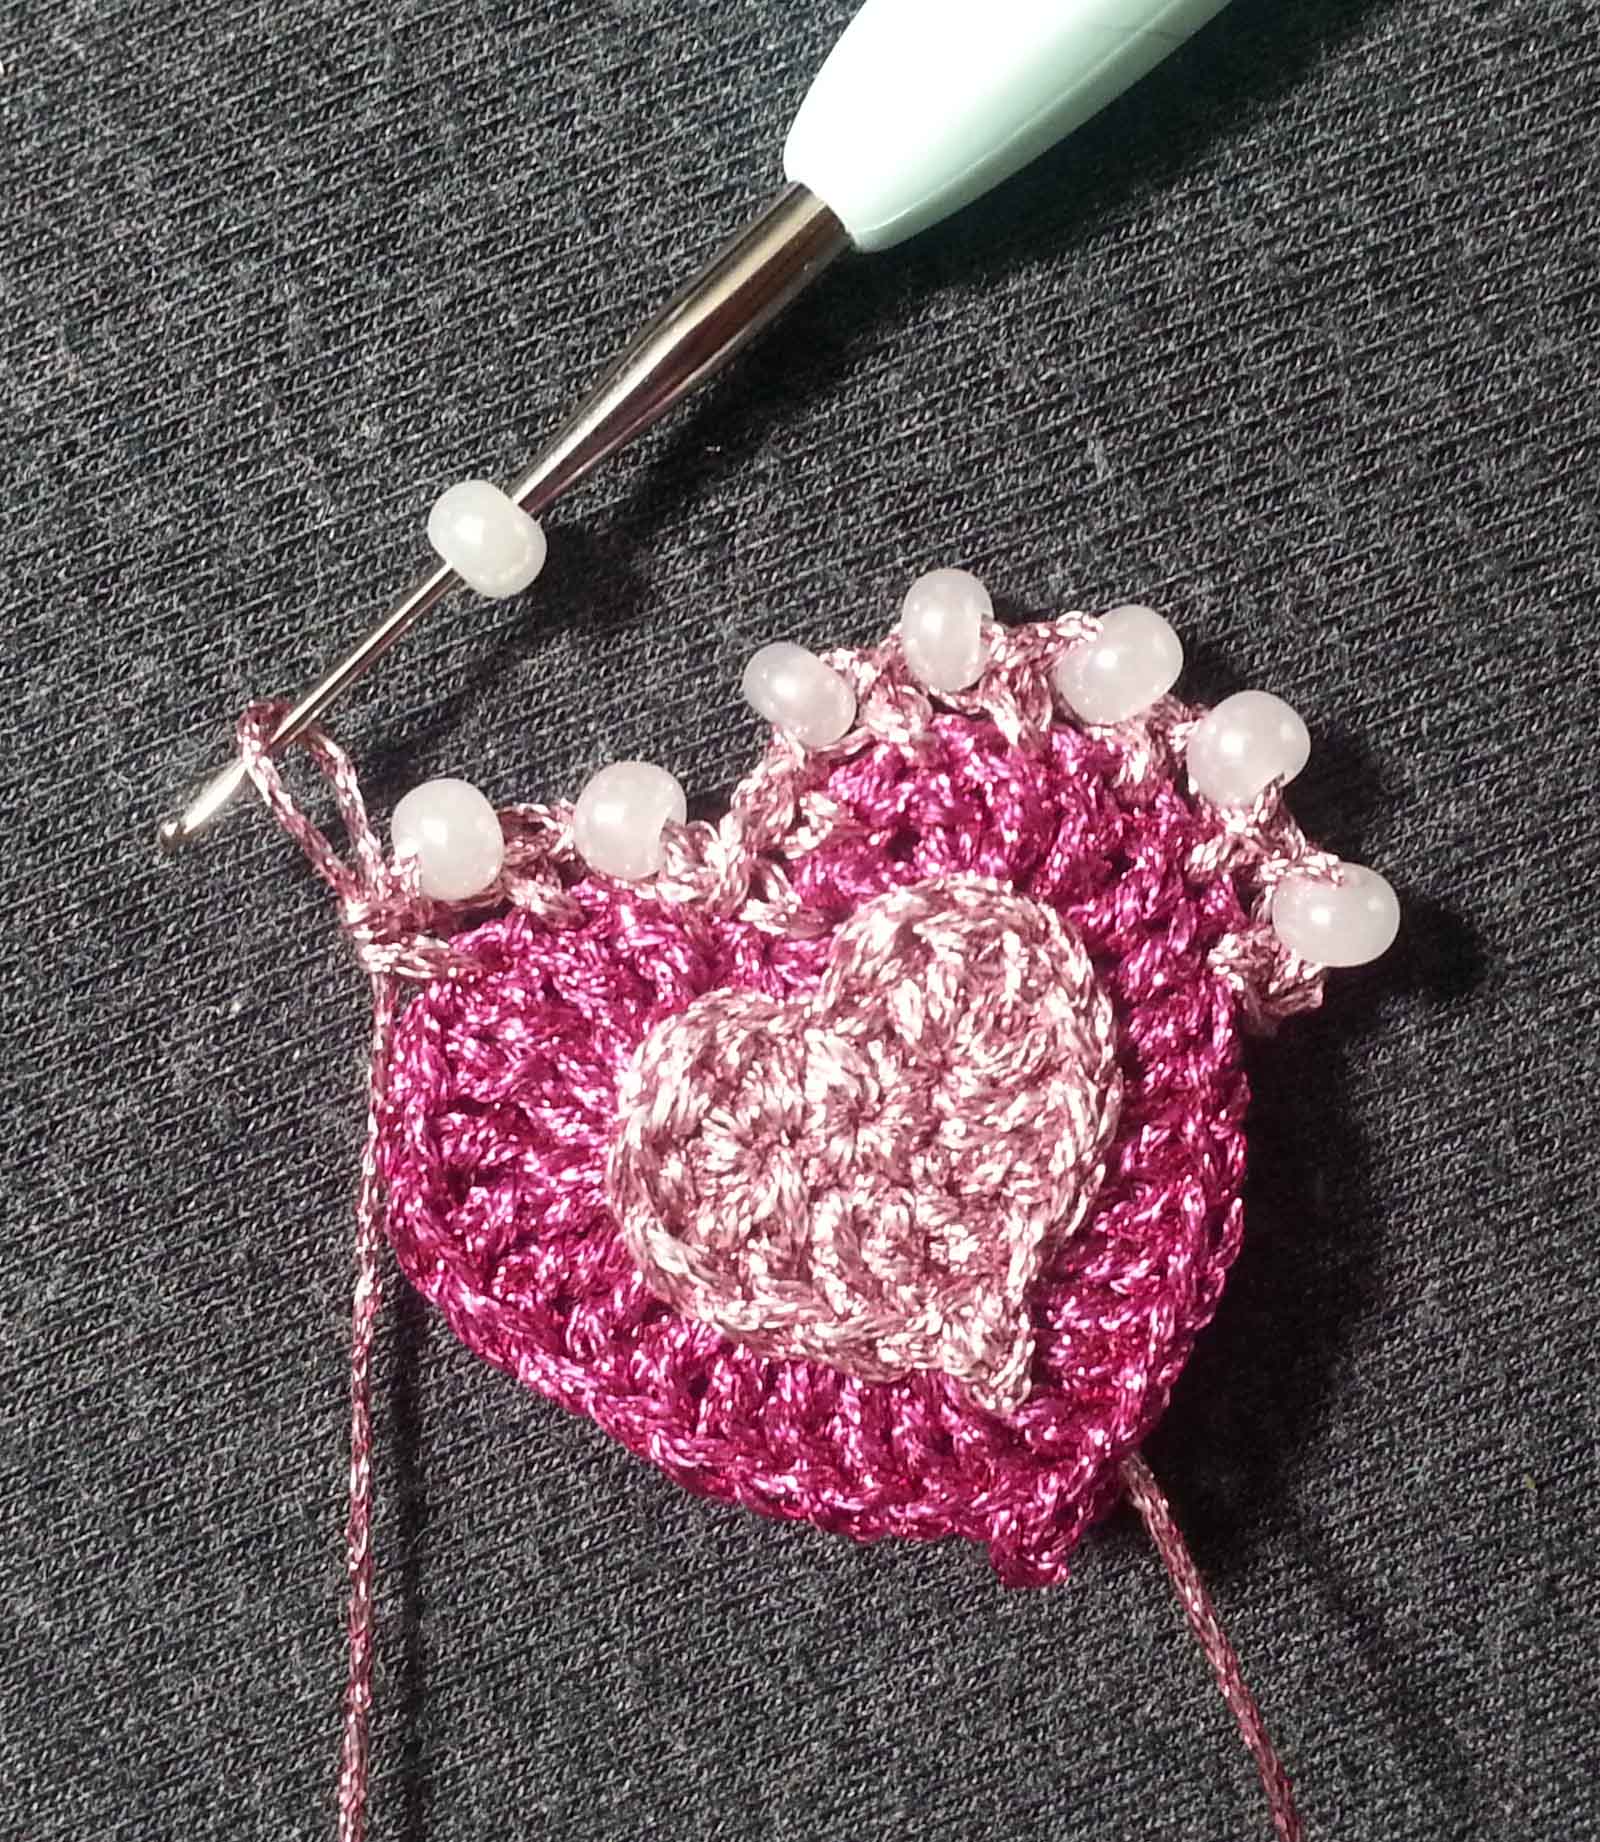
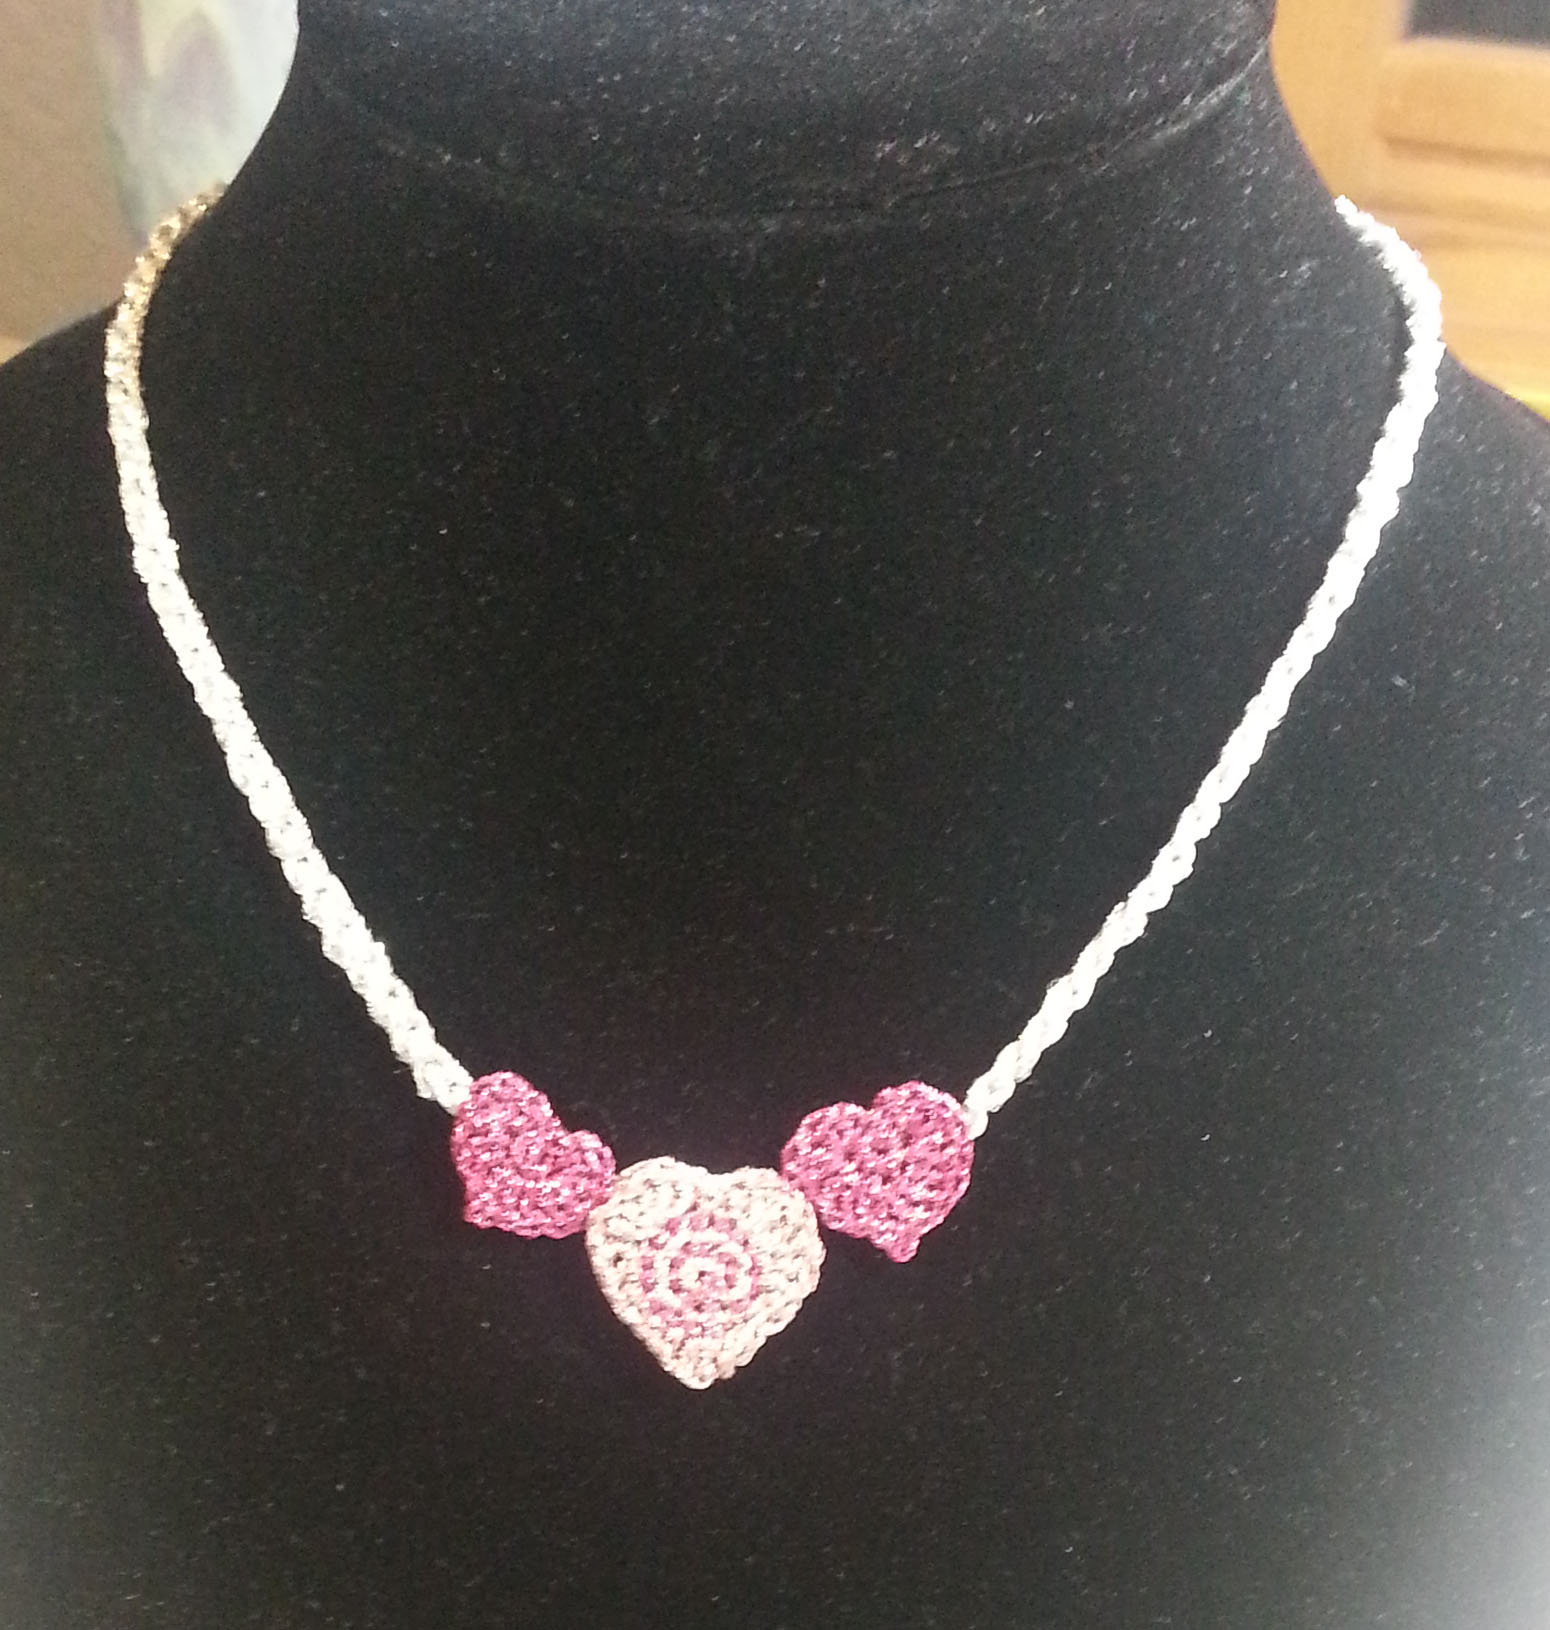
My weekend post was about Valentines Hearts, but I’m not finished yet. This pendant is a bit more complex than the projects I showed you in my last post, so I’m going to walk you thru how I made it.
I used Kreinik #12 metallic with a 1.75mm steel hook. I made 2 “Crocheted Love” hearts, and 1 “Simple Sweetheart” heart. I attached the Simple Sweetheart to the front of one of the larger hearts.
I crocheted my larger hearts together with single crochet stitch border and used a “hoist-on” method to place beads along the border.
For the “hoist-on” method I worked the last stitch before the stitch I want to place my bead on. Then extend the working loop and remove my hook from the loop. I then use a smaller steel hook to pick up a bead and insert that hook into the working loop.
I slide the bead from the shaft of the hook onto the working loop.
Then re-insert my hook that I was crocheting with to complete my stitch. This leaves the bead sitting on the top of the stitch.
Along the curve at the top of the heart I made 1 single crochet stitch working thru the tops of the stitches on both hearts, then placed a bead and chained 1 before making a single crochet in the next stitch. This created enough ease to curve around the curved section of the heart without causing the fabric to cup.
When I reached the straight edges of the heart I made my beaded chain 1, then sc2tog to keep the border from becoming ruffled.
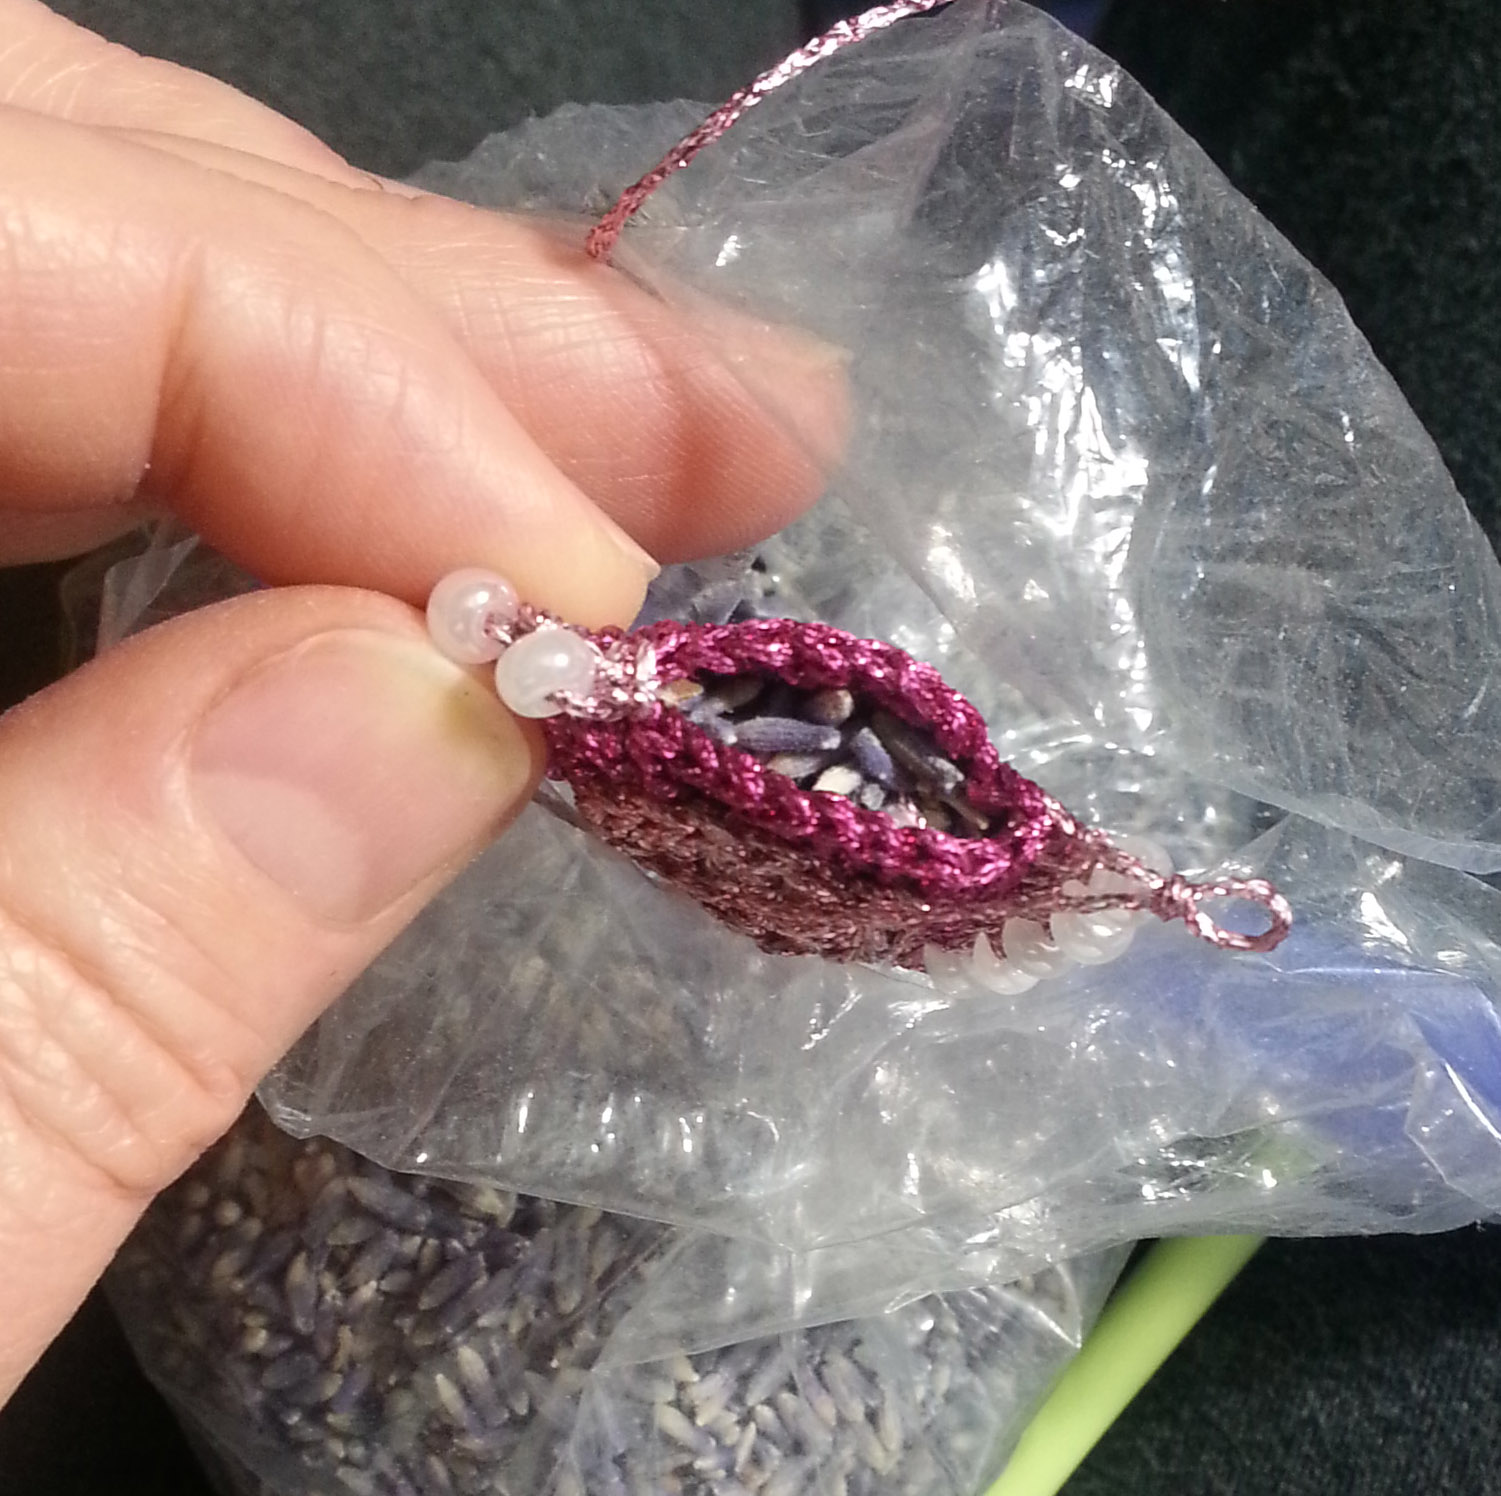
Before completing the sc border I poured some dried lavender buds inside the 2 large hearts. When worn the warmth from the body will release the fragrance of the lavender.
I left long enough tails to weave them back up to the top of the heart. Then I used the tails to sew a split ring to the back of the heart to string it on a necklace.
This survey is part of a major study of U.S. knitters, crocheters, needlepointers, cross-stitchers, weavers, and spinners. The survey will only take about 10 minutes to complete, and the more folks that complete it the better we designers and other yarn industry folks can understand your needs.
By taking this survey you will…
– Help fiber arts organizations and businesses serve you better
– Tell retailers and brands what you want
– Explore your fiber arts life
– Get the chance to win one of five $100 fiber arts store gift cards
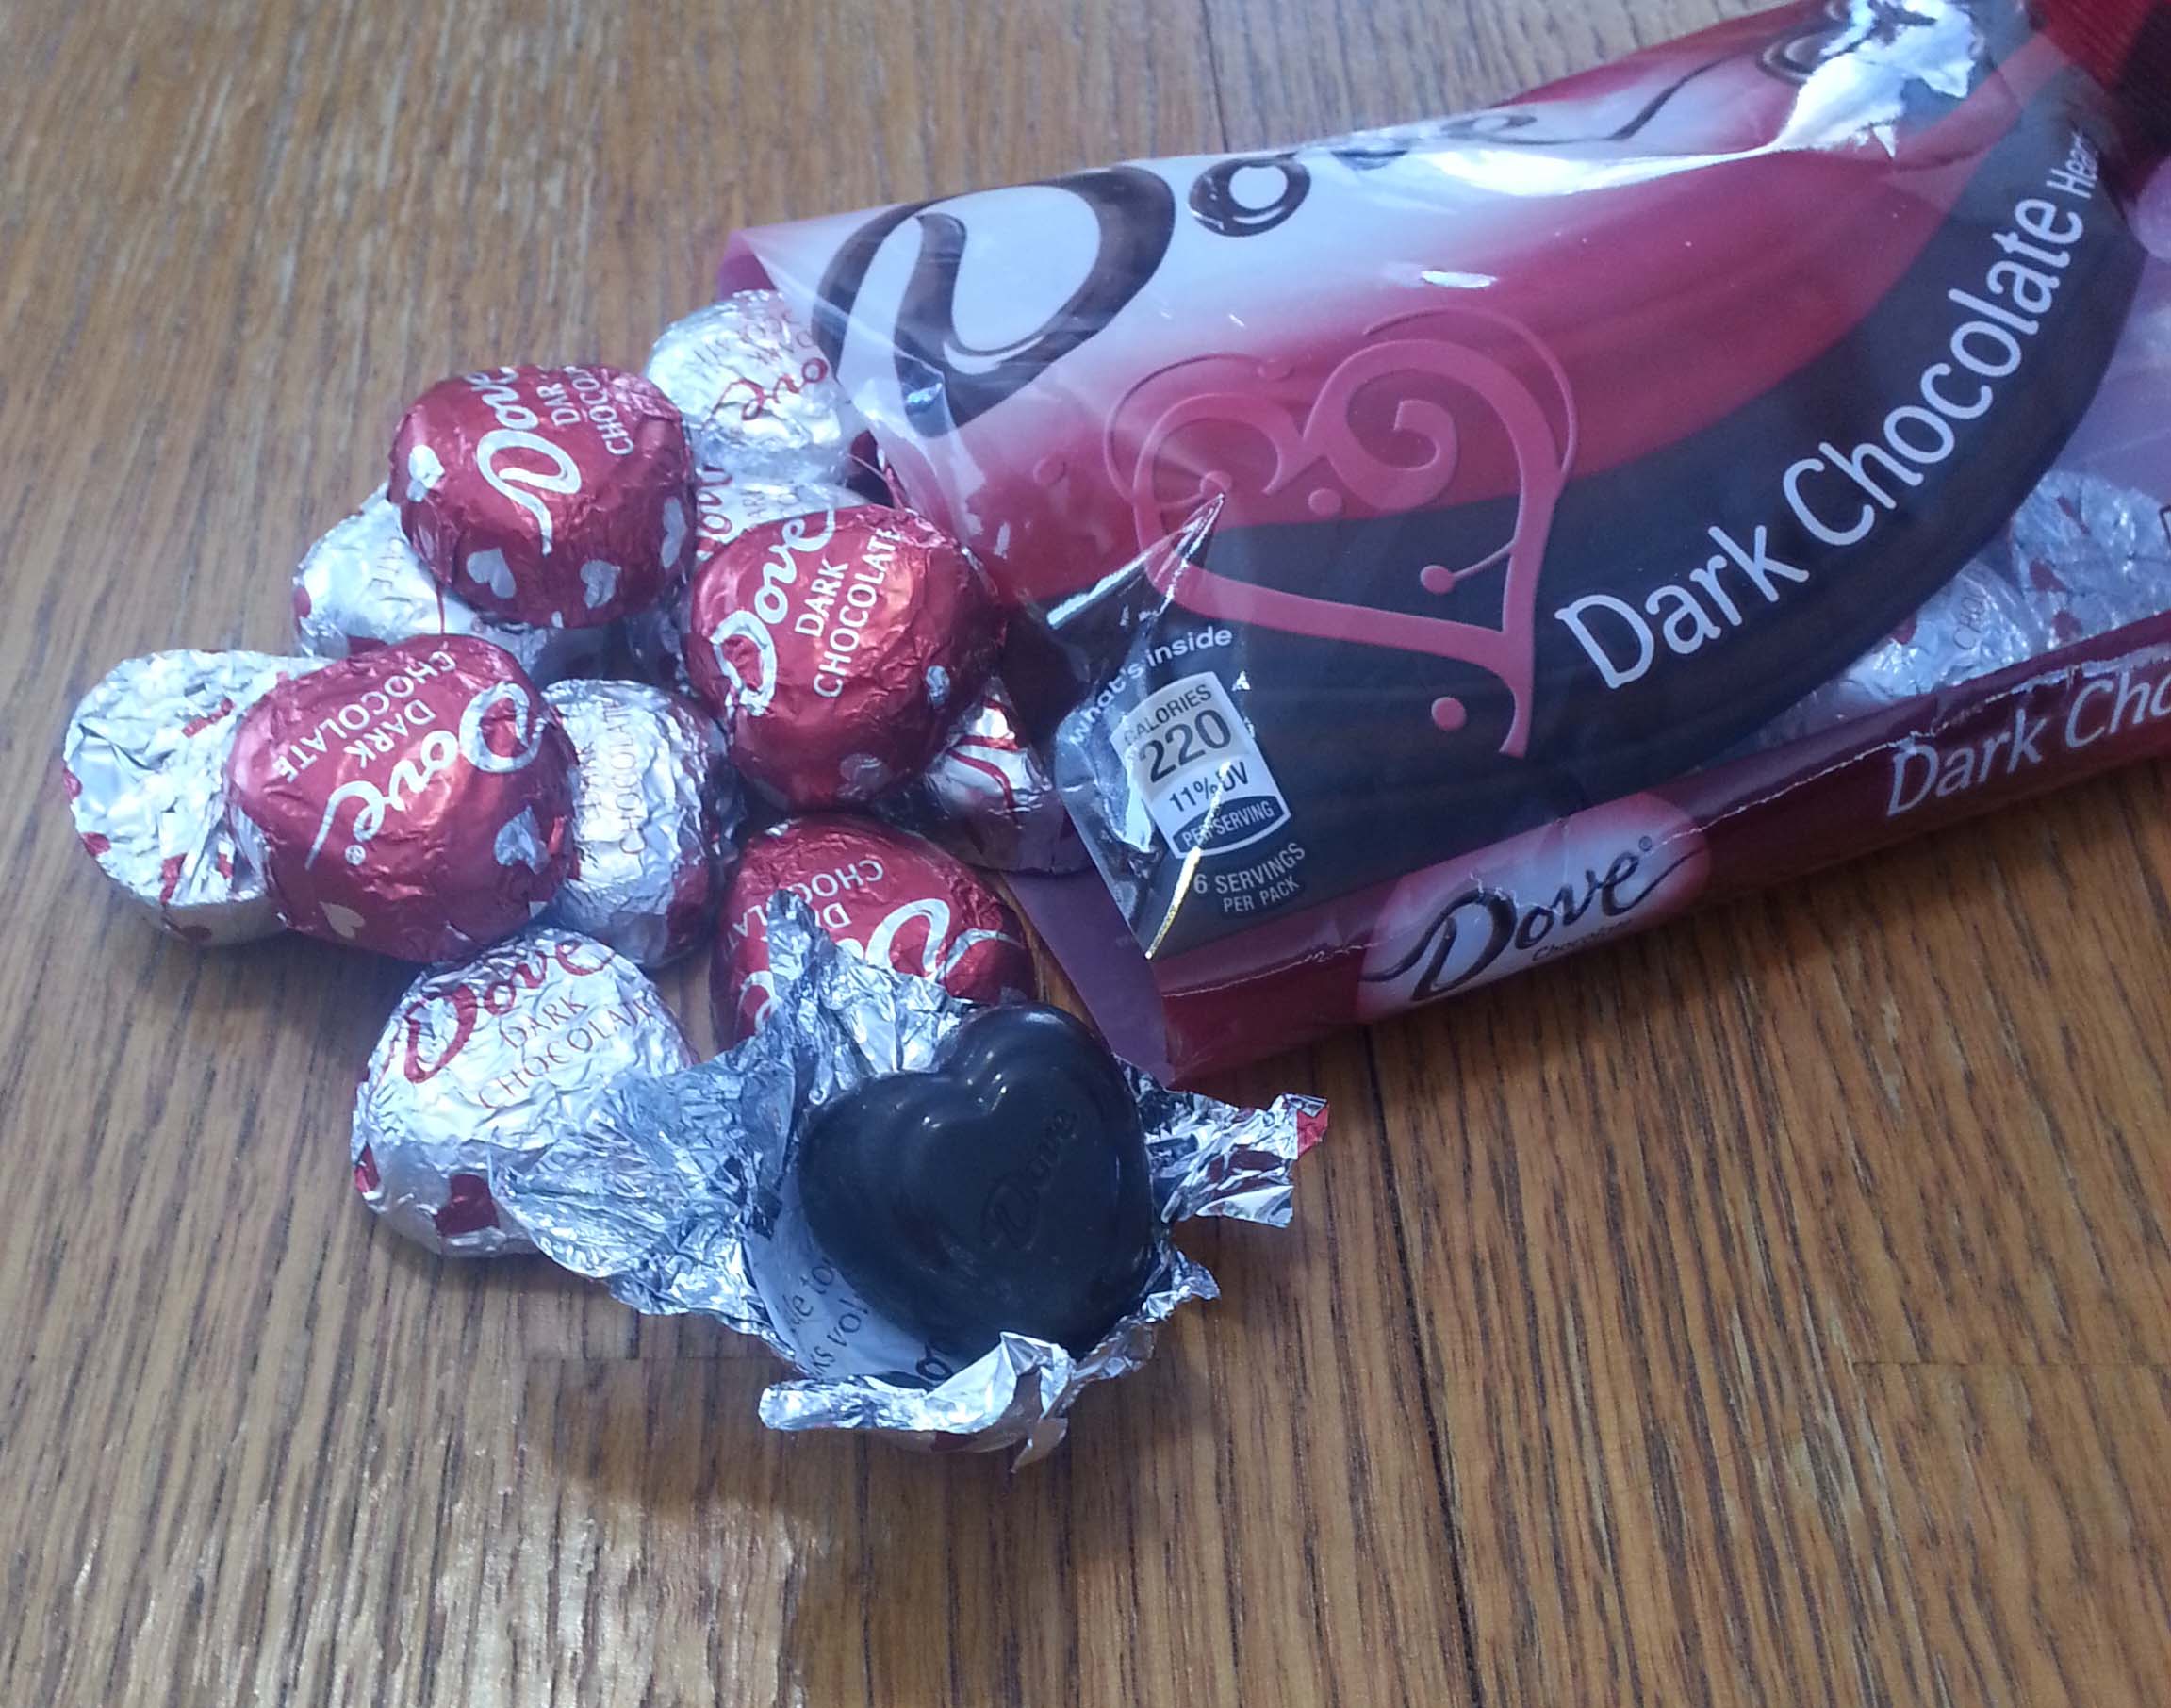
It’s that time of year again, full of snow and cold, February has come blustering in here on the mountain. But my heart is warm because that means Valentine’s Day. For me it’s a holiday that really works as a reason for Chocolate (that’s capitalized on purpose).
I managed to make an early stop to the aisle at my grocery store where all the seasonal stuff is. I indulged in a number of bags of my favorite Dove Dark Chocolate heart candies, they tend to sell out fast here. There is just something about the little heart shapes that makes these individually wrapped candies extra special.
Over the years in my design career I have created a number of crochet patterns that involve hearts. Some are ones that I have offered here on the blog as free patterns. Others have been created for magazines or yarn companies.
Photo Courtesy of Red Heart Yarns
I created the “Valentine Heart Coaster” for Red Heart a few years back. It’s a quick project to work up and you can use it as a coaster, or sew it onto a bag or blanket as an embellishment.
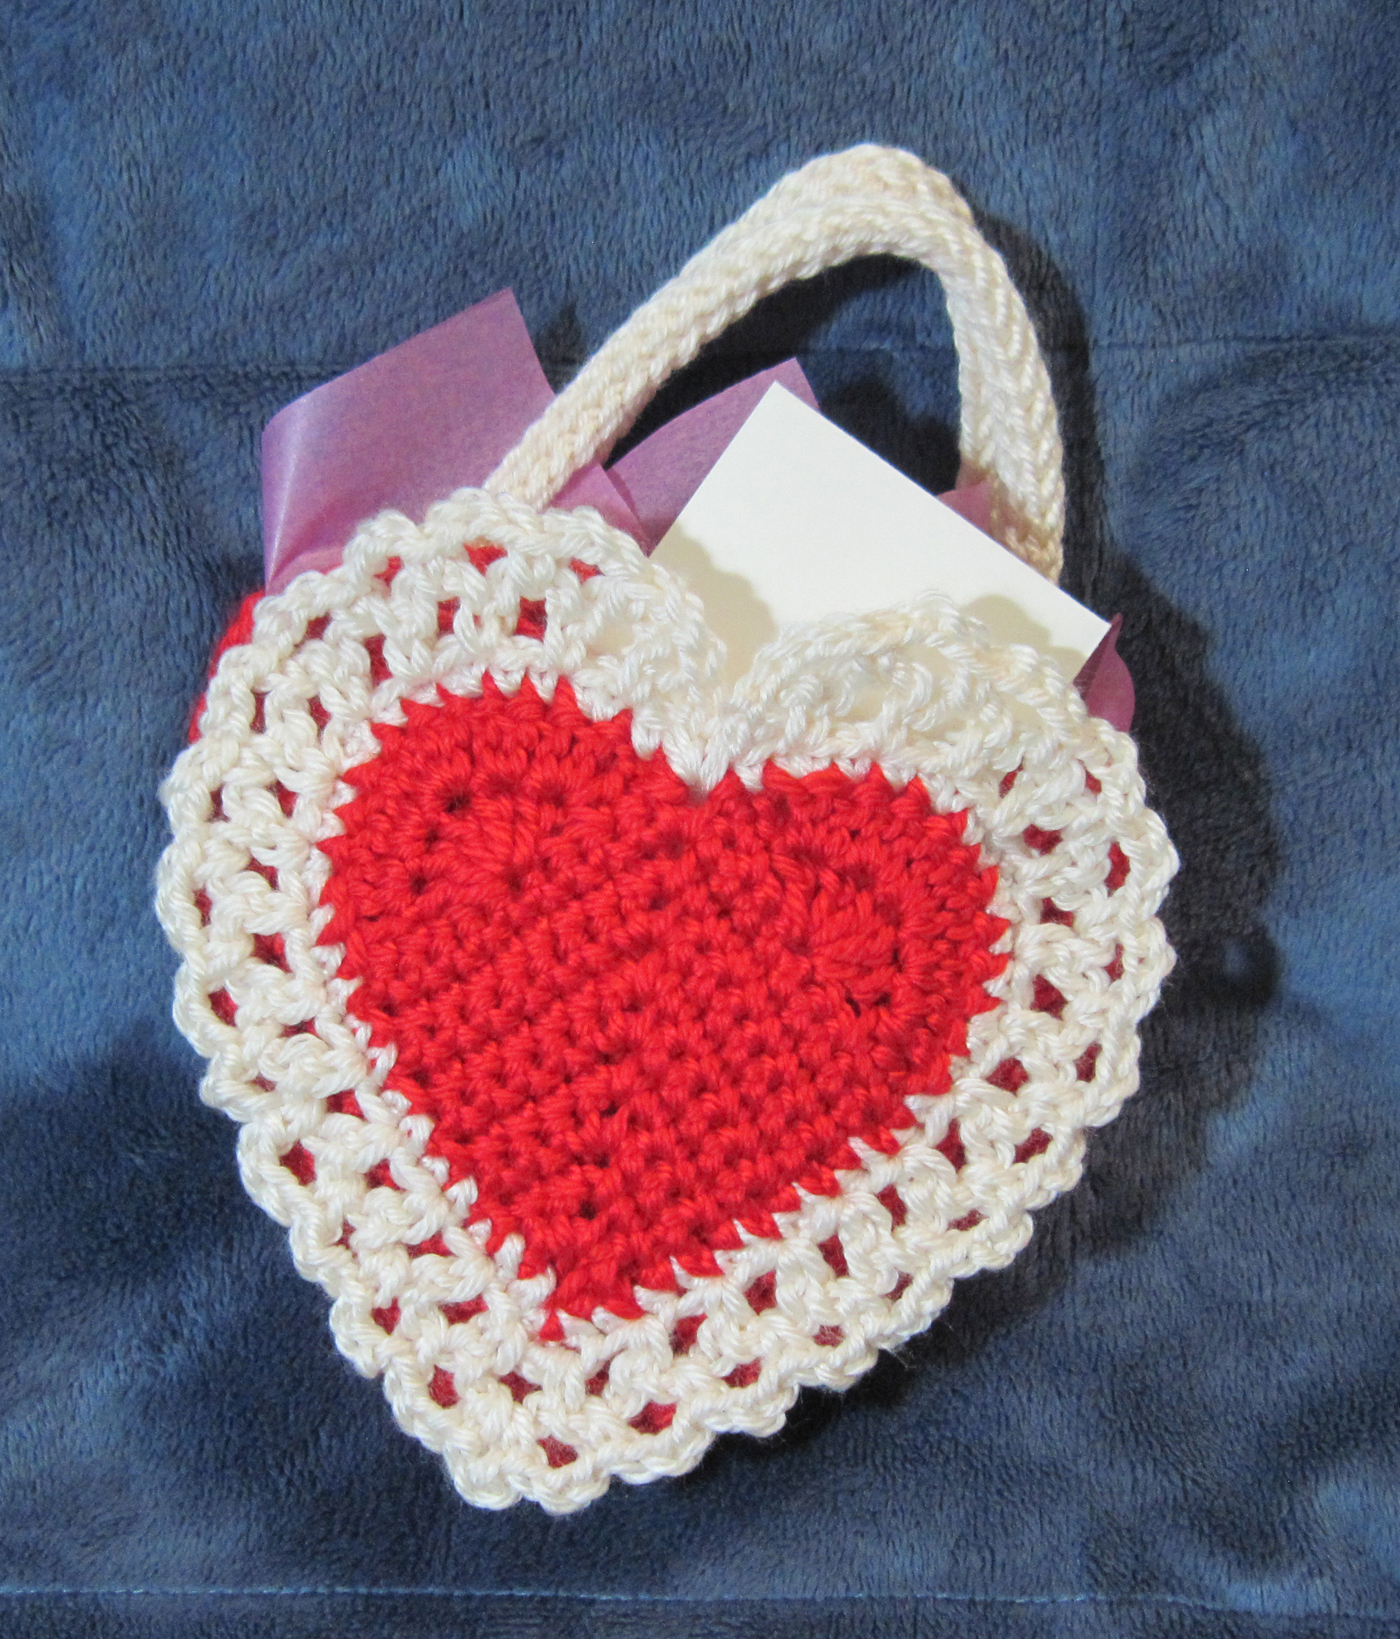
I also created the “Here’s My Heart” gift bag. This project takes a bit more of a time commitment, but makes a lovely gift bag for someone special in your life. This is a bit more complex pattern as well, so a fun challenge for those with more crochet experience. The lace edged heart on the front is actually a pocket, so a great spot to put a special note.
Both of these patterns are available for free at Redheart.com, just click on the link in the pattern names above.
I’ve also put up a number of free heart patterns here on the blog over the years. My top 3 favorites are:
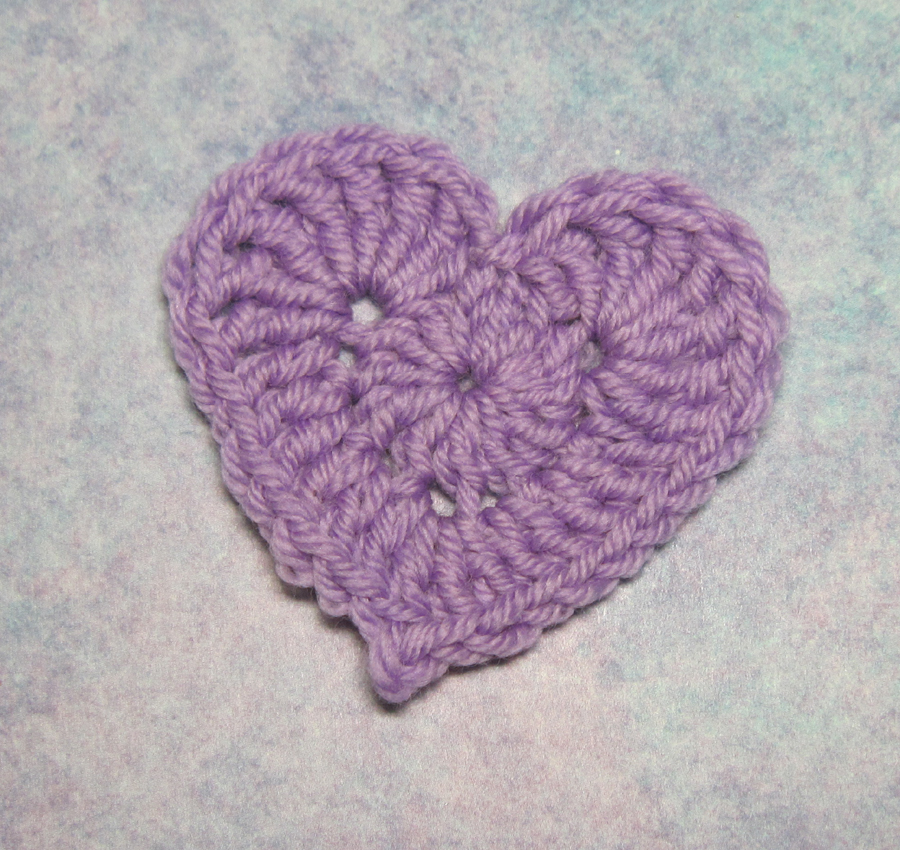
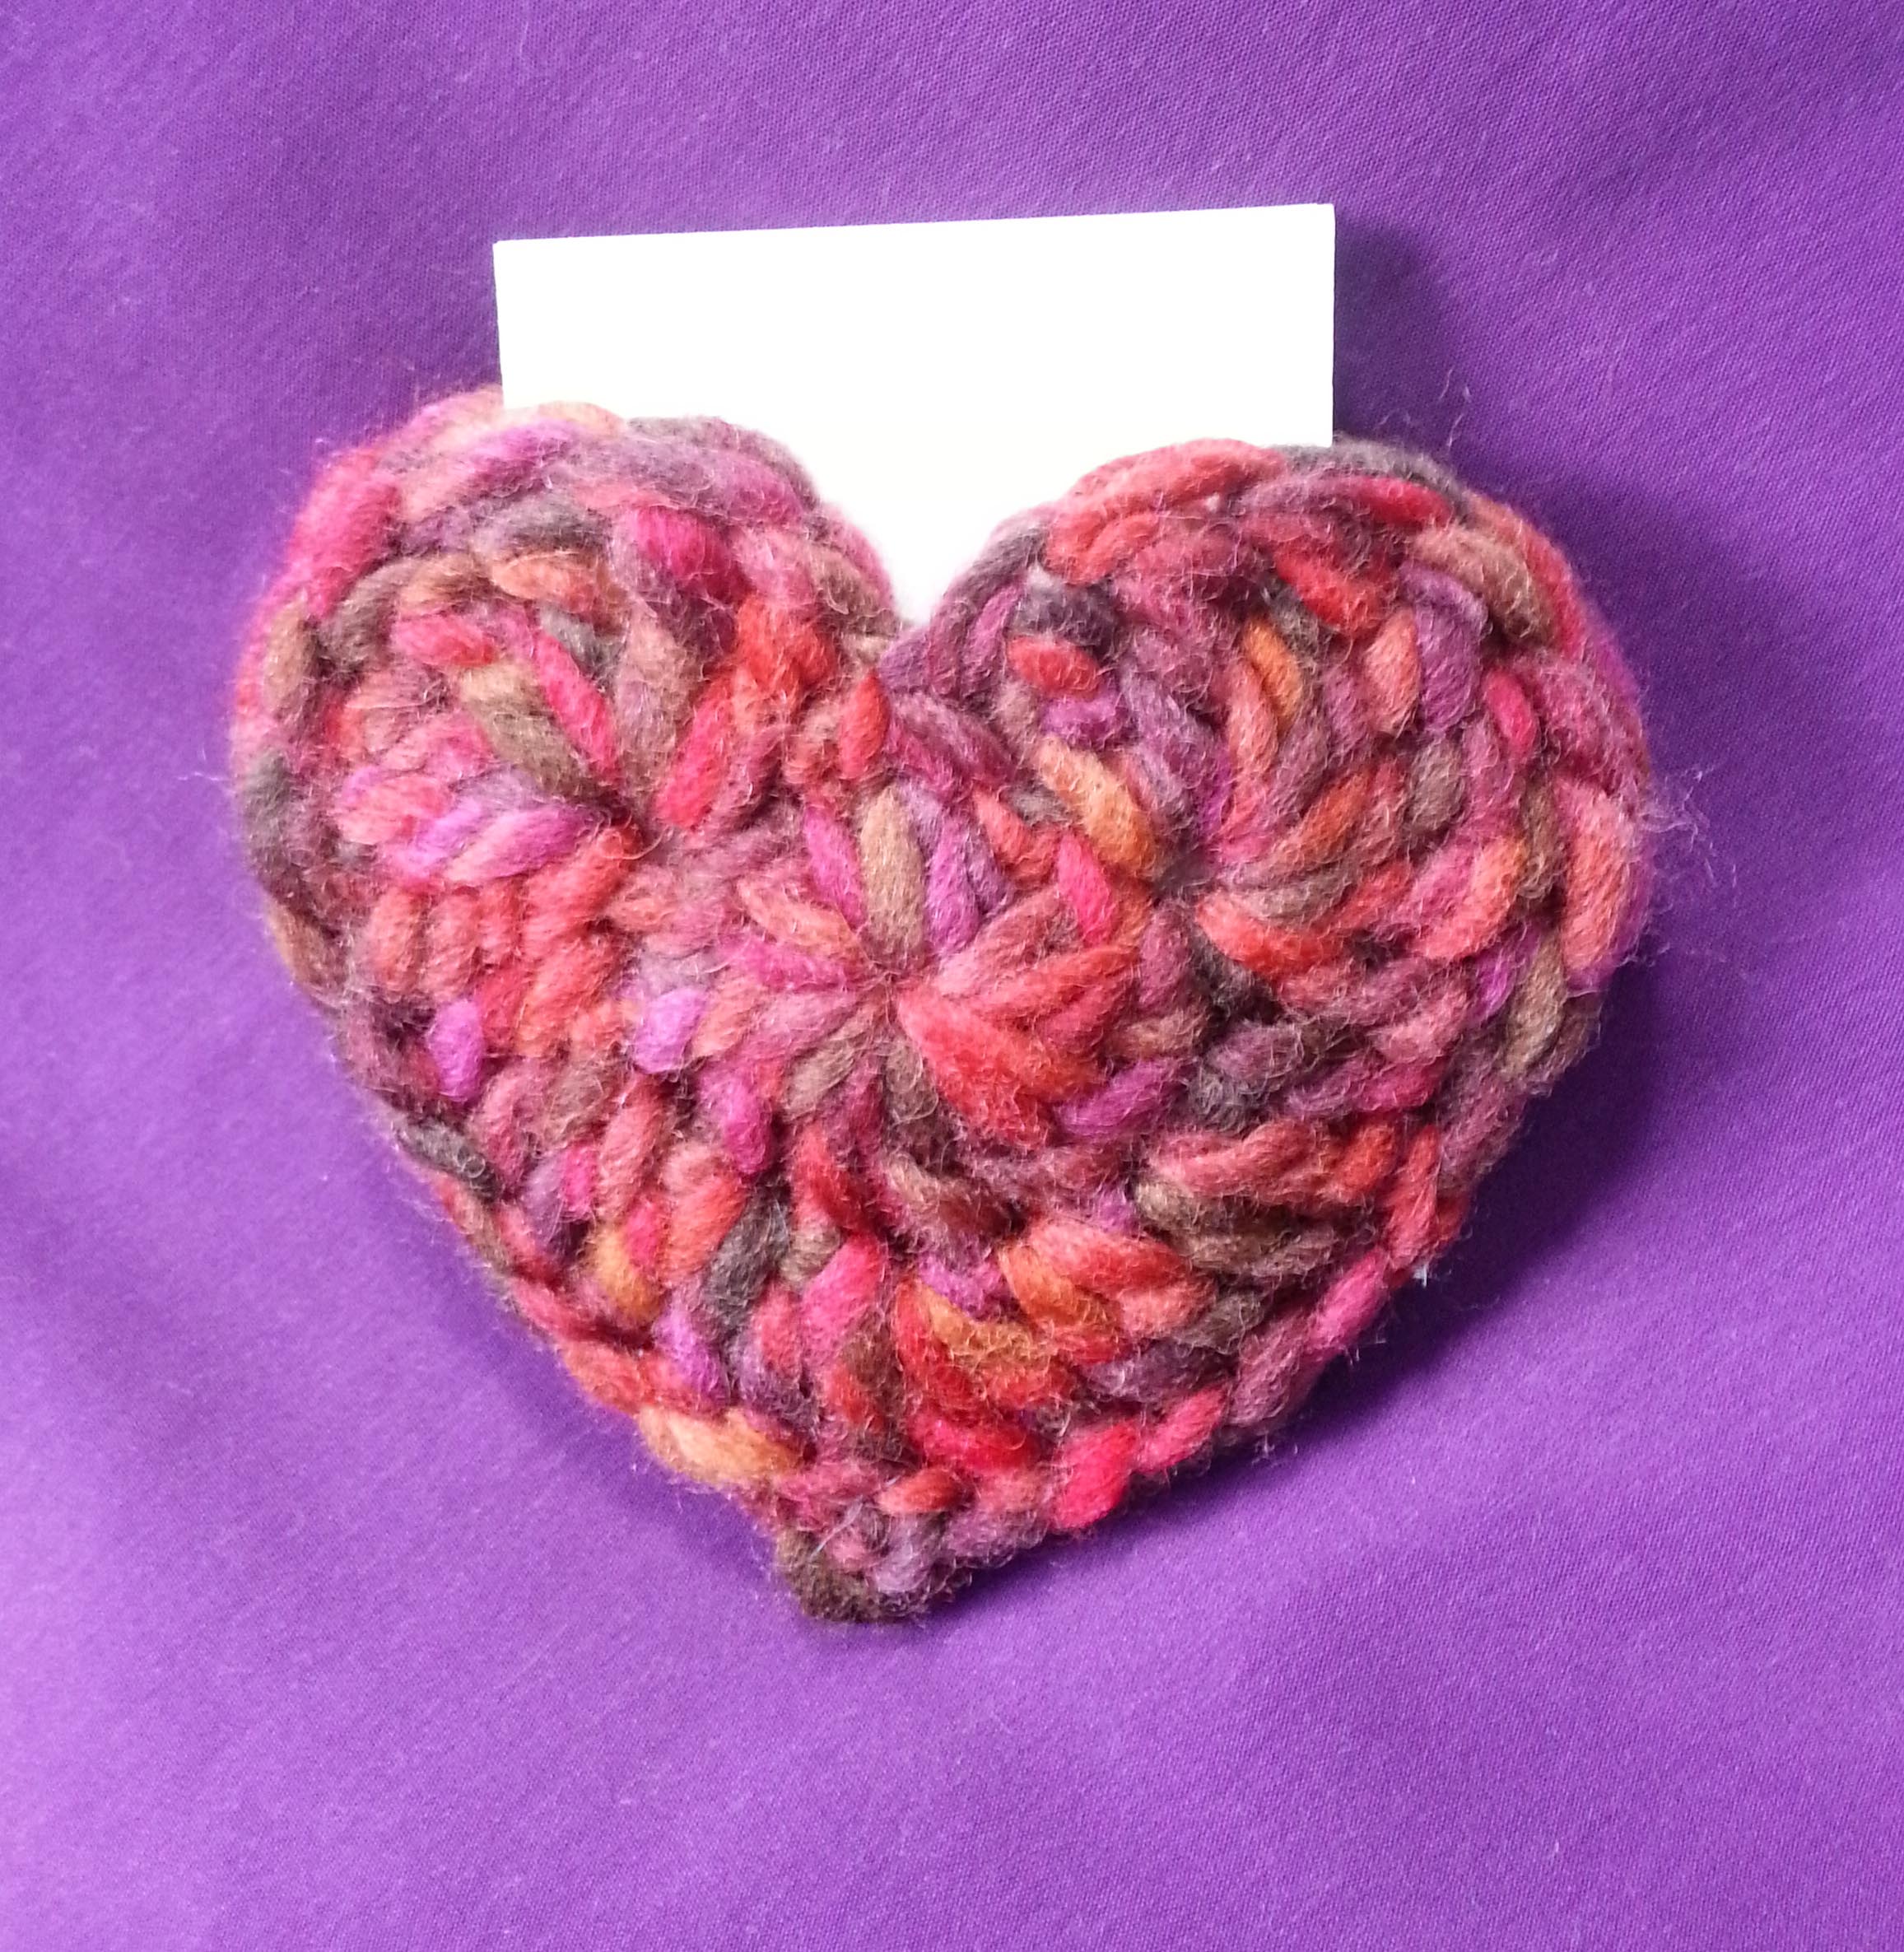
I like to play with these designs and use the hearts as embellishments or elements for projects. My favorite way to use the “Crocheted Love” and “Simple Sweetheart” is to make 2 hearts and sew them together leaving an opening at the top to insert a note or chocolate (often a little Dove heart, since that fits perfectly). You can read more about how I made the little pocket above on my 2014 Valentines Day post.
Last year I used my “Crocheted Love” heart pattern to make this fun little pocket to hold some chocolate and a note for my dear husband.
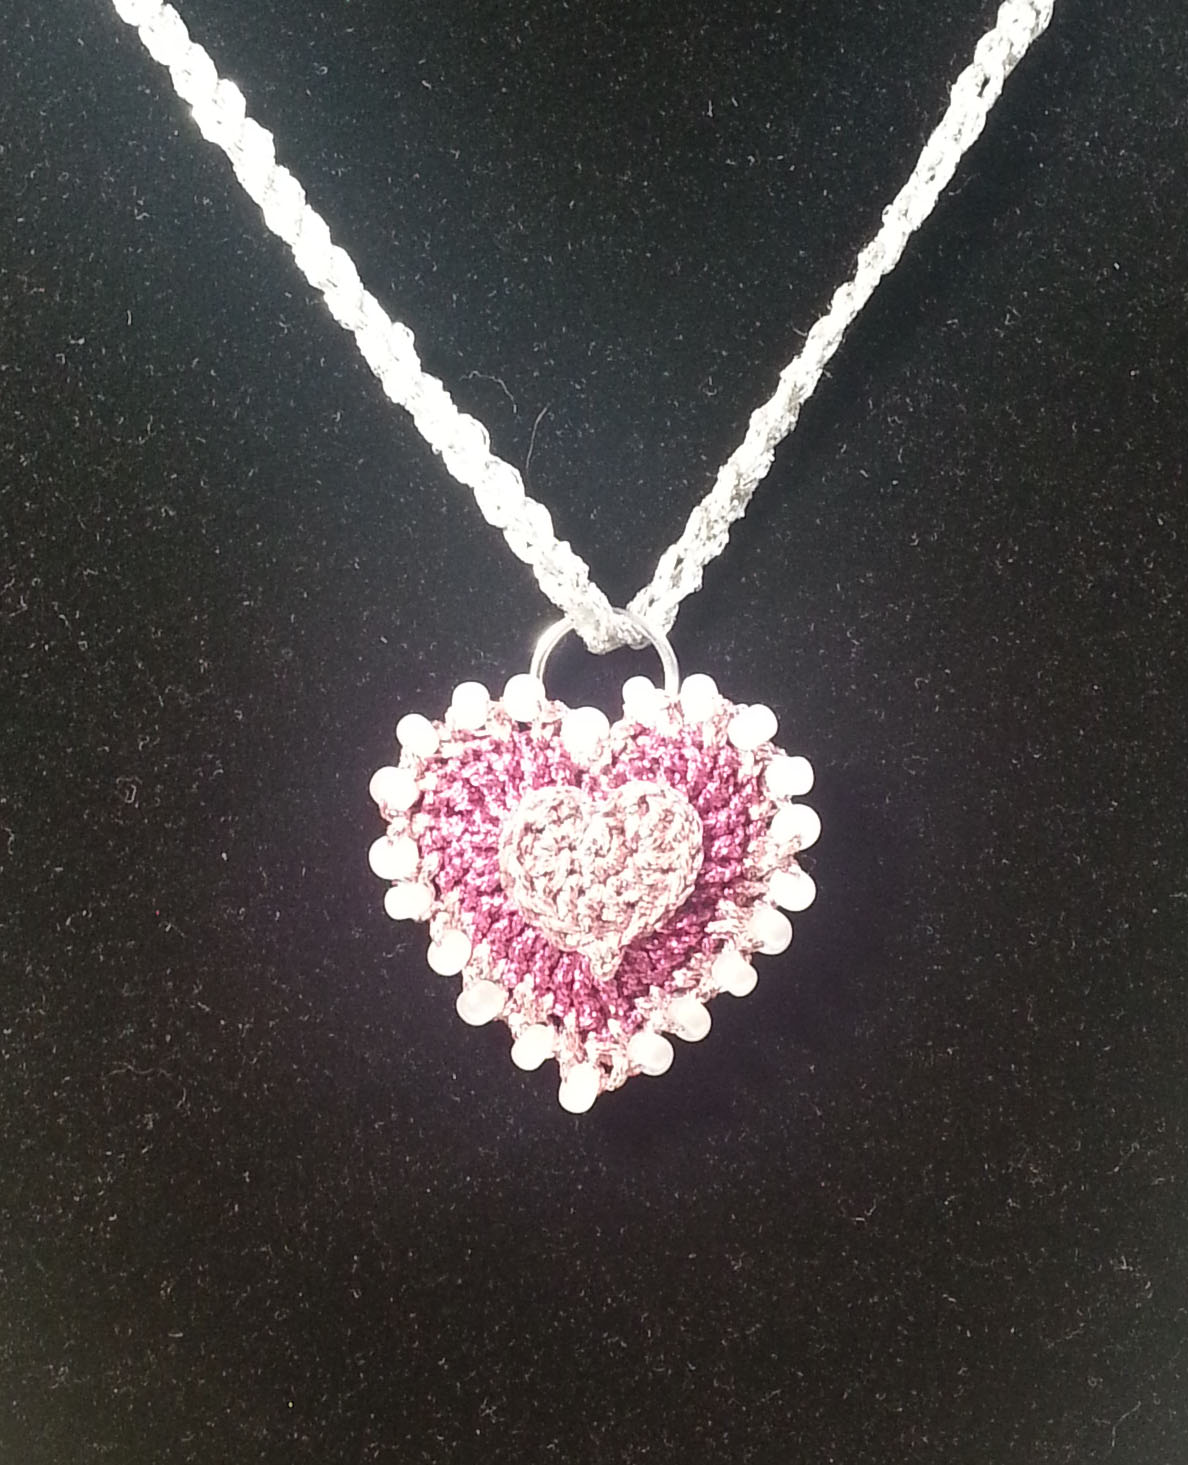
This year I decided I needed some jewelry to wear for Valentine’s Day. So I crocheted up some of my “Simple Sweetheart” and “Spiral in a Heart” using Kreinik #12 Metallic Braid in hot-pink and pink colors. For the necklace pictured above I used a 1.75mm steel hook to create a nice firm fabric that didn’t need additional stiffening.
I also modified my “Spiral in a Heart” pattern to create a more symmetrical appearance to the heart shape. The modification is simple if you want to try it. When you get to the end of Round 3, ch 1, then sl st into side of last hdc, sc next sc, loose sl sts in next 3 sts, fasten off and weave in ends.
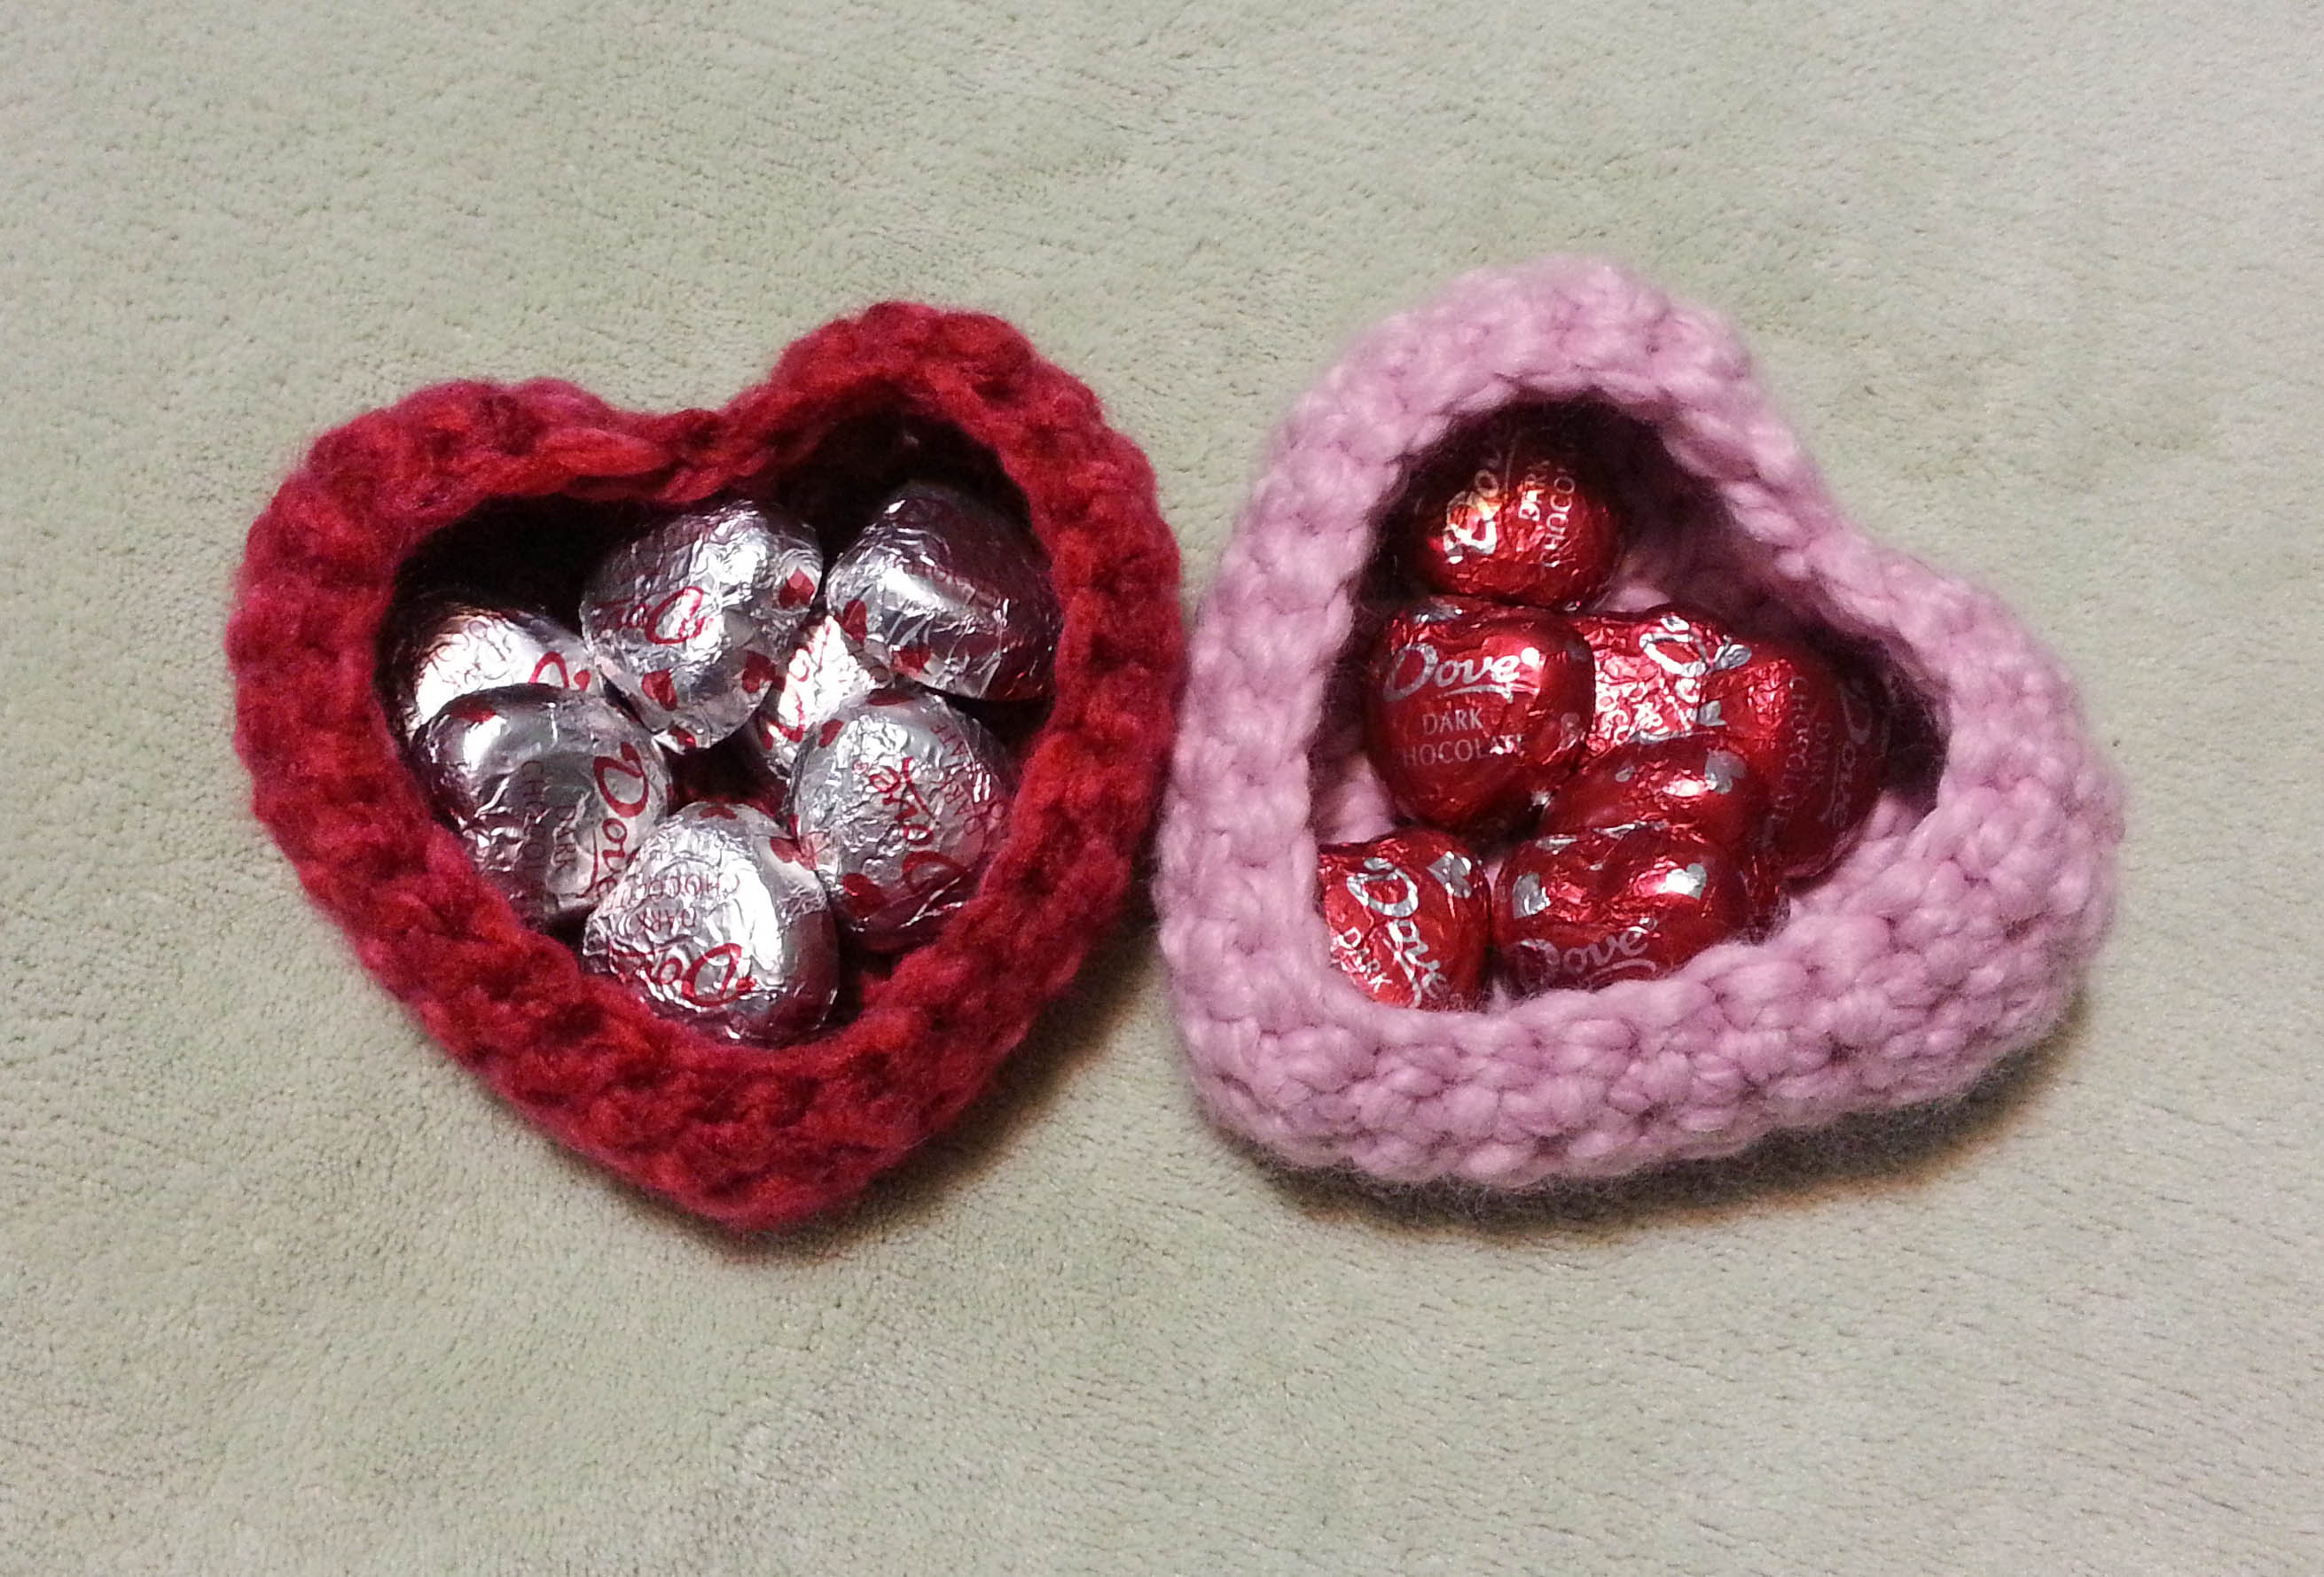
My “Crocheted Love” heart has also been rather popular with other crochet bloggers. They have come up with fun ideas on ways to incorporate it into their projects.
You’ve seen Cintia’s little baskets. The photo above is my experiment with that idea, came out very cushy and they made great containers for chocolates.
Photo by Laura Murray used with permission
Check out this fun project from Laura Murray over at Paper and Pin. She used my “Crocheted Love” hearts and turned them into sweet little conversation heart pillows. I think it’s a toss-up on my favorite one she made, though the “hug” heart is very sweet.
I’ll have a few more ideas for Valentine’s Day for all my dear readers next week, but hopefully these will spark something for those of you looking for ideas for gifts for your loved ones.
As a designer and particularly as an indie-designer, I spend a lot of time thinking about what information a pattern needs to include. Clarity is vital for a pattern to be easy to follow and for stitchers to be able to replicate the original design. After all, that is the main purpose of a pattern. To provide all the information that a crafter will need to get the same result that the designer did.
Interestingly enough, a lot of folks have a hard time being able to follow a pattern. So today’s post is all about the anatomy of a pattern and how changes can make or break your final project.
Patterns can be broken into 4 parts: Materials, Metrics, Pre-Instructions, Instructions. Changes in any of these areas can change the resulting finished project significantly from the sample the designer created for photography. Which can be exactly the result you want, it’s just good to be aware of how your changes will affect the finished object.
Materials
This is where the pattern lists the yarn, hook size and any other materials or tools that you will need to have on hand to complete the project.
If you decide at this point in the pattern to use a different yarn than was used in the design this is where things can change a great deal. Yarn substitution is tricky. Sometimes the listed yarn is no longer available or difficult for you to get hold of. So when looking at substitution it is a good idea to look at not only the weight, but fiber content and even the amount of twist in the yarn originally used as well as in the yarn you wish to substitute.
Metrics
This is where the pattern tells you the sizes the pattern can be used to make as well as the gauge measurements.
If you change the hook size that was listed in the Materials you will very likely have some changes in this area. Gauge swatches can be your friend if you have made changes. Working that swatch will give you an idea of how close you will be to the measurements given.
If your pattern is for something like an afghan or scarf, where gauge isn’t that critical, you still want to have an idea of what the size of your finished project is going to be. If nothing else, to be sure you have enough yarn.
Pre-Instructions
This area is one of the most often skipped areas in pattern reading and can lead to the biggest tangles when working a pattern. It generally includes things like the “Special Stitches” and “Pattern Notes”.
This area of a pattern often gets ignored by stitchers until they run into a snag while working the pattern. This is often very important information for working the pattern smoothly. Special Stitches will explain non-standard abbreviations for stitches. Pattern Notes will give you a heads up about things in the pattern to pay particular attention to.
Instructions
This is the “meat” of the pattern. In the instructions you will get the exact directions on the order and placement of stitches to create the finished object. Sometimes the instructions will include stitch charts, schematics and photo tutorials.
If the pattern is for a complex project, like a garment made from multiple pieces, it will often have the instructions broken out for the various pieces. Sleeves, collars, ribbing, etc.
With longer or more complex patterns it can also be helpful to use post-it notes or some other movable marker to help you keep track of your place in the pattern as you are working. If you miss a repeat or line of the pattern the result can be a bit frustrating.
For crochet patterns that have written text using standard abbreviations you need to be sure if they are using US or UK terminology. If the pattern also includes a stitch chart that can often help you decipher whether the pattern is written in US or UK terms.
Another way to spot if a pattern is US or UK terminology is if it uses the half double crochet stitch (and calls it that). US terminology says Half Double Crochet where UK terminology says Half Treble Crochet. UK doesn’t have any stitches called the Half Double Crochet stitch and US doesn’t have any stitches called Half Treble Crochet.
Now it’s time to grab one of those patterns that have been intimidating you and make a try at it. Hopefully some of the tips in this post will help you triumph.