Needle Felting for Repairs

One of my least favorite things in crochet or knitting is dealing with the loose ends once a project is finished. Needle felting can be a big help in securing those ends though, especially if your project is worked using a wool blend yarn.

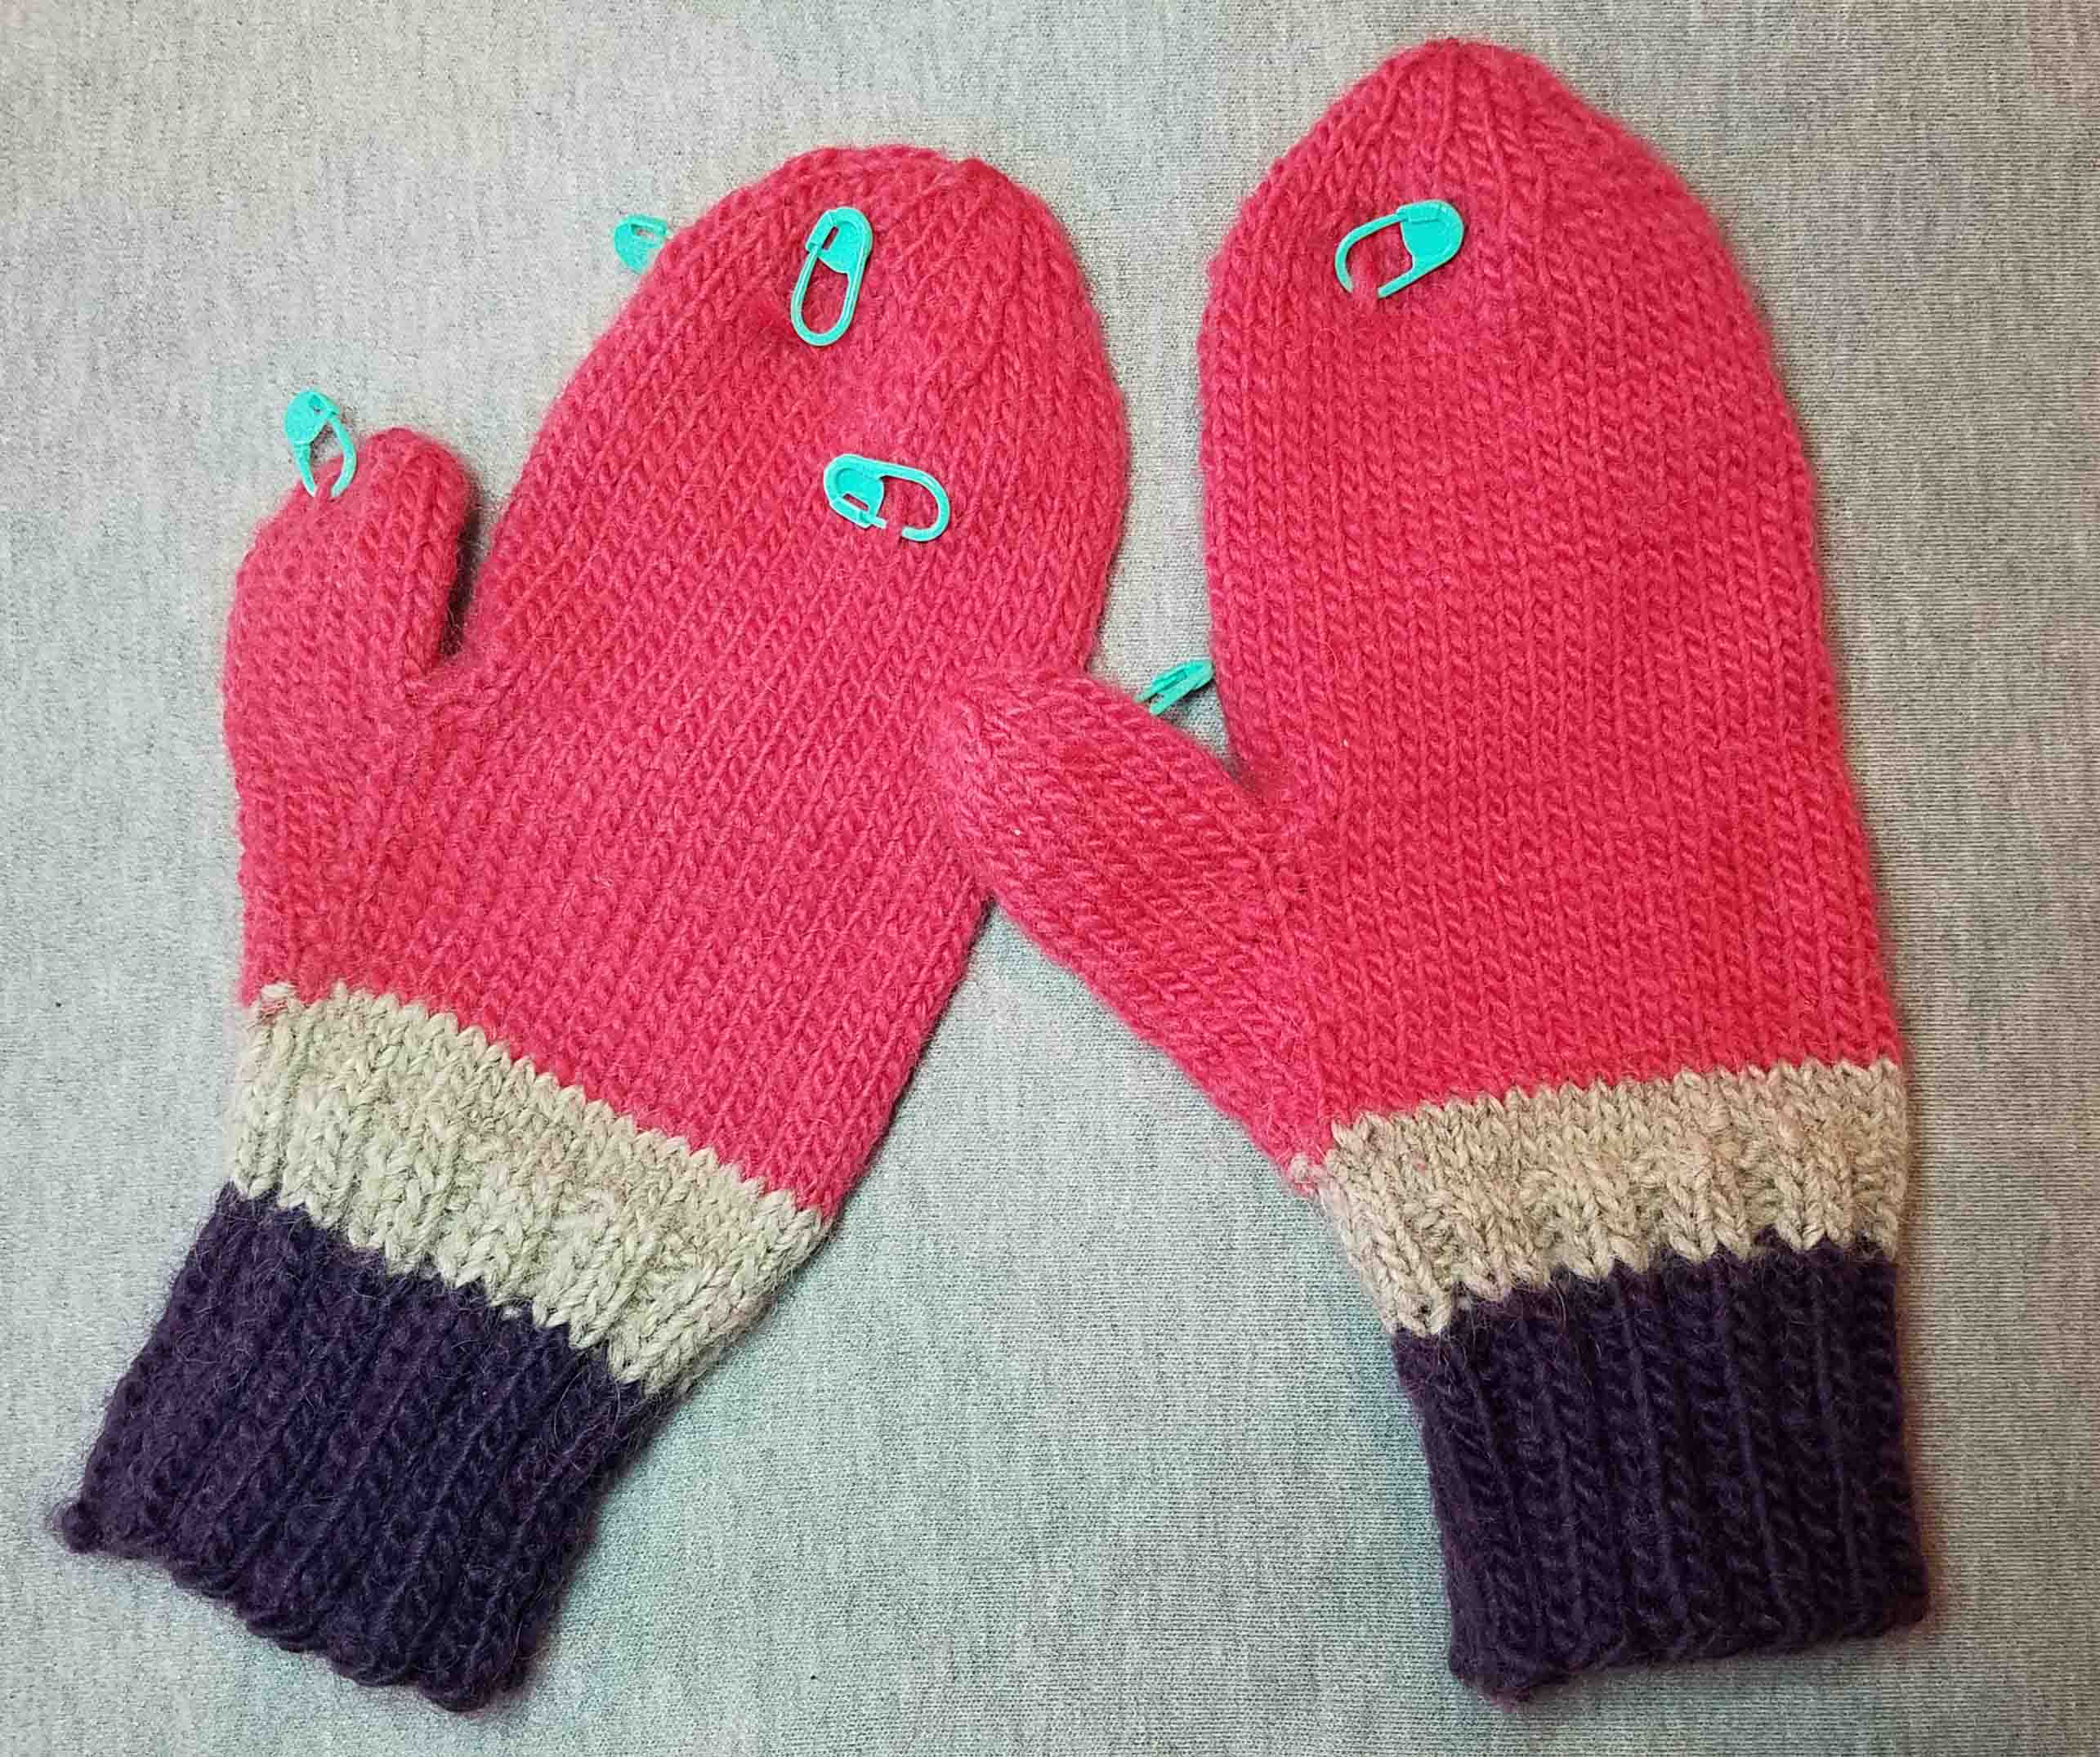
Recently one of my friends had an issue with some mittens she had knit. When weaving in ends she had some extra strands on the outside of her fabric. We looked at the mittens trying to figure out how she could weave in the ends. They were going to be super short and there was a good chance they would pop loose.

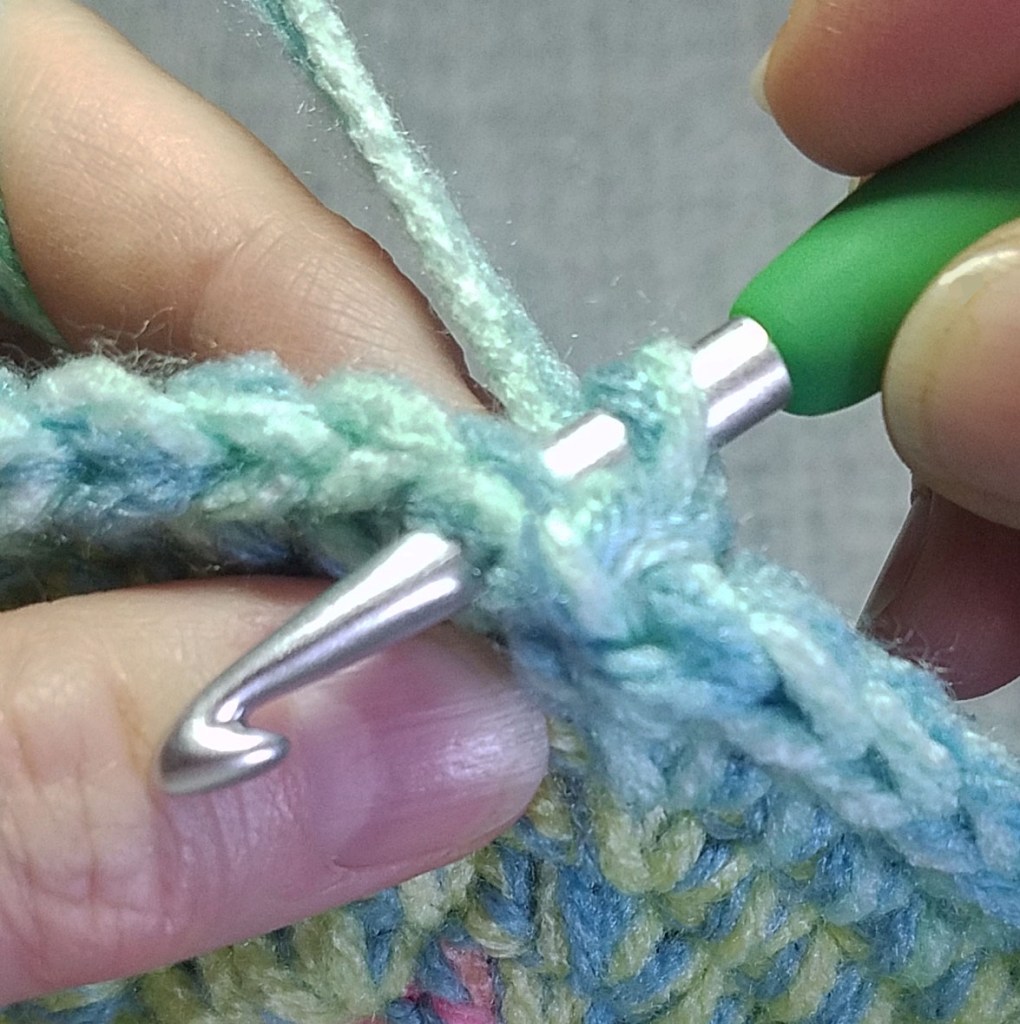
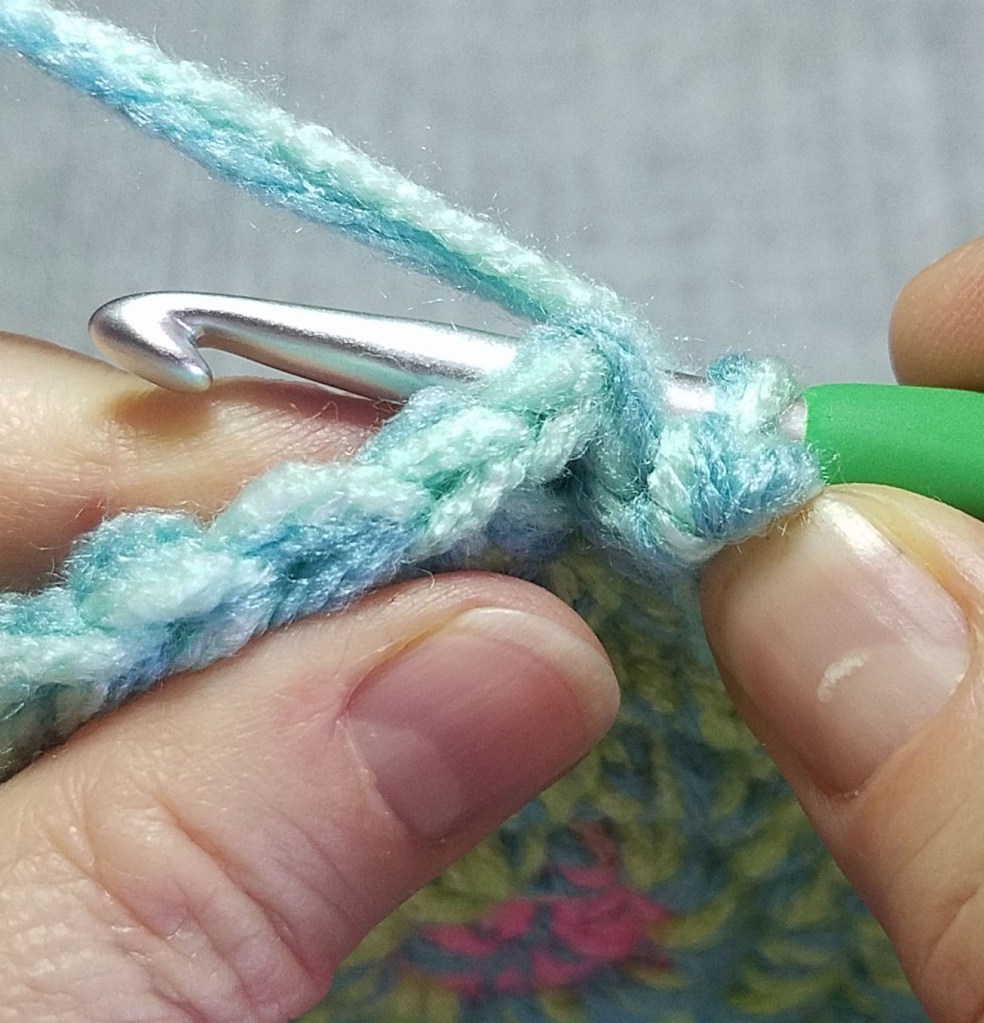
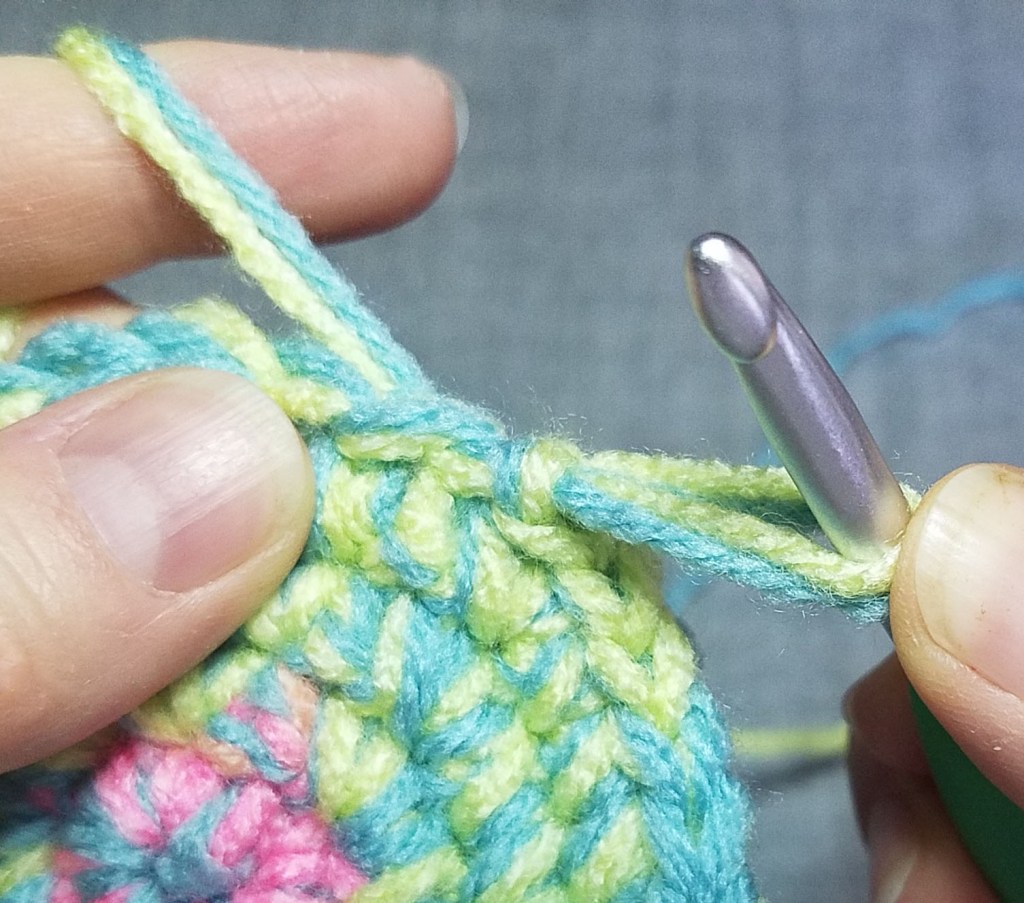
Needle-felting to the rescue! I grabbed my size 40 felting needle, my “egg” felting surface, and a small steel crochet hook (not shown).

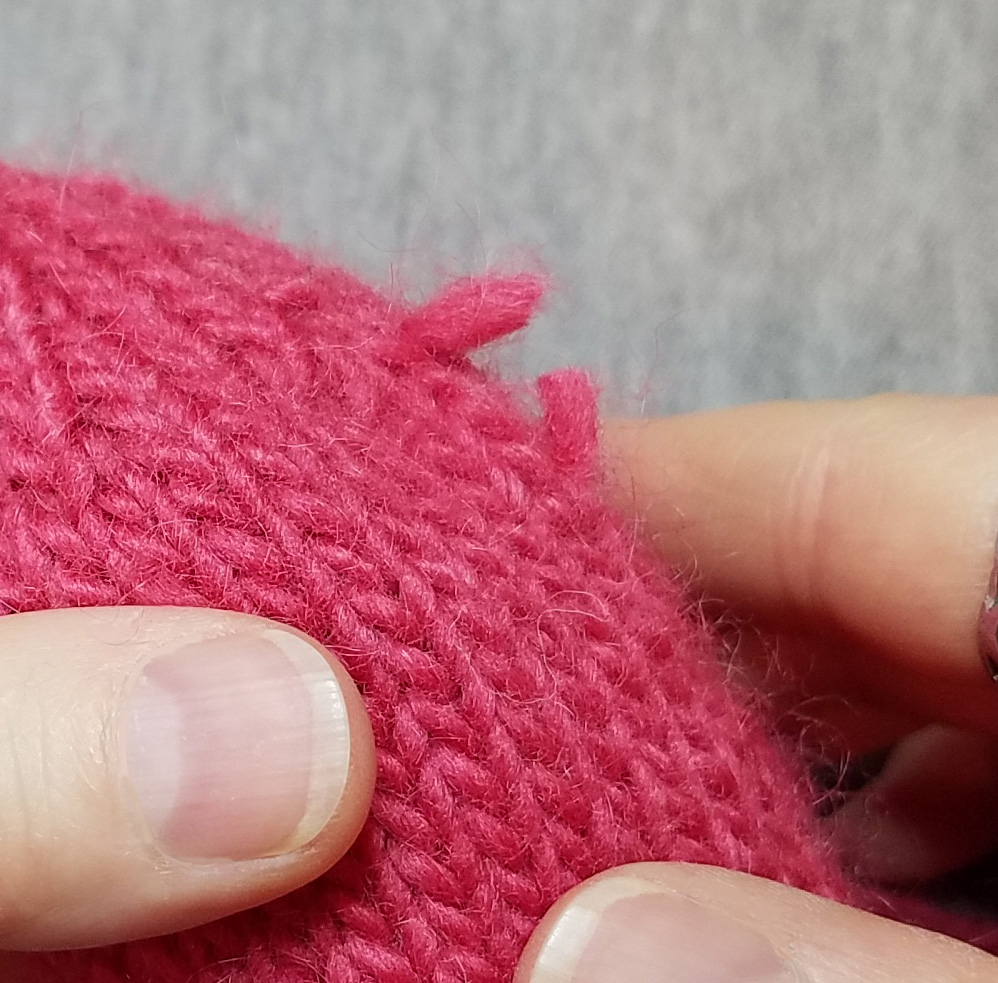
I cut the strand in the center, and had 2 short ends.

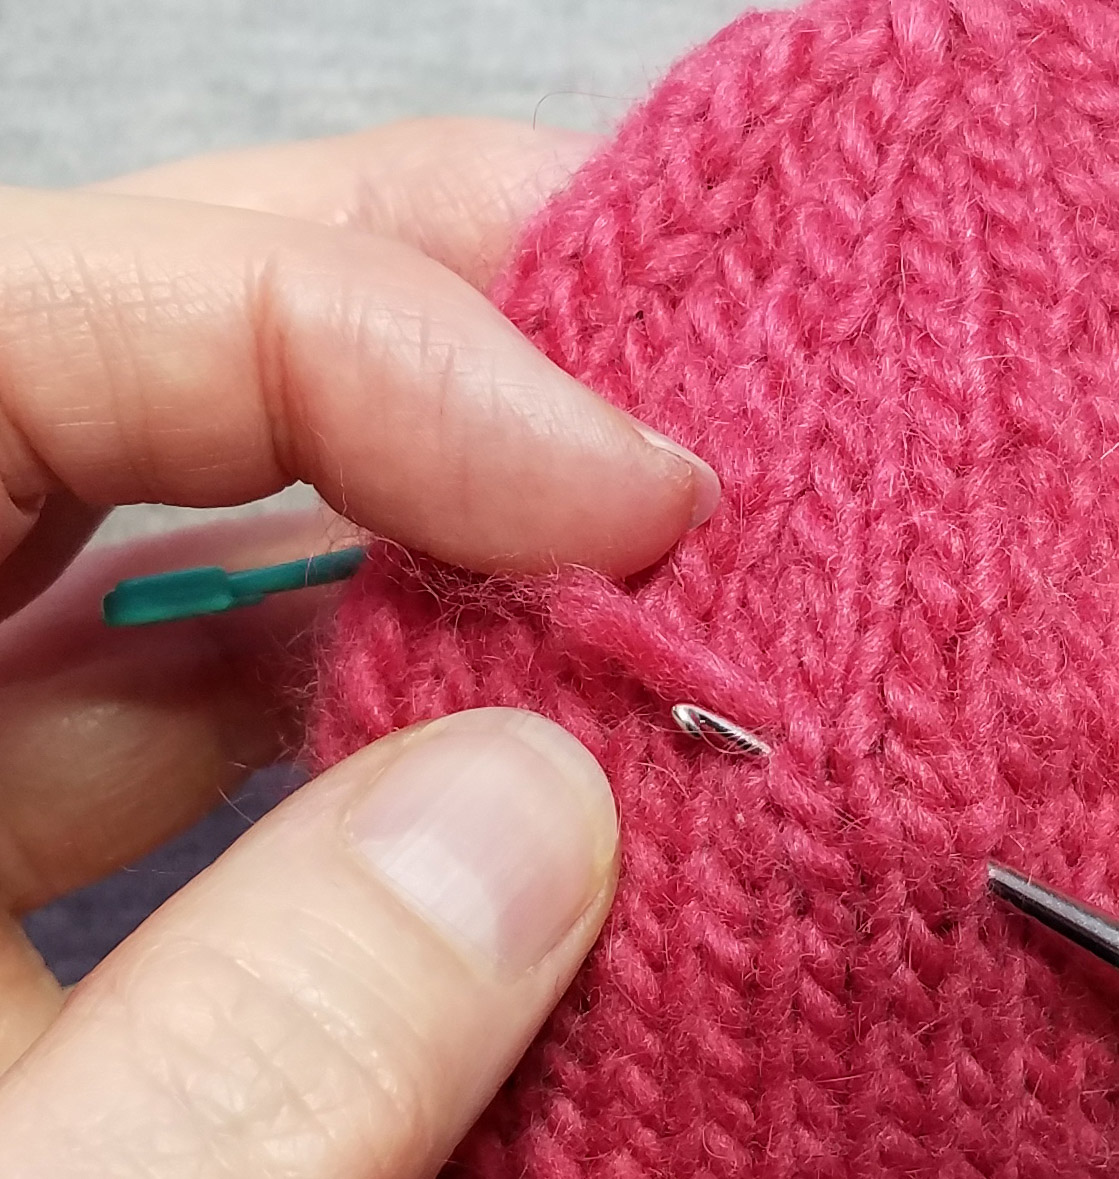
I then pulled the 2 loose ends to the wrong side of the fabric by inserting a small crochet hook in from the side.

I turned the mitten inside out and gently pulled on the ends to be sure I didn’t have any excess yarn on outside of mitten. I inserted my felting surface behind the fabric and snugged the fabric where I would be needling tight to the surface.

I then gently needled the ends close to where they came thru the fabric. I checked the outside (right-side) of the fabric regularly to make sure my work wasn’t visible. I wanted to secure the ends but not decrease the stretch of the fabric. Once I was sure the ends were well secured I trimmed off any excess yarn.

You can use this same method with any knit or crochet project. Especially if the project is worked in a wool or other animal fiber yarn. Needle felting can secure other types of fiber, but you may want to test it out before relying on it for your final project.

Needle felting can even be a great way to secure the cut end of longer tails that have been woven in. Especially helpful on items that get a lot of use like hats, mittens, scarves and blankets.

For longer tails, weave in like you usually do, but before cutting the yarn use your felting needle to secure the end. Then cut close to the needle felted spot to remove excess yarn.

This post contains affiliate links. I may receive compensation (at no additional cost to you) if you make a purchase using these links.

One of my favorite tools is Clover’s Single Needle Felting Tool. It is much easier on my hand than just holding the plain needle. The ergonomic shaping also allows for more control of the needle while working.
If you can’t find this tool locally it is available online at Amazon.com. Click on the photo below to go straight to it.

Festival and Conference Season Begins

A couple weeks ago I spent my Saturday at YarnFest in Loveland, Colorado. This is a great festival that is “local” for me. There are loads of classes and a fun marketplace celebrating yarn and other fibery fun.

I got to see a number of friends and had a little retail therapy time. My first stop and purchases were with the folks at Brown Sheep Company. I’m looking forward to making something summery with the pink yarn. Hopefully I can finish it before the CGOA conference in July.

I had lunch with my good friend Karen Whooley, she taught 4 classes at the festival. We had a great time catching up. Once she had to head back to teach her afternoon class I met up with my friend Susanna.

Turns out Susanna is nearly as dangerous an enabler to shop with as my dear friend Jan. I ended up purchasing a few more items than I had originally planned on. The gorgeous yarns below were too tempting.

This lovely fluffy dark yarn is a Cashmere/Wool blend. There is a little over 320 yards in the 2 balls, so I am hoping to create a lacy cowl or a shawlette. The fluffy halo of the yarn will make for a warm fabric even if it is created with very open stitch work.

Susanna had to bring me to see the yarns at the “Knit Stitch” booth. She had made a hat using some of their lovely hand-dyed yarn. I couldn’t resist this pink and lavendar yarn with it’s bit of sparkle, the color name is “Doodlebug”. I am planning to make myself a beautiful hat for next winter. I think it will look terrific with my silver hair.

A YarnFest tradition for me is to visit glass artist Jodie McDougall’s booth. She always has wonderful glass buttons and goodies. This year I had to adopt some adorable sheep earrings. I’ve been wearing them a lot since the festival. I especially love their little feet.

I was thrilled to see my friend Paula of KnitBaahPurl was at YarnFest again. I had to purchase one of her T-shirts for a new sleep Tee. I really loved this “now I lay me down to sheep” shirt, and it’s in a lovely lavender purple color.

Paula creates all sorts of fun sheep and yarn themed artwork that she sells on T-shirts, mugs, wine glasses, cards and other fun items. I especially love the ecumenical nature of most of her illustrations. No matter what your yarnie art…her artwork will fit the bill.

My final purchase of the day were some cute little stitch markers from the Longmont Yarn Shoppe booth. Who hasn’t played “yarn chicken” when finishing a project? The chicken may actually be inspiration for a crochet or needle felted sculptural piece in the future. I also found the little squirrel to be too cute to resist.

Looking back over all my goodies from YarnFest I’m realizing that I actually exercised some restraint. I stood strong against many of the temptations. Now I just need to crochet like the wind with all this yarn in my stash so I can get more yarn at the other Festivals and Conferences coming up.

In mid-June the Estes Park Wool Market will be here, that could be dangerous to my budget. I’m planning on joining some friends there to tour the vendor barn as well as check out the various critter barns.

The second week of July will be the CGOA conference, which includes a lovely boutique Marketplace. This year’s conference will mark the 25th anniversary of CGOA so there will be extra fun things happening there. If you haven’t had a chance to register for the show it isn’t too late. You can check it out at Crochet.org.

I hope to see some of you at a Festival or Conference this year. But even if you can’t join me at the ones I’m at, do a little research in your area to see if there is one going on near you. It’s a great place to meet fellow yarnies and take classes to expand your crafting skills.

Springtime Bunny

Easter is next weekend and I’ve always loved it as a celebration of Spring. Even though up here on the mountain it is usually still cold and even snowy, down in town there are signs of springtime everywhere. Trees getting green buds or even leaves, tulips and daffodils popping up and showing off their colors.

We will be keeping our eyes and ears open for the arrival of the first hummingbirds as the Easter bunny comes for a visit. We have already seen a few wild bunnies in our yard as they venture out of their warm burrows on the milder days.

Meanwhile I have a new fun coloring page for my readers. This bunny is celebrating springtime with his coat of flowers and greenery. You can download the full page PDF of the coloring page using the link below.

As a special treat for those of you preparing for the upcoming holiday I also have a card version of the bunny.

This page will print out with the bunny on half of a 8.5″ x 11″ page. Color your image then fold the paper into a 5″ x 8.5″ card. You can download the card coloring page PDF using the link below.

I hope you and your family have a wonderful Easter together.

This post contains affiliate links. I may receive compensation (at no additional cost to you) if you make a purchase using these links.

I colored the images in this post using my Chameleon Color Tones pencils. They are a densely pigmented pencil so even a light touch to the paper can give you beautiful color. If you can’t find them locally they are available online at Amazon.com. Click on the photo above to go straight to them.

If you prefer to color with markers, some of my favorites are the Staedtler Triplus Fineliners. If you can’t find them locally they are available on Amazon.com. Just click on the image above to go straight to them.

Time for an Easter Basket

Easter is coming up in just a few weeks and I have a fun little pattern for you to crochet a basket for Easter goodies. This basket is small enough to be perfect for toddlers or as a special gift container.

The trickiest stitch in this project is the Back Post Single Crochet (BPsc). The single crochet isn’t a stitch you usually think of as having enough of a post to work this stitch. You are working it using the top loops of your stitch so that the newly made stitch is sitting on the back side of the stitch. Following is a photo tutorial to help you make this stitch.

Step 1 – BPsc
Step 2 – BPsc
Step 3 – BPsc
Step 4 – BPsc
  1. Insert the hook from back to front of stitch working into.
  2. Insert the hook from front to back of next stitch.
  3. Yarn over and pull up a loop thru both stitches (2 loops on hook).
  4. Yarn over and complete single crochet, Back Post single crochet made.

All rounds in this project are worked concentrically. Each round ends with a tight slip stitch to join. The next round will start with a chain stitch to get to stitch height. For best results you want to be sure that your slip stitch is very tight and that your beginning chain stitch is a little smaller than typical.

Tight Slip Stitch – Step 1
Tight Slip Stitch – Step 2

  1. Make slip stitch as usual.
  2. Without letting working yarn feed out, pull on hook to take out slack from slip stitch.

Happy Spring Basket

designed by Andee Graves / M2H Designs

Skill level:    Intermediate

Finished Size: 4.5” diameter at base, 3” tall in basket, and 6.25” with handle.

Materials:

Yarn 

Red Heart “With Love” (100% Acrylic), 7 oz/198 g; 370 yds/ 338 m, Color #1502 Iced Aqua

Red Heart “With Love – Stripes” (100% Acrylic), 5 oz/141 g; 223 yds/ 204 m, Color #1973 Candy Stripe

Hooks

I-9 / 5.5 mm

Notions

Yarn/tapestry needle

Stitch markers

Gauge:

Barely over 3″ at end of Rnd 4

Special Stitches or Abbreviations:

BPsc — Back Post Single Crochet

PM – Place stitch marker

Pattern Notes:

Basket is worked double-stranded with a smaller than usual hook to create a stiff fabric. It begins with a flat circle worked in joined rounds for the base, then the first round of side is worked as back post stitches to create a sharp edge to bottom of basket.

Handle is worked without cutting the yarn. A couple rows of single crochet are switched to working in joined rounds for length of handle, then a couple more rows of single crochet. Work is fastened off and then sewn to the opposite side on top edge of basket.

Instructions:

Base

Rnd 1: Working with 2 strands at same time, make an adjustable slip knot, ch 2, 7 sc in second ch from hook, slip st to first sc of round. [7 sc]

Rnd 2: Ch 1, 2 sc in each st around, slip st to first sc of round. [14 sc]

Rnd 3: Ch 1, (sc in next st, 2 sc in next st) 7 times, slip st to first sc of round. [21 sc]

Rnd 4: Ch 1, (sc in next 2 sts, 2 sc in next st) 7 times, slip st to first sc of round.  [28 sc]

Rnd 5: Ch 1, (sc in next 3 sts, 2 sc in next st) 7 times, slip st to first sc of round. [35 sc]

Rnd 6: Ch 1, (sc in next 4 sts, 2 sc in next st) 7 times, slip st to first sc of round. [42 sc]

Side

Rnd 1: Ch 1, BPsc in each st around, slip st to first st of round. [42 BPsc]

Rnd 2 – 8: Ch 1, sc in each st around, slip st to first st of round. [42 sc]

Handle

Row 1: Ch 1, sc in next 5 sts.

Row 2: Ch 1, turn, sc in next 5 sts.

Row 3: Ch 1, turn sc in next 5 sts, slip st to first st of row.

Rnd 4 – 25: Ch 1, sc in each st around, slip st to first sc of round.

Row 26: Ch 1, sc in each st.

Row 27: Ch 1, turn, sc in next 5 sts.

Row 28: Repeat Row 27. Fasten off with 10 inch tail

Finishing

Count over 19 sts from both sides of the start of handle along top edge of basket. Sew loose end of handle to top edge of basket with a whip stitch to the remaining stitches opposite the handle start. Weave in all loose tails.

I hope you have a wonderful time making some baskets. Pop on over to my guest post at Mooglyblog.com for the pattern for crocheting the grass shown in the basket.

This post contains affiliate links. I may receive compensation (at no added cost to you) if you make a purchase using these links.

If you were wondering about the stitch marker I was using in the post for the grass pattern it was from this set of Clover stitch markers. I really like these markers because they are light weight, come in a variety of sizes and best of all…they are shaped to look like little sheep. Click on the image above and it will take you to where you can purchase them on Amazon.

Crochet Inspired Coloring

I’m so excited to share with my readers my latest project.

My Crochet themed E-Coloring Book with FaveCrafts.com. Today is the first day it is available on the FaveCrafts website. It is a free downloadable PDF. Click here to get your copy.

The book contains 4 coloring pages for you to print out and color. The front and back covers are some examples of how I colored 2 of the pages using color pencils and fine line markers.

On 2 of the pages I included a stitch chart pattern for making motifs. One is the flower from the “Flowers & Vines” page. The other is a Round-to-Square blanket square from the “Gorgeous Granny Square” page. Both pattern pages also have a drawing of a crocheted motif (the square has 3) so you can play with color on the page to see what colors of yarn you might want to use.

I worked the motifs above with Red Heart’s “With Love” worsted weight yarn and a size I (5.5mm) hook. You can see on the squares that switching colors at the ends of round 1 and 2 creates a floral look. Especially when the last rounds are worked in green.

I hope you enjoy this collection of coloring pages. Please share your colored pages and crocheted projects with me on Instagram (andee.graves) or my Facebook business page (Andee Graves / M2H Designs).