The Joy of Stitch Charts

Many of us that love to crochet are very visual people. It’s the reason I love stitch diagrams also know as stitch charts. I find them easy to understand and I can get a feel for what a stitch pattern will look like just from looking at the stitch diagram.

When I design I often draw rough stitch charts for my notes. I find it easier to make changes as needed without having to worry that I missed changing something in the text directions. Once I have it all figured out between swatching and stitch charts I am ready to write the text directions for the pattern.

Even before I knew about stitch charts I drew my design notes, using images and brief notes about the stitch order. So the first time I saw a stitch chart I was enthralled. They were exactly what I had been looking for all along.

Before I started designing professionally I was always on the hunt for patterns that included stitch charts. My favorite patterns use both text and charts for the instructions. Now that I am designing, most of the crochet books I purchase are stitch dictionaries, and my favorites are the Japanese published books.

Some Japanese Pattern books I bought in 2014.

Another reason I love stitch charts, they can be understood by everyone, no matter what languages you speak or read. I can’t read the Japanese writing, but the stitch charts and swatch photos overcome the language barrier. There is an element of educated guessing when working this way.

This coming Saturday I will be teaching a class at the Longmont Yarn Shoppe called “Stitch Chart Boot Camp”. In the class students will be working from stitch charts only, learning tips and tricks in how to make decisions about the final project. In this class students will work from a stitch chart to create a lovely motif. You’ll learn what the all the symbols in the chart mean and how they can vary depending on the country of origin.

If you are in the greater Denver area, please come join me for this class. You can enroll online at the Longmont Yarn Shoppe website.

For the Love of Crafting

Valentine’s Day is only 9 days away. So it is time for some quick crafting projects to show the special folks in our lives how much we love them.

Today I’m going to be sharing ideas for crafting a bit of love for your family and friends. First off, I have a new coloring page for everyone. You can download this PDF to print and color-in however you want.

20190205 Valentines Coloring Pg – Andee Graves M2H Designs

I have been enjoying coloring books and pages for some time and have decided that I really love having the option to print out the pages I want to color. I have to confess many of my physical coloring books remain uncolored because I didn’t want to “ruin” the images.

Having the option of printing out the pages I am going to color means I can color without worry that I’ll be unhappy with the outcome. It also gives me the chance to play with different coloring styles and mediums. One time I might use only color pencils, the next I’ll get out my Chameleon color-tones markers, or maybe I’ll use both.

When printing out the page from a PDF you can also play with the size of the page. For this Valentines design you can print it out smaller to make the image fit on a regular size greeting card base, or color the page and then cut out the individual elements to use on a smaller card.

The two little cards in the photograph were made using that technique, I used 3 Glue Dots to adhere each heart to a plain card that I had added color to with a marker. I really like using the Glue Dots, no mess on my table and super quick to craft with. The package in the photo was one that I got on my recent trip to the AFCI Creativation show in Phoenix a couple weeks ago. 

For those of you that may not be as much into coloring as crocheting, today’s coloring page includes a stitch chart for the heart motifs that are drawn on the page. This heart may be familiar to those of you that have been visiting my blog for awhile.

It is an update of my “Crocheted Love” heart from 2013 that I revisited last year in my pattern “A Pocket Full of Love”. If you need help with the picot stitch that forms the point at the bottom of the heart you can find a tutorial on my post “The Greatest of these is Love”.

The third craft I am looking at for making fun gifts for Valentine’s Day is needle felting. I’ll be teaching a quick class this Sunday from Noon – 1:30p at the Longmont Yarn Shoppe on how to make these adorable little heart pins.

Students will be provided with a kit of materials that will include a crocheted heart and the fiber to felt a 3-D heart in a contrasting color. The handout for the class will also include the pattern to crochet your own little hearts to needle felt onto.  You can visit the Longmont Yarn Shoppe’s website to enroll in the class.

Update February 8, 2019: My crochet heart coloring page is featured on FaveCrafts. If you are in search of more coloring pages check out their site, but be prepared to get lost on there in the fun of looking at everything.

My October Classes

Wow! 2018 decided to go into high speed. October is half finished, but it isn’t too late to take some classes with me.

I’m teaching 3 classes before October is finished. All 3 classes are great ones for adding to your gift making skills as the holiday season is just around the corner. Best of all they are small projects so you will have plenty of time to finish up a few for the special folks on your gift list.

Saturday, October 20th 1p- 4p  “Curly Sheep Pin”

at the Longmont Yarn Shoppe, Longmont, Colorado.

This sweet little needle felted sheep pin is a wonderful gift item. In class I’ll be covering tips and tricks for needle felting small items, embellishing with mohair locks and how to create a very densely felted piece that will last for years to come. Basic needle felting experience is great, but not required. You will leave the class with your finished pin and the skills to make an entire flock of sheep as gifts for the holidays.

Saturday, October 27th I will be teaching at the Brown Sheep Fiber Arts Schoolhouse in Mitchell, Nebraska. This is a wonderful facility located just across the highway from the Brown Sheep Company. Roomy well-lit classrooms are the perfect place to learn new skills. Mitchell, Nebraska is only 14 minutes from the Scotts Bluff National Monument, so this is a great place to come for a fun weekend.

8:30a – 12:30p “Slippers that Fit!”

There are so many variables when you are crocheting wearables, even if you follow a pattern precisely you may not get the fit you want. In this crochet technique class you will learn what measurements you need and how to use those measurements to make slippers that always fit no matter what size yarn or foot you are working with.

1:30p – 4:30p “Sweet Angel Ornament”

Needle felting is a wonderful craft for creating lightweight wool ornaments for your holiday decorations. You’ll learn how to work with a variety of needle felting sculptural techniques to create a dense long-lasting felted ornament that will be loved for years. Project will introduce using a template for starting your sculpture, creating shapes separately then joining to your sculpture and directional gathering of fiber to create 3 dimensional shapes. Class is ideal for those that have a little experience with needle-felting already

Click on any of the class names to go to the enrollment pages for more information on taking one or more of these classes.

Mountain Wildflower Afghan Square

It’s almost time for the singing to start with my birthday just around the corner. I have been considering the idea that I will continue to celebrate my birthday every year but I won’t add any more years. Theoretically it sounds good. So starting this year I am 55 forever. It is a nice round number.

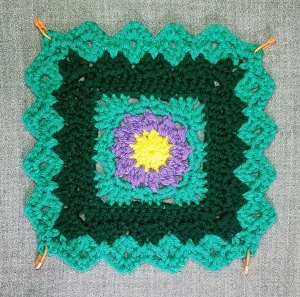
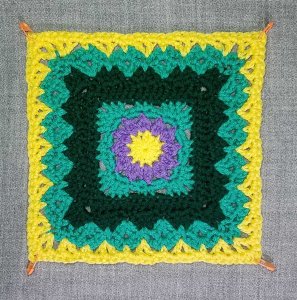
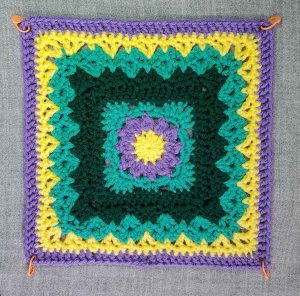
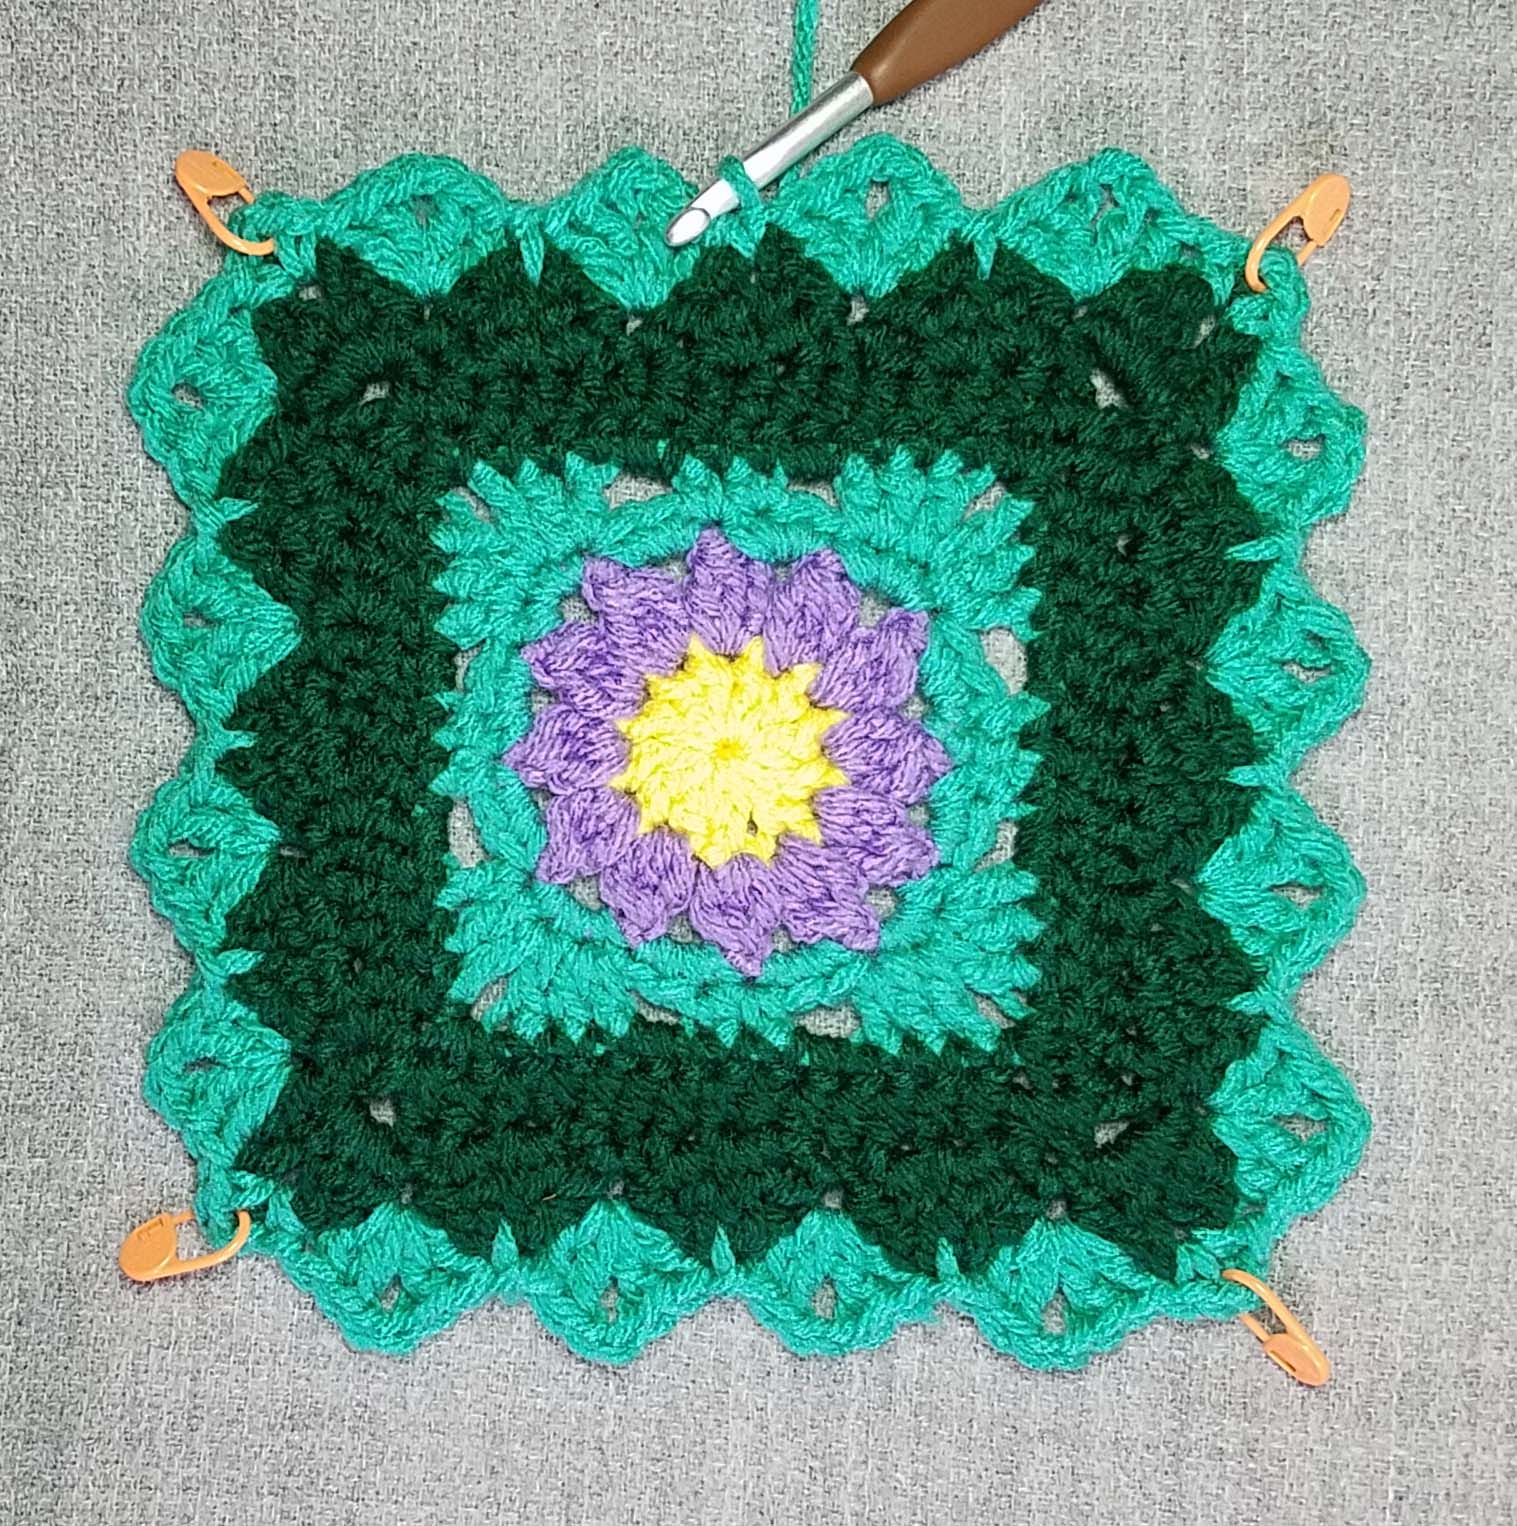
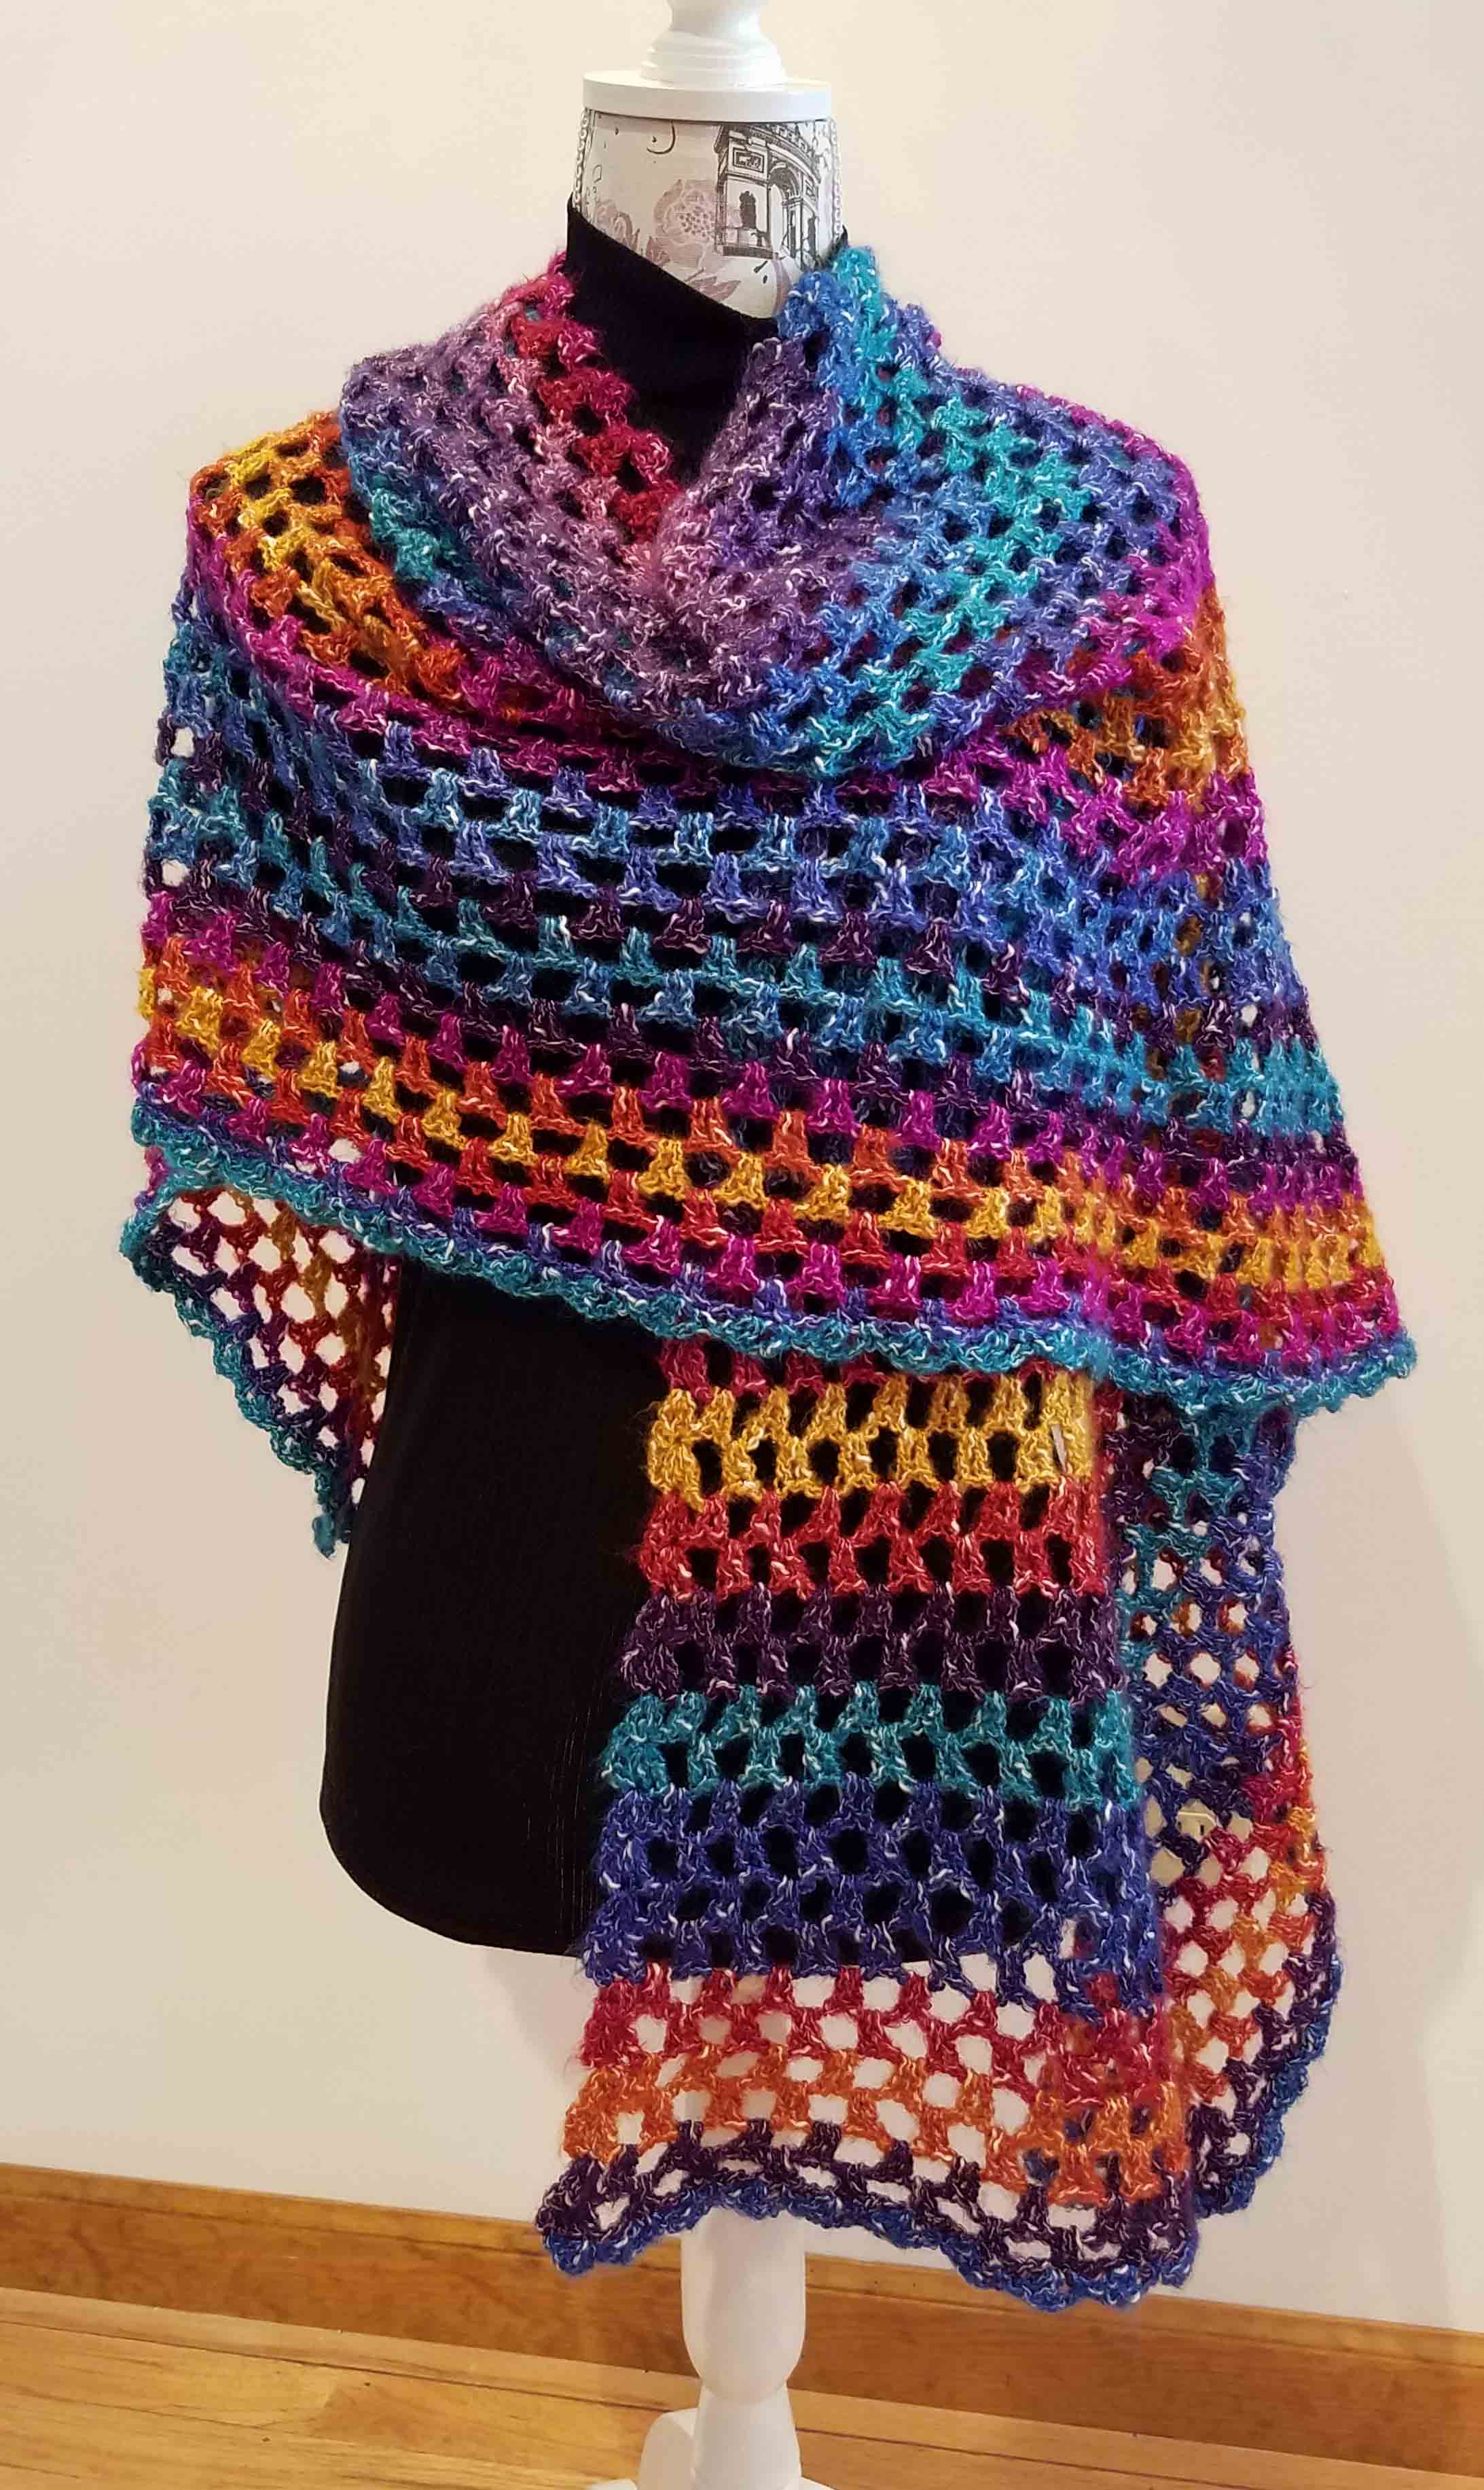
My tradition the past 4 years has been to publish a complimentary crochet pattern for an Afghan Square here on the blog as a birthday gift from me to my readers. This year’s square is my “Mountain Wildflower Afghan Square”. It is Block #20 in the 2018 Moogly Afghan CAL as well.

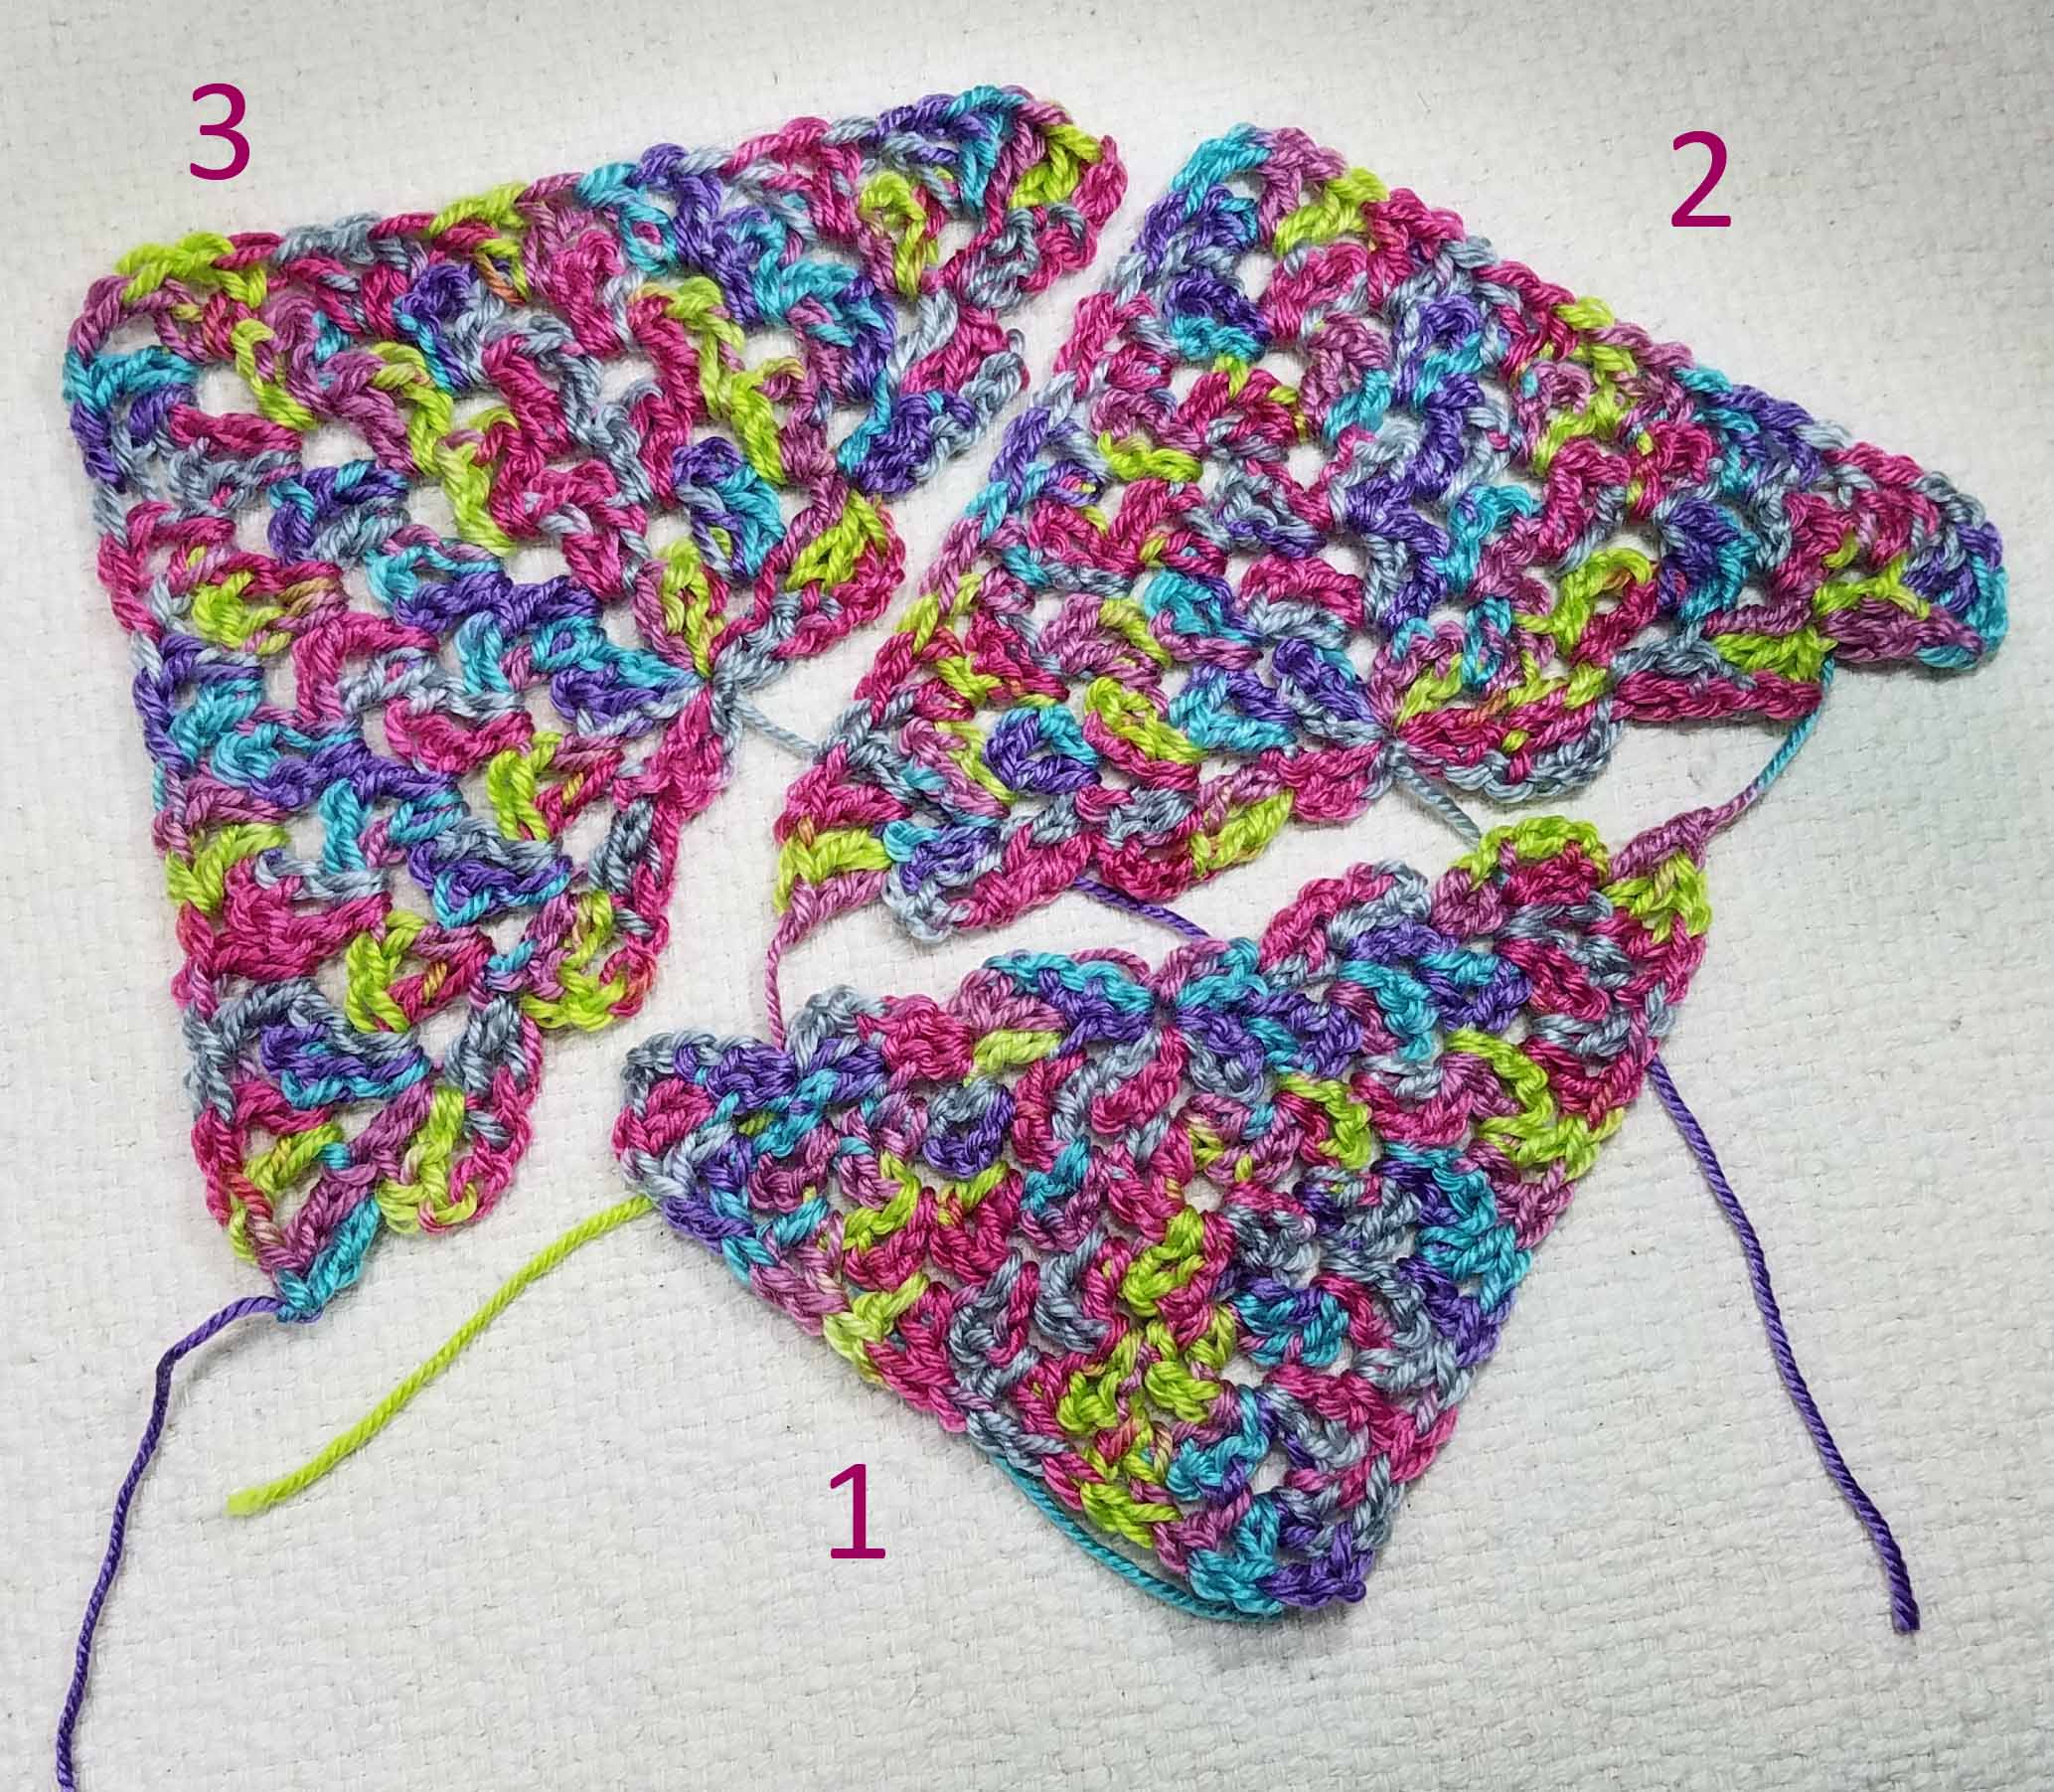
This year I had a lot of fun playing with 2D texture. I used ch, slip st, sc, hdc, dc and cluster stitches. I am having you turn for some rounds, each round instructions are marked either RS or WS to help you stay on track.

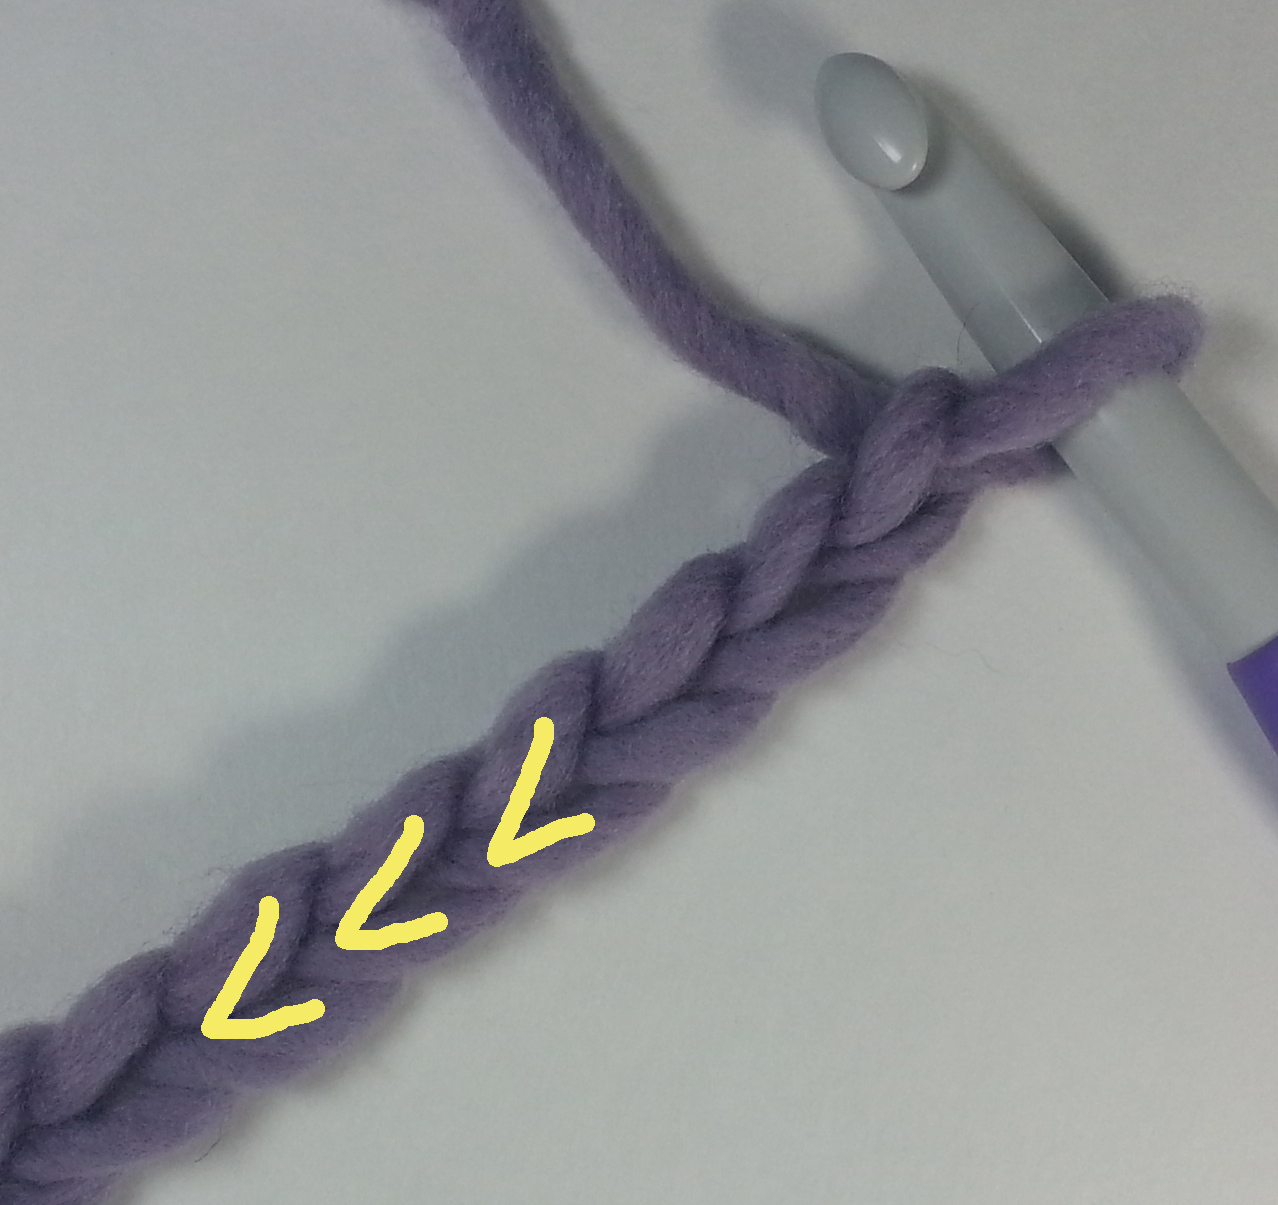
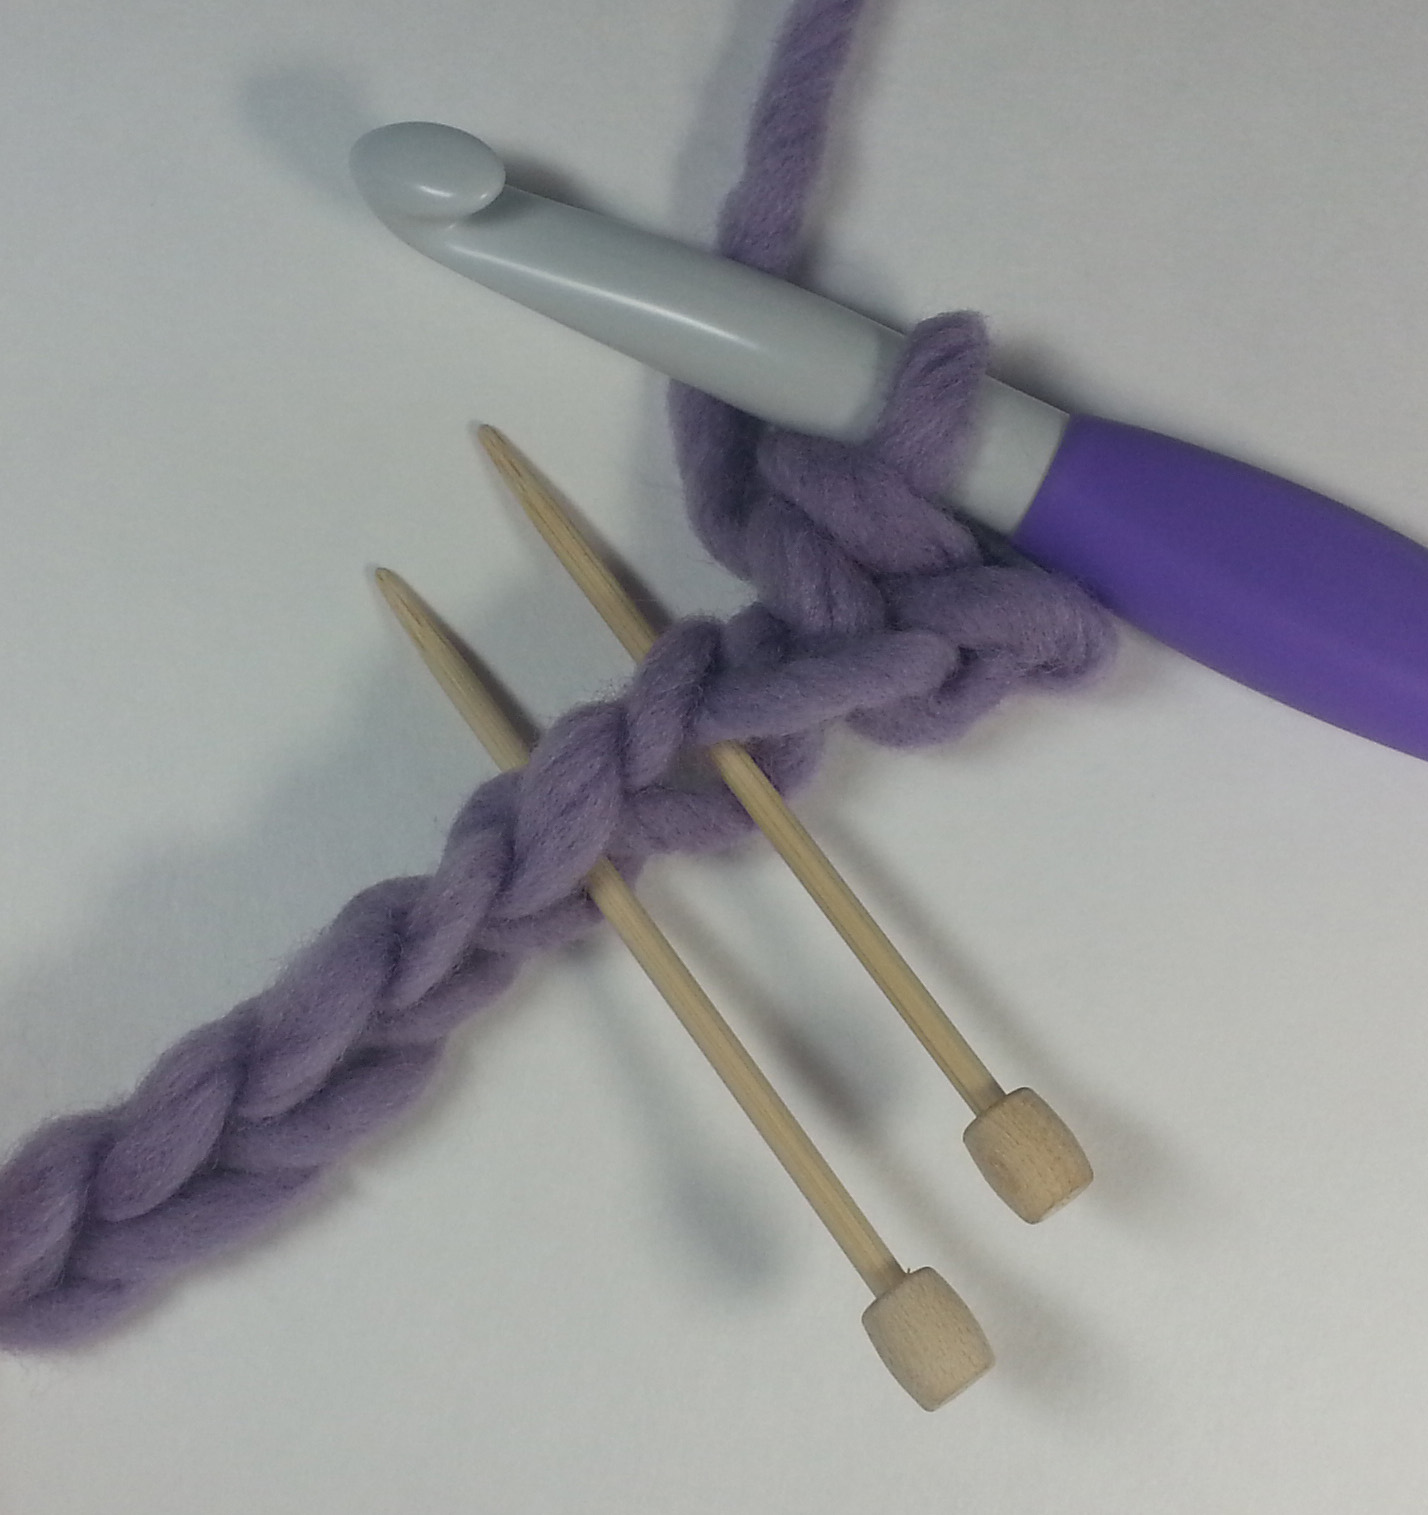
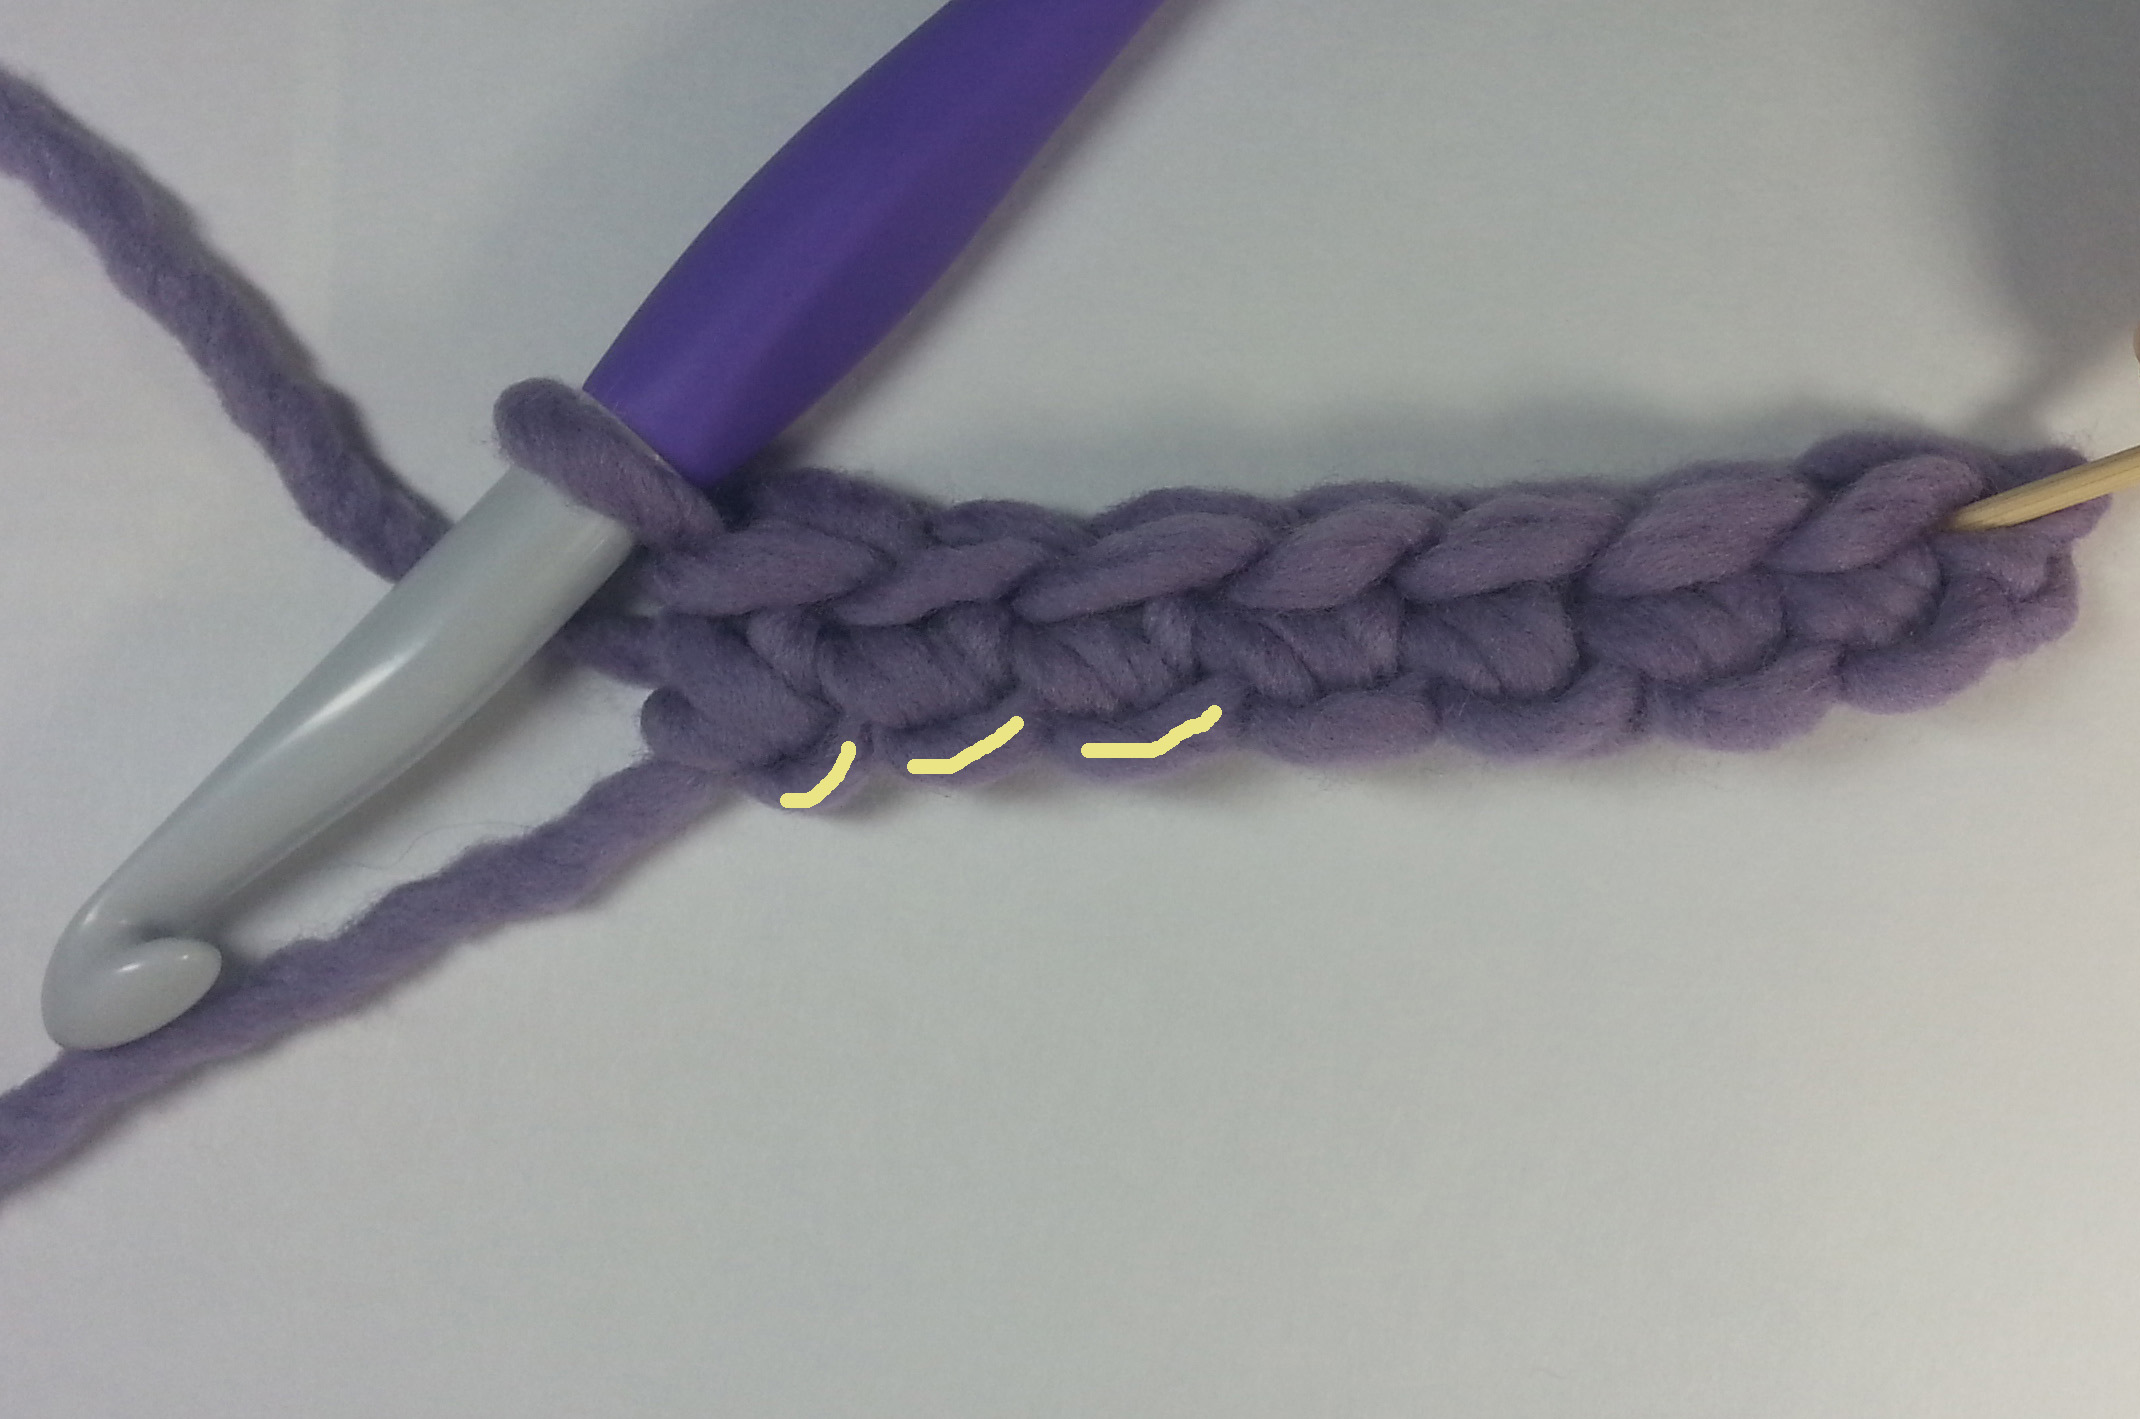
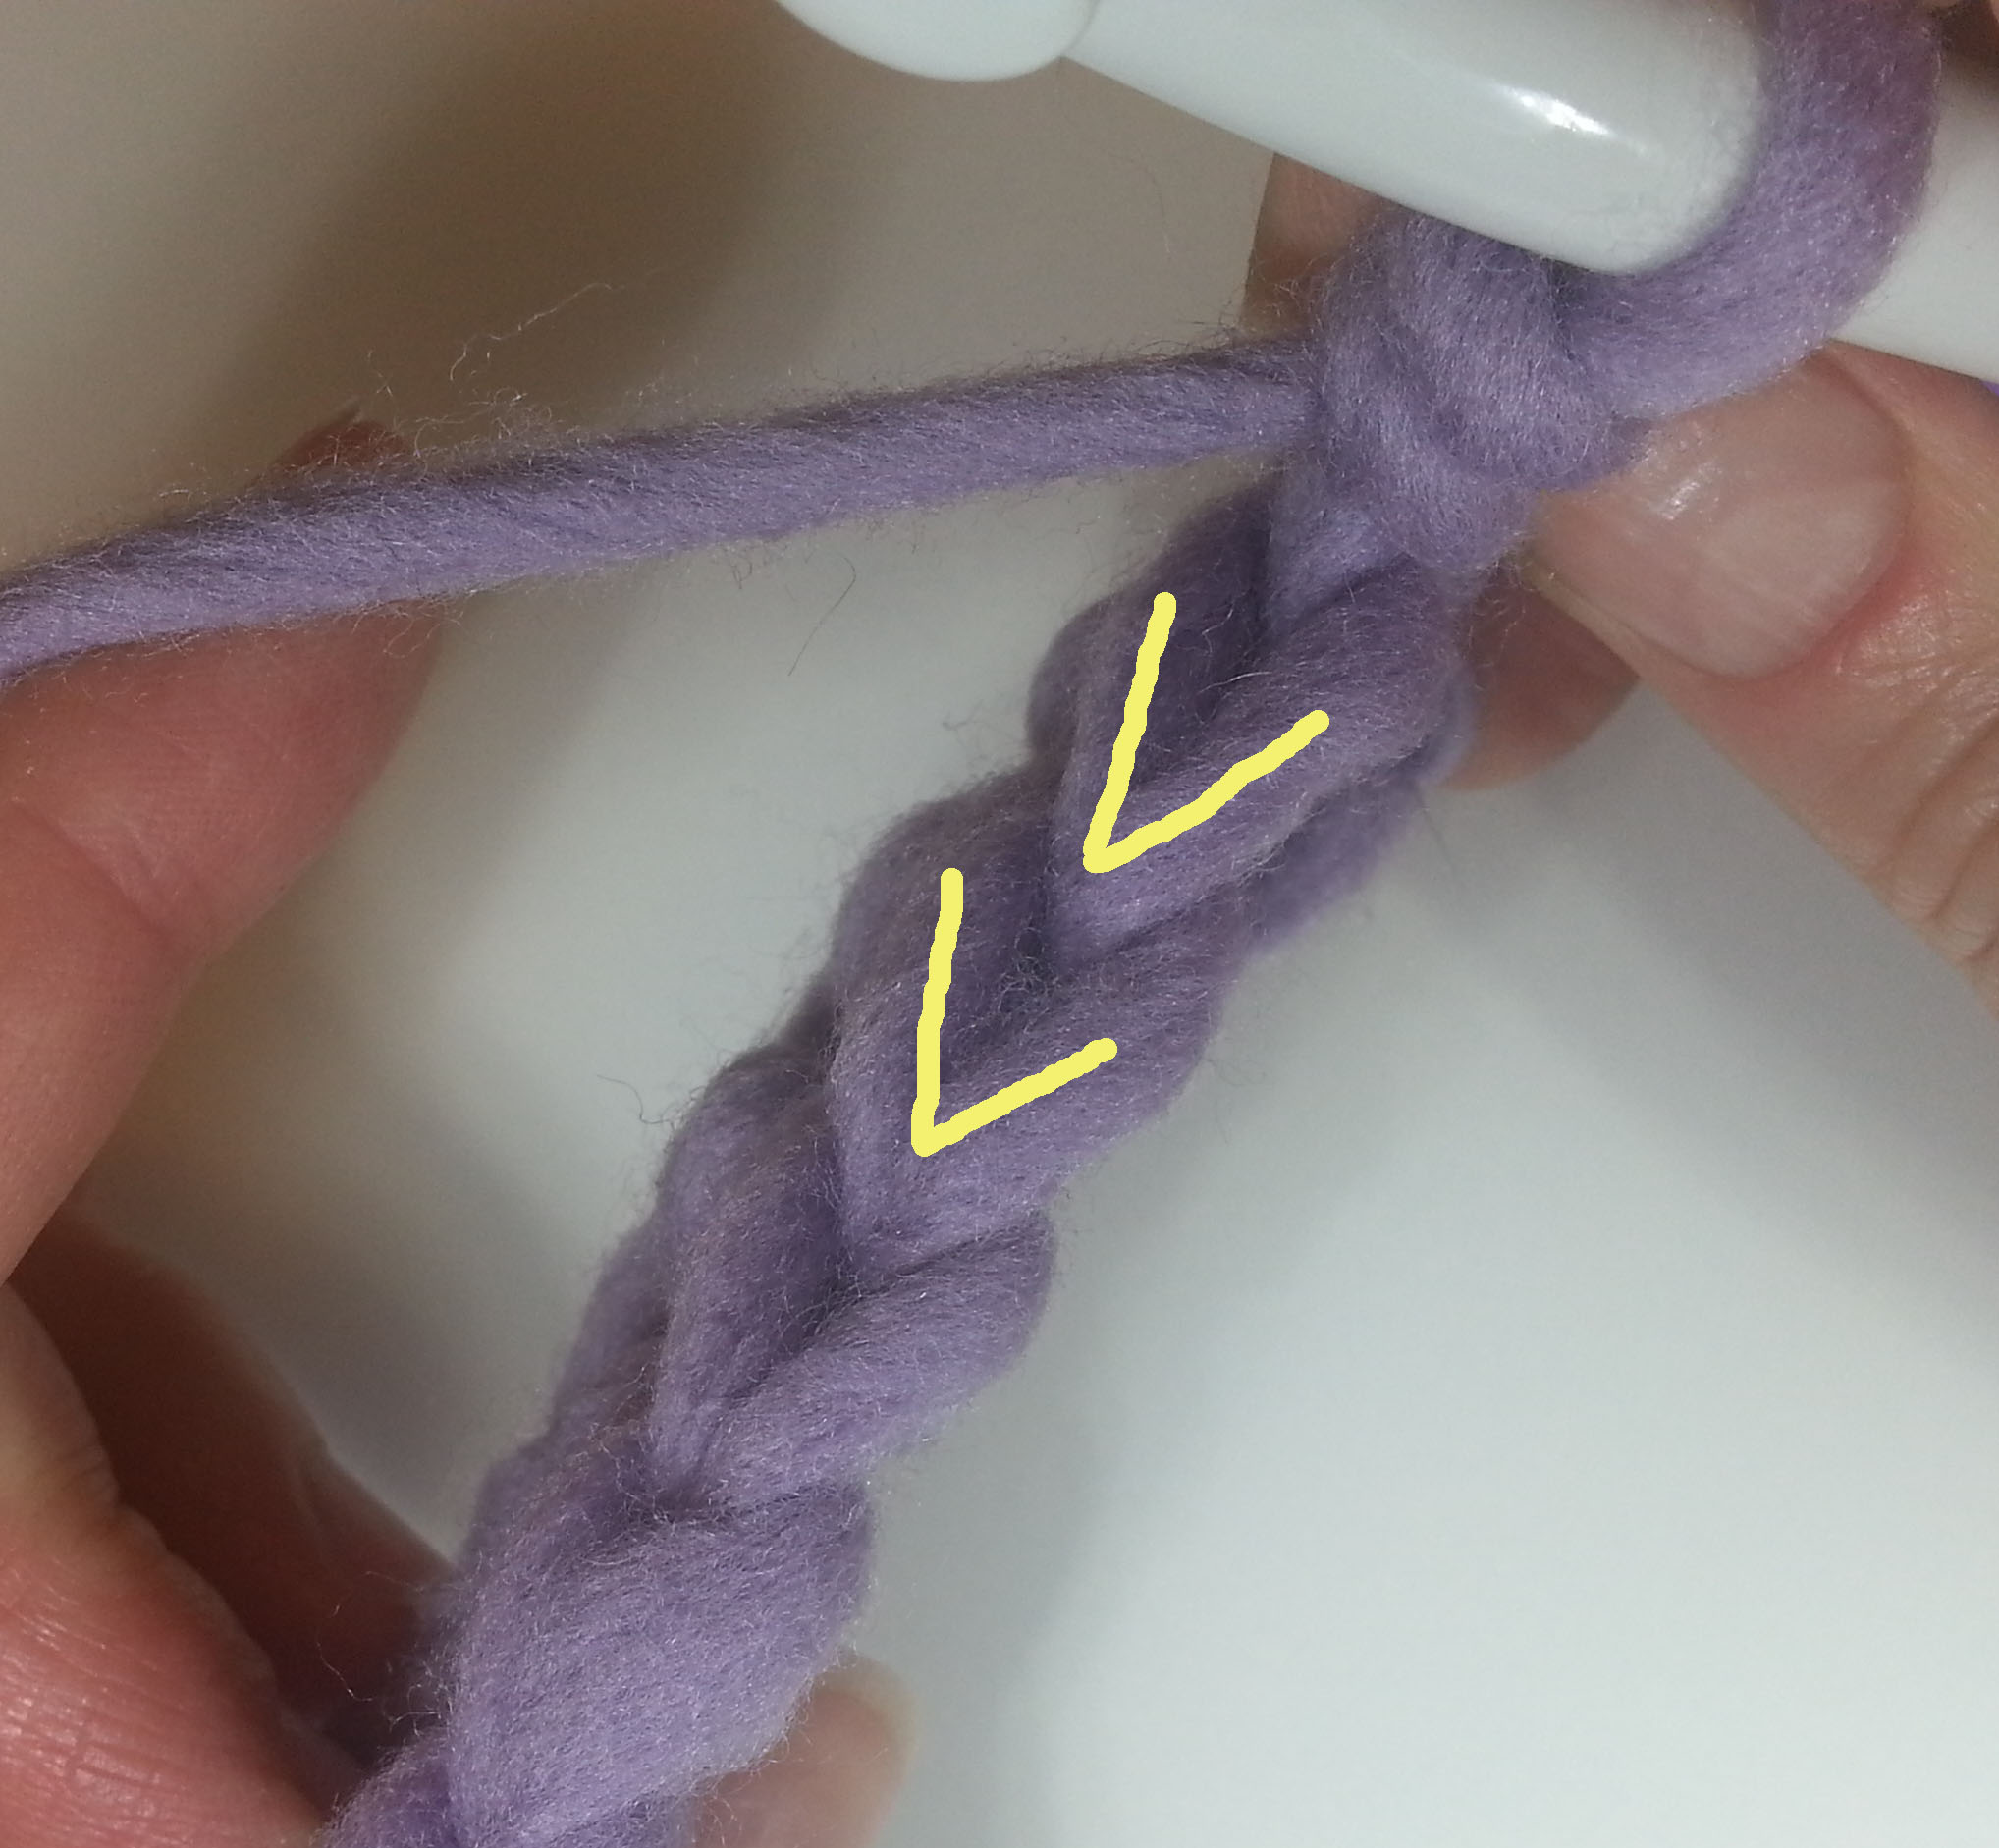
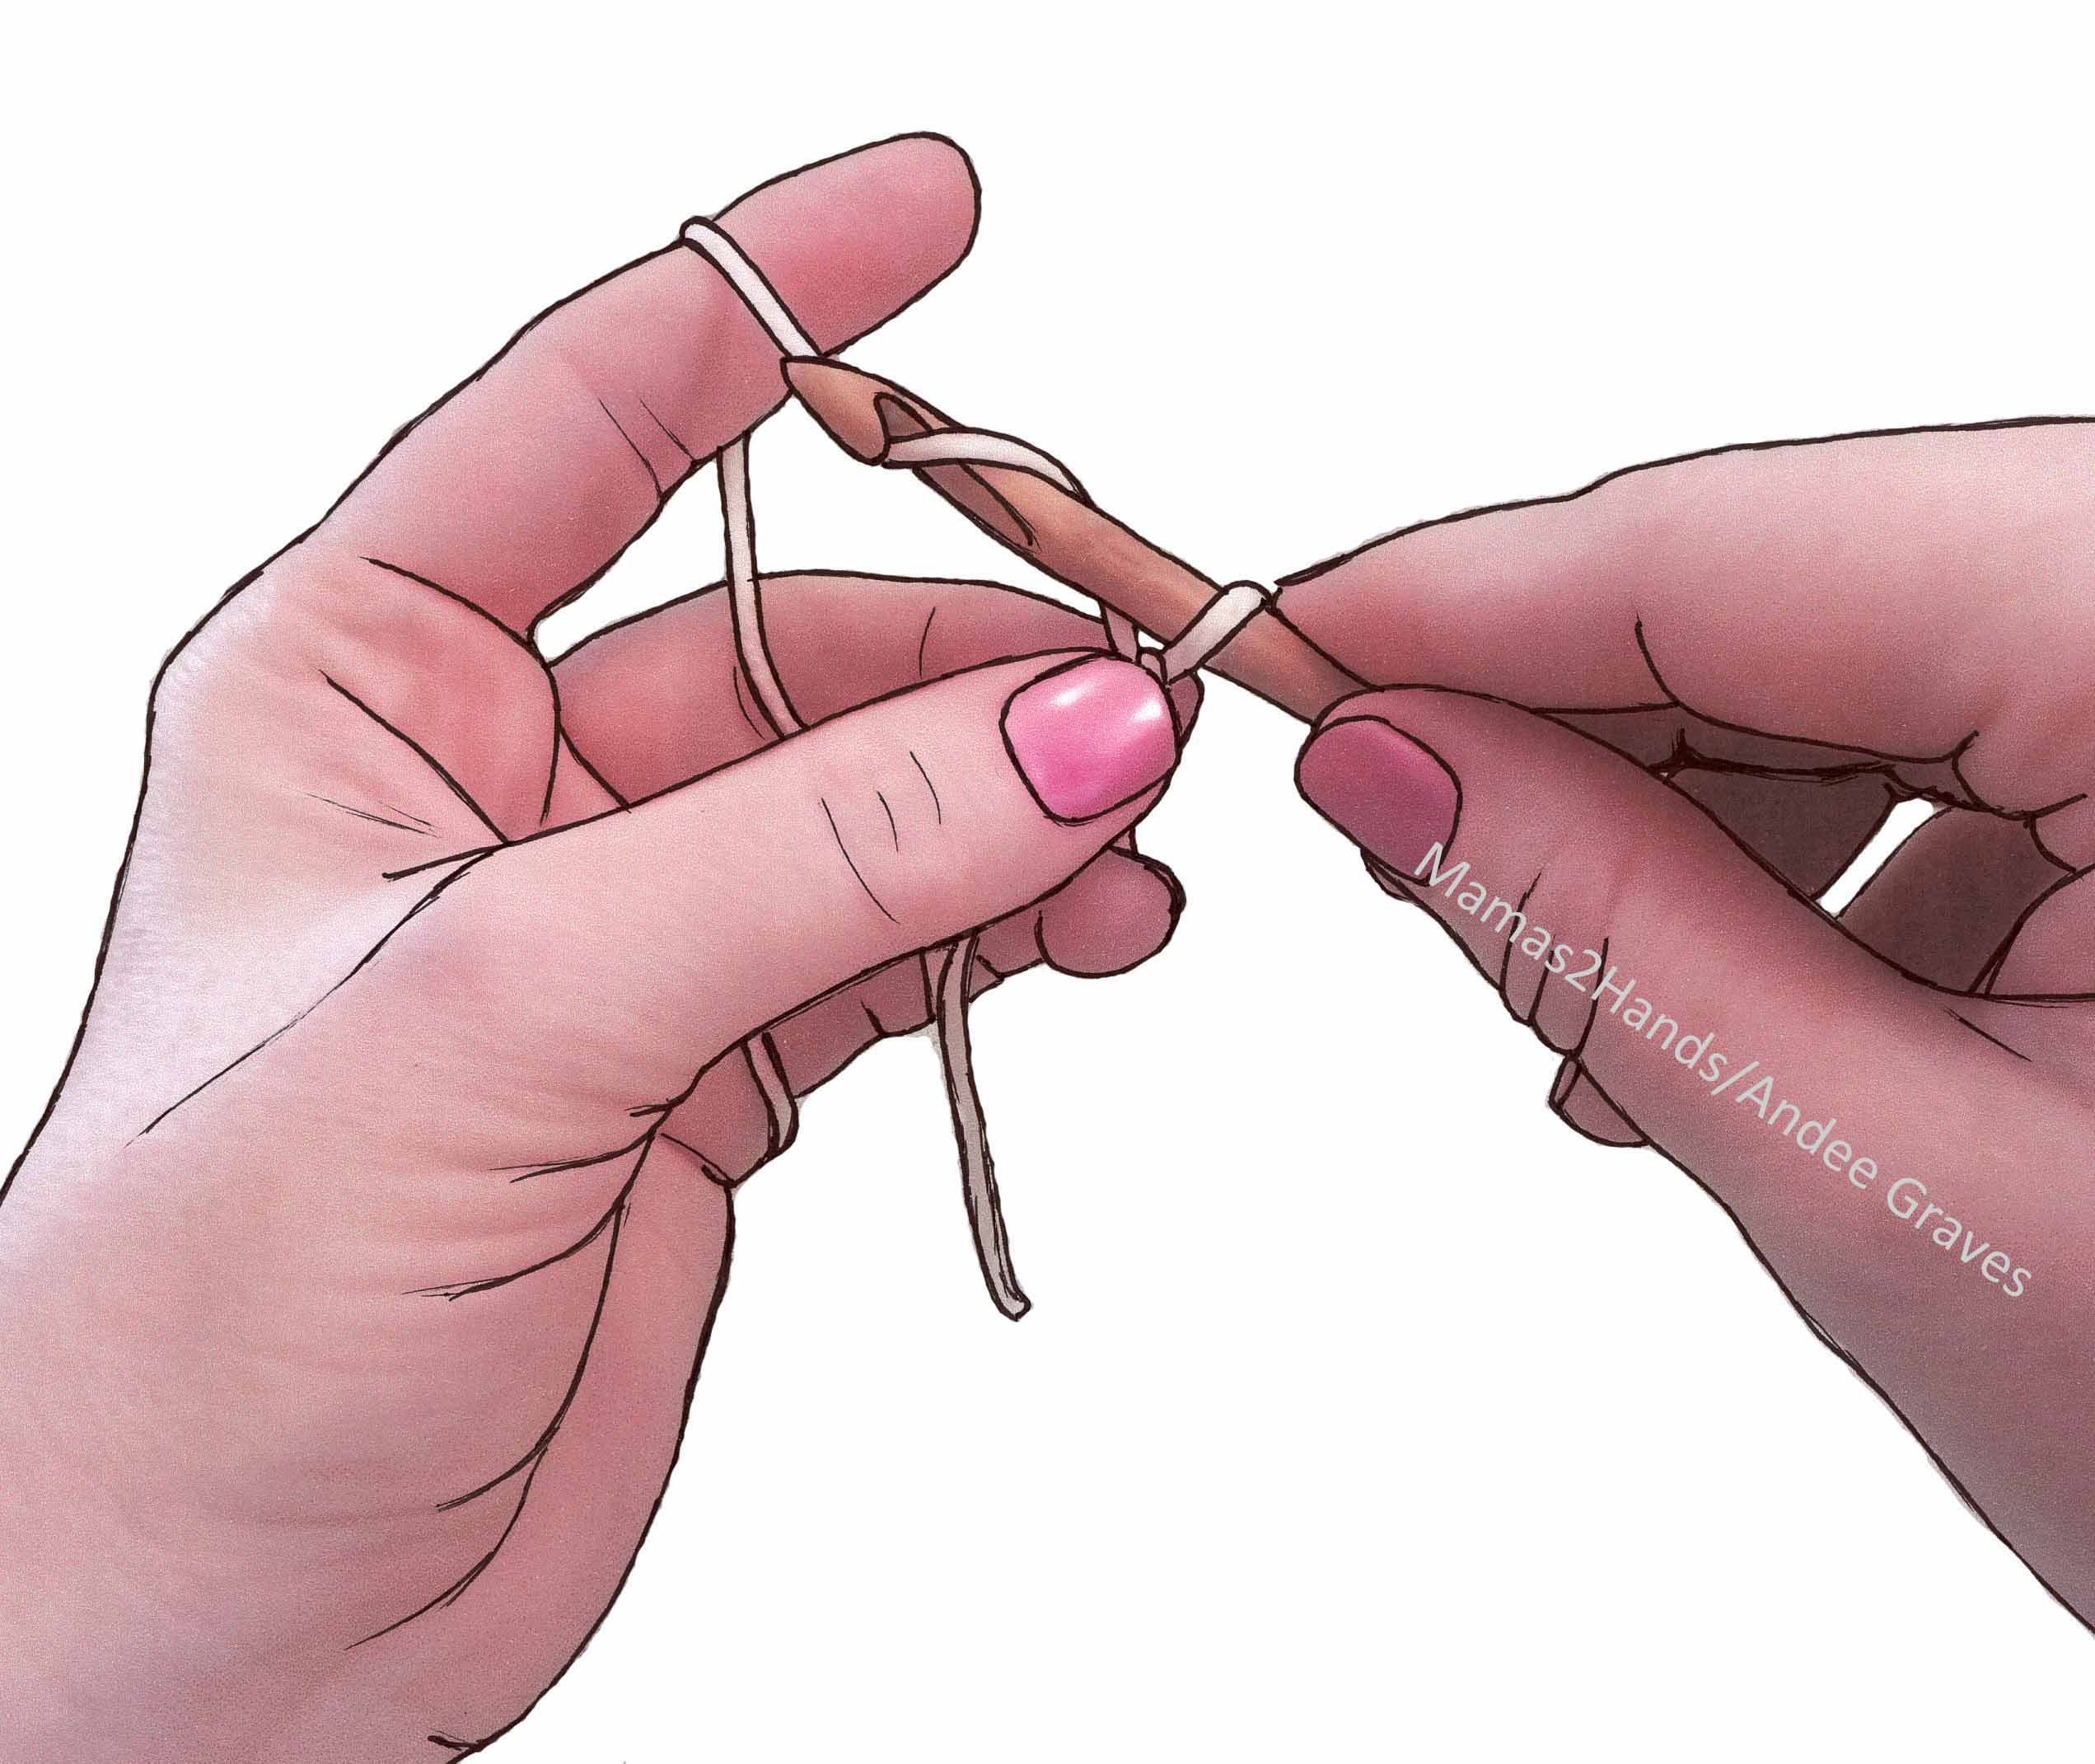
There are times when you will be working toward a chain space that have a hdc before them. I wanted to talk a bit about the hdc before you get started crocheting and share the following photos as a guide.

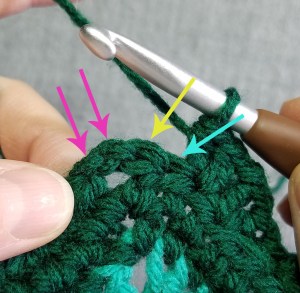
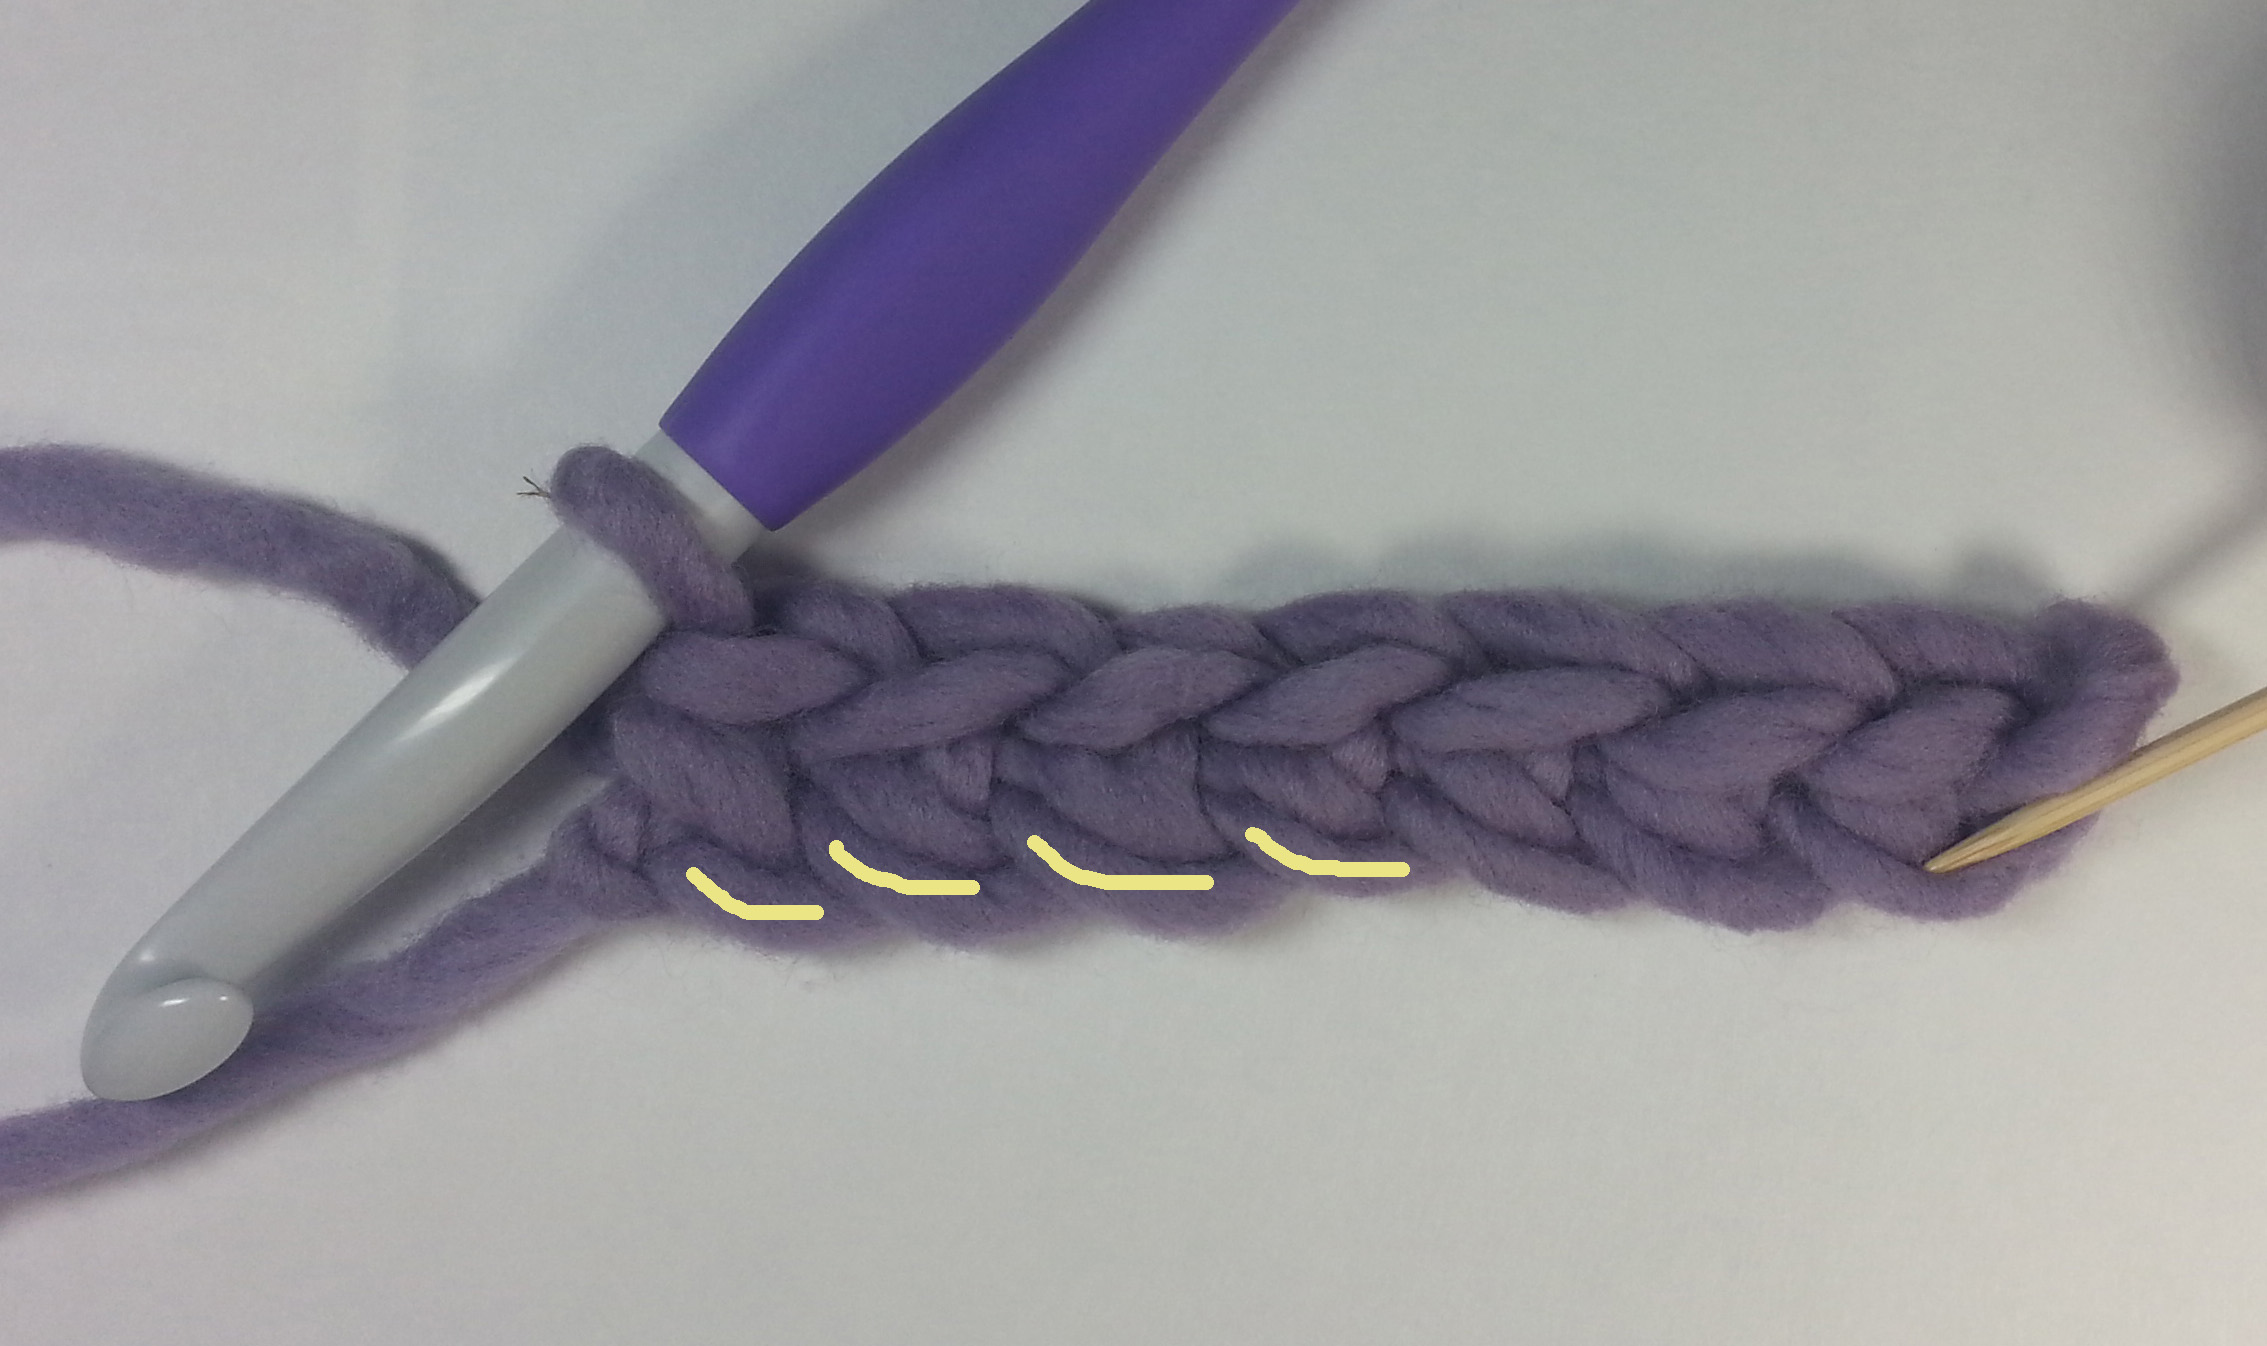
The top of the hdc can look a lot like it is part of a chain space. This is good to keep in mind when working Round 7 of this square. In the photo above, the 2 pink arrows are showing the 2 chains of the ch-2 corner sp, the yellow arrow is the top of the last hdc before the chain space, the aqua arrow is the skipped st.

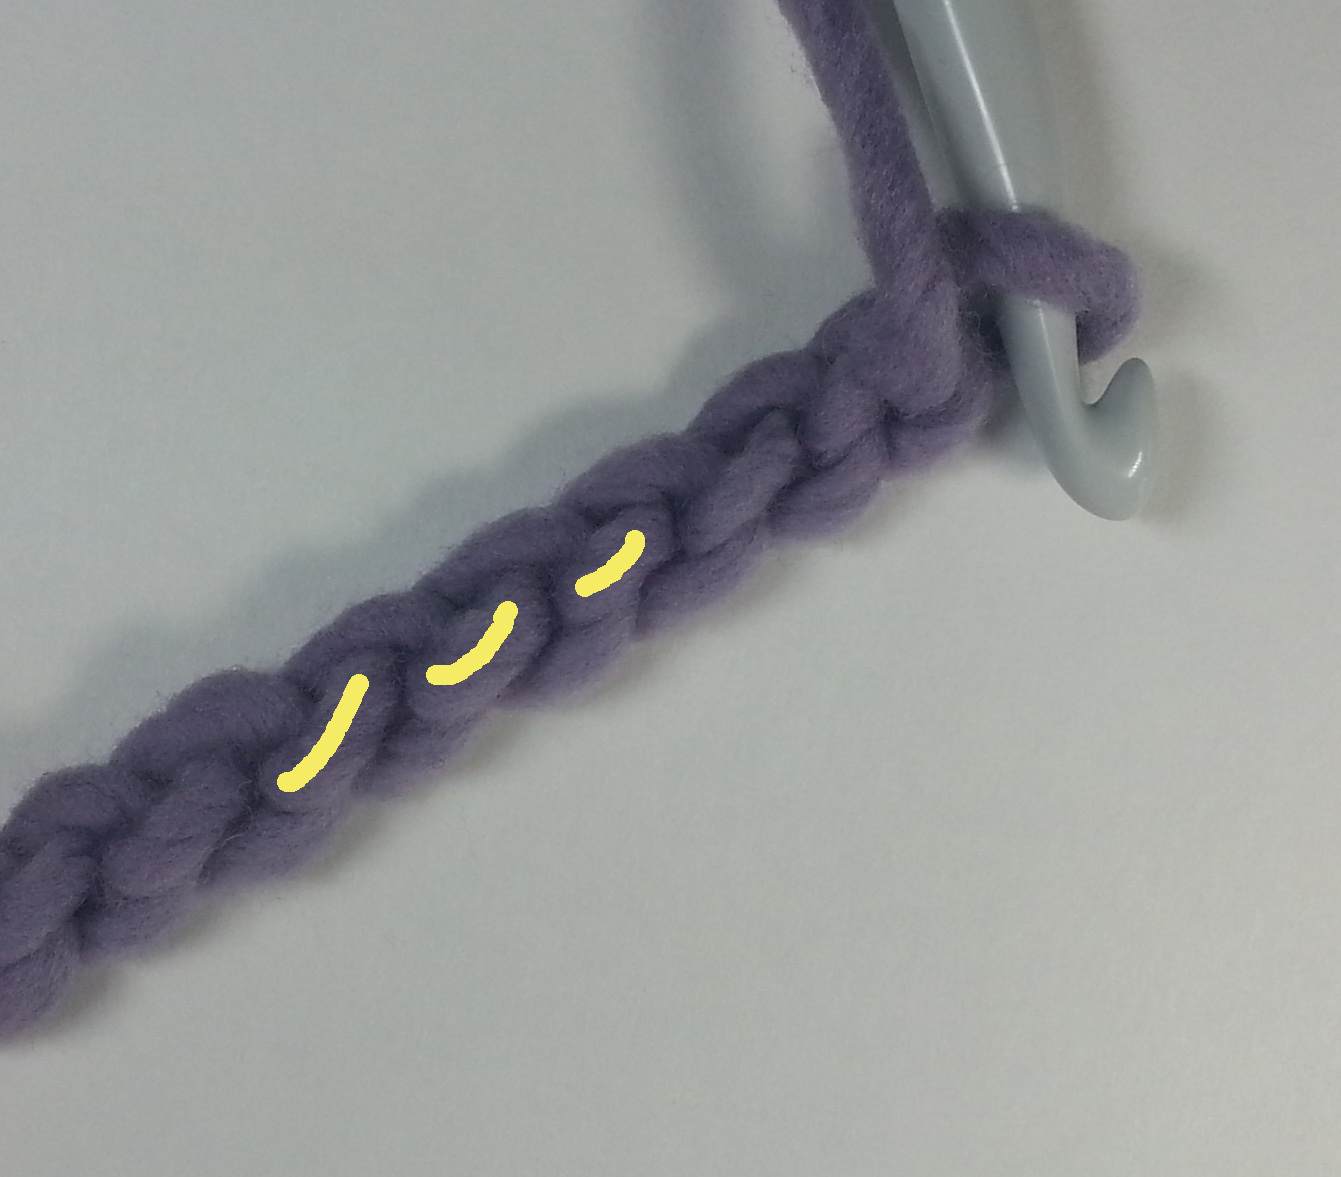
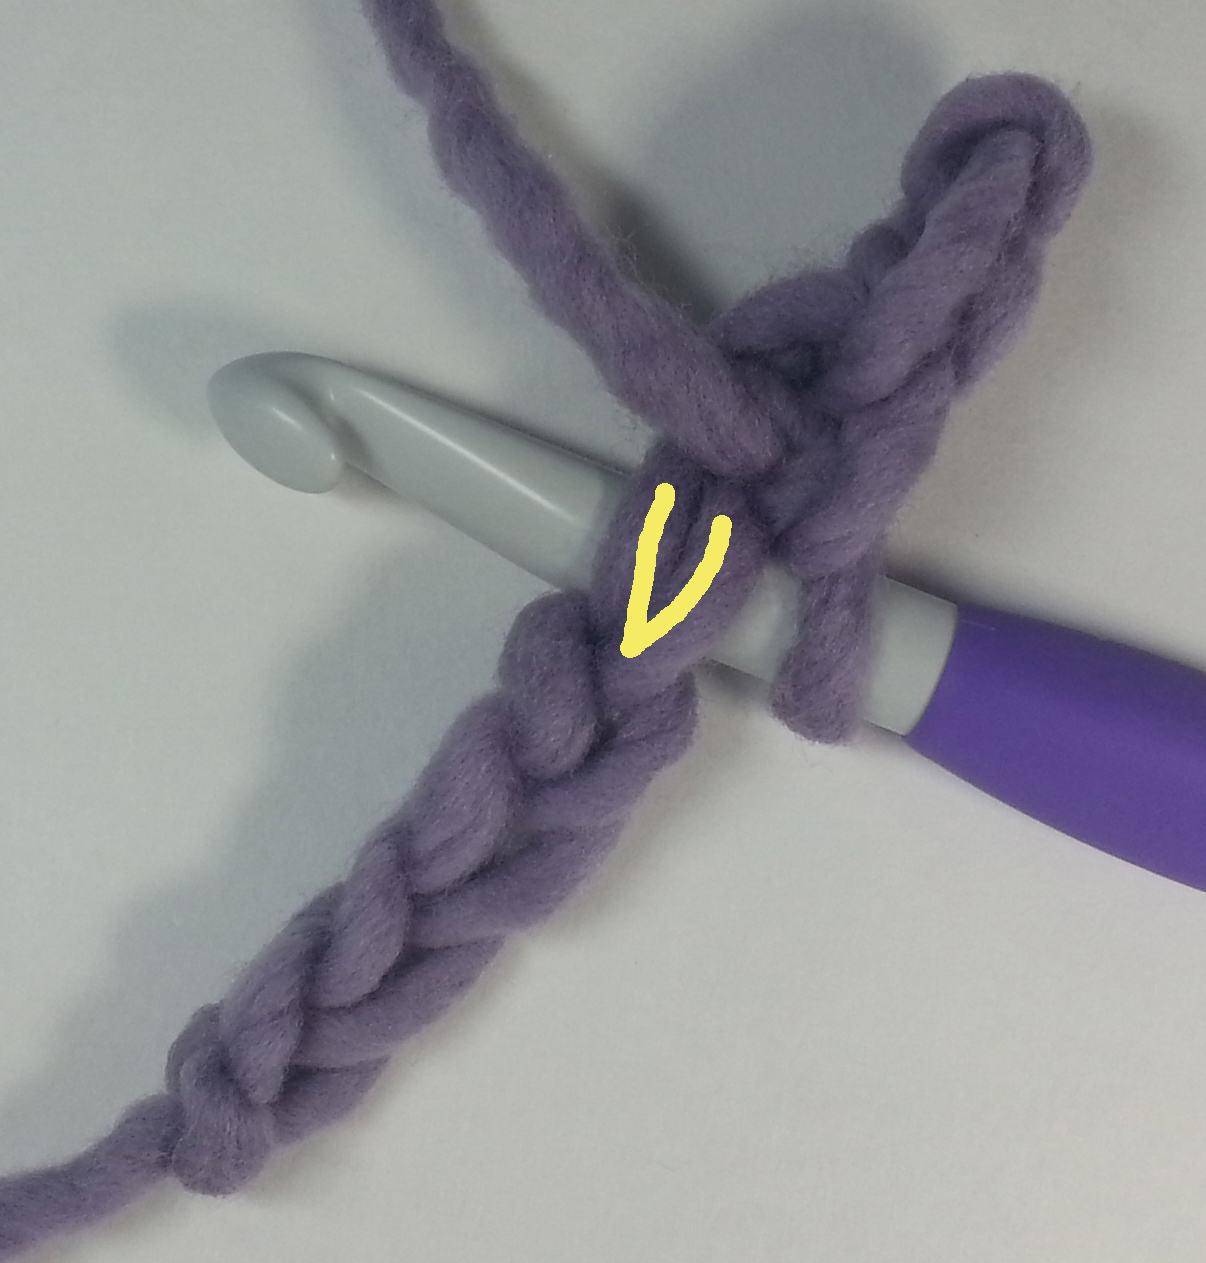
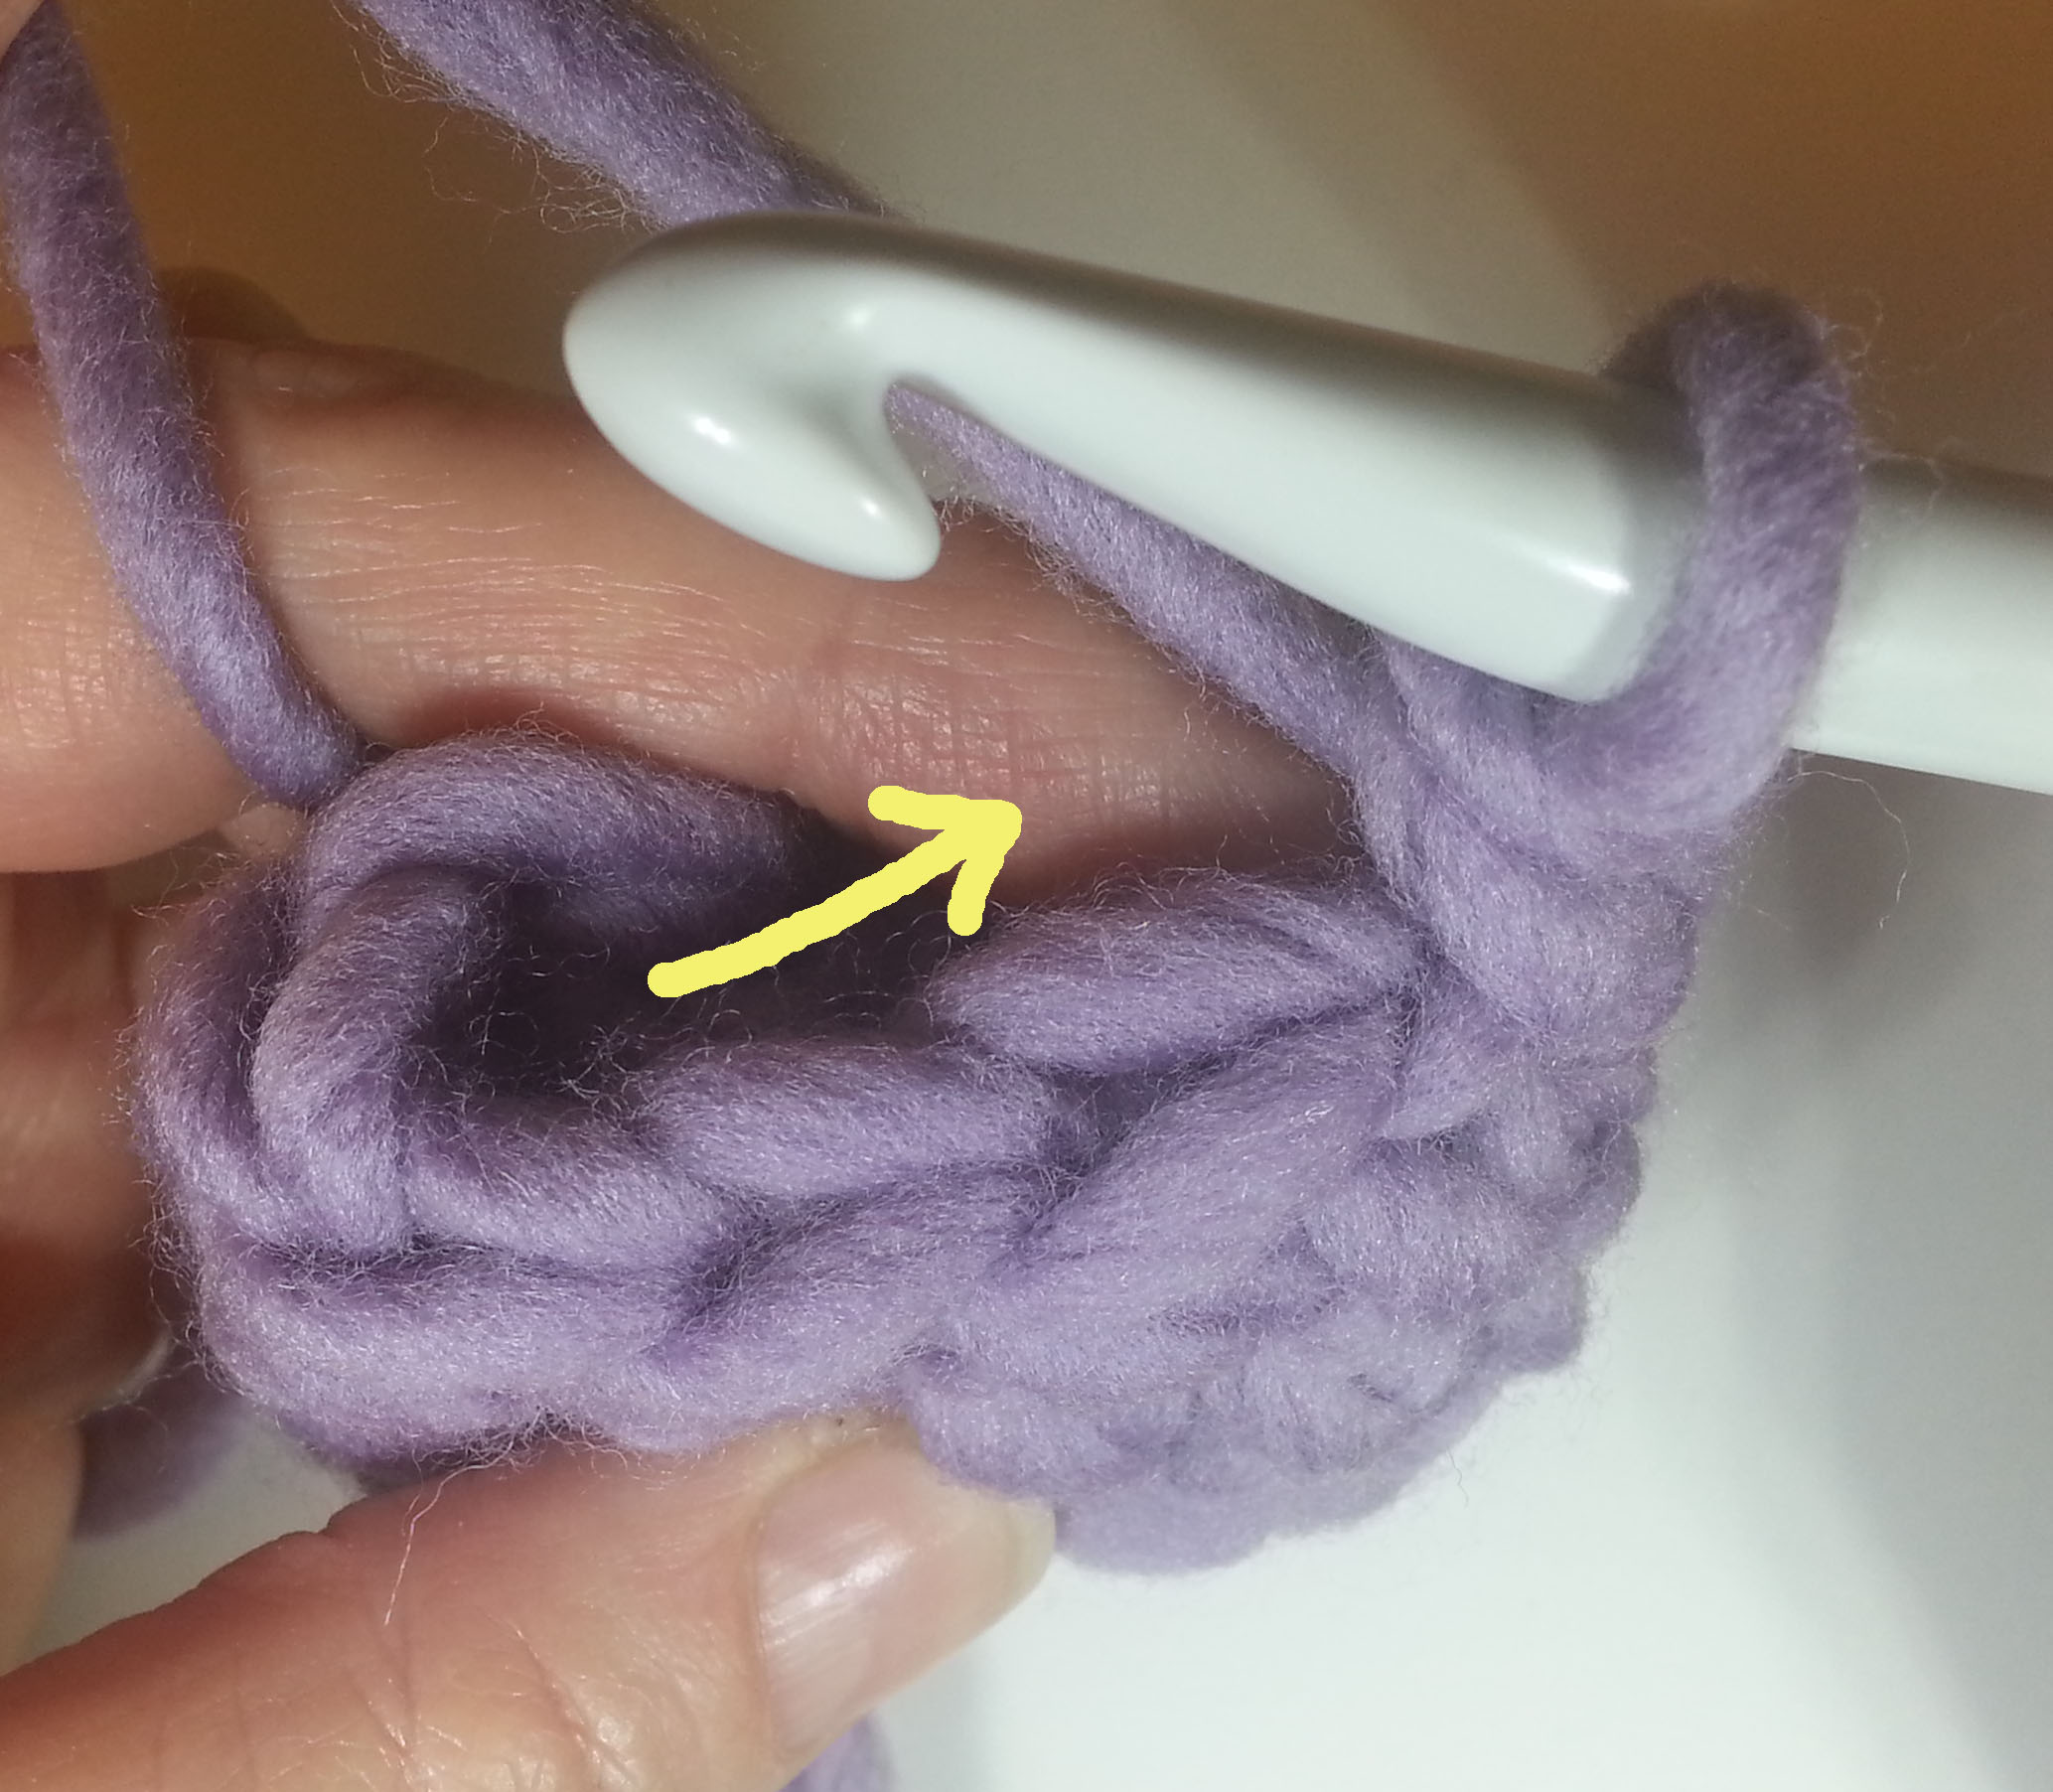
Sometimes it helps to get your finger behind the hdc to guide your hook.

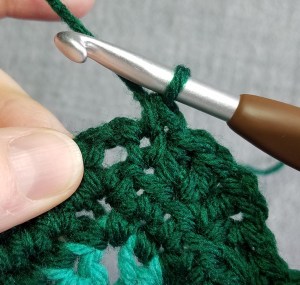
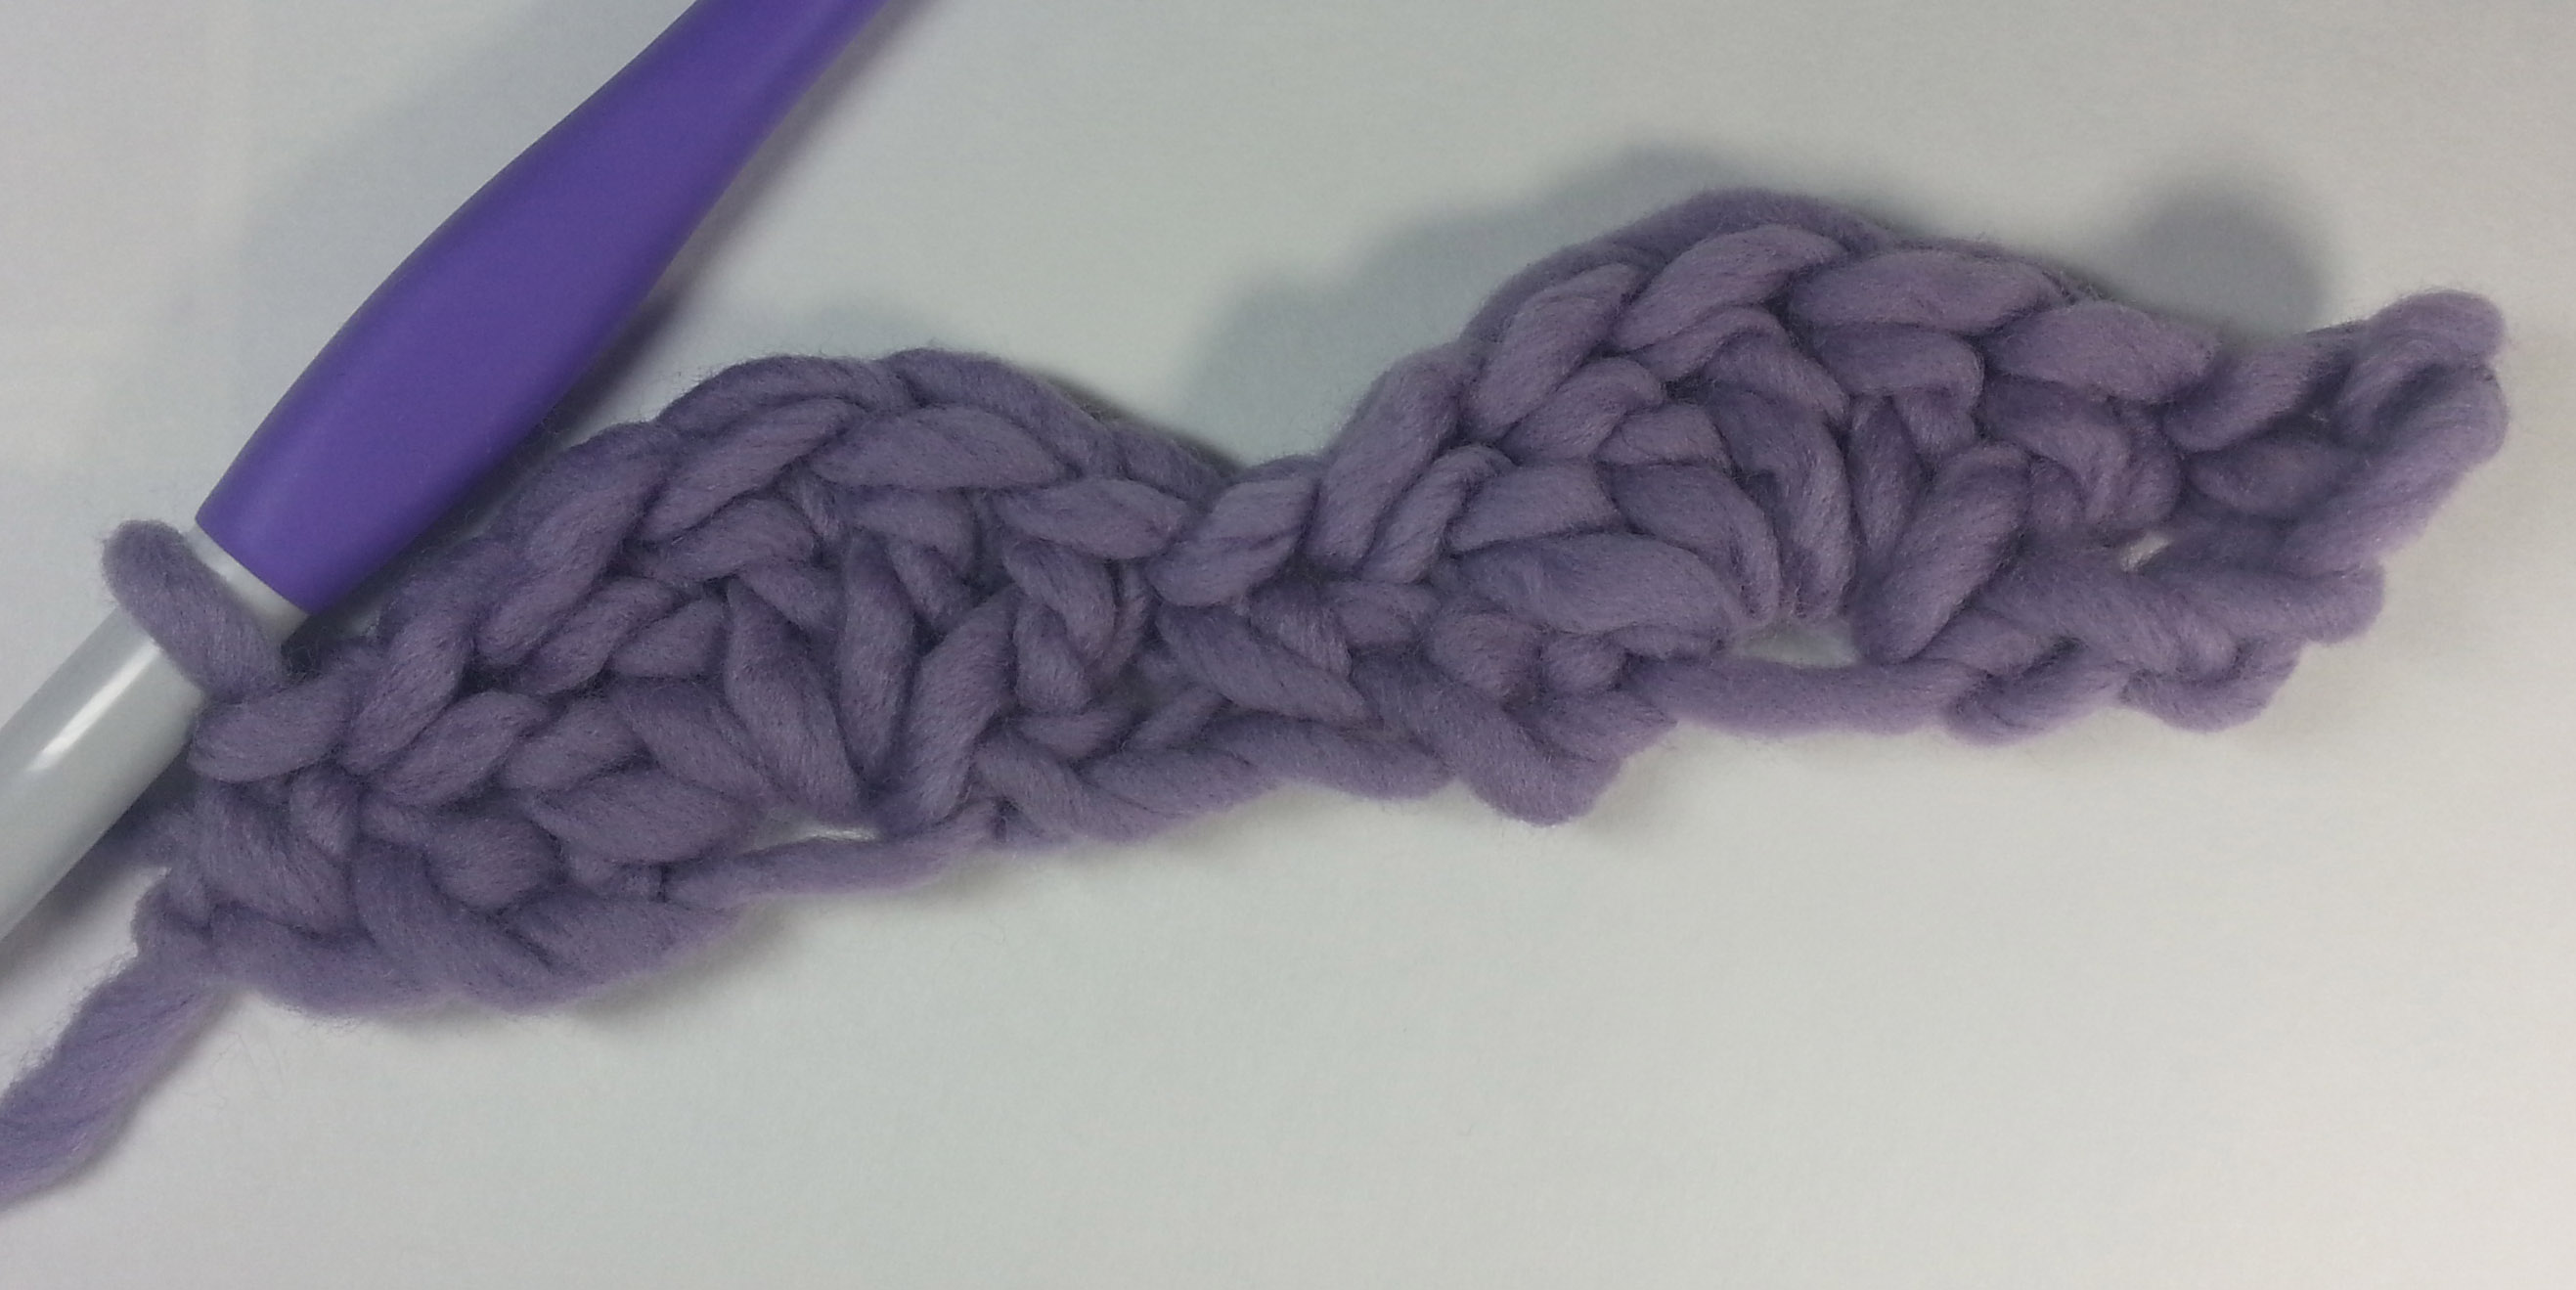
This is the completed single crochet before the ch-2 space.

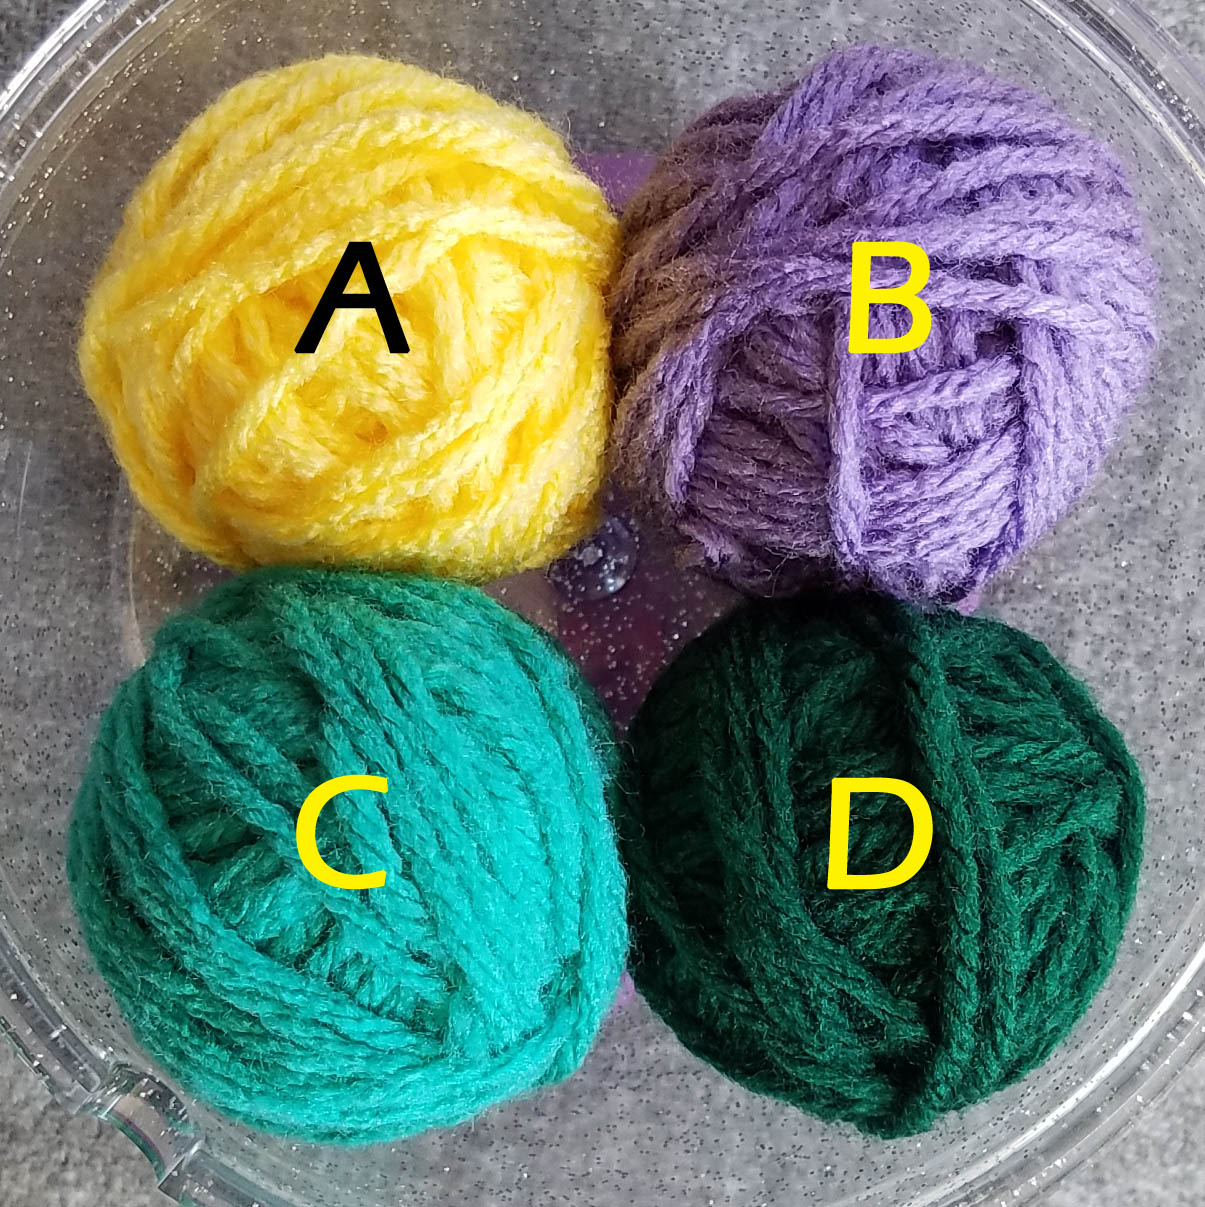
I used 4 colors in this square with 9 color changes. I’ve also listed the amounts of each color of yarn needed for 1 square, so you can have fun using up some of your scrap yarn stash. You could even use 9 different colors if you want. I have listed the amount of yarn needed for the 4 colors and there are break-outs in curly brackets for the amounts in each of the 9 color changes.

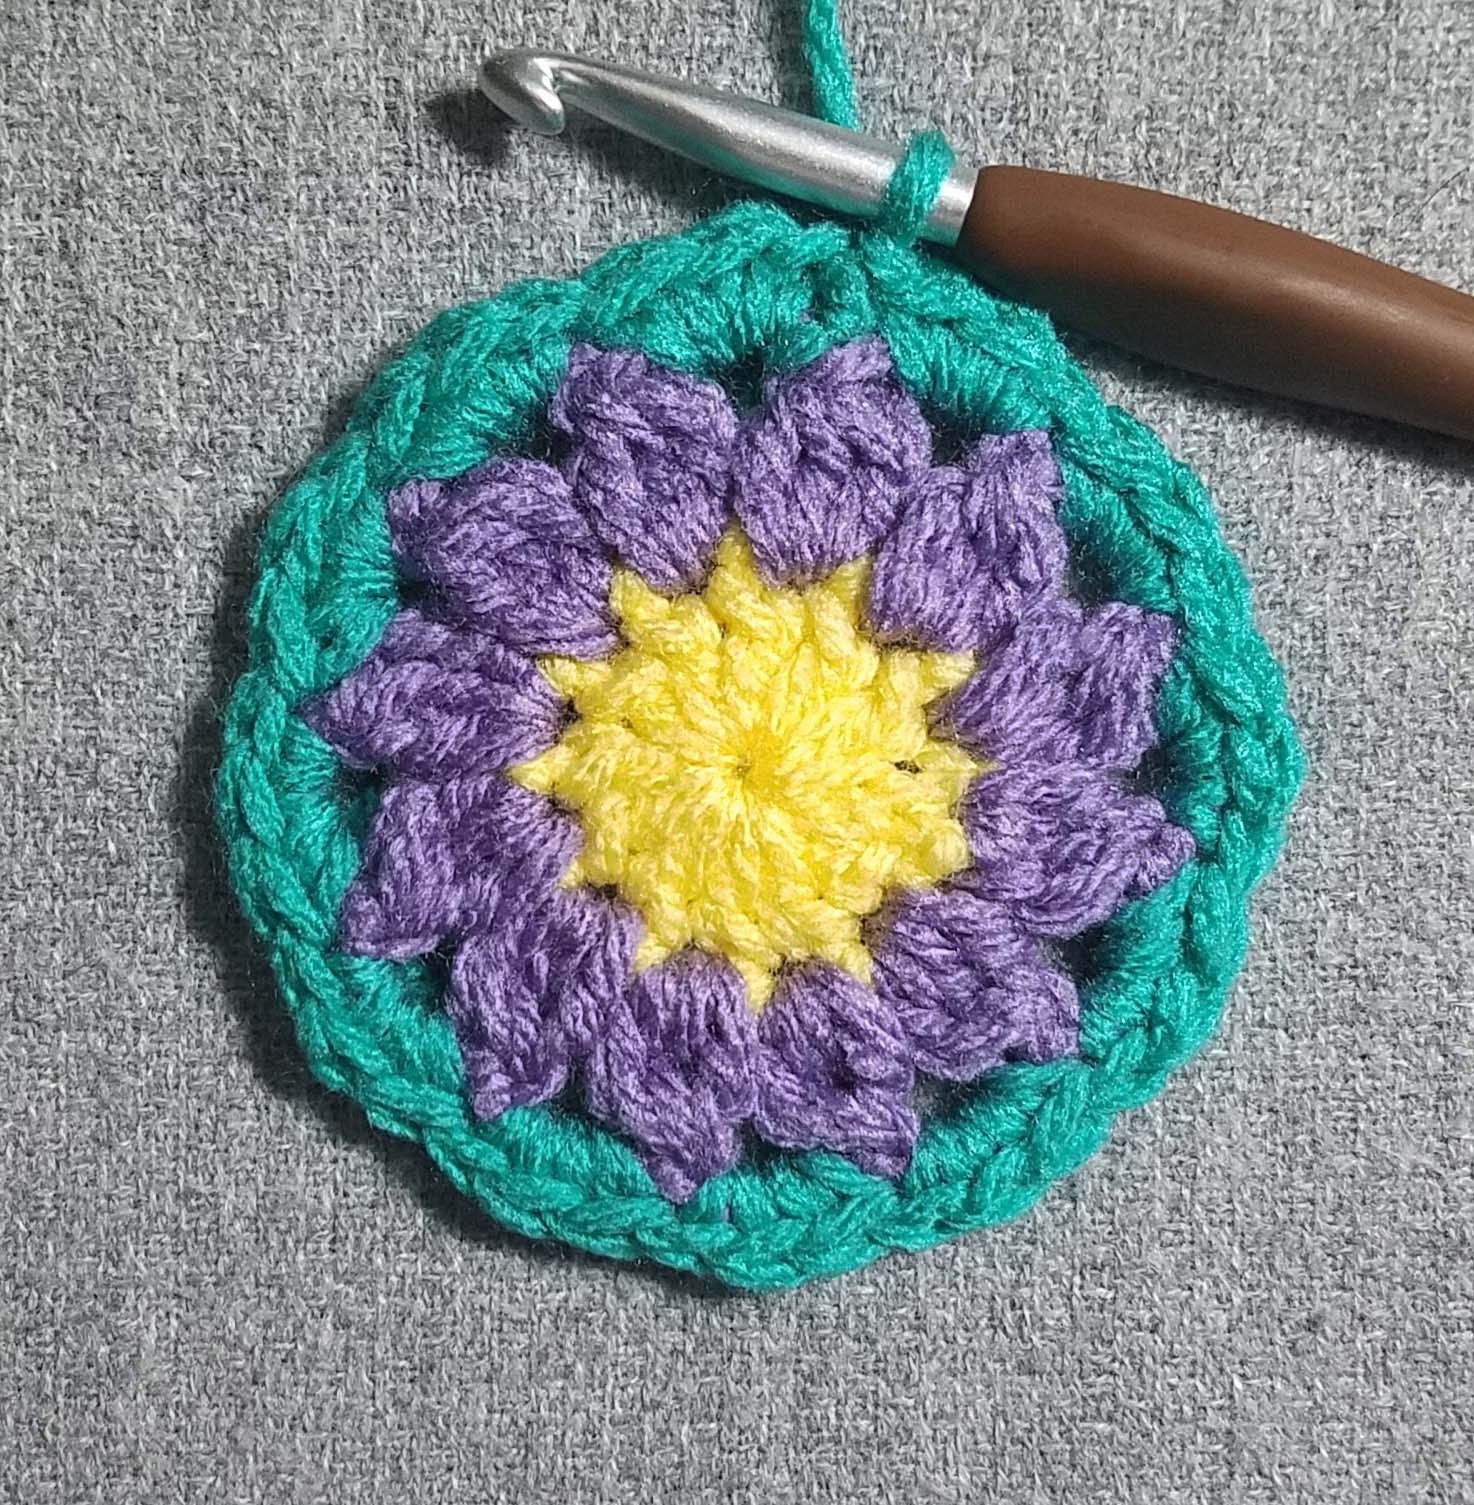
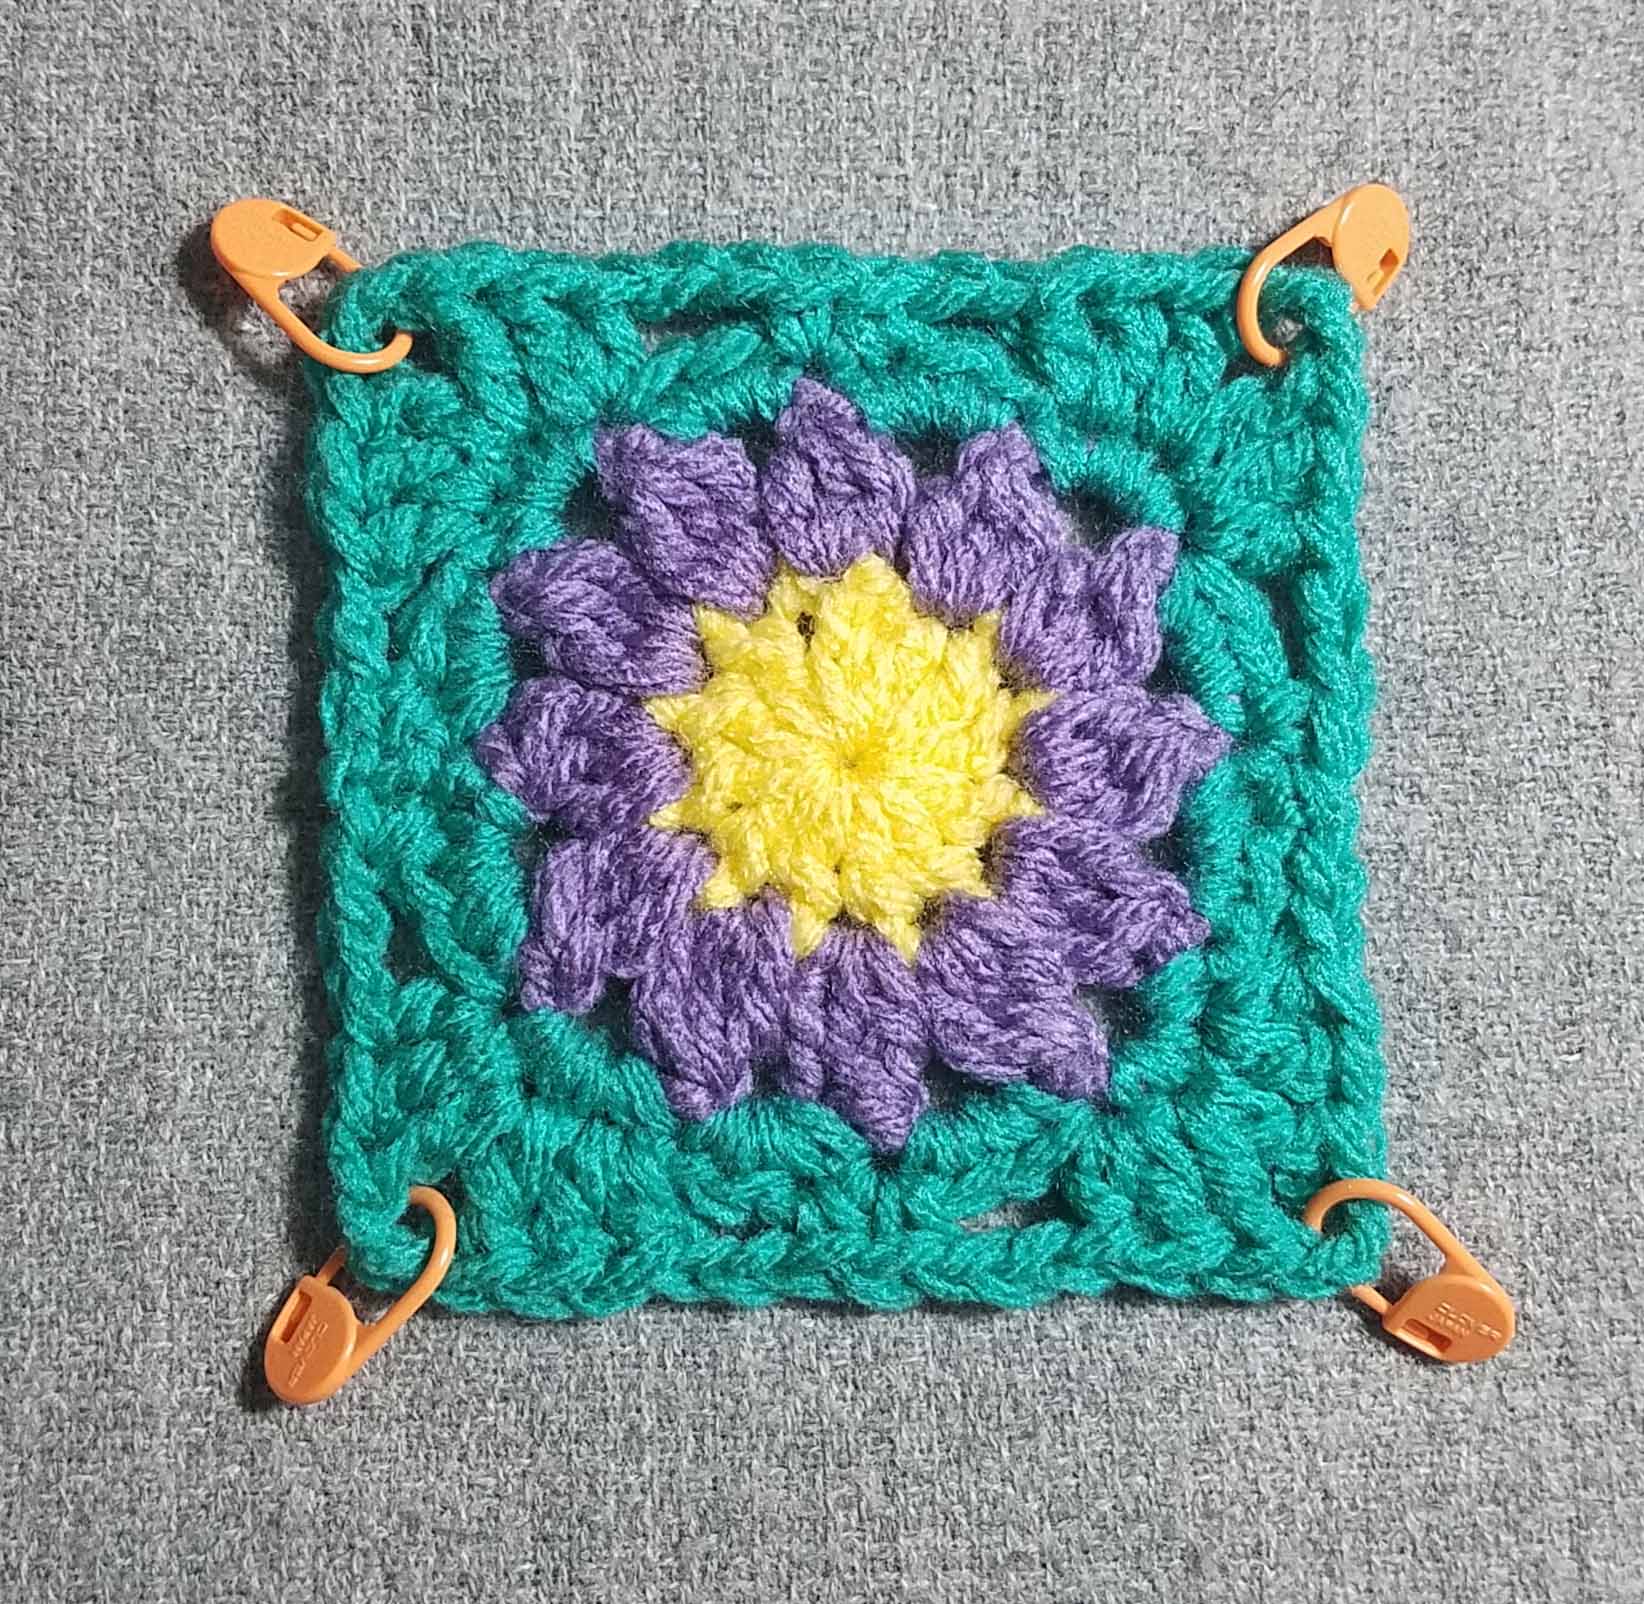
I chose the lighter green color for the third and fourth rounds to give the feel of leaves around the center flower.

Mountain Wildflower Afghan Square

Designed by Andee Graves

Skill level:       Intermediate

Finished Size:   12” (30 cm) square

Materials:

Yarn

Worsted weight yarn in 4 colors

Sample uses Red Heart “With Love” 100% Acrylic (7 oz/198 g, 370 yds/338 m),

Color A: #1201 Daffodil (sample used approximately 18 yards/9 grams) for Rnd 1 {2 yds/1g} & Rnd 10-11 {16 yds/8g}

Color B: #1538 Lilac (sample used approximately 16 yards/8 grams) for Rnd 2 {4 yds/2g} & Rnd 12 {12 yds/6g}

Color C: #1562 Jadeite (sample used approximately 42 yards/21 grams) for Rnd 3-4{8 yds/4g} , Rnd 8-9 {17 yds/9g} & Rnd 13 {16 yds/8g}

Color D: #1621 Evergreen (sample used approximately 36 yards/18 grams) for Rnd 5-7 {17 yds/9g} & Rnd 14 {17 yds/9g}
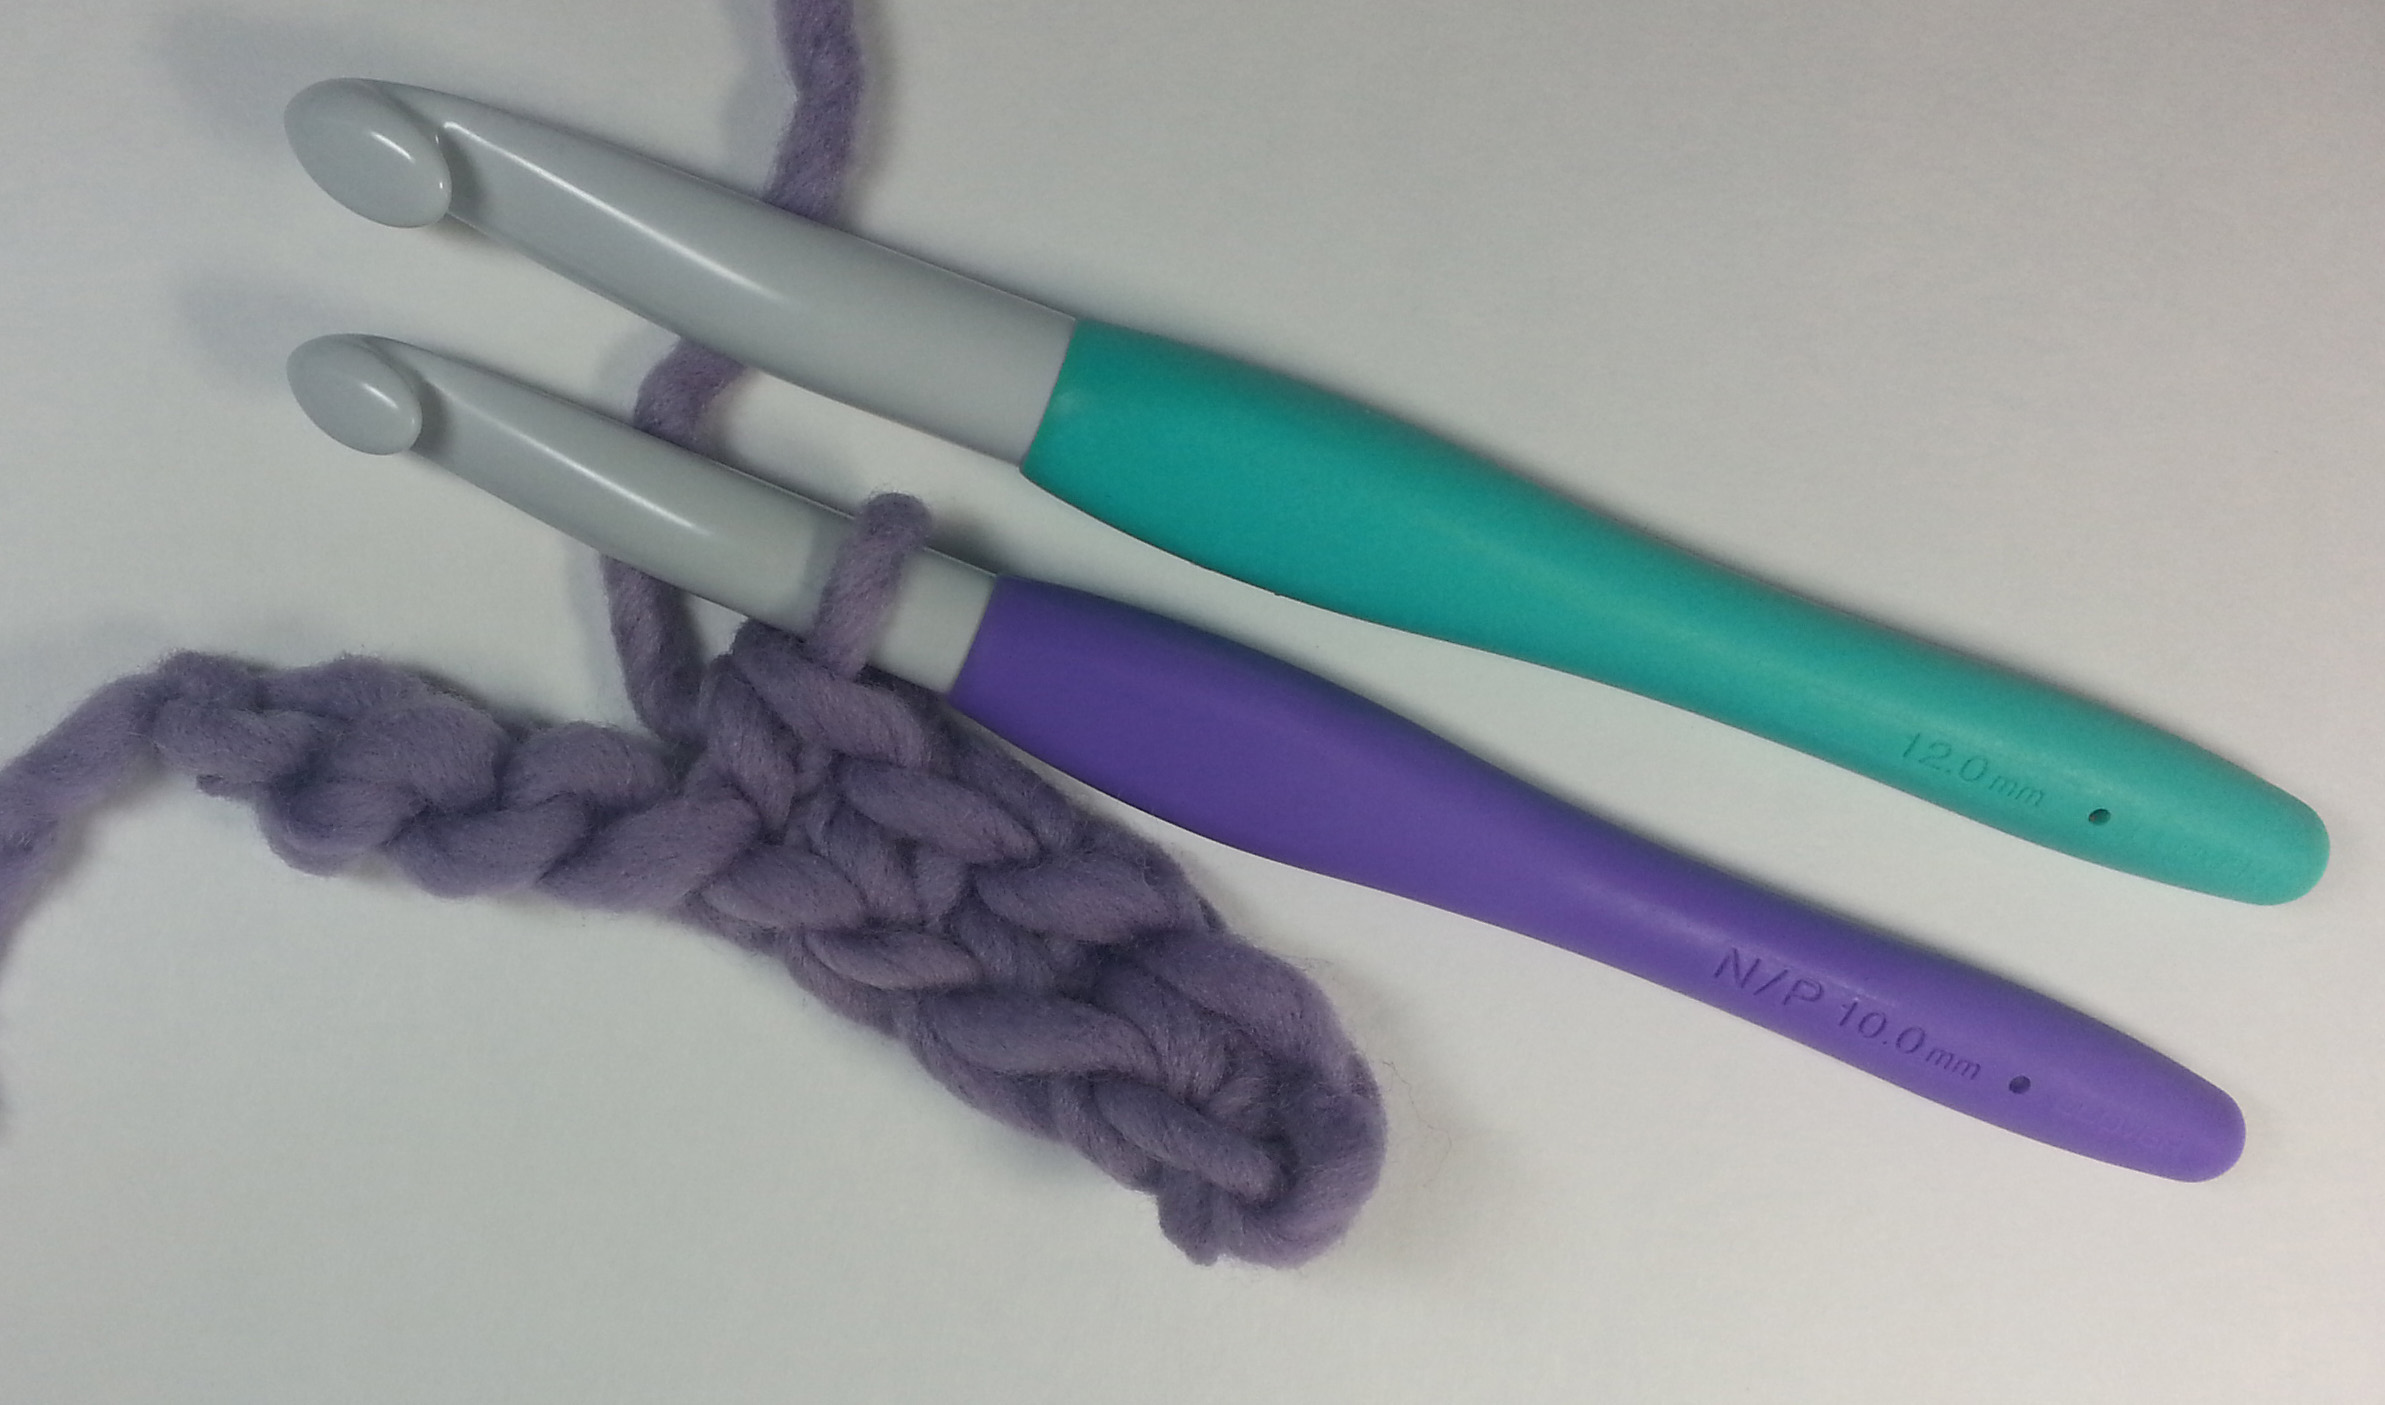
Hook

J / 6mm

Notions

Yarn/tapestry needle

Stitch markers

Gauge

First 4 rounds of pattern = 4” across square

Abbreviations/Special Stitches

Right Side (RS): The side of fabric that will be considered the visible side of the fabric.

Wrong Side (WS): The side of fabric that will be considered the hidden side of the fabric.

Adjustable Slip Knot Start: Make your slip knot so the beginning tail tightens the loop on your hook. If you need further help with this technique I have a video, and a blog post that demonstrate it with more detail.

3 double crochet cluster st (Cl): (YO, insert hook in indicated st or sp, YO pull up a loop, YO pull thru 2 loops on hook) 3 times, YO pull thru remaining 4 loops on hook.

Beginning 3 dc cluster st (Beg Cl): Ch 2, (YO, insert hook in indicated st or sp, YO pull up a loop, YO pull thru 2 loops on hook) 2 times, YO pull thru remaining 4 loops on hook.

Loose slip stitch (loose slip st): Insert hook in indicated place, YO, pull up a loop thru place and loop on hook keeping loose like making a chain st.

Joining slip st (slip st): Insert hook in indicated place, YO, pull up a loop thru place and loop on hook, continue to pull up on working loop until original loop is tight.

V-stitch (V-st): (dc, ch 1, dc) in indicated place.

Standing Double Crochet (Standing dc): make slip knot in yarn and place loop snugly on shaft of hook, yo and insert hook into indicated st, yo, pull up a loop, (yo, pull thru 2 loops on hook) twice. If substituting for a chain start of a round, do not work the first 3 chains of the round instructions.

Place Marker (PM)

Pattern Notes:

Stitch counts at the end of each round and row are shown in italicized brackets at end of each round or row.

When instructions specify “sl st loosely”, this means work those slip stitches similar to a chain stitch and do not pull the working loop to tighten them as in a joining slip stitch. You will be working into those loose slip stitches.

Instructions

Rnd 1 (RS): Begin with flower center color (Color A). Starting with adjustable slip knot, ch 4, 11 dc in 4th ch from hook, sl st to top of beginning ch-4 of Rnd. Fasten off. [12 dc]

Rnd 2 (RS): Change to flower petal color (Color B): With RS facing, attach new color in any dc from Rnd 1, Beg Cl in same st as join, (ch 2, Cl in next st) 11 times, ch 2, sl st to top of Beg Cl. Fasten off. [12 ch-2 sp, 12 Cl]

Rnd 3 (RS): Change to Color C. With RS facing, attach new color in any ch-2 sp, ch 1, 3 sc in same ch-2 sp, (3 sc in next ch-2 sp) 11 times, sl st to first sc of Rnd. [36 sc]

Rnd 4 (RS): Round to Square – Continue working with RS facing, ch 1, sc next st, [*ch 2, skip next 2 sts, (hdc, dc) next st, (dc, ch 2, dc) next st, PM in ch-2 sp just made, (dc, hdc) next st, ch 2, skip next 2 sts,* sc next 2 sts] 3 times; Repeat from * to * once, sc next st, sl st to first sc of Rnd. Fasten off. [8 sc, 8 hdc, 16 dc, 12 ch-2 spcs]

Rnd 5 (WS): Change to Color D. With WS facing attach new color into next ch-2 sp to left of a marked corner ch-2 sp, ch 1, 2 sc in same ch-2 sp, [*sc in next 3 sts, (sc, ch 2, sc) in marked corner ch-2 sp, move up st marker to ch-2 sp just made, sc in next 3 sts, 2 sc in next ch-2 sp, sc in next 2 sts,* 2 sc in next ch-2 sp,] 3 times, Repeat from * to * once, slip st to first sc of Rnd. [56 sc, 4 ch-2 sp]

Rnd 6 (RS): Turn, ch 2, skip st where joined, *hdc in each st until reach marked corner ch-2 sp, (hdc, ch 2, hdc) in ch-2 sp, move up st marker to ch-2 sp just made,* Repeat from * to * 3 times, hdc in each st until reach start of Rnd, slip st to top of beginning ch-2. [64 hdc, 4 ch-2 sp]

Rnd 7 (WS): Ch 1, turn, sc in first hdc, *sk 1 st, (hdc, dc) in next st, ch 1, (dc, hdc) in next st, skip next st, sc next st**, (hdc, dc, ch 2, dc, hdc) in marked corner ch-2 sp, move st marker up to ch-2 sp just made, sc in next hdc,* [Repeat * to ** 2 times, Repeat * to * once] 2 times, Repeat * to ** once, skip next st, (hdc, dc) in next st, ch 1, (dc, hdc) in next st, skip next st, slip st to first sc of Rnd. Fasten off. [16 sc, 32 hdc, 32 dc, 4 ch-2 sp]

Rnd 8 (RS): Change to Color C. With RS facing, attach new color to a center ch-1 sp with slip st, *skip 2 sts, (2 dc, ch 2, 2 dc) in next sc, skip 2 sts, slip st loosely in next ch-1 sp,* [^skip 2 sts, (2 dc, ch 2, 2 dc) in next sc, skip 2 sts, (sc, ch 2, sc) in marked corner ch-2 sp, move st marker to ch-2 sp just made^, Repeat from * to * 3 times] 3 times, Repeat from ^ to ^ once, Repeat from * to * 2 times. [8 sc, 64 dc, 20 ch-2 sp 12 loose slip st]

Rnd 9 (WS): Turn, ch 1, *sc into ch-1 sp on Rnd 7 enclosing slip st from Rnd 8, ch 2, skip 2 sts, (sc, ch 1, sc) in next ch-2 sp, ch 2, skip 2 sts*, Repeat from * to * once, [sc in next sc, (sc, ch 2, sc) in marked corner ch-2 sp, sc in next sc, ch 2, skip 2 sts, (sc, ch 1, sc) in next ch-2 sp, ch 2, skip 2 sts, Repeat from * to * 3 times] 3 times, Repeat from * to * once, slip st to first sc of Rnd. Fasten off. [60 sc, 16 ch-1 sp, 36 ch-2 sp]

Rnd 10 (RS): Change to Color A. With RS facing attach yarn with slip st to first ch-1 sp in from right hand corner, ch 1, sc in same ch-1 sp, [*ch 1, skip next sc and ch-2 sp, V-st in next sc, ch 1,** skip next ch-2 sp and sc, sc in next ch-1 sp*, Repeat from * to * 2 times, Repeat from * to ** once, skip next sc, V-st in marked ch-2 sp, move st marker to ch-1 of V-st just made, ch 1, skip next sc, V-st in next sc, ch 1, skip next ch-2 sp and sc,^ sc in next ch-1 sp] 4 times, In 4th repeat of [ to ] end at ^, slip st to first sc of Rnd. [16 sc, 40 ch-1 sp, 24 V-st]

Rnd 11 (WS): Turn, ch 1, [*sc in next ch-1 sp, sc in next st*, Repeat from * to * 2 times, (sc, ch 2, sc) in marked ch-1 sp, move st marker to ch-2 sp just made, sc in next st, (Repeat from * to * 2 times, sc in next ch-1 sp, skip next sc,) 4 times] 4 times, slip st to first sc of Rnd. Fasten off. [116 sc, 4 ch-2 sp]

Rnd 12 (RS): Change to Color B. With RS facing attach new color with a standing dc in any sc along the middle of a side, [dc each st until reach ch-2 corner, (dc, ch 2, dc) in ch-2 corner sp] 4 times, dc each st until reach beginning of Rnd, slip st to top of first dc. Fasten off. [124 dc, 4 ch-2 sp]

Rnds 13 (WS): Change to Color C. With WS facing attach new color with a standing dc in any sc along the middle of a side, [dc each st until reach ch-2 corner, (dc, ch 2, dc) in ch-2 corner sp] 4 times, dc each st until reach beginning of Rnd, slip st to top of first dc. Fasten off. [132 dc, 4 ch-2 sp]

Rnd 14 (RS): Change to Color D. With RS facing attach new color with a standing dc in any sc along the middle of a side, [dc each st until reach ch-2 corner, (dc, ch 2, dc) in ch-2 corner sp] 4 times, dc each st until reach beginning of Rnd, slip st to top of first dc. Fasten off. [140 dc, 4 ch-2 sp]

Finishing

Weave in tails and block.

If you don’t want to make an entire afghan using this block pattern you can hop on over to check out the 2018 Moogly Afghan CAL and find some more block patterns to try out.

Just for Fun Crochet

The strange thing about being a crochet designer and teacher is how little time I actually get to crochet. Especially crocheting just for the joy of it. Every once and awhile I break free and decide to crochet something just for fun. Recently my fun project was also about creating a lovely handmade gift for a very “crochet-worthy” friend.

Amanda, Me and Meghan

Amanda is the oldest daughter of one of my closest friends that I met soon after moving to Colorado back in the 1980s. She and her sister Meghan are like my nieces. Amanda is soon to be a mother for the third time and this baby is a girl. We had a party for her the second Sunday of August and I wanted to bring her a crocheted gift for the new baby.

My thinking when I was deciding what to make was that I wanted to use cotton. It’s a wonderfully breathable fiber and the yarns I was looking at are easy to care for. A definite advantage for a busy mom. Cotton is also a good fiber if baby is teething and wants to chew on the item.

I decided I would make a “lovey” for this gift. I like those little blankets with a head and arms in the center. They can do double duty as a cover and a toy. I wanted to make a bunny because the ears are perfect for little hands and good to chew on when baby has sore gums. To take the above photo I placed an empty water bottle underneath.

It was time to dig around in my stash and see what I had on hand. Since Amanda is so special to me I was willing to use some of my discontinued and carefully hoarded favorite yarns. In particular Bernat “Cottontots”. Easy care and wonderfully soft I was very sad when Bernat discontinued this line. The balls I have in my stash are all that I have available to use, fortunately I had a good selection of colors that would work well for the blanket part of this project.

I also needed a color for the bunny’s head and arms. I had a ball of Hobby Lobby’s “I Love this Cotton” in a nice tan that would be perfect. It didn’t take an entire ball for this project so I have enough left-over to use again. I find this yarn to be a little stiffer when crocheted up, but for a sturdy fabric it worked great for the “toy” parts of the lovey.

Since this was to be a gift for a baby I wanted the nose and eyes to be crocheted and firmly sewn in place. Fortunately I had some Katia “Mississippi 3” in lots of different colors, including black and a bright pink. Being that this is a fine weight yarn like a fingering or size#10 thread it would allow me a bit more latitude in the shaping for those pieces.

I started out my project by making the bunny’s head. Almost all the loveys I have seen just use a simple ball shape for the head. But I wanted my bunny to have cute little round cheeks. I also wanted ears that would stand up pretty well, so I would need a double thickness in the fabric. For the arms I wanted rounded paws on slender arms.

After some trial and error I had settled on the size and shaping for the ears, cheeks, head and arms. I had also worked out what I needed to do for the eyes and nose. Now it was time to crochet up all the various parts, that is the easy part, the challenge is sewing it all together.

Once I had the head finished I knew I didn’t want the typical attachment to the blanket. I had picked a circular center out stitch for the blanket so that it would give the look of a dress on the bunny. I crocheted the first 2 rounds in the same yarn as the head and arms, then switched to the soft purple Cottontots for the major part of the blanket.

I wanted the blanket part to be large enough to cover baby’s torso and legs in her car seat. So after I used all the purple yarn I used some yellow and green to complete the blanket edging. I wanted the yellow for the feel of little butterflies since Amanda is decorating the baby’s room with butterflies.

I finished the entire project with a day to spare. I even had time to crochet a pretty flower for the gift wrap, which is a good thing since I forgot to add a card. Amanda knew who it was from when she saw the crochet on the outside of the gift.

I have been asked by a number of folks about a pattern for this little lovey. I am working on how to do that since I used so many discontinued or hard to find yarns. I also did not measure the gauge of my work. Hopefully I will have a completed pattern available by March 2019 as part of my National Crochet Month celebration.

The Anatomy of Your Stitches

No matter what your crochet skill level it is helpful to understand the anatomy of your stitches. This is especially handy when you are weaving in tails or repairing crochet fabric. It is also very useful when teaching crochet so you can show your students what to look for while working on their projects.

The anatomy of a Chain Stitch

The first stitch most of us learn in crochet is the chain stitch, it is used in many ways in crochet patterns.

Vs on front of Chain Sts

The tops of the stitches are the V that you see in the above photo. They are what the working loop on your hook becomes as you make each stitch.

Back Bumps of Chain Sts

The chain stitch doesn’t have a “post” or “legs”. There is simply the back “bar” or “bump”. You will see either term used in patterns. It will depend on the publication what terminology they chose. This back bump is formed by the working yarn each time you pull thru a new loop with your hook to make a chain stitch.

The anatomy of a Single Crochet Stitch

The single crochet stitch is usually the first regular crochet stitch we learn to make after the chain stitch. The instructions for this stitch are: insert hook in stitch, yarn over, pull up a loop, yarn over, pull thru both loops on hook. But where do all those various loops end up?

Like with the chain stitch, the working loop on your hook is key. When you finish a stitch you have a working loop of yarn on your hook (yellow arrow pointing to it in above photo).  That loop becomes the top of the next stitch you make, no matter what stitch you are crocheting it will still become the top of the stitch.

When looking at your single crochet stitches as you make them (this is the Right Side row) you can see 2 “legs” (vertical yellow lines in above photo), these are the bottom of the loop you pulled up thru the stitch. Looking at the single crochet stitches from the back side (this is the Wrong Side row) you can see the top of that same loop (horizontal yellow lines in above photo) just below the top of the stitch.

If you turn your work over and look at the stitches from the back you can see the path of the working yarn coming into the stitch and out of the stitch (marked with bright pink and arrows in above photo) forming the “post” of the stitch and the new working loop (top of next stitch) on your hook. The aqua and pink line shows the top of the stitch that had been the working loop previously.

The above image shows all the parts of the stitches in 2 rows. The top row is the right-side row being worked and the next row below is the wrong-side row stitches being worked into. Agua lines highlight the tops of stitches, yellow lines show the second loop made for the single crochet stitch, pink lines and arrows show the path of the working yarn and “back legs” of your stitches. If you look closely you can see that the pink back legs are wrapped around the top of the stitches in the third row below.

How do I work into my foundation chain?

Answering and understanding this is one of the most important skills to have in your crochet tool box. The typical start for a crochet project is to chain a length and then work back into the chain. Of course this often leads to the questions  about how to work into the chain. Which loop do you work under and how many of them?


Traditional method

One of the first ways I learned to work into a chain was by going into the center of the V on the top of the chain and catching the back bar and top leg of the V in the stitch being made. This is the more traditional way of working into a foundation chain.


Trad method free loops

This leaves a single strand at the base of the stitches in your first row. This can work well if you are working pieces of a garment that are going to be seamed together along the base of the foundation rows.

Trad method showing twist

The first row worked into the chain using the traditional method tends to have quite a bit of twist to it before you work additional rows.

Shells worked into chain

It also is more stable when you are starting a stitch pattern that requires multiple stitches worked into some of the chain stitches of your foundation. For example…shell stitches.

Another option is to work under both legs of the V on each chain stitch. I find this to be the most difficult way to work into the chain. It does give you a very stable foundation and the single strand at the base is free for seaming pieces together along the foundation. Working into a chain using this method is easier with a very loosely crocheted foundation chain.


The finished row will again have single strands at its base, but they will be a bit more centered. This row will have a lot of twist to it like the traditional method of working into a chain.


Sts wrkd in back bump base view
Arrow points to foundation chain’s loose Vs when stitches are worked into back bar.

If a pattern doesn’t specify which loop of the chain to use, I tend to use the back bar (or back bump). I like the way the finished foundation looks as it echoes the top of the stitches on the last row of the project. When putting an edging all the way around the finished project I find the base of this foundation easier and neater looking to work into.

Unless a pattern specifies a particular way of working into the chain you can do whatever works best for you. You only need to be consistent for the stitches of your foundation.


Chain w larger hook

If you find that your chain foundation stitches seem to always be tighter than the rest of your crochet fabric it can help to use a hook one size larger for the foundation chain, then switch down to the next hook size when you are ready to begin your first row of stitches into the chains. 

Finding the top of the stitch

Now you have an idea of where to spot the tops of your stitches in a chain, but how do you tell where the top of a regular stitch is?

The simple answer, just like for our chain stitch, the top of the stitch looks like a V.  If you stop and hold your work so the Vs appear stacked they are easier to identify. As long as you don’t remove your hook from your working loop you can manipulate your fabric without losing any stitches.

Am I working in the right direction?

Once you can identify the top of your stitch it becomes a lot easier to tell if you are working in the right direction.

Vs pointing away

If your pattern tells you to turn at the end or beginning of a row, then the Vs of the stitch tops of the row you are working into, should be pointing away from your hook.

Working in the Round

If you are working in the round without turning at the end of each round, then the Vs of the stitch tops of the round you are working into, should be pointing at your hook.

Where do I insert my hook in the stitch?

Insert hook under 2 legs

For your standard crochet pattern you are going to insert your hook under the 2 legs of the V in the top of your stitch.

Gap to Insert Hook thru

To avoid splitting your yarn look for the little gap on the side of your stitch just under that V.

Some patterns will give you special instructions about where to insert your hook to create different textures in your fabric.

Back loop

If your pattern instructs you to work in the back loop of your stitch.  This is generally referring to the back leg of the Vs after you’ve turned your work to begin your new row.

Front loop

The same is true for working in the front loop of your stitch. You would be inserting your hook under the front leg of the Vs after you’ve turned your work to begin your new row.


What if you need to work more than one stitch in the same stitch?

This can be tricky when you are new to crochet. Especially once you work the first stitch the V top of the stitch is obscured. My favorite trick involves manipulating the fabric.

Pulling up to find stitch

If you gently pull up on the stitch just made it becomes easy to see where the base of that stitch goes into the previous row. This hole is where you will insert your hook for your next stitches if the pattern tells you to work multiple stitches into a particular stitch.

Now you have a better understanding of your stitch anatomy time to experiment with some crochet swatches.

Chain 15, then work single crochets back along the chain (using whichever method you like) starting with the second chain from the hook.

Chain 1 and turn to work back along the first row of stitches working a single crochet in each stitch to the end of the row.

Right-side view of blue row

Wrong-side view of blue row.

If you change colors for each row of single crochet stitches you can see more clearly how the stitches fit together.

Beginner’s Mind

The further along the journey of life we travel the less patience we often have with ourselves regarding learning a new skill. I have often met people that say, “Oh I always wanted to learn to crochet, but I’m too old now.”

???!

No way! You are never too old to learn a new skill. In fact it has been proven that learning a new skill in our later years is a great way to increase the agility of our mental faculties. You just have to treat yourself with compassion and patience as you learn a new skill.

This is what is referred to as “beginner’s mind”. In many eastern teachings it is about beginning a new experience without expectation.  To just be in the moment.

I am often reminded of what that looks like when I am teaching young children. Whether it is crafts or math, teaching youngsters can be so engaging. They have no expectation of knowing how to do the task, they are completely in the moment of learning something entirely new or unexpected.

Sadly, children outgrow this most of the time about 8-10 years of age. Like the adults they will grow up to be, they have an expectation of how they should learn, instead of just being in the learning.

For me, one of the things I love the most about crochet is 40+ years after I first made my first stitches with a  hook I’m still learning new things. Sometimes these are things I learn from the teachers in my life, other crochet friends or students in my classes. There are so many things to discover and explore with crochet I’m never bored.

Even though National Crochet Month is over it is never too late to learn to crochet (or tackle a new craft). Just be kind to yourself and allow the new experience to happen without self-judgment. Have fun with being a beginner again.

If you are feeling like starting your crochet journey visit my “Getting Started with Crochet” blog post for some pointers. There are illustrations for both Left handed and Right handed crocheters on holding the yarn and hook.


Spring Break – Crocheting on the Road

Once again it is time for the kids’ school Spring Break. This year we decided on a trip to the Grand Canyon. It’s a shorter drive than going home to Kansas and Ohio and it is a destination I’ve always wanted to take the kids to. We had talked about going there last summer, but Arizona in the summer time seemed ill-advised for mountain dwellers like ourselves.

It looks like we will be having some fairly cool temperatures for the majority of our trip. We will also be doing a lot of driving. This means my packing is very creative. I need my warm layers of clothing so I can adapt to the weather as it changes. But I also need to have lots of “car crochet” projects as well.

What makes a project good for “car crochet”?

For me, I want it to be fairly small, something that will fit easily into a bag that sits on the car seat or in the foot well. It is helpful if it is also in a yarn that can be washed easily, getting in and out of the car on a trip with my family can mean dirt, mud and sometimes food ends up on the yarn. Fussy fibers like silk, mohair and baby alpaca need to sit the ride out, superwash wool and acrylics are more the ticket.

Berroco yarns for on the road

Berroco Yarns “Ultra Wool” is one of my favorite superwash wools these days. I’ll be taking a few colors of it with me on the trip and will be working on mittens and hats.

What are your favorite crochet projects for traveling?

Just a Suggestion

Sometimes I get questions about my patterns that are like the person is asking permission to make a change to how the they work the pattern. Here is the thing…if you want to crochet a project that looks very close to my sample in the photos…you need to follow the pattern as it is written; same yarn (could be a different color), same hook, same gauge. The pattern instructions I have written are to guide you in making a project very similar to the one I made.

But you don’t need permission to take things in a different direction, there are no Crochet Police. For myself pattterns have always been just a suggestion. A place to start, but not necessarily the place I’ll end. My mother has often said that I have never followed a pattern. I guess that is part of why I became a designer.

I think that some of my attitude toward patterns comes from sewing so much. Especially when sewing clothing, adapting the pattern to get the right fit is typical, most sewing patterns even have notes of where to adjust for size changes. No one sees any thing odd about this, though many of us feel overwhelmed by the challenge.

I’ve been asked how I learned to make those modifications in crochet. The simple answer is, a lot of failures.  I experiment all the time, and only 10% of those experiments become part of a design that will be published. The best advice I can give (and not just about crocheting) is “Don’t be Afraid of Failure”.

If you really want to hone your skills on adapting garments for fit, I recommend taking a sewing class. Most will cover fitting, and if you already have the basics of sewing, you will quickly see how you can apply these ideas to your crochet garments.

For a more gradual approach to modifying patterns try playing with substituting yarns. We yarnie types tend to accumulate yarn stashes over time, and wanting to work with the yarn you have on hand is understandable. It just means you need to a have a bit of flexibility in your approach to the pattern you are subbing with.

Using a heavier weight yarn and still trying to match the pattern gauge is a really bad idea. Instead you will want to experiment with increasing the hook size appropriately to the weight of the yarn you have picked. You may have to fiddle with the dimensions of your finished project to get things to come out as desired.

Also keep in mind the fiber content and tightness of the twist for the yarn you’ve picked. If it is very different from the yarn in the original pattern, you may be surprised by the results. Sometimes this is a pleasant surprise, other times not so much.

When substituting yarns your best friend is the swatch. For 3 swatches above I was trying out different size hooks with the same yarn to see which fabric I liked best. I know many crocheters hate to swatch, but it can save you a lot of heartache down the road. Working a swatch that is approximately 6×6 inches is usually enough to give you a feel for what the fabric is going to be like in a larger project. If there is intense blocking needed it is a good idea to block your swatch to see what result you will get.

For many of my design swatch experiments I often don’t cut the swatch from the ball of yarn. Instead I place the remains of the ball in a ziplock style bag sealed over the working strand. Then I handwash, spray and/or pin for blocking to see how the yarn responds. If it’s all a bust, I’ll eventually carefully unravel the swatch and rewind it on the original ball of yarn.

Now you have a few of my tricks to try out it is your turn to begin experimenting. Remember to enjoy the journey of discovery, after all crocheting is supposed to be fun.

2×2 Shawl

As part of my continuing celebration of National Crochet Month I am sharing a pattern for my newest shawl design the 2×2 Shawl. I wanted to create a top down shawl in a simple stitch pattern that is relaxing and meditative to crochet. It is a perfect project to work on when crocheting with friends.

The simple stitch pattern really lets the vibrant color changes of Lion Brand Yarns “Shawl in a Ball” shine. Watching how the colors will come together is half the entertainment.  I wanted a big snuggly shawl that would really provide some coverage so I used 2 balls of this yarn.

I had only 22 g/70 yds of yarn left from the second ball. My favorite thing about a top-down shawl is that you can stop wherever you want, depending on the size shawl you want and the amount of yarn you have.

2×2 Shawl

Designed by Andee Graves

Skill level:       Easy

Finished Size:

2 balls = 74” (187.96 cm) wide x 32” (81.28 cm) tall

1 ball = 54” (137.16 cm) wide x 18” (45.72 cm) tall

Materials:

Yarn

Lion Brand Yarns “Shawl in a Ball” 58% Cotton, 39% Acrylic, 3% Other fiber (5.3 oz/150 g, 481 yd/440 m)

2 Balls of Color # 201 – Restful Rainbow

Hooks

J-10 / 6 mm

Notions

Yarn/tapestry needle

Stitch markers

Gauge:

Approximately 14 stitches and 5.5 rows = 4” (10.16 cm)

Special Stitches or Abbreviations:

PM – Place stitch marker

Pattern Notes:

Shawl is worked top-down with 3 increase points from a stacked rows foundation. 

If you wish to make a smaller shawl work the instructions for the body of the Shawl for fewer rows being sure to stop with a repeat of Row 4, then working the edging row (Row 35) to finish.

Instructions:

Foundation Rows

Row 1: Ch 2, sc in second ch from hook.

Row 2: Ch 3, turn, 2 dc in sc.

Row 3: Ch 1, turn, sc in first dc.

Rows 4 – 41: Alternate repeating Rows 2 and 3 (ending with a Row 3).

Shawl Body

Row 1: Ch 3, turn to work into sides of sc rows, (3 dc, ch 2, 2 dc) in first sc row, PM in ch-2 sp just made, *ch 2, skip next dc row, 2 dc in next sc row*, Repeat from * to * 8 times, ch 2, skip next dc row (2 dc, ch 2, 2 dc) in next sc row, PM in ch-2 sp just made, Repeat from * to * 9 times, ch 2, skip next dc row, (2 dc, ch 2, 3 dc) in last sc row, PM in ch-2 sp just made. [23 ch-2 sps, 50 dc]

The marked ch-2 spaces will be the increase points for the rest of the body of the shawl.

Row 2: Ch 3, turn, skip 1 st, 3 dc in next st, ch 2, skip 1 st, (2 dc, ch 2, 2 dc) in marked ch-2 sp, move marker up to ch-2 sp just made, [*ch 2, skip next 2 sts, 2 dc in next ch-2 sp*, Repeat from * to * until work in marked ch-2 sp, (ch 2, 2 dc) in same marked ch-2 sp, move marker up to ch-2 sp just made] 2 times, ch 2, skip 1 st, 3 dc in next st. [27 ch-2 sps, 58 dc]

Row 3: Ch 3, turn, skip 1 st, 3 dc in next st, skip 1 st, 2 dc in next ch-2 sp, ch 2, skip 2 sts, (2 dc, ch 2, 2 dc) in marked ch-2 sp, move marker up to ch-2 sp just made, [*ch 2, skip next 2 sts, 2 dc in next ch-2 sp*, Repeat from * to * until work in marked ch-2 sp, (ch 2, 2 dc) in same marked ch-2 sp, move marker up to ch-2 sp just made] 2 times, ch 2, 2 dc in next ch-2 sp, skip 1 st, 3 dc in next st. [29 ch-2 sps, 66 dc]

Row 4: Ch 3, turn, skip 1 st, 3 dc in next st, ch 2, skip 3 sts, 2 dc in next ch-2 sp, [*ch 2, skip next 2 sts, 2 dc in next ch-2 sp*, Repeat from * to * until work in marked ch-2 sp, (ch 2, 2 dc) in same marked ch-2 sp, move marker up to ch-2 sp just made] 3 times, Repeat from * to * until work in last ch-2 sp of Row, ch 2, skip 3 sts, 3 dc in next st. [33 ch-2 sps, 70 dc]

Row 5: Ch 3, turn, skip 1 st, 3 dc in next st, skip 1 st, 2 dc in next ch-2 sp, [*ch 2, skip next 2 sts, 2 dc in next ch-2 sp*, Repeat from * to * until work in marked ch-2 sp, (ch 2, 2 dc) in same marked ch-2 sp, move marker up to ch-2 sp just made] 3 times, Repeat from * to * until work in last ch-2 sp of Row, skip 1 st, 3 dc in next st. [35 ch-2 sps, 78 dc]

Rows 6 – 34: Alternate repeating Row 4 and Row 5 ending with a Row 4.

Stitch count at end of Row 34 [123 ch-2 sps, 250 dc]

If using only 1 ball of “Shawl in a Ball” stop at Row 22. [87 ch-2 sps, 178 dc]

Edging

Row 35: Ch 2, skip 1 st, sc in next st, ch 2, 2 dc in next st, *skip next ch-2 sp, sc in next st, ch 2, 2 dc in next st*, Repeat from * to * until work in next to last st of Row, slip st in next st. Fasten off. [124 sc, 124 ch-2 sps, 248 dc]

Finishing

Weave in tails and block.