Yesterday was quite the crochet day for me. I taught the “Learn to Crochet” class at the Longmont Yarn Shoppe. I always have a great time teaching and love it when my students have that light bulb moment when things begin to work for them. It’s also a great reminder of what it’s like to be at the beginning of the crochet journey.
Then I ran a few quick errands in town and headed back home. At home it was a flurry getting my family herded up so we could head over to a friend’s house for a 50th birthday party. There were lots of kids there and our hosts have a nice trampoline that my kids headed straight for.
Meanwhile there were only a few people I knew, so I said “hi” then found a well-lit spot outside to sit with my crochet and keep an eye on my kids. After awhile I got a bit chilly so I came back inside.
One of the other women at the party asked me about someone in Jamestown and if I knew them. Turned out we had a mutual acquaintance. We introduced ourselves and had a chuckle when it turned out her name is Annette, though pronounced the German way, the “e” at the end sounds like an “a”. We chatted about living in the mountains and wildlife visiting my home.
While we were talking I was crocheting on my project and she asked me about my crochet. She is from Germany originally and both knits and crochets, though she said she was a bit out of practice. She told me that she had started a crocheted blanket project about 2 years ago, but had gotten a bit stuck when she went back to work on it.
Her husband had to run their teen-age daughter home about then and Annette asked him to bring her project bag back with him. When he returned the 2 of us dug thru the bag. There were a number of completed squares, but they were very tightly crocheted and we talked about how they would work in a blanket.
She had been inspired by a photo of a crocheted blanket in a catalog. She had the original inspiration photo in the bag. So we took a look at it together. Her squares were pretty different from the squares in the blanket so I asked her if she would be interested in trying something different.
I grabbed a ball of the yarn she had and began designing a different square there on the spot. I was having a great time playing with yarn, and we talked about crochet and our families as the square took shape. She liked what I came up with and thought it would be a nicer blanket than the tight squares she had done. Since she had made so many of those I suggested she use them for a pillow that would carry the same colors as her blanket.
Today I experimented a bit more with the square pattern I had come up with last night and made these 2 versions. The difference between the 2 is in where I decided to make the color change. Instructions for the squares are below and, in honor of my new crochet friend, it is named the Annetta Square.
ANNETTA SQUARE
designed by Andee Graves
Skill level: Intermediate
Materials:
Worsted Weight yarn
I-9/5.5mm hook
Finished Size:
Approximately 3 7/8” square
Gauge:
First 3 Rounds = 2.25”
Special Stitches:
3 double crochet cluster st (Cl): (YO, insert hook in indicated st or sp, YO pull up a loop, YO pull thru 2 loops on hook) 3 times, YO pull thru remaining loops on hook. If you are having trouble with this stitch check out my blog post “Crochet and Springtime” for a tutorial on it.
Beginning 3 dc cluster st (Beg Cl): Ch 2, (YO, insert hook in indicated st or sp, YO pull up a loop, YO pull thru 2 loops on hook) 2 times, YO pull thru remaining loops on hook.
Instructions
Rnd 1: Starting with adjustable slip knot, ch 2, 6 sc in 2nd ch from hook, sl st to first sc of Rnd. [6 sc]
Rnd 2: Ch 1, sc in same st as join, (ch 1, sc in next st) 5 times, ch 1, sl st to first sc of Rnd. [6 ch-1 sps, 6 sc]
Rnd 3: Sl st and Beg Cl in next ch-1 sp, (ch 3, Cl in next ch-1 sp) 5 times, ch 3, sl st to top of Beg Cl. [6 ch-3 sp, 6 Cl]
Change color here to get suspended flower look
Rnd 4: Ch 1, sc in same st as join, (4 sc in next ch-3 sp, sc in next st) 5 times, 4 sc in next ch-3 sp, sl st to first sc of Rnd. [30 sc]
Rnd 5: Ch 1, sc in same st as join, sc next st, (2 sc next st, sc in next 4 sts) 5 times, 2 sc next st, sc next 2 sts, sl st to first sc of Rnd. [36 sc]
Change color here to get circle in square look
Rnd 6: Ch 1, sc next 2 sts,(*hdc next st, (dc, tr) next st, (tr, ch 2, tr) next st, (tr, dc) next st, hdc next st,* sc next 4 sts) 3 times; Repeat from * to * once, sc next 2 sts, sl st to first sc of Rnd. [16 sc, 8 hdc, 8 dc, 16 Tr, 4 ch-2 spcs]
Rnd 7: Ch 1, sc next 6 sts, *(sc, ch 2, sc) next ch-2 sp,** sc next 12 sts*; Repeat from * to * 2 times, then Repeat from * to ** once, sc in next 6 sts, sl st to first sc of Rnd. [56 sc, 4 ch-2 sps]
Fasten off
I really like how these little squares came out. I hope you enjoy making some to use in your projects this spring.
National Crochet Month is zipping by, and I am honored to be celebrating by participating again in the Crochetville NaCroMo 2015 Blog Tour. Amy Shelton and Donna Hulka are terrific supporters of the crochet community and designers.
Amy and I in Reno at the Knit & Crochet Show (yes, she is wearing a tiara)
I’ve met both of them in person thru the Crochet Guild of America (CGOA) and have spent many fun and often inspiring hours in their company.
One of my favorite things about being a member of the CGOA is how it has put me in touch with lots of other crocheters. I’ve met many wonderful crochet friends thru my involvement in CGOA, like Amy and Donna. It’s great fun to be with your “people”, folks that understand this love of playing with yarn. If you haven’t joined CGOA you may want to consider doing so, the annual conference is great fun to attend, but there is even more. Opportunities to meet up locally with other crocheters and to meet online on the CGOA website. The website is: Crochet.org.
As the owners and creators of the Crochetville community and dedicated CGOA members themselves, Amy and Donna are always aware of the importance of supporting others thru charitable work. This year’s blog tour charity project is making hats (or making a monetary donation) for Halos of Hope.
Halos of Hope is a 501(c)3 not-for-profit organization committed to providing volunteer-crafted hats to cancer centers across the country. You can make and send in hats to Crochetville in Alabama or donate money to help Halos of Hope pay for shipping hats to the centers. You can find the mailing address and read more about this project on the Crochetville blog.
Hats are one of my favorite projects to work on but with this recent spring like weather I’m looking at transitional pieces. Headband/Headwrap/Earwarmers (I’m never 100% sure what to call them) are a great choice. I love them during the transitional seasons because they easily fit in a pocket and are a great way to keep my ears warm if the weather gets chilly. They also help keep my hair under control when the wind gets too blustery.
I tend to have light weight gloves and a headband tucked into the pockets of every jacket. Since I recently got my hair cut into a very short 1920’s style bob, headbands can also look quite stylish. In celebration of NatCroMo I’m offering this fun textured headband pattern to my visitors. I’ve used a lot of textured stitches in this project which helps make the fabric even warmer.
This is an intermediate level pattern, but it’s a great project to expand your skills with. I’m including a tutorial on making cluster and puff stitches here for those of you feeling like tackling a new crochet skill. For those of you that already have some experience with cluster and puff stitches the “Special Stitches” section in the pattern should be sufficient to get you started.
Cluster Stitch Tutorial
The cluster stitch for our headband has more texture to it because it is framed on either side by a shorter stitch, the half double crochet. If cluster stitches are worked with spaces and/or taller stitches on either side they are a bit flatter and more of a decorative grouping that doesn’t rise as far above the surface of the work.
The textured “bump” of a cluster stitch as used in this headband sits on the back side of your row, for a single sided project you want to work them only on alternate rows in the project.
In this headband project we are using a 3 dc cluster stitch to create our textured stitches. In a cluster stitch you make the base of the 3 dcs being used, then work the final dc step for all 3 in one go.
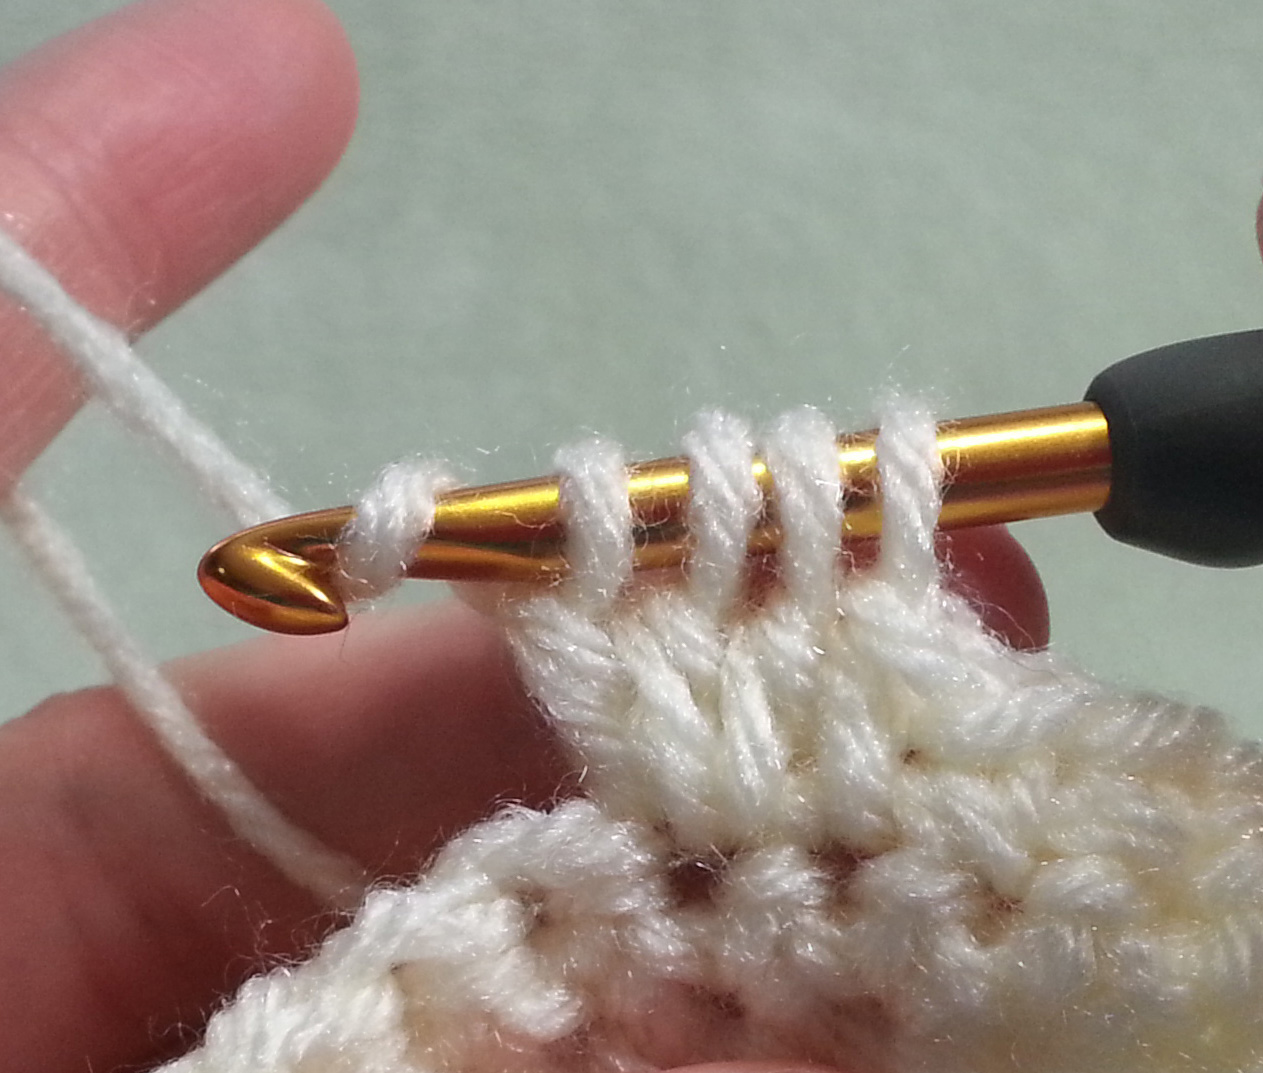
Photo A
To make a 3 dc cluster st, yarn over (yo) like making a dc and insert in st or sp, yo, pull up a loop (3 loops on hook), yo {Photo A},
Photo B
pull thru 2 loops on hook (2 loops remaining on hook, 1st base made), yo, insert in same st or sp, yo, pull up a loop (4 loops on hook), yo {Photo B},
Photo C
pull thru 2 loops (3 loops remaining on hook, 2nd base made), yo, insert in same st or sp, yo, pull up a loop (5 loops on hook), yo, pull thru 2 loops (4 loops remaining on hook, 3rd base made), yo {Photo C}, pull thru all 4 loops on hook.
Puff Stitch Tutorial
This stitch is often a challenge to get right. The primary trick is getting all of your loops to the same length. That can be particularly challenging if you crochet tightly, so remember to keep your work loose.
Puff stitches tend to sit centered in the fabric, which makes them a great stitch to use in scarves, since the texture is visible on both sides of your fabric. In the case of this headband project we are framing the puff stitches with hdc stitches. Like with our cluster stitches this “framing” helps the stitch sit on the backside of the row and creates a 3D effect on the finished project.
There are a number of ways to make a puff stitch, the version I use in this project is secured at the top similar to making a single crochet (I think of these as “locked” puff stitches). For this project you will be making 5 “wraps” for the puff part. Each time you do a “wrap” you get 2 more loops on your hook.
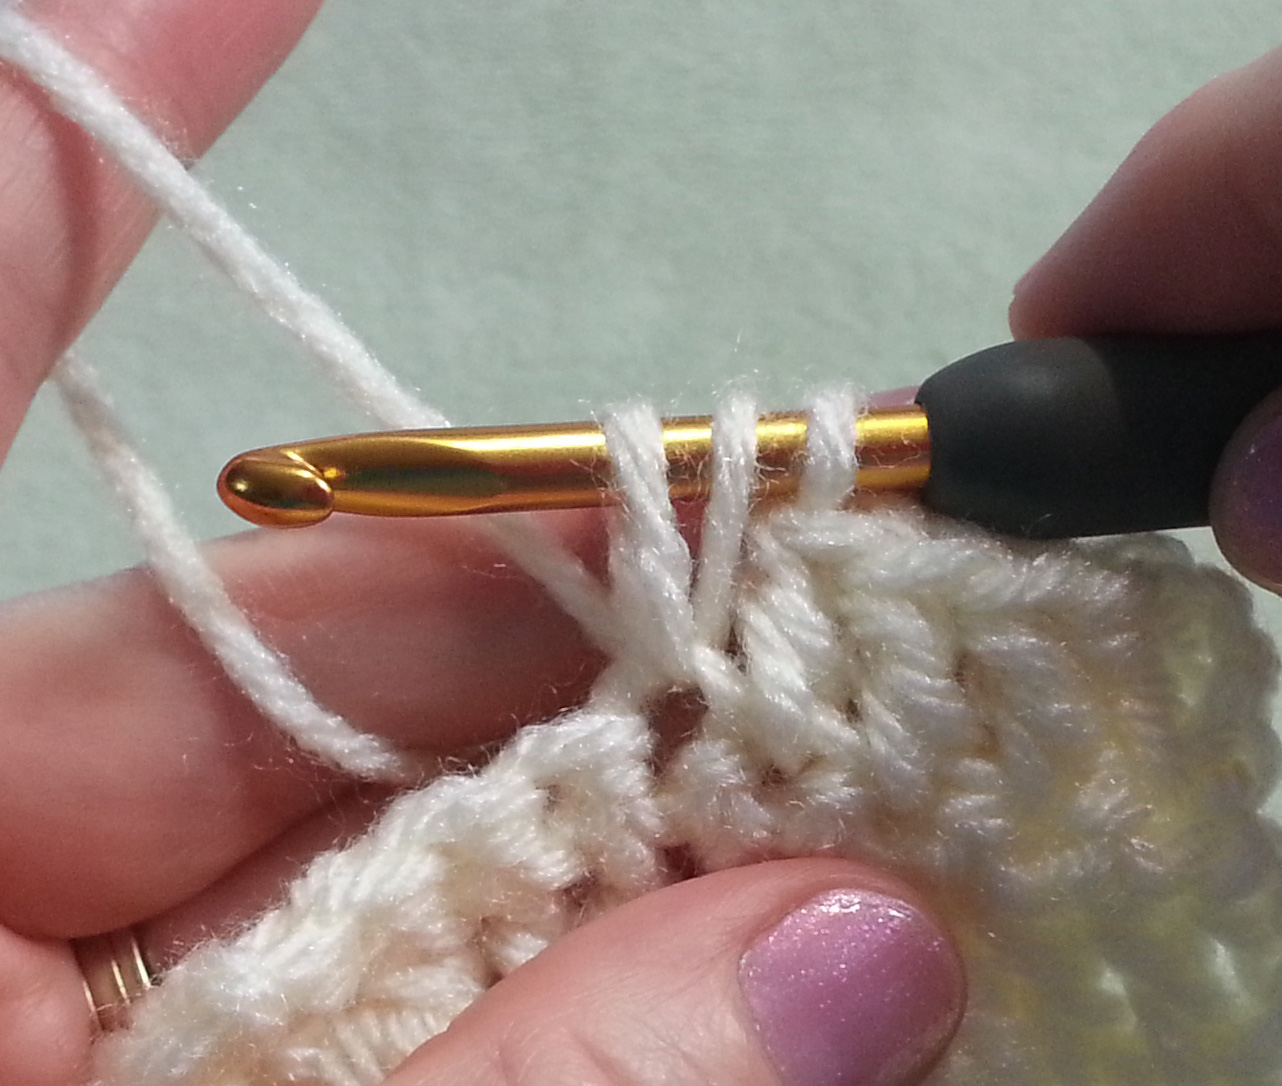
Photo D
Yarn over (yo) and insert your hook in the indicated st or sp, yo, pull up the 2 loops to above the top of your previous st {Photo D},(yo, insert hook in the same st or sp, yo, and pull up the 2 new loops to the same height of the previous loops) 4 times.
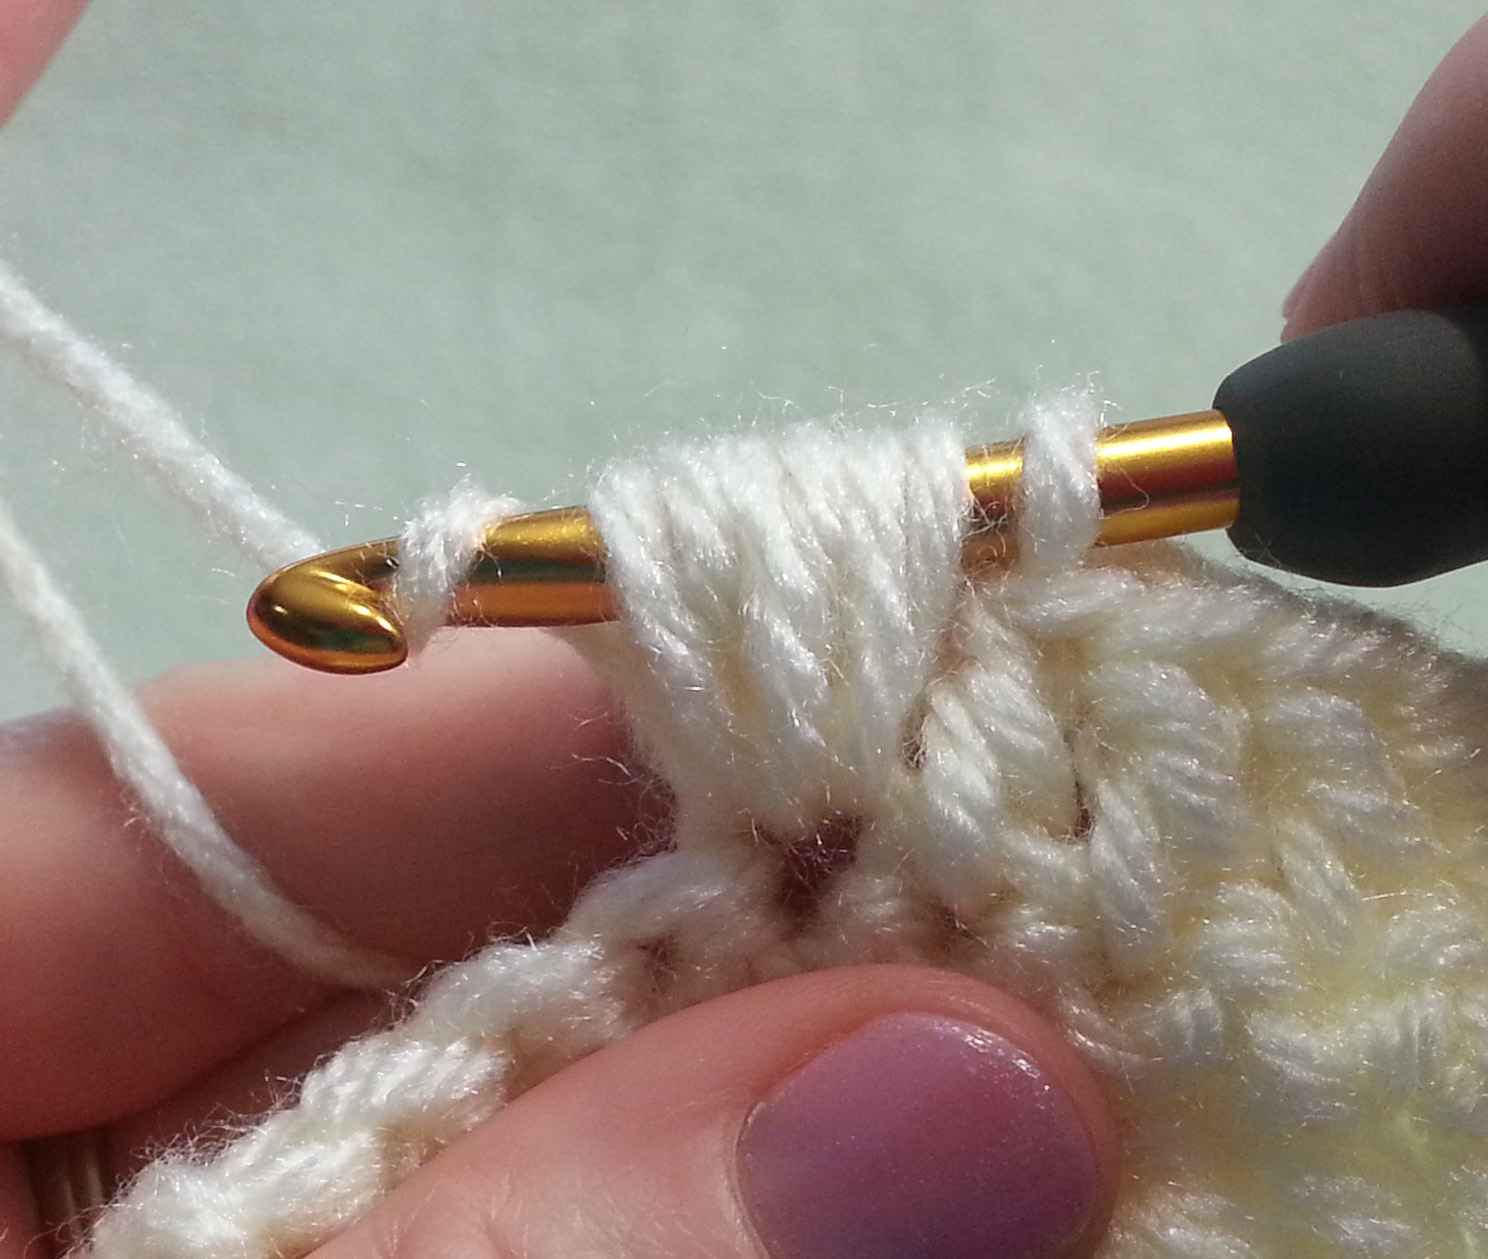
Photo E
You will have 11 loops on your hook*, 10 tall loops for the “puff” and the original working loop. Yo {Photo E} and pull thru the 10 tall loops,
Photo F
you will have only 2 loops on your hook, yo {Photo F}, pull thru the last 2 loops, your puff stitch is complete.
* A peek into the design process: For the eagle-eyed amongst my visitors, you may have noticed in the photos for this tutorial I have only 7 loops on my hook at this point. This is because I made a change in the pattern after I shot the photos. Originally I thought I would like the 3 wraps for my puff stitches, but they weren’t dramatic enough for me in the sample. So I changed it for the final sample and pattern.
SPRINGTIME HEADBAND
designed by Andee Graves
SKILL LEVEL: Intermediate
FINISHED MEASUREMENTS
Headband is approximately 3.25”/8.125cm wide x 22”/55cm long.
#139 Dark Rose Heather sample used 31g/aprx 72 yards = approximately 2 Headbands from 1 skein
CROCHET HOOKS
Size US 7 / (4.5mm)
ADDITIONAL MATERIALS
Stitch markers
Yarn needle
GAUGE
6 rows & 9 sts in hdc = 2”
SPECIAL STITCHES
3 DC Cluster Stitch (Cl): (Yo, insert hook into indicated st or sp, yo, pull up a loop, yo, pull thru 2 loops on hook) 3 times, yo, pull thru 4 loops remaining on hook.
Puff Stitch (Puff): (Yo, insert hook into indicated st or sp, yo, pull up a loop to desired height) 5 times, 11 loops on hook, yo, pull thru 10 loops on hook, 2 loops left on hook, yo, pull thru remaining 2 loops on hook.
Half Double Crochet 2 Together (hdc2tog): Yo, insert hook into indicated st or sp, yo pull up a loop, insert hook in next st, yo pull up a loop, yo pull thru all 4 loops on hook.
NOTES
The Cluster stitches and Puff stitches in this project have more texture because they are “squished” between 2 shorter stitches. The texture is created on the back of the rows. The finished project will have the textured side as the right side of the fabric.
Once the first 65 rows of the headband are crocheted, edging is worked along one edge, then ends of headband are seamed together using slip stitches to reach 2nd side, then 2nd side edging is worked.
INSTRUCTIONS
Row 1: Ch 11, turn, working in back bumps, hdc in 3rd ch from hook and each ch back to beginning. [9 hdcc]
Row 2 (RS): Ch 2 {turning ch only, does not count as st here and thru-out the pattern}, turn, hdc in each st across. PM on front of row to mark right side. [9 dc]
Rows 3- 7: Repeat Row 2.
Row 8: Ch 2, turn, hdc next st, 2 hdc next st, hdc next 5 sts, 2 hdc next st, hdc last st. [11 hdc]
Row 9: Repeat Row 2. [11 hdc]
Row 10: Ch 2, turn, hdc next st, 2 hdc next st, hdc next 7 sts, 2 hdc next st, hdc last st. [13 hdc]
Rows 11 – 16: Repeat Row 2. [13 hdc]
Row 17: Ch 2, turn, hdc next 6 sts, Cl next st, hdc next 6 sts. [12 hdc, 1 Cl]
Row 18: Repeat Row 2.
Row 19: Ch 2, turn, hdc next 4 sts, Cl next st, hdc next 3 sts, Cl next st, hdc next 4 sts. [11 hdc, 2 Cl]
Row 20: Repeat Row 2.
Row 21: Ch 2, turn, hdc next 2 sts, Cl next st, hdc next 3 sts, Puff next st, hdc next 3 sts, Cl next st, hdc next 2 sts. [10 hdc, 2 Cl, 1 Puff]
Row 22: Repeat Row 2.
Row 23: Repeat Row 19.
Row 24: Repeat Row 2.
Row 25: Repeat Row 17.
Rows 26 – 28: Repeat Row 2.
Rows 29 – 52: Repeat Rows 17 – 28, twice.
Rows 53 – 55: Repeat Row 2.
Row 56: Ch 2, turn, hdc next st, hdc2tog next st, hdc next 7 sts, hdc2tog next st, hdc last st. [11 hdc]
Row 57: Repeat Row 2.
Row 58: Ch 2, turn, hdc next st, hdc2tog next st, hdc next 5 sts, hdc2tog next st, hdc last st. [9 hdc]
Rows 59-65: Repeat Row 2. Do not fasten off, Secure working loop so work doesn’t come unraveled.
EDGING
Side 1: Ch 1, with RS facing turn band to work along first edge, work sc in side of Row 1, then work 98 sc spaced evenly along edge in ends of rows (3 sc in the ends of the every 2 rows), sl st to first sc in round.
Align ends of band, RS together sl st loosely working thru both the top of sts in Row 65 and bottom of sts in Row 1 across to second edge.
Side 2: Turn work with RS facing and work along edge, ch 1, work 99 sc spaced evenly along edge in ends of rows, sl st to first sc in round. Fasten off.
FINISHING
Weave in ends. Block lightly, if desired.
Now you are ready to make a bunch of these headbands to be ready for those cooler spring days. Have a great time crocheting and keep celebrating crochet everyday.
Today I’m honored to be a part of the 2014 Crochetville NatCroMo Designer Blog Tour. Amy Shelton and Donna Hulke of Crochetville included me last year in their National Crochet Month tour to celebrate crochet and it was great fun. These two are the right women to lead the celebration of all things crochet, visit them at the Crochetville site or their blog and you’ll know just what I mean.
My focus this year for NatCroMo has been teaching others to crochet. It’s been very exciting that my youngest son is learning. Above is his latest effort, he wanted to make a scarf so I got him started with the first row of this little V-stitch scarf and he is amazing me at how well he is doing. It’s also a great excuse for some cuddle time as we snuggle together on the sofa and crochet.
Today I will be at the Longmont Yarn Shoppe from 12p – 1:30p with my local CGOA Chapter showing folks how to get started crocheting. We will be making quick fun little beaded bracelets that students can make and take away with them. Beaded crocheted chains are a fun easy project that give beginners the chance to make something beautiful with minimal crochet skills.
Our projects for the “Make & Take” will use plain worsted weight yarn and plastic pony beads.
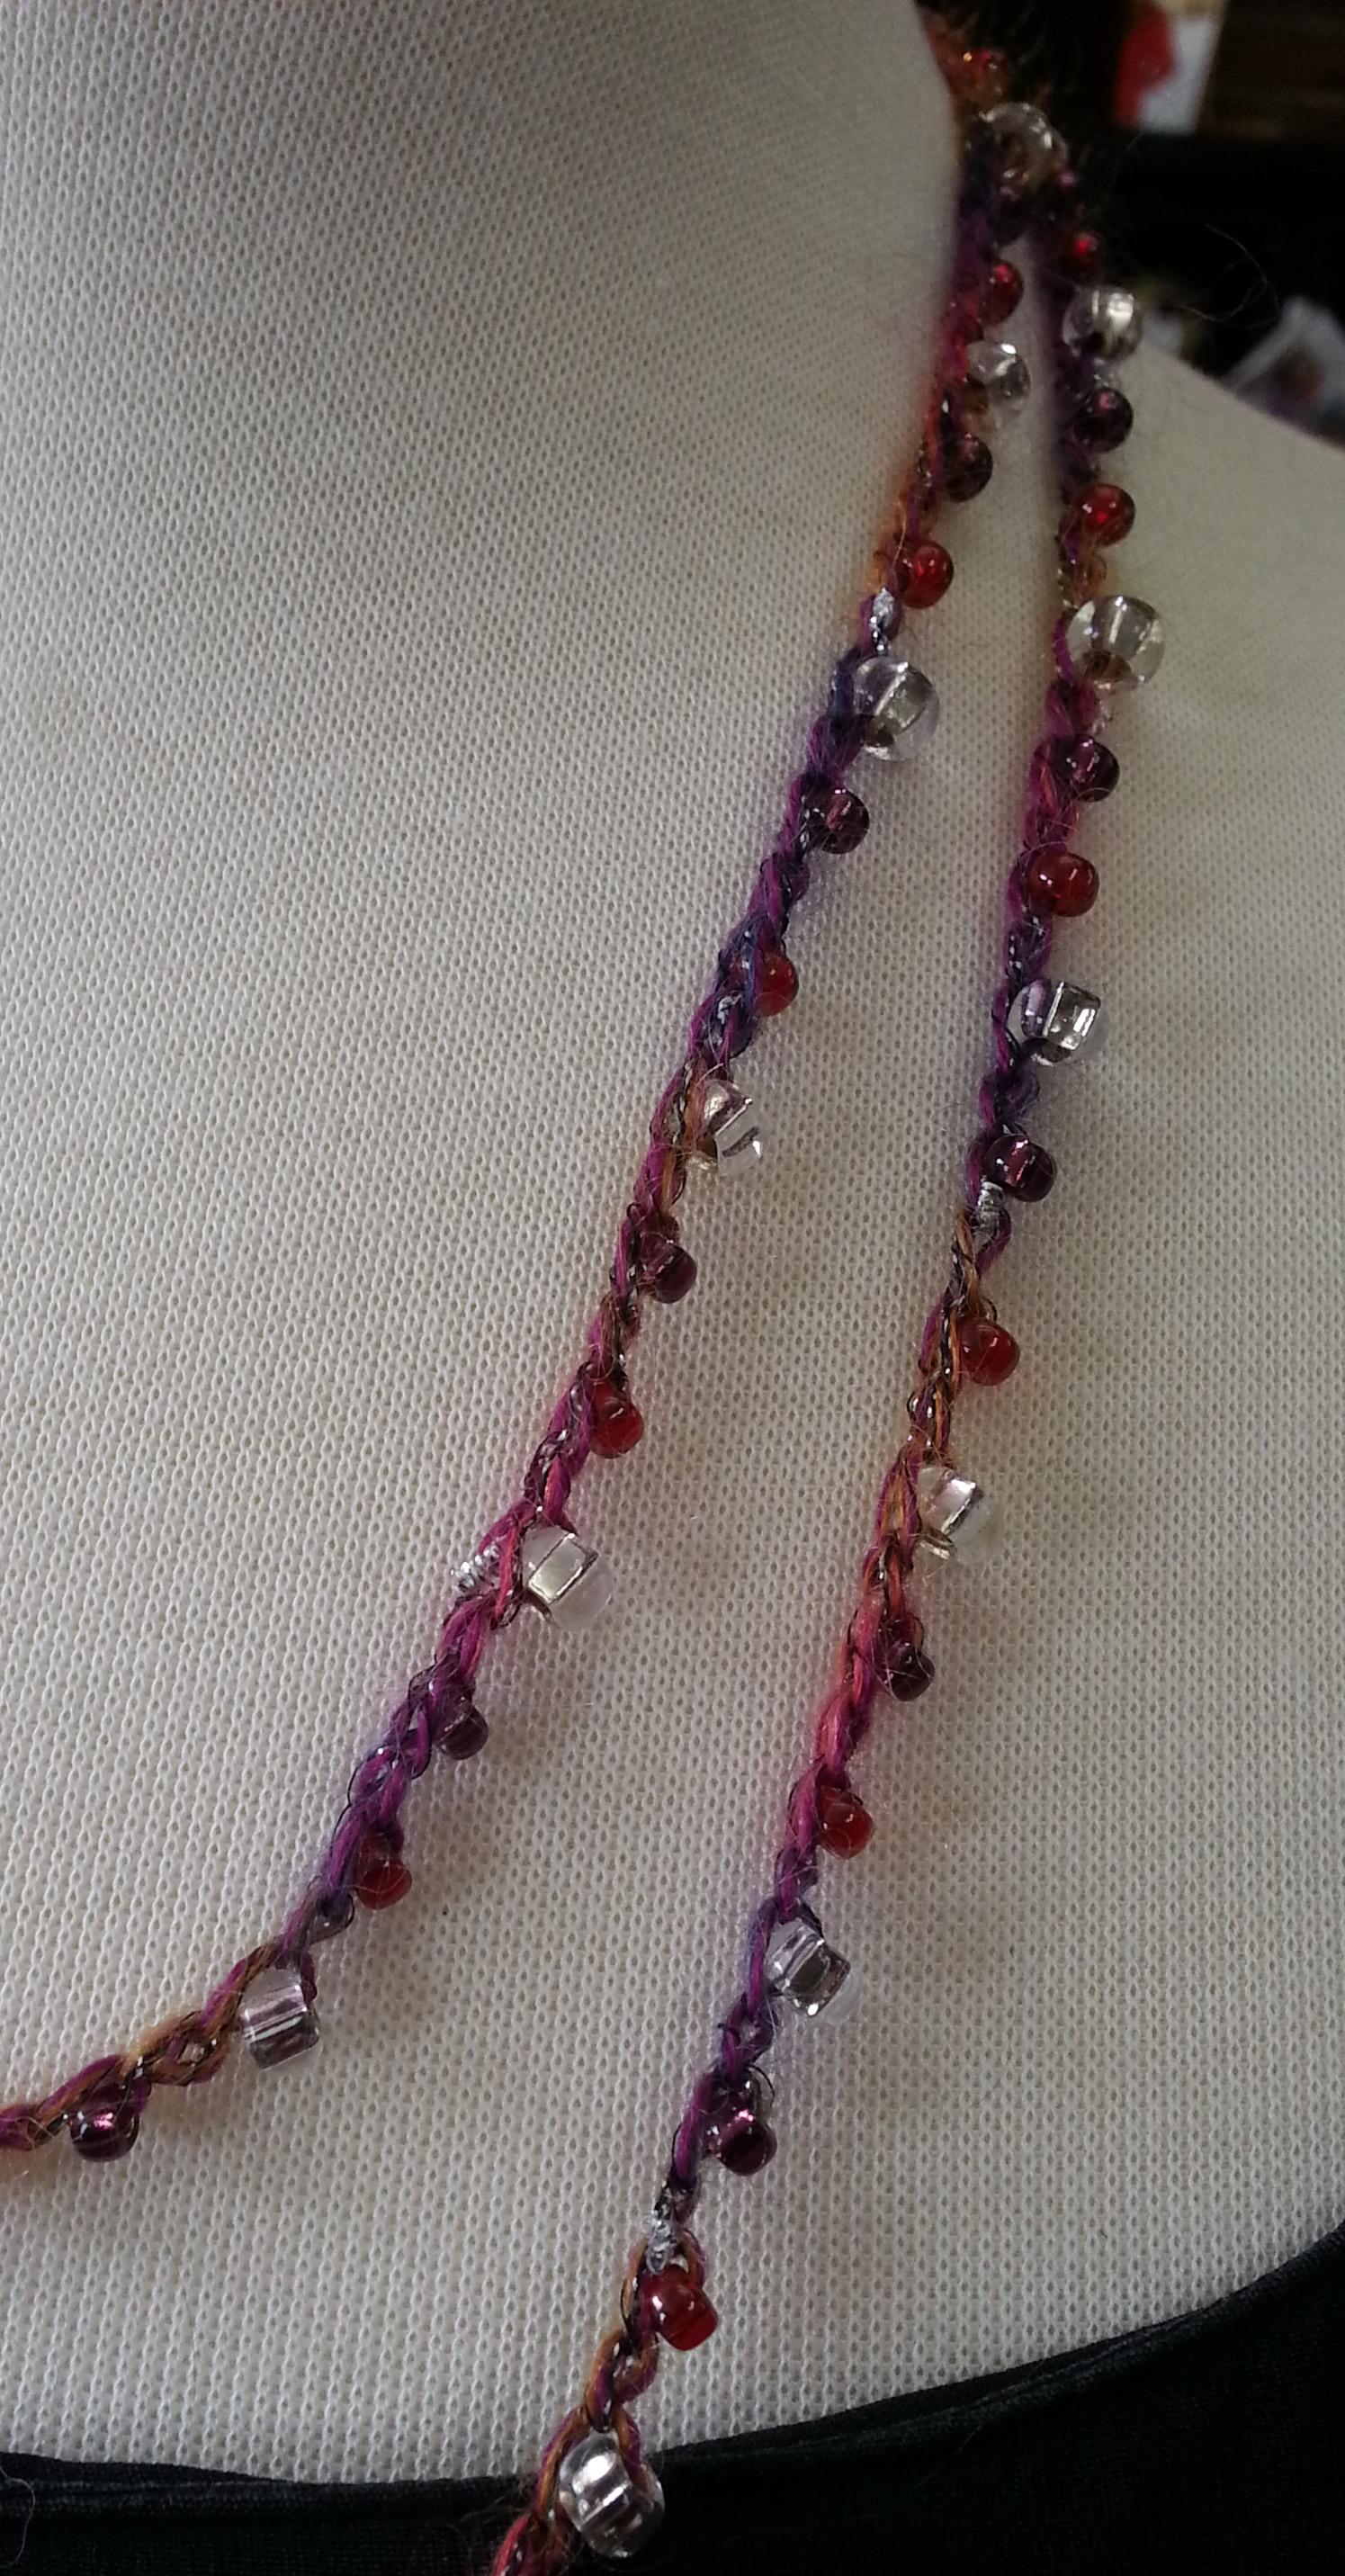
Switch out the yarn to something with silk or glimmering threads and the beads for lovely glass or semi-precious beads (just need holes big enough for the yarn to go thru), and you’ve got a beautiful piece of jewelry.
Look at the lovely necklaces we have on display at the shop, these were all made just by stringing beads on the yarn then working crocheted chains to the desired length.
For those of you that can’t be with us today I have included photos and instructions for you to practice at home. Or if you are an experienced crocheter teaching some one else how to get started, this is a great starter project as they get accustomed to working with the yarn and hook.
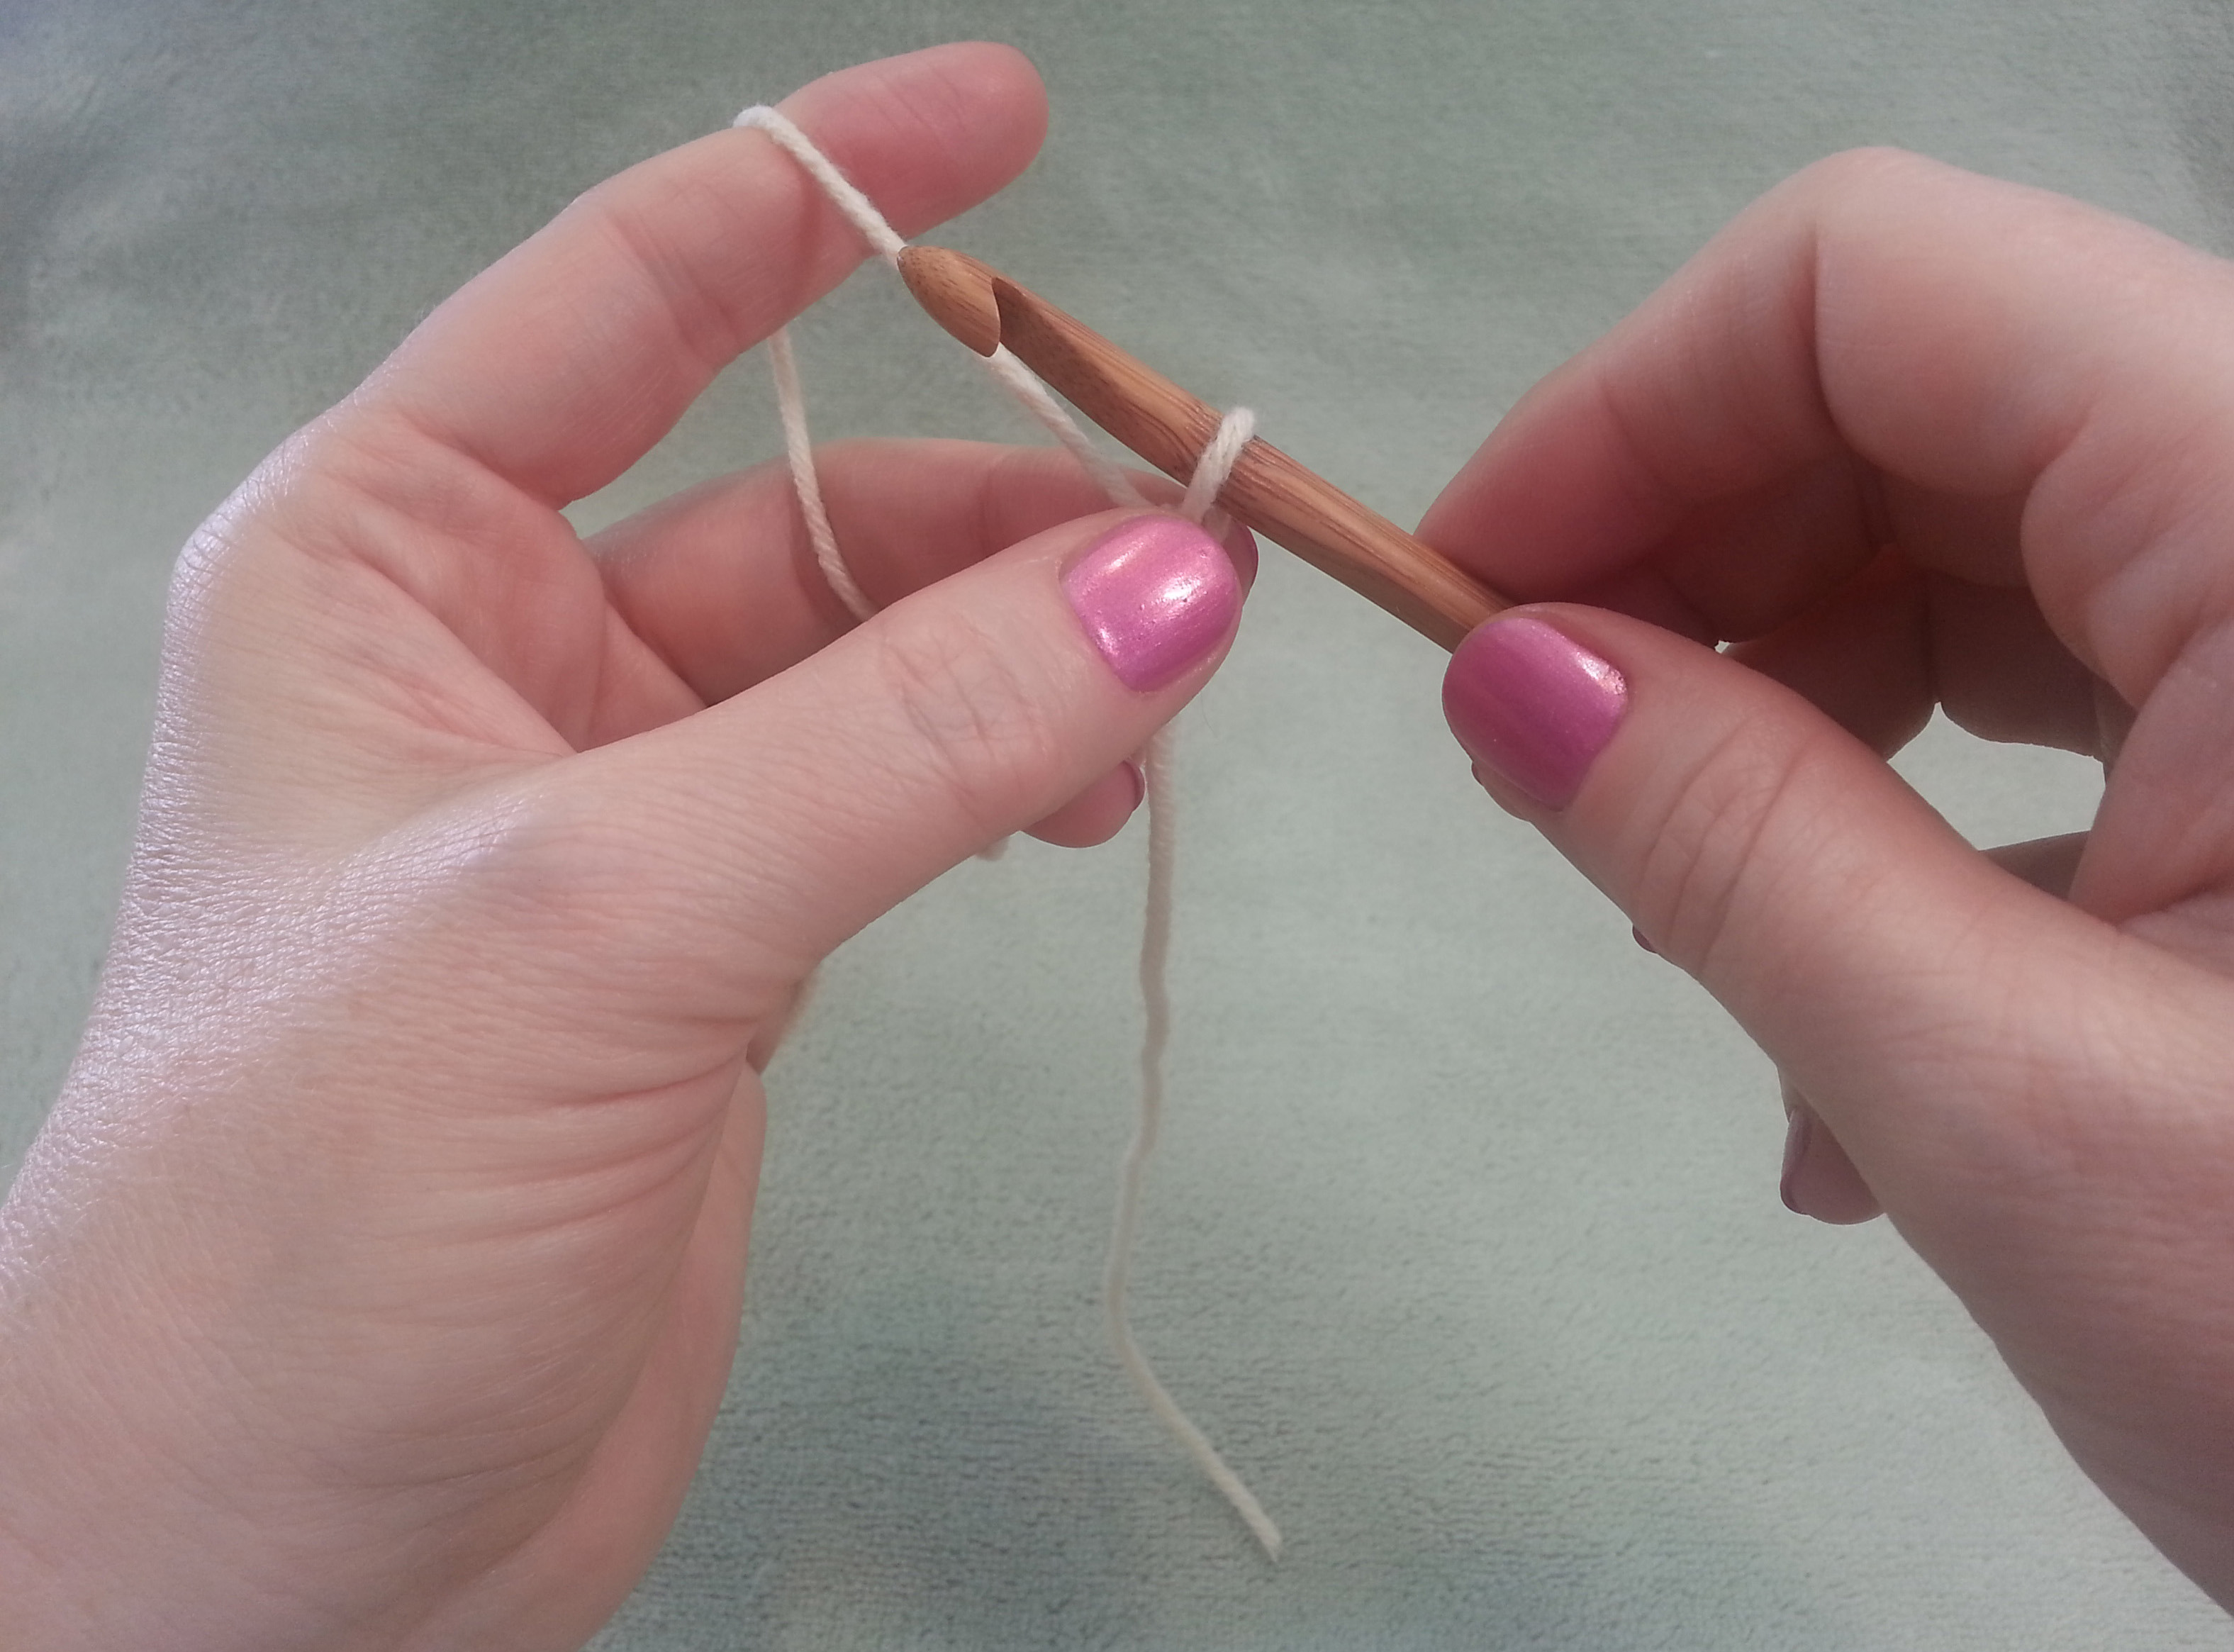
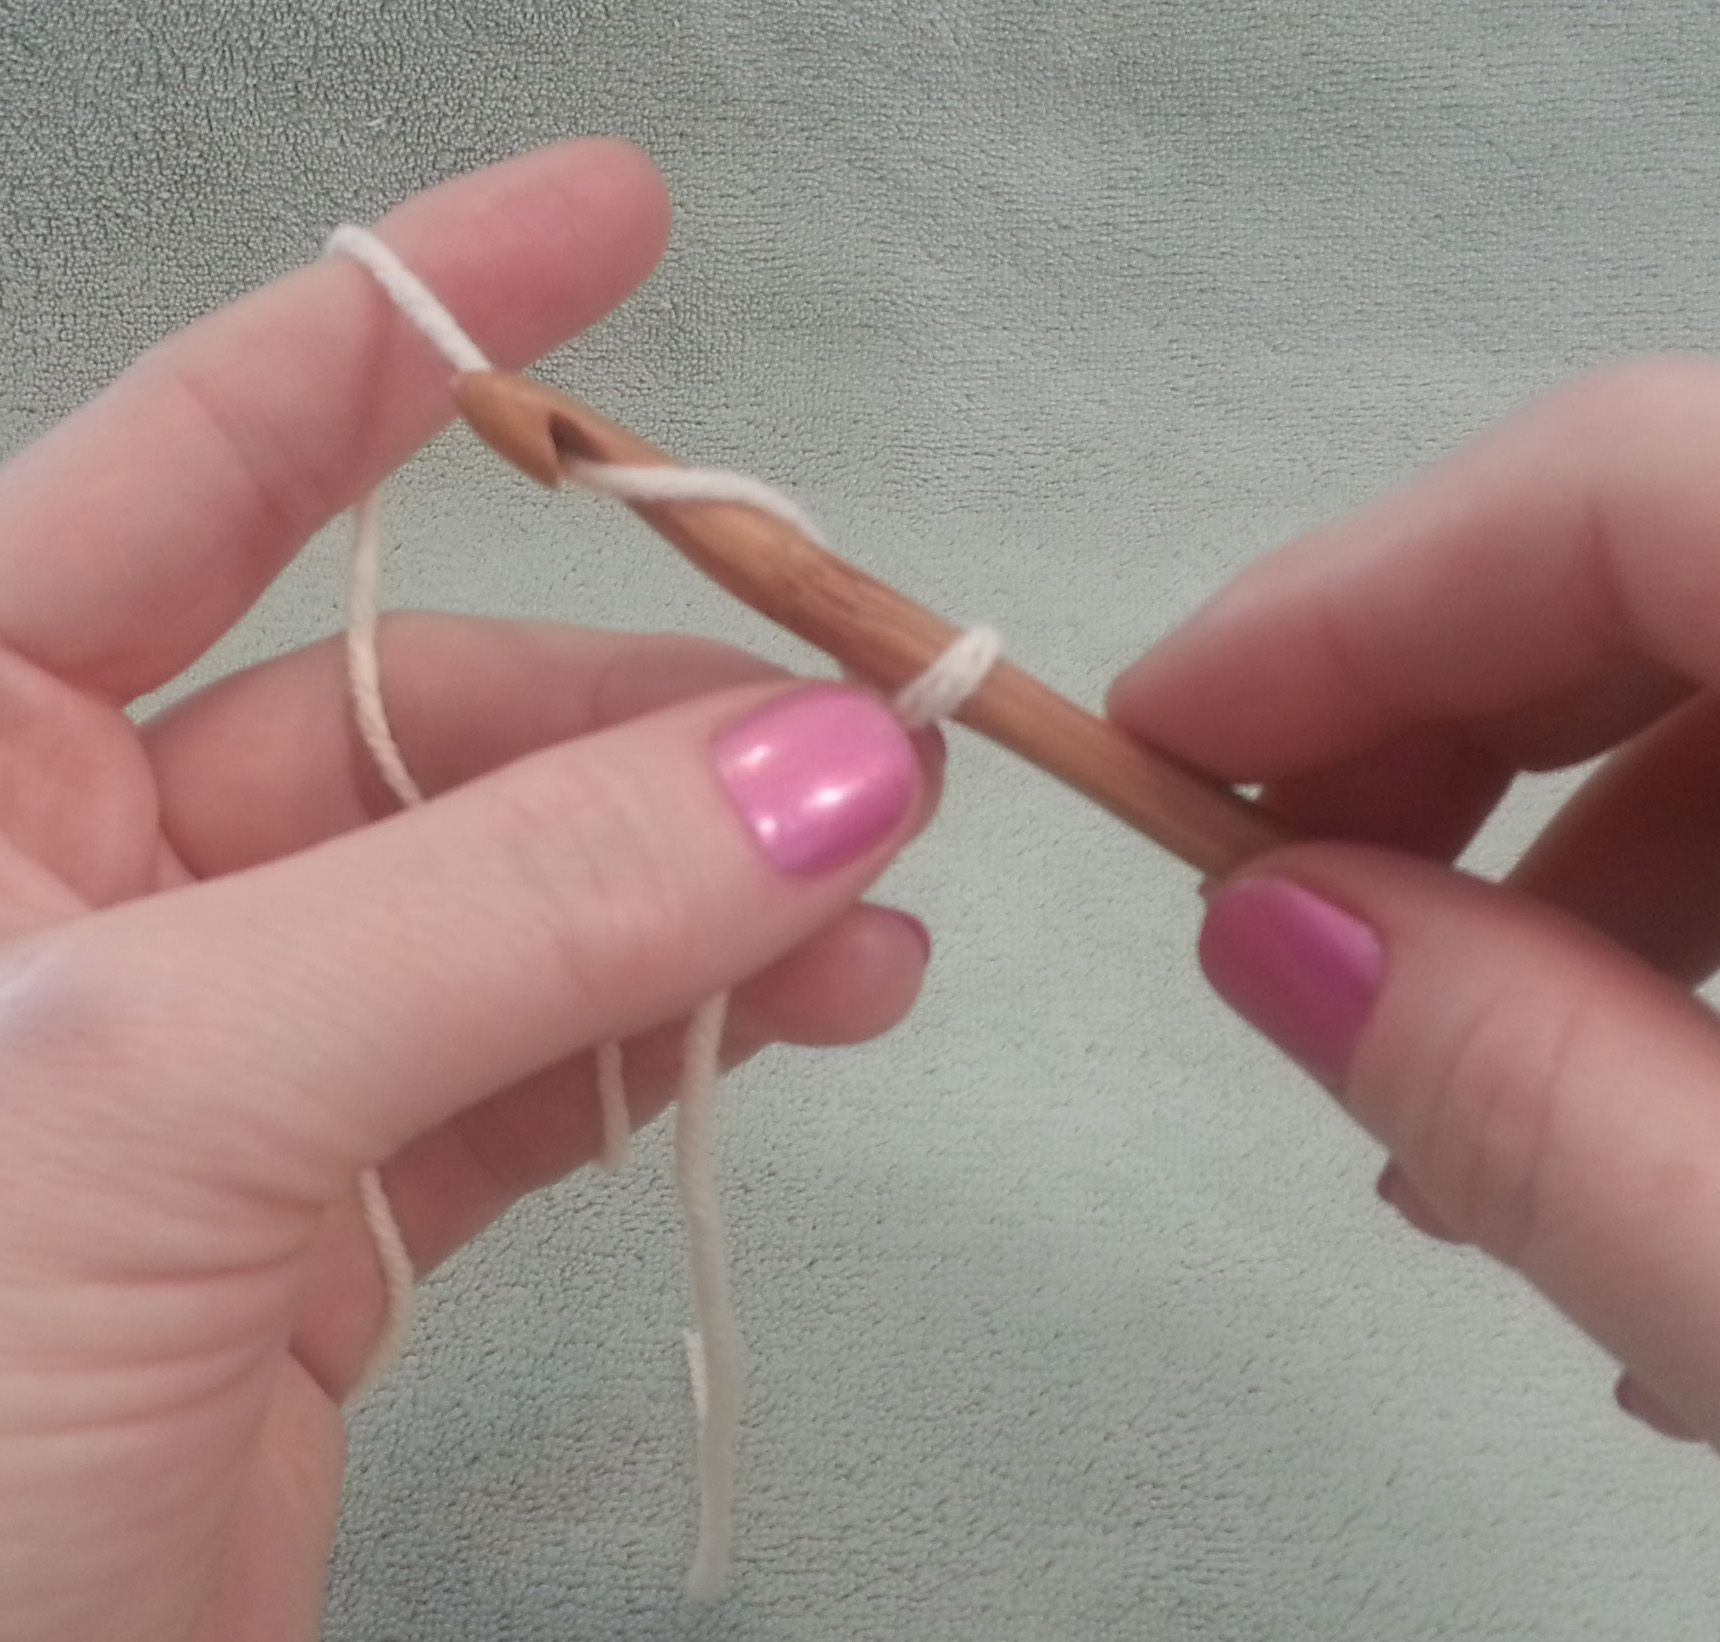
If you’ve never crocheted, or it’s been a long time since you crocheted, you may have forgotten how to hold your hook and yarn. These photos Show how to hold the yarn and hook if you are right-handed. For left-handed crocheters just reverse which hand holds the yarn and hook. The most important thing to remember when crocheting is to keep your hands relaxed.
Making a slip knot to place on your hook
I create a loop with the working yarn (coming from the ball of yarn) going over the top of the beginning tail, then reach thru the loop with my hook (or fingers) to pull up a loop from the working yarn, I place that loop over my hook and gently pull on the working yarn to snug the loop on my hook.
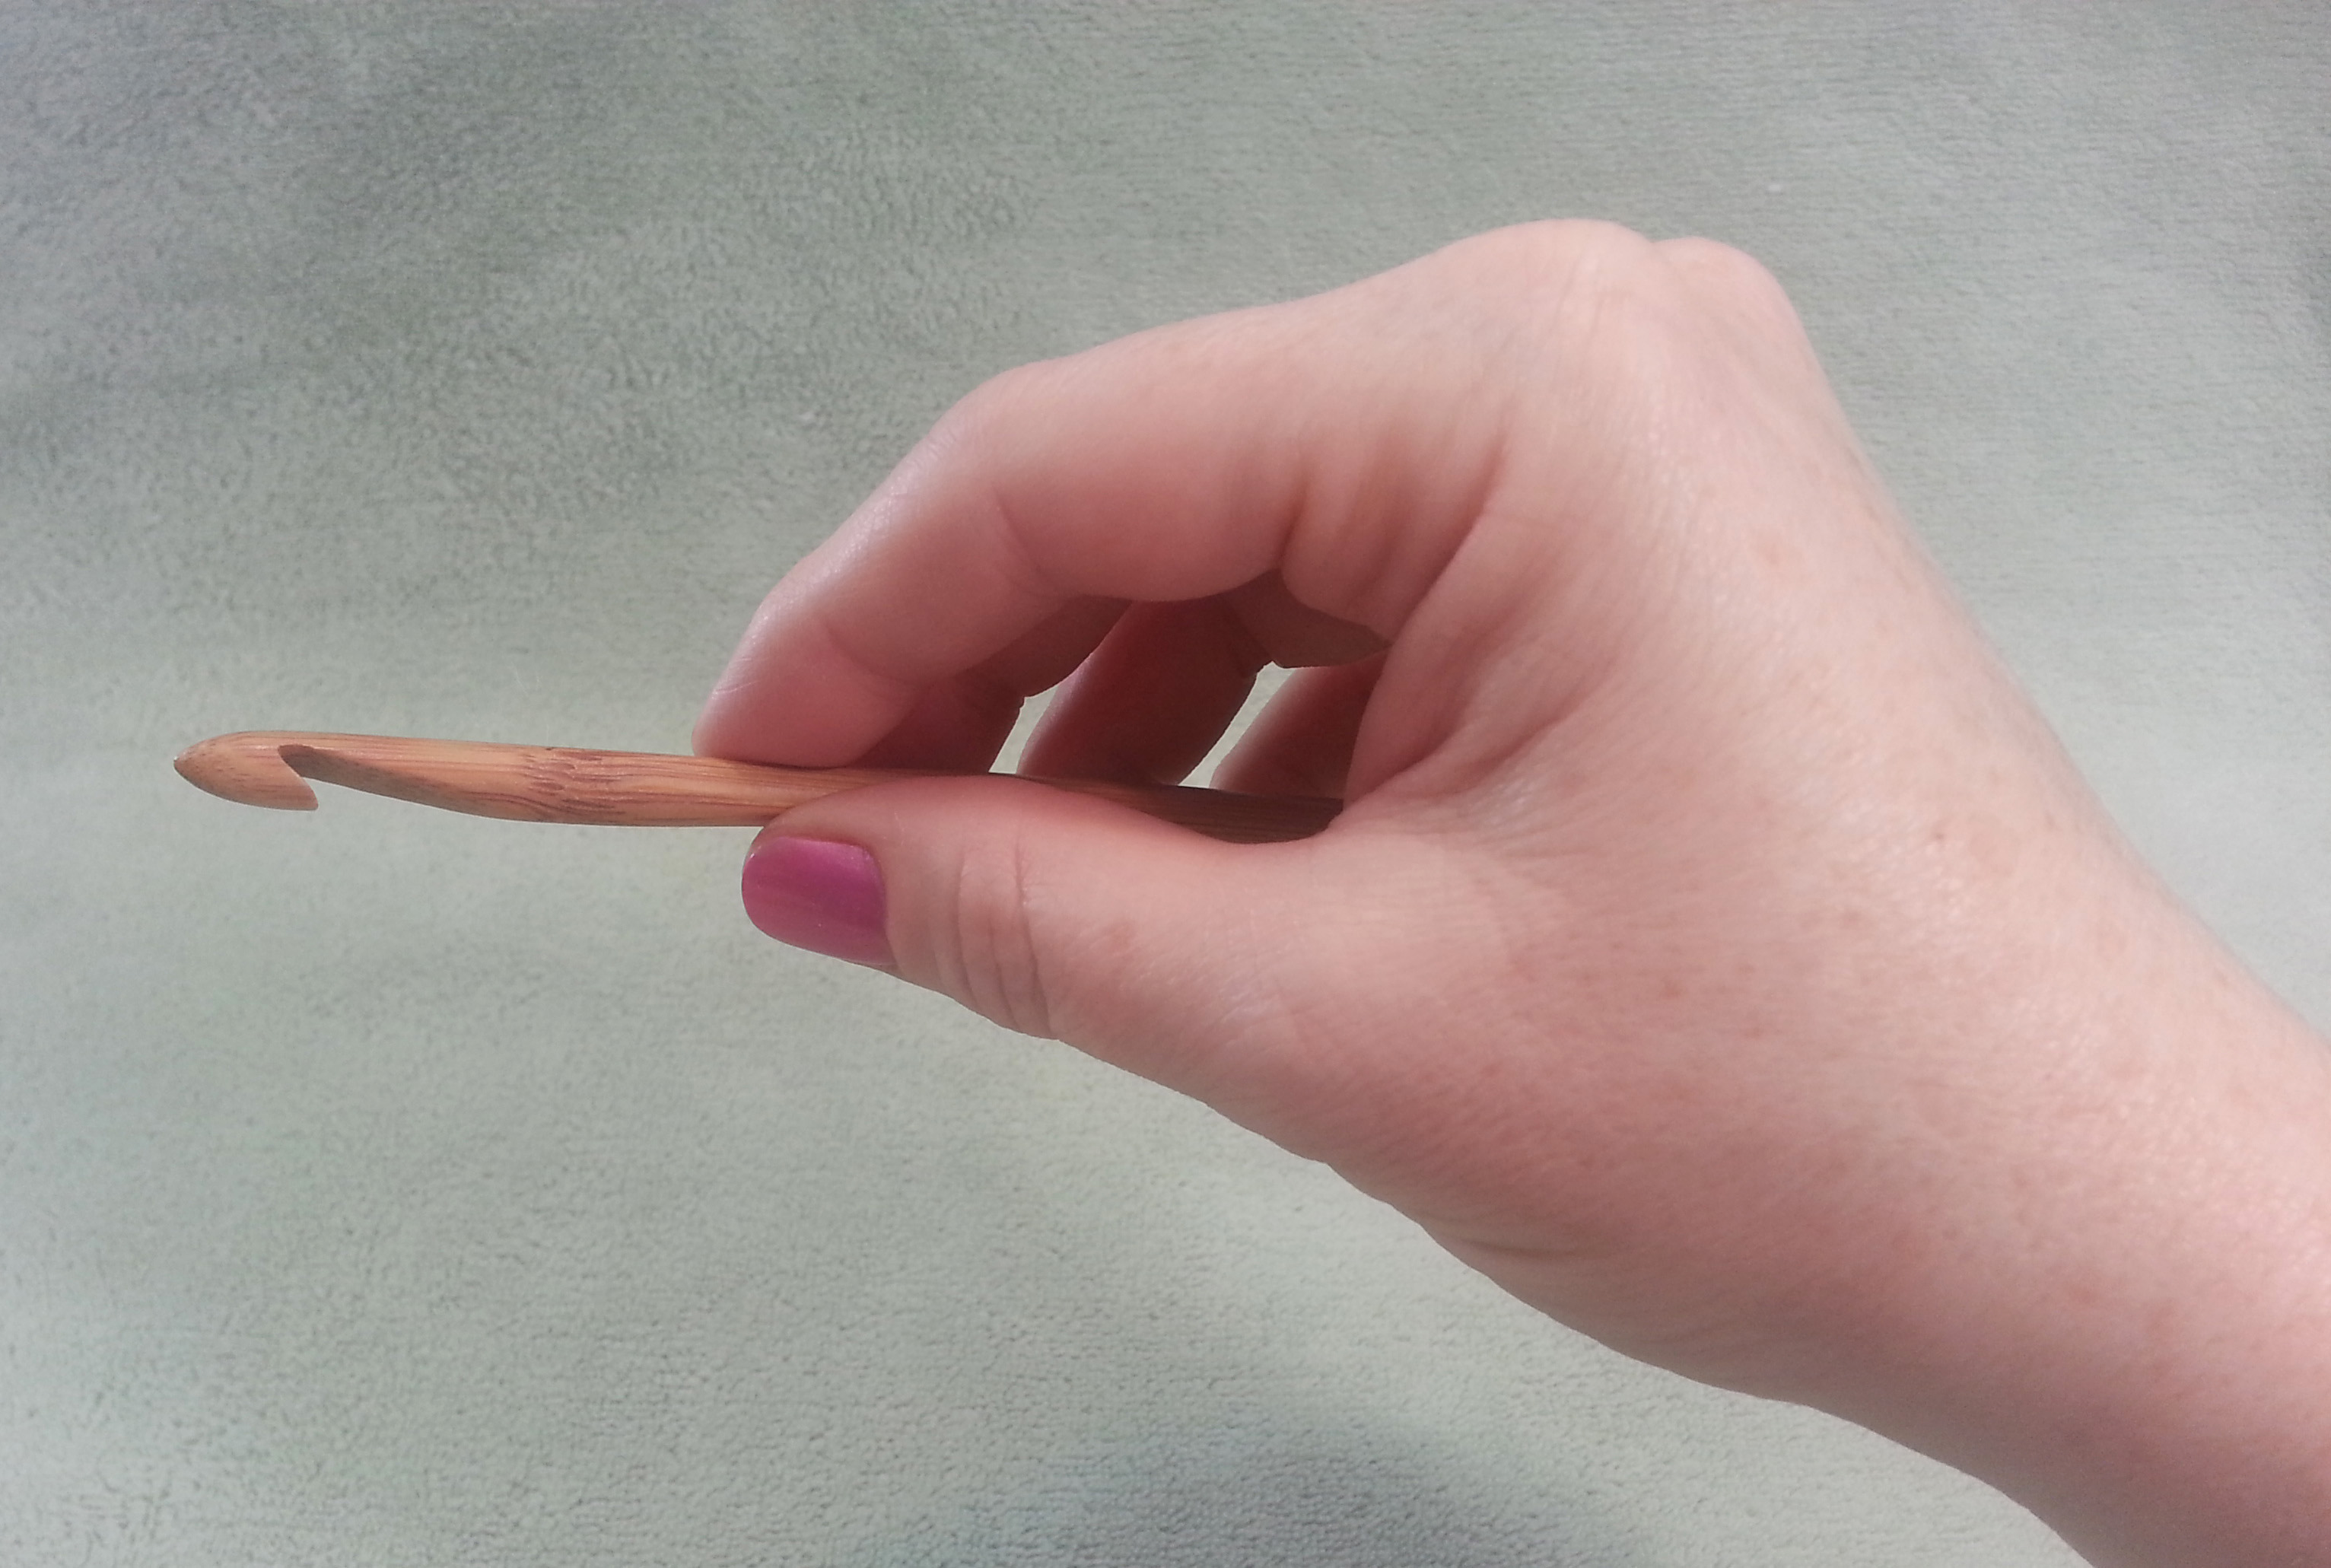
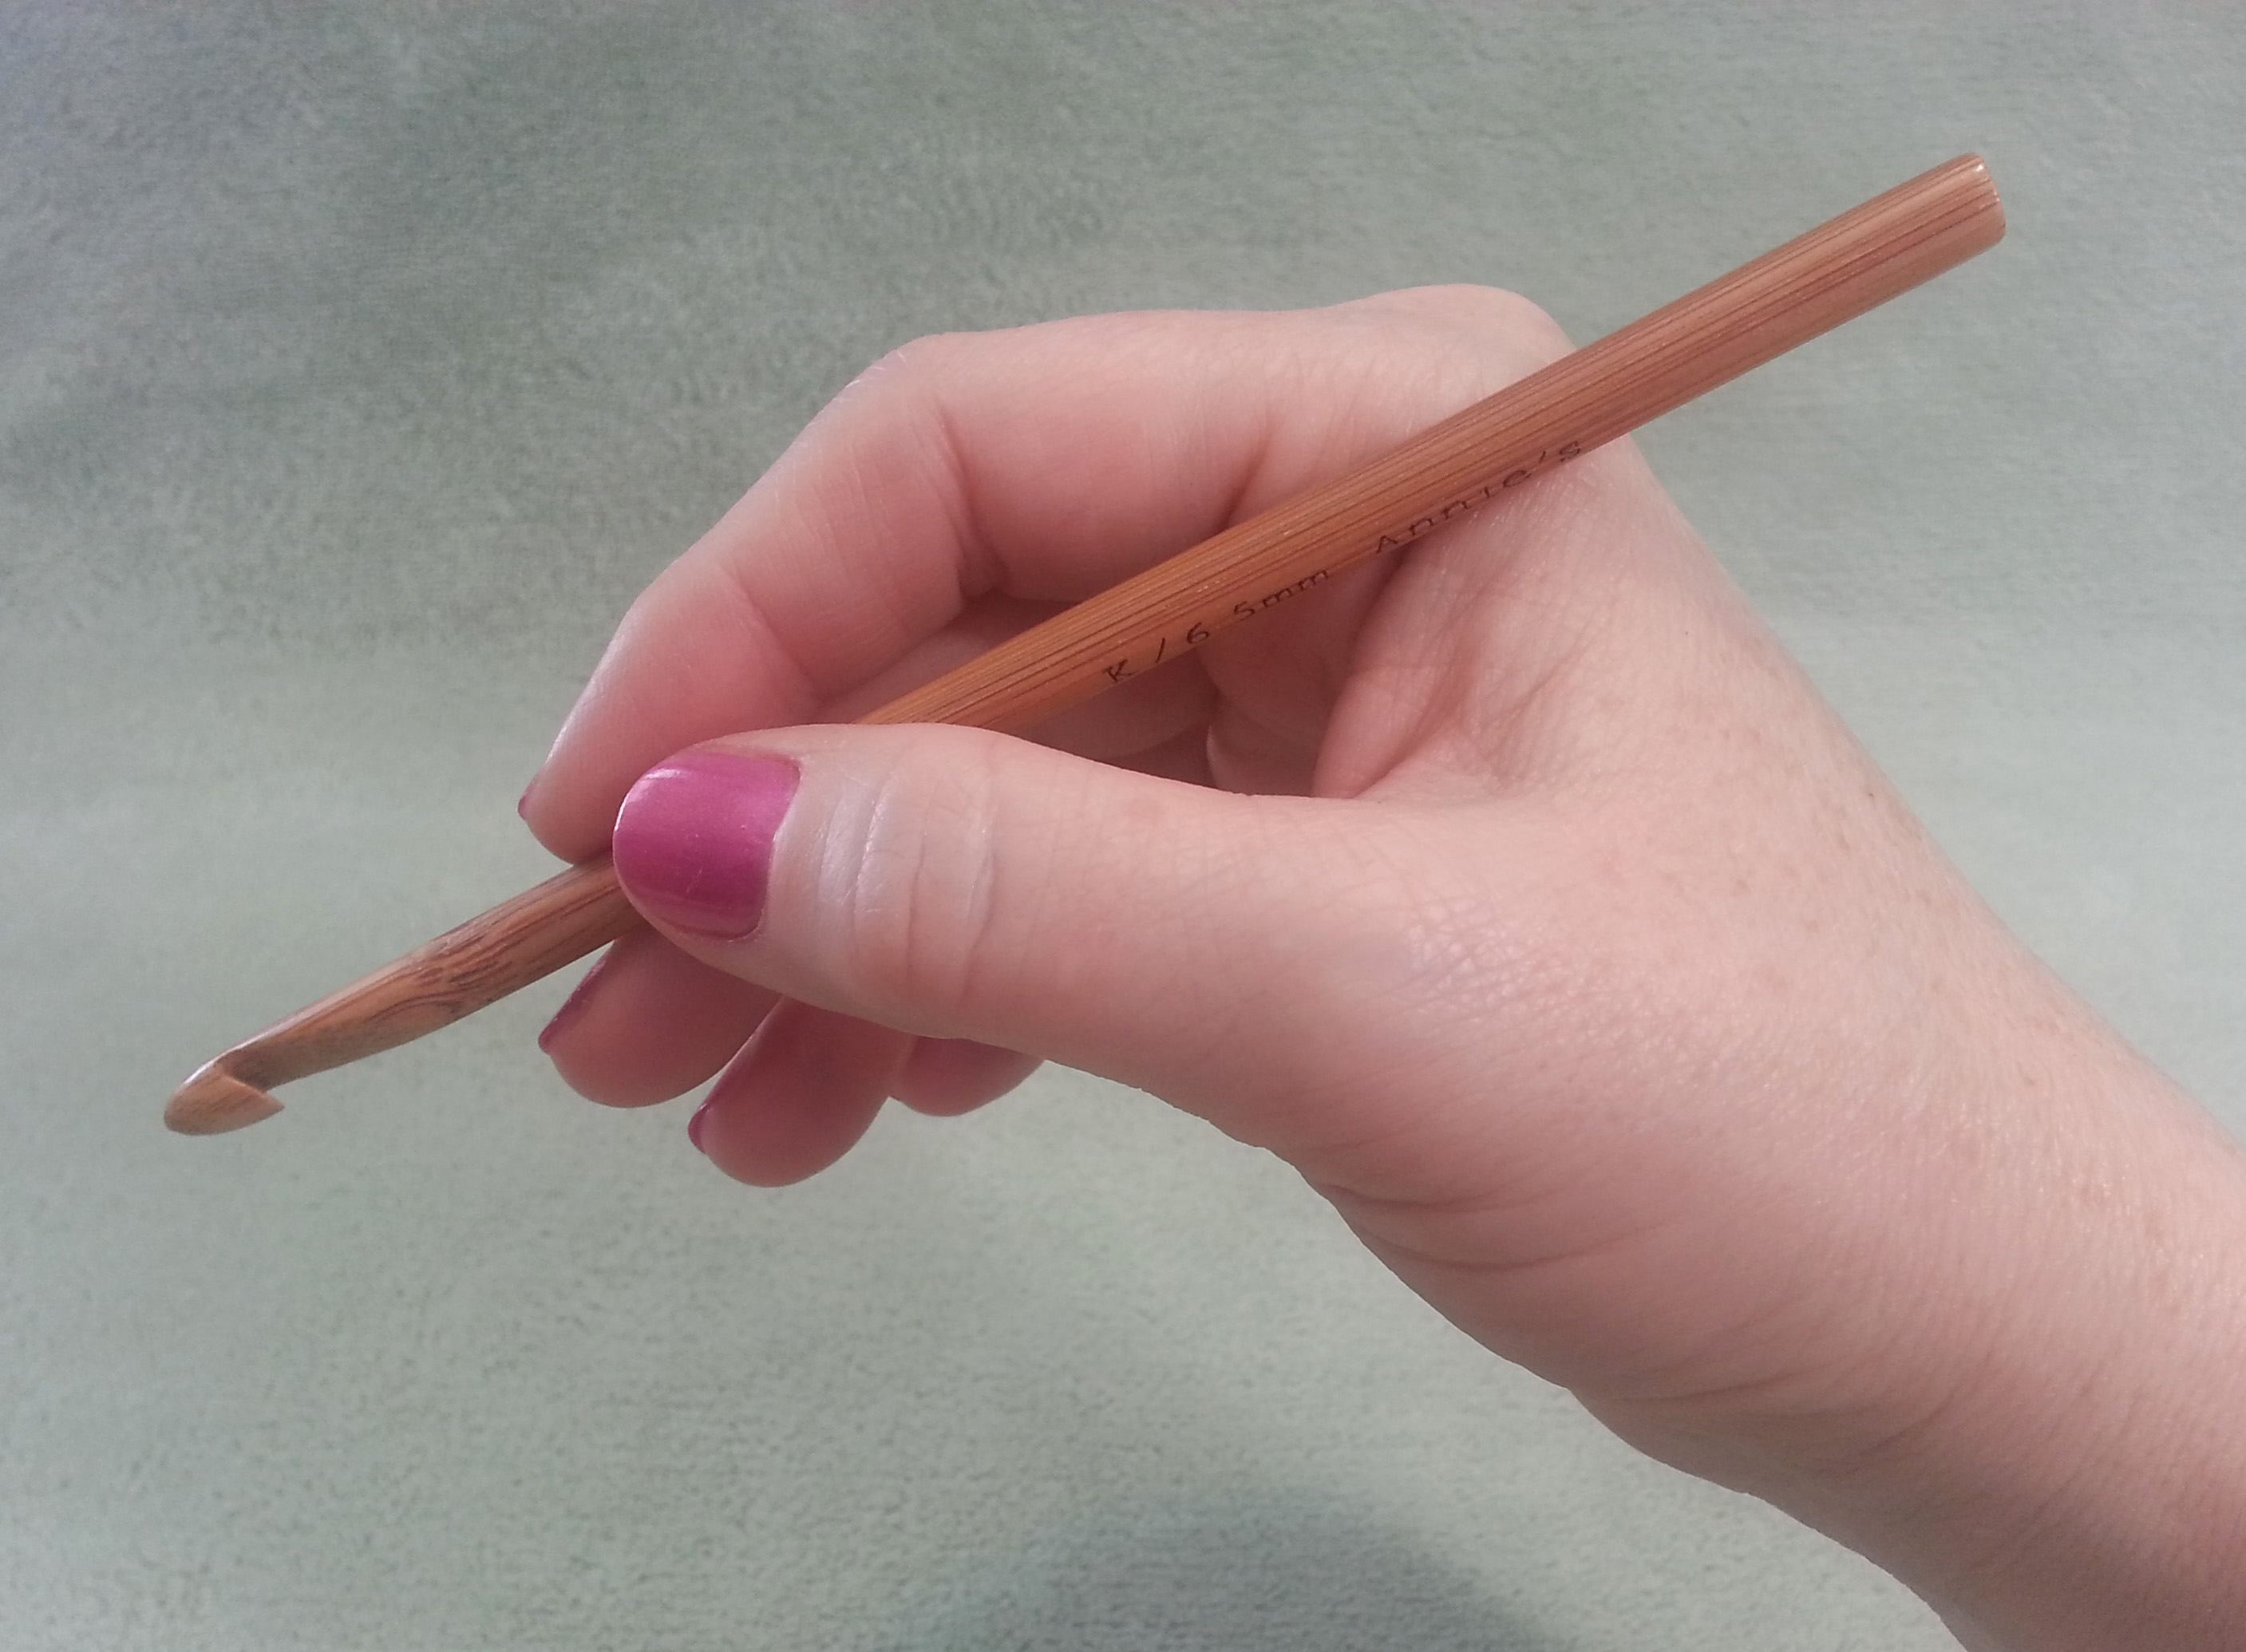
Holding your hook
There are 2 fairly common ways to hold your crochet hook…
The Knife or Toothbrush hold….
Or the Pencil hold.
Try them both out and see which is most comfortable to you.
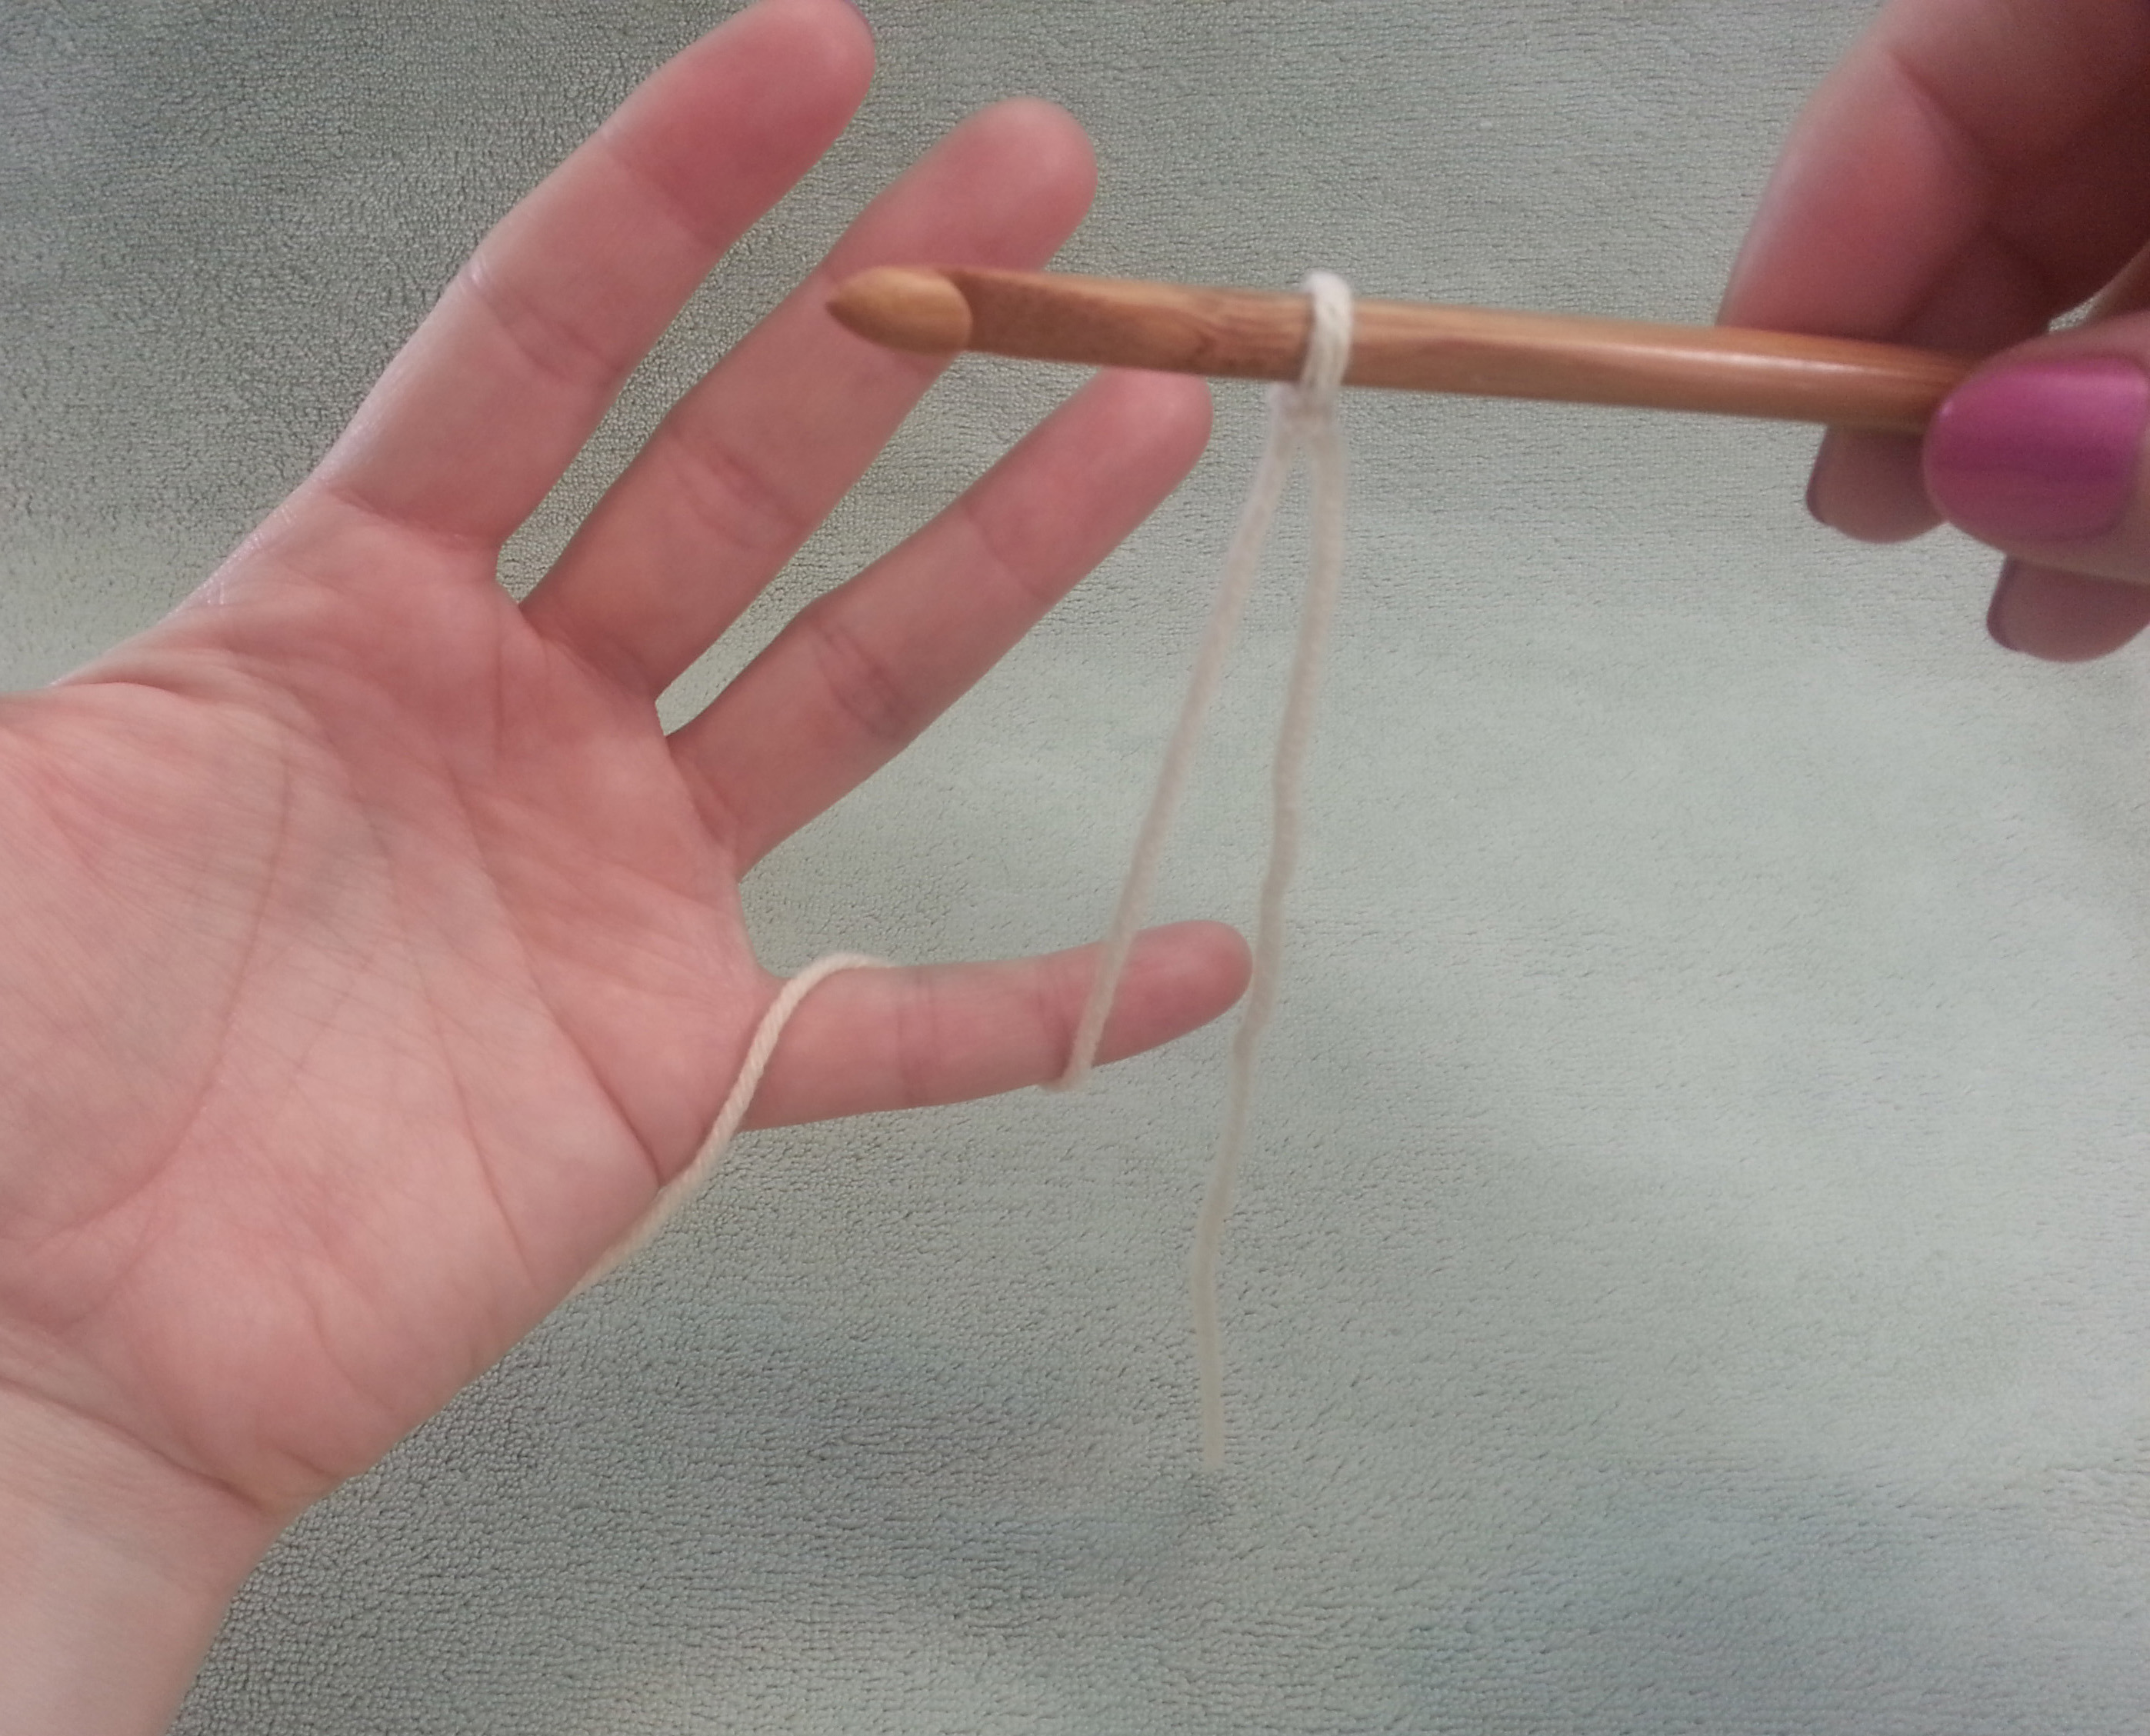
Tensioning (holding) the yarn
You may need to adjust how you hold the yarn depending on how dry your skin is and the texture of the yarn you are working with.
I loop the yarn around my left-hand pinkie…..
then weave it thru my fingers over and under so the yarn going to my hook comes over the top of my index finger.
I then use the middle finger and thumb of my left hand to hold at the base of the loop on my hook. This allows my hook to move freely in the loop.
To make a chain stitch
I scoop the tip of my hook from the front to the back of the strand of yarn coming from my index finger, then “hook” the yarn and pull it thru the loop on my hook.
Now you are ready to start on your bracelet project.
Simple Beaded Chain Bracelet
Slide bead up close to hook.
Materials needed:
Worsted weight yarn
Approximately 15 “pony” beads in desired colors
Size I (5.5mm) or J (6mm) hook
Instructions:
String 15 pony beads on yarn (note you may have beads left-over once your reach your ideal bracelet length).
Chain 1 and capture bead.
Make a slip knot in yarn, ch 1, slide 1 bead up close to hook, ch 1 capturing bead, continue with alternating plain chain stitch and beaded chain st until strand measures 7 inches long (or long enough to fit loosely around wrist), finish with a final plain ch 1. Fasten off.
Tie ends together using a square knot, trim ends to 1″ long.
You can read more about my initial beaded chain projects in my post: The Beauty of Beads
Thanks again for making my blog one of your visits for our blog tour. I hope you come by to visit again soon. Meanwhile if you are a more experienced crocheter, and like to make hats, please join us during NatCroMo in crocheting (or knitting) hats to support the Halos of Hope organization. There are many patterns at the Halos of Hope website to use for this effort or you can use my “Pi Recipe” to create a simple stretchy hat that will be very appreciated.
Crochetville has received a lot of support from the crochet community over the years. They believe strongly in the importance of giving back. In 2013, Crochetville became a corporate sponsor of a wonderful organization called Halos of Hope. You can read more about Crochetville’s fundraising efforts and hat collection on the Crochetville blog.
Halos of Hope is a 501(c)3 not-for-profit organization founded by Pam Haschke, herself a survivor of inflammatory breast cancer. Halos of Hope’s mission is to provide volunteer-crafted hats to cancer centers across the country. – See more at: Halos of Hope website and the Halos of Hope Facebook Page.
As Amy said, ” Wouldn’t it be cool if we could somehow reach all of the 1.7 million crocheting households in the United States? If you’re going to dream, dream big, I say!”
I’ve been told I have a big heart. I don’t know if that is always true, I do try to be a generous person and to treat folks fairly and kindly. The past couple of years I have posted a number of patterns on my blog of heart motifs. Most of them are small quick projects.
With Valentines Day only a day away, it’s good to have a quick project to crochet up. So I wanted to show you what another blogger, Cintia came up with using my “Crocheted Love” heart pattern.
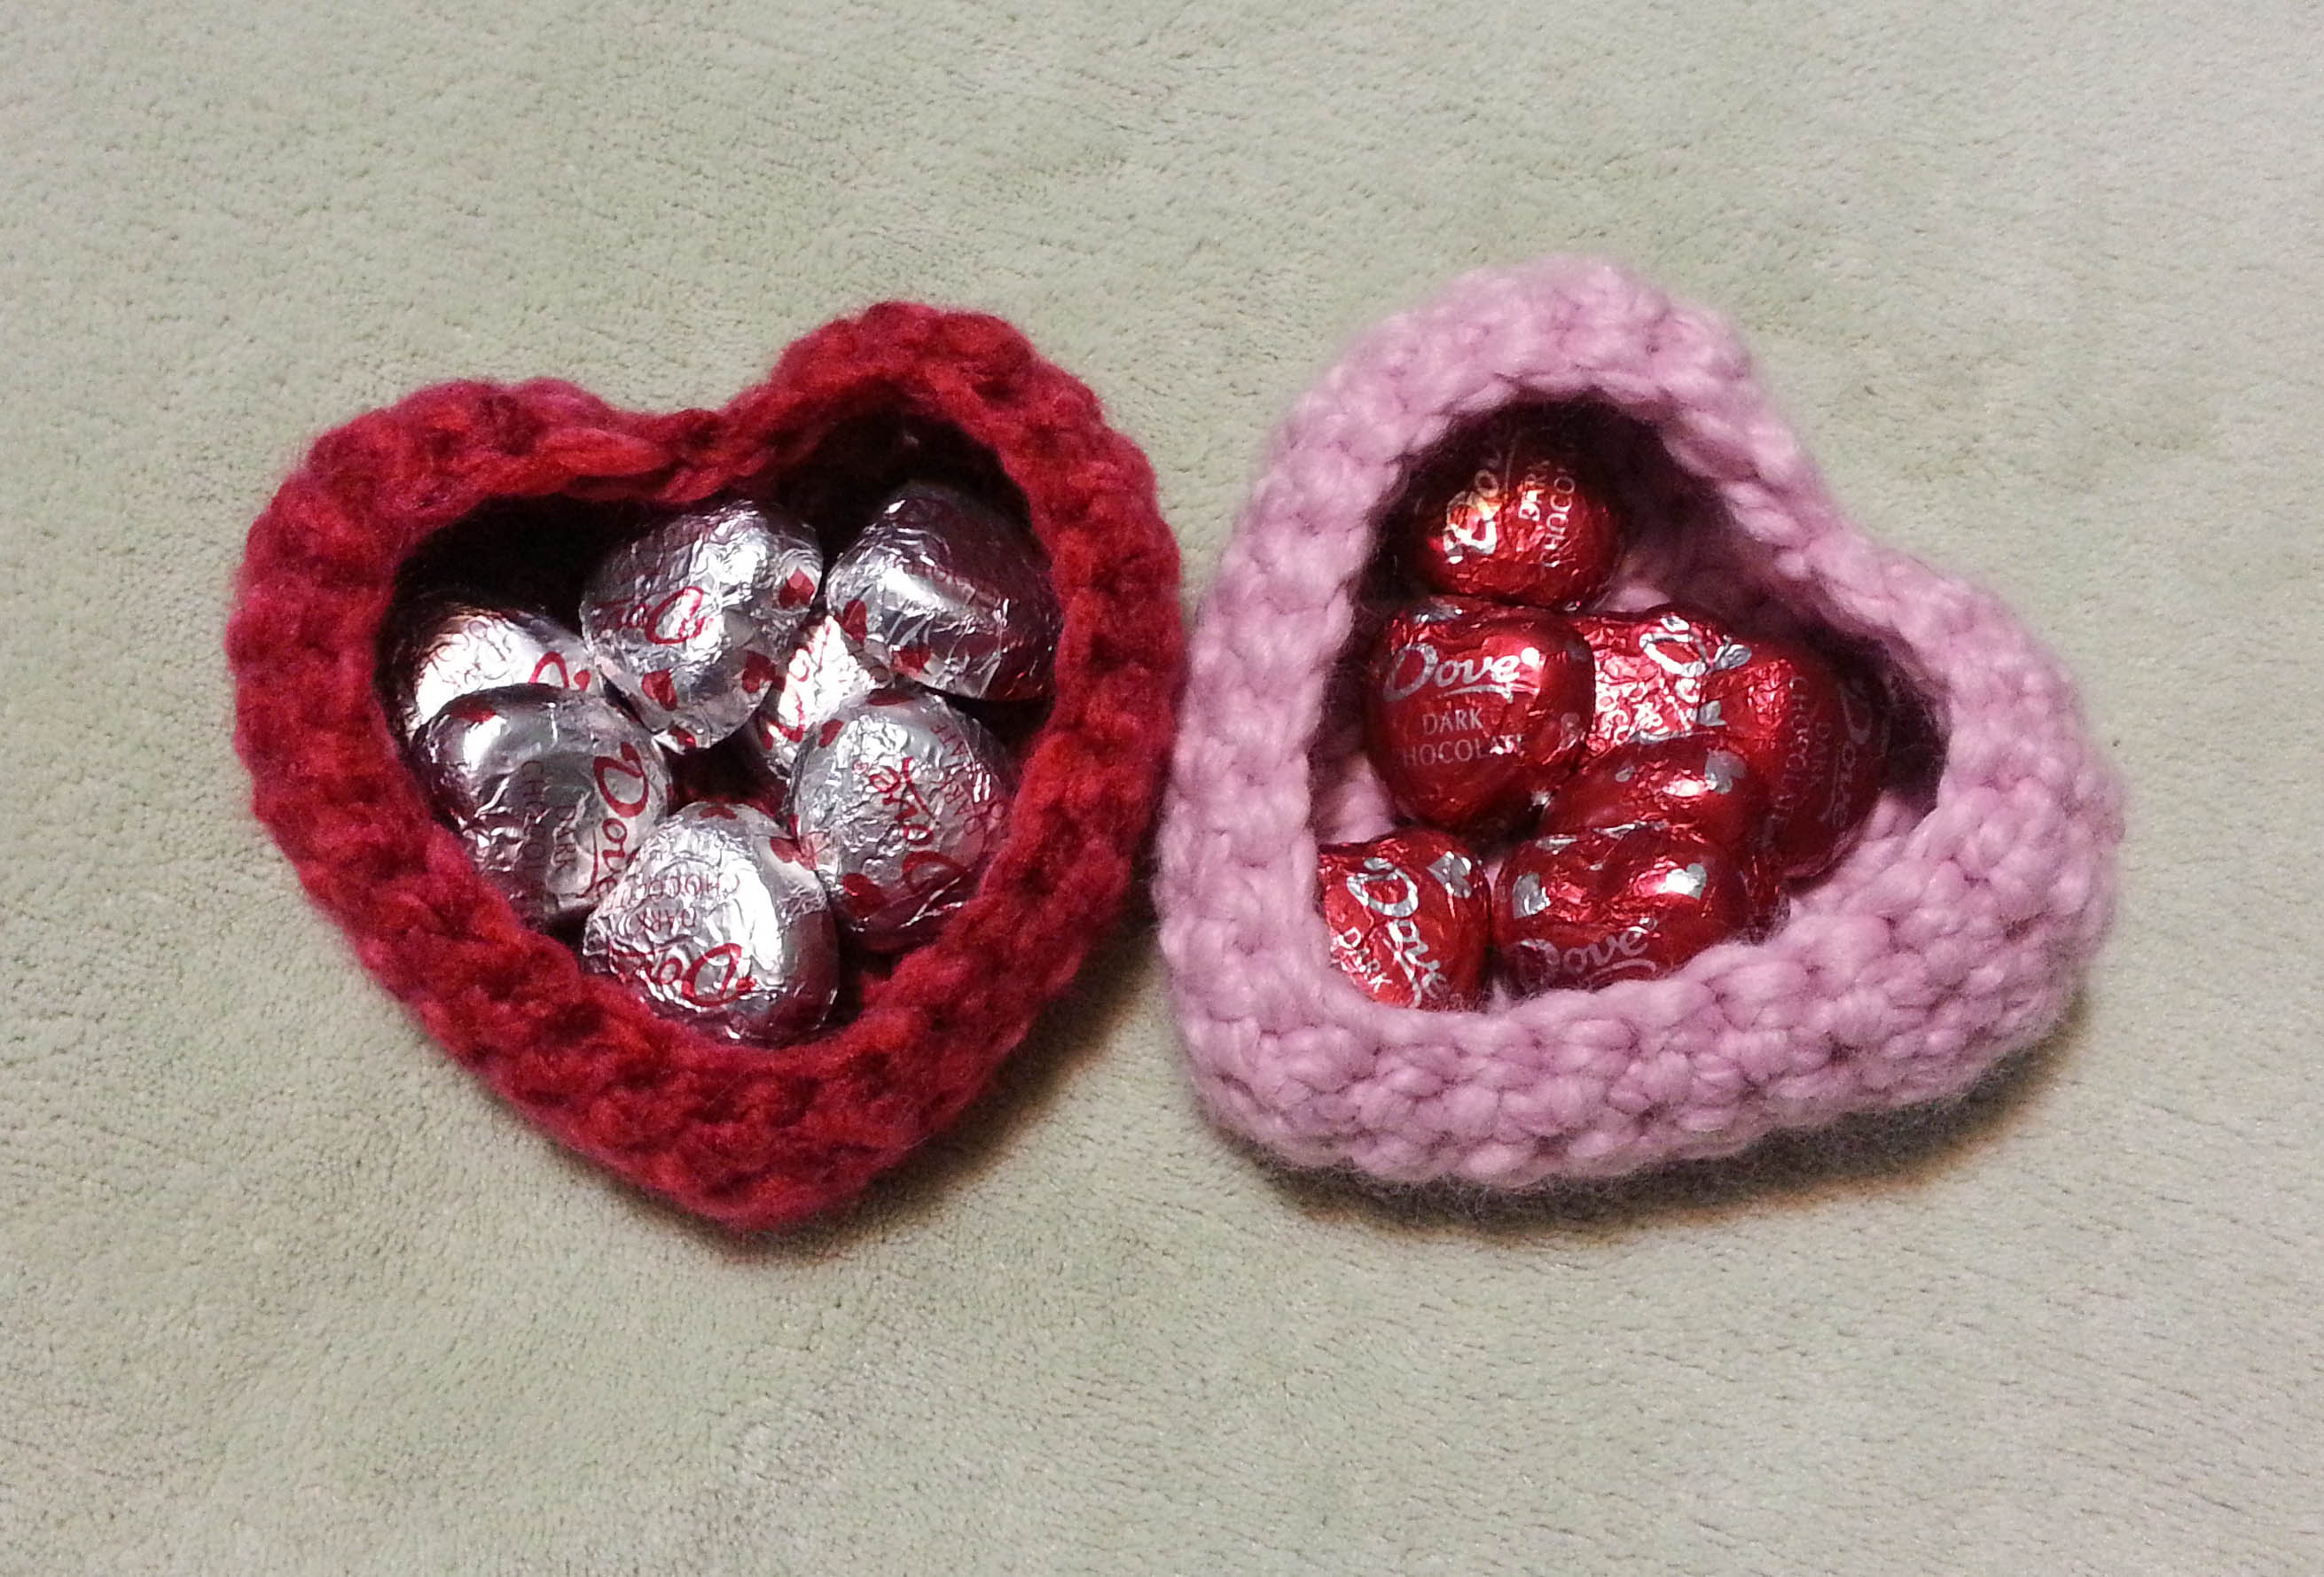
These adorable baskets. The ones pictured above I made using Premier Yarns Serenity Chunky Weight with a size L (8 mm) hook, and Lion Brands Thick n Quick Super Bulky yarn with a size M (9 mm) hook.
You can find Cintia’s tutorial on making this sweet little basket at her blog My Poppet. Her idea of using a super bulky yarn got me thinking about doing that with some of my other heart patterns.
So I decided to work up 2 hearts using my “Simple Sweetheart” pattern and Lion Brands Thick n Quick Super Bulky yarn with a size M (9mm) hook.
I fastened off the 2nd heart with a long tail and wove in the center tails on both and the ending tail on the first heart. Then used the long tail to sew the 2 hearts together with a running stitch just below the tops of the stitches.
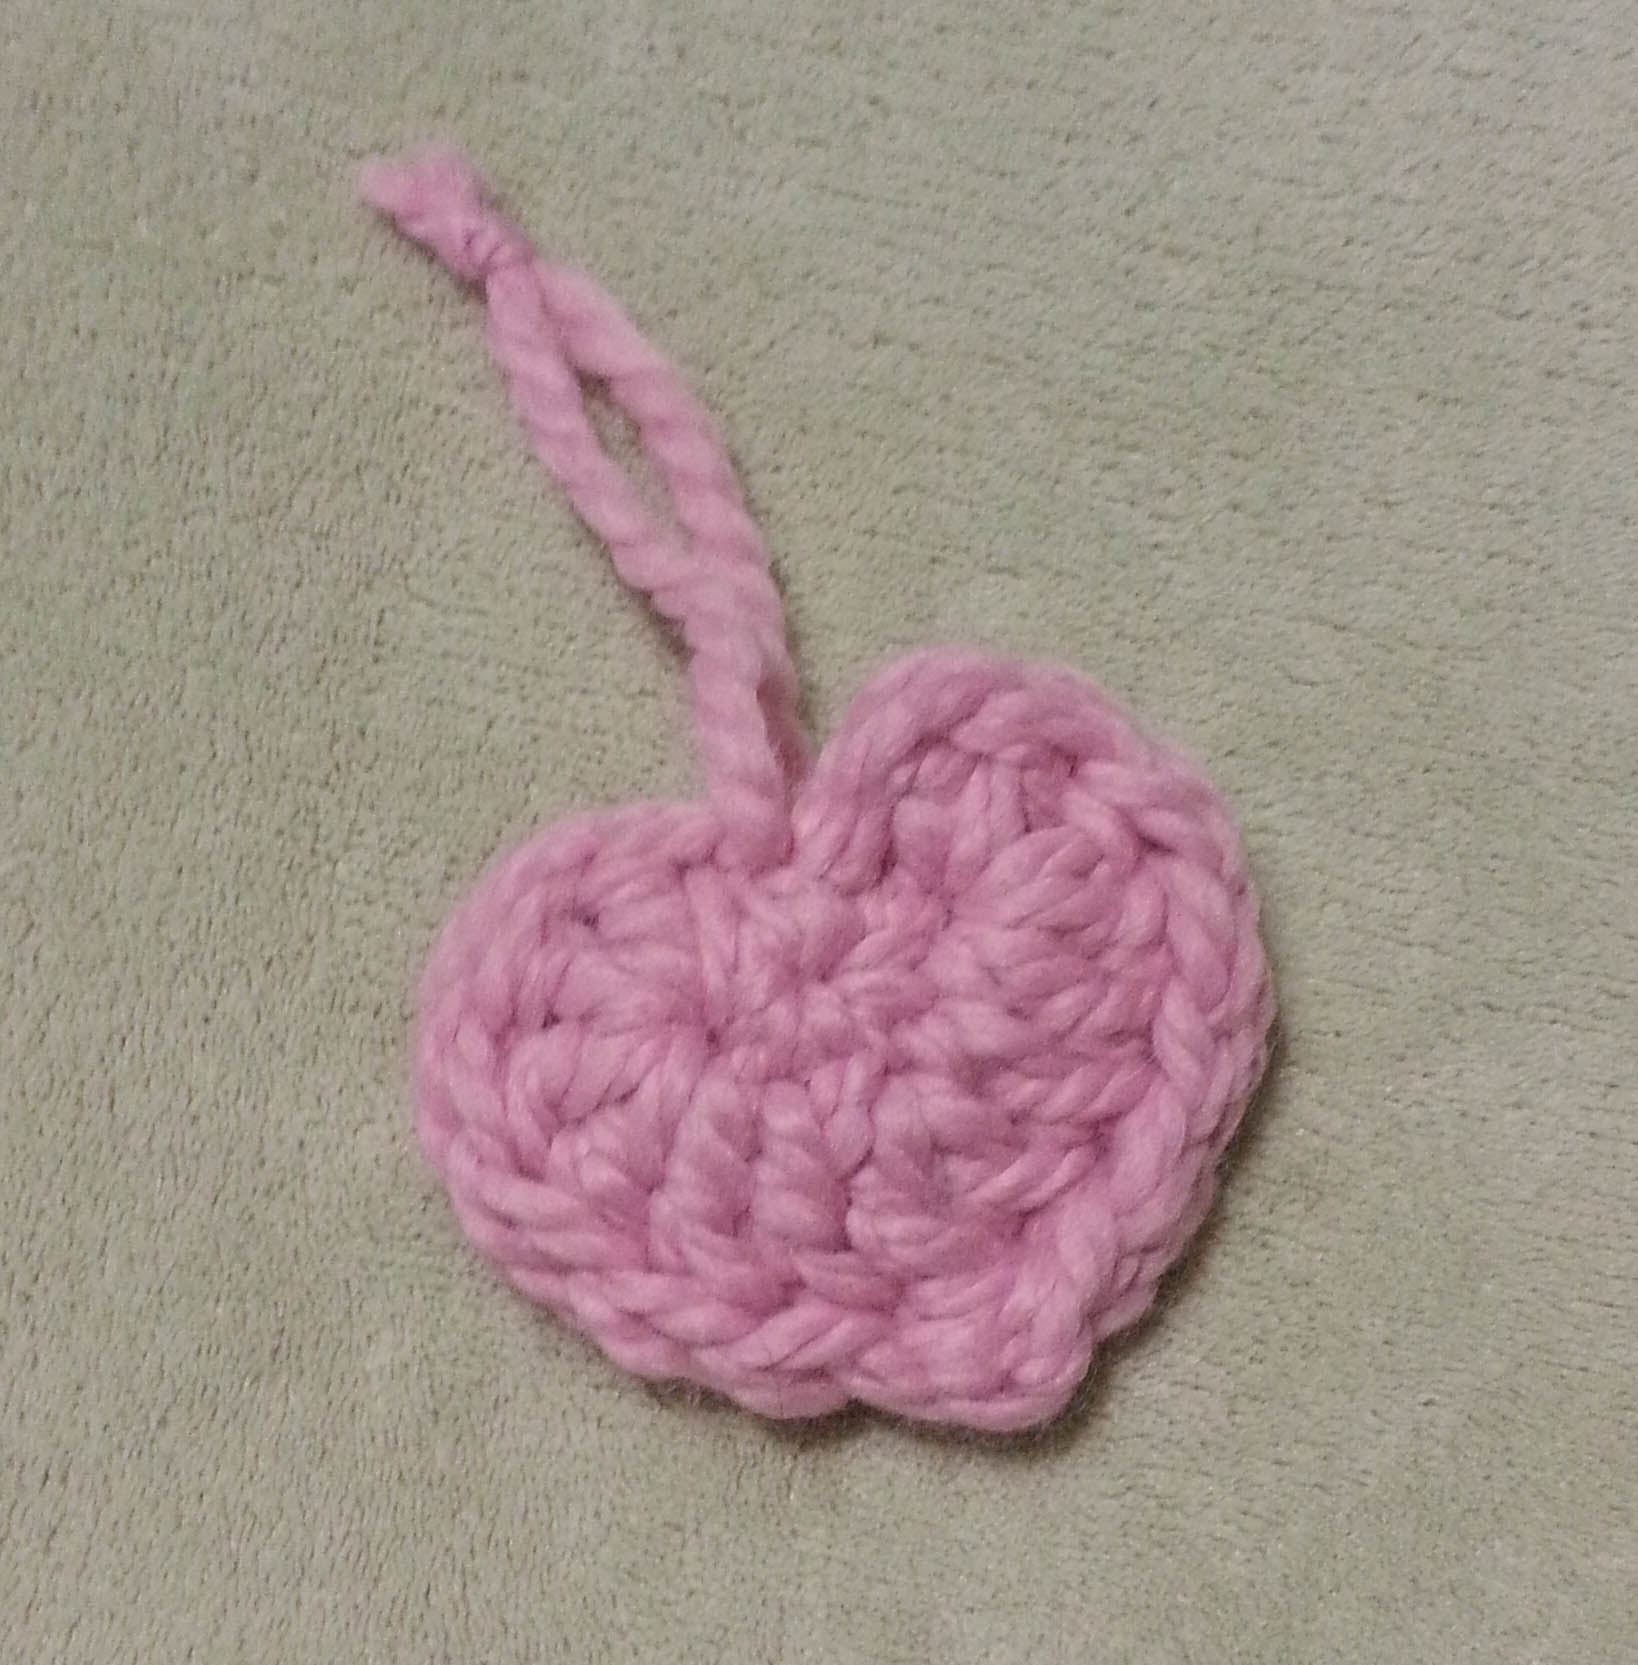
I left the stitches at the top of the hearts un-sewn to make a little pocket. There is a Dove Dark Chocolate heart in there, and would be room for a little note or card as well.
Then I used a length of yarn to make a loop to hang the heart with and knotted it together.
I made the loop just long enough that it can be moved out of the way to insert a candy and/or note. When the loop is pulled up it holds the pocket closed. You can hang it up somewhere for your Valentine to find as a sweet surprise.
I hope all my readers have a wonderful Valentine’s Day, filled with the joy and laughter of loving friendships.
So November is zipping along already and that means big holidays just around the corner. I’ve been preparing for our Thanksgiving, ordering our turkey and coordinating with family members for getting together.
Thanksgiving is the usual starting gun for me for my Christmas panic. Suddenly it’s time for Holiday parties, school programs, and family coming to visit. This year Thanksgiving is falling a bit later in the month, so I am trying to get myself motivated early.
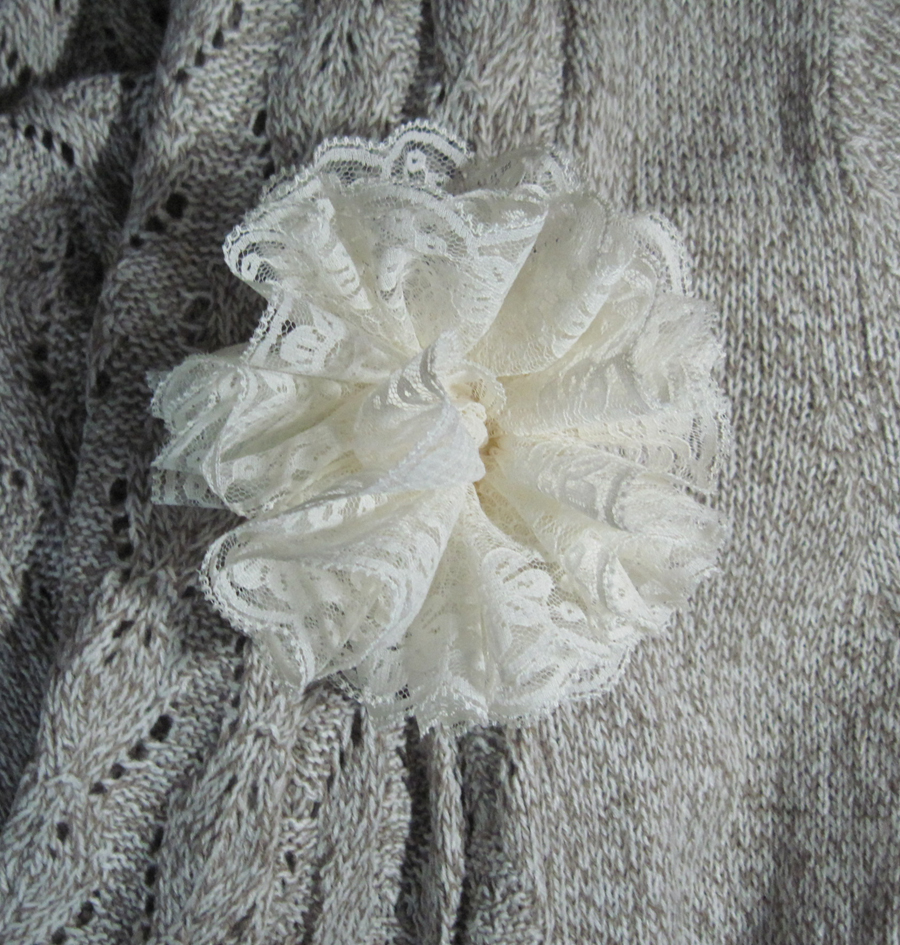
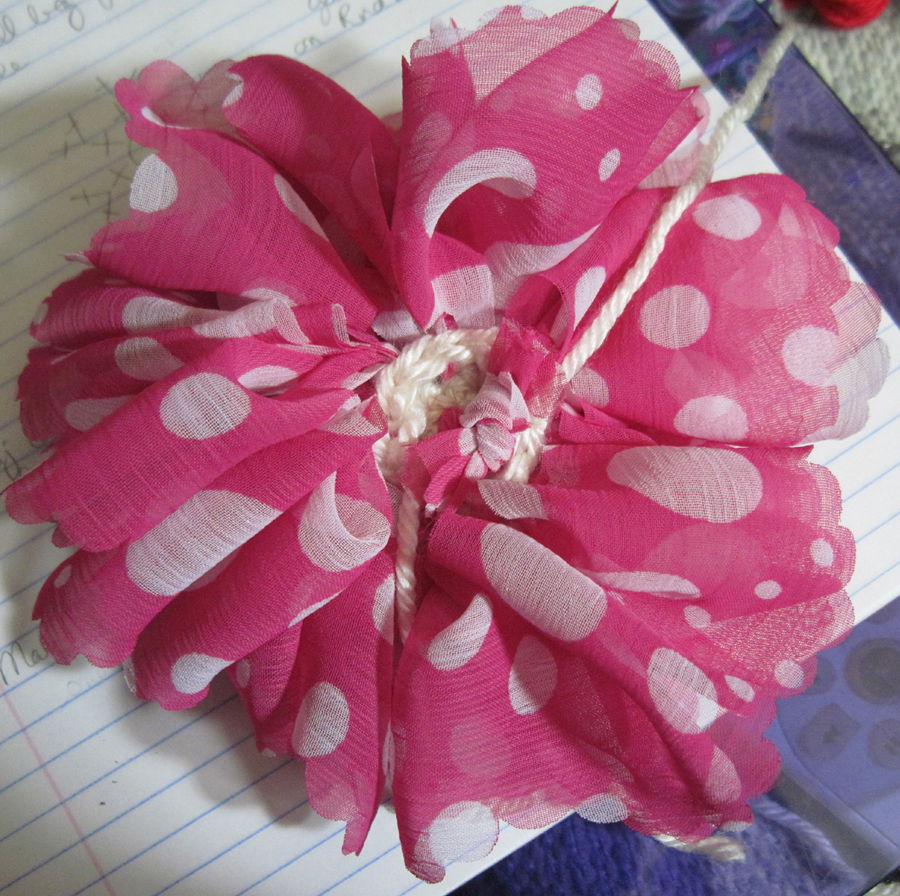
Photo courtesy of Red Heart Yarns
I was very excited to be reminded of a design I created for Red Heart Yarns: Ruffled Rose Pin. This fun little pin takes about 4 yards of smooth worsted weight yarn (sample used Red Heart Soft Yarn), and 15 yards of Red Heart’s Boutique “Sassy Fabric” yarn. You can get 2 pins out of one skein of the Sassy Fabric, and it comes in 9 different styles/colors.
You could even substitute their “Sassy Lace” that comes in 7 different colors.
Working with a “yarn” like these is a bit different. I’m always fussing at the raw end of the fabric strip, I like my projects to look tidy and neat when I finish. I discovered some nifty tricks as I developed this design, I hid the ends inside the backing.
As you can see in the above photo the back of the pin looks as nice as the front (my grandmother would be so proud of me).
Even with the finishing work on the back of the pin, this is a quick little project, perfect for a last-minute gift. It took me about 30 minutes from start to finish to make the Lace version of my Ruffled Rose Pin. Granted, I am a very speedy crocheter, but even someone working at half my speed can finish a couple of these in an evening.
I really enjoy making lace work in crochet. Open stitches are lovely for imparting drape and a more economical usage of yarn for the amount of fabric created.
One of the things that really made me fall completely in love with lace work though was when I learnt about blocking my work. I had used a version of blocking in the past without knowing it. All those wonderful hard-wearing 100% acrylic afghans and scarves I had made were blocked in the simpliest way possible. Machine washing and drying.
A lot of blocking is about the combination of water and heat. When you wash and dry acrylic yarn you are using a version of steam blocking. You can be more deliberate with it by using an actual garment steamer.
Until a couple years ago I had never used wires to block. Since getting some wires and using them I’ve become a true believer. Wire blocking is most effective when working with natural fibers like wool, silk or cotton. But you can wire block synthetic fibers too, you may need a bit of steam or heat to “set” the blocking though.
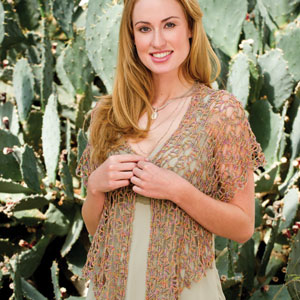
Photo courtesy of Annie’s Publishing/Crochet! Magazine
My “Right Angle Wrap” design in the Autumn 2010 issue of Crochet! Magazine is a great example of the magic of using wires to block lace. When my dear friend Jan came out for our Reno adventure, last September, I got a chance to introduce her to wire blocking.
Jan had crocheted up the “Right Angle Wrap” to wear at the conference, but it first needed to be blocked. She had never used wires and wanted to give it a try, so I told her to bring the wrap with her and we would block it before leaving for the conference.
Unfortunately, I forgot to take a photo of the wrap before we started, so you don’t get the full drama of how the fabric changes.
First step in this process is to get the item wet, I gently soaked Jan’s shawl in a solution of luke warm water with a bit of Eucalan wash in it. Eucalan is a good product to use with hand wash only fibers especially as it doesn’t need to be rinsed out.
While the shawl was soaking Jan and I laid out the blocking pads on the floor in my design office. You can buy really nice blocking pads that interlock and are marked with a gird pattern to help with precise alignment.
My blocking pads are actually some interlocking foam flooring pads that are 18″x18″ and designed for use on concrete floors. I bought a set of them at our local Costco a number of years back and they have served very well. I cover the pads with towels to help absorb the moisture from the garment I am blocking.
We were ready to take the shawl out of the bucket and remove some of the excess moisture from it. In Colorado, items you are wet-blocking tend to dry very quickly, but Jan lives in New Jersey which is a great deal more humid. So I wanted to show her an easy way to get most of the water out of the shawl.
I laid out a couple more towels that were folded in double layers. Then neatly laid the wet shawl on the towels.
Once the shawl was in position I rolled the towels up and pressed on the resulting log to squeeze out the water. The shawl was damp enough now to block nicely, but not so soggy that handling it would stress the stitches. It also dries quicker.
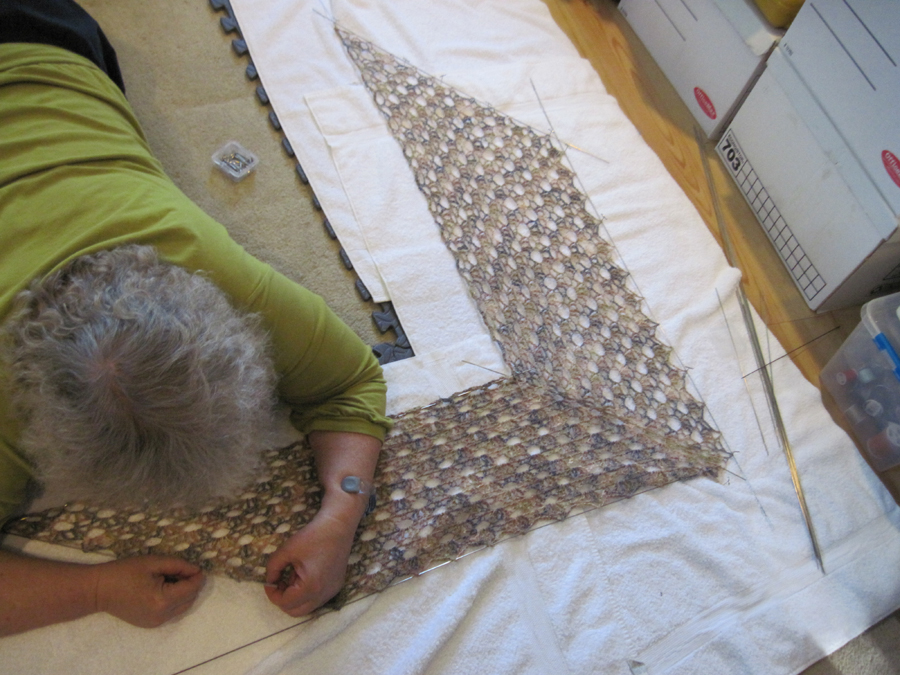
I helped Jan lay the shawl out on the blocking pad and we shaped it to roughly the layout we wanted. You can see here that the fabric is still not all that defined, but it gives you a feel for what the coming transformation accomplishes.
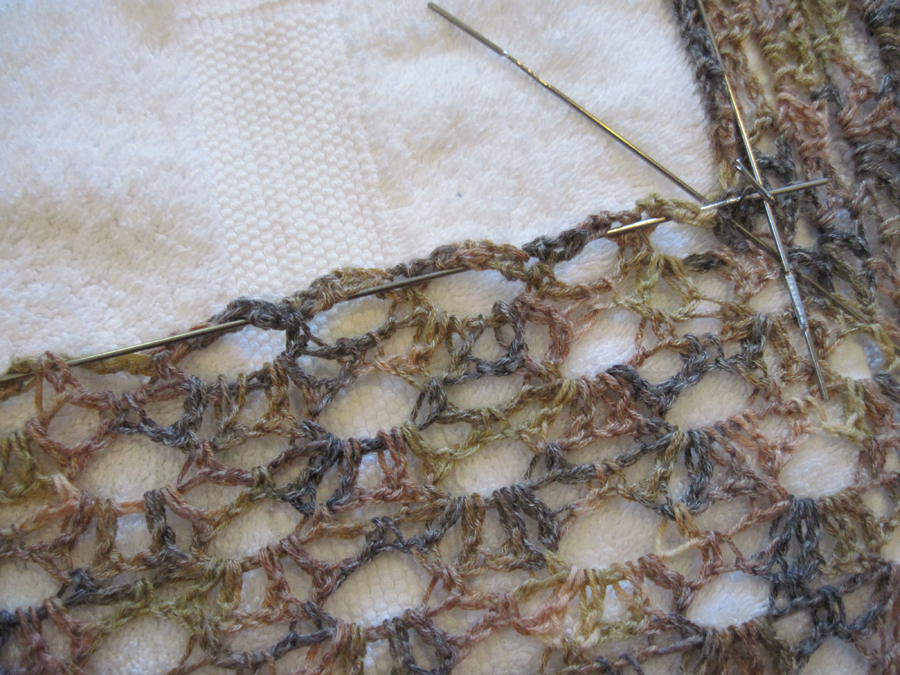
Now began the somewhat tedious task of threading the wires to open the lace pattern. Jan and I took turns with this part of the project. The point of threading the wires into the fabric is to create an even amount of pressure along the fabric.
Once the wires are threaded in the real fun begins. I usually pin out the top edge of the shawl to act as an anchor.
Then I gently pull the other wires to open the stitch work, pinning and re-pinning as necessary to create even pressure.
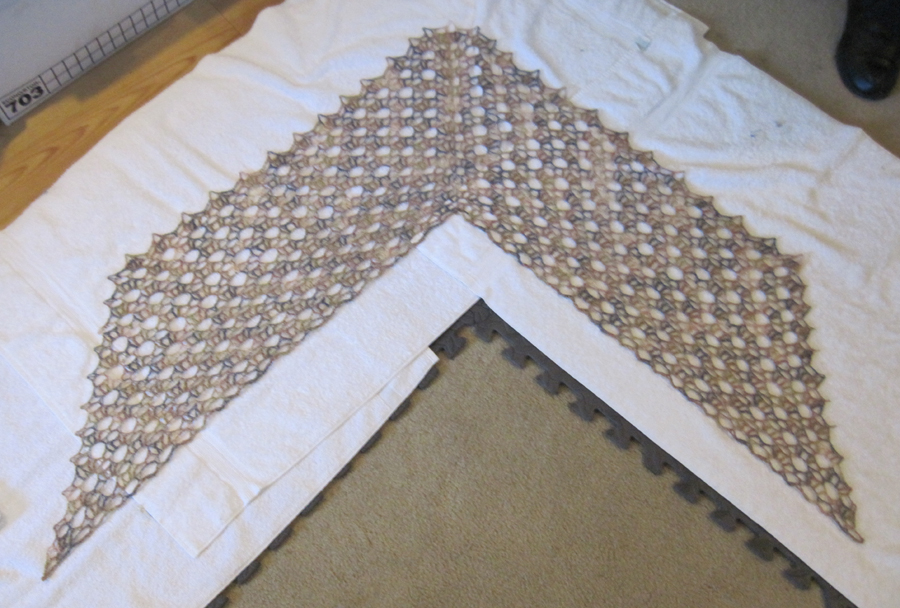
Once the shawl was fully stretched and pinned in place we left it to dry overnight. If you live in a more humid climate than Colorado you might want to have a fan or such blowing on the piece to help it dry faster.
I have occasionally used a blow-dryer to speed up the drying process, but you want to be careful not to melt your yarn if it contains any sort of rayon, polyester or acrylic fibers. Of course, a blow dryer or garment steamer is a great way to “set” the blocking if the yarn you used contains a dominate amount of synthetic fibers.
The next morning we removed the wires and you can see how much the blocking has opened the stitches up and really allowed the lace to be shown to it’s best.
And here is Jan modeling her beautiful finished shawl.
Many of you are aware I live in the mountains of Colorado. Which means I often have snow and freezing temperatures when it is warm weather season for everyone else in the country. One thing you might not realize is that Colorado is arid.
You see on the news about our fires and the worry about fire because of the drought conditions we are subjected to. But Colorado has always been a very arid state. Our average annual moisture level is around 18 inches, compared to the averages for places like Washington or New York states which are 38 and 40 inches.
What this means for my skin is a constant battle to keep it moisturized. Especially my hands.
These are some of the lotions and unguents that I have had the most success with. The Shikai Borage Therapy and the Hugo Naturals All Over Lotion are the ones I use each time I wash my hands. I keep them right beside my desk. They are light and absorb quickly so don’t gunk up my yarn and hooks.
The L’Occitane Dry Skin Hand Cream I carry with me in my project bag, it is the most expensive of the 6 at $10 per .5 oz. Also absorbs quickly.
The Soothing Skin Salve is from a local shop called Rebecca’s Apothecary, and is my favorite to use on my hands right before bed. It’s especially good when I have little cuts or dry patches on my hands, and really great for helping my cuticles.
The DermaE cream and Hugo Naturals Shea Body Butter are my favorite after shower lotions, especially for elbows and heels.
All these lotions are great, but an important thing to also remember is to drink lots of water. Even being slightly dehydrated can make your skin dry and flaky. So drink up.
Crochet is magical. Any one of us that have even a basic familiarity with the art of the hook know this.
This past week I got to demonstrate another version of crochet magic. I was asked by my kids to create a “Merlin” cloak and hat as a birthday gift for one of their good friends. The birthday party was this past Saturday so I can post the pictures of the finished project now.
I had made a version of this costume for my oldest when they wanted to be Harry Potter for Halloween last year. What I needed: 1 1/2 yards of 60″ wide poly fleece, about 300 yards of acrylic yarn (I used 2 different colors), 24″ wide by 15″ tall piece of acrylic felt, size G hook, sewing needles and sewing thread.
The first part of this project was to cut out the “cloak” from the poly fleece. The great thing about poly fleece for a project like this is I can leave the raw edge un-hemmed and it won’t fray. The piece of fleece I was using had a few bits cut out of it, so I had to work around that. I folded it in half and cut out the shape I wanted with a concave curved bit for the “collar”. The photo shows the basic shape I cut out with the collar in place.
Then I blanket stitched along the collar area to give me an edge to crochet into. The collar itself was a single crochet base worked into the blanket stitching, then some slight increasing with double crochet stitches to create the shape I wanted. I wasn’t really following any type of pattern. Just going by a feel for how I wanted the finished collar to look, as well as including a “button-hole” for the button fastening.
You can see the button and button-hole better in this photograph.
Of course, it isn’t a real magic costume if you don’t have a hat. So I grabbed some black felt and cut out a shape to make a cone for the crown of the hat. To make the hat go more with the cloak I cut out some of the leaves and stars from the left-over scraps of fabric I had from the cloak.
I then sewed them in place with a simple whip-stitched edge. Once all the appliques were sewn on I rolled the felt into a cone and sewed the seam where the edges overlapped.
I crocheted a brim by starting with a foundation single crochet strip that was the right circumference for a good fit. Rounds of single crochet worked even and then in flat increases created the rest of the brim with a finishing round of double crochet worked even. After the crocheted brim was finished I used yarn and a zig zag hand stitch to attach it to the bottom of the felt cone.
The final costume was finished just in time to be wrapped and ready for my kids to give to their friend. The costume was a big hit and already has had some serious play time.
Tape measures are one of the handiest things to have in your project bag. Measurements are an important part of creating crochet projects, especially if you are making garments. Personally I use them a lot when working out designs.
Of course, like all the tools of my trade, I seem to be constantly searching for my tape measure. So I am always on the hunt for inexpensive tape measures when I’m out shopping. My brilliant idea being if I have one in every project bag, I’ll have one whenever I need it.
I’ve seen a number of lovely “covered” measuring tapes. Some of them even have crocheted covers, and though I’ve admired them, few have instilled in me the desire to purchase one.
Friday I was at the local hardware store (McGuckins in Boulder, CO), it is one of the best stores for finding amazing and fun stuff to use in creative pursuits. I discovered some nifty round retracting measuring tapes for the very reasonable price of $1.60. So I tossed a couple of them in my basket and decided it was time for some experimenting with covering them in crochet.
This gorgeous Aunt Lydia’s Classic 10 thread was in a range of colors that I love, plus it would make it easy to spot my tape in the bottom of most all of my project bags.
I didn’t have a pattern for this. Instead I did my favorite type of crocheting, “Seat of the Pants”.
I began with the plain side of the tape measure. I started a simple single crochet spiral round and kept holding it up to the tape casing to see if it was big enough. My spiral tended to “dome” a little in the center, so I wanted to have the final circle be small enough that it would fit tightly around the casing.
Once I reached the size needed, I worked a row of single crochet off the wrong side of the final round. I left a gap between the beginning and ending of the row for where the tape would feed out. I worked a couple more rows to cover the flat edge of the tape casing, then fastened off with a very long tail. The tail would be used to sew the 2 pieces of the cover together.
Next I chained a ring to just fit around the button of the tape, and crocheted 18 single crochet in that ring. The circle on the opposite side was 12 rounds, so I counted the first round on this side as round 3 and worked out from there. Once I had 10 rounds I fastened off and wove in the center tails for both sides as well as the ending tail for the 2nd circle.
I then placed the 2 pieces around the tape measure, lining up the opening on the edge with the tab for the tape. I used the long tail from the first side to whip stitch the edging to the “button” circle, stretching and positioning the circles to fit well on the casing.
The little tab cover was just a chain long enough to wrap around the tab, then rows of single crochet to the length I needed to cover the tab. I folded it in half and used a couple more rows of sc to join the top edges and make a shaped point. Slipped it over the tab and sewed thru the opening of the tab and along the open side.
I now have my own little covered tape measure. Hopefully this one won’t get lost for awhile.
Last night we had a big snow storm and woke up to 2 feet of powdery white stuff. Timing was perfect as my in-laws had arrived earlier in the day. Now we have a nice fire going in the wood-stove and we are watching Christmas movies.
I did have to wonder if the snow came because I’ve been crocheting lots of snowflakes out of cotton crochet thread.
I’m not usually a “threadie” when it comes to crochet. But there is something about snowflakes worked in crochet thread that really makes it feel like Christmas time is here. Plus they are wonderful quick gifts that can be mailed easily or used as a decorative element on greeting cards and packages.
Snowflakes can be very simple or extremely complex. Personally I like to play with different ideas, sort of riffing with the hook and thread. My only guide being that I need to keep the flakes 6-sided.
Generally I start off with an adjustable slip knot, then chain 2, work 6 single crochet in the 2nd chain from hook. Pull on the beginning tail, slip stitch into the first sc of the round and I have a nice little center for my snowflake, from there out any thing can happen.
The best bit of snowflakes is that you can make lots of open spaces, then when you use the stiffening material they suddenly become beautiful crystalline looking miniature works of art.
I like to pin my snowflakes out with blocking pins on top of wax paper with one of my foam blocking pads or a piece of cardboard underneath.
Then I brush the snowflakes with my stiffening solution. I use the product “Stiffy” that I purchased at our local Michaels. But there are lots of options out there such as Alene’s glue mixed with water or laundry starch. Sometimes you need to experiment to see what works best for your climate. I want to saturate the fibers enough that the flake will be strong, but not so much that it gets blobby looking.
Once the flakes have completely dried I remove the pins carefully and may use a tiny bit more solution brushed lightly over the flake and sprinkle with some glitter.
A bit of nylon line to make hanging loops and my flakes are ready to decorate the tree or hang in the window.
I hope all of you are having a wonderful holiday visit with your friends and family too. Happy Holidays to all my lovely readers.


![halosofhope[1]](https://mamas2hands.com/wp-content/uploads/2015/03/halosofhope1.jpg)