You Gotta have Heart

It’s that time of year again, full of snow and cold, February has come blustering in here on the mountain. But my heart is warm because that means Valentine’s Day.  For me it’s a holiday that really works as a reason for Chocolate (that’s capitalized on purpose).

Chocolate Hearts

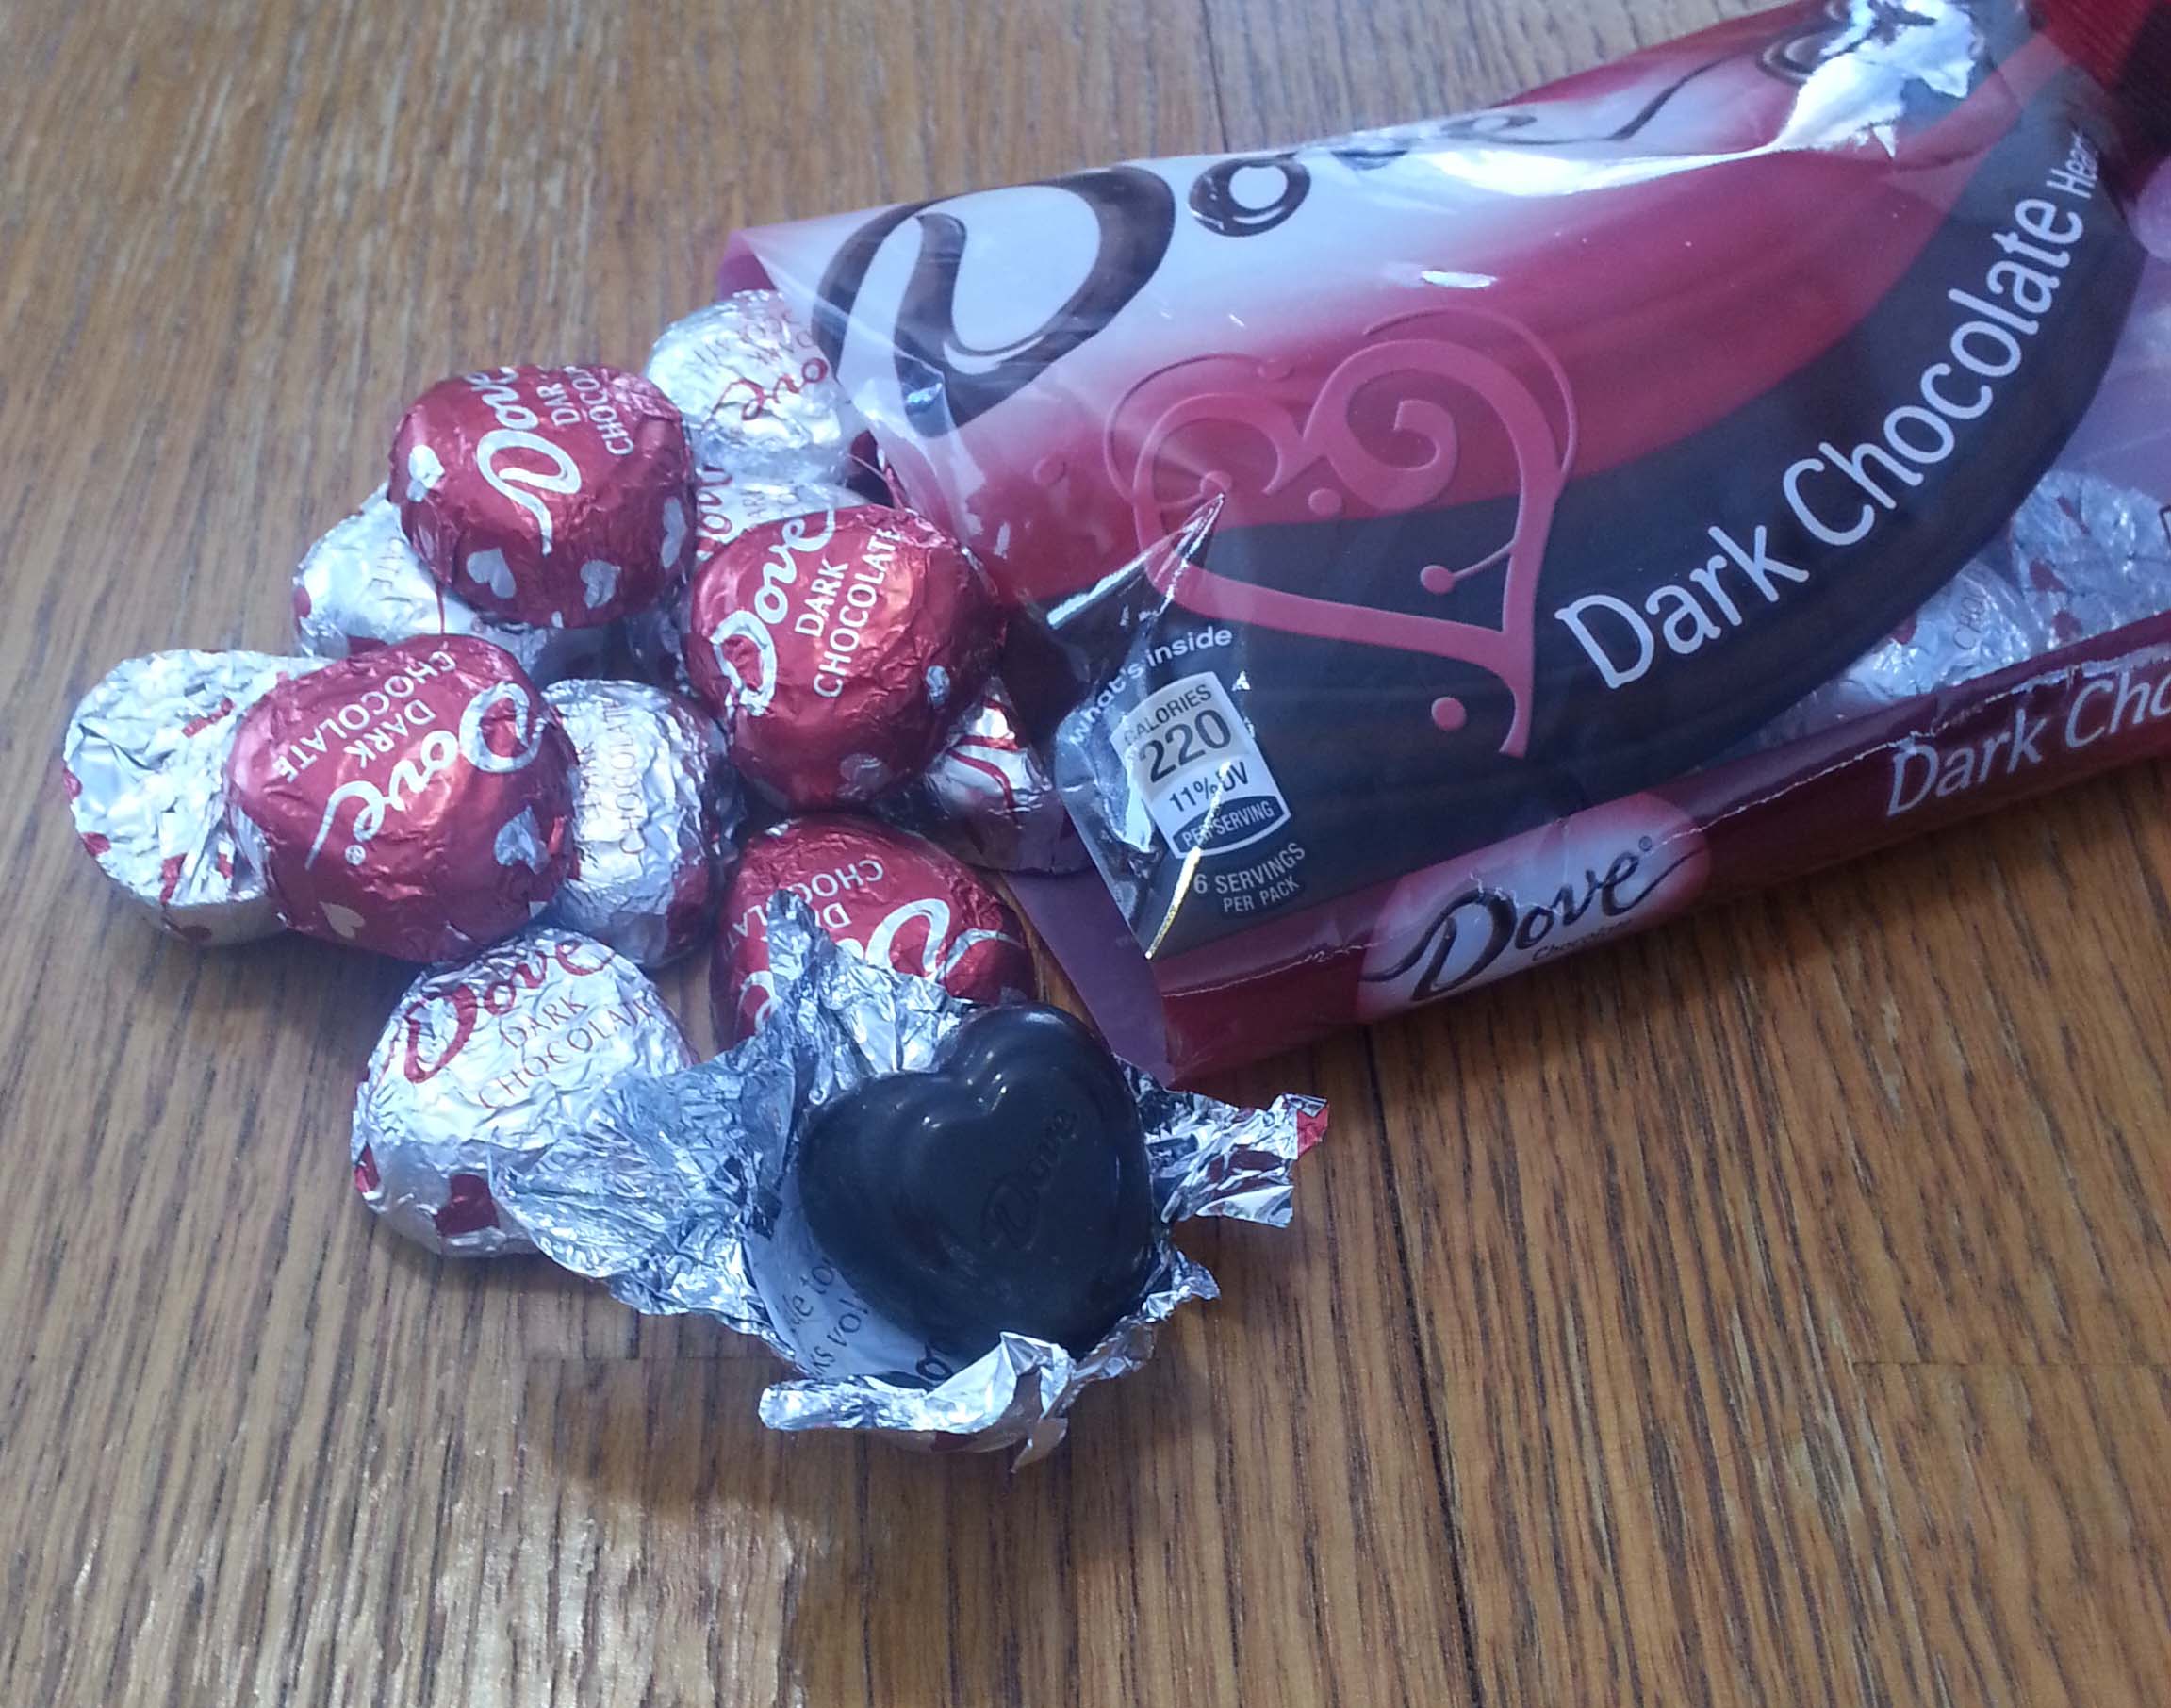
I managed to make an early stop to the aisle at my grocery store where all the seasonal stuff is. I indulged in a number of bags of my favorite Dove Dark Chocolate heart candies, they tend to sell out fast here. There is just something about the little heart shapes that makes these individually wrapped candies extra special.

Over the years in my design career I have created a number of crochet patterns that involve hearts. Some are ones that I have offered here on the blog as free patterns. Others have been created for magazines or yarn companies.

Photo Courtesy of Red Heart Yarns

I created the “Valentine Heart Coaster” for Red Heart a few years back. It’s a quick project to work up and you can use it as a coaster, or sew it onto a bag or blanket as an embellishment.

Bag staged w env.s

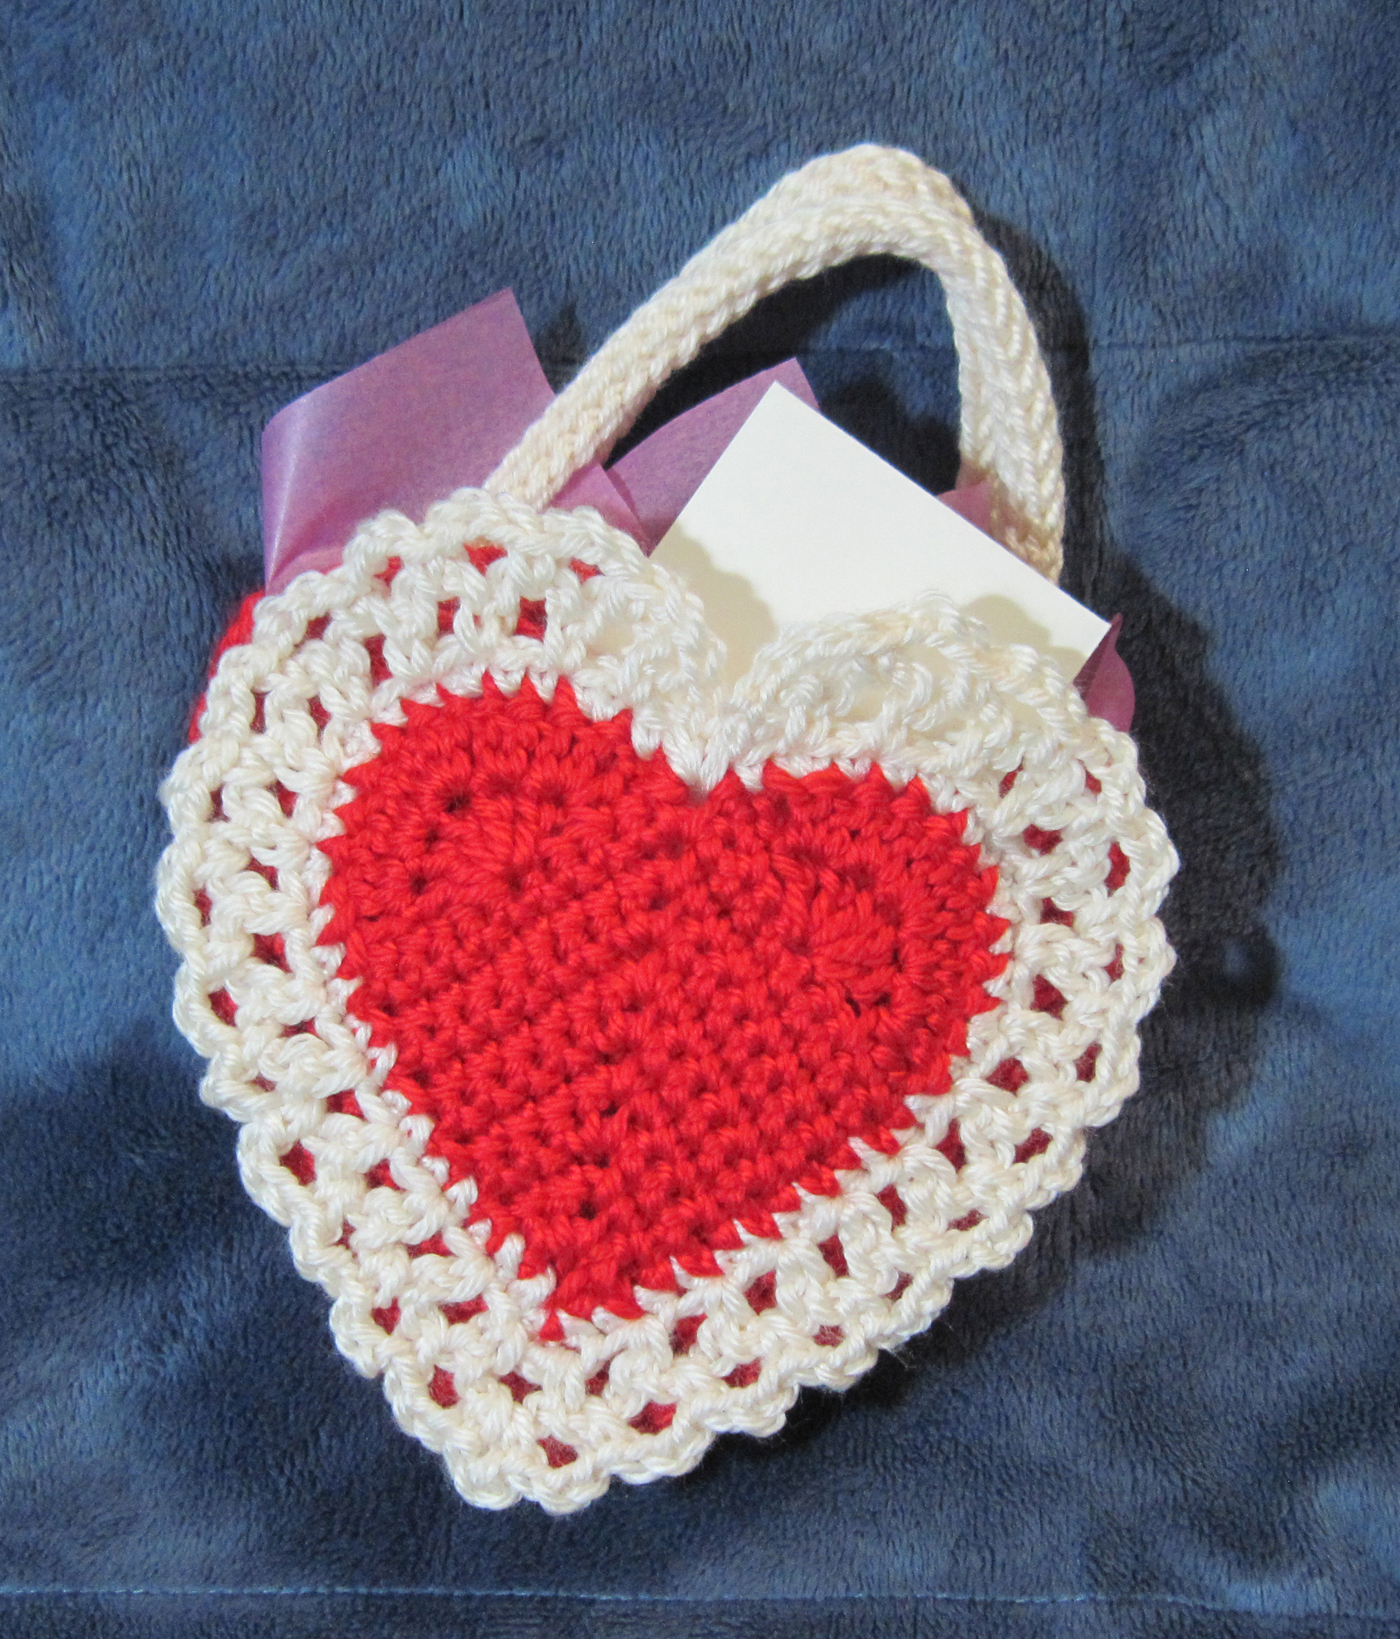
I also created the “Here’s My Heart” gift bag. This project takes a bit more of a time commitment, but makes a lovely gift bag for someone special in your life. This is a bit more complex pattern as well, so a fun challenge for those with more crochet experience. The lace edged heart on the front is actually a pocket, so a great spot to put a special note.

Both of these patterns are available for free at Redheart.com, just click on the link in the pattern names above.

I’ve also put up a number of free heart patterns here on the blog over the years. My top 3 favorites are:

Crocheted Love Sample photo

Crocheted Love

Spiral-in-a-heart

Spiral in a Heart

Sweetheart-in-hand

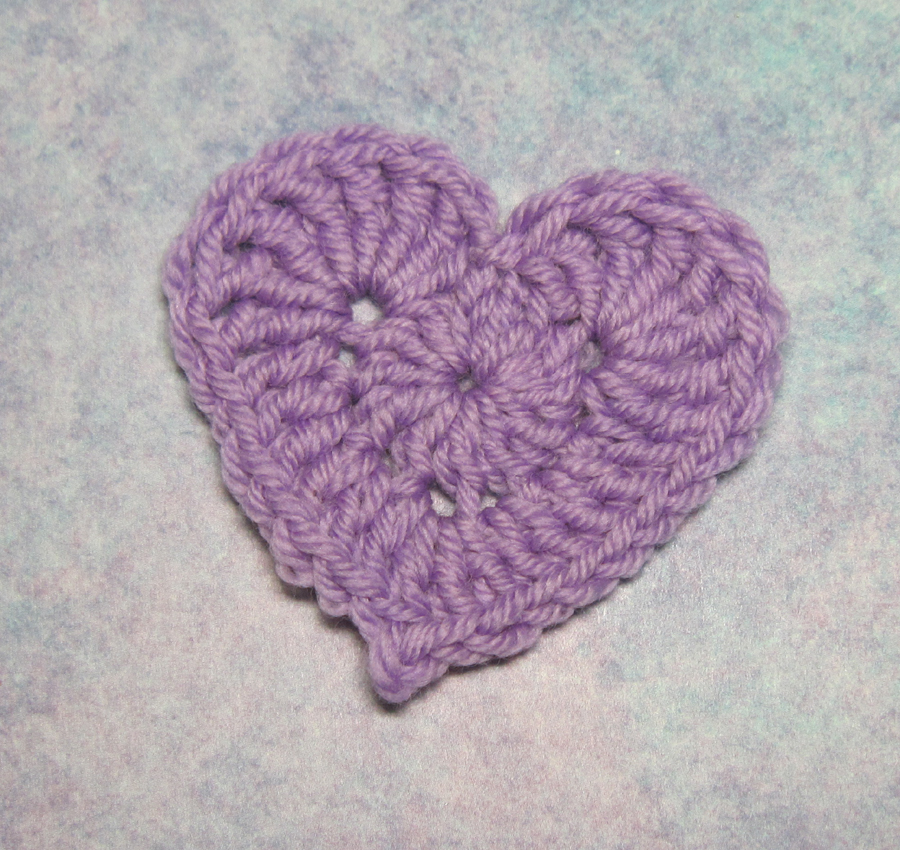
and Simple Sweetheart.

Candy in Heart

I like to play with these designs and use the hearts as embellishments or elements for projects. My favorite way to use the “Crocheted Love” and “Simple Sweetheart” is to make 2 hearts and sew them together leaving an opening at the top to insert a note or chocolate (often a little Dove heart, since that fits perfectly). You can read more about how I made the little pocket above on my 2014 Valentines Day post.

Pocket Heart

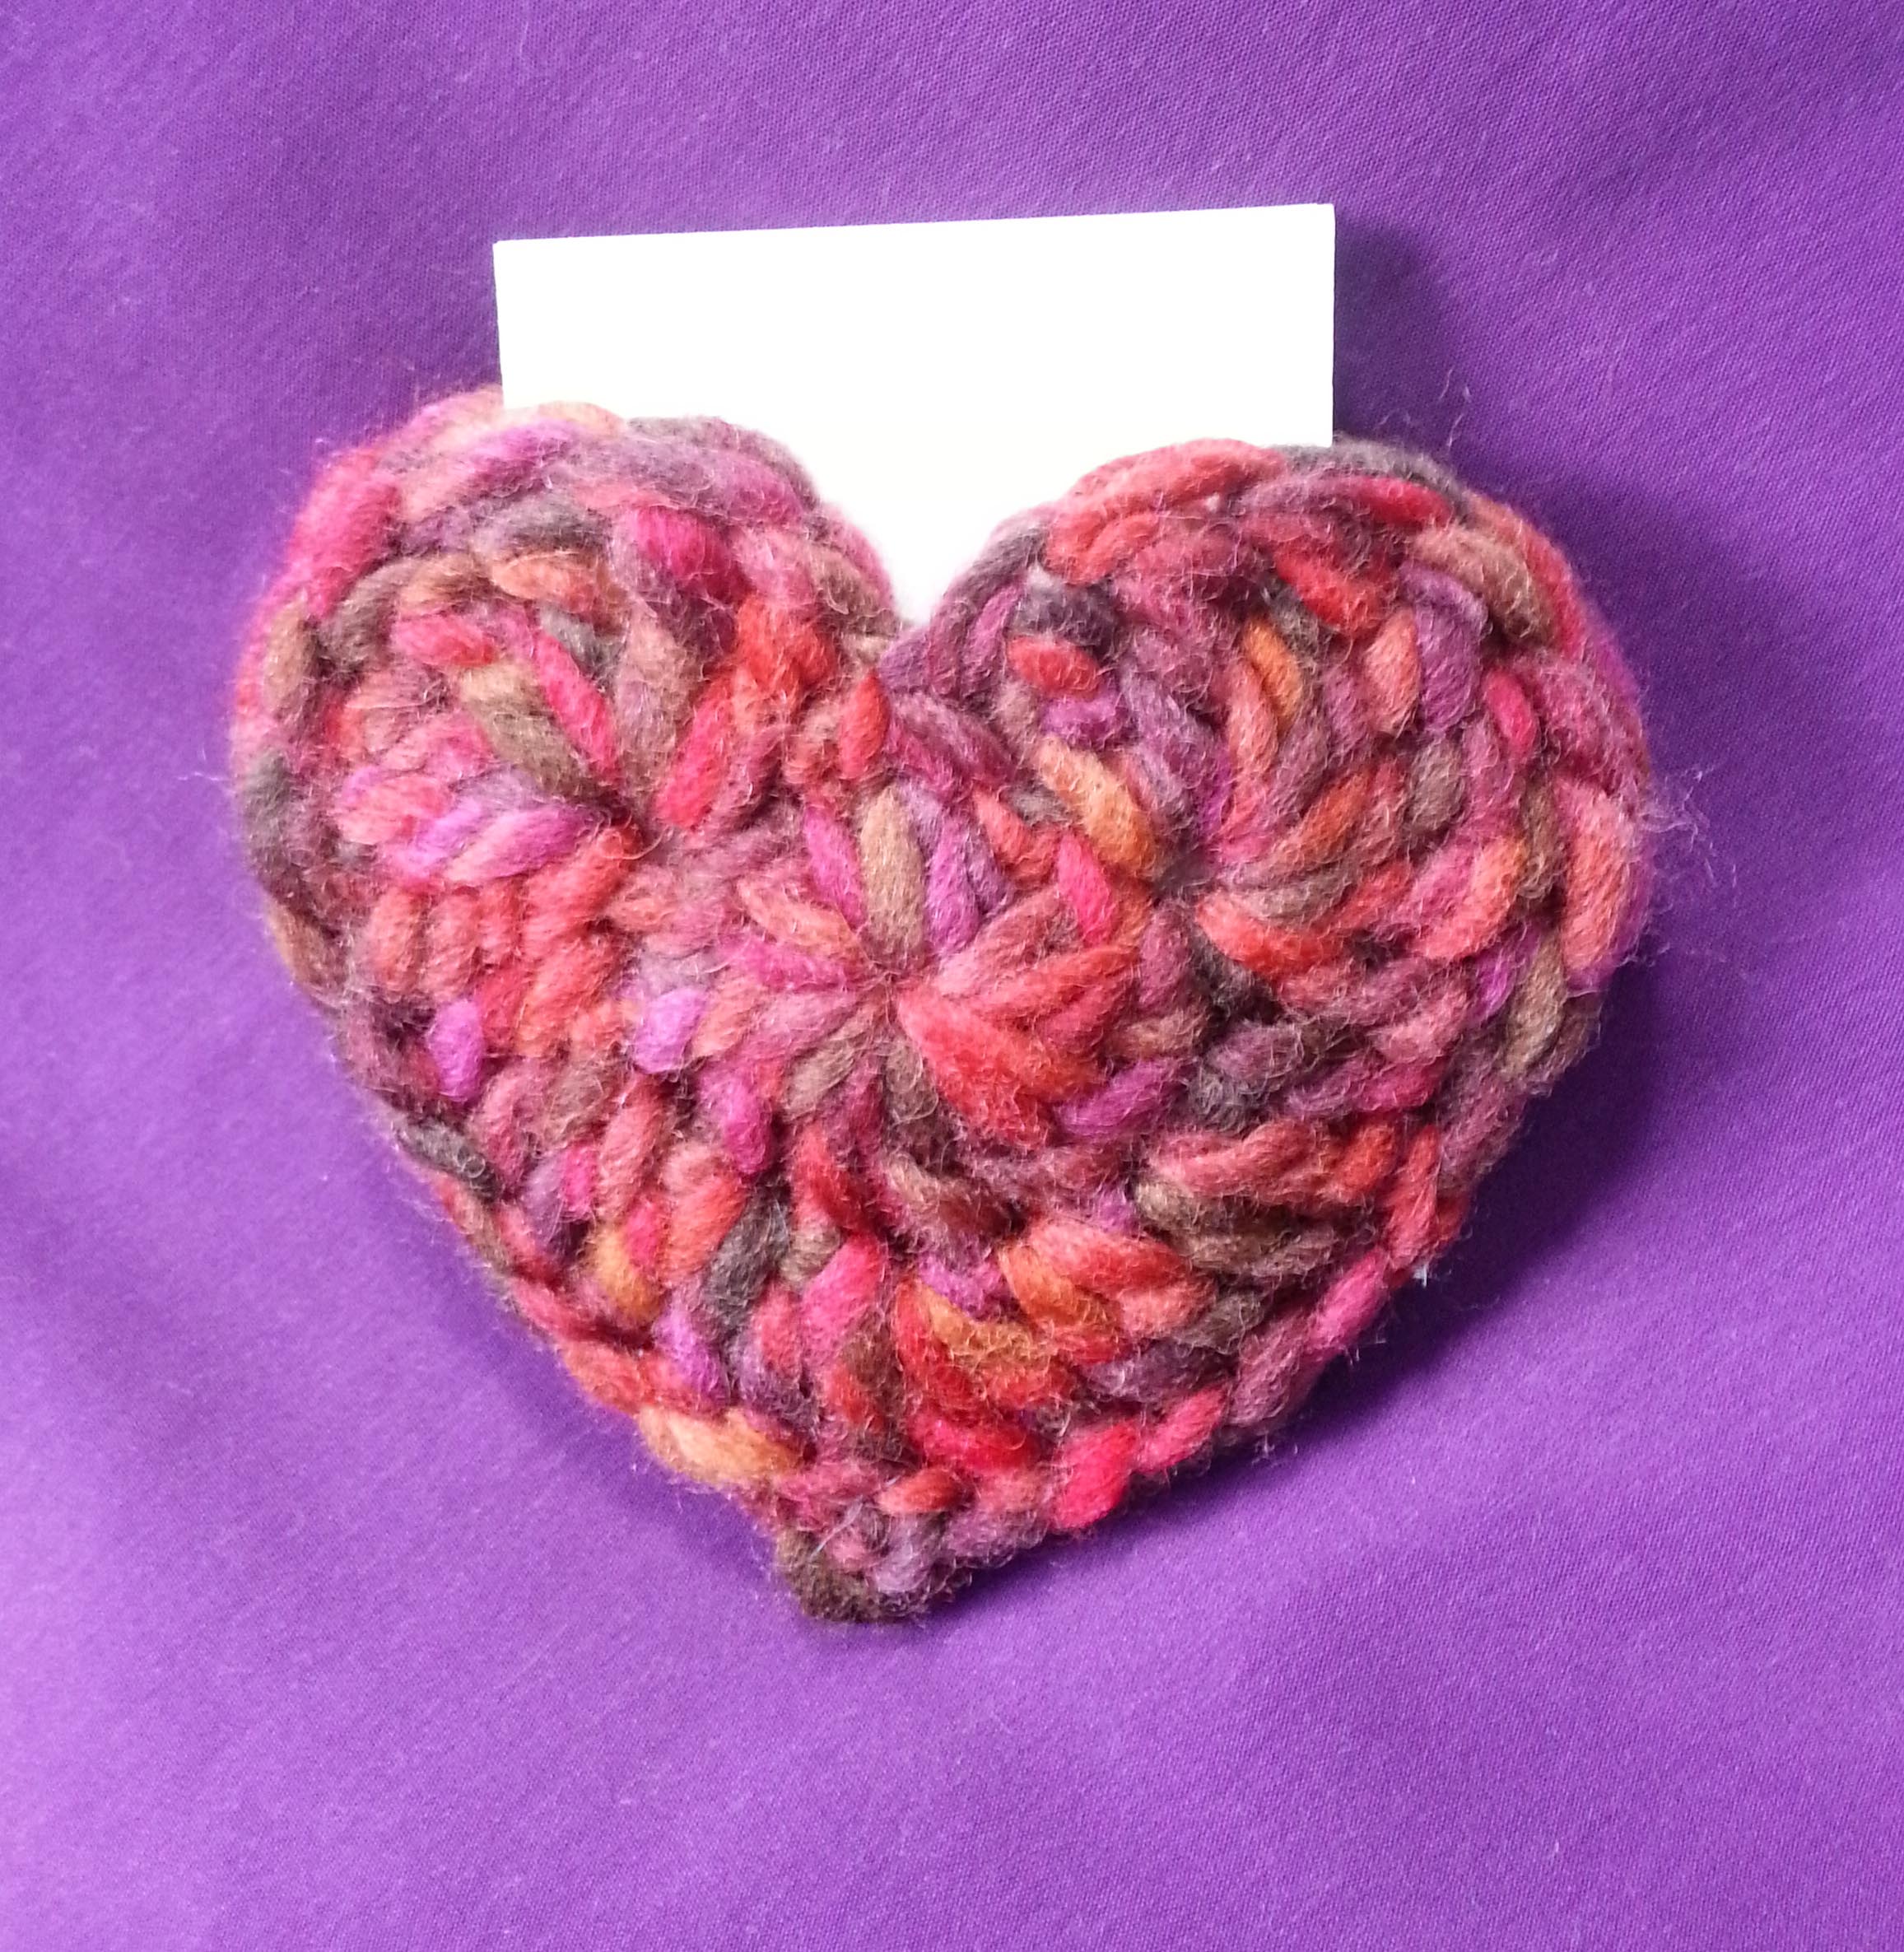
Last year I used my “Crocheted Love” heart pattern to make this fun little pocket to hold some chocolate and a note for my dear husband.

Hearts Necklace

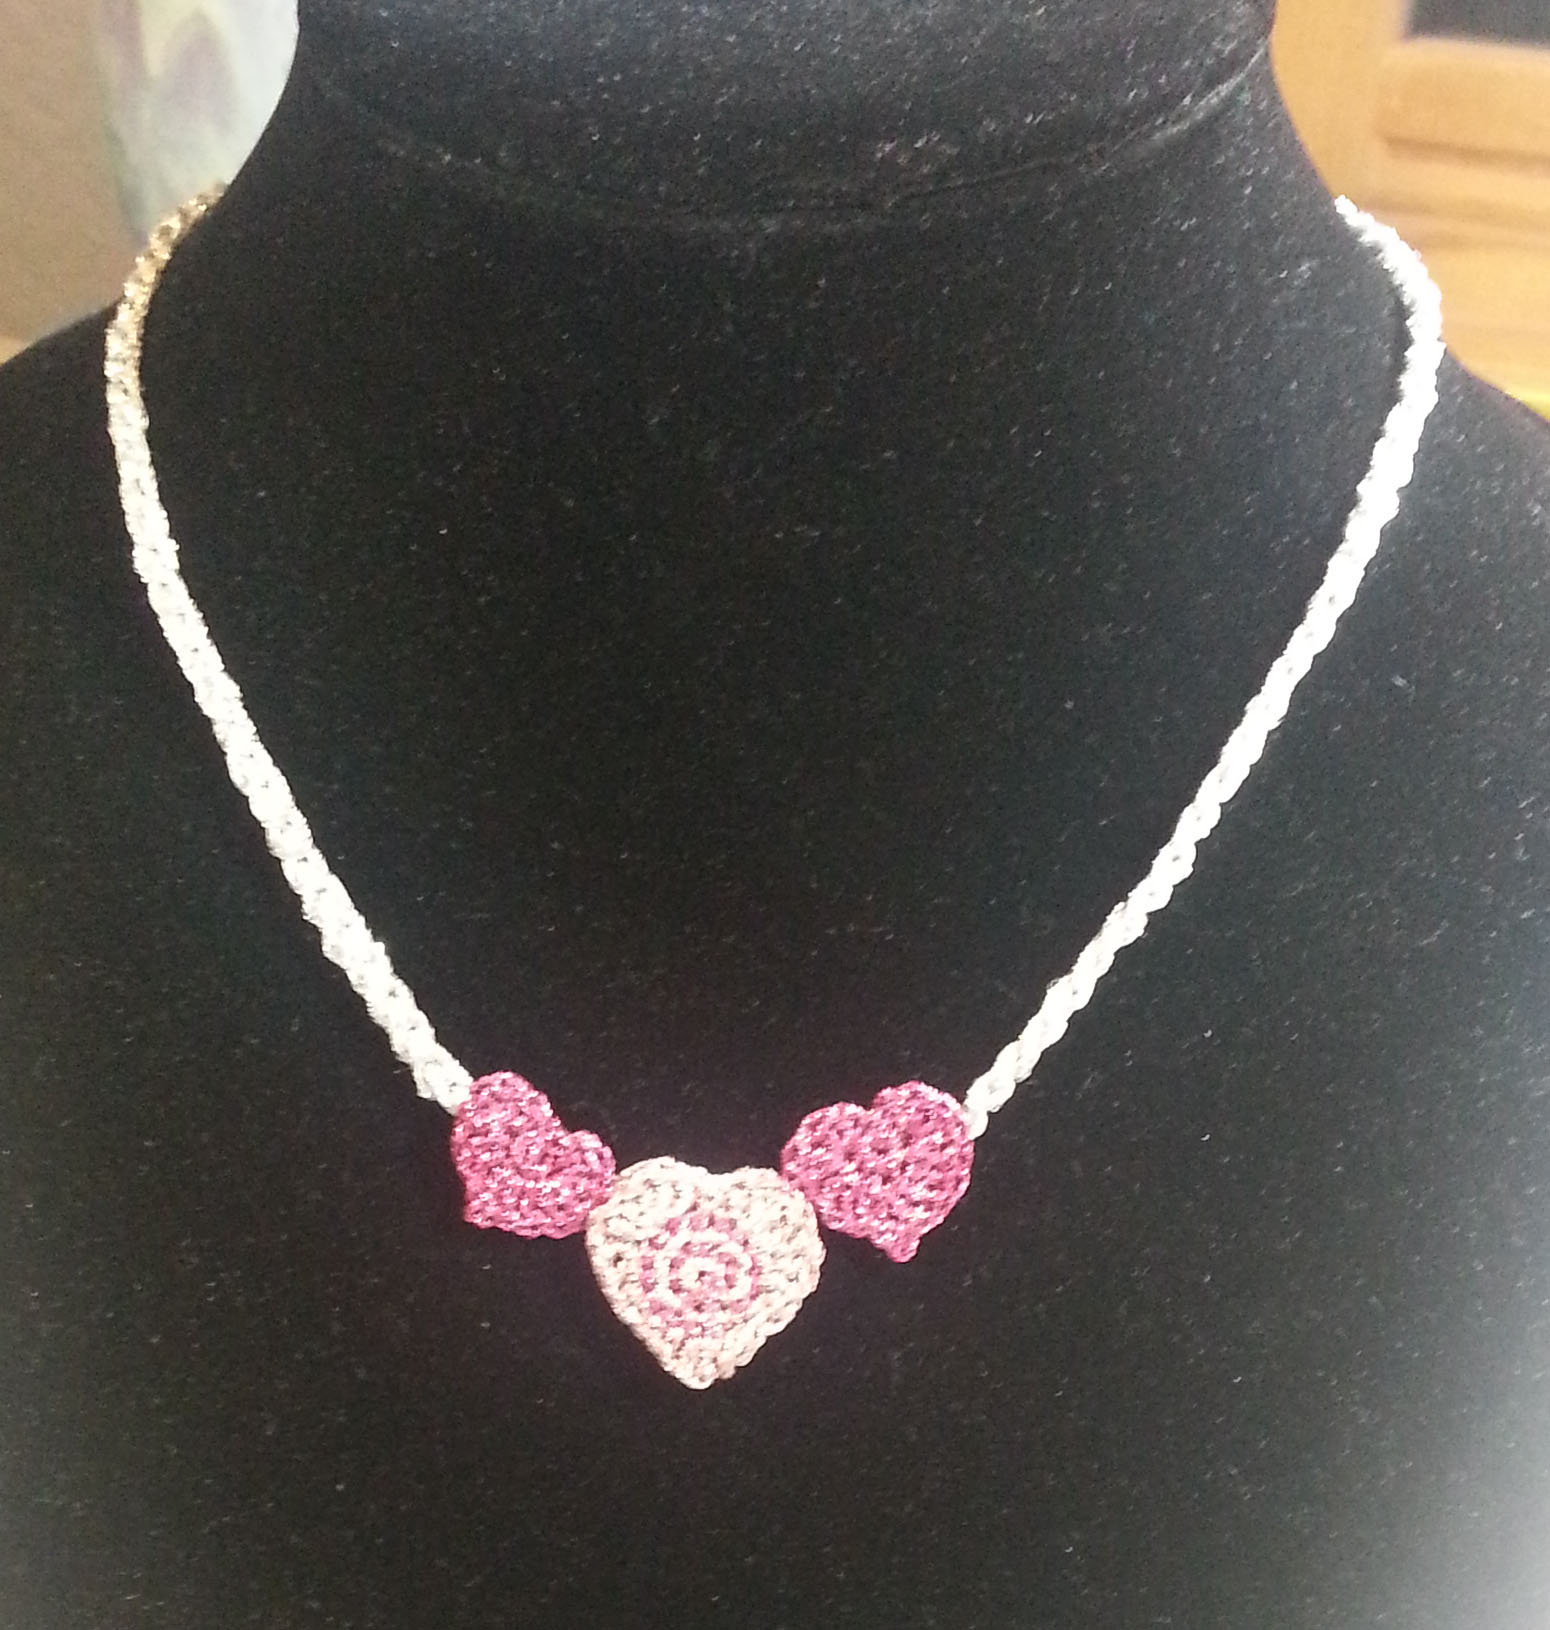
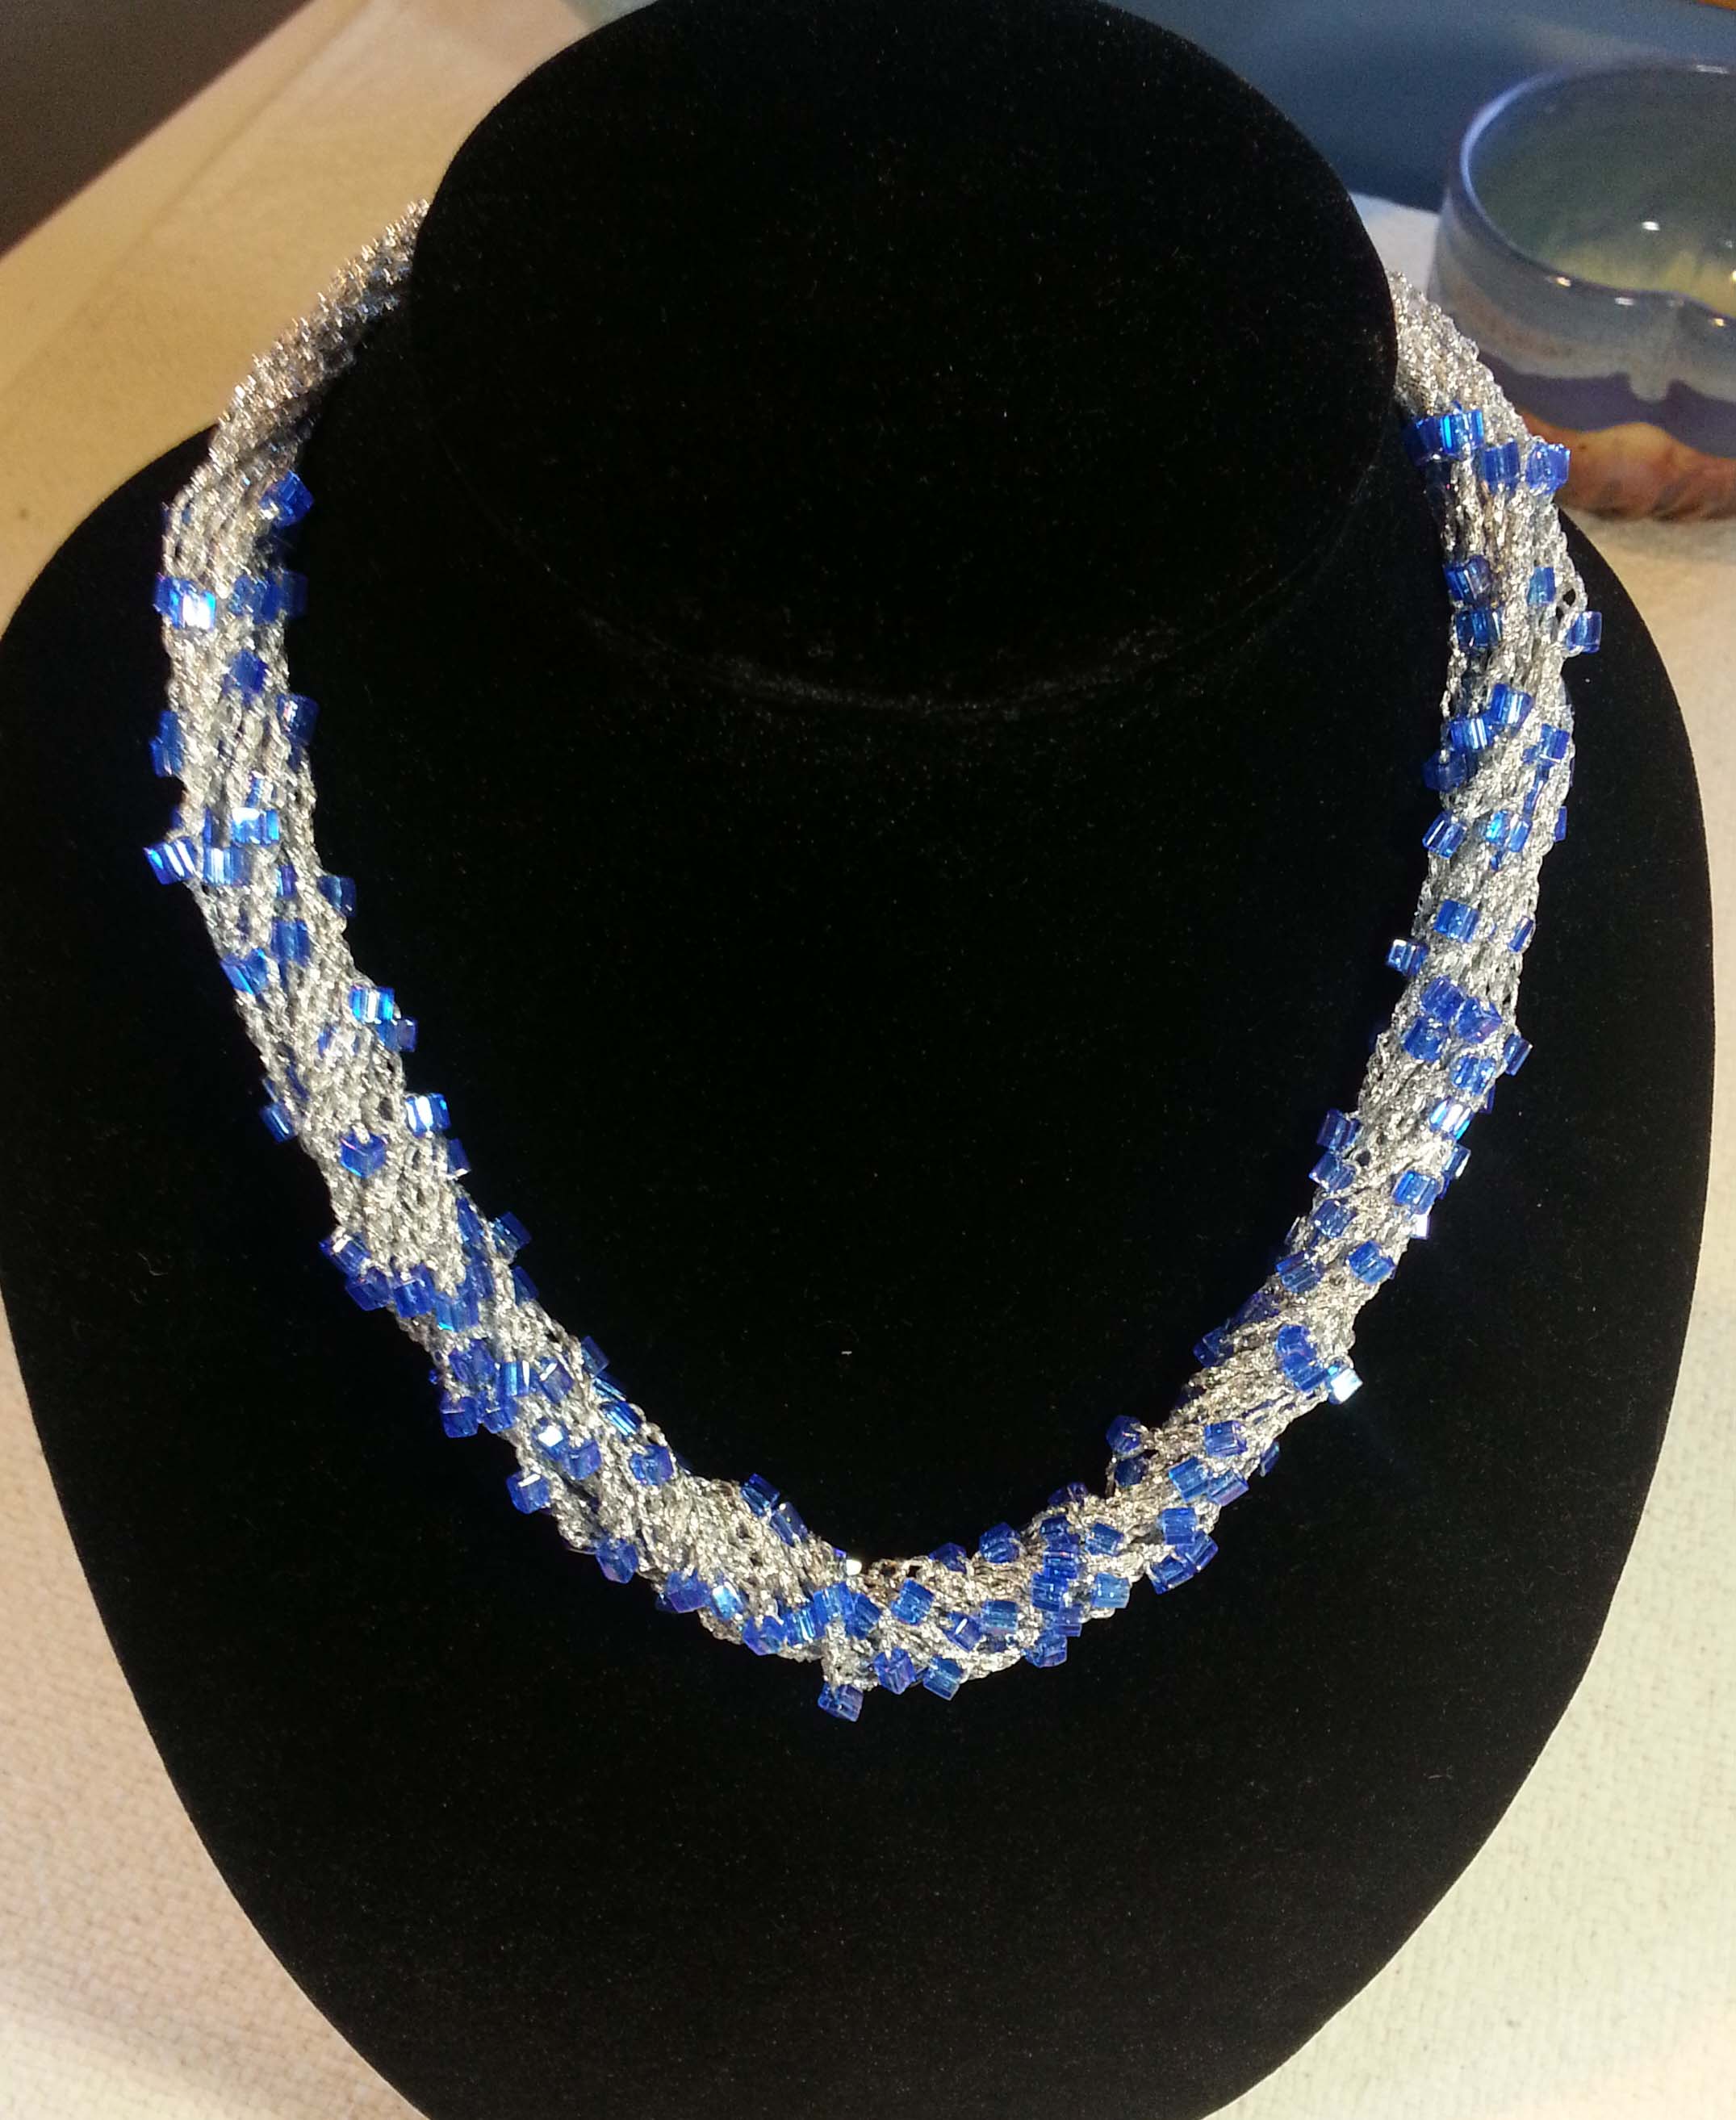
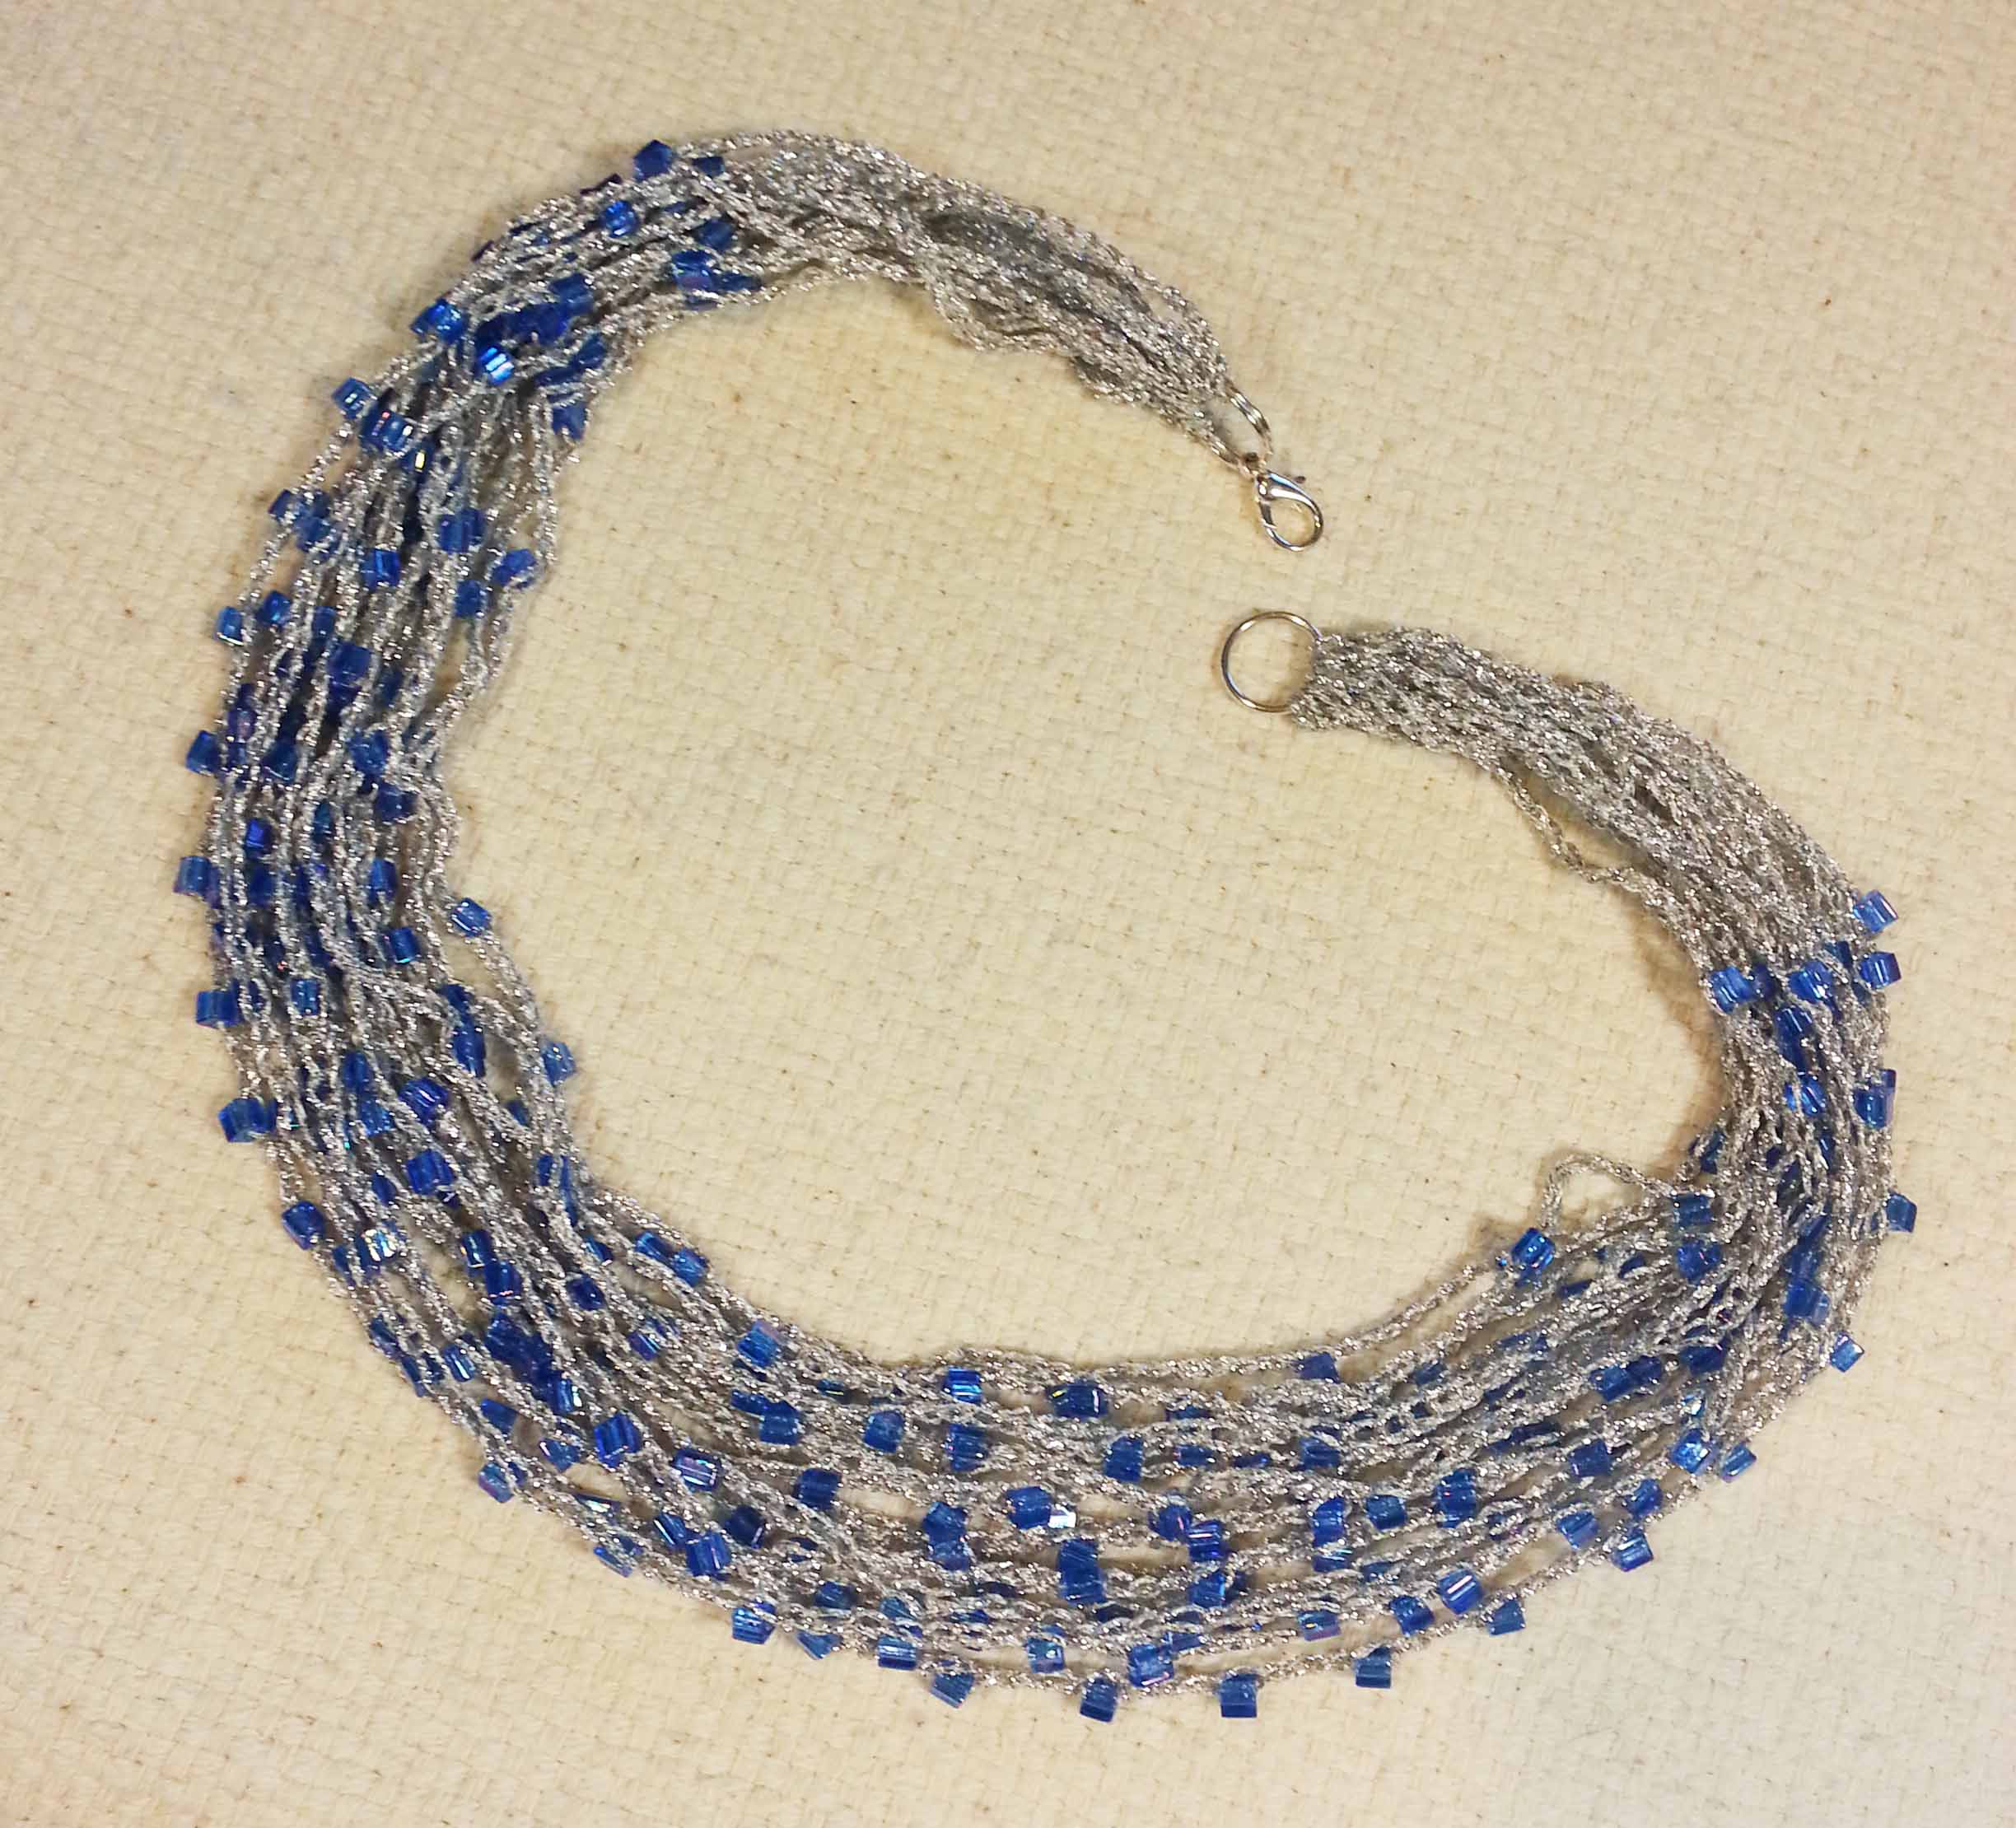
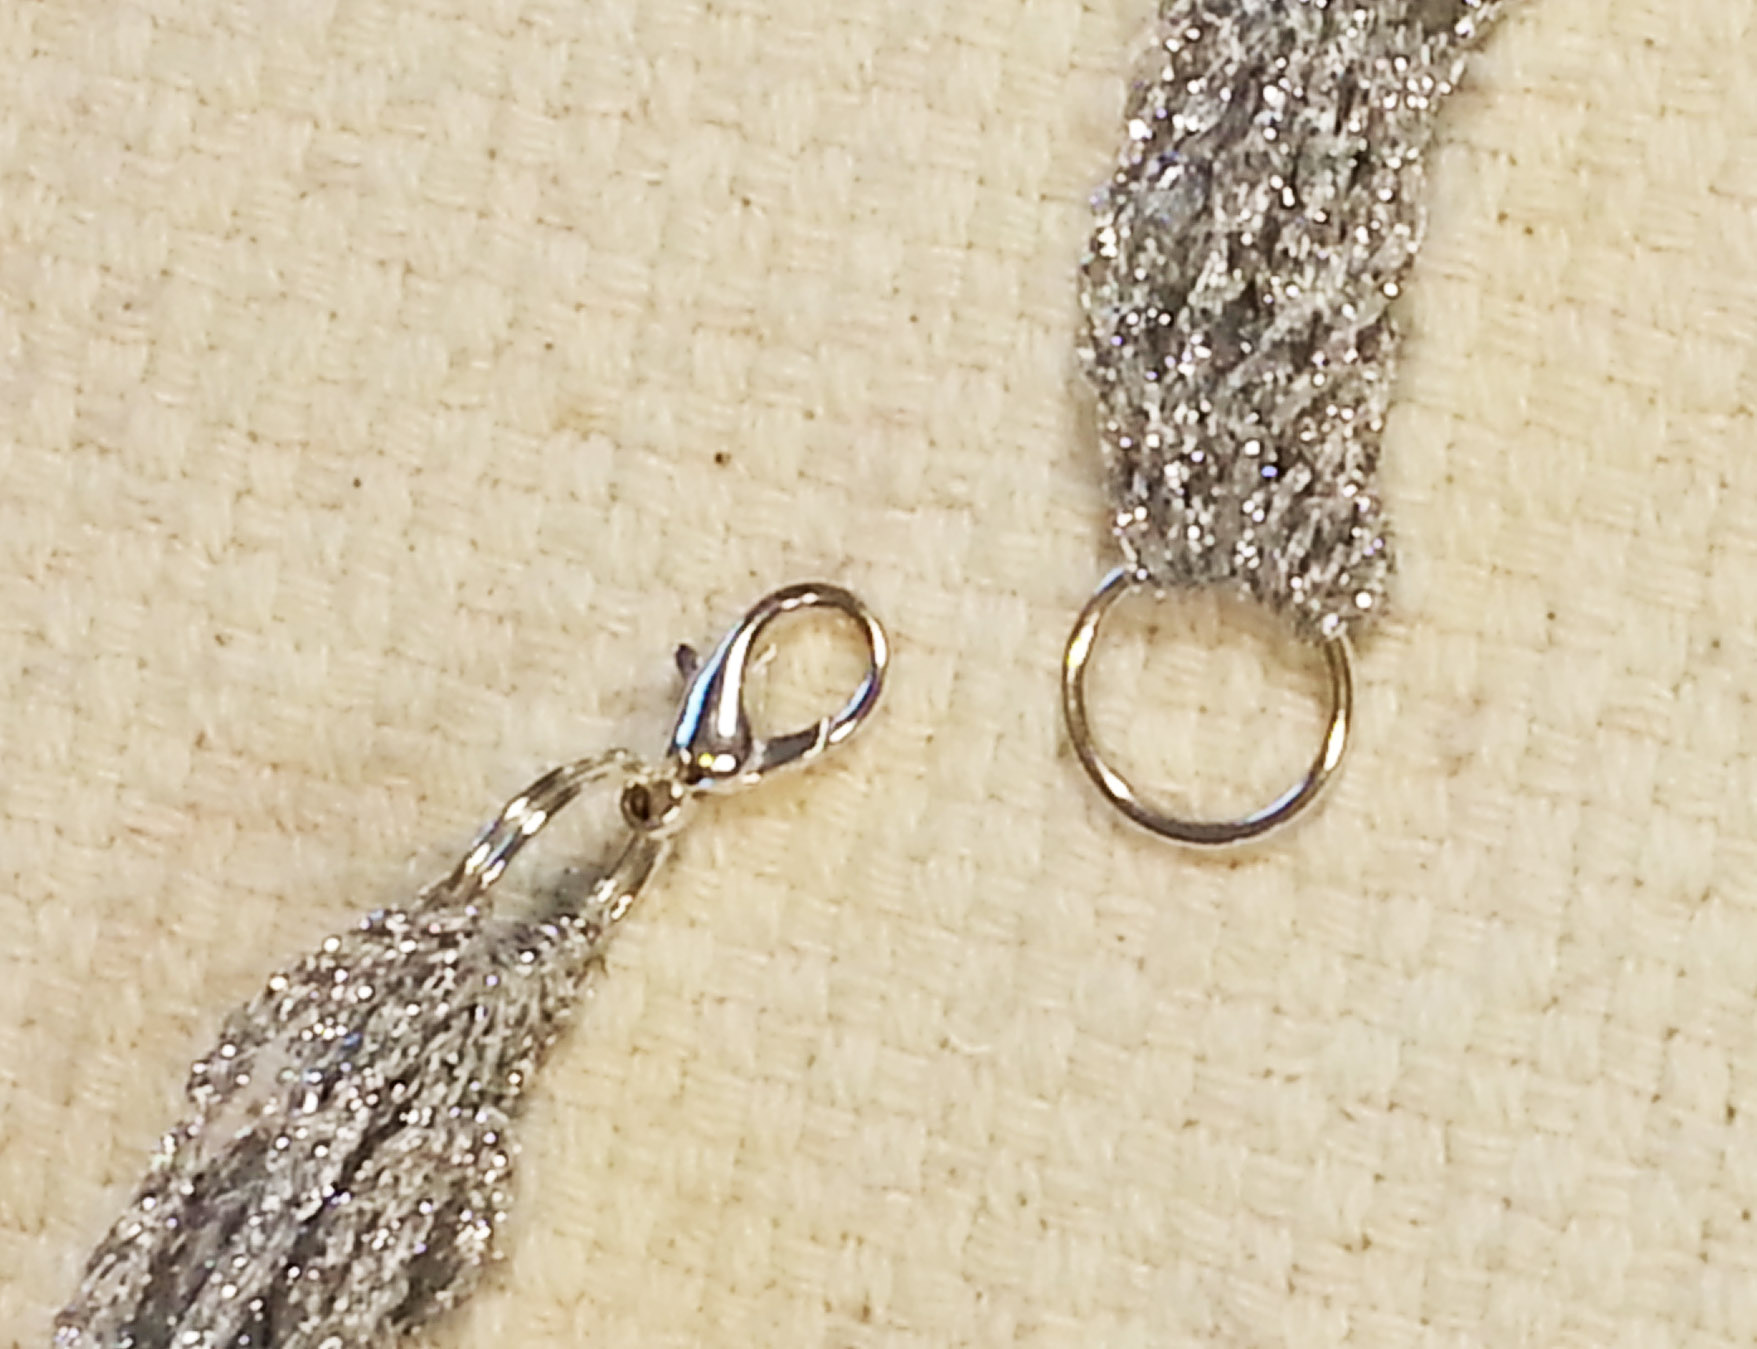
This year I decided I needed some jewelry to wear for Valentine’s Day. So I crocheted up some of my “Simple Sweetheart” and “Spiral in a Heart” using Kreinik #12 Metallic Braid in hot-pink and pink colors. For the necklace pictured above I used a 1.75mm steel hook to create a nice firm fabric that didn’t need additional stiffening.

Spiral Heart in K

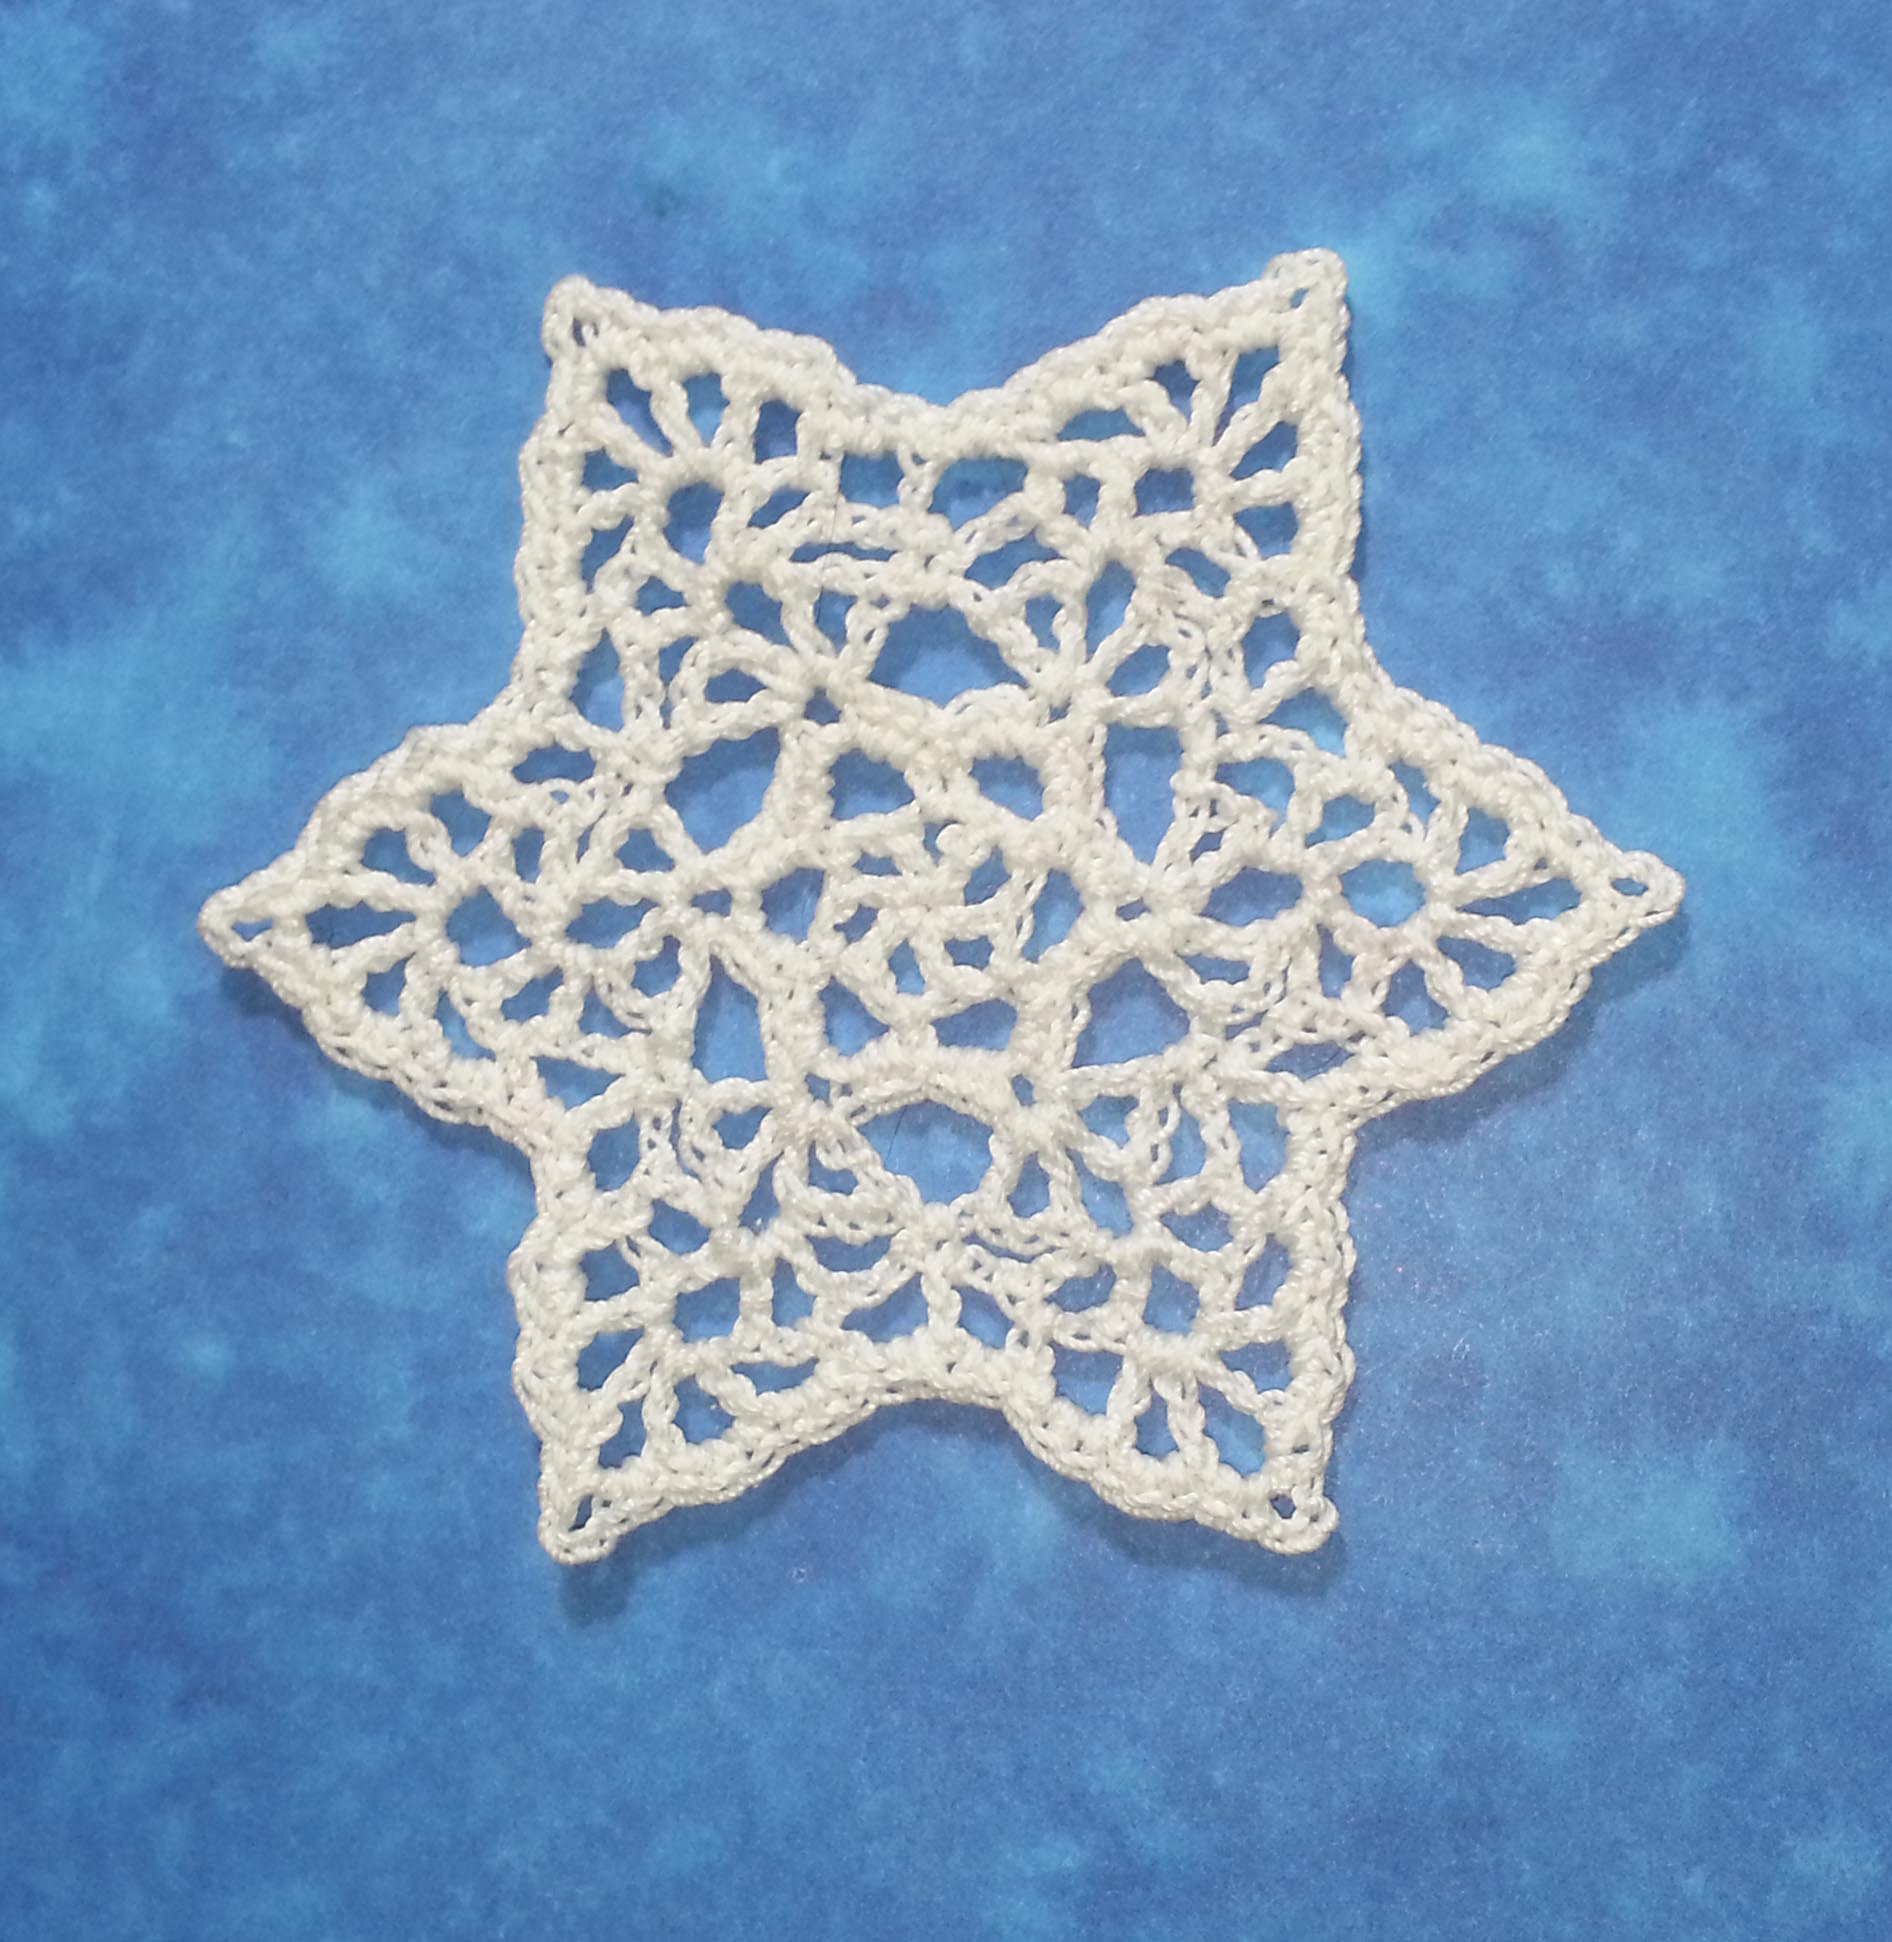
I also modified my “Spiral in a Heart” pattern to create a more symmetrical appearance to the heart shape.  The modification is simple if you want to try it. When you get to the end of Round 3, ch 1, then sl st into side of last hdc, sc next sc, loose sl sts in next 3 sts, fasten off and weave in ends.

My “Crocheted Love” heart has also been rather popular with other crochet bloggers. They have come up with fun ideas on ways to incorporate it into their projects.

Heart Baskets

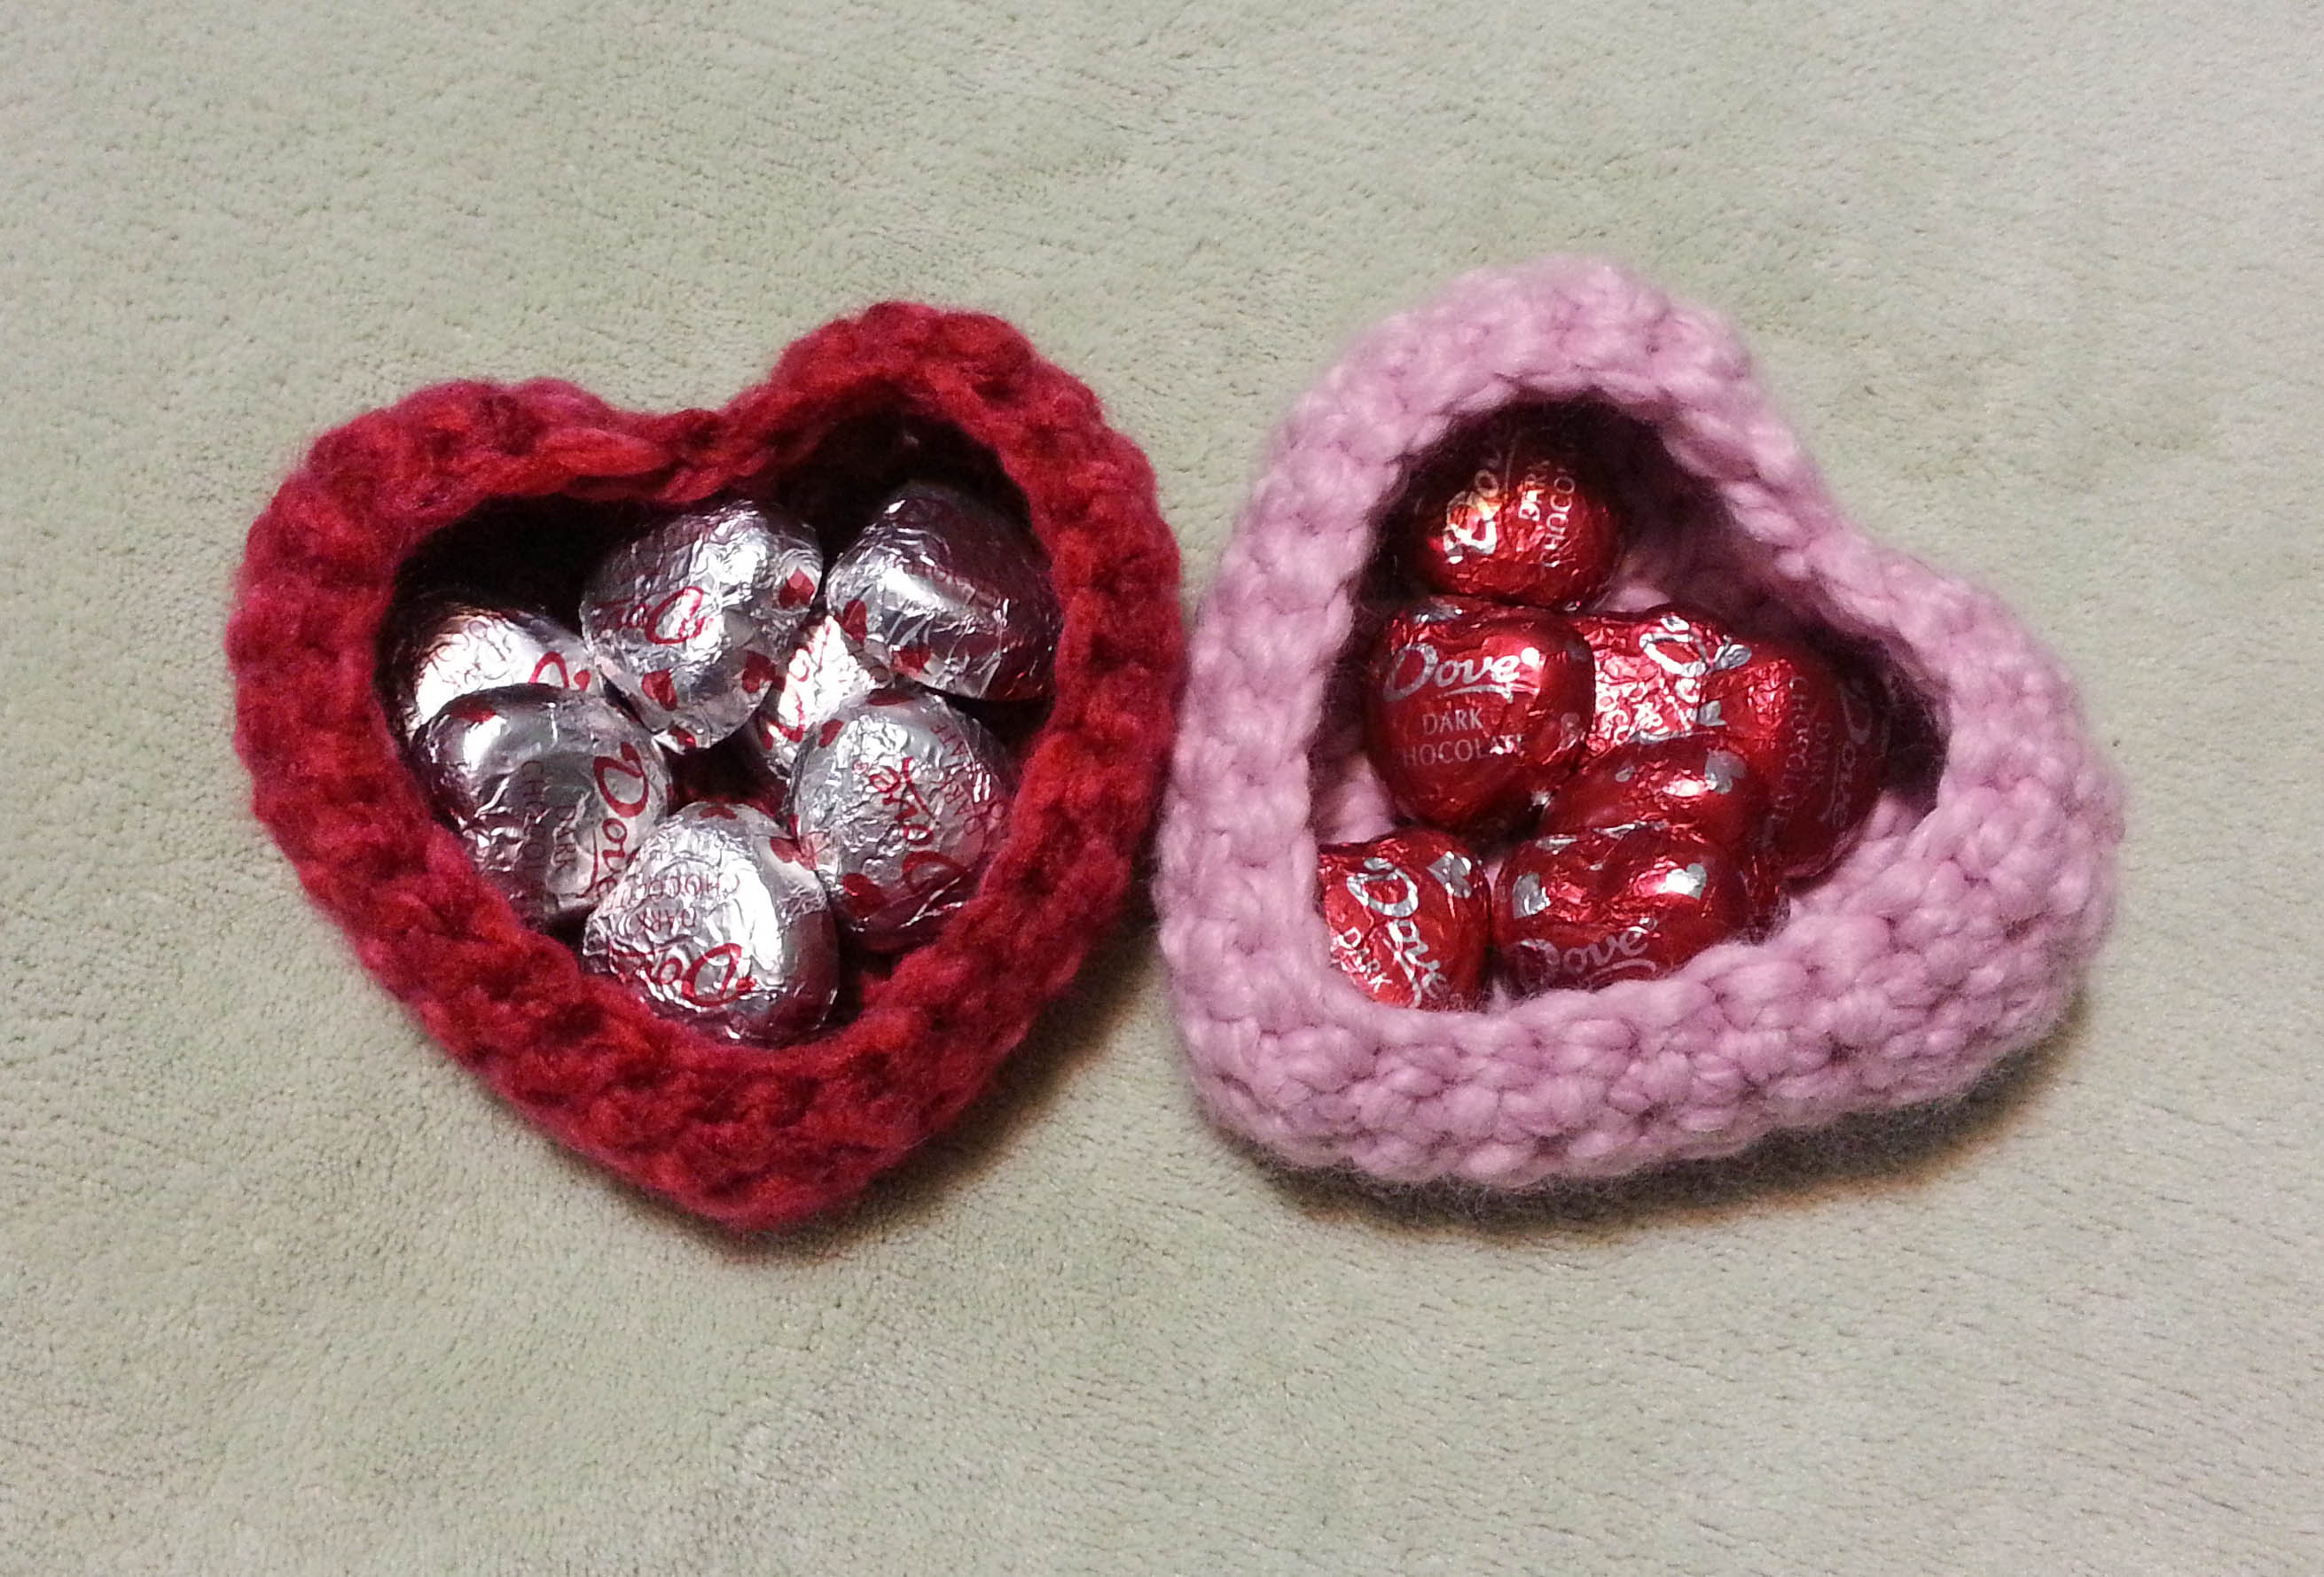
You’ve seen Cintia’s little baskets. The photo above is my experiment with that idea, came out very cushy and they made great containers for chocolates.

Photo by Laura Murray used with permission

Check out this fun project from Laura Murray over at Paper and Pin. She used my “Crocheted Love” hearts and turned them into sweet little conversation heart pillows. I think it’s a toss-up on my favorite one she made, though the “hug” heart is very sweet.

I’ll have a few more ideas for Valentine’s Day for all my dear readers next week, but hopefully these will spark something for those of you looking for ideas for gifts for your loved ones.

Getting the Most from a Pattern

As a designer and particularly as an indie-designer, I spend a lot of time thinking about what information a pattern needs to include. Clarity is vital for a pattern to be easy to follow and for stitchers to be able to replicate the original design.  After all, that is the main purpose of a pattern. To provide all the information that a crafter will need to get the same result that the designer did.

Interestingly enough, a lot of folks have a hard time being able to follow a pattern. So today’s post is all about the anatomy of a pattern and how changes can make or break your final project.

Patterns can be broken into 4 parts: Materials, Metrics, Pre-Instructions, Instructions. Changes in any of these areas can change the resulting finished project significantly from the sample the designer created for photography. Which can be exactly the result you want, it’s just good to be aware of how your changes will affect the finished object.

Materials

Materials

This is where the pattern lists the yarn, hook size and any other materials or tools that you will need to have on hand to complete the project.

If you decide at this point in the pattern to use a different yarn than was used in the design this is where things can change a great deal. Yarn substitution is tricky. Sometimes the listed yarn is no longer available or difficult for you to get hold of. So when looking at substitution it is a good idea to look at not only the weight, but fiber content and even the amount of twist in the yarn originally used as well as in the yarn you wish to substitute.

Metrics

Metrics

This is where the pattern tells you the sizes the pattern can be used to make as well as the gauge measurements.

If you change the hook size that was listed in the Materials you will very likely have some changes in this area. Gauge swatches can be your friend if you have made changes. Working that swatch will give you an idea of how close you will be to the measurements given.

If your pattern is for something like an afghan or scarf, where gauge isn’t that critical, you still want to have an idea of what the size of your finished project is going to be. If nothing else, to be sure you have enough yarn.

Pre-Instructions

This area is one of the most often skipped areas in pattern reading and can lead to the biggest tangles when working a pattern. It generally includes things like the “Special Stitches” and “Pattern Notes”.

This area of a pattern often gets ignored by stitchers until they run into a snag while working the pattern. This is often very important information for working the pattern smoothly.  Special Stitches will explain non-standard abbreviations for stitches. Pattern Notes will give you a heads up about things in the pattern to pay particular attention to.

Instructions

This is the “meat” of the pattern. In the instructions you will get the exact directions on the order and placement of stitches to create the finished object. Sometimes the instructions will include stitch charts, schematics and photo tutorials.

If the pattern is for a complex project, like a garment made from multiple pieces, it will often have the instructions broken out for the various pieces. Sleeves, collars, ribbing, etc.

With longer or more complex patterns it can also be helpful to use post-it notes or some other movable marker to help you keep track of your place in the pattern as you are working. If you miss a repeat or line of the pattern the result can be a bit frustrating.

For crochet patterns that have written text using standard abbreviations you need to be sure if they are using US or UK terminology. If the pattern also includes a stitch chart that can often help you decipher whether the pattern is written in US or UK terms.

Another way to spot if a pattern is US or UK terminology is if it uses the half double crochet stitch (and calls it that). US terminology says Half Double Crochet where UK terminology says Half Treble Crochet. UK doesn’t have any stitches called the Half Double Crochet stitch and US doesn’t have any stitches called Half Treble Crochet.

Now it’s time to grab one of those patterns that have been intimidating you and make a try at it. Hopefully some of the tips in this post will help you triumph.

The Cure for SSS

Second Sock Syndrome (SSS) is often spoken about by those that like to knit or crochet socks. One sock gets finished and the second half of the pair waits in the project bag for ages sometimes to never be seen again. Today I’m going to share my cure for SSS and how to finish 2 at a time in crochet, whether it is socks, mitts, slippers or sleeves.

Making 2 identical objects is always a challenge for me.  Being I seem to have been born with the designer gene I tend to “fiddle” with patterns.  Unfortunately, if you don’t write down the fiddling bits when doing the first object, you are a bit sunk when making the second one.  Sometimes my pairs are more like fraternal twins than identical and a few times it was questionable as to if they were even from the same family.

Photo from Red Heart Website

Along comes the idea of making 2-at-a-time.  Quite popular with my sock knitting friends it seemed a good idea for me when crocheting fingerless mitts.  Especially as I was doing the original designing bit. You can find the free pattern for the above design at the RedHeart.com website here.


Photo courtesy of Leisure Arts Publishing

I worked all the samples for my mitts in my “Texting Mitts” book using this method (You can purchase an electronic version or paperback version of my book on the Leisure Arts website here). The great thing is you get to the end of the pattern and you have 2 mitts all done!

What you will need:

2 balls of yarn

At least 2 locking stitch markers, more if your pattern calls for them.

Pattern for pairs: Either mittens, gloves, slippers or socks (or the sleeve section of a sweater pattern).

I recommend 2 balls of yarn.  Some folks use the 2 opposite ends of the same ball.  I find that to be a bit tricky and tangly.  If I already have 2 balls of the color I want to use, I just go with them.  If not, I weigh the yarn and do a quick calculation of yards/per grams(or ounces) then use my 2 yard niddy noddy to measure out half of the yarn.

Measuring Yarn on my Niddy Noddy

Pop that onto my swift and wind it up into another ball (I generally wind the other half remaining in the original ball too as it gives me a tidier ball to work with and is less likely to tangle…I hate tangles).

The 2 balls of Yarn to Work From

Now you need the pattern.  Any crochet pair pattern could be worked similarly.  No matter what pattern you are using I highly recommend that you work the foundation/start in the same sitting if at all possible.

I am sharing this from a sad experience.  I was making myself a set of mitts and thought I would work the palm bit then return to the foundation and work the palm bit of the 2nd mitt.  Unfortunately, I was a few rows into the palm of the 2nd mitt and discovered my gauge was too different in my foundation round.

2-at-a-Time-A

The real trick to working 2 at a time in crochet is the locking stitch markers.  One of the wonderful things about crochet is that you have only one “live” loop at a time. The locking stitch marker placed in that loop means you can run off with the hook to work on the 2nd object or even a completely different project and your stitches will not unravel.

2-at-a-time-b

As you work back and forth between your 2 items you place the stitch marker in the working loop of the “resting” item. I use 2 different colors to keep track of which 1 of the 2 I’m working on. These were the start of some fingerless mitts I made using one of my patterns from my “Texting Mitts” book a few years back.

I crocheted the foundations for each mitt, placing the locking stitch marker in my working loop as I finished the foundation. Then I worked 2 rounds of the first mitt, placed the stitch marker in the working loop, removed the stitch marker from the working loop in my 2nd mitt, inserted my hook and crocheted 2 rounds of the 2nd mitt.

There are other methods for securing your working loop, but I like the stitch markers because you don’t need to make the working loop super large to keep it from getting pulled out. That allows me to be fairly speedy in my crochet work and that helps me with deadlines.

When I am designing my mitt or other pair patterns, I crochet 1 round at a time noting any design changes and switching back and forth between the 2 objects. Sometimes I will pin the 2 objects together to make it easier to switch back and forth. Just pin them so that you don’t obstruct the area you need to crochet into.

scritches

Now dear readers, it’s your turn to tackle some pairs. Hopefully you will end up with 2 of a kind.


Sophisticated Simplicity

Sophisticated Simplicity Necklace - Andee Graves/M2H Designs

I am really happy to share my latest beaded chain pattern with all my readers. This was an idea that has been bumping around in my brain for a while. It’s a very simple project to crochet, but does take a bit of coordination.

You’ll need to be comfortable with working chain stitches [ch], beaded chain stitches [bdch] and single crochet stitches [sc]. I have a tutorial on crocheting beaded chain stitches here on my blog (scroll down to the bottom half of the post) for those of you needing a refresher on that stitch.

Sophisticated Simplicity Necklace - Andee Graves/M2H Designs 2

Sophisticated Simplicity Necklace

Designed by Andee Graves

Skill level: Easy

Materials

Thread/Yarn:  Sample was made with Kreinik’s Ombre Twist thread, took approximately 45 yards (3 yds per strand), you can get approximately 6 necklaces out of one cone depending on how many strands you decide to have in your necklace.

Hook: Size B/2.25mm

265 glass  beads: Sample was made with Twisted Sistah’s 4mm Cube Transparent Sapphire with AB finish.

2 metal split rings (I used rings that were 1/2″ in diameter) and a large lobster clasp necklace fastener.

Gauge:

15 chain stitches = 2″

Instructions:

Before you begin crocheting, string all the beads you want to use onto the thread (I always add in a few extra when stringing my beads just to be on the safe side). Also work the ring of the lobster clasp onto one of your split rings.

Leaving about 6 inches of thread for your beginning tail make a slip knot and place loop on your hook. Slip st into one ring, chain 1 and single crochet into the ring to secure the end of your first strand.

You will work the necklace by working chained strands in 3 different styles:

Bead interval for Style 1 & 2
Bead interval for Styles 1 & 2

Style 1: Ch 24, (bdch, ch 7) 12 times, bdch, ch 24, sc to opposite ring. [132 ch, 13 bdch, 1 sc]

Style 2: Ch 21, (bdch, ch 7) 13 times, bdch, ch 21, sc to opposite ring. [133 ch, 14 bdch, 1 sc]

Bead interval for Style 3

Style 3: Ch 19, (bdch, ch 3) 25 times, bdch, ch 19, sc to opposite ring. [113 ch, 26 bdch, 1 sc]

Completed Necklace
Completed Necklace

I alternated working the various styles of strands until I had completed 15 strands (5 strands of each style). You could do more or less, you’ll just want to adjust the number of beads you string before starting your project.

Once you have crocheted all your chain strands and have made the final sc in the ring, fasten off with a six-inch long tail. Weave the ending and beginning tails in and trim off excess thread. If you need to you can secure the tails further with a drop of cyanoacrylate glue (sometimes known as “Super Glue”).

Tips and Tricks for Success

When I was working on my sample in the photos I kept getting carried away with crocheting the beaded chain intervals. About half way thru I discovered a little trick that really sped things up and saved me some frogging and frustration.

Tip for keeping track of beads.

Start the next strand by crocheting the chain stitches before the first beaded chain. Bring the number of beads for the strand you are working close to your hook, and push the remaining beads further down your thread so you have plenty of thread to work with while crocheting the strand. Make a slip knot in the thread right before your extra beads and put a locking stitch marker in the loop.

Now work your strand of chains and beaded chains, when you run out of beads you know it is time to finish that strand and connect it to the opposite ring with a single crochet. If you use up the thread you had pulled up, just move the extra beads further down the thread, undo your slip knot and create another slip knot down the thread. Replace your stitch marker and finish your strand.

Rings and Clasp

Note about the rings you use for the ends: I choose split rings because there is not an opening that the thread can slip thru causing your strands to drop off. If you prefer to use regular jump rings make sure that the opening in the ring is tightly closed.

I would also recommend placing a drop of thin cyanoacrylate glue over the join and let it dry completely before proceeding with your project. You want the thin runny type of glue that can penetrate the tight space between the 2 ends of your jump ring, not the thicker “gel” formulas that are also available.  Obviously you want to have your lobster claw fastener placed on the jump ring before you seal it with the glue.

Now it’s your turn dear readers. Find some beads that appeal to you and crochet a Sophisticated Simplicity Necklace that will turn heads. No one needs to know how easy it was to make.

Time flies

My little man on his first Birthday.
My little J’s first Birthday.

Today is my oldest’s 13th birthday. Really not sure how that went by so fast. I took a walk down memory lane looking at photos of both my kiddos as babies.

Babies are so much fun, especially when they belong to friends and extended family.  I really like crocheting wearable gifts for them because they are quick to make. It’s that nearly instant gratification aspect.

If you don’t have a baby to crochet for check with your local hospital to see if they have a program for accepting donated hats for little noggins.

Finished Little Noggin Cap - M2H Designs
Finished Little Noggin Cap – M2H Designs

I was asked by my friends at the Longmont Yarn Shoppe to crochet a baby hat for a sample recently and this is the little hat I made. I used my Little Bitty Noggin Cap pattern from my November 2010 blog post. I actually had enough yarn left over that I could have made some booties to go along with it. It took less than 1/2 a 50g ball of yarn.

Yarn for Hat

The yarn I used was Plymouth Yarns “Dreambaby DK; Paintpot”. I started with a G (4mm) hook, but felt the fabric was coming out too stiff, so I pulled it all out and switched to my 7 (4.5mm) hook. The fabric still came out solid, but had a bit more stretch to it and a softer feel.

Finished Hat - Crown View

I made this hat a little bigger than the hat in my “Little Noggins” blog post. But essentially I used the same instructions. I made the flat circle for the crown larger by repeating the increase instructions for 8 rounds (instead of 6), I worked 10 more rounds without increases and then 2 rounds of ribbing.  I wanted this hat to be ideal for a brand new baby, which is typically 14 – 15 inch head circumference.

The half double crochet stitch has nice stretch to it and babies tend to have silky hair, so I made this hat to be a little snug by aiming for a circumference in the 13.5 inch range.

Measuring across the diameter of your crown. This was the original Little Noggin Cap.

If you would rather have a hat that is bigger, work your increase rounds until your crown diameter is just over 5 inches. That will give a hat that is a tad large for most newborns, but they grow very fast and will likely fit it in just a few short weeks.

I also changed how I work the ribbing at the brim for my hats. In the original pattern I had you step down the continuous spiral and then work the brim in joined rounds. I’ve since discovered that I can go right into the back post/front post ribbing without stepping down and it isn’t really all that obvious. Then I work the step down at the end of the ribbing rounds. Much easier that way.

I hope you have fun making some hats for the little noggins in your life.

I’m off to San Diego for the TNNA Winter Show. Hope to have some fun new yarns and products to show you all when I get back. My next post may not happen until Wednesday morning. So thanks for your patience.

Changing Colors

One of the most interesting things about being a designer is working with a variety of colors in designs.

Sometimes the color of yarn chosen for a design is up to me, other times it is decided by the editor. There have been a few times when I wasn’t too sure about the color picked. It was a color or combination of colors that I don’t normally like together.

Or an editor might have decided that a design I like in a solid color would be better in a multi-colored yarn.

Right Angle Wrap Photo courtesy of Annie's Publishing/Crochet! Magazine
Right Angle Wrap
Photo courtesy of Annie’s Publishing/Crochet! Magazine

A prime example of that is my “Right Angle Wrap” that was in “Crochet !” magazine. I had originally envisioned that design as a single color. But the editor decided to go with a multi-color in the yarn.

Me wearing the "Right Angle Wrap"
Me wearing the “Right Angle Wrap”

In the years since I created that design I’ve actually grown very fond of the colorful version. I’m wearing it in the photo above.

The best part of crocheting though is you have the choice of making a project in any color that pleases you. Many times I’ve seen a photo of a design in the magazine and thought, “If I made that I think I would use a different color”. Often I have a yarn in my stash that I know will work up well in a design and I don’t even worry about color (most of my personal stash yarn has already been chosen for color). I’ve even re-worked some of my published designs in a different color just to see how they would look.

Photo Courtesy of Annies

I made a “Winged Columns Wrap” for my mother one year in the silver grey color of that yarn. Unfortunately I didn’t take a photo of it before sending off the gift to her.

Whirlwind Square - M2H Designs

An example of some of my readers changing colors are all the gorgeous “Whirlwind Afghan Block” projects folks made for the Moogly 2015 CAL. Some folks even changed the number of colors they used in the block adding to or subtracting from the original 5 colors in the pattern. I love to see that kind of creativity.

So the next time you are looking at patterns for a project, remember the color choices are all up to you.

A Lovely Lacy Snowflake

Snow is a reality where I live, sometimes I love it, other days it makes me cross to deal with it. But no matter what, I always find freshly fallen snow to be beautiful.  Crocheted snowflakes are one of my very favorite Christmas decorations (and my favorite way to enjoy snow).

There are many ways to incorporate snowflakes into your holiday themed projects. They are great for using as embellishments on cards or gifts and you can stiffen them with a glue solution to hang them on your tree or in the window as ornaments. Sprinkle some glitter over them before the glue dries, to add a little sparkle.

This post contains affiliate links. I may receive compensation (at no additional cost to you) if you make a purchase using these links.

As my holiday gift to all my lovely readers here is my newest snowflake pattern. For those of you that prefer stitch charts to work from, or just want a nice PDF of the pattern, this pattern is available in my Ravelry Shop.

Lacy Snowflakes M2H Designs

LACY SNOWFLAKES

designed by Andee Graves/M2H Designs

SKILL LEVEL: Intermediate


FINISHED SIZE: 4″ (10cm) diameter at widest point

THREAD: Red Heart Aunt Lydia’s Size #10 Crochet Cotton, (100% Cotton) white

CROCHET HOOK: US Steel #2 (1.5 mm) or size needed to obtain gauge.

GAUGE: First 4 rounds = 2” in diameter at widest point


FINISHED SIZE: 5 1/8″ (13cm) diameter at widest point

THREAD: Red Heart Aunt Lydia’s Size #3 Crochet Cotton, (100% Cotton) blue

CROCHET HOOK: US B (2.5 mm) or size needed to obtain gauge.

GAUGE: First 4 rounds = 2 3/4” in diameter at widest point


ADDITIONAL MATERIALS: Yarn needle, Stitch markers 

SPECIAL STITCHES

Open Shell (Shl): (dc, ch 2, dc, ch 3, dc, ch 2, dc) in indicated st or sp.


INSTRUCTIONS

Start with an adjustable slip knot. Click here to see my video on this technique.

Rnd 1: Ch 6, (dc, ch 2) 5 times in 6th ch from hook, sl st to 3rd ch of beginning ch-6.

Rnd 2: Turn (Sl st, ch 1, sc) in next ch-2 sp, (ch 4, sk next st, sc in next ch-2 sp) 5 times, ch 4, sl st to first sc of round.

Rnd 3: Ch 1, [(3 sc, ch 3, 3 sc) in next ch-4 sp] 6 times, sl st to first sc of round.

Rnd 4: Sl st in next 2 scs, sl st in next ch-3 sp, ch 5, (dc, ch 3, dc, ch 2, dc) in next ch-3 sp, (ch 2, Shl in next ch-3 sp) 5 times, ch 2, sl st in 3rd ch of beginning ch 5.

Rnd 5: Ch 1, turn, (sc in next ch-2 sp, ch 2, sk 4 sts, Shl in next ch-3 sp, ch 2, sk 4 sts) 6 times, sl st to first sc of round.

Rnd 6: Ch 5, turn, (*sk 3 sts, sc in next ch-2 sp, ch 2, sk next st, Shl in next ch-3 sp, ch 2, sk next st, sc in next ch-2 sp, ch 2, sk 3 sts,* dc in next sc, ch 2) 5 times; Repeat from * to * once, sl st in 3rd ch of beg ch-5.

Rnd 7: Ch 1, 2 sc next ch-2 sp, [*(sk next st, 3 sc in next ch-2 sp) twice, sk next st, (2 sc, ch 3, 2 sc) in next ch-3 sp, (sk next st, 3 sc in next ch-2 sp) twice,* (sk next st, 2 sc in next ch-2 sp) twice] 5 times, Repeat from * to * once, 2 sc next ch-2 sp, sl st to first sc of round.


FINISHING

Weave in all ends. If you want to stiffen your snowflakes for hanging ornaments the Stiffy Mod Podge product shown below is what I use.

If you can’t find it locally you can purchase it on Amazon. Click on the photo below to go right to Amazon.

This post contains affiliate links. I may receive compensation (at no additional cost to you) if you make a purchase using these links.

Less than 3 weeks til Christmas!

So much to be done and time is getting short. All those grand plans you had for crocheting up the perfect gift for family and friends are now down to the wire.  For those of you looking for a quick crochet gift project, I and a few of my fellow designer/blogger friends have some suggestions for you.

Hurry Up Holiday Cowl by Tamara Kelly/Moogly
Hurry Up Holiday Cowl
by Tamara Kelly/Moogly

From the lovely Tamara Kelly over at Moogly the first pattern of her 2015 Moogly Holiday Mini CAL is available. Make this chunky cowl with one skein of Lion Brand Yarn Hometown USA… in less than an hour! Video tutorials included!

Sparkly Jar Cover
Sparkly Jar Cover

Tamara also pulled together a gift giving guide on the Lion Brand Blog (including my Sparkly Jar Cover).

Center
Coraline in Morocco Cowl by Simply Collectible Crochet

From Celina of Simply Collectible Crochet here is a list of some quick crochet projects that would make great gifts. I especially love her “Coraline in Morocco Cowl”. Make it in festive colors or a sparkly yarn and you have a lovely quick gift to brighten someone’s holiday. This would be a really great project for one of those lone balls of beautiful yarn that has been sitting in your stash for a couple of years un-loved.

Lorraine-Free-Crochet-Ear-Warmer-Pattern-Blue-Green

From Jessie of Jessie-At-Home is her Last Minute Gift pattern Round-up from 2014. My favorite in this Round-up is the pattern for the “Lorraine” a wonderful wide ear warmer that buttons in the back. I especially like the version Jessie made with a big bold crocheted flower on it.

Peppermint Kisses Beanie - Kathy Lashley/ELK Studio
Peppermint Kisses Beanie – Kathy Lashley/ELK Studio

From Kathy of ELK Studio is the gorgeous “Peppermint Kisses” beanie. This pattern gives you 2 different band styles to choose from as well.  I could see this hat worked in any combination of colors. You could even work it in your giftee’s school colors.

Smidgen Cozy - M2H Designs
Smidgen Cozy – M2H Designs

One of my favorite recent designs for a quick crochet gift is my “Smidgen Cozy”. This project is quick to make because you are working with a large hook and very bulky yarn. All you need is yarn, hook, a pretty button and an evening to crochet up this cozy gift.

A lot of my patterns available for purchase thru my Ravelry Shop also work up quickly for gift giving.

Little Christmas Wreath - M2H Designs
Little Christmas Wreath – M2H Designs

One of my favorites to use as a Christmas brooch is my “Little Christmas Wreath”.  You can work it up in any yarns you have available, just use the appropriate size hook to fit your yarn. The little wreaths can also be embellished with beads to make them even more festive.

Twisted Vs Cowl - M2H Designs
Twisted Vs Cowl – M2H Designs

Another quick project is my “Twisted Vs Cowl”. This project again takes advantage of bulky yarn and a big hook, as well as an open stitch pattern, to speed you to completion of another gift.

Anna Moebius Cowl - M2H Designs
Anna Moebius Cowl – M2H Designs

My all-time favorite crochet gift project for my female friends and relatives though is my “Anna Moebius Cowl”.  I can complete one of these cowls in approximately 3 hours.  I especially like to use yarns with long color changes as the stitch pattern shows them off spectacularly.

Hopefully one or more of the patterns you can find thru these links will be just what you need for your gift-making projects. Remember to be gentle with yourself and take lots of breaks while you are stitching away on those last-minute gifts.


Let It Snow

Snowy Front yard ThanksgivingAh yes, winter has made itself known here on the mountain. No matter that the calendar says that it’s still Fall until December 20th.

Warm Fire

Our Thanksgiving holiday was a very snowy one. Fortunately we hadn’t planned to go anywhere, so we enjoyed the snow with a lovely warm fire in the wood stove and lots of good food on the table.

Yoda

We watched the first 3 Star Wars movies (which are called Episodes 4, 5 and 6…yes I know it’s confusing). I finished crocheting my Yoda amigurumi from the kit I showed you. That is one Christmas present done for the boys, but quite a few things remaining.

Light as Lace Snowflake - M2H Designs
Light as Lace Snowflake – M2H Designs

With less than a month to Christmas-time I started working on a new snowflake motif.  Hopefully I’ll have the pattern ready to share with all of you in the next week. Though the way this year has gone by so swiftly I’m not 100 percent sure I can pull it off. Edited 12/10/2015: The pattern for this snowflake is now available for free here on the blog. Lacy Snowflake

Meanwhile if you are looking for some quick crochet projects for your holiday gift-giving you might want to take a look at some of my patterns on my Ravelry Designer Page.


Cuddly Crochet Kits

This last week has been another busy one. On top of all the other crochet work related stuff, I had a realization that Christmas is sneaking up on me far too quickly. Eek!

On Wednesday I was at the Longmont Yarn Shoppe all day. It was our monthly Casual Crochet Wednesday and I was working that afternoon as the shop’s crochet help.

C2C Scarf 1

Everyone at the Casual Crochet was working on their Corner to Corner project. I had finished my scarf and took the above photo before leaving it as a shop sample.

My friend Margie was there and she had some fun things to show me. In particular she had a crochet kit that she had picked up at Costco. The one she showed me was Disney’s “Frozen”, but she said they had Star Wars and the Peanuts too.

Frozen and Peanuts

The next day was my planned Costco trip and amazingly enough I remembered to look for the kits at my Costco. They had all 3, so I bought all 3. Not just because I was being indulgent (okay, maybe that was a little of it), but because I thought crocheting up some of the fun little figures could be good Christmas presents for my boys and a few other family members.

Star Wars Kit Open

I was so excited about the Star Wars kit that I opened it before taking a photo of it in pristine condition. As you can see the kit comes with instruction book, yarns, 2 sets of safety eyes, crochet hook, sewing/darning needle and fiber stuffing. The needle and hook are somewhat poor quality, but the little book is well worth the $12 price I paid. There are patterns for 12 Star Wars characters. The yarn included is enough to make a Storm Trooper and a Yoda.

Yoda in book

Bits for Yoda project

I decided I wanted to make a Yoda first.  Always loved this little green guy, though I think this cute little fella is going to live with my husband in his office.

Yoda hanks wound into balls

First I had to wind the little hanks into balls that I could crochet from. Was excited to get started.

Yoda head w Eyes

I changed the order of working some of the pieces for Yoda. I made his ears first so that I could sew them in place while the head was un-stuffed.

The instructions so far have been very clear and easy to follow the book is full of photo tutorials as well. So this is a great gift for crocheters on your list that want a project to get excited about. I would purchase a nicer crochet hook and darning needle to include though, especially if they don’t have a collection of their own hooks already.

Yoda w feet

I’m making pretty good progress on him so far. Just need to make his arms and little jacket. I’ll add another photo once he is finished. I won’t be giving away my kits as gifts, instead I will be making a lot of the characters as gifts. So part of my Christmas list is sorted.

Hope everyone is having a Wonderful pre-Thanksgiving Day weekend and that you are staying warm as well.