Crochet Surgery or Not

One of the things I have celebrated on my blog are the number of good friends I’ve made over the years of being online. Most of these friends are fellow crochet enthusiasts. One of my online friends is “Maven”, we met thru a group on Ravelry back in 2008 and have continued to stay in touch thru Ravelry, Facebook and Twitter over the intervening years.

We have even met in real life. It was a couple years ago, when I took my trip to NJ and NYC to visit Jan. It was far too short  a visit, but really fun to finally have a face to go with the name.

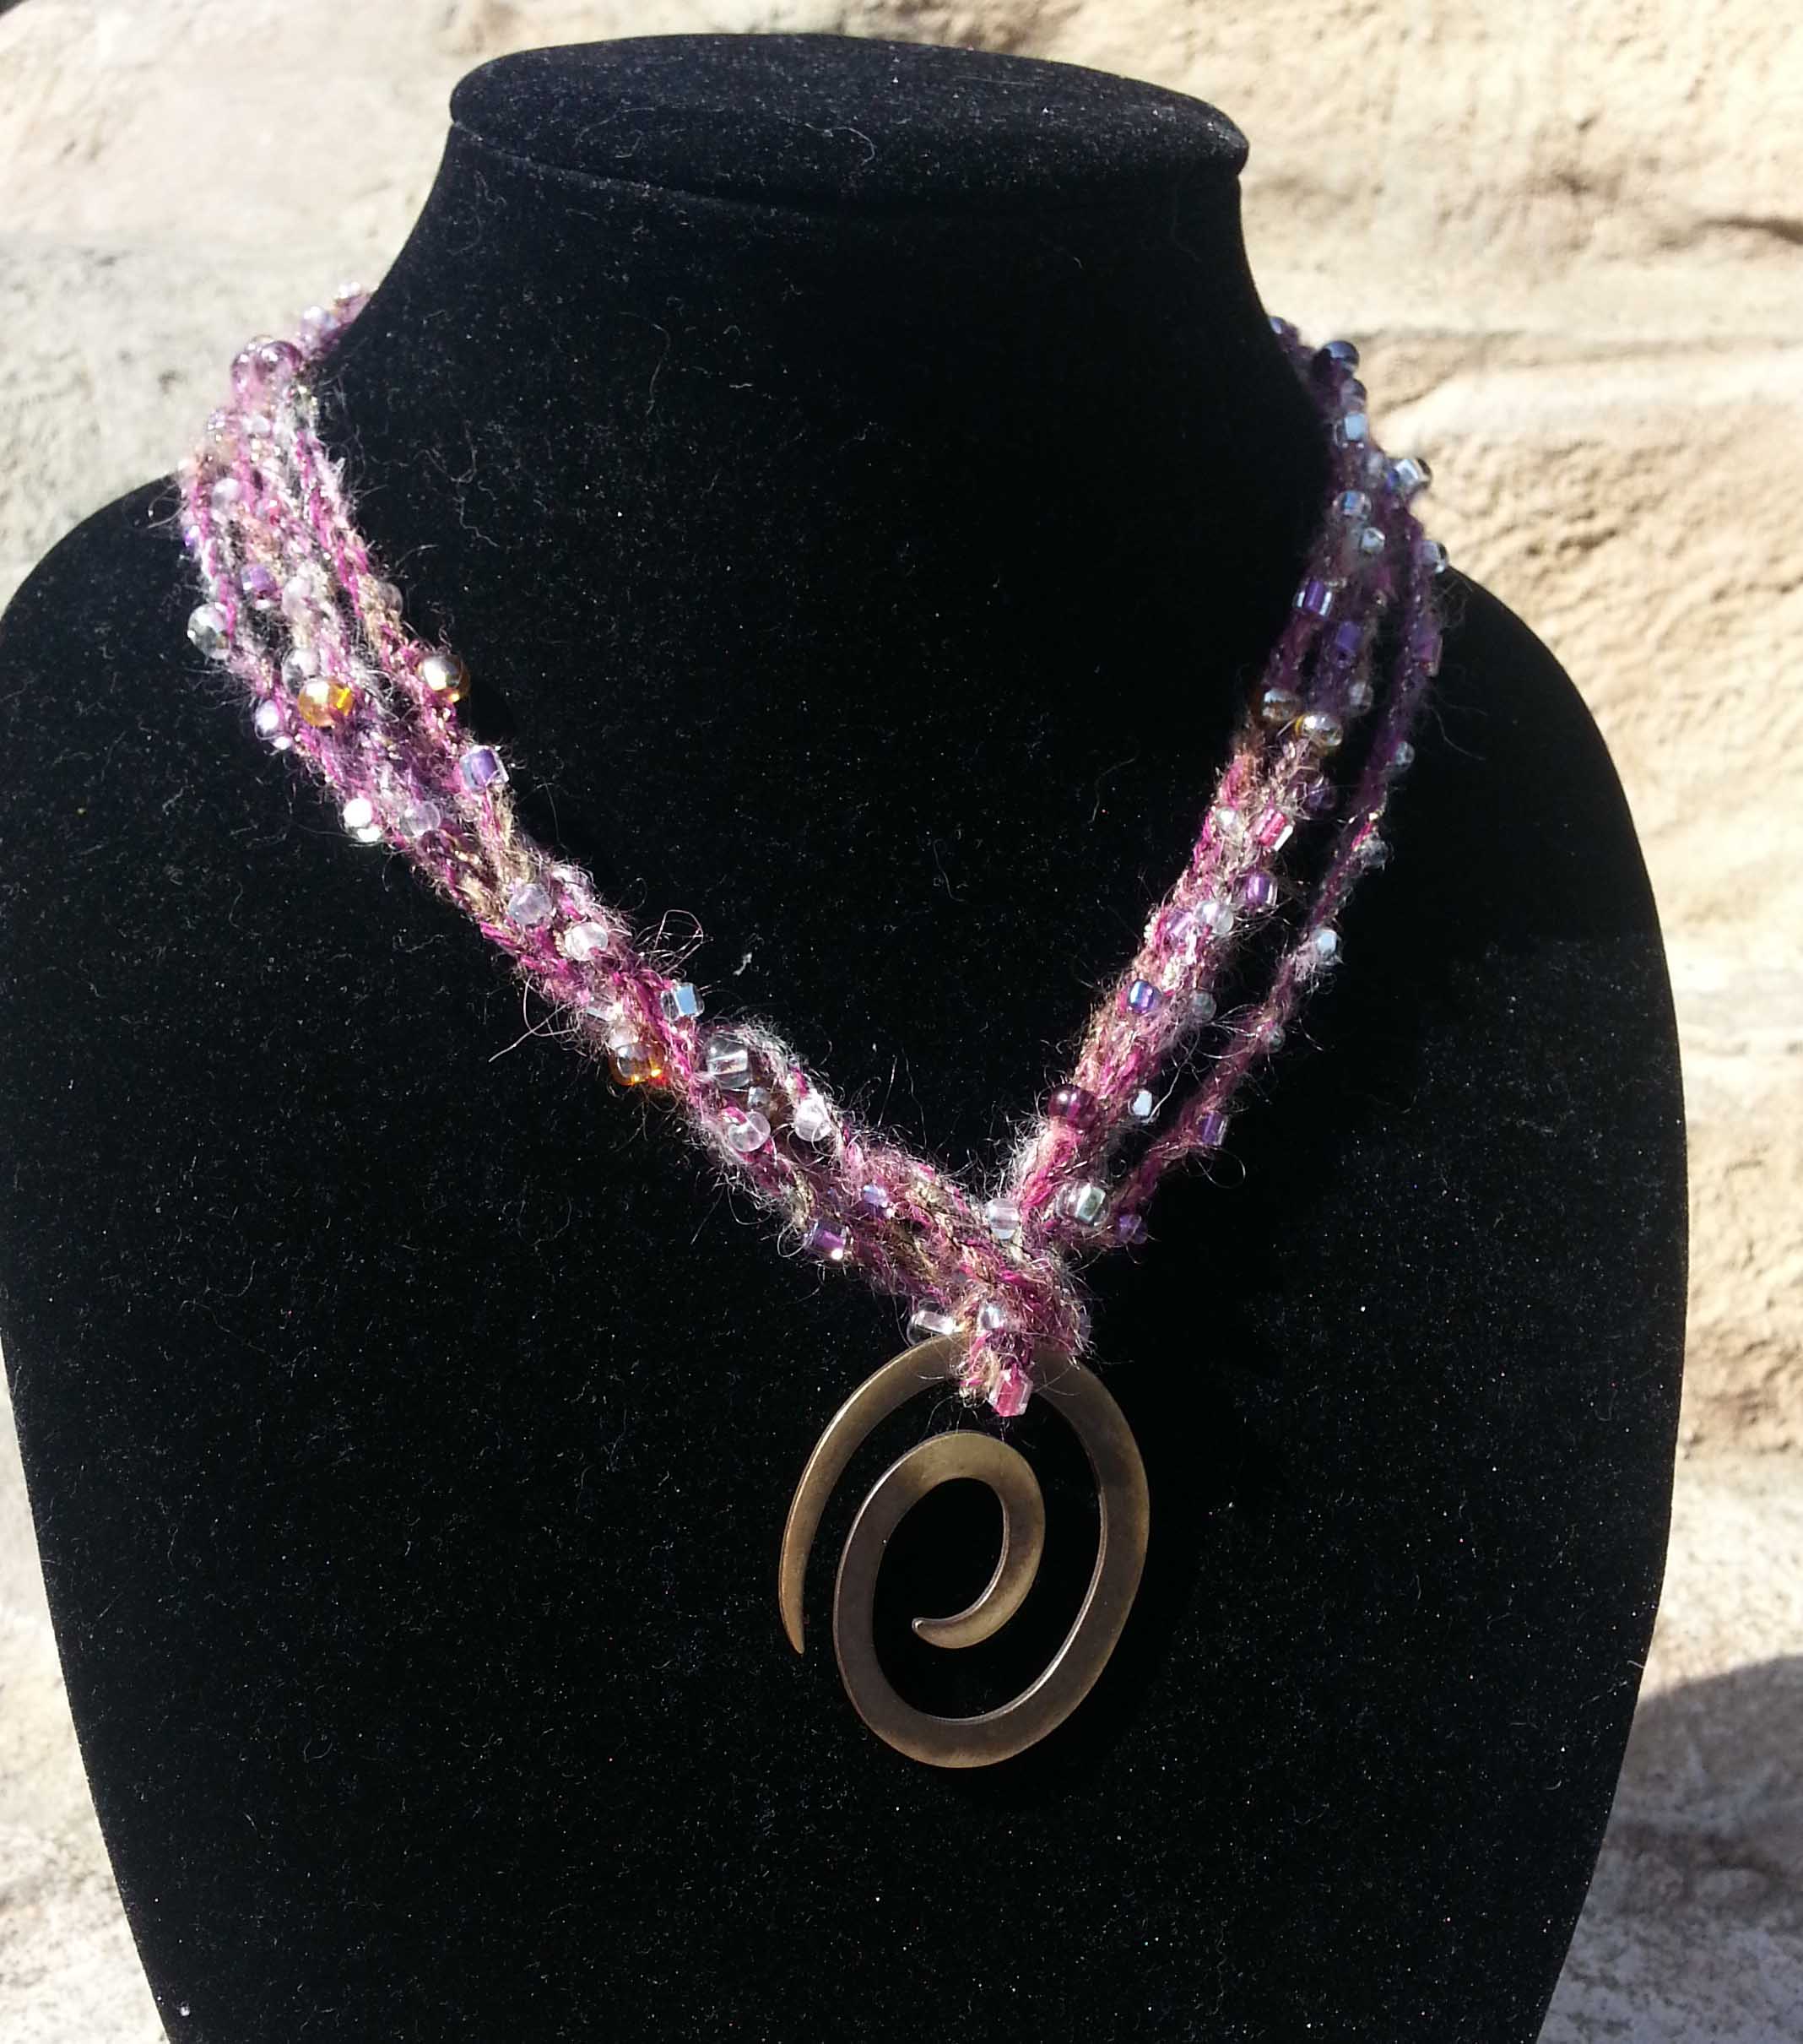
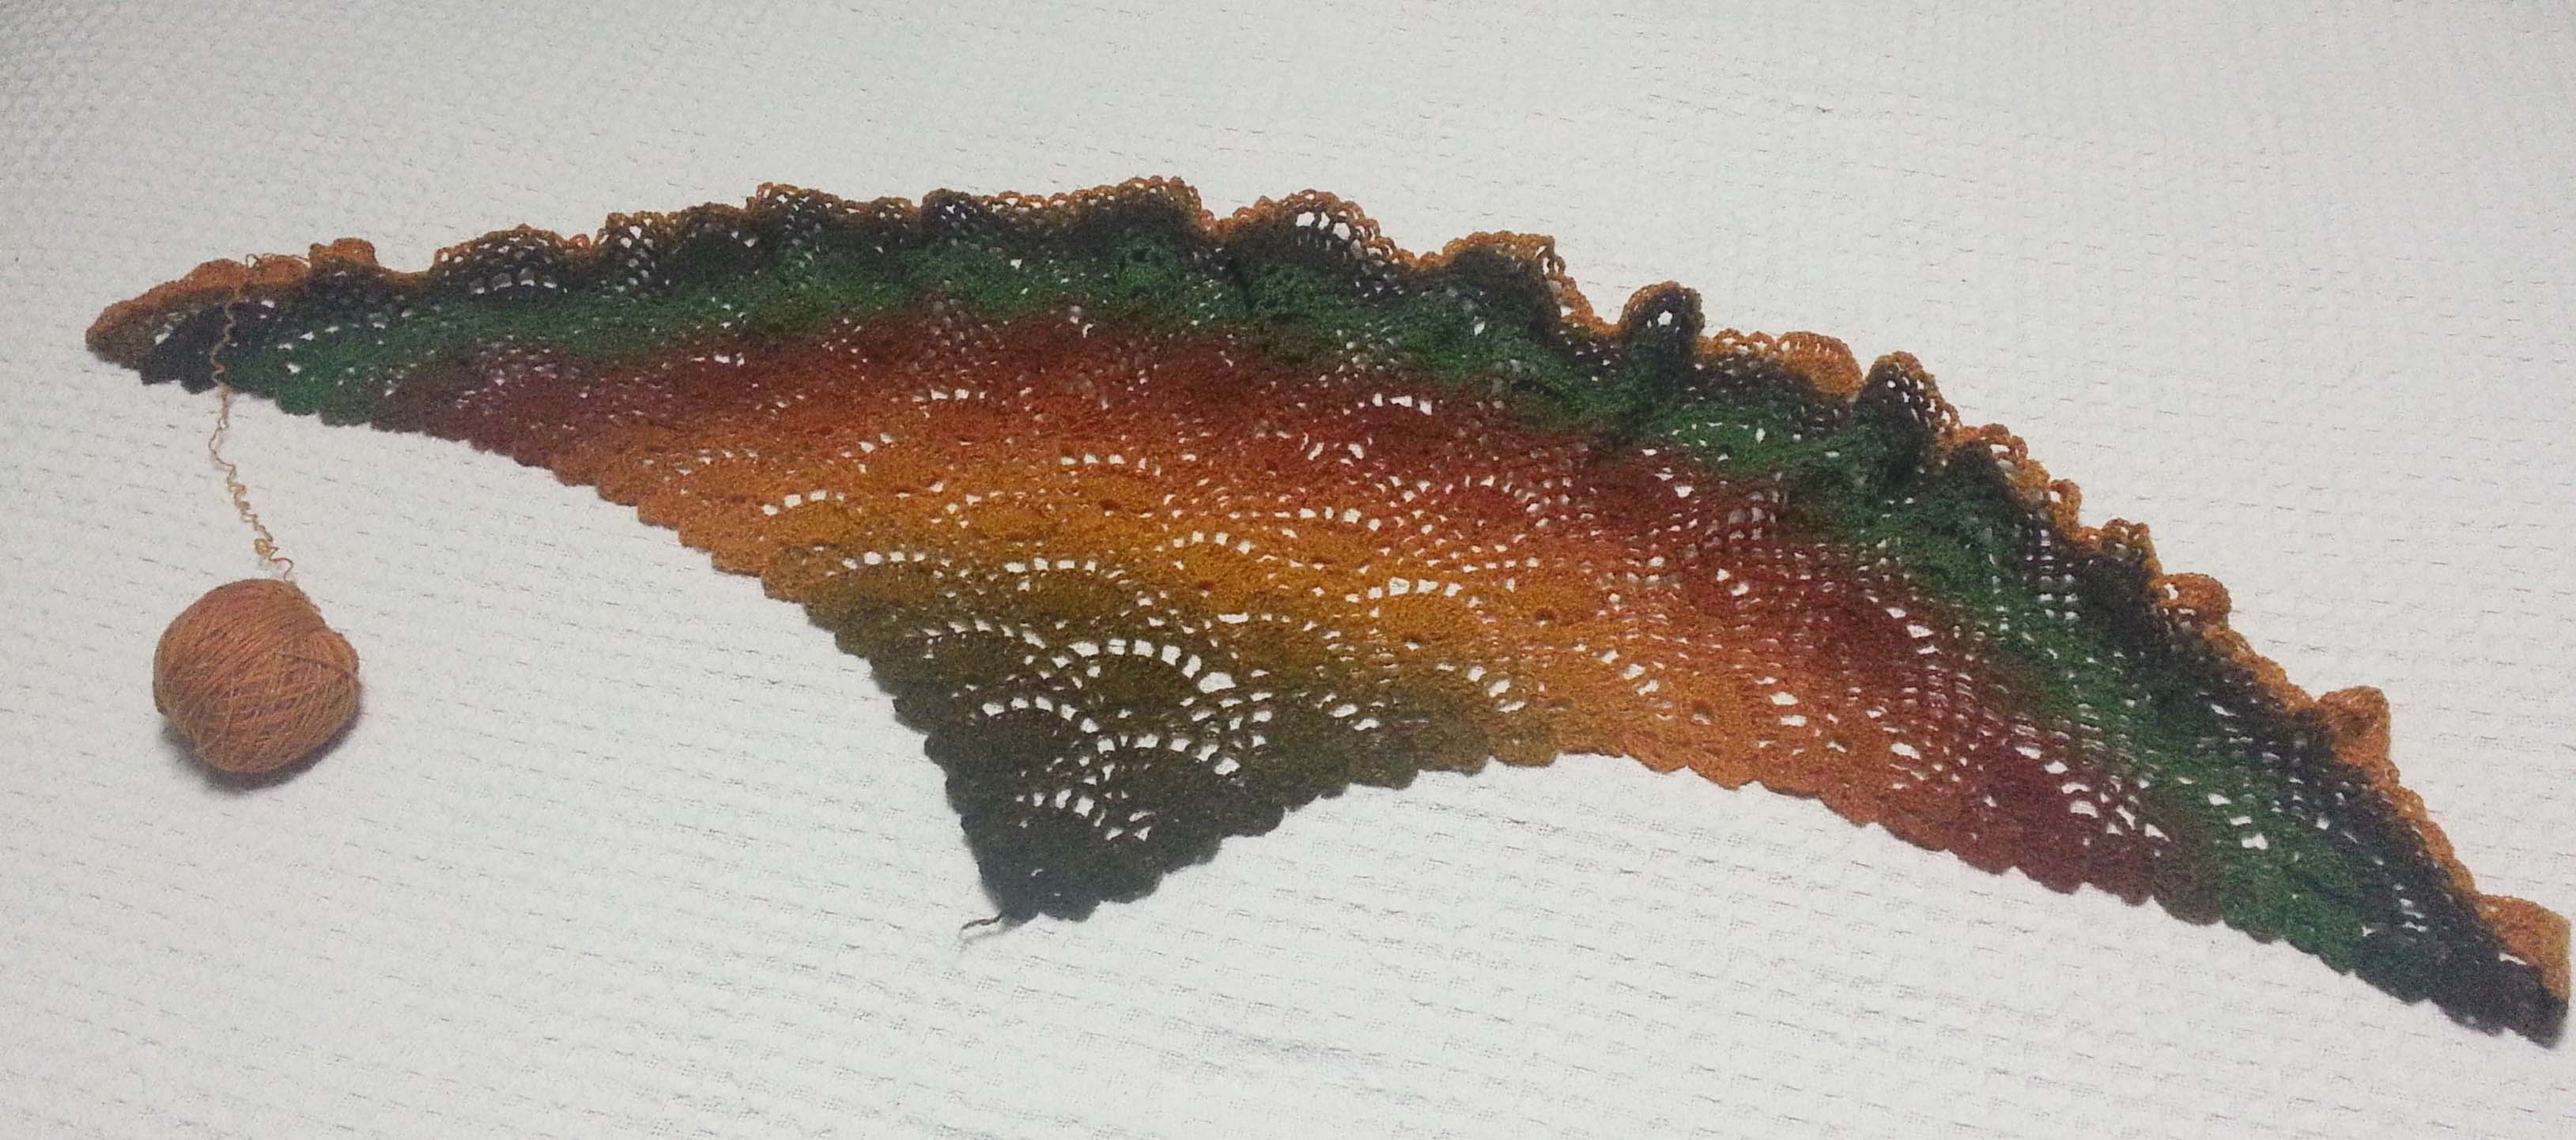
Maven likes to collect yarn when she travels and she purchased some yarn in Tallinin, Estonia on her trip there in May 2012. In May 2014  she decided to crochet a shawl with it while traveling in London and Paris.  She picked the “Festival Shawl” pattern designed by Lyn Robinson. This is a pretty point-up triangle shawl.

Unfortunately it was not coming out the way she wanted, but it turned out the yarn was really difficult to frog. It is a rather toothy wool that likes to grab onto itself. She decided to put it in time-out for awhile in June 2014.

Maven had posted photos of her project and we had talked about how to fix it. I had suggested doing some surgery on the original UFO, then finishing the shawl with how-ever much yarn she had left.  Or she could try using hair conditioner on the project and seeing if she could gently un-ravel the project that way.

She wasn’t sure she was up to either of those fixes and jokingly suggested that she should send it to me to mess with. Of course, I thought that was a great idea, Blog Post!

1 - Box of Goodies and WIP

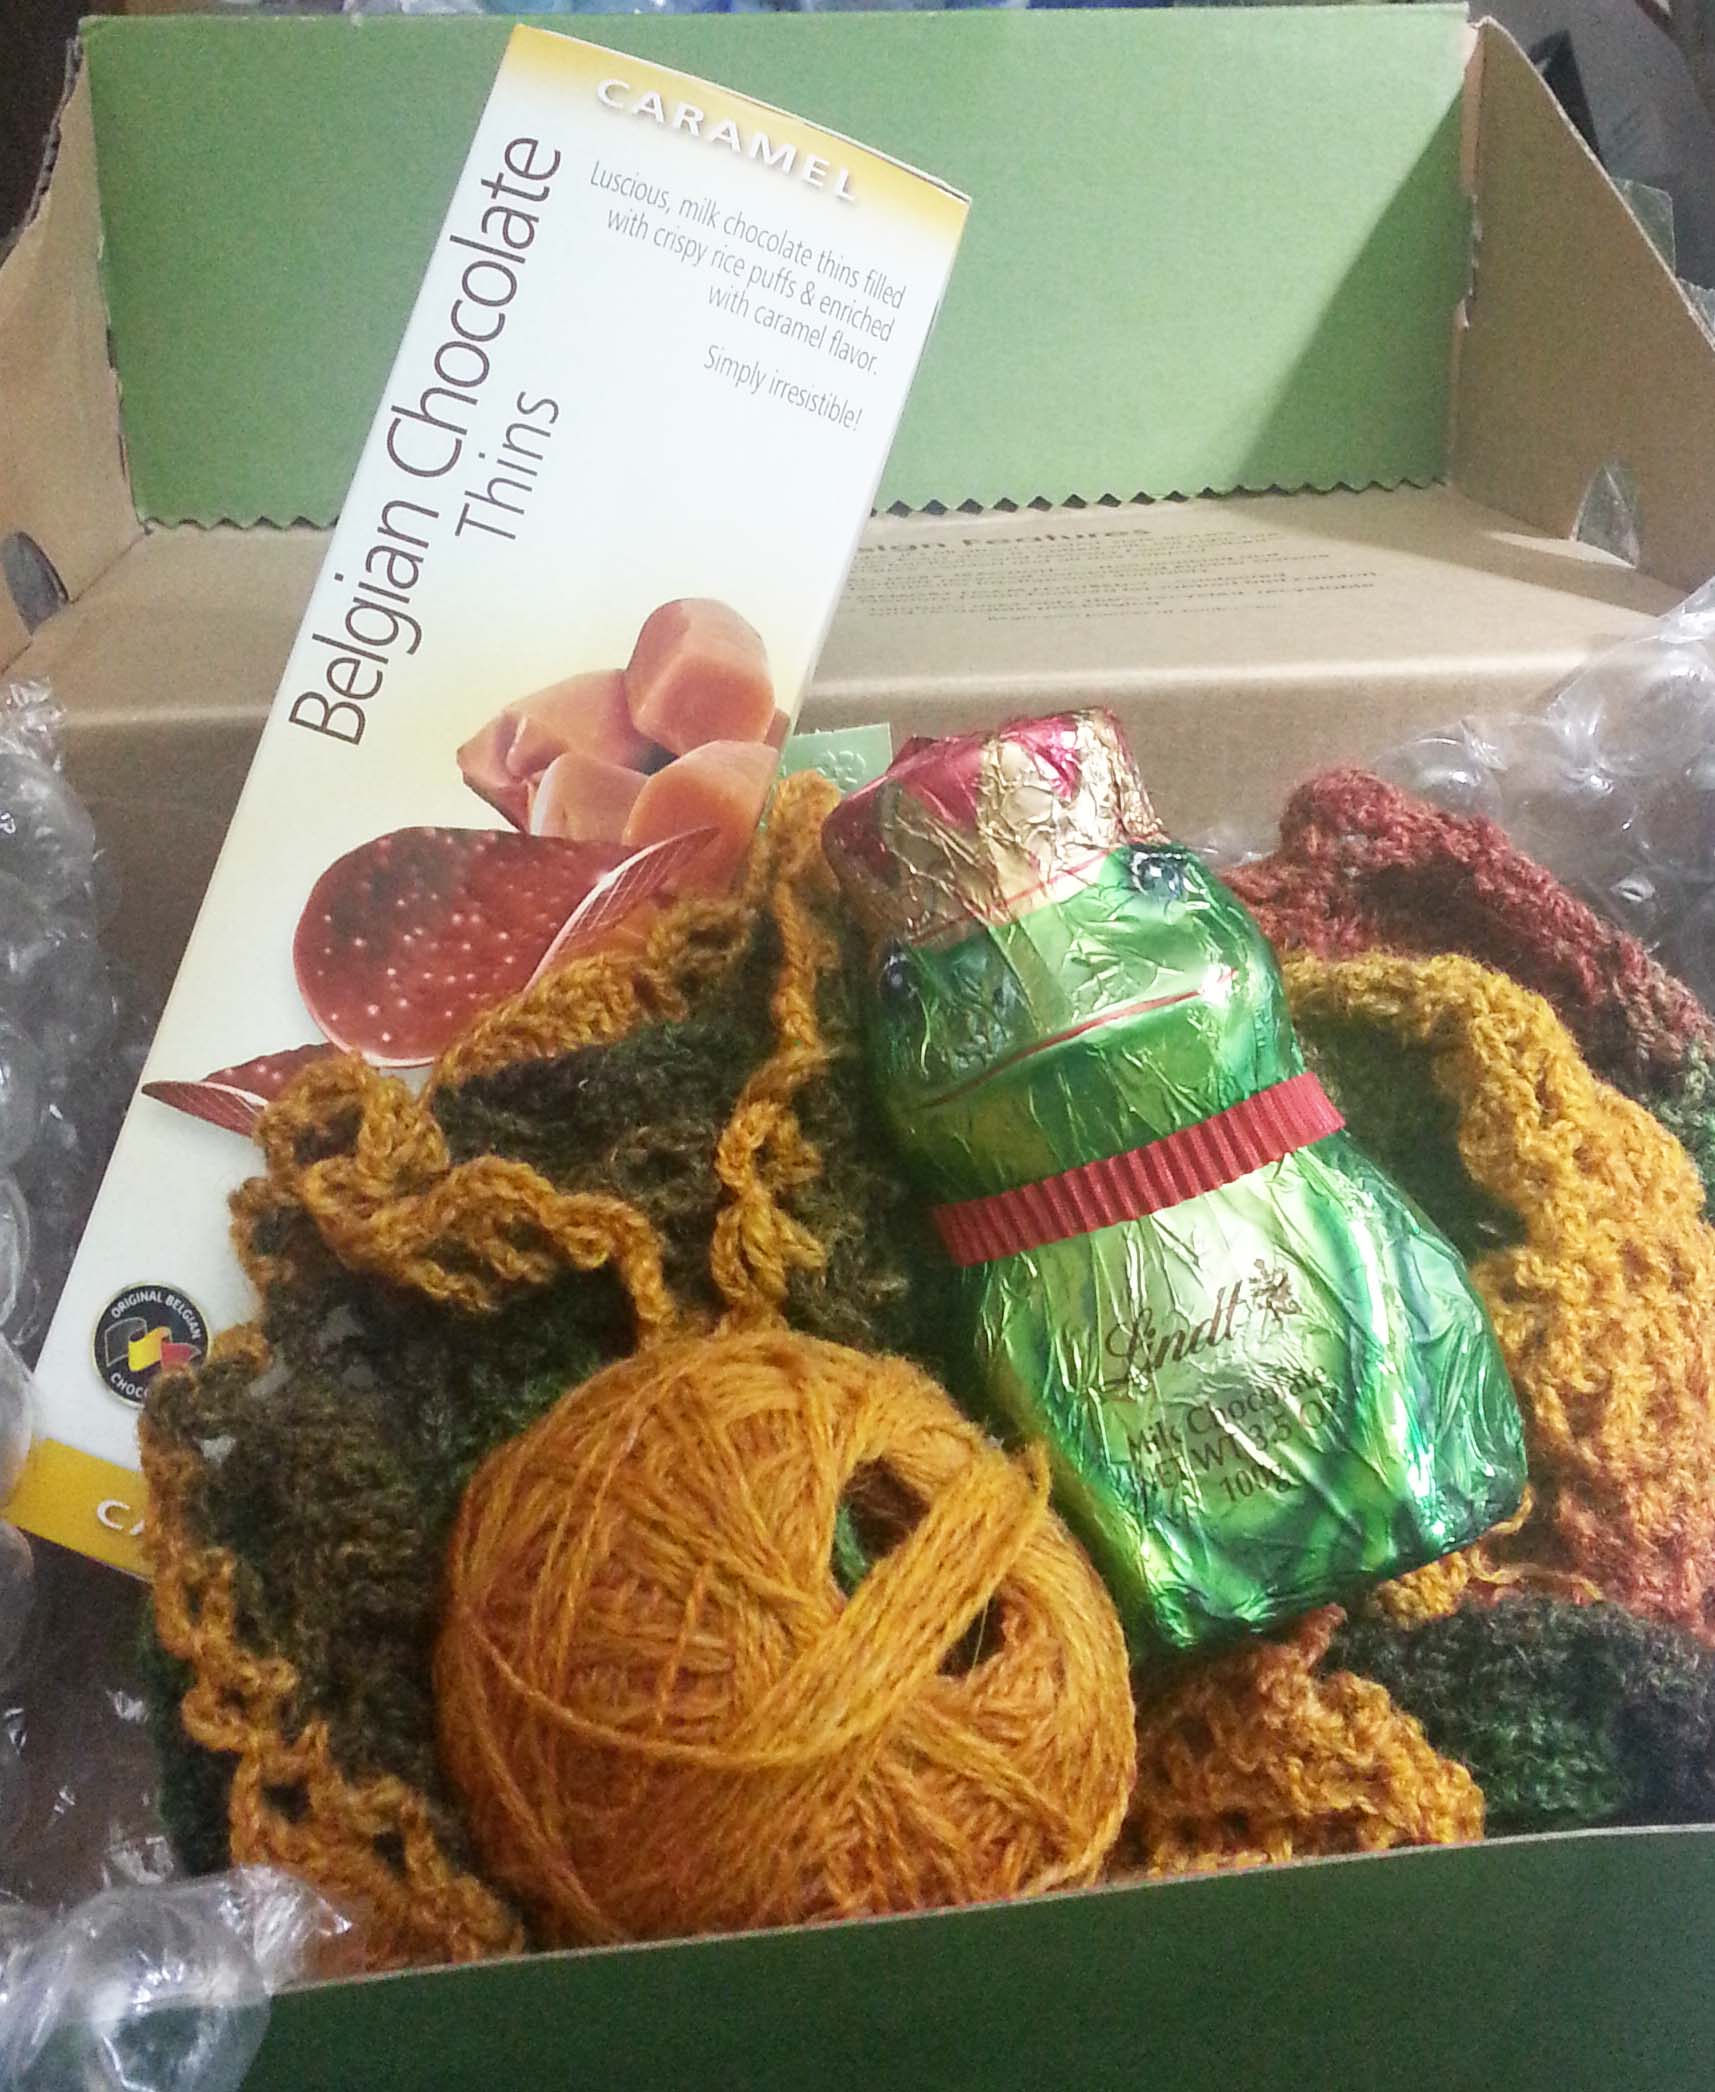
This joke kept getting tossed back and forth between us, finally she decided to take me up on the offer for real. Tuesday of this week I got the box in the mail. There was the expected project, but Maven also included some interesting chocolate goodies. She knows what a chocolate fiend I am. I am not planning on sharing any of these.

Triangle Shawl

Initial look at the project made me think that crochet surgery could work quite well. But I wanted to get a really good look at the project in the light of day before making my final assessment.

2 - Looking at options 1

I could see changing the direction of wear and loping off the original bottom point might work. That would mean the shawl would be more of a crescent shape than a triangle. But would Maven like it, and want to wear it?

3 - Materials for Surgery

4 - Looking at route for Safety line

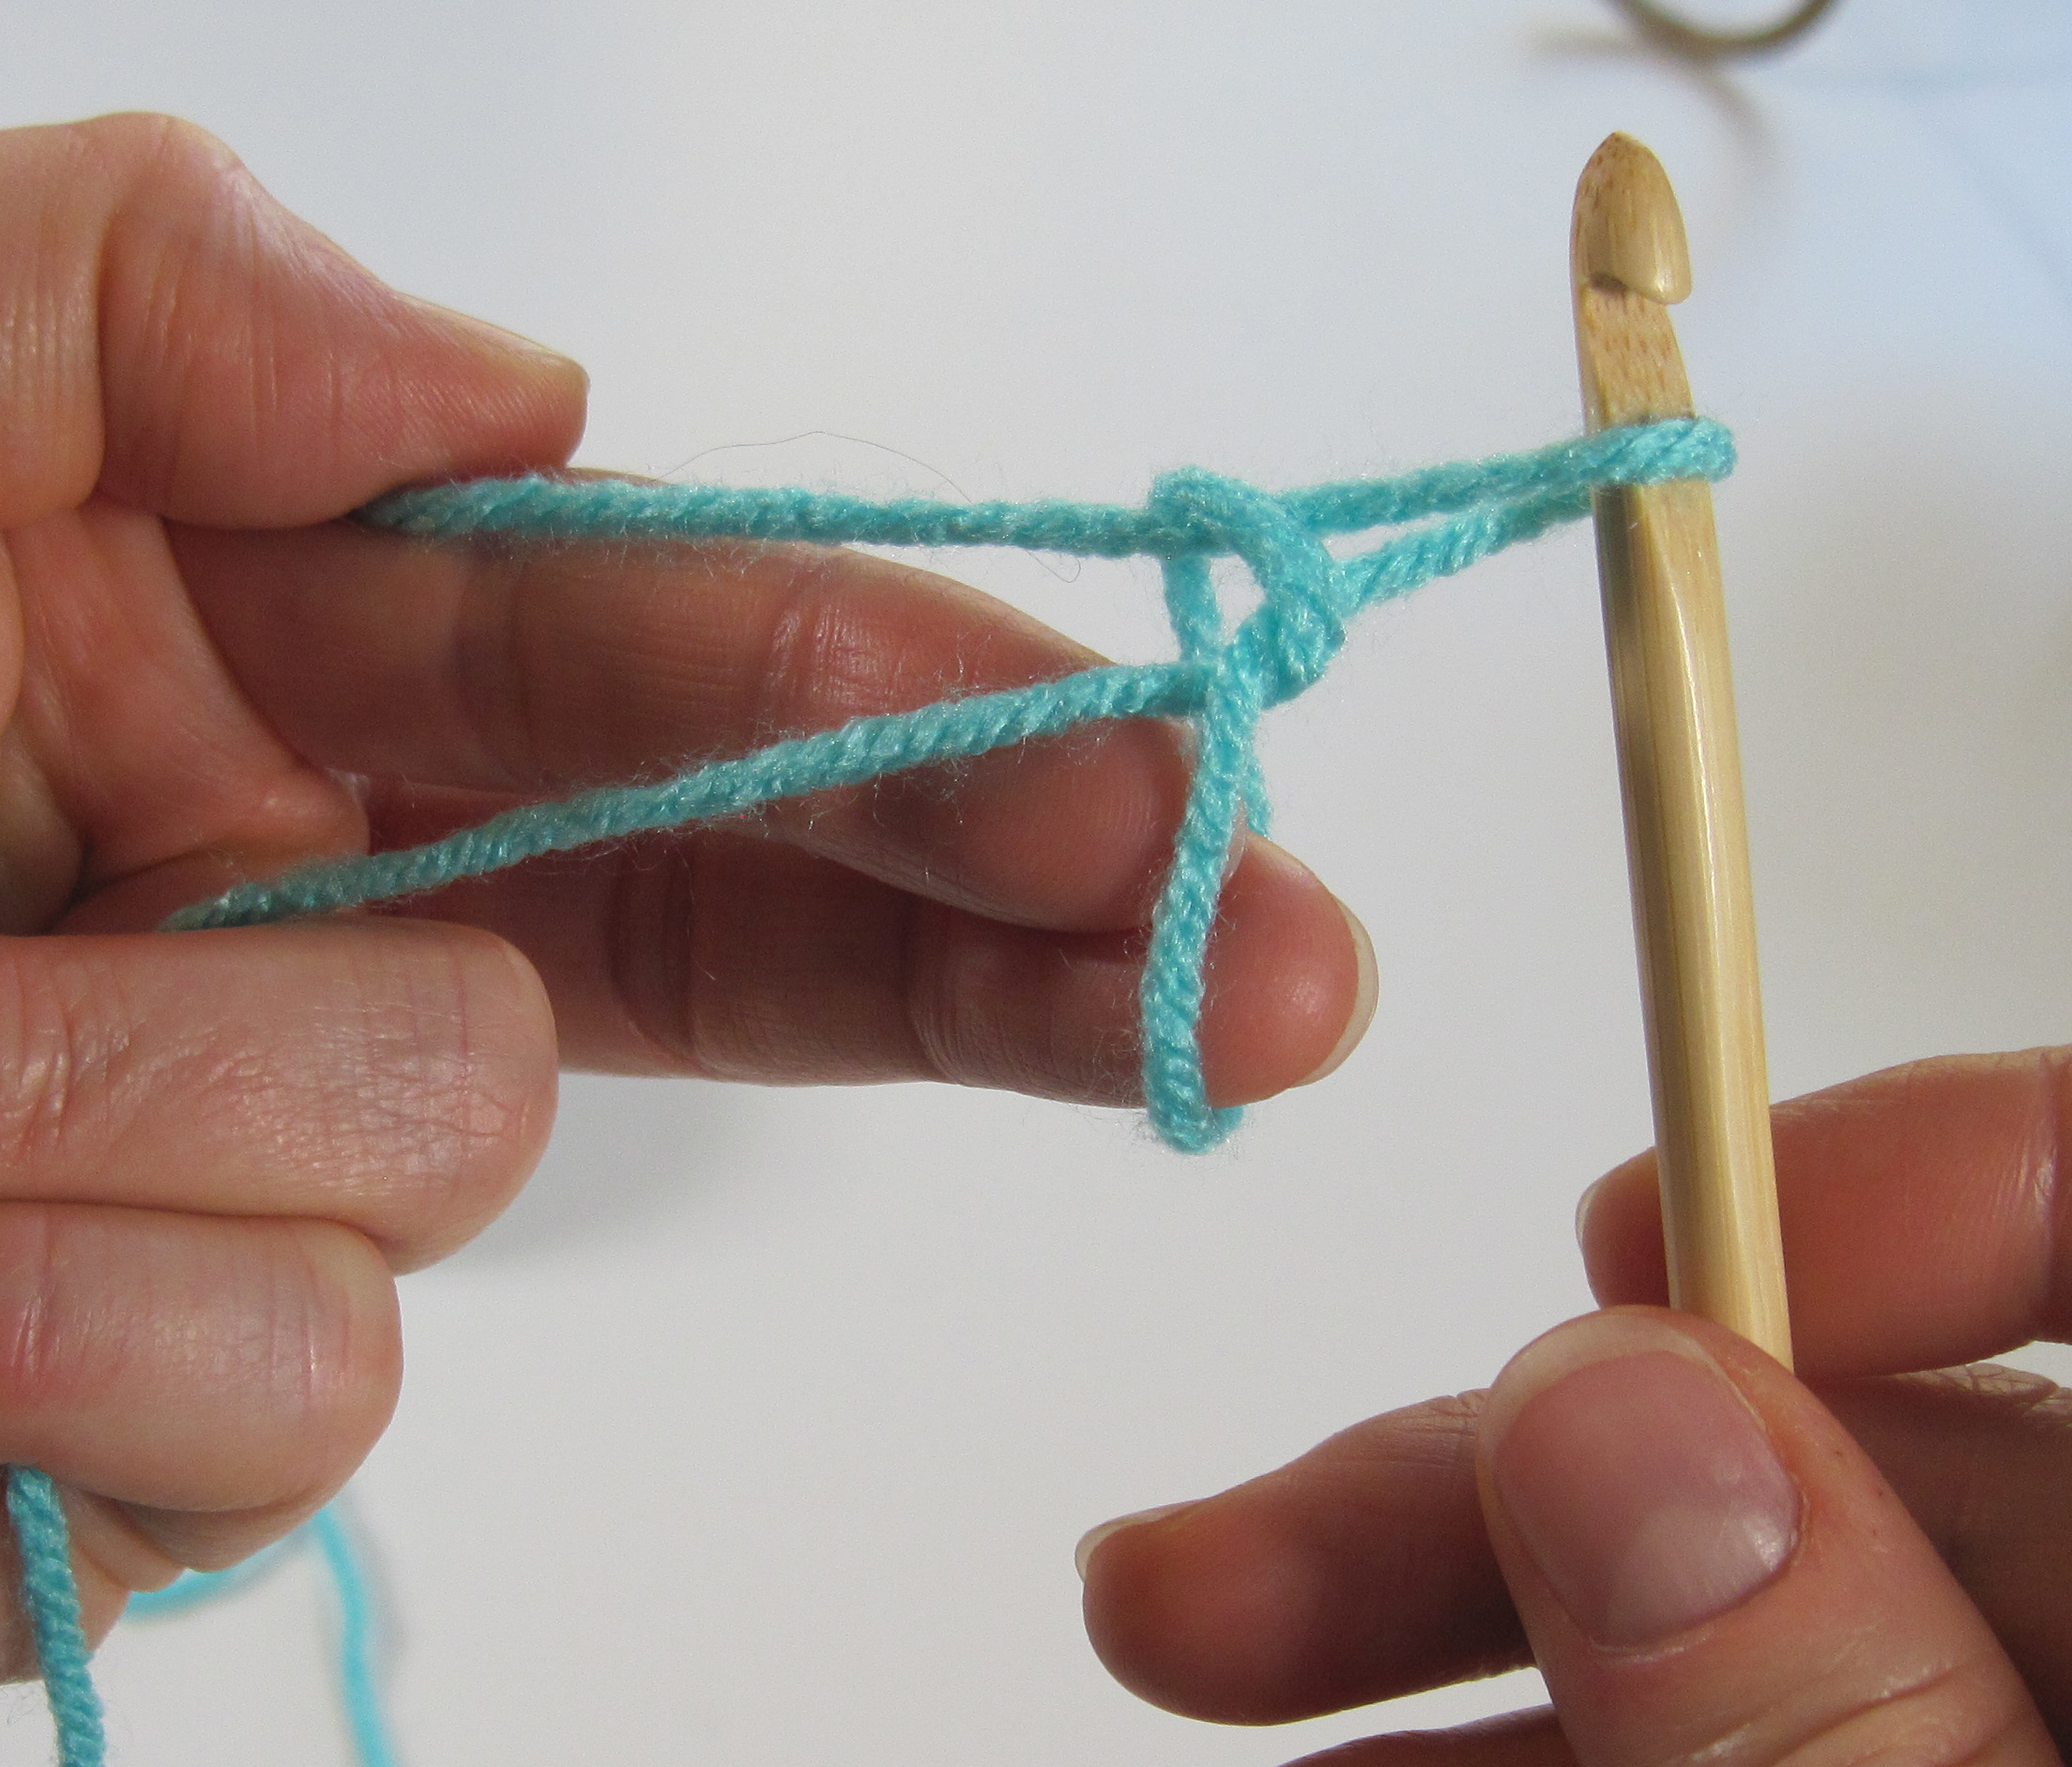
I even went so far as to begin the set-up for crochet surgery. In this case I used some size 3 crochet cotton thread and a blunt yarn needle.

5 - Running safety line thru sts

I carefully wove the thread into the base of each stitch of my chosen row. The idea being once I had secured that row I could then cut the yarn on the previous row and un-ravel it or otherwise remove it.

If you decide to do surgery on your crochet this is the basic approach. If I had continued along this line with this project I would have left a lengthy tail at both ends of my secured row when removing the previous row.

Then I would have used some of the yarn in the remaining ball of yarn to crochet a chain that captured the base of each of my secured stitches and created bridges between them where needed. After that it is just a matter of treating that chain like a normal crochet foundation and crocheting any additional stitches off of it for the neckline of the shawl.

6 - Safety line in place

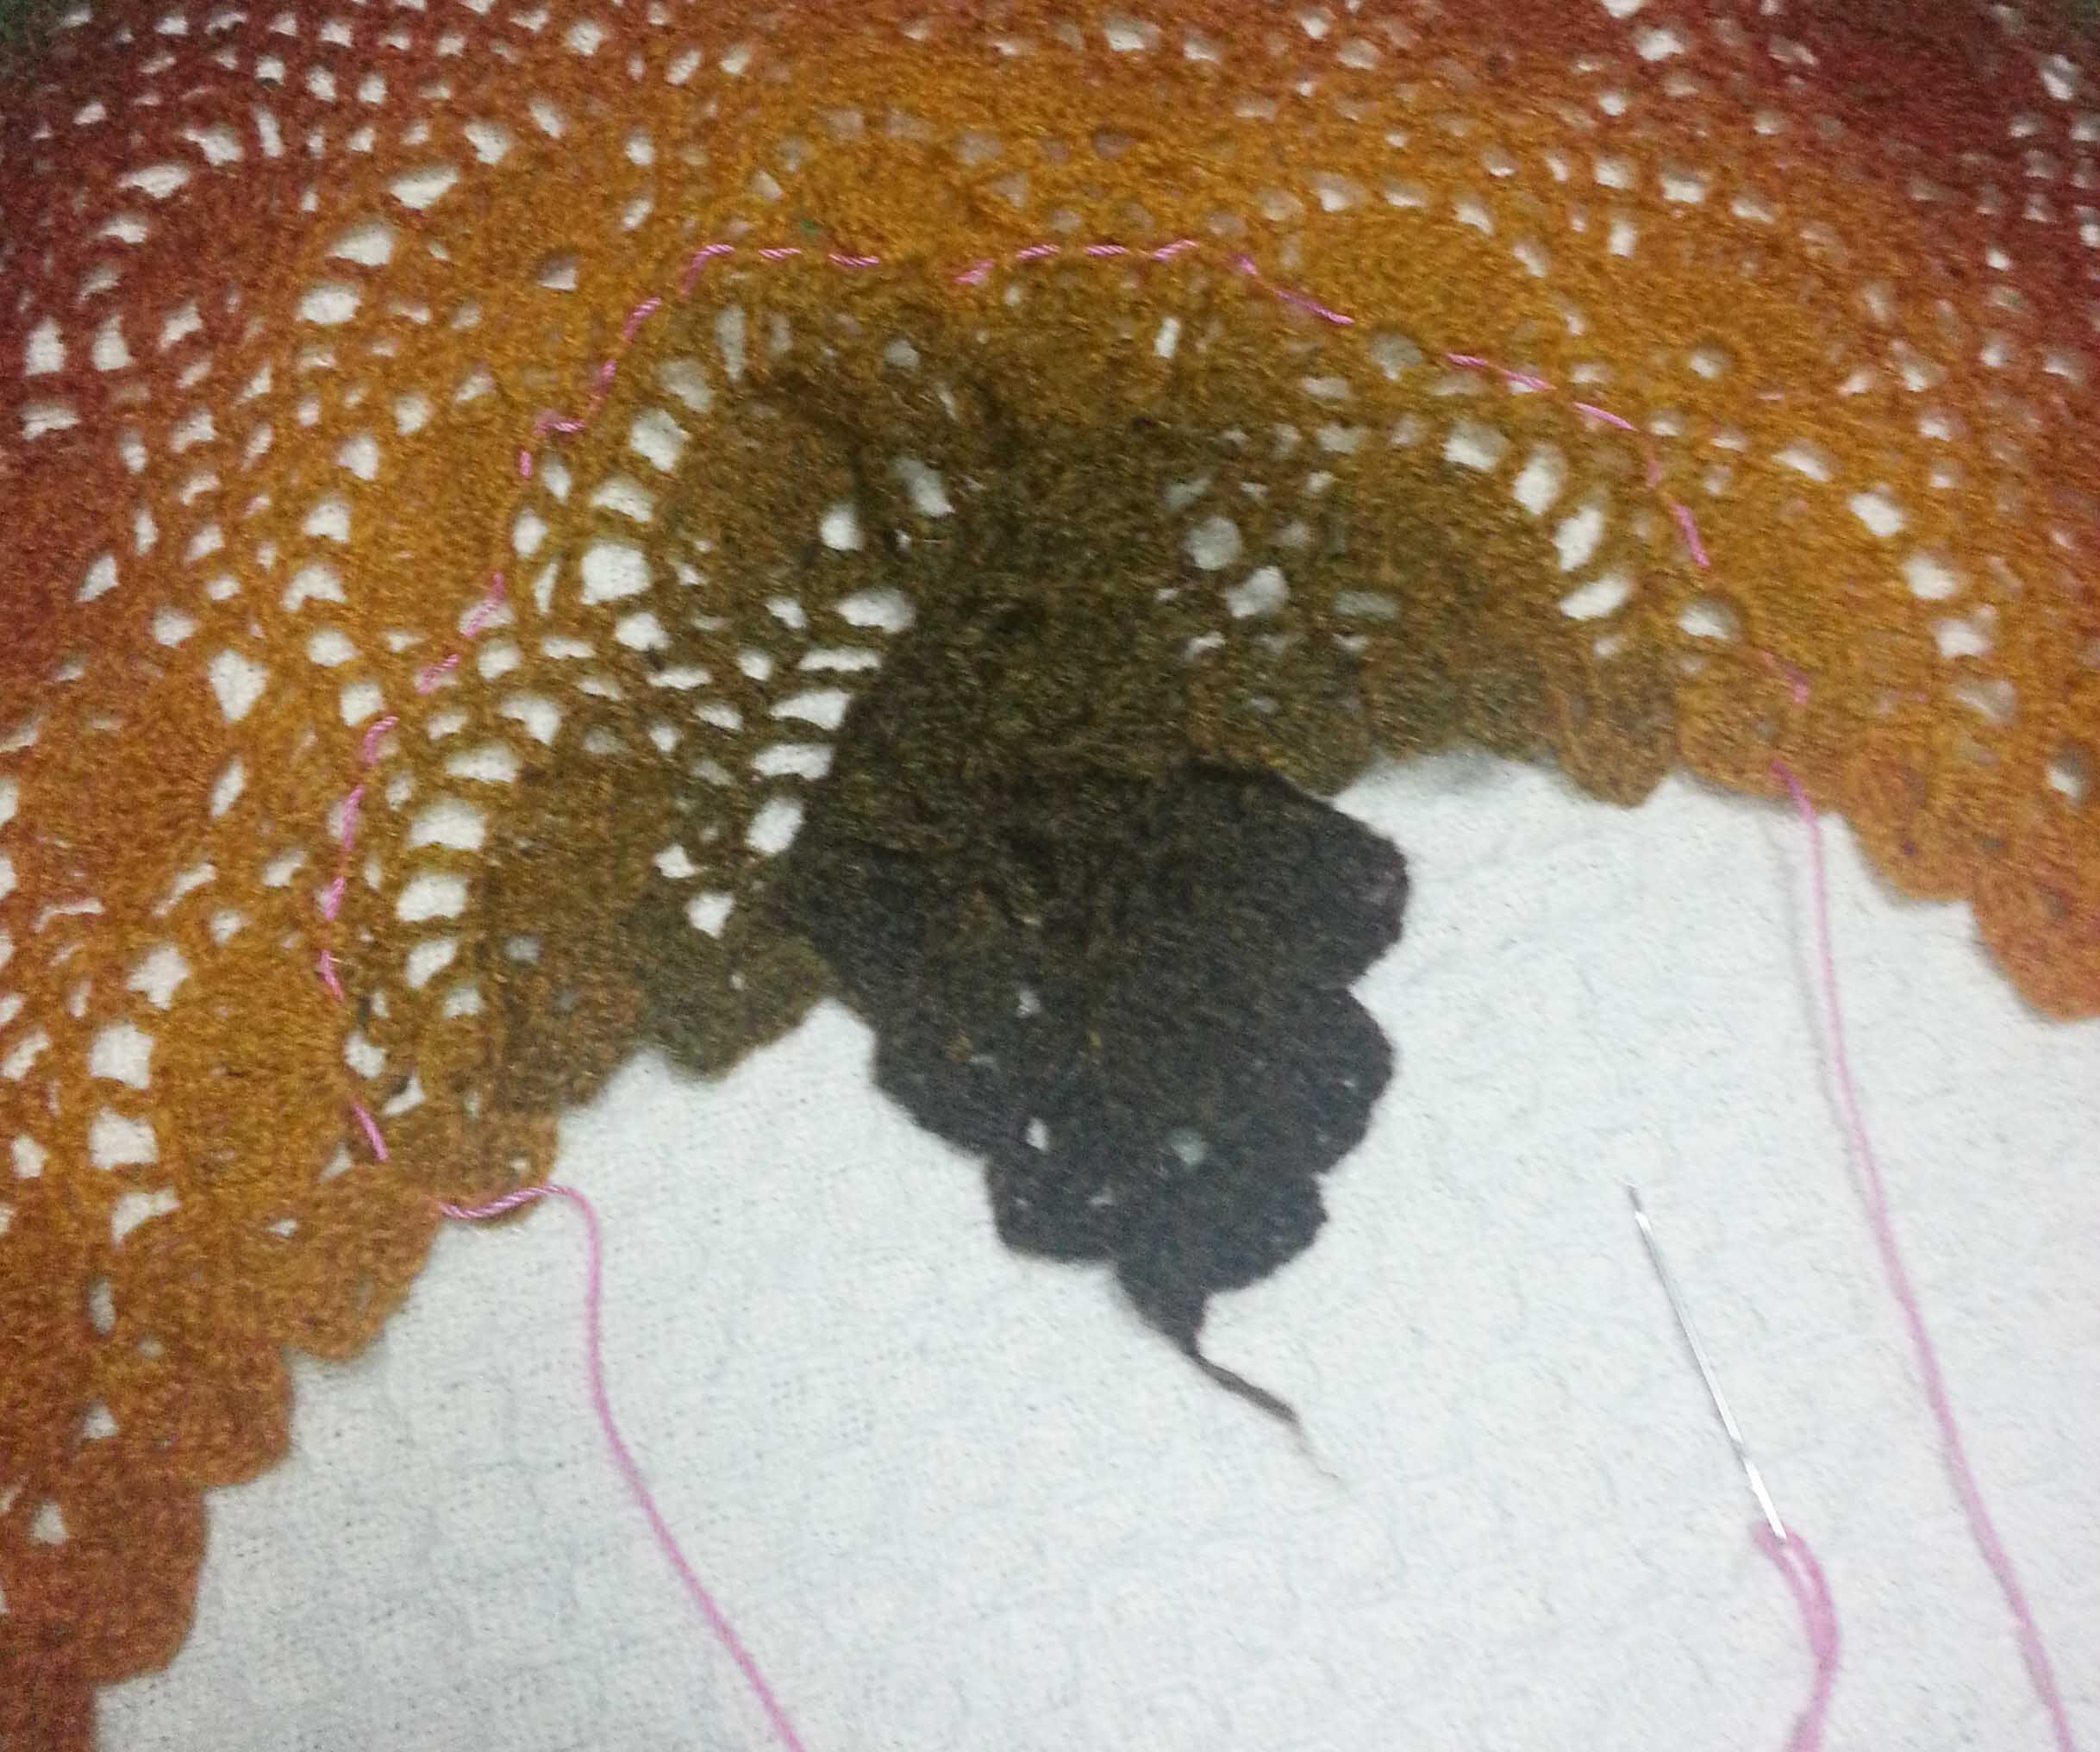
Once I had the thread in place though I kept looking at the project and was concerned that the finished object would not work for Maven. I wanted her to be happy with whatever I came up with and it really didn’t look like this would fit the bill.

7 - Partial Row

What about frogging it?  The last row on the project was un-finished, so I looked at it to see how difficult it would be to un-ravel. It came apart easier than I had expected. I realized that frogging the project and returning the yarn to Maven was a real possibility.

I hadn’t even tried the conditioner or de-tangling spray yet. So I began to very carefully pull the stitches apart and wind up the yarn as I went.

8 - Broken Yarn and crochet hook

Yarn wrap for broken ends

Early on there was a break in the yarn, so I folded the ends together and used a long slip knot to secure them. That way when Maven goes to work with the yarn again the color gradients won’t be interrupted.

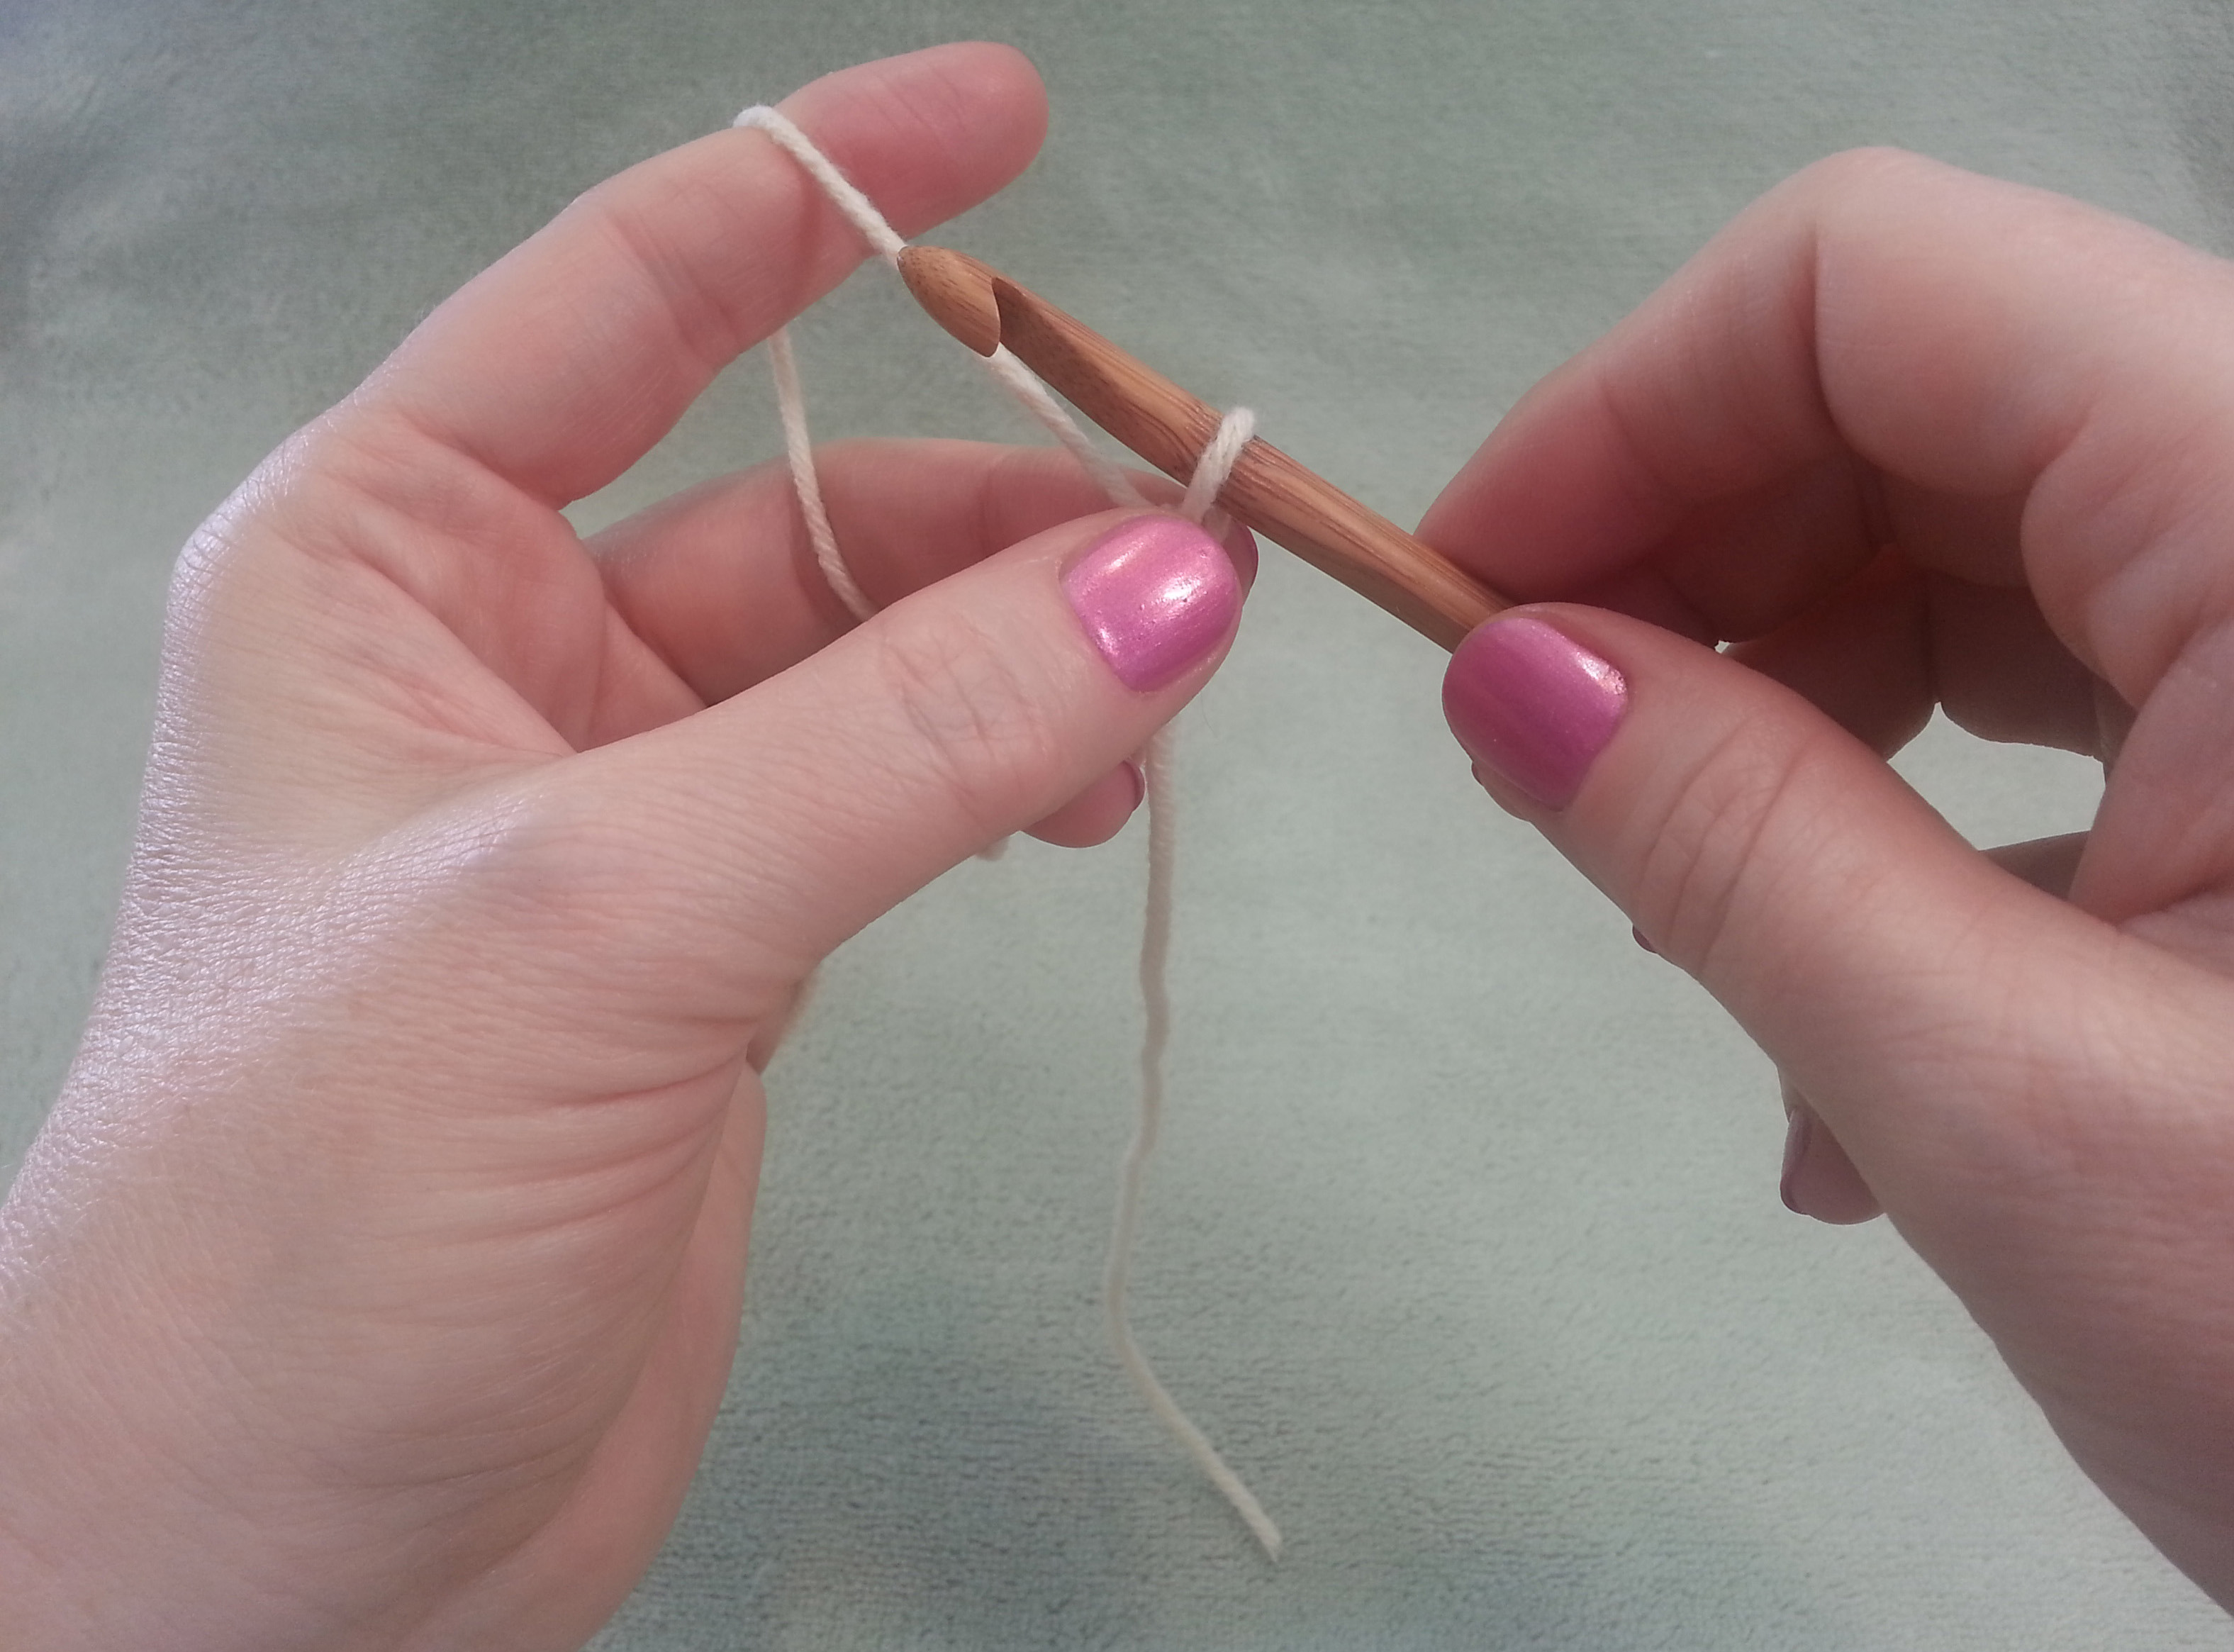
One of the tricks when un-raveling a fussy yarn like this: take it slowly, one stitch at a time. I occasionally used a small crochet hook to hold the top of a stitch open as I gently persuaded the yarn to release. Other times I pinched the base of that top loop between my thumb nail and fore finger.

9 - Almost done Frogging

Whenever I ran into a spot that wouldn’t come free I would gently tease the fibers loose. Yes, this takes a bit more time. So only work on frogging a project like this in bits and pieces so that you don’t get impatient.

Now, some of you may be wondering why I could frog this and Maven can’t. I think 2 factors were in play here. Lack of humidity and very cold temperatures. I live on a cold dry mountain, Maven lives at sea-level on the East Coast. It was really cold the day the package arrived, 27F in fact.

If you are trying to un-ravel a project and are having difficulties with the fiber grabbing onto itself, try popping it in your freezer for a bit. A de-humidifier can be helpful too.

10 - Final Ball of Yarn

Now I have turned this project into a big ball of yarn. It’s ready to go back to Maven for her to crochet it into something new.

Working the Whirlwind (Video)

It has been a very interesting week. Today’s post was originally planned for Tuesday, then Friday, and finally I am getting it all together for an early Saturday morning post.

Whirlwind Square - M2H Designs

This one isn’t a lot of reading. Just wanted to direct you to my new video on crocheting the first 12 rounds of my Whirlwind Afghan Square. I ended up needing to make it into 2 videos. You can find Part 1 on my YouTube Channel here:

Whirlwind How-To Part 1

I hope to have Part 2 up in the next couple of days. I have found out it takes a lot more time to edit a video than I had originally anticipated. Really love making these videos though, and I hope you find them helpful. As always I appreciate your feedback, but please remember to be constructive and kind.

Thank you to all of my readers that have been asking for this video and patiently waiting for it. I’ll try not to make you wait as long for Part 2.

For those that haven’t seen it already you can find the written pattern and photo tutorial for the “Whirlwind Afghan Square” on my post: Spirals and Squares.

Playing with Corner to Corner

Last Wednesday was the “Causal Crochet” meet-up at the Longmont Yarn Shoppe. The 3rd Wednesday of every month crocheters can get together from 10:30 a.m. to 12:30 p.m. to crochet and learn new crochet tips and tricks.

C2C projects M2H Designs

At last week’s meeting we started our CAL. We are making a corner to corner scarf to practice the corner-to-corner (C2C) technique.  If you have never tried making corner-to-corner project this is a good starting project that works up fairly quickly. All the crochet skills you need are Chain, Slip Stitch, and Double Crochet.

Corner to corner projects are about the direction the stitches are worked. Projects begin with a single square, following rows of squares are worked on the diagonal with increases until the desired width is reached. Then rows of squares are worked along the diagonal with an increase at one end and decrease at the opposite end until the desired length is reached. Once the desired length is obtained, decreases are worked to square off the final corner.

The C2C Basics Scarf uses 3 different squares made with a ch-3 and 3 dc. Increase, Regular and Decrease Squares.

The first square of the C2C project is basically an Increase square.

Beginning Chain 6
Beginning Chain 6

You start by chaining 6, you will want to keep all your chain stitches relaxed as you will be working back into the actual chains.

First Square completed

The first square is counted as your Row 1 for this pattern.

Beginning Row 2
Beginning Row 2, Ch 6 work in 4th, 5th, & 6th chain stitches from hook.

To begin Row 2 you start with an Increase Square again.

Finished 1st block of Row 2, flip up Row 1 block
Finished 1st square of Row 2, flip up Row 1 square

Once you have made that square, you flip up the first square to work in it’s begining chain 3. Marked in the photo above with yellow dots.

Row 2, Regular Square completed.

The second square for Row 2 is a Regular Square. This involves working a slip stitch, ch 3, dc all in the first chain stitch (first yellow dot on the right), then working a dc in each of the next 2 chains of that same square.

I prefer to crochet all my C2C squares by working into the chains. You can also work the Regular and Decrease squares by working into the space below the Ch-3, but this does give you a very different look to the overall fabric and the edges.

Once you have worked the number of increase rows you want for the size of your project, you will need to start decreasing along one side to keep your rows the same length (working “even”). Sometimes you will create your increase by working on top of the last square in the row and your decrease by not working on top of the last square in the row.

10 - Dec Sq part 1

When you need an actual Decrease square will be when your last square in the previous row ends next to the completed fabric. You will use a ch-3 to get your hook back to the right spot. The solitary yellow dot in the photo above is where you work the connecting slip stitch at the end of the previous row.

Sl st & Ch 3 in first ch of next ch-3.

Your ch-3 will be connected to the first chain of the next ch-3 (marked with 3 yellow dots) with a slip stitch followed by a chain 3.

12 - Dec Sq part 3

You then work the same as you would for a Regular Square. Continue working regular squares in the chain-3s marked with yellow dots.

Your next “even” row will begin like Row 2, with an Increase square, but will end with a square worked into the ch-3 of the next to last square of the previous row.

Beginning Decreases for 2nd Corner

Once you’ve crocheted the “even” rows to the length you want your project you need to make your second corner by decreasing at both ends of  each row. The red square in the above photo is where the last square is worked for that row.

14- Corner Dec R2

Next to last row of corner decrease.

15 - Corner Dec Final Sq

Final square for corner decrease, the last sl st is worked into the chain indicated with a blue dot in the above photo.

Now you are ready to make your own C2C project. Be sure to read thru the pattern thoroughly before starting, and refer to the tutorial above if you get stuck.

C2C Basics Scarf

Designed by Andee Graves

Skill level:       Easy

Finished Size:

Approximately 6”wide x 48” long

Materials:

Yarn

Ella Rae Seasons (76% Acrylic, 14% Wool, 10% Polymide; 3.52 oz/100g, 219 yds/200m) 1 ball

Hook

J-10 / 6mm

Notions

Yarn/tapestry needle

Stitch markers

Gauge

5 squares = 4 inches

Abbreviations/Special Stitches

Increase Square: Ch 6, dc in 4th ch from hook, dc in next 2 chs

Decrease Square: Ch 3, (sl st, ch 3, dc) in top of ch-3 of next square, dc in next 2 chs of same ch-3.

Regular Square: (Sl st, ch 3, dc) in top of ch-3 of next square, dc in next 2 chs of same ch-3.

Pattern Notes:

When working into chain stitches go under 2 strands of yarn.

Your beginning tail will help you identify the bottom right hand (or left hand) corner of your scarf when you begin working even rows. It is also helpful to mark the bottom (first) end of your scarf with a stitch marker.

Instructions

INCREASING FOR FIRST CORNER

Row 1/First Square: Ch 6, dc in 4th ch from hook, dc in next 2 chs. [1 ch-3, 3 dc]

Row 2: Ch 6, dc in 4th ch from hook, dc in next 2 chs, flip work up to (sl st, ch 3, dc) in top of ch-3 of 1st square, dc in next 2 chs of same ch-3. [2 ch-3, 6 dc {2 squares}]

Row 3: Ch 6, dc in 4th ch from hook, dc in next 2 chs, flip work up to* (sl st, ch 3, dc) in top of ch-3 of next square, dc in next 2 chs of same ch-3*; Repeat from * to * once. [3 ch-3, 9 dc {3 squares}]

Row 4: Ch 6, dc in 4th ch from hook, dc in next 2 chs, flip work up to* (sl st, ch 3, dc) in top of ch-3 of next square, dc in next 2 chs of same ch-3*; Repeat from * to * until work in ch-3 sp of last square in previous row. [4 ch-3, 12 dc {4 squares}]

Rows 5-7: Repeat Row 4. Count at end of Row 7  [7 ch-3 sp, 21 dc {7 squares}]

WORKING EVEN ROWS

Row 8: Ch 3, flip work up, *(sl st, ch 3, dc) in top of ch-3 of first square, dc in next 2 chs of same ch-3*; Repeat from * to * until work in ch-3 of last square in previous row.

Row 9: Ch 6, dc in 4th ch from hook, dc in next 2 chs, turn work to* (sl st, ch 3, dc) in top of ch-3 of next square, dc in next 2 chs of same ch-3*; Repeat from * to * until work in ch-3 of next to last square in previous row, sl st in top of ch-3 of last square in previous row. [7 ch-3 sp, 21 dc {7 squares}]

Rows 10 – 60: Alternate repeating Row 8 and Row 9.

DECREASING FOR SECOND CORNER

Row 61: Ch 3, turn, (sl st, ch 3, dc) in top of ch-3 of first square, dc in next 2 chs of same ch-3*; Repeat from * to * until work in ch-3 of next to last square in previous row, sl st in top of ch-3 of last square in previous row. [7 ch-3 sp, 18 dc {6 squares}]

Rows 62 – 66: Repeat Row 61.

Finishing

Fasten off, Weave in tails and block if desired.

A new look and more

I had a birthday last week, it wasn’t a surprise since it shows up like clock-work on the same day every year. Though I am of the opinion that the years have gotten significantly shorter between birthdays lately.

This past year has been marked with events that have really woken me up and made me very aware that it’s time to do the things I’ve always wanted to do. On that note I decided to do something that I have thought about for over 2 years.

Andee 102015 web

The Friday before my birthday I had my hair stylist put big chunks of bright pink and purple all over the top of my head. I really love it. It’s a freedom I thought I would never allow myself. I’ve spent so much of my adult life pretending to be well-behaved and really somewhat boring. I have been chipping away at that image for the past 5 years, and those of you that are close friends know my true outrageous nature.

C2C projects M2H Designs

I am also challenging myself with learning new things in crochet.  Amazingly enough in all my years crocheting I had never crocheted a corner-to-corner project, though I had seen lots of them. This past July I decided it was time to learn this technique and now I’m sharing that excitement with fellow crocheters. Tomorrow (October 21st) during the “Causal Crochet” get together at the Longmont Yarn Shoppe we are going to be starting a Crochet-Along (CAL). I’m going to be demonstrating working a Corner-To-Corner scarf.

There are lots of other big things that I am working away on the next couple of months, so keep dropping by here at the blog to learn what I’m up to.


I Love Yarn Day

Head and Heart full of Yarn

Saturday October 17th is “I Love Yarn Day”. This is a day that is very aptly named for the life I lead. Of course, that is sort of my day everyday, since a love of all things yarn is what put my feet on this journey as a designer and teacher.

ILYD-2015_instagram1_200x200

I was thrilled that the theme this year is “Stitch it Forward”, which is all about teaching others how to craft with yarn.

Playing and Crocheting w Andee

Very appropriate as I want to introduce you to my latest teaching tool. My YouTube Channel. I’ll be doing a series of videos titled “Playing and Crocheting with Andee”. The first 2 videos are now available and I plan to be adding to them frequently. I’ll be announcing here on the blog (and on my Facebook page and Twitter feed) whenever I have a new video up. Next month you will also be able to find a directory of my videos and the links to them on my “YouTube Channel” page here on the blog.

The first video is a tutorial on working the Adjustable Slip Knot.

The second video is a tutorial on making the Foundation Single Crochet.

I hope you have a wonderful “I Love Yarn Day” and hopefully an opportunity to teach someone else the love of yarn.

Spirals and Squares

Fire Pit

************

October 29, 2015: Hello dear readers and new visitors just a little update to this post.

My Whirlwind Afghan Square is block #22 in the 2015 Moogly Afghan CAL.

If you hadn’t heard about the Moogly Afghan CAL it’s not too late to join the fun. You can hop on over to Mooglyblog.com to get all the details and see Tamara’s interpretation of my Whirlwind.

Thank you so much to Elke Wellens for providing a Dutch Translation of this pattern on her blog you can find her blog here.

Het Nederlandse patroon, vertaald door HET HAAKBEEST, kun je hier vinden. 

Check back on the blog next Tuesday, November 3, 2015. I’ll have the link to my YouTube video that will demonstrate how to crochet the first 12 rounds of this square.

************

Yesterday was my 52nd birthday and I celebrated by spending most of my day goofing off, especially in the evening with my boys.  We built a fire in our outdoor fire pit and roasted hotdogs and marshmallows like we were camping out. Then I opened my cards and presents by firelight.

Today I’m continuing the celebration by sharing a new design here on the blog for all my lovely readers. This one is a little more complex than I usually share. In fact, one might call it a skill building pattern.

After all, we are celebrating my birthday so this pattern is going to be about many of the things I love in crochet. It uses a center-out construction, one of my favorite styles of design as the outside edges are all the tops of your stitches. It is also constructed round-to-square, which I find visually interesting. And of course, Spirals.

2 hands logo small

I love Spirals. You might be able to tell that just looking at my logo. I find them fun and intriguing. When I was in massage school I was very happy when I learnt that spirals are an common symbol for healing. Which is why I choose to use them in my logo.

Back in 2008, when I first became interested in free form crochet, I started exploring creating spirals in my crochet. Suddenly I was seeing spirals in so many of the crochet designs being published at that time.

Some of the instructions I found for working spirals were a bit wishy washy, which is more than fine for freeform work, but not so great for writing a pattern that others would want to replicate and get the same result. Thus my mathematical brain decided to enter the party.

Spirals are related to circles and circular geometries are always fun for me. Fortunately for those of you that might be a little math-adverse, you don’t have to understand all the numbers behind this design in order to crochet it.

One of the things I wanted to do was come up with a way to make working spirals easy for anyone to do. Especially when you are working with multi-arm spirals. For this pattern I started with a 4 armed spiral in the center this creates that round-to-square progression that I also like. I used the half-double crochet (hdc) stitch for my spirals because it takes 8 hdc to create a flat full circle which helps me take the circular spiral to a 4 cornered square.

When working spirals you need to work in continuous rounds.  This is generally the method of construction used for amigurumi and hats because it allows for a seamless appearance. That does mean that it can be easy to lose track of which round you are working on and if you have reached the end of your round. The solution for this is to use stitch markers.

8 Stitch markers

For the construction of the first 8 rounds of this design I used 8 stitch markers. Having the 3 colors is really helpful. I love my Clover Locking Stitch Markers, but if you don’t happen to have any like that on hand you can use paper clips or coil less safety pins. Some folks like to use a spare bit of yarn for a stitch marker, but I find those tend to get pulled out of my work too easily.

First 5 rounds w Markers

This photo shows the first 5 rounds of my square completed and the placement of the stitch markers. The large yellow marker is marking the last stitch of the full round, as well as the last stitch of that section of color and the increase point. The other orange markers are marking the last stitch of that section of color and the increase point. The green markers are marking the first increase point in the various color sections. Whatever type of stitch markers you use you need ones that allow you to distinguish between the end of round/increase (1), end of color section/increase (3) and the first increase in each color section(4).

Whirlwind Square - M2H Designs

Whirlwind Afghan Square

Designed by Andee Graves

Skill level:     Intermediate

Finished Size:

12” square

Materials:

Yarn

Worsted wt (Sample uses Lion Brand Yarns “Heartland” 100% Acrylic (5 oz/142g, 251 yd/230 m)

I picked the colors of October up here on my mountain, but you can choose any 5 colors that you like together. Alternating light and dark will make the spiral in the center stand out more.

Color A: #169 Shenandoah (sample used approximately 8 yards)

Color B: #180 Kings Canyon (sample used approximately 12 yards)

Color C: #158 Yellowstone (sample used approximately 10 yards)

Color D: #173 Everglades (sample used approximately 10 yards)

Color E: #124 Big Bend (sample used approximately 9 yards)

Hook

I / 5.5mm

Notions

Yarn/tapestry needle

8 Stitch markers in 3 colors (1 in first color, 3 in next color, 4 in last color)

Gauge

First 5 rounds of pattern = 4” in diameter

Abbreviations/Special Stitches

PM – Place stitch marker

Standing Single Crochet – make slip knot in yarn and place loop snugly on shaft of hook, insert hook into indicated st, yo, pull up a loop, yo, pull thru both loops on hook.

Standing Double Crochet – make slip knot in yarn and place loop snugly on shaft of hook, yo and insert hook into indicated st, yo, pull up a loop, (yo, pull thru 2 loops on hook) twice.

Pattern Notes:

Start square with an adjustable slip knot. Beginning tail tightens the loop on the hook. If you don’t know how to do an adjustable slip knot you can see a tutorial on my blog here, or watch this video on my YouTube channel.

First 9 rounds use 4 colors. Each color is 1/4 of the total stitches in the round, you will need to insert your hook back into the dropped loop as you come to the new color, snug that loop up to the shaft of your hook and begin working the stitches as instructed in the new color. Follow instructions for using stitch markers so you don’t lose your place.

Color 1 of stitch markers is used to mark last stitch of entire round as well as last stitch/increase point of that color section.

Color 2 of stitch markers is used to mark the other 3 last stitch/increase point of color sections.

Color 3 of stitch markers is used to mark the first increase point in each color section.

When working the first 9 rounds move stitch markers up to 2nd stitch worked in each increase point.

When ending Round 9, the 2nd sl st is a tight one for final “step-down” of spirals, you will not be working into this stitch in Round 10.

For concentric rounds where changing colors attach yarn with a standing stitch.

If you have an easier time understanding a video then reading a pattern, visit my YouTube Channel to watch:

Whirlwind How-to Part 1 and Whirlwind How-to Part 2

Instructions

Rnd 1: Starting with color A make an adjustable slip knot, ch 2, (sc, hdc) in 2nd ch from hook, pull up a long loop and remove hook, with color B *insert hook in center/first ch of round, pull up a loop on hook, ch 1, (sc, hdc) in same center/ch, pull up a long loop and remove hook,* ; Repeat from * to * with Color C and D. PM in each hdc w/end of color/round markers (placing single color marker in hdc of Color D), PM in each sc with first increase markers. [4 sc, 4 hdc]

Rnd 2: *2 hdc in next 2 sts, move st marker to 2nd st worked in each st, pull up long loop and remove hook**, insert hook in next color*; Repeat from * to * 2 times; Repeat from * to ** once. [16 hdc]

Rnd 3: *(Hdc in next st, 2 hdc in marked st, move st marker to 2nd st worked) 2 times, pull up long loop and remove hook, insert hook in next color*; Repeat from * to * 2 times; Repeat from * to ** once. [24 hdc]

Rnds 4 – 8: *(1 hdc in each unmarked st, 2 hdc in marked st, move st marker to 2nd st worked in marked st) 2 times, pull up long loop and remove hook,** insert hook in next color*; Repeat from * to * 2 times; Repeat from * to ** once. Stitch count for end of Rnd 8 [64 hdc]

Rnd 9: *hdc in next 7 sts, 2 hdc in next marked st, move st marker to 2nd st worked in marked st, hdc next 6 sts, sc next st, sl st next st, ** insert hook in next color*; Repeat from * to * 2 times; Repeat from * to ** once. Make 1 additional sl st in next st for each color, fasten off yarn, remove end of round markers. [8 sl st, 4 sc, 60 hdc]

End of Rnd 9

Rnd 10: Attach color E with a standing sc along any side in same st as the second slip st of any color section from Rnd 9, sc next st, *Hdc next 3 sts, dc next 2 sts, 2 dc next st, (Tr, ch 1, Tr) in marked st, 2 dc next st, dc next 2 sts, hdc next 3 sts**, sc next 4 sts*; Repeat from * to * 2 times; Repeat from * to ** once, sc next 2 sts, sl st to first sc of round. Fasten off current color. Move increase st markers to ch-1 sp. [16 sc, 24 hdc, 32 dc, 8 tr, 4 ch-1 sps]

Rnd 11: Attach new color along any side in 11th st from marked ch-1 sp in direction of work, with a standing sc, sc next 2 sts,*hdc next 3 sts, dc next 3 sts, 2 dc next st, (Tr, ch 2, Tr) in marked ch-1 sp, 2 dc next st, dc next 3 sts, hdc next 3 sts**, sc next 6 sts*; Repeat from * to * 2 times; Repeat from * to ** once, sc next 3 sts, sl st to first sc of round. Fasten off current color. Move up increase st markers to ch-2 sps at corners. [24 sc, 24 hdc, 40 dc, 8 tr, 4 ch-2 sps]

Rnd 12: Attach new color along any side in 11th st from marked ch-2 sp in direction of work, with a standing dc, *dc in each st until reach next marked ch-2 sp, (2 dc, ch 2, 2 dc) in marked ch-2 sp*; Repeat from * to * 3 times, dc in each st until reach beginning of Round, sl st to first dc. Fasten off current color. Move increase st markers to ch-2 sps at corners. [112 dc, 4 ch-2 sps]

Rnds 13 – 16: Repeat instructions from Rnd 12. Fasten off. Stitch count at end of Rnd 16 [176 dc, 4 ch-2 sps]

Finishing

Weave in tails and block.

A big Thank You to the folks at Lion Brand Yarn for supplying the yarn for this design. I really love the colors that their Heartland yarn comes in. Hop on over to their website to check it our for yourself.

Something Simple yet Beautiful

I’ve blogged before about using pretty beads and yarns to create simple beaded chains for necklaces and bracelets.

Recently I realized that my favorite beaded necklace had taken quite a beating and it was time to recycle those beads into a new necklace.

First I removed the beads from the old necklace. This wasn’t as simple as unraveling the old chain because the yarn had slightly felted to itself. I spent an evening gently pulling it apart and sometimes resorting to scissors. I should have taken a photo of the little pile of beads I ended up with. I was startled that there were so few in what had seemed like a fairly long necklace.

Supplies for beaded chain.

Being that I do not belong to the “less is more” school of thought when it comes to beads, I felt I should add more beads to those that I had used in the old necklace. I took out my bead box and looking at the colors in the yarn picked out additional beads for this project.

Then I needed to string the beads on the yarn in preparation for creating my beaded chain. This is really the longest part of this project. I used my handy-dandy dental floss threader to place the beads on the yarn. The nice big “eye” of the threader makes it super easy to thread the yarn onto this “needle”. And the flexibility of the nylon material helps it contract for getting thru the holes of the beads with the yarn.

20 inches beads strung

I wanted a rather random appearance to the order the beads were strung. Mixing up large and small beads as well as the different colors. I ended up separating out all the beads into 4 different groups to create a sort of patternless pattern while stringing them.

I strung the beads until I had approximately 20 inches of beads on the yarn. I knew I was going to work a beaded chain separated by 2 plain chain stitches. That lead me to calculate that 20 inches of beads would get me to the 60 inch length I wanted. My finished necklace actually came out to nearly 80 inches around.

Now things proceeded much more easily. I moved the beads down the yarn to create a stretch of empty yarn to work with. Then I crocheted 2 chain stitches, pulled up the first bead and made a beaded chain stitch.

Slide bead up close to hook.
Chain 1 and capture bead.

The above images show you the basics of making a beaded chain stitch. These are from another beaded project I taught at the Longmont Yarn Shoppe for our National Crochet Month celebration. You can find the blog post about it here.

3 loops on rock

And this is my simple and beautiful beaded necklace. This is one long loop that I can wrap and wear in a variety of ways.

lariat style on rock

As a Lariat.

Spiral pendant on rock

Using a fastener as a decorative pendant.

Twisted strands w Spiral fastener on rock

Or Twisted with the fastener connecting it. Below is a quick little how-to on creating the above look.

Twisted strands w Spiral fastener how to 1

Fold beaded chain loop in half and insert fastener thru fold.

Twisted strands w Spiral fastener how to 2

Gently twist the strands to create a “rope” look. Place rope around neck and insert fastener to close.

Now it is your turn my dear readers. It only takes about 5 yards (if that) of fingering weight yarn to create a nice long beaded chain. So it’s a great project to use up those bits of yarn we all have accumulated from other projects. Especially nice for those expensive yarns that you don’t what to toss the 10 yards left over.

Gather a variety of quality glass beads in different sizes and colors, just stick to ones that have a decent sized hole and no sharp edges on the hole (cause they will cut thru your yarn). String the beads on your yarn and you are ready to make your own necklace loop.

The lovely Adjustable Slip Knot

Hot Spot Square copyright 2015 M2HDesigns/Andee Graves
Hot Spot Square
copyright 2015 M2HDesigns/Andee Graves

If you have worked one of my hat or motif patterns you may have seen me reference the Adjustable Slip Knot at the beginning of my pattern instructions. I’ve blogged about it before, but I wanted to review it with you today.

I first encountered this technique in a class with Dee Stanziano, but it took me awhile to really understand how I was doing it. Most of my successes came around by happy accident.

The Adjustable slip knot method allows room to work the first round of stitches and yet end up with a snug center. The most important thing to remember: when you’ve made this slip knot correctly the beginning tail tightens the loop around your hook.

Typically when we make a slip knot to start a crochet project we create the working loop (the loop on our hook when we start) from the working yarn (the yarn coming from the ball of yarn). This creates a very stable first chain loop.

An adjustable slip knot creates the working loop from the beginning tail of your yarn. This allows the size of your first chain loop to be adjusted even after working into it with subsequent stitches.

Beg Tail over working yarn web

1. Hold the working yarn across your palm, wrap beginning tail around 2 fingers making an X over the top of the working yarn.

Insert hook under working yarn web

2. Insert hook under both strands of yarn and hook the beginning tail,

Pull up loop under wrkg yarn web

pull up a loop under the working yarn strand.

Sliding knot loop off fingers web

3. Holding the yarn strands, slide the loop off your fingers.

Loop on hook web

4. Holding the beginning tail end and working yarn continue to pull up a loop and gently snug the yarn to create the slip knot.

Round 1 expanded sl knot with labels

Begin working your first stitches according to the pattern. Tip: when working into the first chain loop, work under one of the “legs” of the V to get the best result.  Leave a long enough tail for your first round to expand the slip knot.

Tightening-Tail

Once you’ve finished working into the first chain, gently pull on the beginning tail to tighten the center of your round.

I’ve used this start in a number of the patterns I have here on the blog.

Annetta Square

Hot Spot (Annetta Square #2)

Sparkly Jar Cover (doesn’t specify using the Adjustable Slip Knot, but it’s a lot easier with it)

The Humble Granny Square

Simple Sweetheart (again doesn’t specify it in the directions, but it is how I worked that first round)

Little Snowflake Ornament (this pattern is a stitch diagram only, but that big circle in the middle is your first chain, and it’s much easier to work into if it’s an Adjustable Slip Knot)

Summer Shower Scrubbie

Spiral in a Heart (doesn’t specify in the directions, but again it is how I worked that first round)

Little Bitty Noggin Cap (same as some of the others, the Adjustable Slip Knot isn’t specified, but it is how I worked it)

Pretty Petunia (as above, not specified, but much easier to work the first round using an Adjustable Slip Knot)

So try out the Adjustable Slip Knot for yourself and see how you like it. You may find it becomes your favorite start for a project.

Update: I now have a video on my YouTube channel that shows how to make this slip knot for those of you that find that an easier way to learn. Adjustable Slip Knot Video.

A bit of My History – RSI and Crochet

There are a number of reasons that I started applying my training as a medical massage therapist to my crochet obsession. The main one though is my own experience with repetitive stress injury. When I was working full-time as a massage therapist 16 years ago I came near to causing myself permanent injury.

Repetitive stress injuries are very common in the massage therapy field. The last time I was researching the numbers on longevity for massage therapists I found that most work only a short time in the field. 2-4 years is often the typical life-span of a massage career, not all of them end due to injury, but that is a factor for many of them.

When I was in school at the Boulder College of Massage Therapy one of the things that was emphasized in our training was how to care for ourselves to avoid injury. Of course, my trouble didn’t come from my massage work, it came from crocheting.

I had made an ambitious decision to crochet afghans as gifts for a number of my close friends and family members for Christmas. Once the weather got cold they were particularly enjoyable projects. I would snuggle under the afghan as I was working on it. Unfortunately, the holidays were speedily catching up to me, so I was crocheting every spare hour I could find.

I didn’t realize at the time that I had some very bad habits in the way that I was holding my yarn and hook. Those habits might have gone un-remarked, except I was also crocheting for long stretches of time without taking a break. Now, for any of you that have attended one of my presentations about avoiding injury when crafting, you’ve likely spotted a number of red-flags in the previously described scenario.

One of the reasons that I’ve made it my mission to talk to fiber loving folks about how we craft and how to avoid injury when we are crafting, is because I came so close to losing my beloved crochet craft. In short I hurt myself badly. The pain got to the point that I had difficulty working at my occupation of massage therapy. So of course I went to see a doctor. First thing he said after our initial interview was that I would need to stop crocheting.

I asked if he meant just for a little while. His response was in the negative. His advice was that I should give up crocheting, basically forever. “After all, you are a young woman, and crocheting and knitting are for old ladies.”

Okay, stop laughing, I know you all are envisioning my response to that statement. Especially those of you that have met my rather “salty” side. Needless to say I fired that doctor.

Next I sought out a doctor that dealt with sports medicine. These doctors are trained to look at root causes of injury, so that the activity can continue but in a way that doesn’t cause further injury. Generally this work means improving the mechanics of movements involved in the “sport” of choice. In my case that meant crocheting.

First off, I did need to take a break from crochet, I couldn’t crochet for the entire month of January and the first 2 weeks of February. I was really missing my hooks and yarn. In the meantime my doctor had me doing daily contrast baths on my wrists and forearms everyday that I did massage work.

This involved filling a big pan with cold water and ice, then filling the sink with hot water that wouldn’t scald me. I would submerge my entire forearm, wrist and hand in the ice-cold water for as long as I could tolerate it, about 30 seconds.  Then move to the hot water bath for 30 seconds. I would go back and forth between the 2 temperatures, ending with the cold bath.

I know it might sound like torture, but it actually helped a great deal. You don’t even have to be injured for contrast baths to be helpful.

Holding the Yarn 2
My method for holding the yarn
Holding the Yarn 3
Once yarn is woven thru fingers I can grip my work without strain in my yarn hand.

After I was given the okay to crochet again I worked with my chiropractor to find a way of holding my crochet hook and yarn that wouldn’t stress my wrists and arms.  I also developed better habits in taking breaks when I was crocheting on a project.

4-ModKnfHoldLBL

My hook hold is a bit unusual, I call it a modified knife hold. It reduces the amount of stress on both my wrist and fingers. It took a while to get used to, but has helped me avoid injury for 14 years now. In the photo above I have the end of the hook between my 2nd and 3rd finger. Sometimes I hold it between my 3rd finger and pinkie. Just depends on the size of the hook and the project I am working on.

My boys when little

All this happened many years before I started designing professionally. In the years since that injury I became a mother and added all those fun tasks to an already busy life. For awhile I barely had the time or energy to crochet. Once I had some time for my favorite creative outlet though, I kept up with my better crochet habits.

Even as a designer working on some mad deadlines, I try to be very aware of listening to my body and being sure to take regular breaks. Even if a break is just getting up and putting another load of laundry in the washing machine or making a snack for my kids.

I also try to include stretching exercises in my daily routine, like the hand stretches in my post “Keeping Your Hands Happy”.

If you notice, I say I “try” to do these things. We are all human and often times we have to be experiencing some aches and pains to remind us to keep up with these good habits. That includes me.

If you are starting to have regular pain from your crochet hobby be sure to get help from your healthcare provider. And if they are telling you to give up crochet forever…get a second opinion.