It’s beginning to look like springtime finally. Off the mountain in town a lot of the trees are showing leaves and the flowers are in bloom. Up top though it’s been a slower sense of the season. Yesterday I was at my friend and neighbor V’s house for our weekly crochet and crafting visit.
V’s Garden last Friday
V has a lovely garden and a number of her bulbs were showing off blooms. Best of all to me though was that her lilac bushes are getting leaves and buds. I didn’t get any photos though since the weather got wet and cold. Hopefully the weather will be kind and the lilacs won’t be frozen before blooming and sharing their lovely scent.
Meanwhile we are still getting some cold days and a bit of snow up here on my mountain. We are at 8,400 feet above sea level and V’s house is around 7,000 feet. There is a fairly big difference in the seasons between our houses, and V is a much more talented and dedicated gardener than I am.
Lilacs at Denver Zoo Spring 2012
I need to make a trip to the Denver Zoo with my family soon as the lilacs there are generally in bloom long before the ones up here on the mountain. They have a lot of lilacs on the zoo grounds and I always try to make at least one visit there while they are in bloom.
M2H Designs: Tumbling Leaves Scarf
I decided it’s time to crochet some transitional pieces to add to my wardrobe. It’s been over 4 years since I published my “Tumbling Leaves Scarf”. This is a fun project to crochet for experienced or intrepid intermediate stitchers.
Originally I created this design with a bulky yarn worked with a P size hook, but I wanted to try it in a lighter weight yarn with a smaller hook for a skinny scarf to wear this spring. I picked a ball of Crystal Palace’s “Mochi Plus” that reminded me of my favorite colors of springtime and used an I (5.5mm) hook to crochet with.
I love “Mochi Plus” because it comes in so many lovely color combinations. I enjoy working with and designing with yarns that have long runs of color that blend together and this yarn doesn’t disappoint. My original scarf was 6.5 inches wide and 75 inches long. Using the “Mochi Plus” and the smaller hook this scarf came out 3.5 inches wide and 41 inches long before blocking.
Because of the faux motif design of this scarf I am going to try a different blocking technique with it and will share my results with you later.
If you’d like to make a scarf like this you can purchase the pattern in my Ravelry shop by clicking here.
The pattern includes both US crochet terminology text and charted directions.
In this video I’m using a rather primitive animation technique. I took photos of almost every stitch I made working the swatch above. Then I edited them together with music and instructional text for this 1 1/2 minute long video.
Take a look and see what you think. The text pattern with photo tutorial is in my first “Playing with Triangles” post.
I’m off tomorrow to visit the Marketplace at the Interweave YarnFest and to spend some time with friends from out of town. I’m going to try to behave myself and not purchase too much yarn. But I do know I’ll be coming home with some loose wool fiber to practice my needle-felting with.
Hope everyone has a fabulous weekend, and gets some crochet time in.
This past week has been a busy and fun one. My boys were on Spring Break and we made a quick trip to Kansas to visit some of my family. Got to have a good visit with my Dad and brothers, but the highlight of the trip was taking my niece and her 2 little ones to Kansas City for a fun-filled day at LEGOland, as well as an entertaining dinner at Fritz’s where toy trains deliver your food to your table.
We were supposed to head back to Colorado on Wednesday, but the weather forecast looked like we would end up stranded with highway closures. We stayed an extra day in Topeka and drove home on Thursday. Once we got to Colby, Kansas on Interstate 70 we could see that it had definitely been the right decision. Now we just need to dig out our driveway and deck from the approximately 2.5+ feet of snow that fell here on the mountain.
Our Easter bunny is going to need snow boots to deliver eggs, especially since more snow is expected thru the weekend. I may just be curling up in front of a nice fire in the wood stove and crocheting. I’ve got a couple shawl projects on the hooks and that fits with today’s post.
Recently we had a little math lesson here on the blog for figuring out the yardage for making a triangle shawl. Today I thought I would give you the tools for starting your own triangle shawl. I’m going to walk you thru this pattern, hopefully that will make it easy for even our newer-to-crochet folks to follow.
As I’ve said before, my favorite way to design is using what I call “Small Starts” for a project. To me the first 2-3 rows or rounds of a project are often the most fiddly, so I like to get them out of the way quickly so I can get to the “good” stuff. Nothing makes me happier than being able to write the beginning instructions of a pattern as “Chain 2 work in second chain from hook, . . . ”
For this simple shawl I wanted a pretty scalloped edge along the top as the rows were completed and I wanted the rows to be a simple Zen-like stitch that didn’t require a lot of thought to work on. These types of shawls are terrific relaxing projects to work on watching telly in the evening or for Prayer Shawl group meetings.
One of my favorite Zen-like stitches is the V-stitch. It is simple to make with just enough variety not to become completely boring.
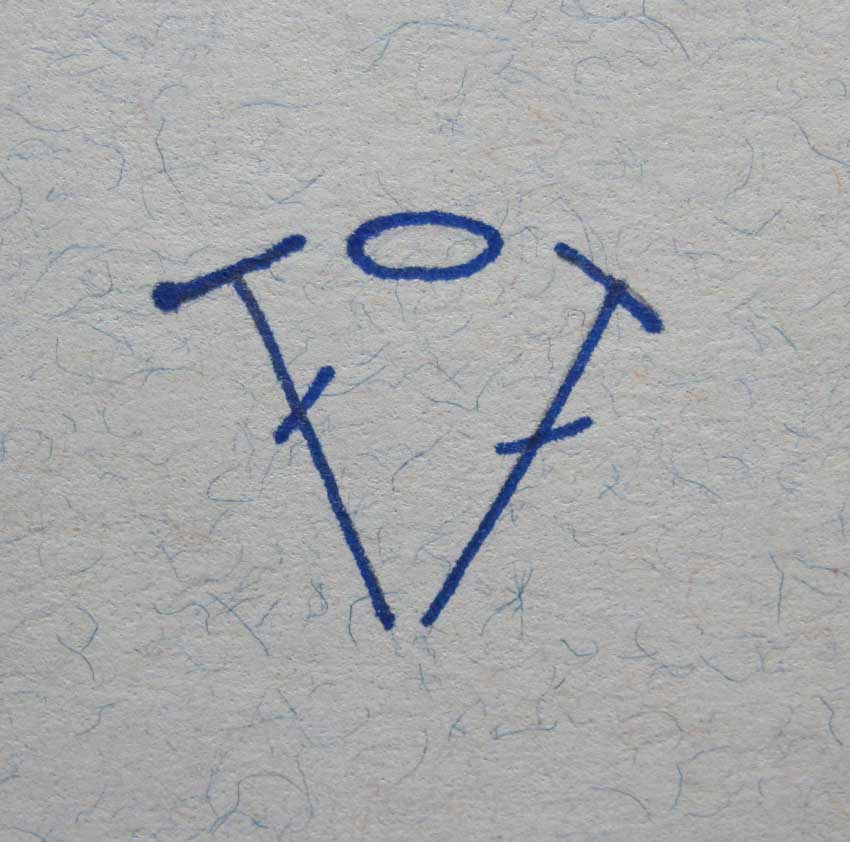
Photo A: Stacked V-Stitches
I’ve used this stitch both in stacked construction and staggered.
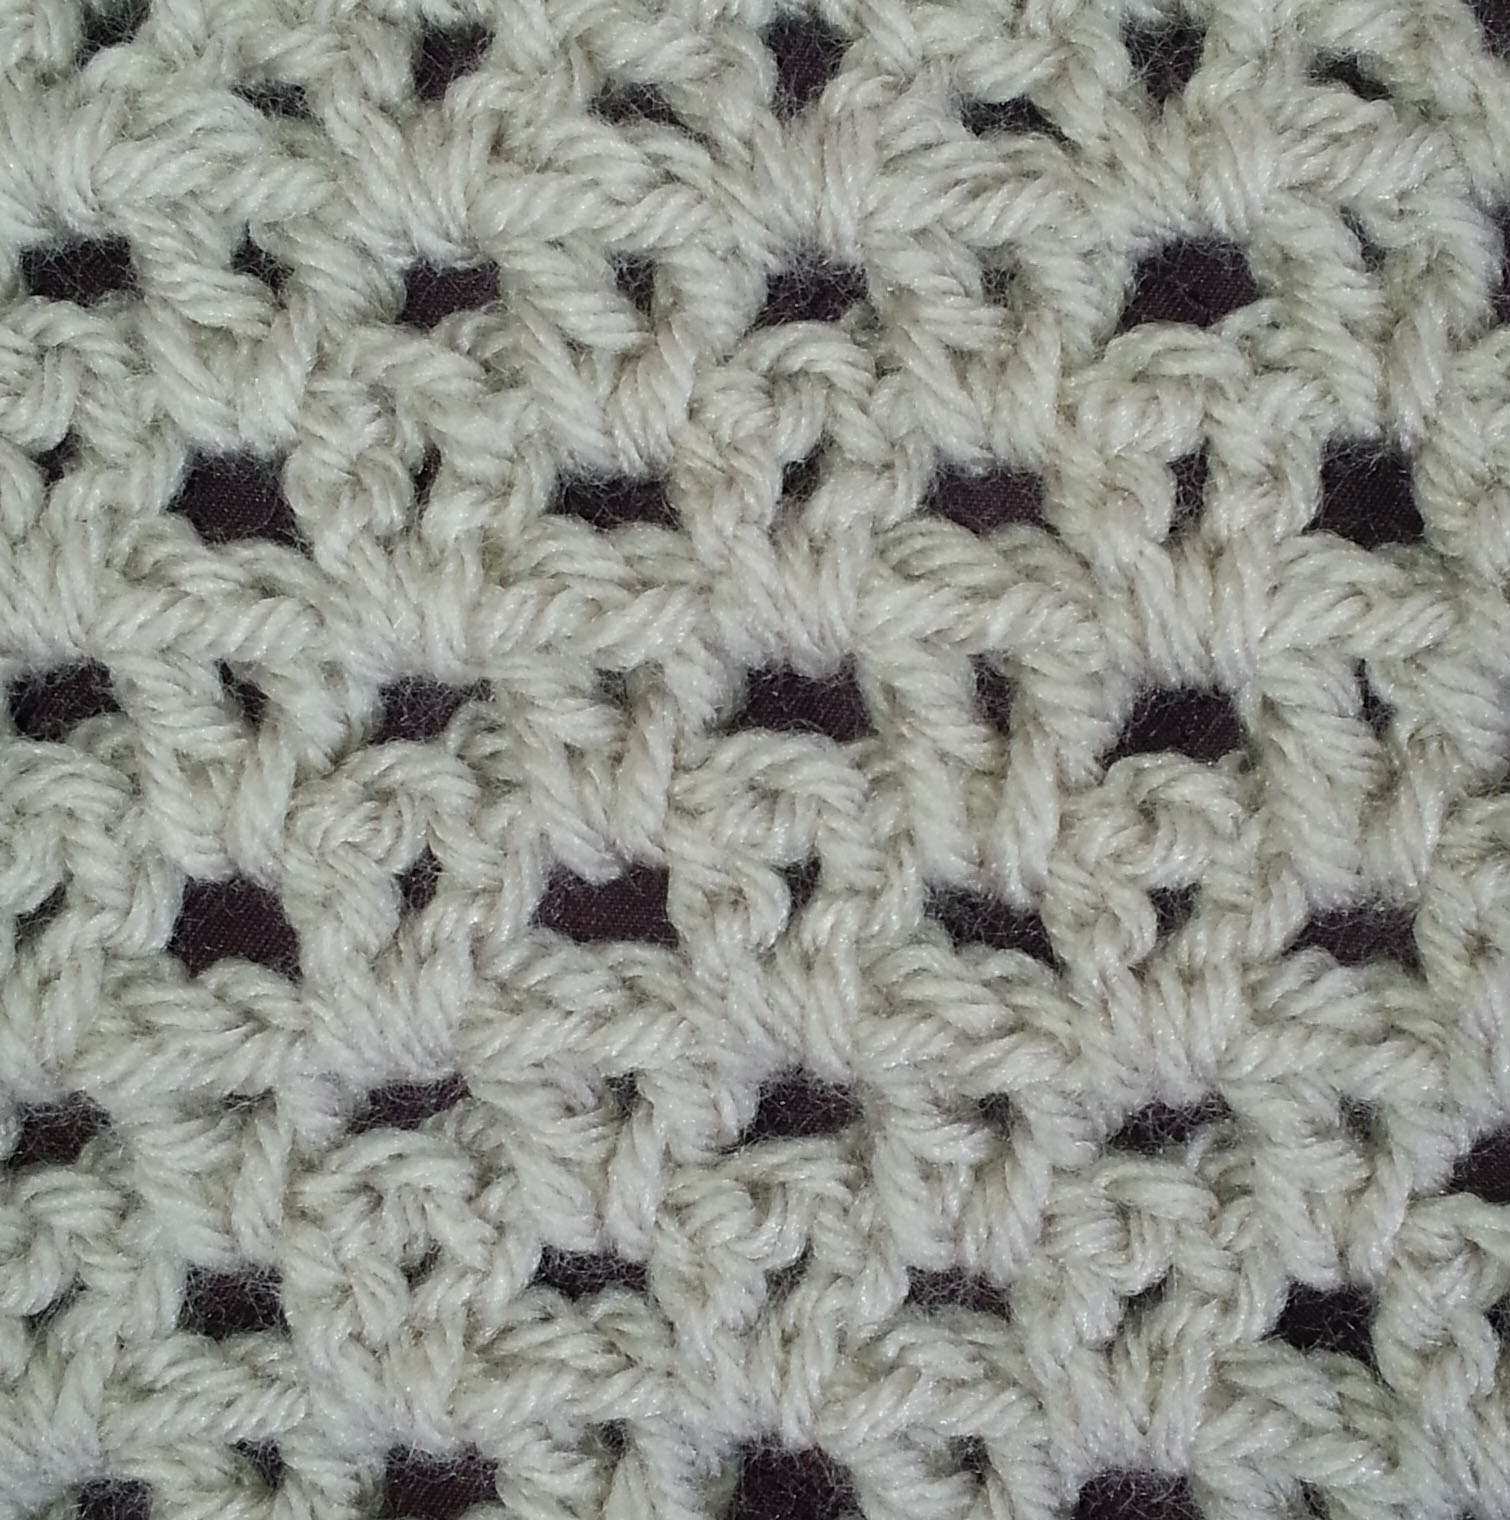
Photo B: Staggered V-Stitches
Now that I knew what stitch I wanted to use it was time to play with constructing the shawl. For my initial project I decided to use Lion Brand’s Vanna’s Choice. It’s a good sturdy acrylic worsted weight and I have it in lots of colors in my stash. I used a J (6mm) hook with this yarn as I wanted to keep my stitches loose.
You can use any weight yarn you want with the size hook that gives you a fabric you like. That might involve a bit of experimenting to decide on the right combination of yarn and hook. Because this shawl is worked from the top center with increases at the center point and at each end of the top edge you can just work as many rows as you like until you reach the size you want, or until you run out of yarn.
After making the swatch above I calculated for my Vanna’s Choice version of the shawl I would need approximately 6 skeins of yarn (870 yards). That would make a shawl that is 60 inches across the top and 30 inches long at the center point. I worked 6 rows of the body stitch pattern and then the border for this swatch to get my numbers.
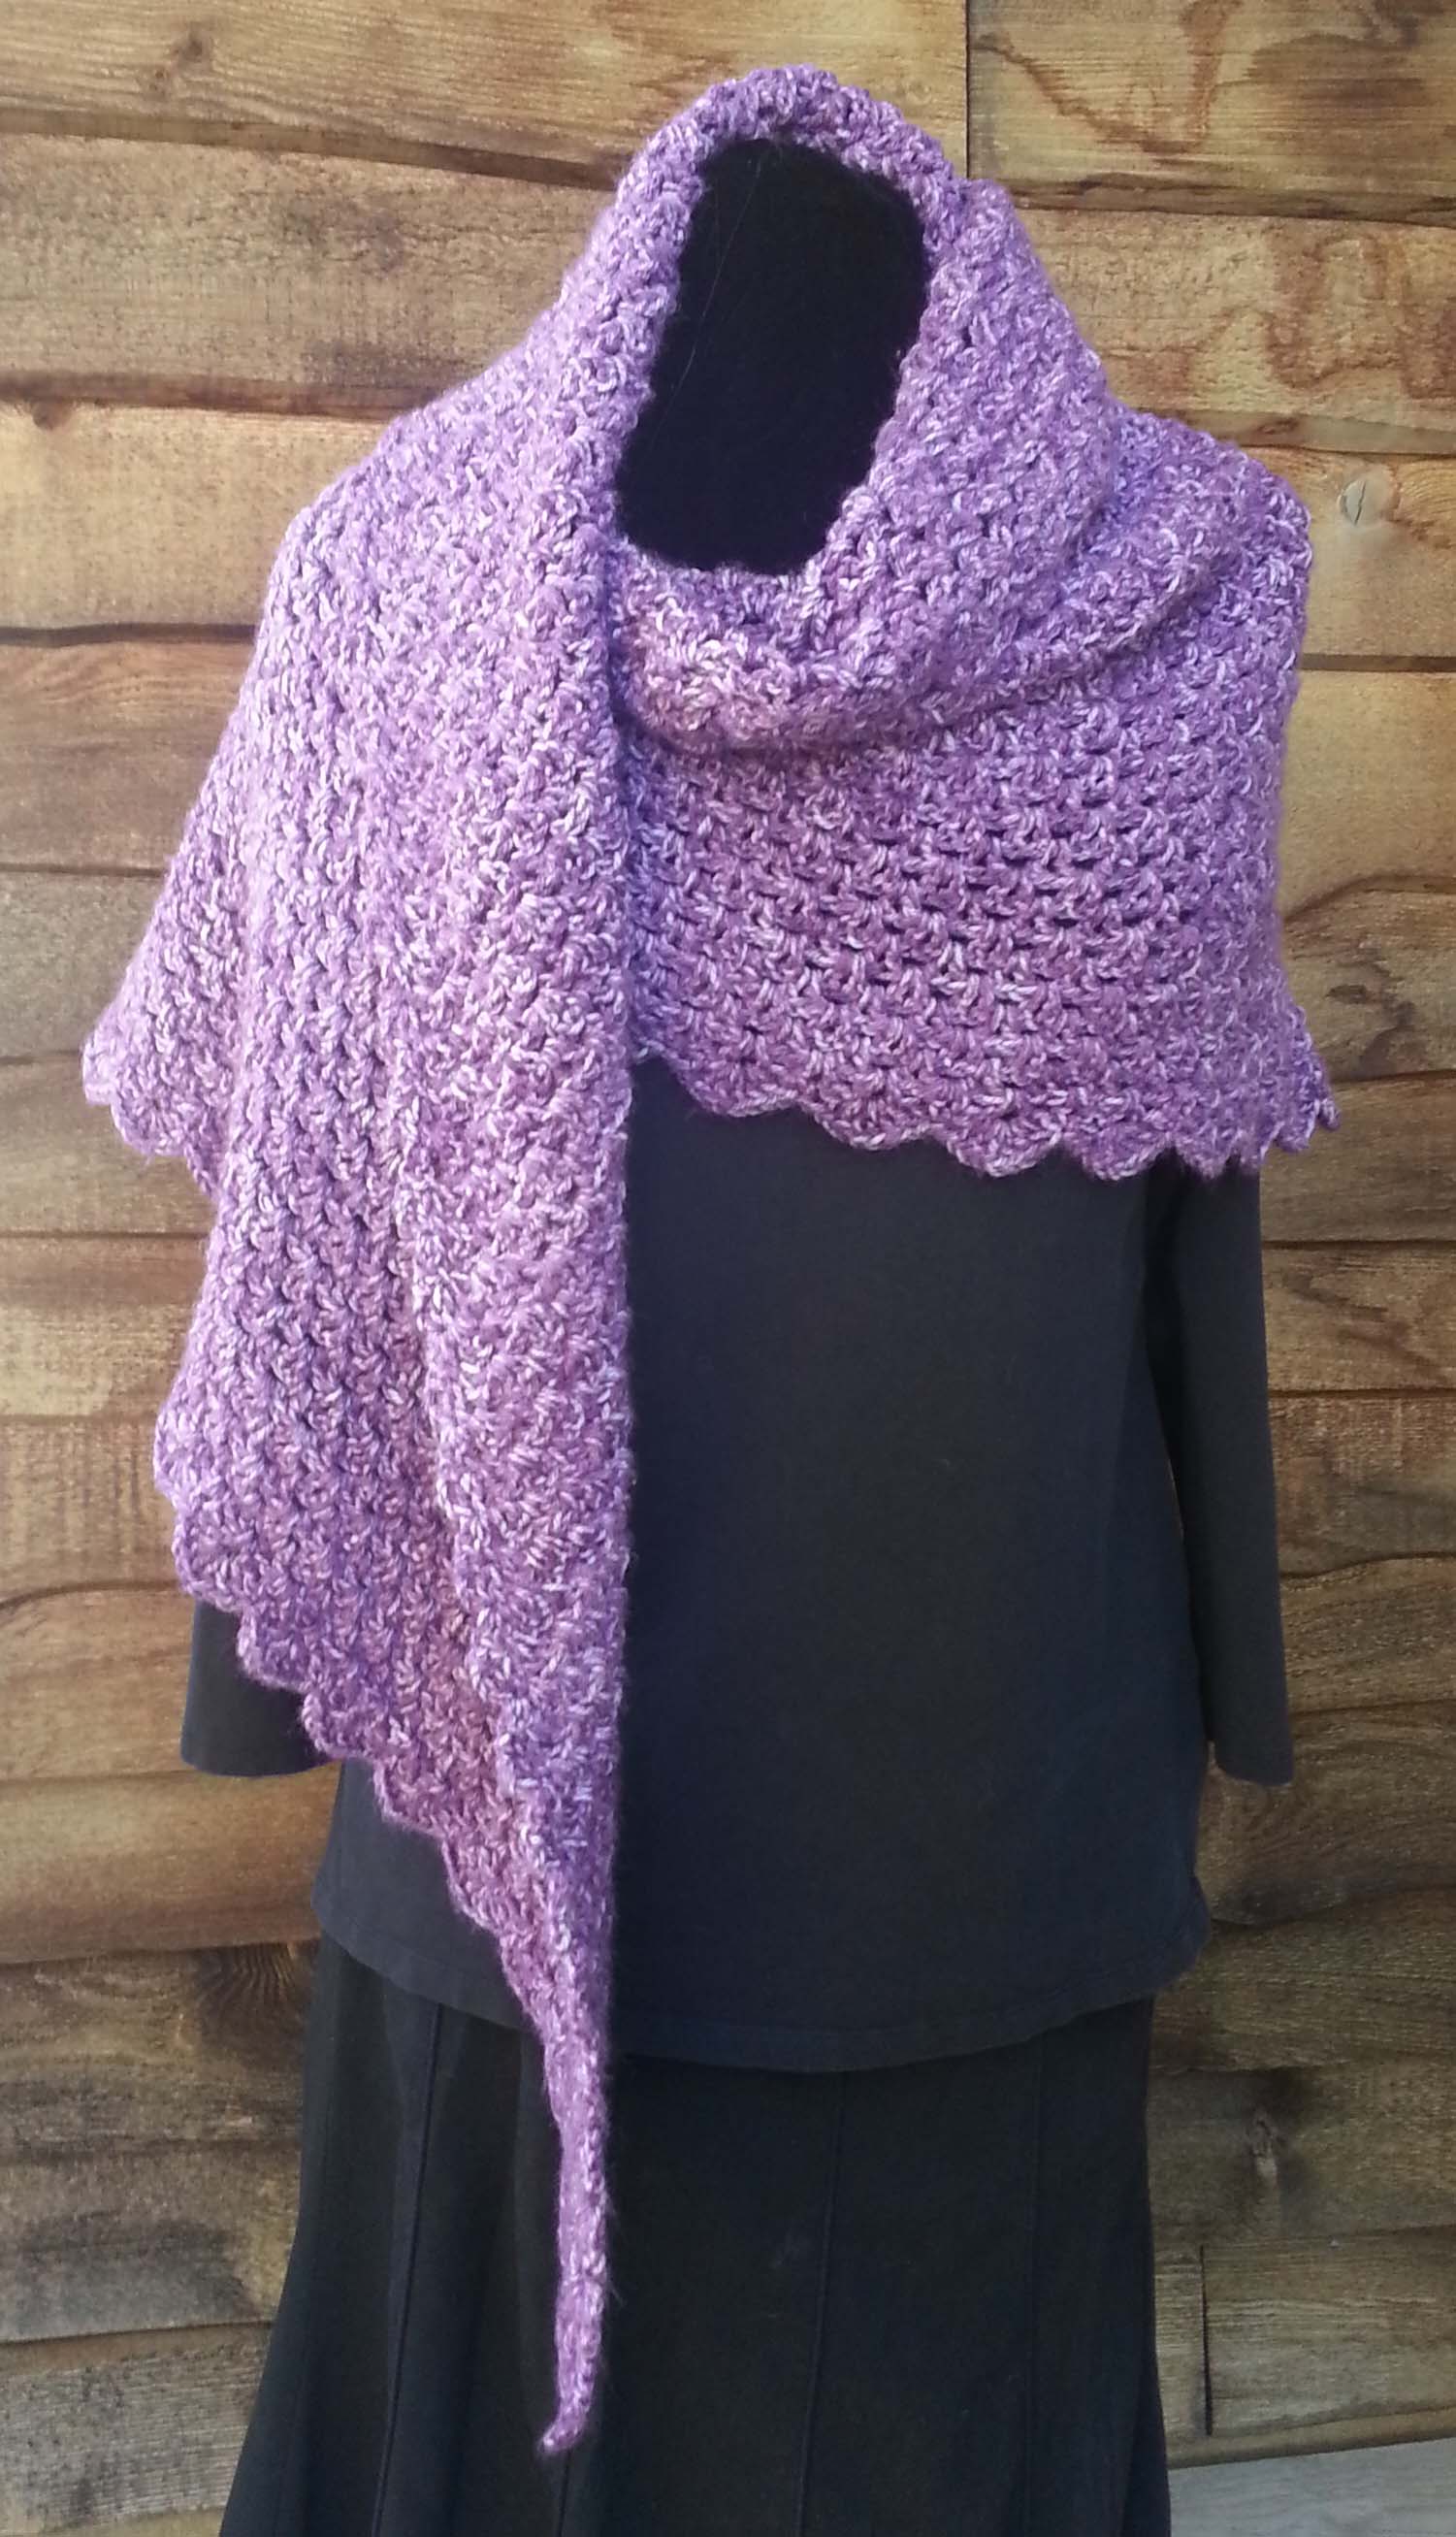
My first finished Playing with Triangles Shawl.
Playing with Triangles Shawl
Designed by Andee Graves
Skill – Beginner
Stitches you need to know: Chain (ch), Double Crochet (dc), Single Crochet (sc), Slip Stitch (sl st)
V Stitch (V-st): (dc, ch 1, dc) in indicated place
Materials
Yarn in weight and yardage you want to use for your preferred size of Shawl.
Hook in size appropriate for the fabric you want from your yarn.
Stitch markers (at least 3)
Pattern Notes
The majority of the body of this shawl is worked in staggered V-stitches. This means the 2 legs of the V-st are worked in the space between two V-stitches. Like you see in Photo B above the pattern instructions.
Each chain stitch counts as a single stitch for skipped stitches, ie… the top of a V-st would count as 3 stitches.
Instructions
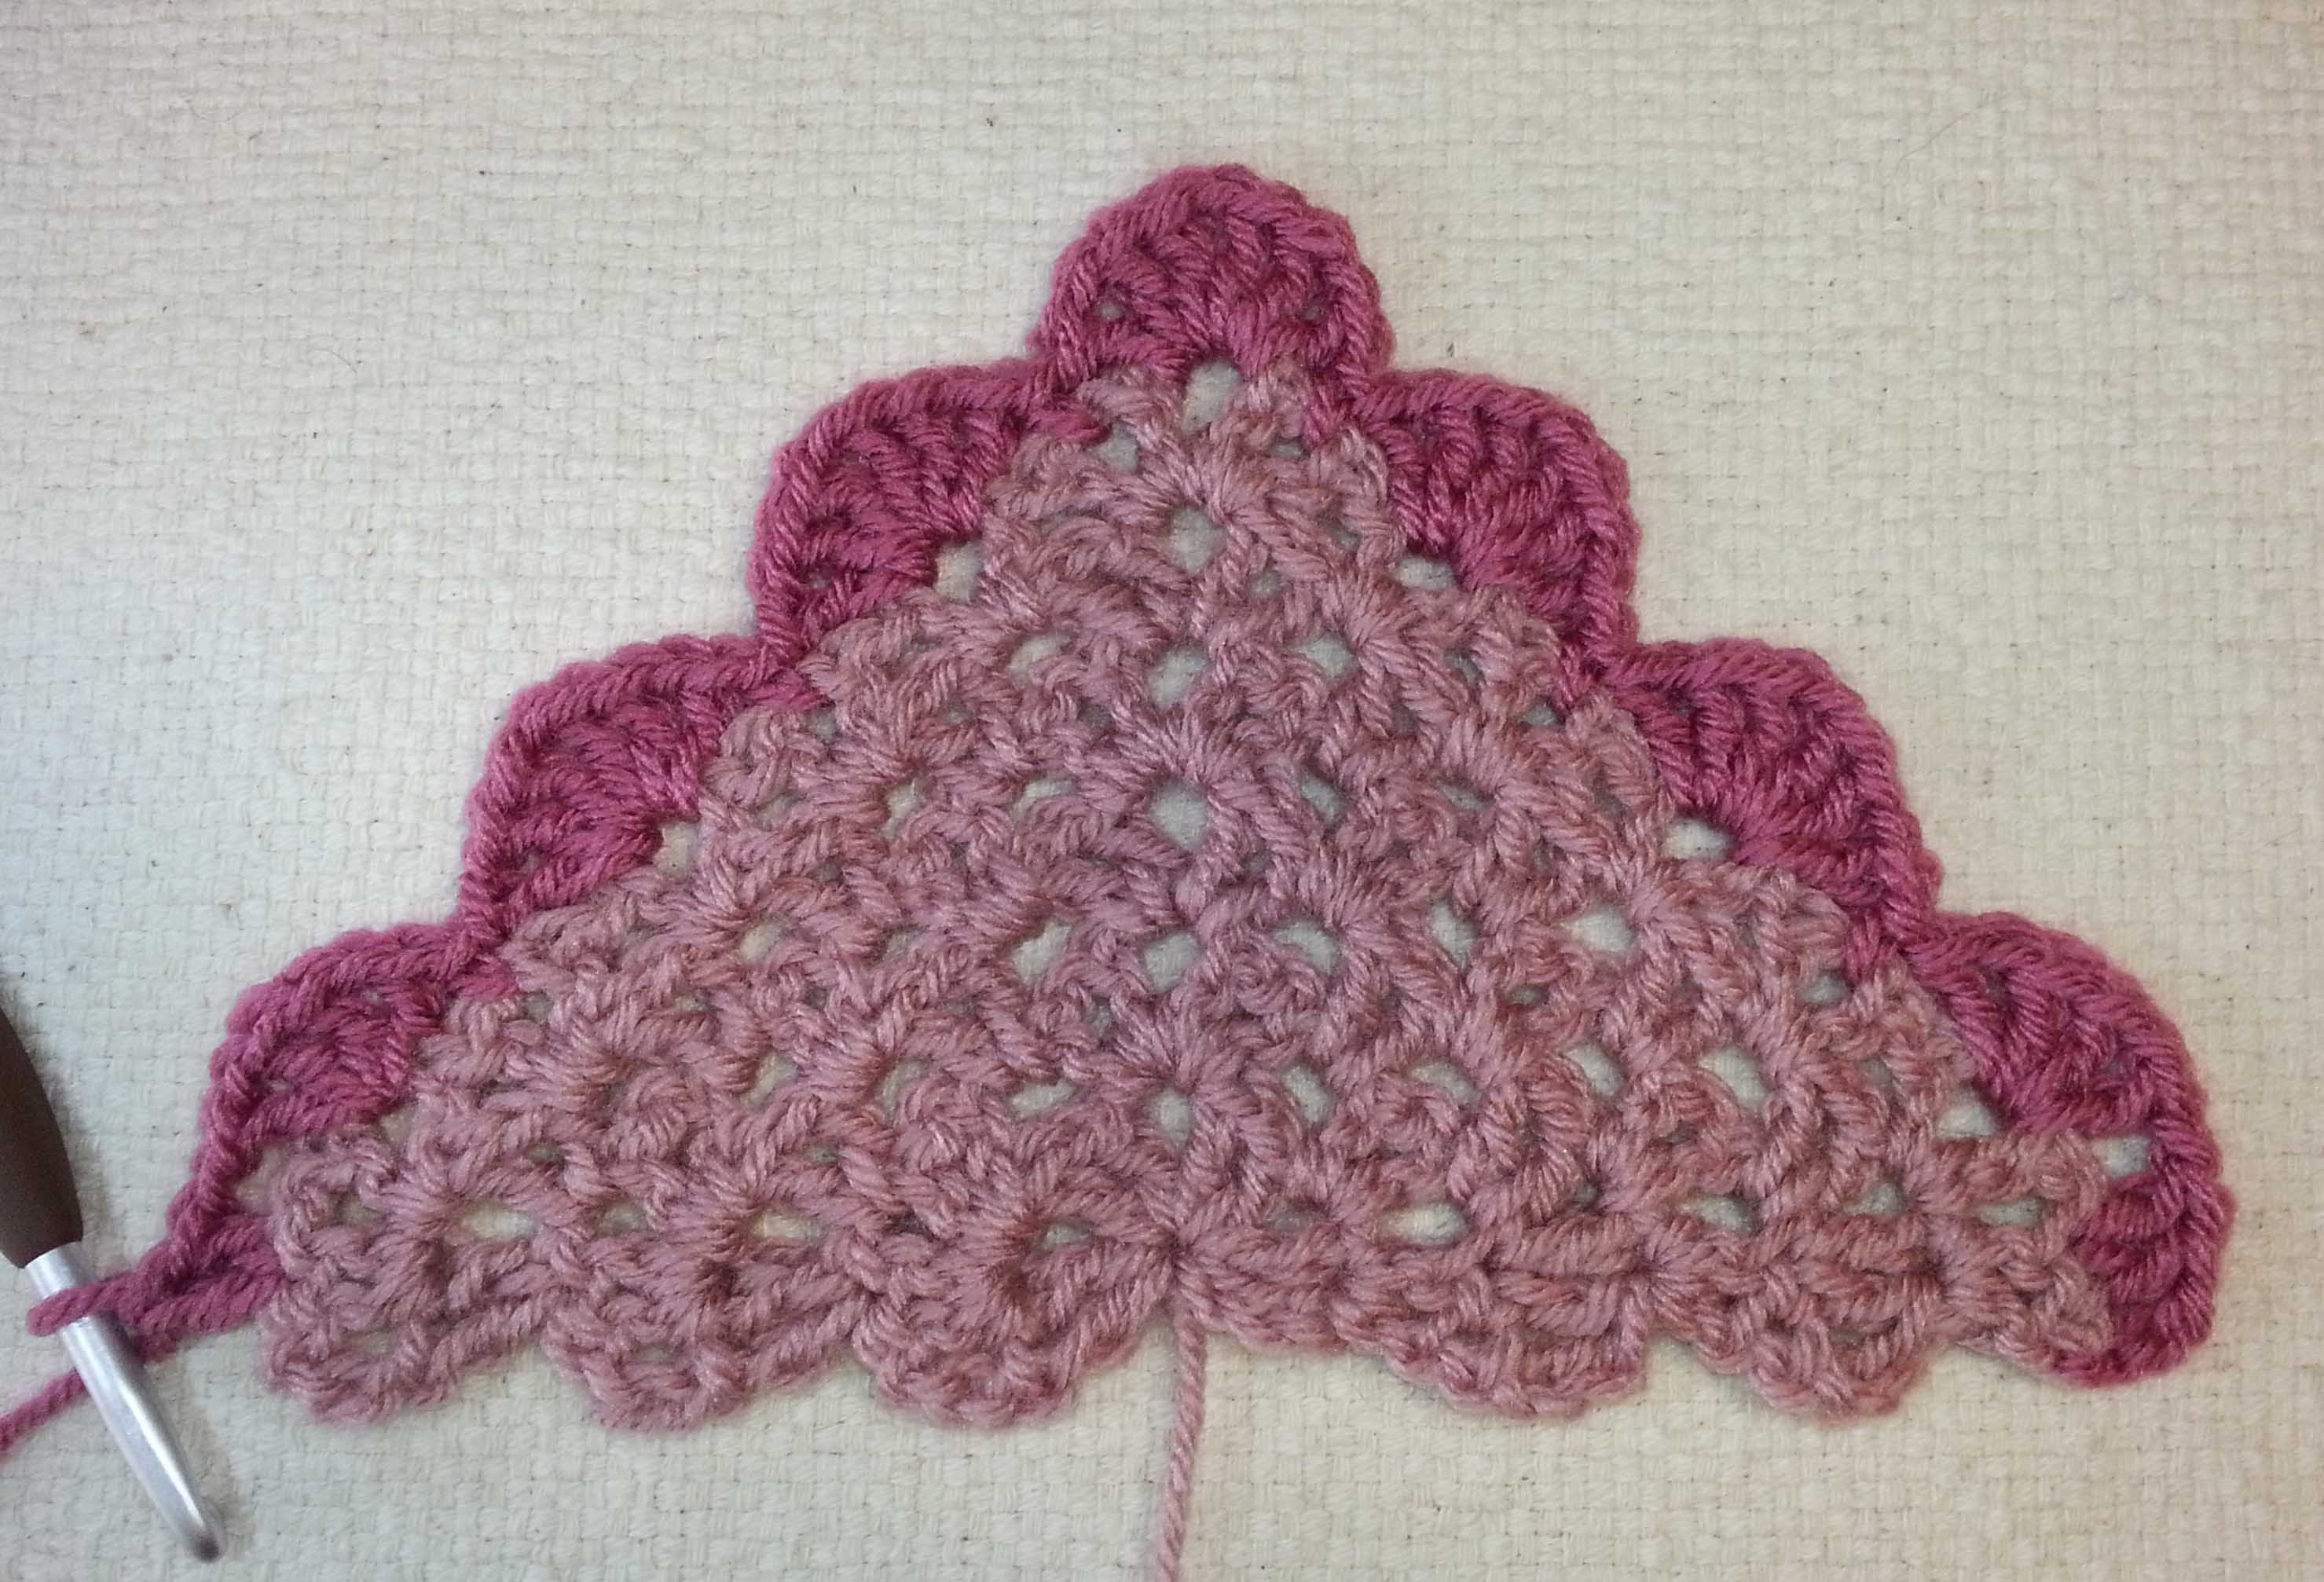
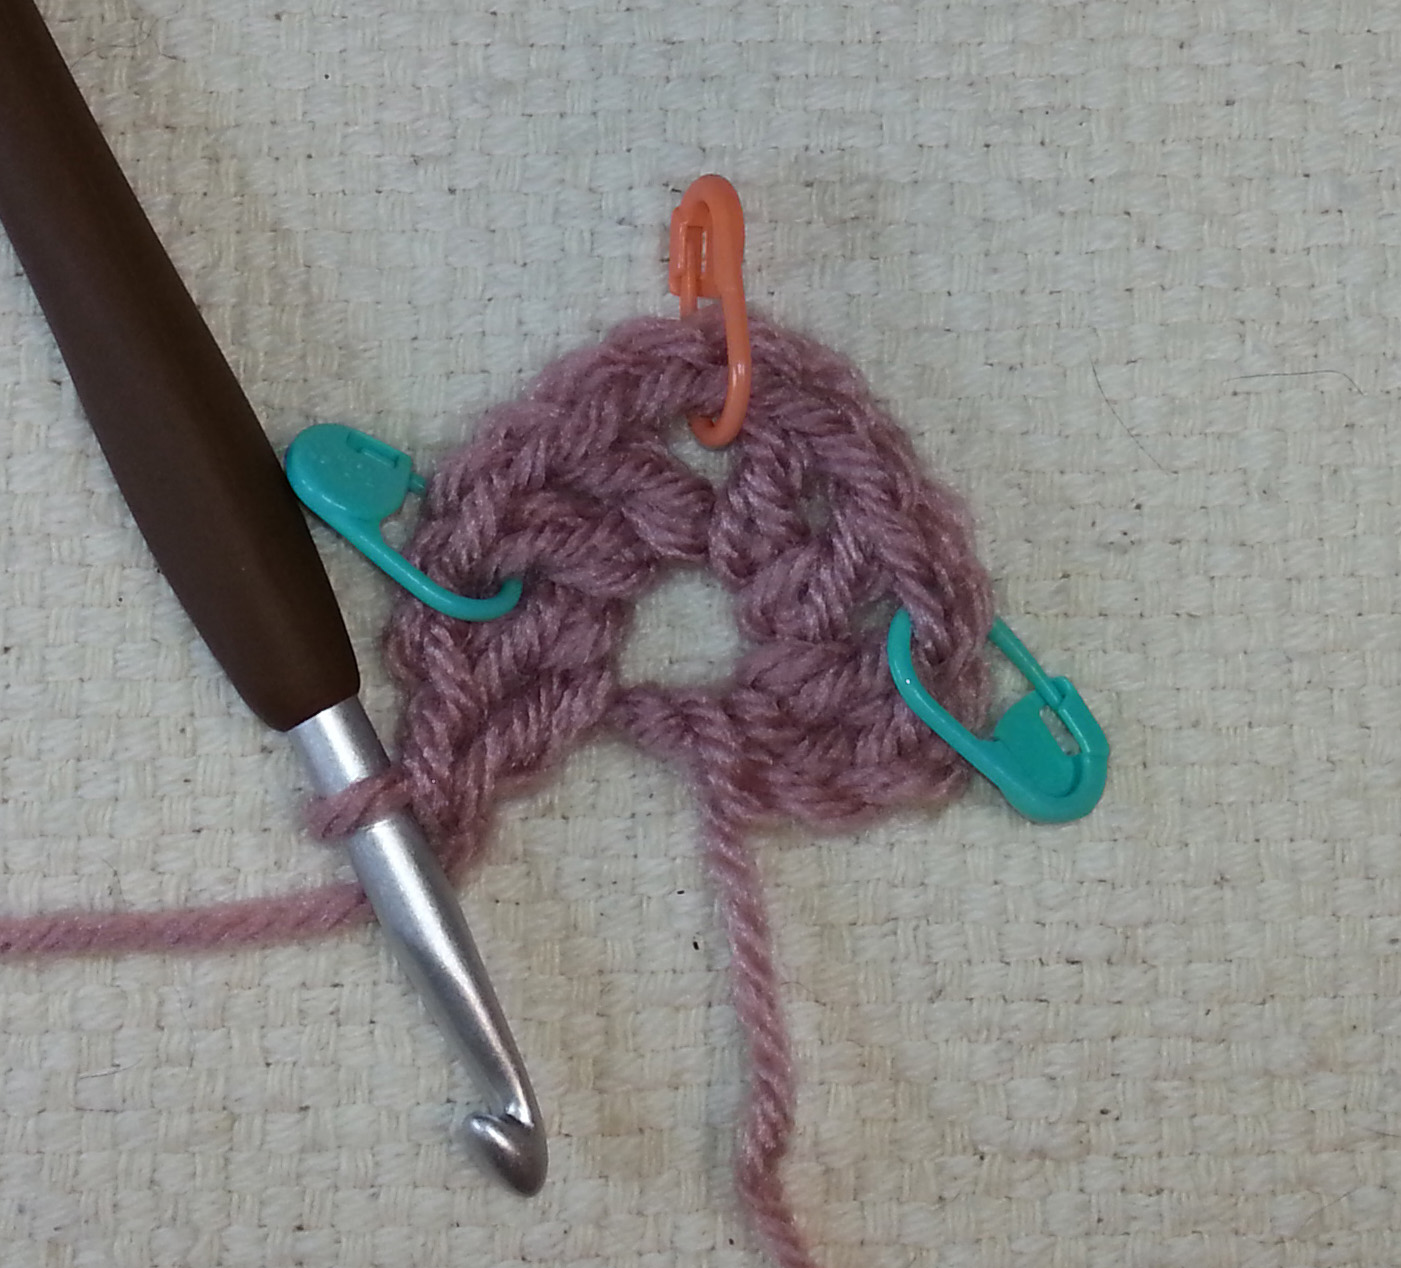
Row 1 completed
Row 1: Starting with an adjustable slip knot Ch 4 (counts as dc and center), ({dc, ch 1} 2 times, dc, ch 2, {dc, ch 1} 2 times, 2 dc) in fourth ch from hook. Place st markers in first and last ch-1 spaces, and in ch-2 sp. (4 ch-1 sp, 1 ch-2 sp, 8 dc)
Row 2 completed
Row 2: Ch 3, turn, sk first st, 2 dc next st, ch 1, V-st in marked ch-1 sp, move st marker to first ch-1 sp just made, sk 3 sts, (V-st, ch-2, V-st) in marked ch-2 sp, move st marker to ch-2 sp just made, sk 3 sts, V-st in marked ch-1 sp, ch 1, 2 dc in next st, move st marker to second ch-1 sp just made. (4 V-st, 4 dc, 2 ch-1 sp, 1 ch-2 sp, 1 ch-3)
Row 3 completed
Row 3: Ch 3, turn, sk first st, 2 dc next st, ch 1, V-st in marked ch-1 sp, move st marker to first ch-1 sp just made, sk 3 sts, V-st in space before next V-st, sk 3 sts, (V-st, ch 2, V-st) in marked ch-2 sp, move st marker to ch-2 sp just made, sk 3 sts, V-st in space before next V-st, sk 3 sts, V-st in marked ch-1 sp, ch 1, 2 dc next st, move st marker to second ch-1 sp just made. (6 V-st, 4 dc, 2 ch-1 sp, 1 ch-2 sp, 1 ch-3)
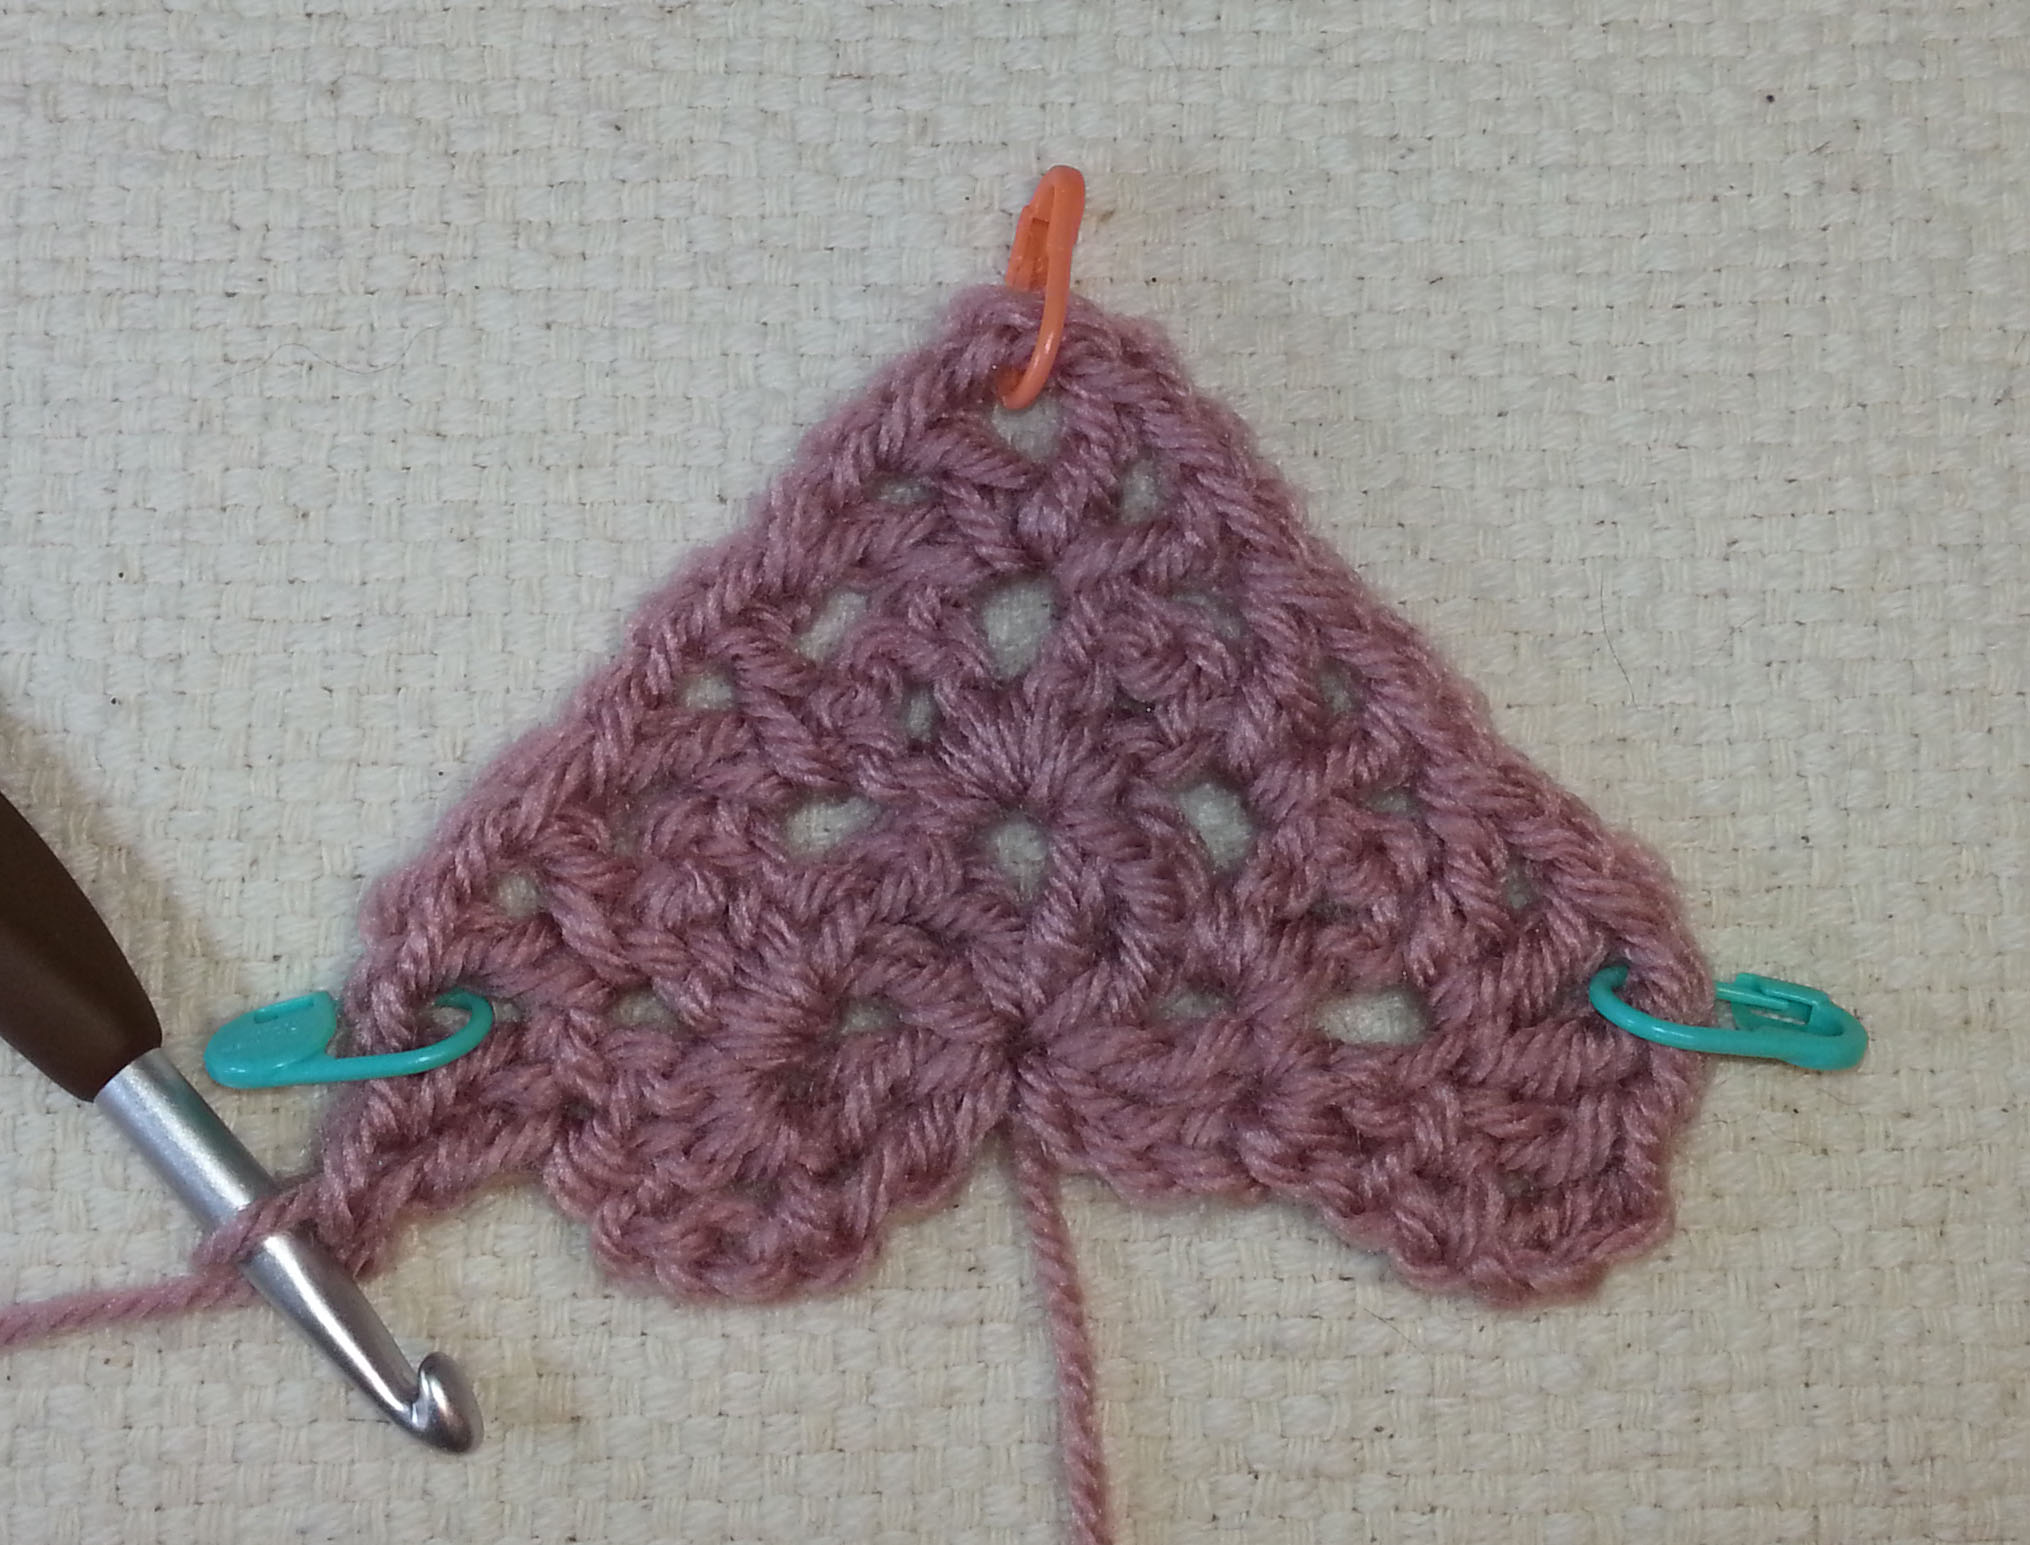
Row 4 completed
Row 4: Ch 3, turn, sk first st, 2 dc next st, ch 1, V-st in marked ch-1 sp, move st marker to first ch-1 sp just made, *sk 3 sts, V-st in space before next V-st*, repeat from * to * until reach V-st before marked ch-2 sp, (V-st, ch 2, V-st) in marked ch-2 sp, move st marker to ch-2 sp just made, repeat from * to * until reach V-st before marked ch-1 sp, V-st in marked ch-1 sp, ch 1, 2 dc in next st, move st marker to second ch-1 sp just made. (8 V-st, 4 dc, 2 ch-1 sp, 1 ch-2 sp, 1 ch-3)
Repeat Row 4 until reach the desired length, you will need to end on an even numbered row to set up for the scalloped border.
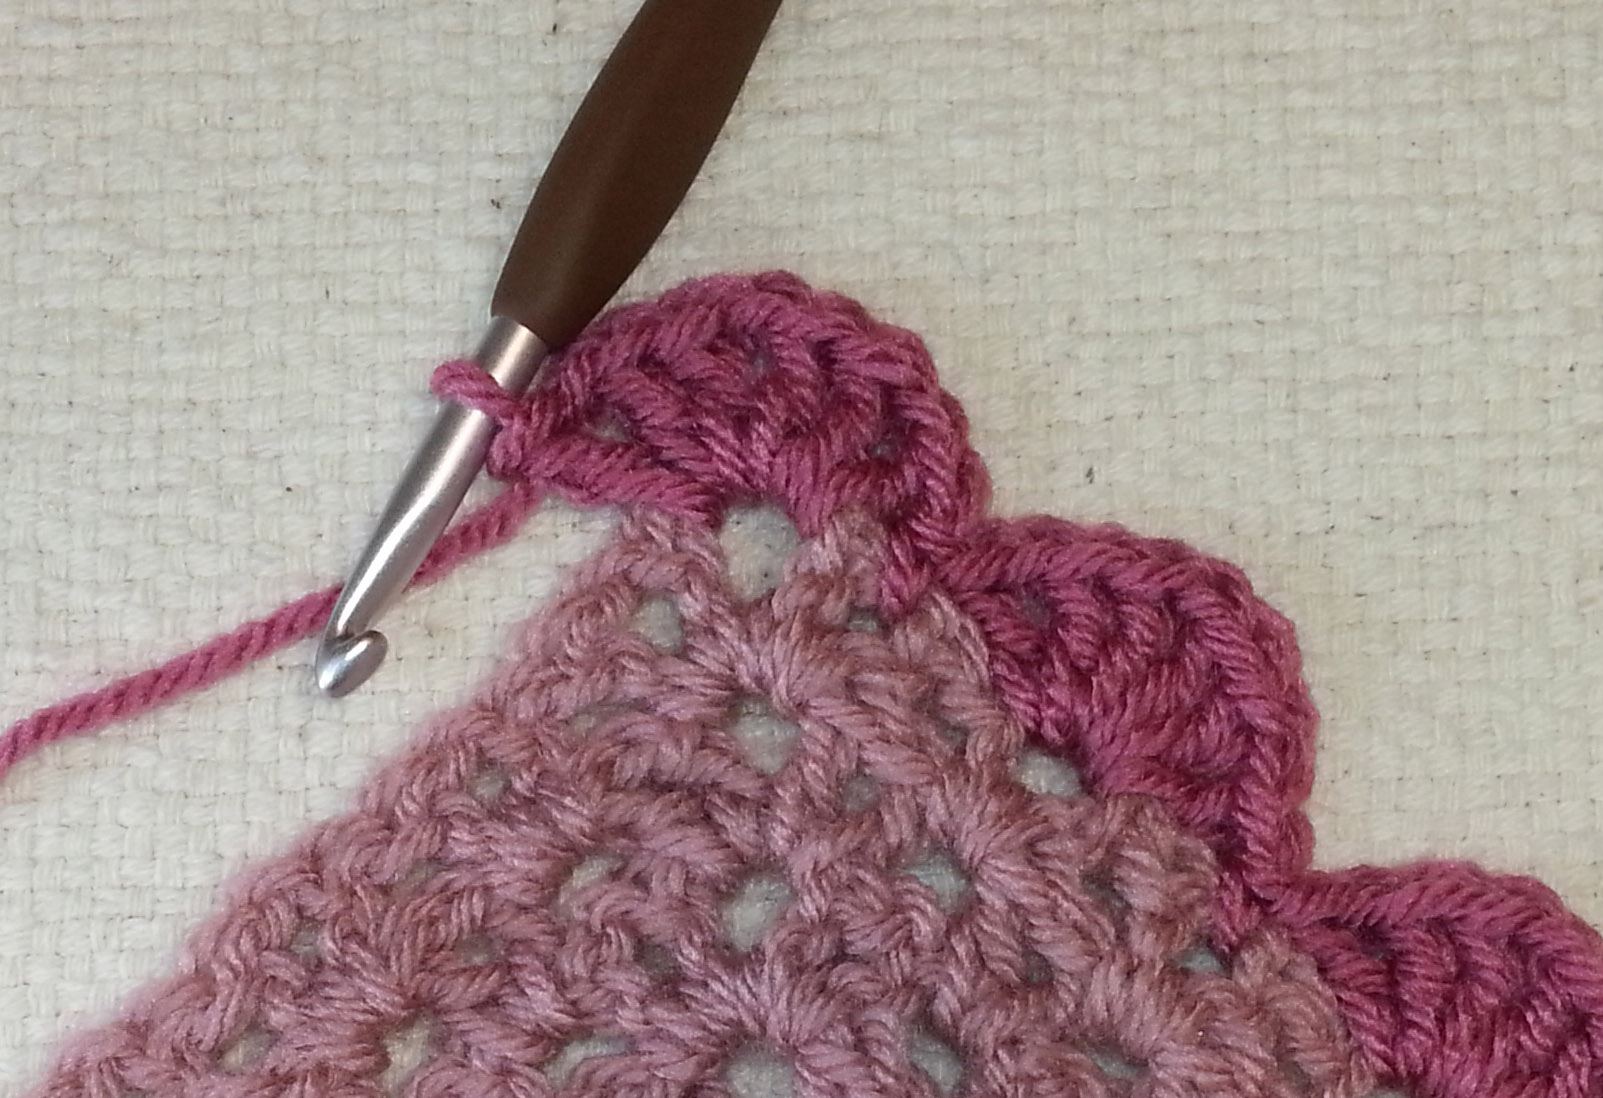
Border: I’ve shown the border worked it a different color to make it stand out clearer in the photos, you can continue in the same color as the body of the shawl or use a contrasting color.
Ch 3, turn, sk first st, 2 dc next st, ch 1, sk 2 sts, 2 V-st in next ch-1 sp,
* sk 2 sts, **sc in next ch-1 sp, sk 2 sts, 3 V-st in next ch-1 sp*,
repeat from * to * until one V-st remains un-worked before marked ch-2 sp,
sk 2 sts, sc in next ch-1 sp, sk 1 st, 3 V-st in marked ch- 2 sp, sk 1 st, repeat from ** to * once,
repeat from * to * until 2 V-st remain un-worked before marked ch-1 sp at end of row,
sk 2 sts, sc in next ch-1 sp, sk 2 sts, 2 V-st in next ch-1 sp, ch 1,
sk 2 sts, 2 dc next st.
Fasten off. Weave in tails. Gently block if desired.
I also have a video available for this pattern on my YouTube channel. Click here to see it.
Now it’s your turn to get creative. Have fun experimenting with different textures and weights of yarn to create a shawl that is just right for you. Check thru your yarn stash and see if you have a mixture of similar weight yarn in harmonizing colors that you could combine in your shawl.
It’s just a few short days until it’s Easter! How did that happen? Of course, the Easter Bunny sometimes has to wear his snow boots when he comes to our house. Fortunately for most of my lucky readers they are seeing warmer temperatures and flowers blooming.
I’ve been seeing a few brave flowers and leaves making an appearance down in town, but up on the mountain there isn’t much indication that winter is winding down.
Easter time is lots of fun and at our household involves the consumption of chocolate bunnies. I’ve bought our bunnies already and hid them so the chocolate monsters won’t eat their ears off before the big day. Nothing more off-putting than having an Easter basket with an earless bunny in it.
Bunnies are a great theme at Easter, but please don’t buy a real baby bunny unless you are ready to give them a good home for the next 10 years or so. Bunnies grow up to be rabbits and they require special care and attention to have full happy lives. Just like any pet you adopt.
And if you really want to adopt a pet rabbit, wait until after Easter and go to your local animal shelter. Usually a week after Easter they start to get lots of bunnies that folks realize they don’t want to keep. Sad, but true.
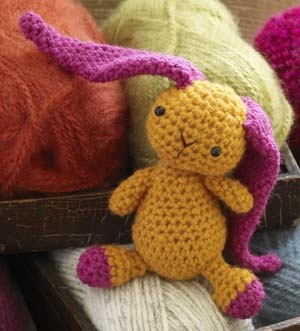
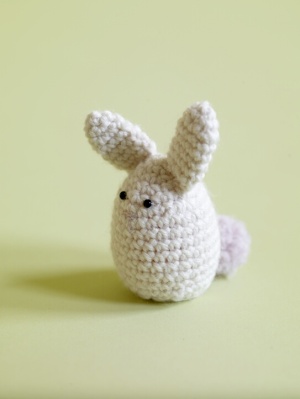
This cutie is the “Best Bunny” from the Lion Brand Website and I think he is adorable. I love the big floppy ears and generous size of the toy. Just big enough to make a great back pack friend, but not so huge that you need 5 months to make it.
He is shown worked in a fun 2 color combination, but you could make him in one solid color if you desired. Personally I am tempted to make him a bright blue or aqua.
Or you could stuff the body with fiberfill and work a few more decrease rounds to close up the bottom of the cozy and turn him into an eggy shaped softie. Again I’m seeing this bunny worked in a variety of bright spring colors.
If neither of these bunnies inspire you to crochet up some rabbit friends, then take a look at the pattern database on Ravelry. You can search in a variety of ways to find the pattern that you like best.
Now get hopping, Easter will be here before you know it.
I’m still celebrating NatCroMo, and those of you looking for something pretty to wear this spring will appreciate this little pattern.
I made these earrings over the last couple of weeks. I’ve been having a great time experimenting with Size #10 Crochet Cotton and beads worked over a split ring armature.
As you can see, it’s possible to get really different looks just by altering the size and colors of beads used. Both of the above earrings used the same metallic gold/cream thread, the only change was the beads I’ve chosen. It’s endlessly entertaining making these with the various beads in my stash.
I like the Ball Hook Earwires because I can make a variety of earrings, and use the same wires by interchanging the crocheted part. I purchased these at my local JoAnns Craft and Hobby shop.
Simple Victorian Drop Earrings
Designed by Andee Graves
Stitch Chart for Simple Victorian Drop Earrings
Materials
#10 Crochet Cotton Thread
Hook 1.75 mm & .90mm steel
2 – 20mm Split Rings
10 – glass beads with large enough holes for thread to fit thru doubled
Gauge:
29 single crochet with a chain-2 space should cover the ring fully without being too crowded.
Special Stitches
Beaded Chain Stitch (bdch): Remove hook from working loop, place bead on smaller hook and insert in working loop, slide bead onto working loop, remove smaller hook and replace larger hook in working loop, YO and make chain stitch. Need help with this step check out my blog post “Making a Pendant”
Instructions
Begin by fastening your thread around the ring and placing working loop on larger hook. Need help with this step check out my blog post “Getting Started on a Thread Earring”
Round 1: Ch 1, 23 sc working into the ring, ch 2, 6 sc working into the ring, sl st to first sc of Rnd. (29 sc, 1 ch-2 sp)
Round 2: Ch 1, sk 1 st, sc next 2 sts, *ch 1, bdch, ch 1, sk 2 sts,* sc next st, Repeat from * to *, (dc, ch 1, bdch, ch 1, dc) next st, Repeat from * to *, sc next 2 sts, ch 1, sl st next st.
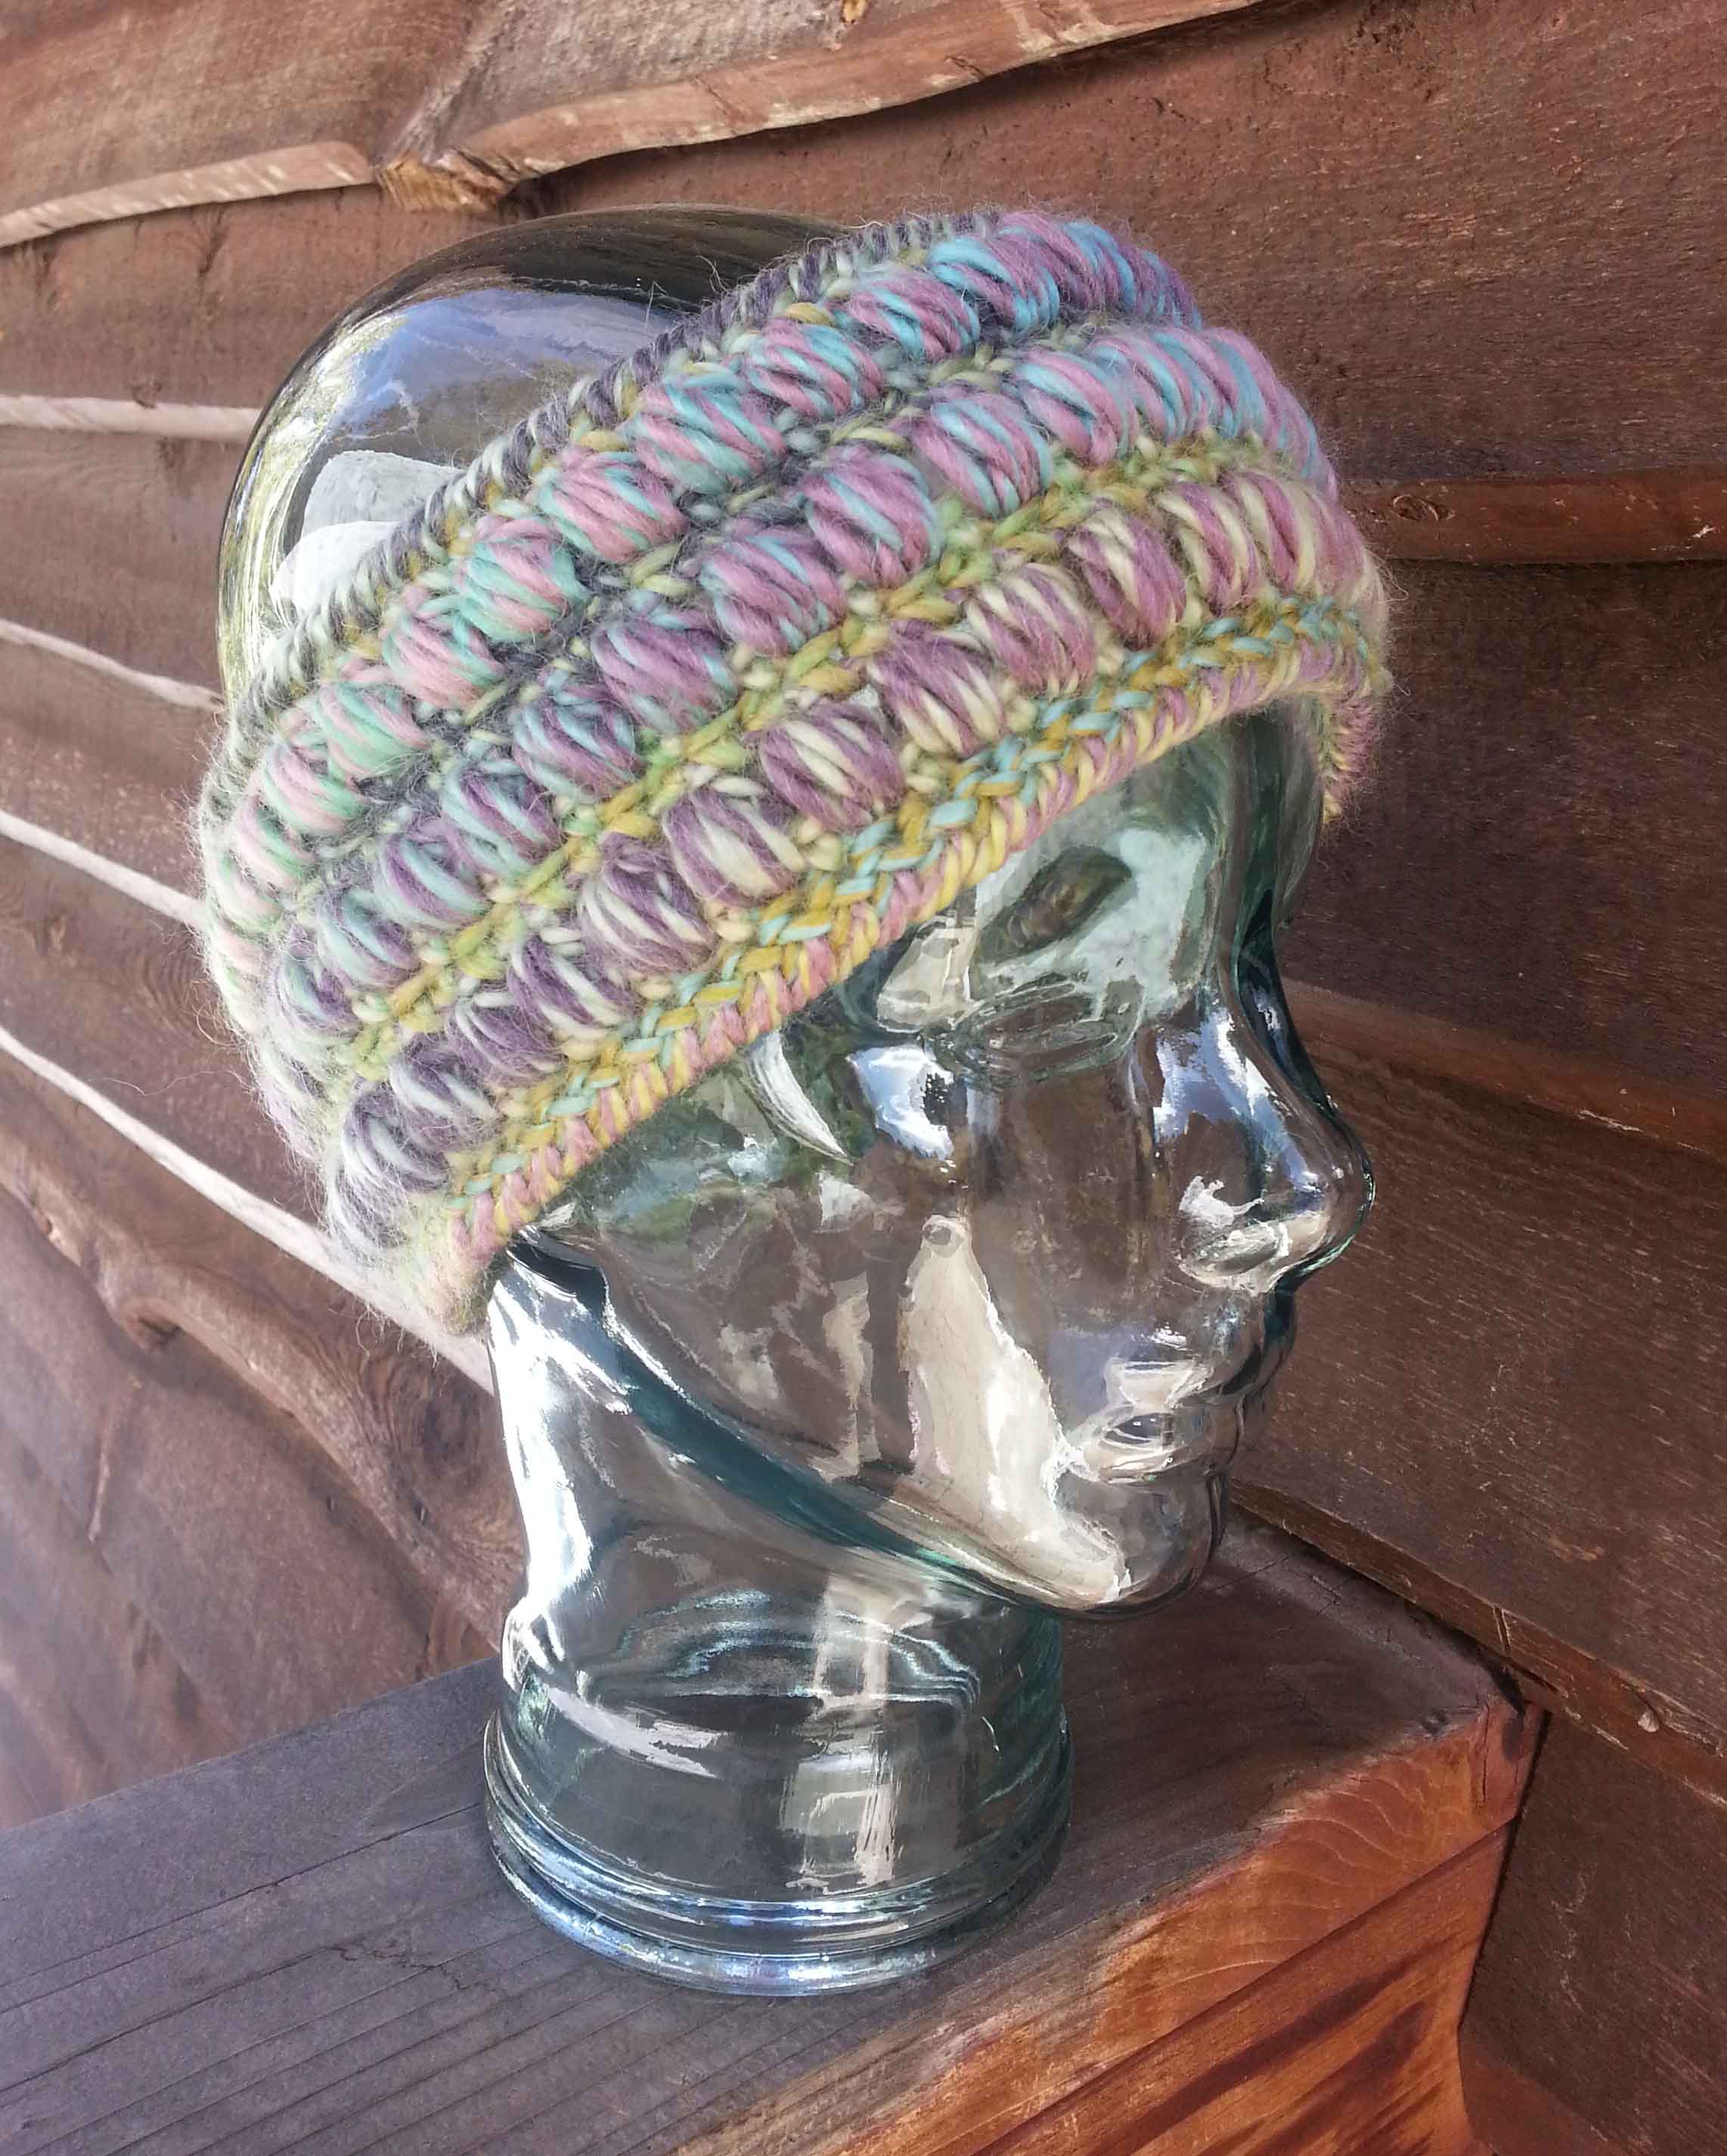
The weather is warming up a little up here on the mountain. But with my new short hairstyle my ears can get quite chilly when I am out for walks with my dog.
Photo courtesy of Beatrice Ryan Designs
So I decided it was time to try this fun headband pattern designed by my friend Elena at Beatrice Ryan Designs. You can find the pattern over on her blog “Whimsical Warmth Headband”.
I thought it would look really nice in a yarn with long gradual color changes so I decided to use Red Heart’s Boutique “Treasures” in the Watercolors colorway.
I made a few changes when working this pattern. I used a foundation single crochet for the foundation instead of working a chain and then working into the chain.
I also didn’t want to cut the yarn and re-attach to the bottom of the foundation. Instead I used chain and slip stitches to work down along the inside seam of the headband after I completed the reverse single crochet edge on the top edge of the headband. Then I completed the reverse single crochet edging along the base of the foundation.
I really like the way this headband came out, and it’s going to be my favorite to wear on my walks this spring.
I am really happy to share my latest beaded chain pattern with all my readers. This was an idea that has been bumping around in my brain for a while. It’s a very simple project to crochet, but does take a bit of coordination.
You’ll need to be comfortable with working chain stitches [ch], beaded chain stitches [bdch] and single crochet stitches [sc]. I have a tutorial on crocheting beaded chain stitches here on my blog (scroll down to the bottom half of the post) for those of you needing a refresher on that stitch.
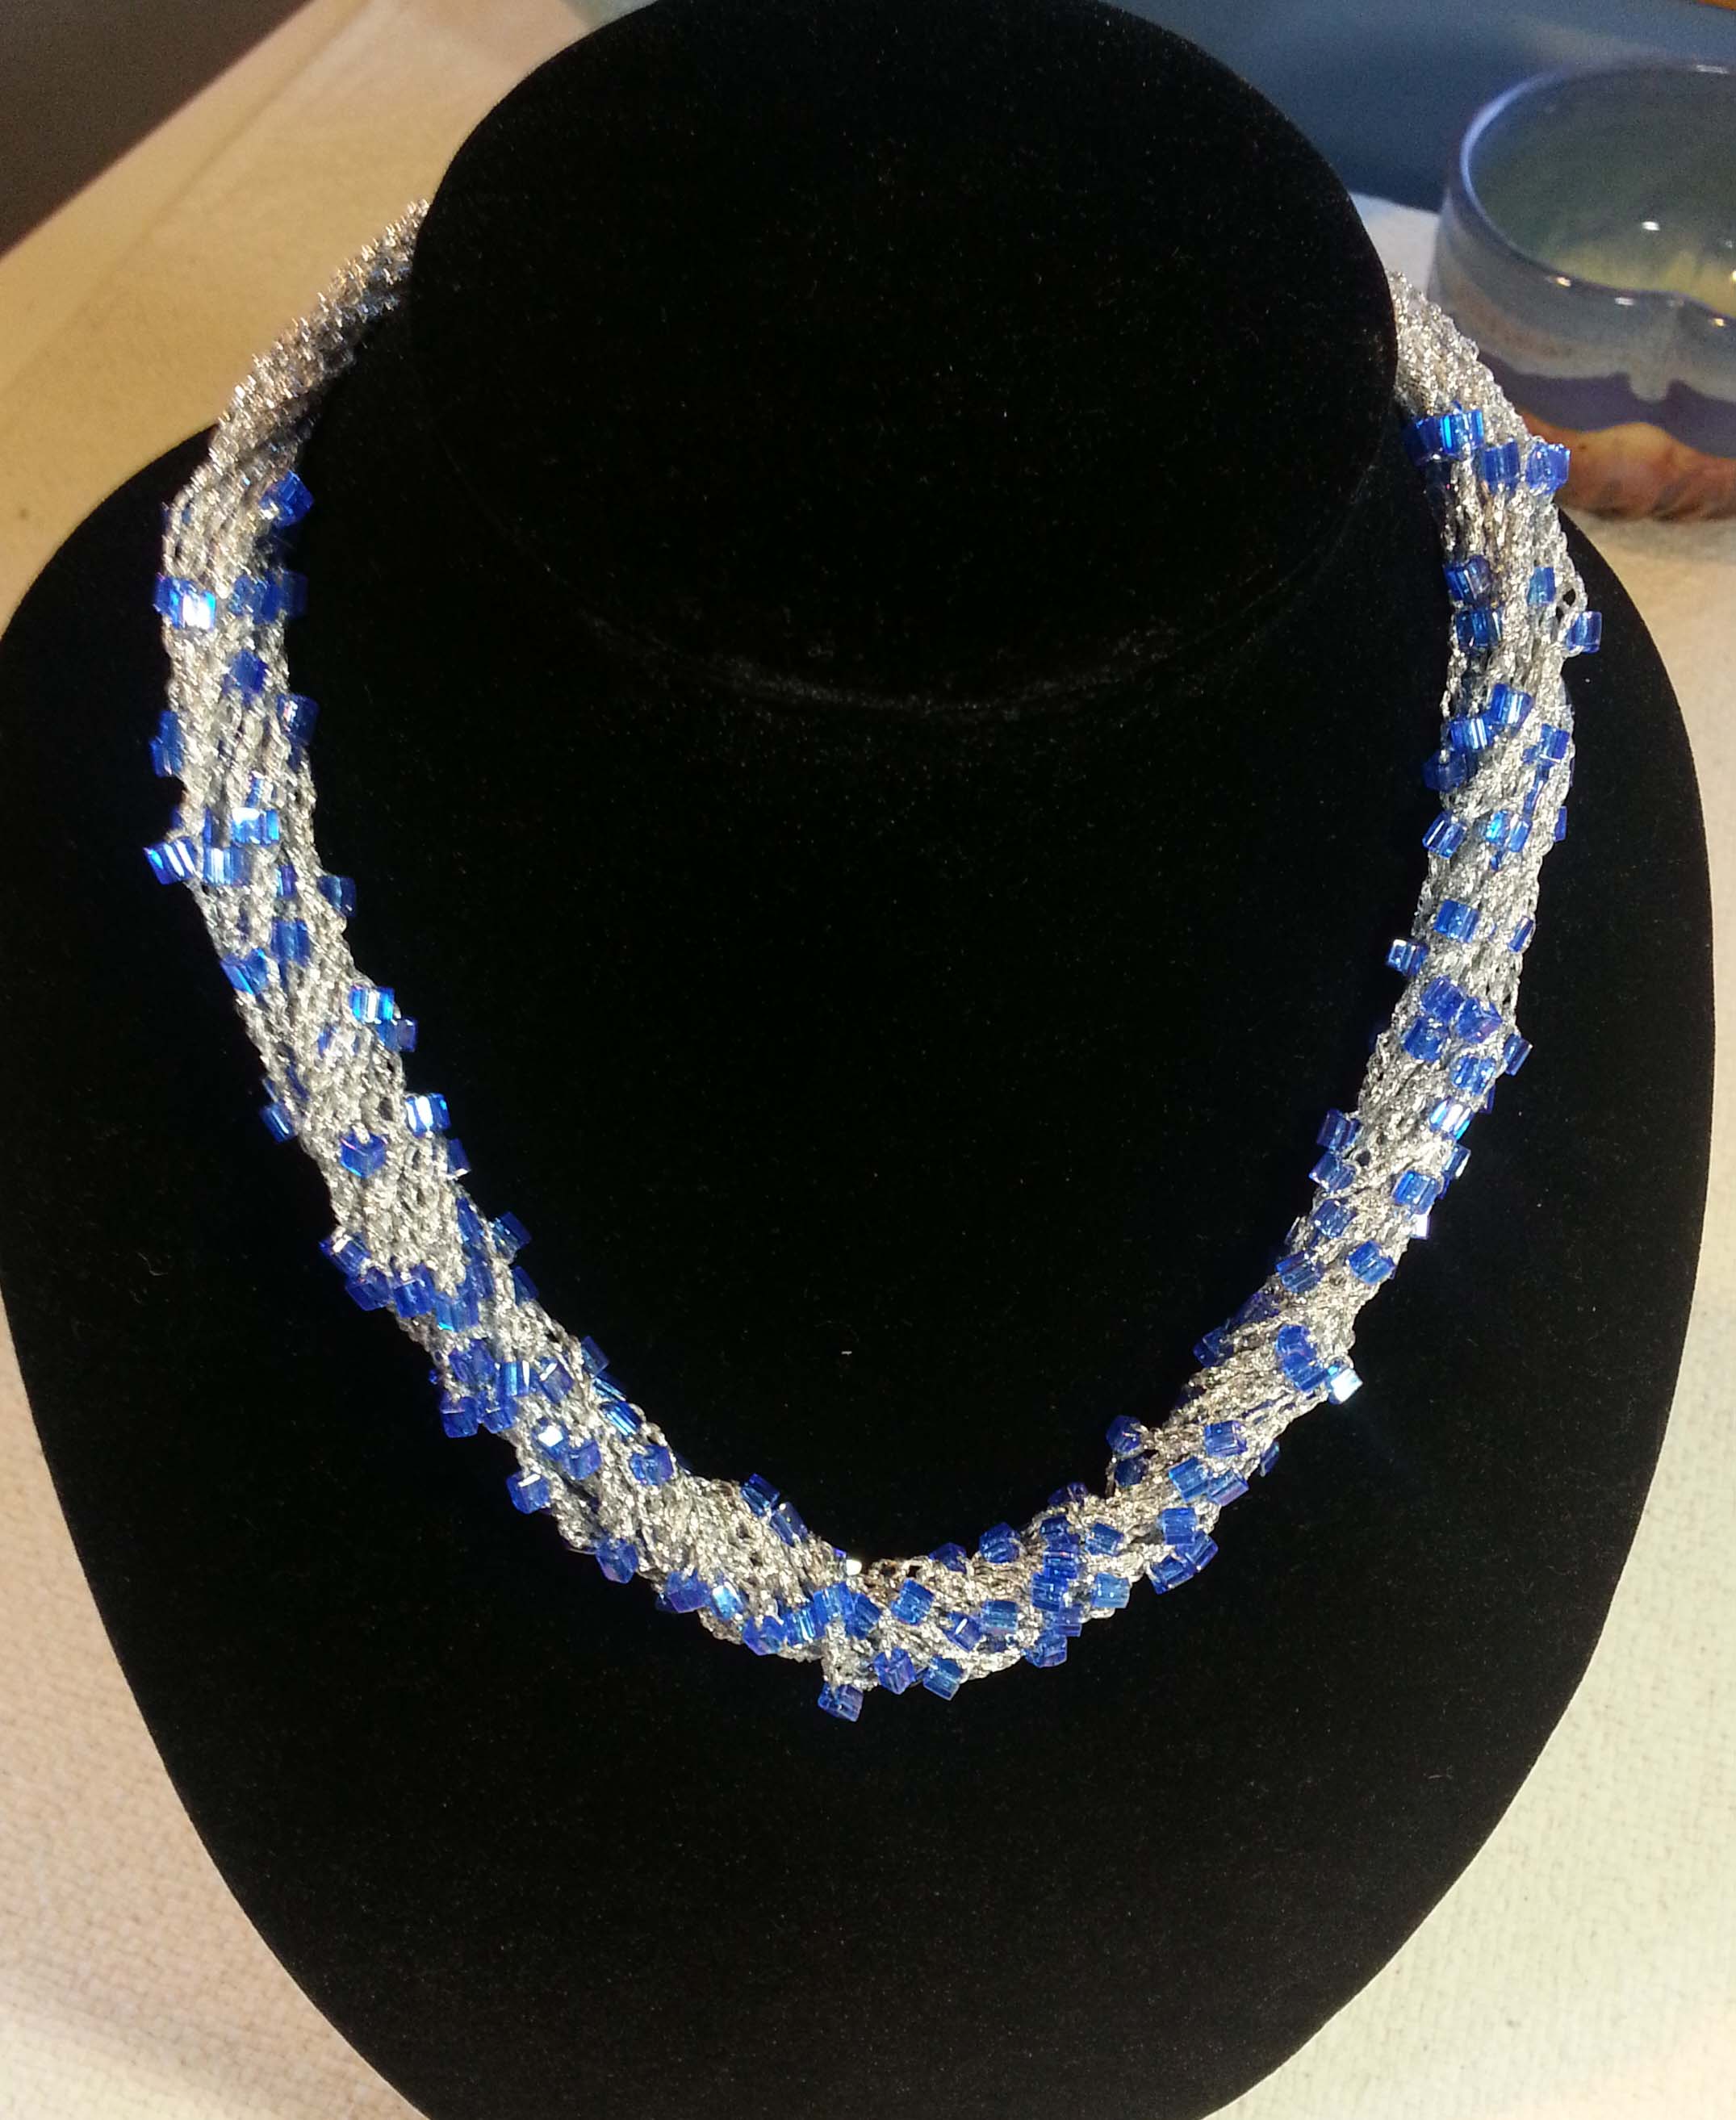
Sophisticated Simplicity Necklace
Designed by Andee Graves
Skill level: Easy
Materials
Thread/Yarn: Sample was made with Kreinik’s Ombre Twist thread, took approximately 45 yards (3 yds per strand), you can get approximately 6 necklaces out of one cone depending on how many strands you decide to have in your necklace.
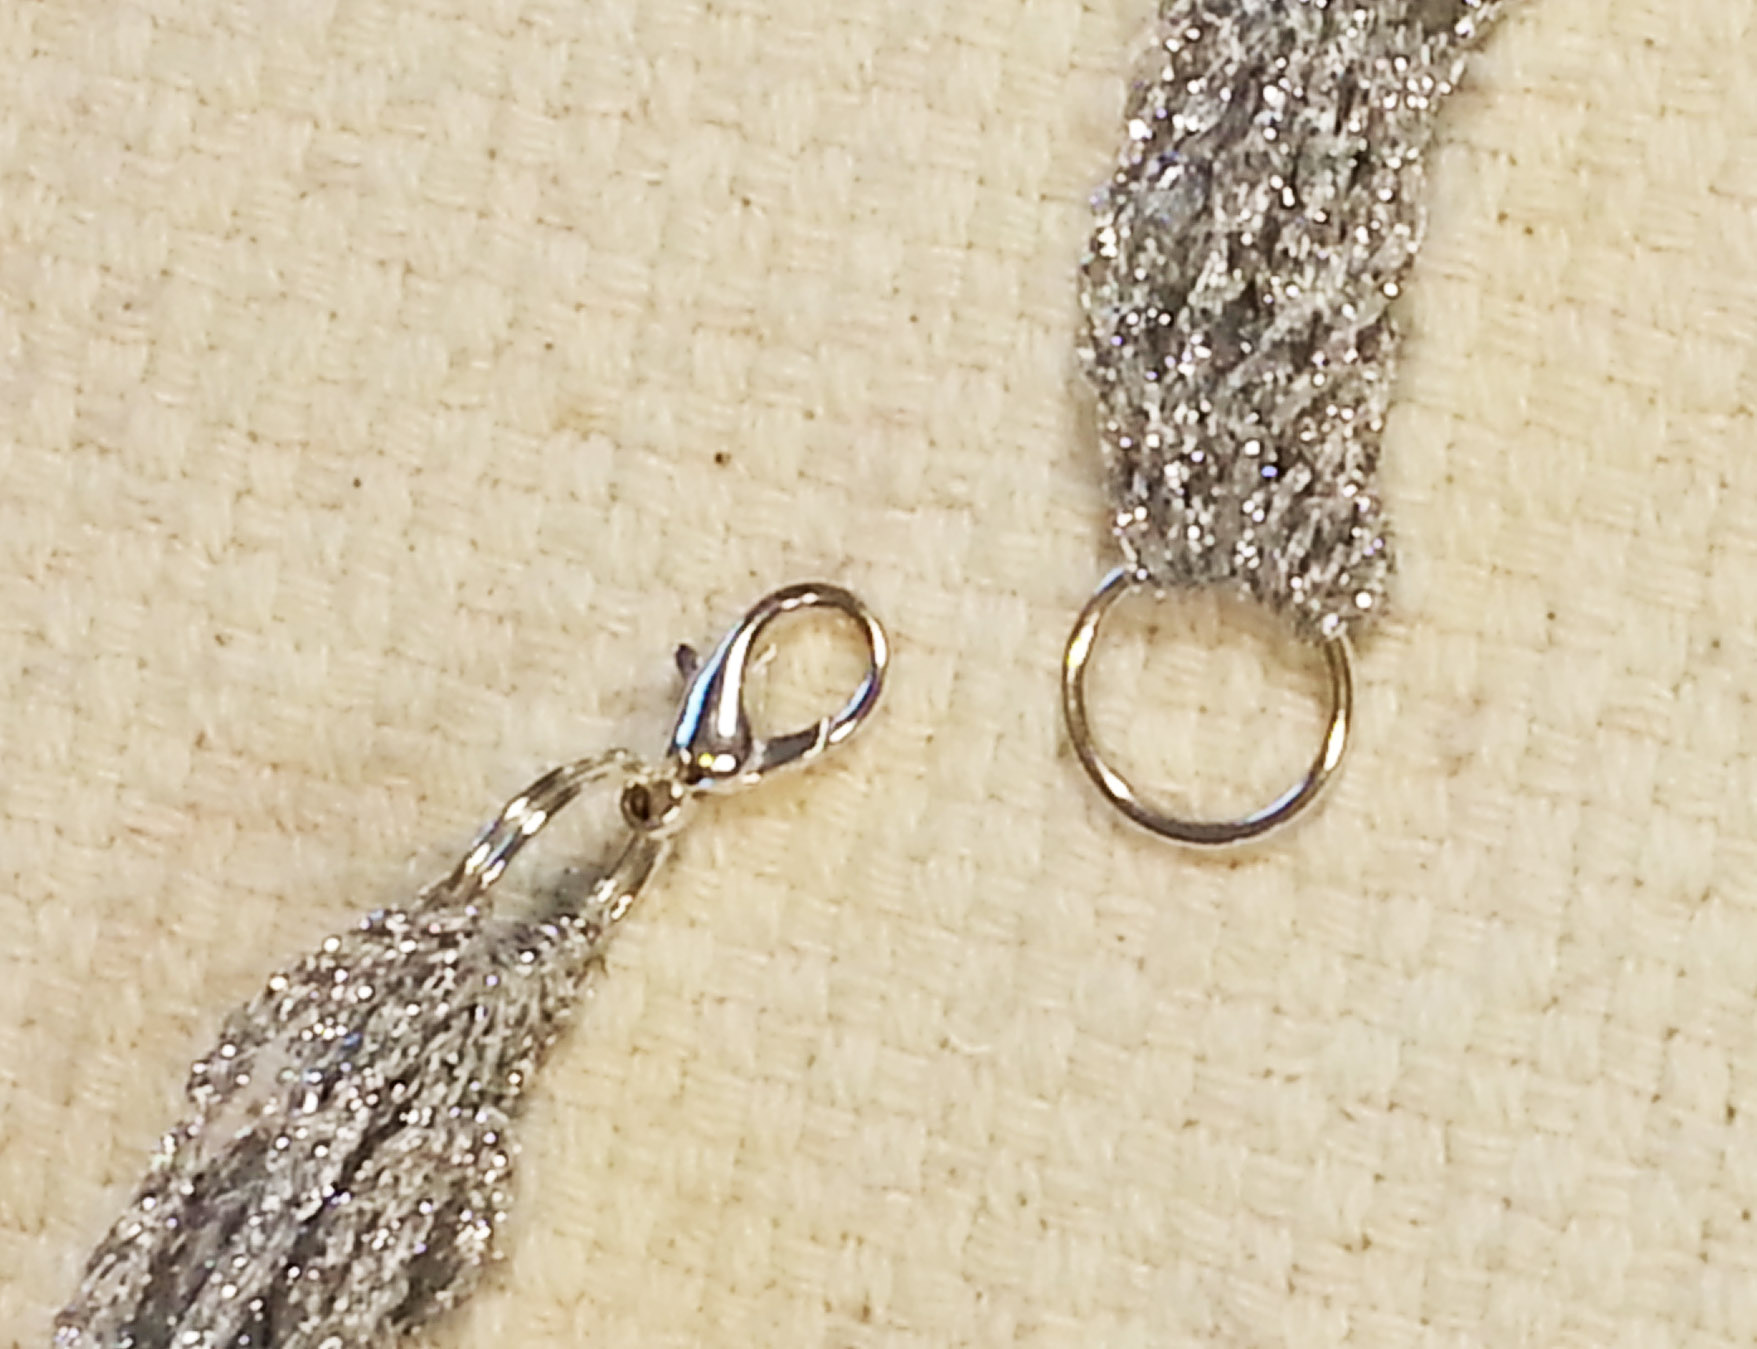
2 metal split rings (I used rings that were 1/2″ in diameter) and a large lobster clasp necklace fastener.
Gauge:
15 chain stitches = 2″
Instructions:
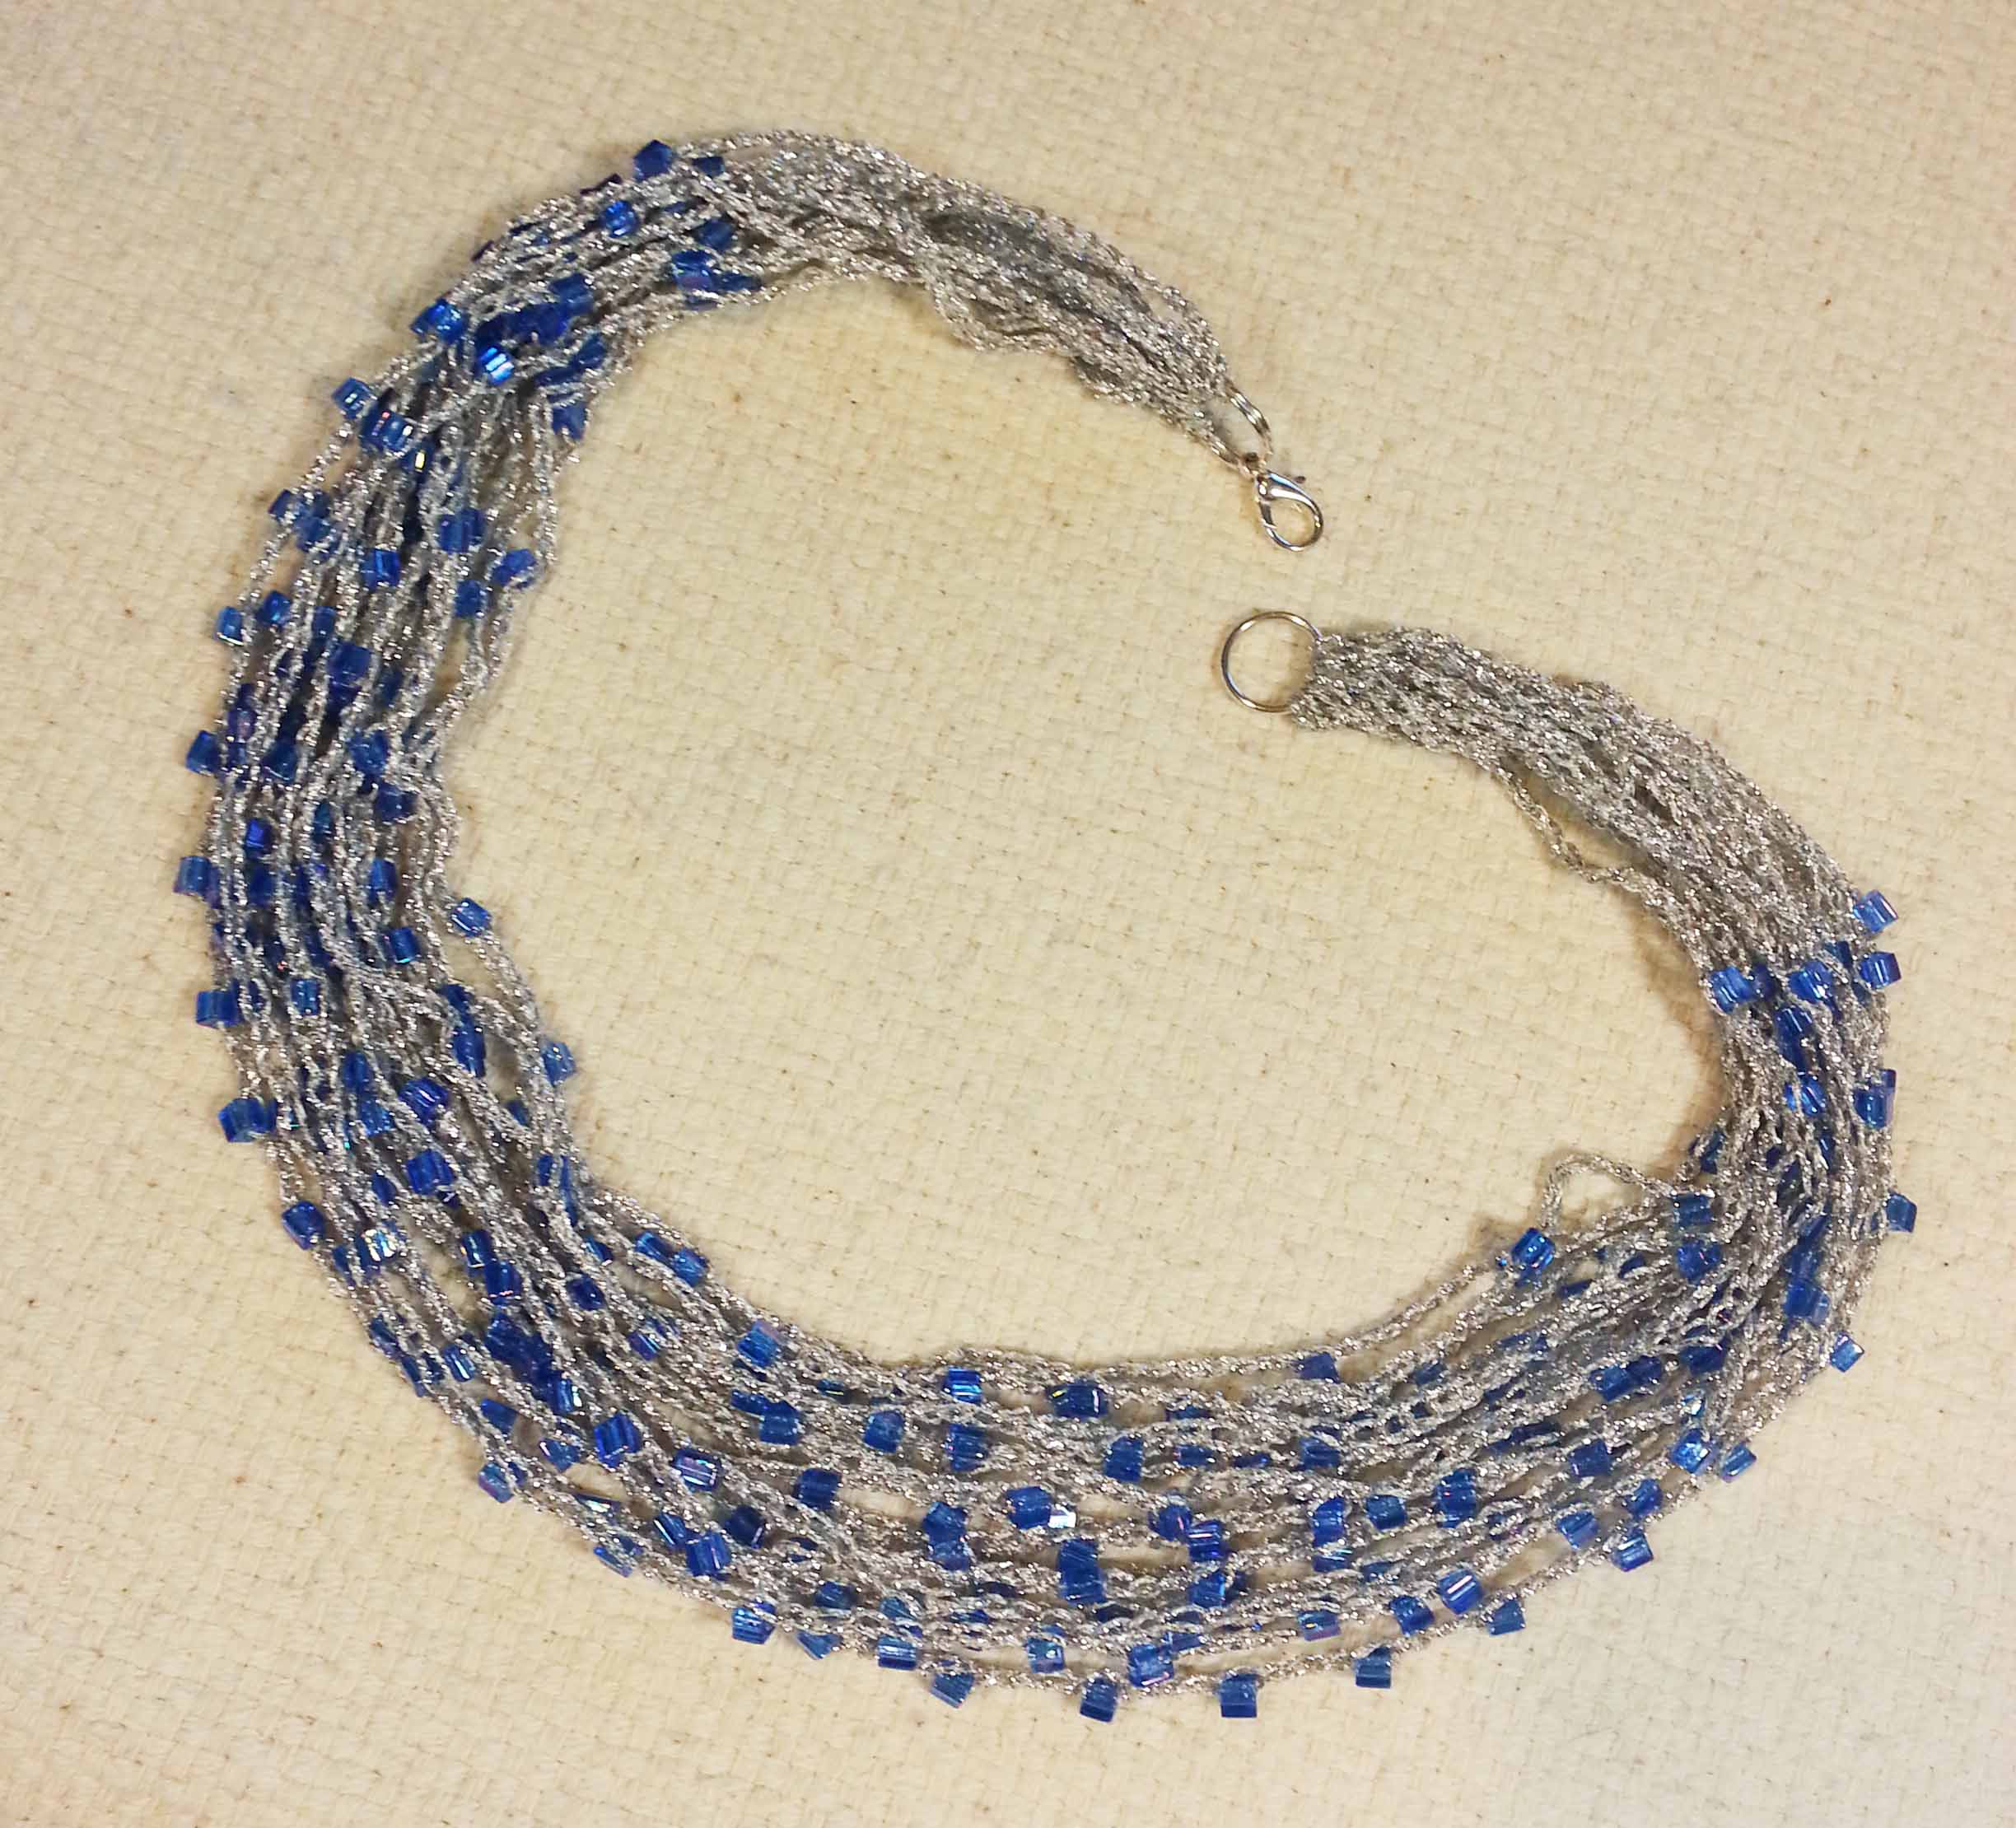
Before you begin crocheting, string all the beads you want to use onto the thread (I always add in a few extra when stringing my beads just to be on the safe side). Also work the ring of the lobster clasp onto one of your split rings.
Leaving about 6 inches of thread for your beginning tail make a slip knot and place loop on your hook. Slip st into one ring, chain 1 and single crochet into the ring to secure the end of your first strand.
You will work the necklace by working chained strands in 3 different styles:
I alternated working the various styles of strands until I had completed 15 strands (5 strands of each style). You could do more or less, you’ll just want to adjust the number of beads you string before starting your project.
Once you have crocheted all your chain strands and have made the final sc in the ring, fasten off with a six-inch long tail. Weave the ending and beginning tails in and trim off excess thread. If you need to you can secure the tails further with a drop of cyanoacrylate glue (sometimes known as “Super Glue”).
Tips and Tricks for Success
When I was working on my sample in the photos I kept getting carried away with crocheting the beaded chain intervals. About half way thru I discovered a little trick that really sped things up and saved me some frogging and frustration.
Start the next strand by crocheting the chain stitches before the first beaded chain. Bring the number of beads for the strand you are working close to your hook, and push the remaining beads further down your thread so you have plenty of thread to work with while crocheting the strand. Make a slip knot in the thread right before your extra beads and put a locking stitch marker in the loop.
Now work your strand of chains and beaded chains, when you run out of beads you know it is time to finish that strand and connect it to the opposite ring with a single crochet. If you use up the thread you had pulled up, just move the extra beads further down the thread, undo your slip knot and create another slip knot down the thread. Replace your stitch marker and finish your strand.
Note about the rings you use for the ends: I choose split rings because there is not an opening that the thread can slip thru causing your strands to drop off. If you prefer to use regular jump rings make sure that the opening in the ring is tightly closed.
I would also recommend placing a drop of thin cyanoacrylate glue over the join and let it dry completely before proceeding with your project. You want the thin runny type of glue that can penetrate the tight space between the 2 ends of your jump ring, not the thicker “gel” formulas that are also available. Obviously you want to have your lobster claw fastener placed on the jump ring before you seal it with the glue.
Now it’s your turn dear readers. Find some beads that appeal to you and crochet a Sophisticated Simplicity Necklace that will turn heads. No one needs to know how easy it was to make.
Snow is a reality where I live, sometimes I love it, other days it makes me cross to deal with it. But no matter what, I always find freshly fallen snow to be beautiful. Crocheted snowflakes are one of my very favorite Christmas decorations (and my favorite way to enjoy snow).
There are many ways to incorporate snowflakes into your holiday themed projects. They are great for using as embellishments on cards or gifts and you can stiffen them with a glue solution to hang them on your tree or in the window as ornaments. Sprinkle some glitter over them before the glue dries, to add a little sparkle.
This post contains affiliate links. I may receive compensation (at no additional cost to you) if you make a purchase using these links.
As my holiday gift to all my lovely readers here is my newest snowflake pattern. For those of you that prefer stitch charts to work from, or just want a nice PDF of the pattern, this pattern is available in my Ravelry Shop.
LACY SNOWFLAKES
designed by Andee Graves/M2H Designs
SKILL LEVEL: Intermediate
FINISHED SIZE: 4″ (10cm) diameter at widest point
THREAD: Red Heart Aunt Lydia’s Size #10 Crochet Cotton, (100% Cotton) white
CROCHET HOOK: US Steel #2 (1.5 mm) or size needed to obtain gauge.
GAUGE: First 4 rounds = 2” in diameter at widest point
FINISHED SIZE: 5 1/8″ (13cm) diameter at widest point
THREAD: Red Heart Aunt Lydia’s Size #3 Crochet Cotton, (100% Cotton) blue
CROCHET HOOK: US B (2.5 mm) or size needed to obtain gauge.
GAUGE: First 4 rounds = 2 3/4” in diameter at widest point
ADDITIONAL MATERIALS: Yarn needle, Stitch markers
SPECIAL STITCHES
Open Shell (Shl): (dc, ch 2, dc, ch 3, dc, ch 2, dc) in indicated st or sp.
Rnd 1: Ch 6, (dc, ch 2) 5 times in 6th ch from hook, sl st to 3rd ch of beginning ch-6.
Rnd 2: Turn (Sl st, ch 1, sc) in next ch-2 sp, (ch 4, sk next st, sc in next ch-2 sp) 5 times, ch 4, sl st to first sc of round.
Rnd 3: Ch 1, [(3 sc, ch 3, 3 sc) in next ch-4 sp] 6 times, sl st to first sc of round.
Rnd 4: Sl st in next 2 scs, sl st in next ch-3 sp, ch 5, (dc, ch 3, dc, ch 2, dc) in next ch-3 sp, (ch 2, Shl in next ch-3 sp) 5 times, ch 2, sl st in 3rd ch of beginning ch 5.
Rnd 5: Ch 1, turn, (sc in next ch-2 sp, ch 2, sk 4 sts, Shl in next ch-3 sp, ch 2, sk 4 sts) 6 times, sl st to first sc of round.
Rnd 6: Ch 5, turn, (*sk 3 sts, sc in next ch-2 sp, ch 2, sk next st, Shl in next ch-3 sp, ch 2, sk next st, sc in next ch-2 sp, ch 2, sk 3 sts,* dc in next sc, ch 2) 5 times; Repeat from * to * once, sl st in 3rd ch of beg ch-5.
Rnd 7: Ch 1, 2 sc next ch-2 sp, [*(sk next st, 3 sc in next ch-2 sp) twice, sk next st, (2 sc, ch 3, 2 sc) in next ch-3 sp, (sk next st, 3 sc in next ch-2 sp) twice,* (sk next st, 2 sc in next ch-2 sp) twice] 5 times, Repeat from * to * once, 2 sc next ch-2 sp, sl st to first sc of round.
FINISHING
Weave in all ends. If you want to stiffen your snowflakes for hanging ornaments the Stiffy Mod Podge product shown below is what I use.
If you can’t find it locally you can purchase it on Amazon. Click on the photo below to go right to Amazon.
This post contains affiliate links. I may receive compensation (at no additional cost to you) if you make a purchase using these links.
So much to be done and time is getting short. All those grand plans you had for crocheting up the perfect gift for family and friends are now down to the wire. For those of you looking for a quick crochet gift project, I and a few of my fellow designer/blogger friends have some suggestions for you.
Hurry Up Holiday Cowl by Tamara Kelly/Moogly
From the lovely Tamara Kelly over at Moogly the first pattern of her 2015 Moogly Holiday Mini CAL is available. Make this chunky cowl with one skein of Lion Brand Yarn Hometown USA… in less than an hour! Video tutorials included!
Coraline in Morocco Cowl by Simply Collectible Crochet
From Celina of Simply Collectible Crochet here is a list of some quick crochet projects that would make great gifts. I especially love her “Coraline in Morocco Cowl”. Make it in festive colors or a sparkly yarn and you have a lovely quick gift to brighten someone’s holiday. This would be a really great project for one of those lone balls of beautiful yarn that has been sitting in your stash for a couple of years un-loved.
From Jessie of Jessie-At-Home is her Last Minute Gift pattern Round-up from 2014. My favorite in this Round-up is the pattern for the “Lorraine” a wonderful wide ear warmer that buttons in the back. I especially like the version Jessie made with a big bold crocheted flower on it.
Peppermint Kisses Beanie – Kathy Lashley/ELK Studio
From Kathy of ELK Studio is the gorgeous “Peppermint Kisses” beanie. This pattern gives you 2 different band styles to choose from as well. I could see this hat worked in any combination of colors. You could even work it in your giftee’s school colors.
Smidgen Cozy – M2H Designs
One of my favorite recent designs for a quick crochet gift is my “Smidgen Cozy”. This project is quick to make because you are working with a large hook and very bulky yarn. All you need is yarn, hook, a pretty button and an evening to crochet up this cozy gift.
A lot of my patterns available for purchase thru my Ravelry Shop also work up quickly for gift giving.
Little Christmas Wreath – M2H Designs
One of my favorites to use as a Christmas brooch is my “Little Christmas Wreath”. You can work it up in any yarns you have available, just use the appropriate size hook to fit your yarn. The little wreaths can also be embellished with beads to make them even more festive.
Twisted Vs Cowl – M2H Designs
Another quick project is my “Twisted Vs Cowl”. This project again takes advantage of bulky yarn and a big hook, as well as an open stitch pattern, to speed you to completion of another gift.
Anna Moebius Cowl – M2H Designs
My all-time favorite crochet gift project for my female friends and relatives though is my “Anna Moebius Cowl”. I can complete one of these cowls in approximately 3 hours. I especially like to use yarns with long color changes as the stitch pattern shows them off spectacularly.
Hopefully one or more of the patterns you can find thru these links will be just what you need for your gift-making projects. Remember to be gentle with yourself and take lots of breaks while you are stitching away on those last-minute gifts.
Last Wednesday was the “Causal Crochet” meet-up at the Longmont Yarn Shoppe. The 3rd Wednesday of every month crocheters can get together from 10:30 a.m. to 12:30 p.m. to crochet and learn new crochet tips and tricks.
At last week’s meeting we started our CAL. We are making a corner to corner scarf to practice the corner-to-corner (C2C) technique. If you have never tried making corner-to-corner project this is a good starting project that works up fairly quickly. All the crochet skills you need are Chain, Slip Stitch, and Double Crochet.
Corner to corner projects are about the direction the stitches are worked. Projects begin with a single square, following rows of squares are worked on the diagonal with increases until the desired width is reached. Then rows of squares are worked along the diagonal with an increase at one end and decrease at the opposite end until the desired length is reached. Once the desired length is obtained, decreases are worked to square off the final corner.
The C2C Basics Scarf uses 3 different squares made with a ch-3 and 3 dc. Increase, Regular and Decrease Squares.
The first square of the C2C project is basically an Increase square.
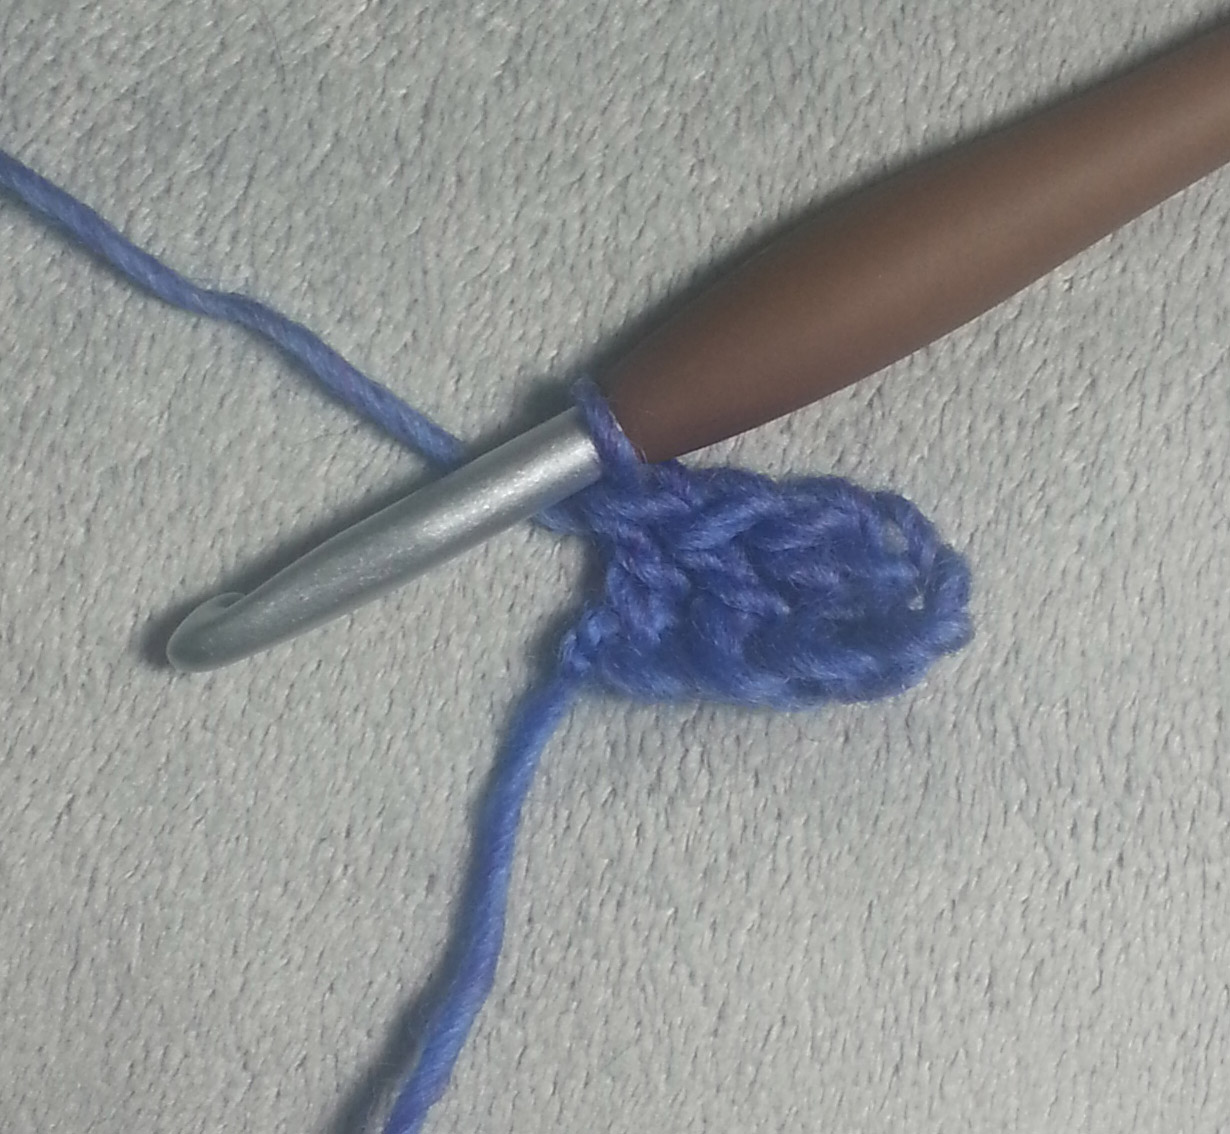
Beginning Chain 6
You start by chaining 6, you will want to keep all your chain stitches relaxed as you will be working back into the actual chains.
First Square completed
The first square is counted as your Row 1 for this pattern.
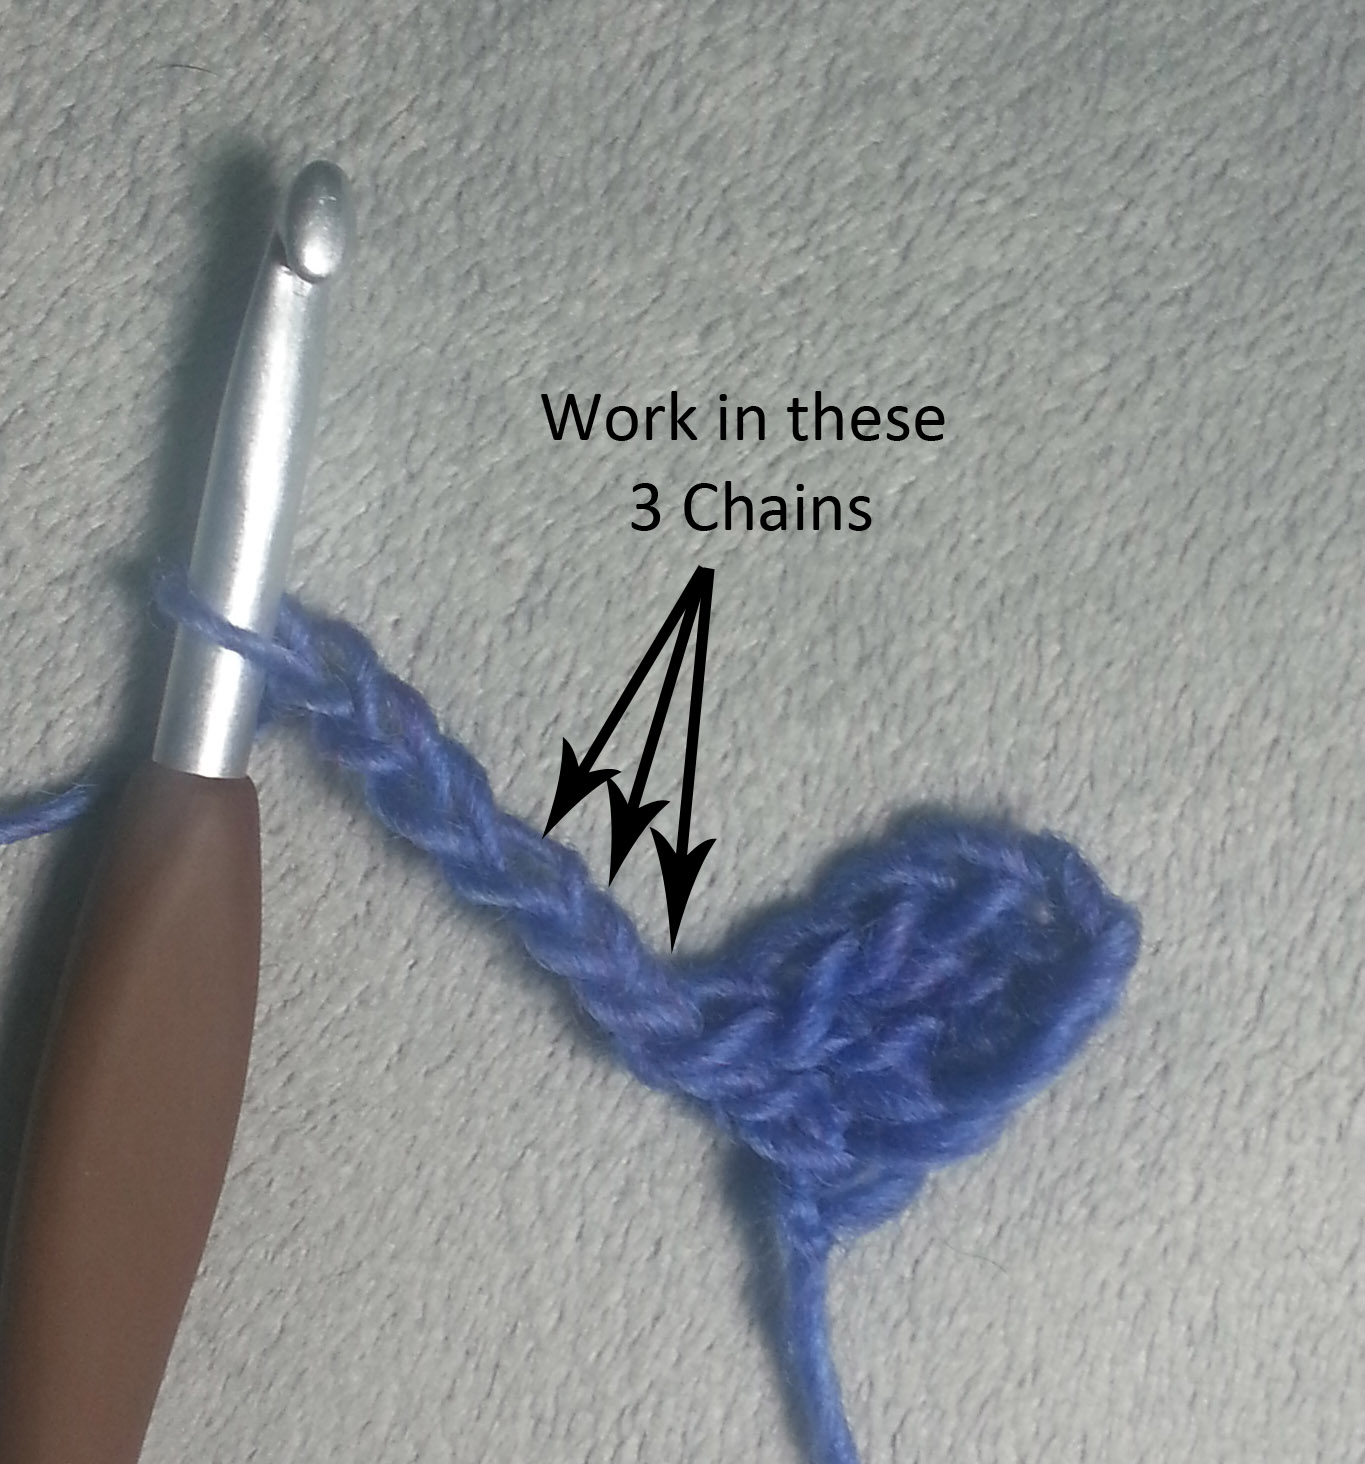
Beginning Row 2, Ch 6 work in 4th, 5th, & 6th chain stitches from hook.
To begin Row 2 you start with an Increase Square again.
Finished 1st square of Row 2, flip up Row 1 square
Once you have made that square, you flip up the first square to work in it’s begining chain 3. Marked in the photo above with yellow dots.
Row 2, Regular Square completed.
The second square for Row 2 is a Regular Square. This involves working a slip stitch, ch 3, dc all in the first chain stitch (first yellow dot on the right), then working a dc in each of the next 2 chains of that same square.
I prefer to crochet all my C2C squares by working into the chains. You can also work the Regular and Decrease squares by working into the space below the Ch-3, but this does give you a very different look to the overall fabric and the edges.
Once you have worked the number of increase rows you want for the size of your project, you will need to start decreasing along one side to keep your rows the same length (working “even”). Sometimes you will create your increase by working on top of the last square in the row and your decrease by not working on top of the last square in the row.
When you need an actual Decrease square will be when your last square in the previous row ends next to the completed fabric. You will use a ch-3 to get your hook back to the right spot. The solitary yellow dot in the photo above is where you work the connecting slip stitch at the end of the previous row.
Sl st & Ch 3 in first ch of next ch-3.
Your ch-3 will be connected to the first chain of the next ch-3 (marked with 3 yellow dots) with a slip stitch followed by a chain 3.
You then work the same as you would for a Regular Square. Continue working regular squares in the chain-3s marked with yellow dots.
Your next “even” row will begin like Row 2, with an Increase square, but will end with a square worked into the ch-3 of the next to last square of the previous row.
Beginning Decreases for 2nd Corner
Once you’ve crocheted the “even” rows to the length you want your project you need to make your second corner by decreasing at both ends of each row. The red square in the above photo is where the last square is worked for that row.
Next to last row of corner decrease.
Final square for corner decrease, the last sl st is worked into the chain indicated with a blue dot in the above photo.
Now you are ready to make your own C2C project. Be sure to read thru the pattern thoroughly before starting, and refer to the tutorial above if you get stuck.
C2C Basics Scarf
Designed by Andee Graves
Skill level: Easy
Finished Size:
Approximately 6”wide x 48” long
Materials:
Yarn
Ella Rae Seasons (76% Acrylic, 14% Wool, 10% Polymide; 3.52 oz/100g, 219 yds/200m) 1 ball
Hook
J-10 / 6mm
Notions
Yarn/tapestry needle
Stitch markers
Gauge
5 squares = 4 inches
Abbreviations/Special Stitches
Increase Square: Ch 6, dc in 4th ch from hook, dc in next 2 chs
Decrease Square: Ch 3, (sl st, ch 3, dc) in top of ch-3 of next square, dc in next 2 chs of same ch-3.
Regular Square: (Sl st, ch 3, dc) in top of ch-3 of next square, dc in next 2 chs of same ch-3.
Pattern Notes:
When working into chain stitches go under 2 strands of yarn.
Your beginning tail will help you identify the bottom right hand (or left hand) corner of your scarf when you begin working even rows. It is also helpful to mark the bottom (first) end of your scarf with a stitch marker.
Instructions
INCREASING FOR FIRST CORNER
Row 1/First Square: Ch 6, dc in 4th ch from hook, dc in next 2 chs. [1 ch-3, 3 dc]
Row 2: Ch 6, dc in 4th ch from hook, dc in next 2 chs, flip work up to (sl st, ch 3, dc) in top of ch-3 of 1st square, dc in next 2 chs of same ch-3. [2 ch-3, 6 dc {2 squares}]
Row 3: Ch 6, dc in 4th ch from hook, dc in next 2 chs, flip work up to* (sl st, ch 3, dc) in top of ch-3 of next square, dc in next 2 chs of same ch-3*; Repeat from * to * once. [3 ch-3, 9 dc {3 squares}]
Row 4: Ch 6, dc in 4th ch from hook, dc in next 2 chs, flip work up to* (sl st, ch 3, dc) in top of ch-3 of next square, dc in next 2 chs of same ch-3*; Repeat from * to * until work in ch-3 sp of last square in previous row. [4 ch-3, 12 dc {4 squares}]
Rows 5-7: Repeat Row 4. Count at end of Row 7 [7 ch-3 sp, 21 dc {7 squares}]
WORKING EVEN ROWS
Row 8: Ch 3, flip work up, *(sl st, ch 3, dc) in top of ch-3 of first square, dc in next 2 chs of same ch-3*; Repeat from * to * until work in ch-3 of last square in previous row.
Row 9: Ch 6, dc in 4th ch from hook, dc in next 2 chs, turn work to* (sl st, ch 3, dc) in top of ch-3 of next square, dc in next 2 chs of same ch-3*; Repeat from * to * until work in ch-3 of next to last square in previous row, sl st in top of ch-3 of last square in previous row. [7 ch-3 sp, 21 dc {7 squares}]
Row 61: Ch 3, turn, (sl st, ch 3, dc) in top of ch-3 of first square, dc in next 2 chs of same ch-3*; Repeat from * to * until work in ch-3 of next to last square in previous row, sl st in top of ch-3 of last square in previous row. [7 ch-3 sp, 18 dc {6 squares}]


 I love “Mochi Plus” because it comes in so many lovely color combinations. I enjoy working with and designing with yarns that have long runs of color that blend together and this yarn doesn’t disappoint. My original scarf was 6.5 inches wide and 75 inches long. Using the “Mochi Plus” and the smaller hook this scarf came out 3.5 inches wide and 41 inches long before blocking.