Dizzy Corner Afghan Square

Tomorrow is my birthday and I am keeping with my tradition of celebrating with a blog pattern for my readers. Once again I wanted to have some fun with my favorite crochet technique: Spirals. I also wanted to play with some textures in this project and incorporated clusters and cross stitches for that aspect.

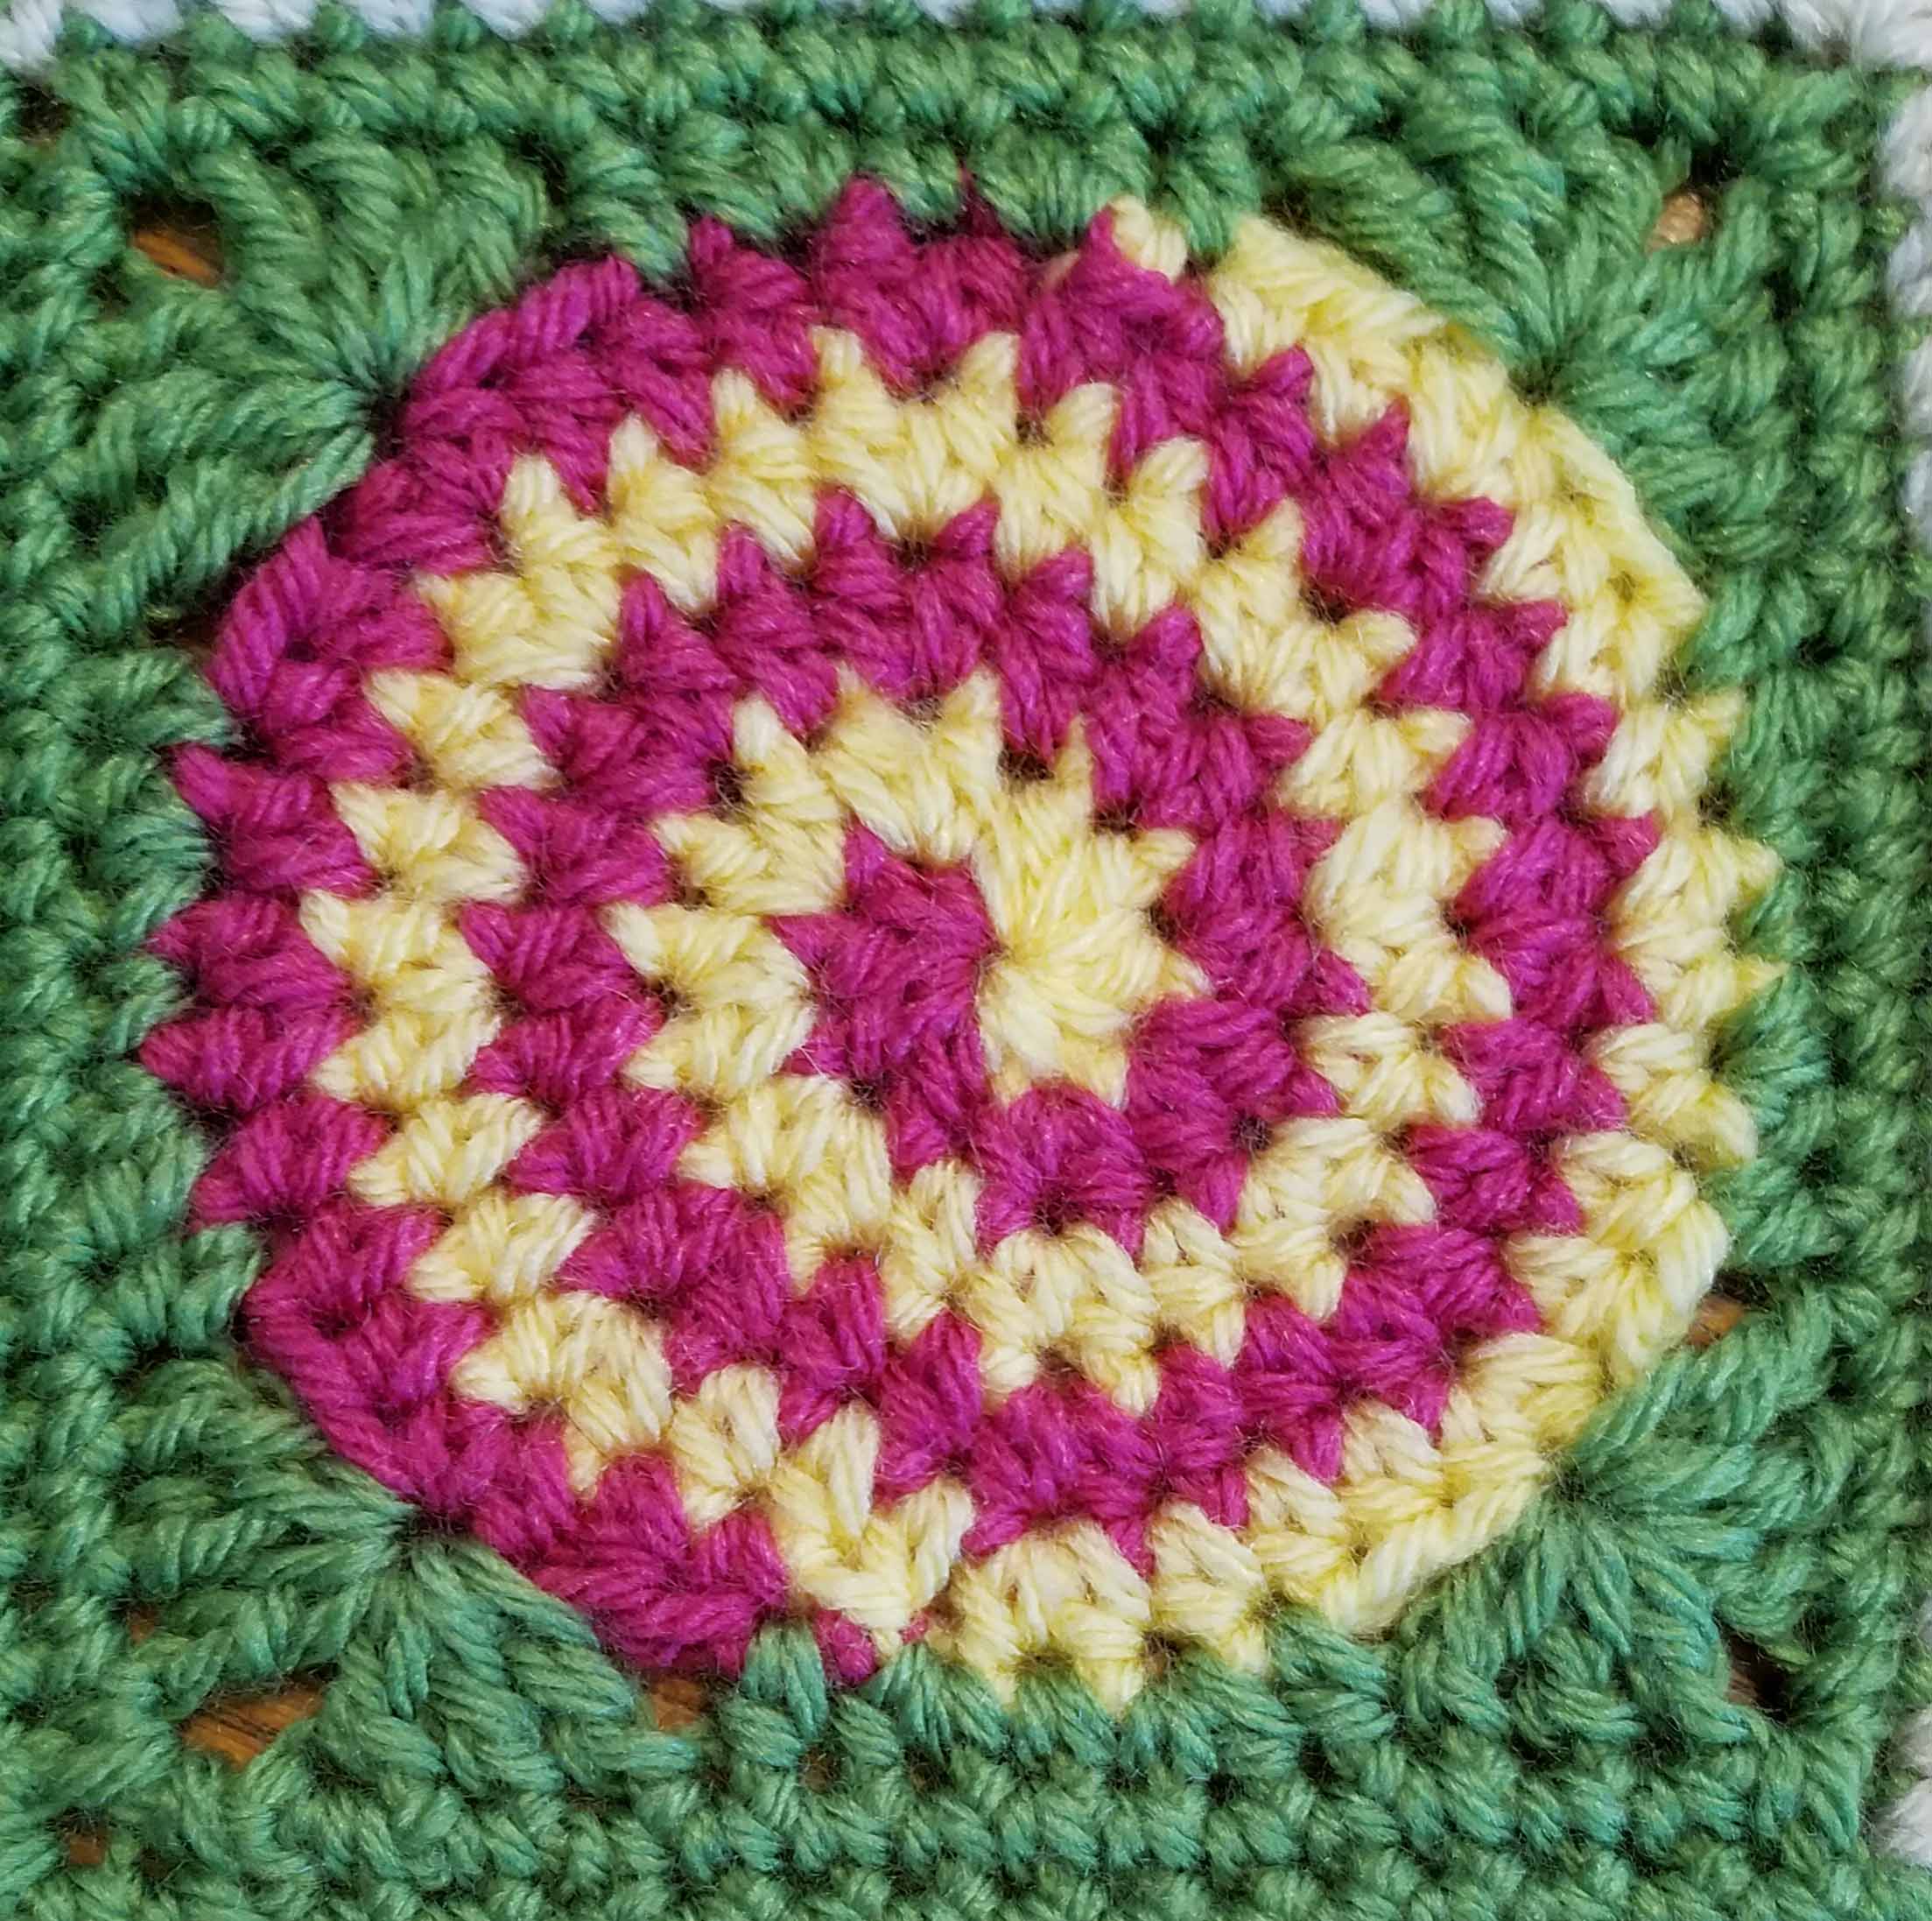
The result is my “Dizzy Corner Afghan Square”.

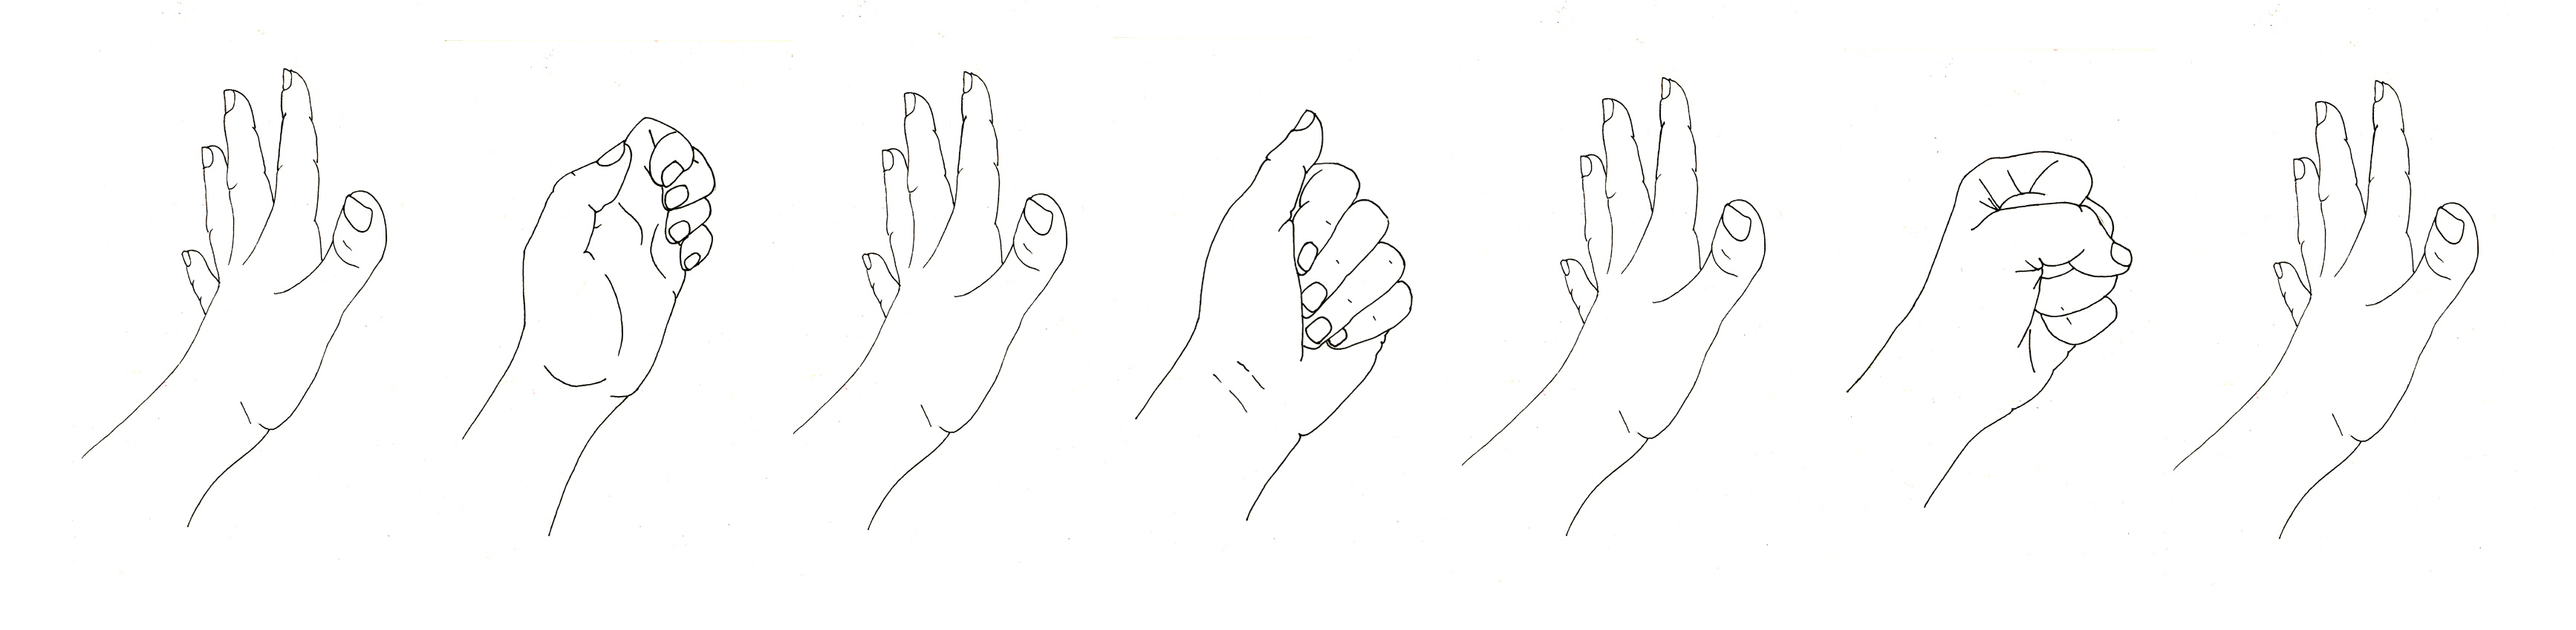
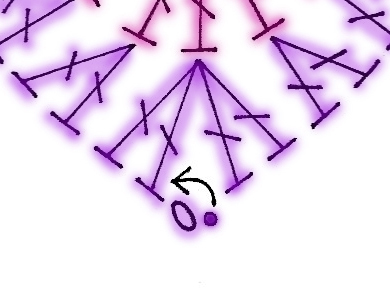
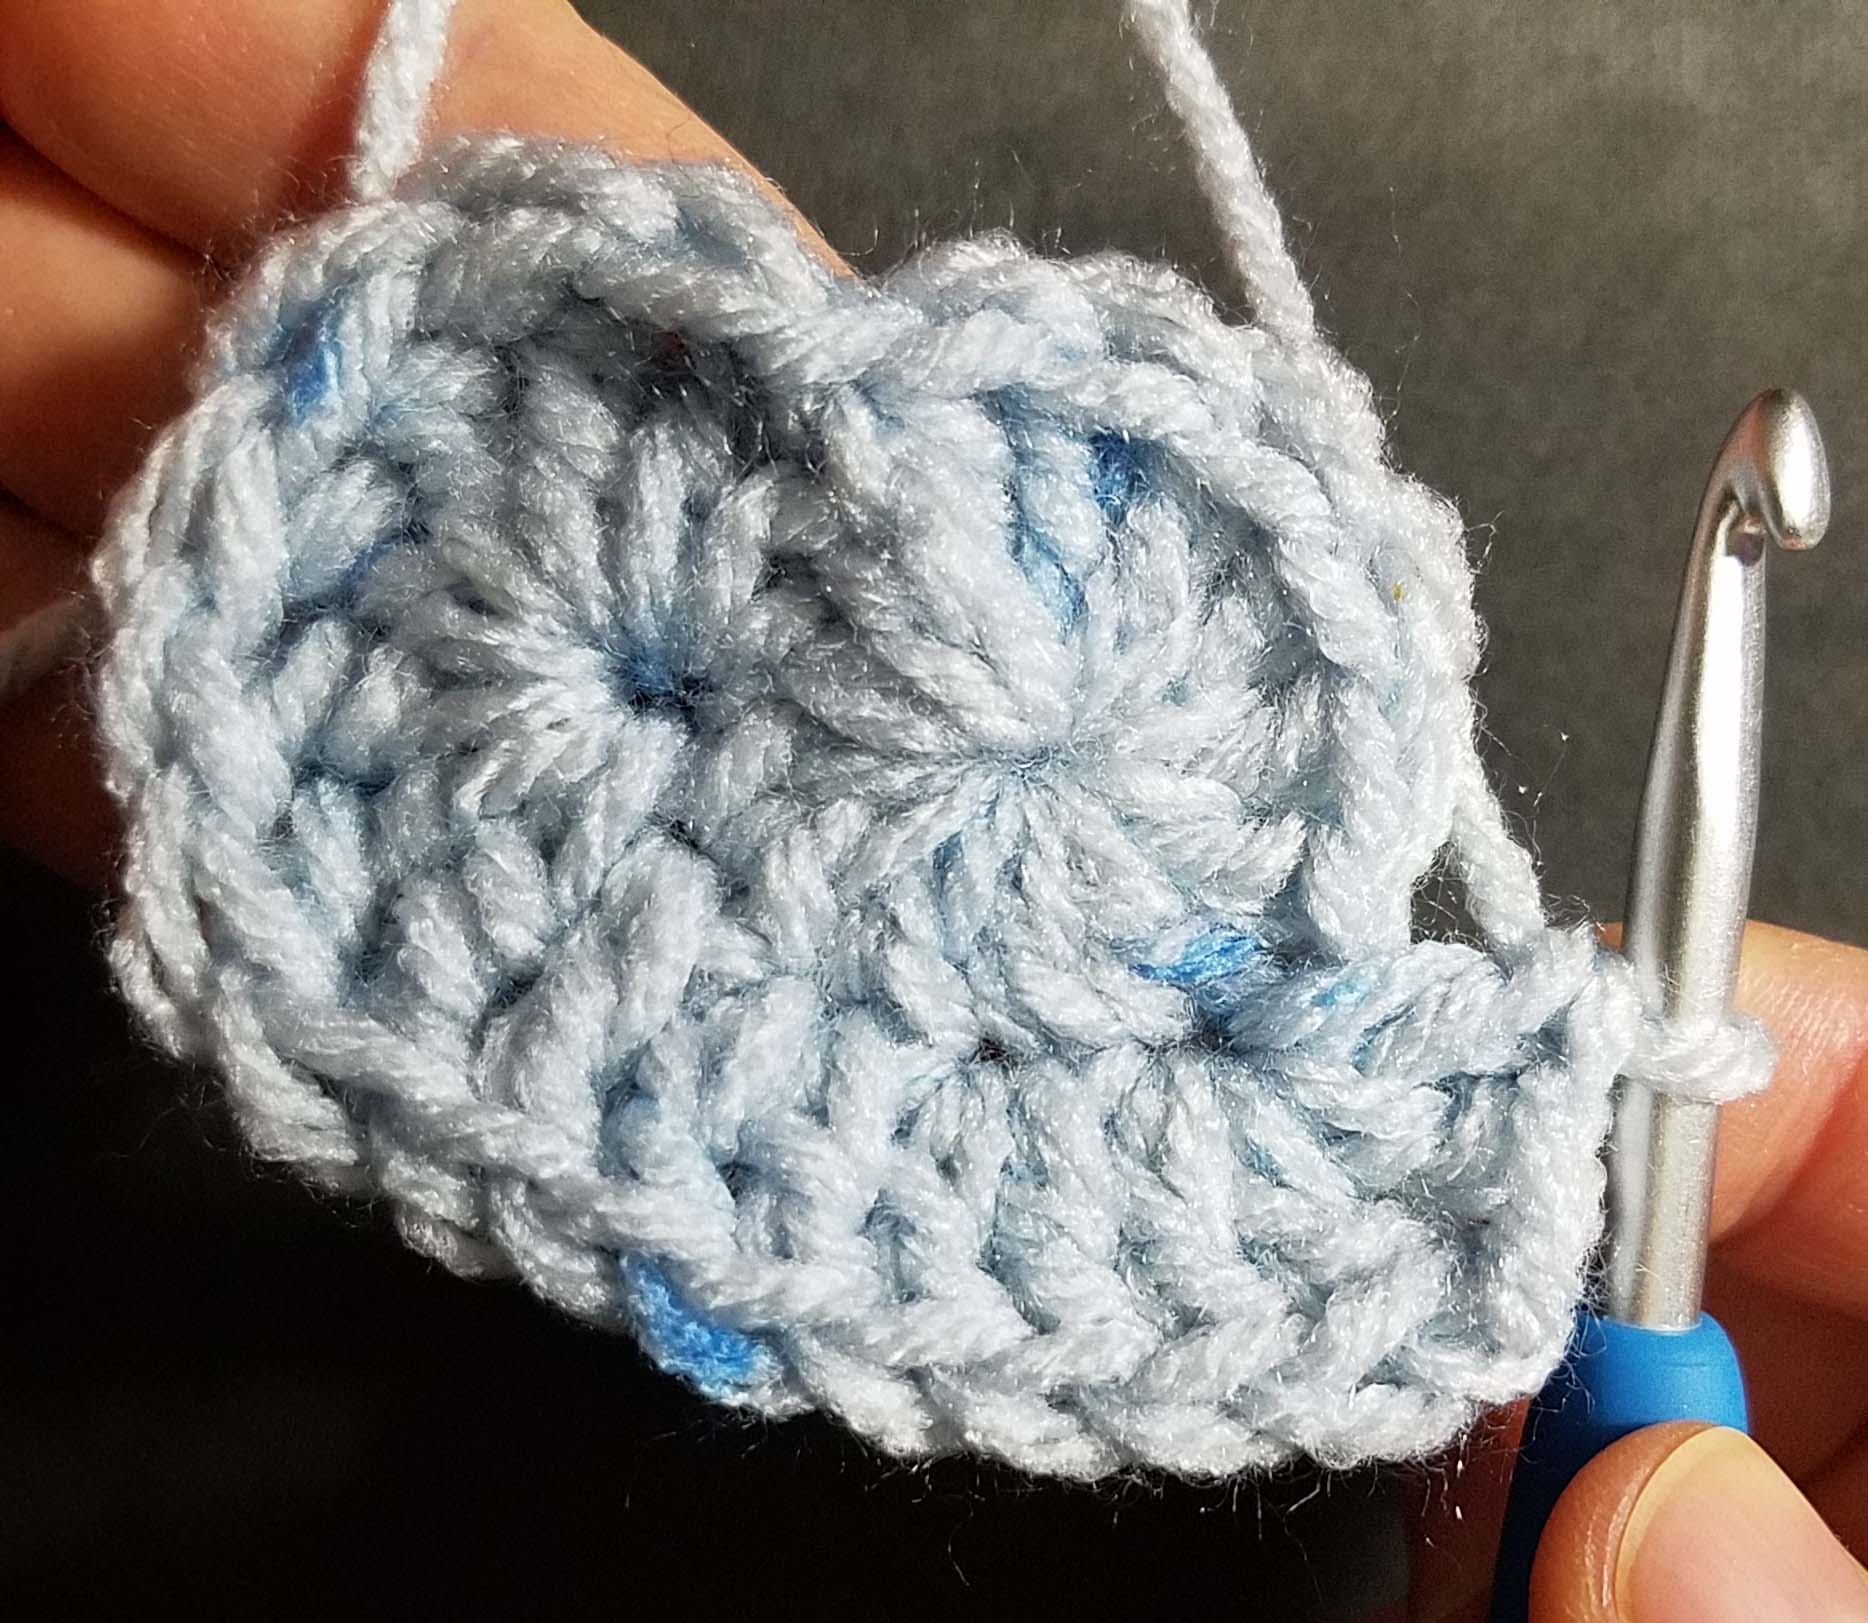
Working spirals can be a little tricky, and this spiral is made with 2 arms in 2 colors. I’ve used my favorite method of spiral making using stitch markers to help keep track of the increases and the ends of each round.

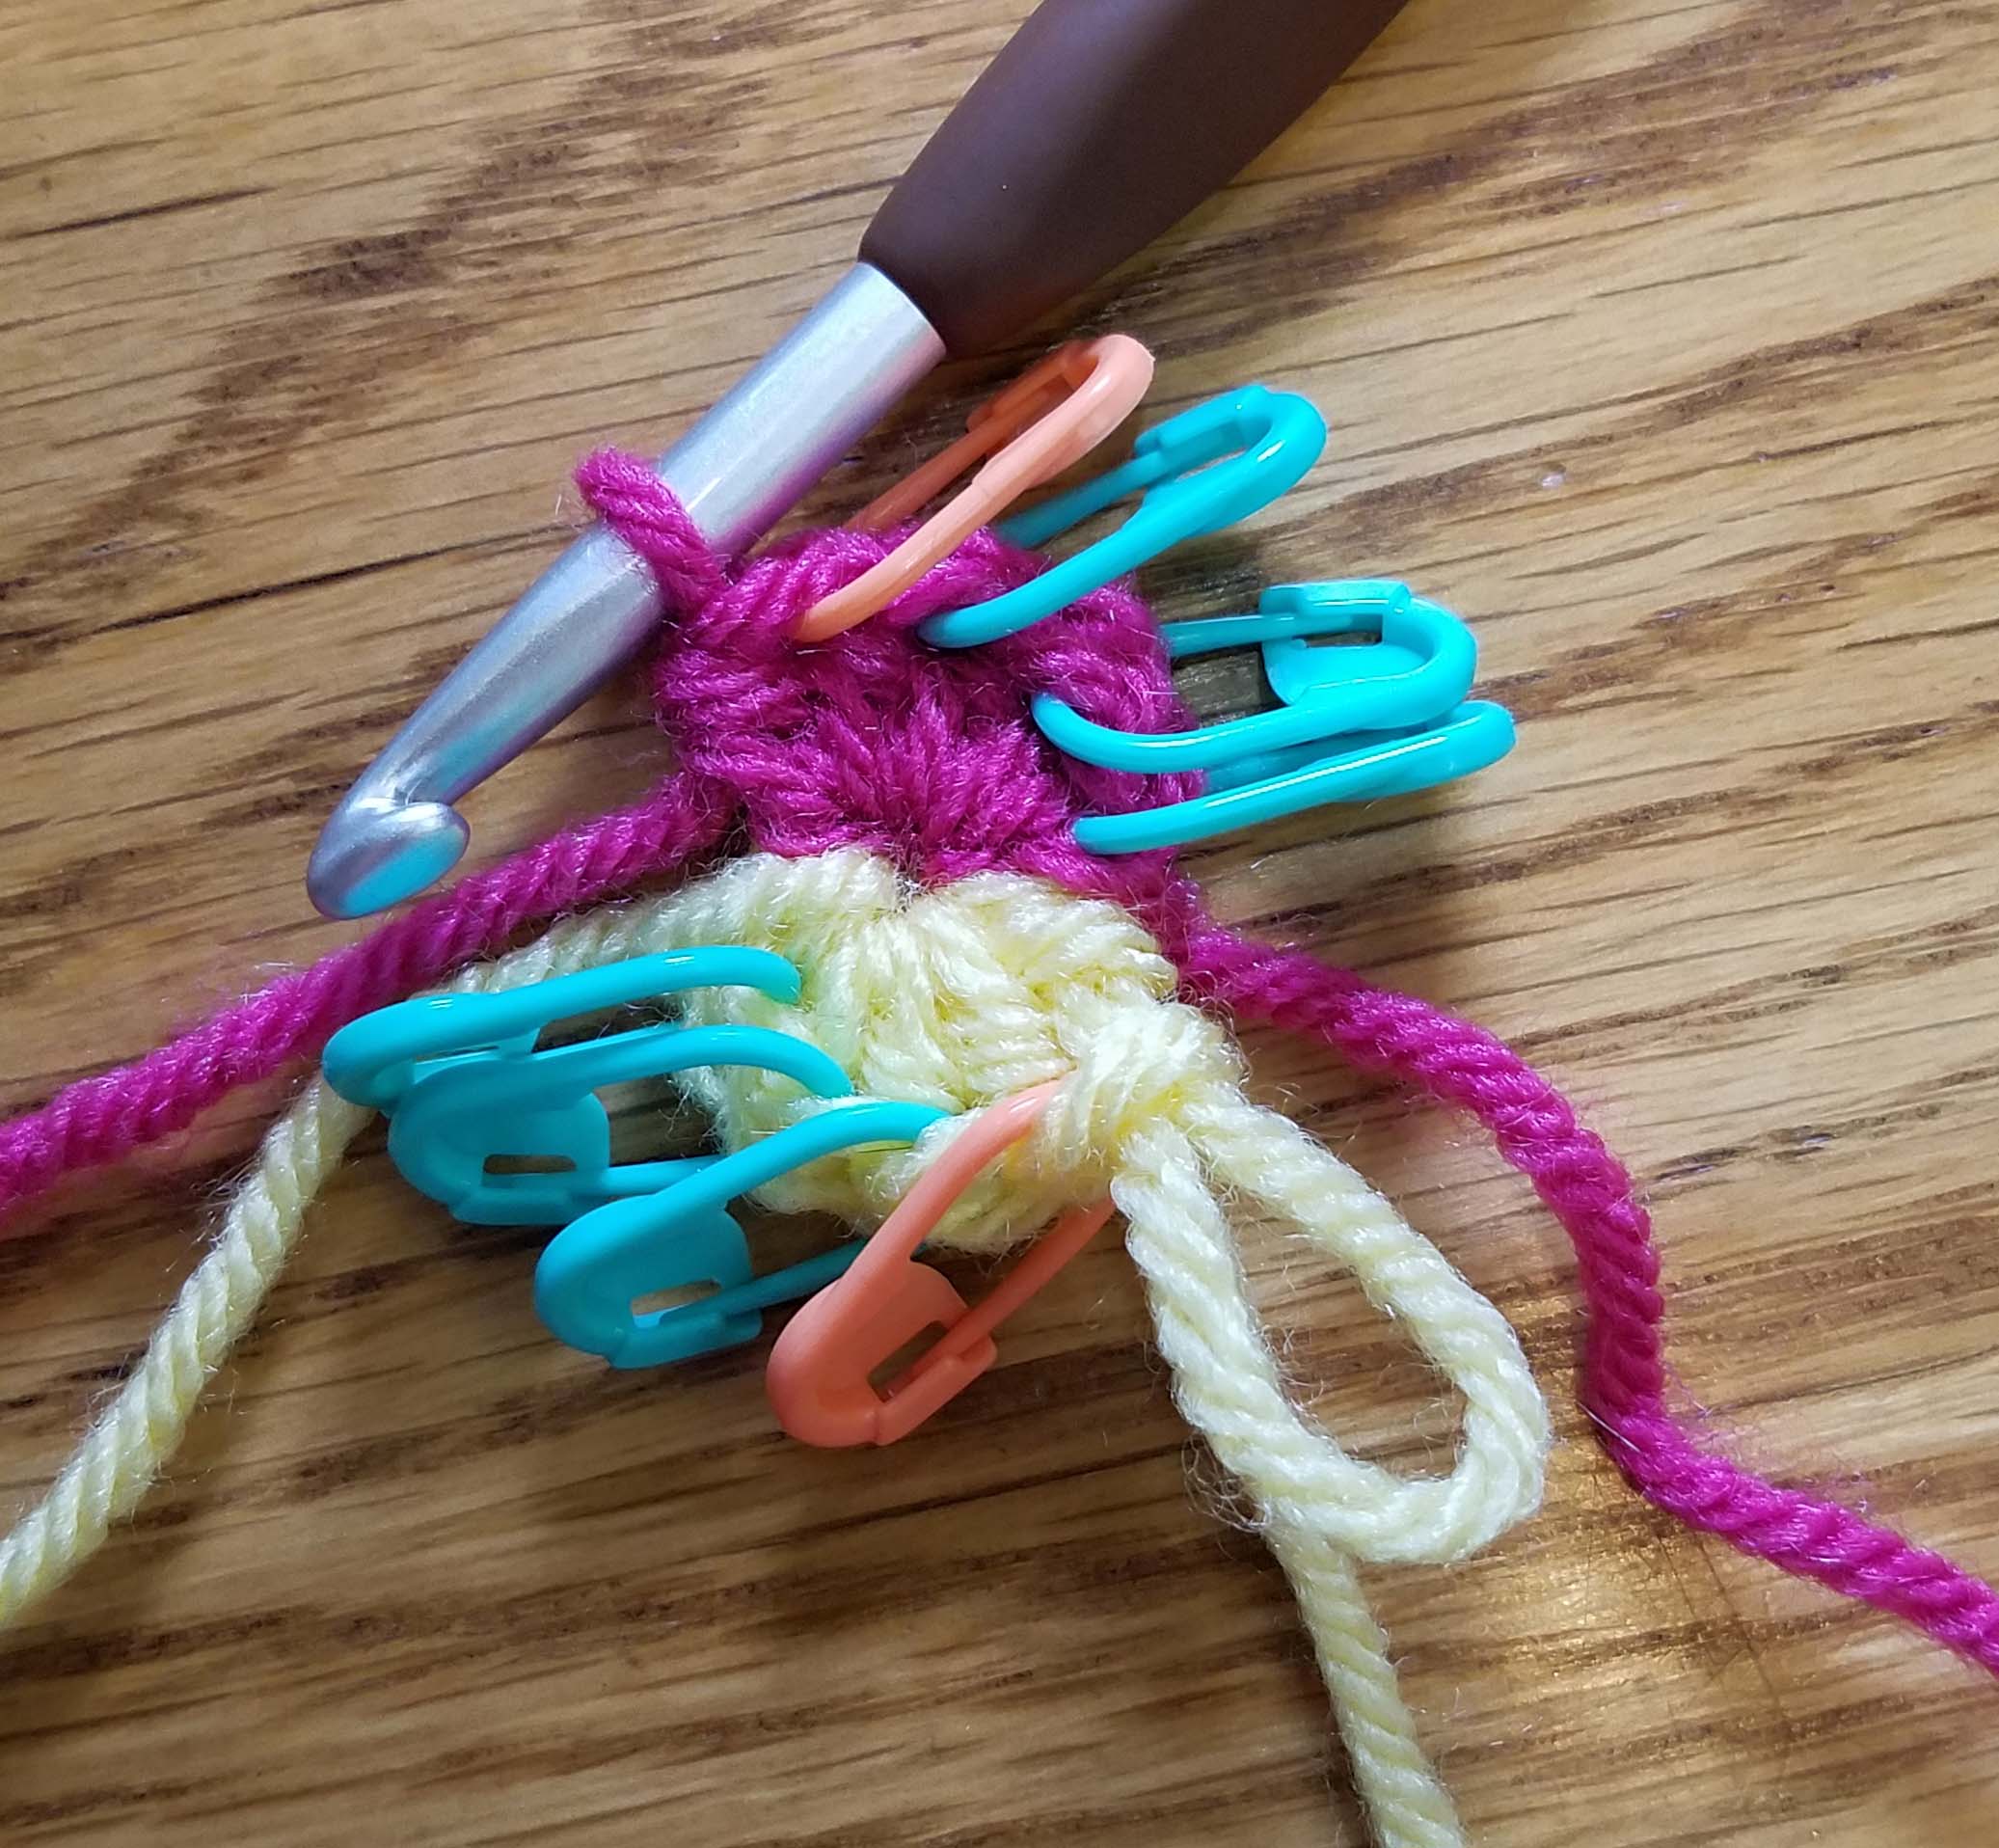
You mark each stitch of Round 1, using a different color stitch marker for the last stitch in each color.

In the following 4 rounds you work 1 stitch in each unmarked stitch and 2 stitches in each marked stitch, moving the stitch marker up to the 2nd stitch.

End of Round 5 Spiral stitches

When you work a continuous spiral in crochet you will need a step-up and a step-down to get a perfect round. At the beginning of Round 1 the first stitch is a single crochet followed by 3 half double crochets to create the step-up.

Then Round 5 of the spiral ends with a step down. In the instructions for the pattern I have broken out the step-down instructions at the end of Round 5.

Dizzy Corner Afghan Square

Designed by Andee Graves

Skill level:       Intermediate

Finished Size:

12” square

Materials:

Yarn

Worsted wt (Sample uses Lion Brand Yarns “Vanna’s Choice” 100% Acrylic (5 oz/142g, 251 yd/230 m)

Color A: #159 Lemon (sample used approximately 22 yards/12 grams)

Color B: #112 Raspberry (sample used approximately 20 yards/11 grams)

Color C {primary color}: #171 Fern (sample used approximately 62 yards/35 grams)

Color D: # 098 Fisherman (sample used approximately 30 yards/17 grams)

Hook

J / 6mm

Notions

Yarn/tapestry needle

Stitch markers

Gauge

First 5 rounds of pattern = 4” across square

Abbreviations/Special Stitches

Standing Double Crochet (Standing dc): make slip knot in yarn and place loop snugly on shaft of hook, yo and insert hook into indicated st, yo, pull up a loop, (yo, pull thru 2 loops on hook) twice.

Standing Single Crochet (Standing sc): make slip knot in yarn and place loop snugly on shaft of hook, insert hook into indicated st, yo, pull up a loop, yo, pull thru 2 loops on hook.

Loose slip stitch (loose slip st): Insert hook in indicated place, YO, pull up a loop thru place and loop on hook keeping loose like making a chain st.

Joining slip st (slip st): Insert hook in indicated place, YO, pull up a loop thru place and loop on hook, continue to pull up on working loop until original loop is tight.

Extended Double Crochet (Edc): YO, insert hook in indicated st or sp, YO pull up a loop, YO pull thru first loop on hook, (YO, pull thru 2 loops on hook) 2 times.

2 double crochet Cluster (Cl): (YO, insert hook in indicated st or sp, YO pull up a loop, YO pull thru 2 loops) 2 times, YO pull thru remaining loops on hook.

Double Crochet Cross Stitch (X-st): Skip one st, dc in next st, working around previously made dc, dc in skipped st. Each X-st uses 2 sts and creates 2 sts.

Pattern Notes:

Start square with an adjustable slip knot. Beginning tail tightens the loop on the hook.

Stitch counts at the end of each round and row are shown in italicized brackets at end of each round or row.

Square starts with a 2 color hdc spiral circle in one corner, then rounds to square the circle. Next 16 textured mitered rows are worked off 2 sides of that square, ending with 2 rounds of sc encasing entire afghan square.

When instructions specify “sl st loosely”, this means work those slip stitches similar to a chain stitch and do not pull the working loop to tighten them as in a joining slip stitch. You will be working into those loose slip stitches.

Instructions

Rnd 1 (RS): Begin with Color A, ch 2, (sc, 3 hdc) in second ch from hook, pull up long loop of color A and remove hook, insert hook in same ch as previous work, pull up a loop of Color B on shaft of hook, ch 1, (sc, 3 hdc) in same ch st, pull beginning tail of Color A to close center tightly. Place st markers in each st using a different color marker to indicate the last st of each color section. [1 sc, 3 hdc, in each color]

Rnd 2: Begin with Color A, *(2 hdc in marked st, move st marker up to second st worked) 4 times*, pull up loop of Color A, switch to Color B, Repeat from * to *. [8 hdc, in each color]

Rnd 3: Begin with Color A, *(hdc in next st, 2 hdc in marked st, move st marker up to second st worked) 4 times*, pull up loop of Color A, switch to color B, Repeat from * to *. [12 hdc, in each color]

Rnd 4: Begin with Color A, *(hdc in next 2 sts, 2 hdc in marked st, move st marker up to second st worked) 4 times*, pull up loop of Color A, switch to Color B, Repeat from * to *. [16 hdc, in each color]

Rnd 5: Begin with Color A, *(hdc in next 3 sts, 2 hdc in marked st, move st marker up to second st worked) 4 times*, pull up loop of Color A, switch to color B, Repeat from * to * once, [Count at this point is 20 hdc in each color]

step down: **hdc next st, sc next st, slip st loosely in back loop and back bar of next st, slip st tightly in back loop and back bar of next st**, fasten off Color B, switch back to Color A, Repeat from ** to ** once, fasten off Color A. [21 hdc, 1 sc, 2 slip st, in each color] 4”diameter.

To prepare for  working round to square, remove every other st marker leaving 4 markers equally spaced around circle.

Rnd 6: With RS facing attach Color C yarn with a standing dc in any marked st, 2 Edc in same st, *skip 2 sts, hdc next st, hdc & sc next st, sc next st, sc & hdc next st, hdc next st, skip 2 sts, (2 Edc, dc, ch 2, dc, 2 Edc) nextmarked st, move marker to ch-2 sp just made*; Repeat from * to * 2 times; skip 2 sts, hdc next st, hdc & sc next st, sc next st, sc & hdc next st, hdc next st, skip 2 sts, (2 Edc, dc) in first worked st, ch 2, slip st to first dc of Rnd. [16 Edc, 8 dc, 16 hdc, 12 sc, 4 ch-2 sp]

Rnd 7: Ch 1, *sc in next 13 sts, (sc, ch 2, sc) in marked ch-2 sp*; Repeat from * to * 3 times, slip st to first st of Rnd, fasten off Color C. [60 sc]

Row 8: With RS facing attach Color D with a standing sc in corner ch-2 sp, sc next 15 sts, (sc, ch 2, sc) in next corner ch-2 sp, sc next 15 sts, sc in next corner ch-2 sp. [34 sc, 1 ch-2 sp]

Row 9: Ch 1, turn, sc in first st, *Cl next st, sc next st*; Repeat from * to * until work in st before corner ch-2 sp, (sc, ch 2, sc) in ch-2 sp, sc next st, Repeat from * to * until work in last st of previous row. [16 Cl, 1 ch-2 sp, 18 sc]

Row 10: Ch 1, turn, sc in first st, sc in each st until work in last st before corner ch-2 sp, (sc, ch 2, sc) in corner ch-2 sp, sc in each st until work in last st of previous row. Fasten off Color D. [38 sc, 1 ch-2 sp]

Row 11: With RS facing attach Color C with standing dc, dc in each st toward corner until work in last st before ch-2 sp, (2 dc, ch 2, 2 dc) in ch-2 sp, dc in each st away from corner until work in last st of previous row, Fasten off Color C. [42 dc, 1 ch-2 sp]

Row 12: With RS facing attach Color A with standing sc, Repeat Row 10. [42 sc, 1 ch-2 sp]

Row 13: Turn, sc in first st, ch 2, *X-st over next 2 sts*, Repeat from * to * 9 times, dc next st, (2 dc, ch 2, 2 dc) in ch-2 sp, dc next st, Repeat from * to * 10 times, dc in last st of previous row. [20 X-sts, 8 dc, 1 ch-2 sp]

Row 14: Repeat Row 10 in Color A, Fasten off Color A. [50 sc, 1 ch-2 sp]

Row 15: With RS facing attach Color C with standing dc, Repeat Row 11, Fasten off Color C. [54 dc, 1 ch-2 sp]

Row 16: With RS facing attach Color B with standing sc, Repeat Row 10. [56 sc, 1 ch-2 sp]

Row 17: Ch 1, turn, (sc next st, dc next st) 14 times, (sc, ch 2, sc) in ch-2 corner space, (dc next st, sc next st) 14 times. [28 dc, 30 sc, 1 ch-2 sp]

Row 18: Ch 1, turn, Repeat Row 10, Fasten off Color B. [60 sc, 1 ch-2 sp]

Row 19: With RS facing attach Color C with standing dc, Repeat Row 11, Fasten off Color C. [64 dc, 1 ch-2 sp]

Row 20: With RS facing attach Color D with standing sc, Repeat Row 10. [66 sc, 1 ch-2 sp]

Row 21: Turn, sc in first st, ch 2, *X-st over next 2 sts*, Repeat from * to * 15 times, (2 dc, ch 2, 2 dc) in ch-2 sp, Repeat from * to * 16 times, dc in last st of previous row. [32 X-sts, 6 dc, 1 ch-2 sp]

Row 22: Repeat Row 10, Fasten off Color D. [72 sc, 1 ch-2 sp]

Weave in all tails so far.

Row 23: With RS facing attach Color C with standing dc, Repeat Row 11, DO NOT fasten off Color C. [76 dc, 1 ch-2 sp]

Edging Rounds

Rnd 1: With RS facing turn work counter clockwise to work along edges of Rows, ch 1, 2 sc in side of Row 23, sc in side of Row 22, 2 sc in side of Row 21, sc in side of Row 20, 2 sc in side of Row 19, sc in side of Row 18, sc in side of Row 17, sc in side of Row 16, 2 sc in side of Row 15, sc in side of Row 14, 2 sc in side of Row 13, sc in side of Row 12, 2 sc in side of Row 11, sc in side of Row 10, sc in side of Row 9, sc in side of Row 8, sc in corner ch-2 sp of beginning square, sc in next 15 sts,

(sc, ch 2, sc) in next corner ch-2 sp,

sc in next 15 sts, sc in next corner ch-2 sp of beginning square, sc in side of Row 8, sc in side of Row 9, sc in side of Row 10, 2 sc in side of Row 11, sc in side of Row 12, 2 sc in side of Row 13, sc in side of Row 14, 2 sc in side of Row 15, sc in side of Row 16, sc in side of Row 17, sc in side of Row 18, 2 sc in side of Row 19, sc in side of Row 20, 2 sc in side of Row 21, sc in side of Row 22, 2 sc in side of Row 23,

ch 2, turn and sc in top of first st of Row 23, sc in next 37 sts,

(sc, ch 2, sc) in next corner ch-2 sp,

sc in next 38 sts, ch 2, slip st to first sc of Rnd 1. [156 sc, 4 ch-2 sp]

Rnd 2: Ch 1, *sc in each st until work in last st before ch-2 sp, (sc, ch 2, sc) in ch-2 sp*; Repeat from * to * 3 times, slip st to first sc of Rnd 2, fasten off. [164 sc, 4 ch-2 sp]

Finishing

Weave in tails and block.

Flatirons Shawl

The Flatirons Shawl is my latest independent published design. This was what I was working on during our Mount Rushmore/Eclipse road trip. It is made with Theodora’s Pearls “Auxanometer” hand-dyed yarn, dyed in Longmont. This is a lovely rayon yarn that has beautiful sheen and drape in the finished project. Each hank contains approximately 400 yards of fingering weight yarn.

It is constructed of 3 triangles crocheted continuously from one triangle to the next, creating an asymmetrical wrap that has only 4 tails to weave in at the finish. There are 2 different lace patterns used to create the triangles and 2 colors of yarn to add textural interest. The triangles inspired the name “Flatirons” because of the dramatic rock formations bordering the Boulder Valley.

Back view of Kerchief wrap

Between the yarn and the shape this is an extremely wearable shawl. I tried styling it a number of ways on Collette.

Pinned Ends Cowl style

For this wearing option I pinned the two tips of the shawl at the back of the neck and made a doubled circle across the shoulders to create a cowl look.

Fastened with Shawl Pin

Then there is always the useful shawl pin option. This style really shows off the drape of the fabric and gives great coverage of the shoulders.

The pattern is an advanced intermediate level, so a definite skill builder. It involves working 4 row repeating lace patterns, decreases, color work, and changing direction of stitches. The pattern contains stitch charts for the lace pattern in each triangle as well as a detailed schematic for the edging directions.

Foothills Sunrise
Chautauqua Moonlight
Boulder Canyon
St. Vrain Trail

Today is the launch of this project at the Longmont Yarn Shoppe.  As part of their 5th year anniversary celebration the shop is doing kits of the above 4 different color combinations for $62 each. The pre-order of the kits starts today, September 5th thru September 17th. If you pre-order the yarn during this time the shop will provide a complimentary copy of the pattern. The yarn will be delivered to customers the week of the 25th.

Then I’ll be hosting the CAL starter party Saturday, September 30th from 2p – 4p at the shop. We will also have a thread in the Longmont Yarn Shoppe Ravelry group. So even if you live far from Longmont, Colorado you will be able to participate in the CAL and the pre-order of the yarn. Just call the shop to order your kit at 303-678-8242.

The color kits will still be available after the 17th, but will not include the complimentary pattern.  You will be able to purchase the pattern thru my Ravelry shop at any time.


Taking Care of Yourself

My kids are back in school and that means Summer is over for me.  As I’ve shared a bit already, this Summer was a super full one for me, 2 big family trips and 2 work trips. I’m now back into the swing of design work deadlines and preparing for teaching at the Scotts Bluff Valley Fiber Arts Fair and at the Longmont Yarn Shoppe this Fall.

There is also the awareness that I need to get to work on making my gifts for the Christmas season (only a wee bit over 18 weeks to go) and the slew of birthdays coming up over the next 4 months. That means lots of crafting hours. I’m sure I’m not alone in the crafting crunch as the weather cools off for those of us in the Northern Hemisphere.

I have a “survival” guide that I follow to be sure that all that crafting doesn’t lead to me being in pain. Today I want to share with you my top 5 tips to surviving the crafting crunch.

  1. Get enough sleep
  2. Stay well hydrated
  3. Take regular breaks
  4. Find some stretches that work for you
  5. Set realistic goals

Get Enough Sleep

I know, who has time for sleep?  I’m as guilty as the next person of cutting into my sleep hours to get more stuff done. But sleep is a major component to preventing injury. Getting enough sleep allows your body to mend and restore itself, as well as increasing the efficiency of your brain. You are much more likely to make mistakes in a project when you are too tired. It’s better to set aside the crafting and head to bed earlier, you will be able to work with greater clarity and speed after a good night’s sleep.

How much sleep do you need? That really depends, the typical recommendation is 8 hours, but some people need a little more and some a little less. Most doctors advise 7 – 9 hours of sleep every night. I know for me personally I seem to do best with 7 1/2 hours.

Stay well Hydrated

Our bodies are mostly water and we lose a lot of it each day thru respiration, elimination and perspiration. Drinking water regularly thru-out the day is one of the best things you can do for your health. Even mild dehydration can make us more prone to injury as well as causing mental fatigue. The classic recommendation is 12 – eight ounce glasses (96 ounces) of water thru-out the day. That doesn’t take into account different sizes of people and different activity levels.

My favorite formula for figuring out the minimum amount of water to drink thru out the day uses your weight. Take your weight in pounds and halve that number to get the amount of ounces of water you should be consuming each day.  Example – if you weigh 150 pounds you need to drink at least 75 ounces of water daily. If you are having a very active day, or you live in a hot climate, you may want to increase the amount of water you drink.

I say “water”, but there are many other drinks you can have that count toward your fluid intake.  Except caffeinated beverages. They actually act as a diuretic and remove water from your body thru elimination. So enjoy your cup of coffee in the morning, but remember to drink an extra glass of water to counteract the caffeine.

Take Regular Breaks

Taking a break doesn’t mean you have to stand on your head doing Yoga for 15 minutes, though that would be awesome if you want to do that. Taking a break means doing something else for a bit. I often have breaks built into my day by normal household maintenance chores.

Sometimes it is moving the laundry to the dryer, making myself some lunch, or taking the dog for a walk.  Just doing something different that gets me up and moving for a little bit at least every 30 minutes. It’s about the only way my house gets tidied, 10 minutes of cleaning chores every half hour.

The typical recommendation is to take a break every 20 minutes. If you are having some pain in your hands/neck/back from crafting that is a good strategy. More frequent breaks keep your body from seizing on a particular movement or posture as the only muscle setting. If you are drinking enough water you will be needing a “bio-break” every 2 hours or so, and that counts as well.

Find some Stretches that work for You

We all have a spot that hurts the worse after a day of intense crafting, so it is important to figure out how to stretch or strengthen your “spot”. I tend to feel it in my hands and neck when I have over done the crafting time. When I worked as a massage therapist I had a series of stretches I used to keep my hands working for me.

These are my favorite hand stretches. I do them at least 3 times during my work day and once more before I go to sleep. You can read a bit more about these hand stretches in my blog post: Keeping your Hands Happy.

Set Realistic Goals

I always seem to be hit with inspiration for the perfect massive gift about 2 weeks before the gift giving occasion. This rarely works out well and can lead to crazy nights of crocheting with only a few hours of sleep (Yup, that is how I know the importance of sleep).  I have finally learnt to be kinder to myself and have set more realistic goals for my gift making. If you want to do a large project for your gift you need to give yourself enough time to get it finished.

One of the things I have figured out after too many insane crochet deadlines is that it will usually take you about twice as long to finish a project than you think it will. Partially this is due to the fact that there is more to finishing a project than just the crochet. There is also all the weaving in of ends and blocking/washing the item and so on.

If you are looking at a couple of weeks before a gift is due to be presented, then look to smaller projects. The following are some links to patterns that make great gifts and are quick to crochet.

Snowflakes are one of my first choices for a fast gift. They are easy to ship and make great embellishments. You can work them in thread and stiffen them or attach the points to a larger ring for a beautiful addition to any holiday décor. I’ve also worked them in yarn and used them to embellish commercially made hats, scarves or gloves for a personalized gift.

I have 3 free snowflake patterns here on the blog.

Frozen Star Snowflake – This was last year’s snowflake pattern and it is a super quick one to work up with only 3 rounds to work up. This one is really ideal to work in a thicker yarn to attach to another project or a commercially made item as an embellishment.

Lacy Snowflakes – This is my favorite snowflake pattern, it is a written instruction only pattern here on the blog – if you prefer charts along with the text you can purchase a PDF version of this pattern thru my Ravelry shop for $1.99.

Little Snowflake Ornament – This was the first snowflake pattern I shared here on the blog and it is a stitch chart only pattern.

I love hats, earwarmers and cowls for wearable gifts, they don’t take a lot of time or yarn to crochet.  I make a lot of hats for my family, it has become a bit of a Christmas tradition. I have a couple of hat patterns available for free here on the blog and a couple of hat patterns for sell in my Ravelry shop.

Whirlwind Hat – This is an intermediate level text pattern available here on the blog. I’ve included photos and a link to a video to help with learning the trick to working the spiral.

Simple Double Crochet Hat – This is a super easy hat that works up quick in double crochet stitches and a single crochet finish. Work it in variegated yarn for a colorful look, or use a solid yarn for a background that can be embellished with motifs.

Mountain Top Beanie – This is an intermediate level pattern available for purchase in my Ravelry Shop. The pattern includes stitch charts for the crown, sides and ribbing. The sample for this hat was worked in Ella Rae Lace Merino Aran yarn, a wonderful luxurious yarn that is so soft and colorful. Because the hat only uses 1 ball it is a fun splurge project.

Spiraling Crosses Hat – This is an easy intermediate level pattern available for purchase in my Ravelry Shop. The pattern includes a stitch chart of the crown and sides to help you with the placement for the cross stitches. The slightly cabled texture of this stitch pattern makes a good hat for either women or men on your gift list.

Perfect Fit Crocheted Hat – This is an easy level pattern full of all the tips and tricks I teach in my hat class. It is a great pattern for those wanting to create any size hat with any size yarn. You can purchase it in my Ravelry Shop.

Lace Hat – This pattern is available on the Red Heart website. This was one of the first designs I sold when I started out as a designer. For a time the yarn for this project was discontinued, but they have brought back a new version of “Heart & Sole” yarn.

Springtime Headband – This is a pattern on my blog that is great for a quick gift, you can usually get 2 out of 1 ball of Lion Brand’s Wool-Ease in worsted weight. It is an intermediate level pattern, but I have included photo tutorials for the 2 texture stitches used in the pattern.

2 by 2 Cowl – This pattern is an easy level and speedy crochet project, it also uses only 1 ball of yarn. You can find the text pattern here on my blog and there is a link on the pattern post to a video to help you with the foundation I used.

Kellie Cowl – This pattern is available for purchase in my Ravelry Shop and is an intermediate level project. It would make a great gift for someone living in a warmer climate, or for those that don’t feel the cold all that much. The pattern has stitch charts to help you with the tricky parts and clear text instructions. It takes only 1 ball of the specified yarn and if you add the optional beads it is a fun dressy accessory to wear anytime of year.

These 3 moebius style cowls are quick and fun to crochet. The patterns are available individually in my Ravelry Shop.

Twisted Vs Cowl – A super quick project worked with bulky yarn and a big hook. The text pattern includes a photo tutorial about moebius construction.

Anna Moebius Cowl – Named after a friend’s grand-daughter this cowl is another fast one to work up in a chunky yarn. Pattern includes stitch chart and is an easy intermediate level project.

Twisted Garden Cowl – This pattern is an intermediate level project, with an interesting stitch pattern. This is still a small enough project to complete quickly, and is entertaining for more experienced or intrepid crocheters.

For those that don’t feel like working the moebius off a twisted foundation, there is always my Springtime Cowl. This pattern is available here on my blog and used 2 balls of the yarn for the sample. It is a simple stitch with the twist added when the 2 ends are sewn together.

If you have made it this far in my post I have a special gift for you. A 10% discount for any of my patterns over $3.50 price point. The code is: Crunch2017, and will only be valid until Friday, August 25th, 2017 at 11 p.m. Mountain time.

I hope this helps you all get started on the gift projects you need to complete and that you all survive the crafting crunch.

Summer is Flying By

This summer is going so fast, I’ve been traveling for both work and family stuff, so the times at home are super packed with household and work tasks.

We got back from our Lake Huron trip the evening of the 11th and I hit the ground running the next day.

It was Casual Crochet meet-up and the end of our Testing Pool CAL. Everyone that could make it was there to get their photo taken wearing their cowls. A number of these ambitious crocheters had made 2 cowls. Can you tell that the Aqua colorway was very popular?

For naming this cowl I took all the names of my testers and put them in a hat. We drew out a name and this cowl is now known as the “Kellie Cowl”. That’s Kellie at the lower left in the photo.

You can purchase the pattern for this cowl in my Ravelry shop. It comes with detailed stitch charts for the foundation, joins and increase point.

I’m headed out to Chicago for the CGOA Chain Link Conference this week, so this may be a one post week again. We will see how busy it all is there and if I will have a decent internet connection. If you are coming to the conference be sure to say hello. I’m looking forward to seeing lots of my yarnie friends and making new ones.

2 by 2 Cowl Pattern

Hello my dear readers. May has been zipping by and I can’t believe there are only 2 weeks left of the school year for my kiddos. This summer is already beginning to look very busy. Between fiber arts conferences and family trips I’ll be on the go pretty much non-stop.

This is my newest design the “2 by 2 Cowl”.  I wanted to start the summer off with a fun pattern for everyone that doesn’t take a lot of yarn and is relatively small to have in your hands or lap when the temperatures start to rise. It uses only 1 skein of Lion Brand’s “Heartland” yarn with a size J hook.

This was all that was left of my skein of yarn when I finished the sample, just 5 grams or a little under 9 yards.

I start this cowl with my favorite foundation: Stacked Rows. If you need a little help with understanding how to work a stacked rows foundation I created a video to help you. You can find it here on my YouTube Channel. For those of you that are ready, let’s jump right into the pattern.

2 by 2 Cowl

Designed by Andee Graves

Skill – Easy

Stitches you need to know: Chain (ch), Double Crochet (dc), Single Crochet (sc), slip stitch (slip st)

Finished size: Approximately 14” wide x 34” around (35cm x 85cm)

Materials

Yarn: Lion Brand Yarns “Heartland”; 100% Acrylic, 142 grams/5 oz, 230m/251 yards. (sample was made with 1 ball of color #147 Hot Springs)

Hook: J-10/6mm, or size needed to obtain gauge

Blunt yarn needle

Gauge:

6 rows and 16 stitches in pattern = 4” (10cm)

Pattern Notes

Foundation is worked in stacked rows to create a scalloped and elastic circle that the rest of the cowl is built off of.

Body of the cowl is worked in joined rounds off the straight side of the stacked row foundation. Look for the hole at the base of the double crochet rows to find the single crochet row to work into when crocheting Round 1.

Instructions

Foundation:

Row 1: Ch 2, sc in 2nd ch from hook.

Row 2: Ch 3, turn, 2 dc in sc.

Row 3: Ch 1, turn, sc in first dc.

Rows 4 – 65: Alternate repeating Row 2 and Row 3

Row 66: Repeat Row 2, join strip of rows into a circle without twisting, slip st to base of Row 1. {33 Scallops, 33 sc rows}

Body of Cowl:

Rnd 1: Turn to work along straight side of foundation rows, ch 3 {counts as dc here and thru-out pattern}, dc in side of first sc row, *skip next dc row, ch 2, 2 dc in side of next sc row; repeat from * until work in last sc row of foundation, ch 2, slip st to top of beginning ch-3. [66 dc, 66 ch-2 sp]

Rnd 2: Turn, (loosely slip st, ch 3, dc) in first ch-2 sp, skip 2 dc sts, ch 2, 2 dc in next ch-2 sp; repeat from * until work in last ch-2 sp of previous row, ch 2, slip st to top of beginning ch-3. [66 dc, 66 ch-2 sp]

Rnds 3 – 21: Repeat Row 2.

Rnd 22: Do Not Turn, ch 1, *sc in first dc, ch 2, 2 dc next dc, skip next ch-2 sp; repeat from * until work in last dc of Rnd 21, slip st to top of first sc of Rnd. Fasten off

Weave in all loose tails. Gently block if desired.

18 Patterns in 2016

I was talking with a crochet friend the other day about how many patterns I had published in 2016, and I wasn’t sure. I knew I had been doing a lot of work in 2016. So today I decided to take a tally. Turns out I had 18 patterns published, counting the 6 that were in my newest book: “Wraps for All Seasons”.

There were 5 decorative neckwear patterns:

Sophisticated Simplicity Necklace – this pattern is available here on my blog.

Springtime Cowl – this pattern is available here on my blog.

Loopy de Loop Necklace – this pattern is available here on my blog and I have a video tutorial for it on my YouTube channel.

Sweet Song Decorative Scarf – this pattern is available here on my blog.

Photo courtesy of Red Heart

Beaded Crochet Necklace – this pattern is available on the Red Heart website.

There were 3 Hat patterns:

Mountain Top Beanie – the pattern is available for purchase in my Ravelry Shop.

Simple DC Hat – the pattern is available here on my blog.

Whirlwind Hat – the pattern is available here on my blog.

There were 2 fun little projects in Thread crochet:

Simple Victorian Earrings – the pattern is available here on my blog.

Frozen Star Snowflake – the pattern is available here on my blog.

One afghan square:

Fans & Lace Afghan Square – the pattern is available here on my blog as well as tutorial videos on my YouTube Channel .

There were 7 wraps patterns:

The 6 in my book from Annie’s Publishing – “Wraps for All Seasons”, which you can purchase on Amazon or at the Annie’s website.

Playing with Triangles Shawl

Playing with Triangles Shawl – the pattern is available here on my blog as well as an informative video on my YouTube Channel.

Let’s see if I can double the number of patterns in 2017.

Whispering Wind Cowl

I enjoy creating moebius style cowls but decided to challenge myself with designing a simple tube style cowl with this design. I wanted to create a crocheted cowl that would have a very graceful drape and would be a lovely accent piece to wear indoors, but could also serve nicely as a warm layer under a coat or jacket.

First order of business was chosing a yarn, I picked Berroco’s “Folio” yarn. This luxurious yarn is an Alpaca/Rayon blend that feels like cashmere, with marvelous drape and warmth. I paired the yarn with a simple mesh stitch pattern to allow the yarn to really shine.

Collette’s first modeling gig

Next I gave some serious thought to how I wanted to work the foundation and how to finish the opposite end of the tube to compliment the foundation. I usually like everything to be very precisely matched. It’s probably the math part of my brain dictating terms. I decided to give myself permission to have the finishing edge be different from the foundation.

Freedom!

Funnily enough, the 2 edges don’t look all that different. But never fear, I will be playing with this some more and there will be some very different edges in the future. I just wanted to get my toe wet this time around.  I have definitely found a new fascination. Throwing out the idea of precise matching has stirred up all sorts of creativity in my brain.

I used my stacked row foundation to start this cowl, then the rounds of mesh stitch are worked off one side to the desired length. In this pattern I have written the instructions, and worked the sample to be 31 inches around and 13 inches wide from foundation to finished edging. I’ve also included instructions on how to modify the pattern to make a wider cowl (deep enough to be pulled up as a hood), or a longer cowl that makes it more like an infinity scarf.

You can purchase the pattern in my Ravelry Shop for $4.99.

You can use a different yarn than I chose for the sample, but I would strongly recommend a yarn with a large percentage of fine alpaca fiber or rayon. You want the yarn to be very fluid to get the fantastic drape you see in the photos.


The Luck of the Irish

Today is Saint Patrick’s Day, and my family has a little Irish heritage (we are a classic American family with a big mixture of ancestry from all over Northern Europe and the British Isles), so I thought I would come up with a fun little crochet pattern for making a lucky 4 leaf clover.

Funny enough, none of us have much in the way of green clothing, every year I think that I really should at least get the kiddos some green clothing. That thought has not translated to my shopping brain yet. I tend to purchase whichever shirts are on sale, since both of my kids are a bit rough on their clothes.  Instead I crocheted up lucky clovers and made them into pins they could wear.

For those of you that are wondering about Shamrocks versus 4 Leaf Clover. The typical Irish symbol is the 3 lobed clover and is called a shamrock. 4 lobed clovers are much rarer and are not “officially” considered a symbol of Ireland or Saint Patricks day. The shamrock with it’s 3 lobes is said to have been used by St. Patrick to demonstrate the holy trinity of Christian faith. The 4 Leaf Clover is said to symbolize luck because they are so rare.

I had a lot of fun playing with a way to create a 4 Leaf Clover that could be worked in just 2 rounds. This project is rated at the intermediate level, because I used some more advanced techniques like Clusters and working in the back bump of chains.  If you need help with working clusters I have a photo tutorial in the Special Stitches section of the pattern.

Luck of the Irish Clover

Design by Andee Graves

Skill level: Intermediate

Materials:

Yarn – Lion Brand “Vanna’s Choice”, 100% Acrylic (3.5 oz/100g, 170 yds/156m) Color #171 Fern

Hook – I/9 – 5mm hook

Pin back or safety pin to attach to back of clover.

Special Stitches

3 DC Cluster (Cl):

Photo A

To make a 3 dc cluster st, yarn over (yo) like making a dc and insert in st or sp, yo, pull up a loop (3 loops on hook), yo {Photo A},

Photo B

pull thru 2 loops on hook (2 loops remaining on hook, 1st base made), yo, insert in same st or sp, yo, pull up a loop (4 loops on hook), yo {Photo B},

Photo C

pull thru 2 loops (3 loops remaining on hook, 2nd base made), yo, insert in same st or sp, yo, pull up a loop (5 loops on hook), yo, pull thru 2 loops (4 loops remaining on hook, 3rd base made), yo {Photo C}, pull thru all 4 loops on hook.

Instructions:

Round 1: Start with an Adjustable slip knot, ch 3, 7 hdc in 3 ch from hook, gently pull beginning tail to close center,

slip st under 2 loops (the “V” front of the ch st) at top of beginning ch-3 to join the round.

Round 2: {Thanks to Edith for the correction.}  Ch 3, *(Cl, ch 3 and slip st) in next st,** (slip st, ch 3) in next st*;

Repeat from * to * 2 times, Repeat from * to ** once,

Stem: Ch 6, working in back bumps, sc in 2nd ch from hook and in next 3 ch sts, slip st in last ch, cut yarn with 4-5 inches of tail. Stem will curl, it is supposed to.

Weave ending tail toward center, use tails to sew on a pin backing.

I hope you have a very lucky Saint Patrick’s Day, and some fun wearing a 4 Leaf Clover.

The Greatest of these is Love

“So now faith, hope, and love abide, these three; but the greatest of these is love.”

1 Corinthians 13:13

This bible verse has resonated with me thru-out my life, no matter where my spiritual travels have taken me. The idea that the most important thing that we strive for in life is to live in love.

crocheted-love-rainbow-heart-andee-graves-m2h-designs

This is entirely appropriate, since today is Valentines Day, a holiday that celebrates love. Though some folks view it  as a “greeting card” holiday that focuses on romantic love, I like to look at it a bit more broadly.  I have always enjoyed celebrating it as a holiday about love in all it’s forms.

The love for our children. The love of dear friends that lift us up thru life’s challenges. Even the unconditional love of our beloved furry family members. The love that is expressed as compassion and kindness for our fellow humans on life’s journey.

crochet-love-andee-graves-m2h-designs

Recently I was talking with a crochet friend about how we crochet love into the projects we make. Whether it is love for the person whom we will be gifting the finished project to, or love and compassion for others when we are making projects for charity. There is even the love of our craft that is crocheted into every stitch as we make something for ourselves or (as is the case for me about 60% of the time) a project sample for work.

The image I used for the Crochet Love picture is the stitch diagram for my very popular heart pattern “Crocheted Love” from 2013. This heart has been popular with other crochet bloggers to build on in their blog tutorials and such. This has led to some interesting interpretations of the pattern.

Today I wanted to show you some quick tips on making these hearts. They only take a little bit of yarn and time to whip up to include on a card or as an embellishment for a gift item to celebrate the holiday of love.

The biggest stumbling blocks seem to be where to work the slip stitch that creates the point at the bottom of the heart and the final slip stitch that anchors the last “bump” at the top of the heart.

point-st-chart

This is a close-up of the stitch diagram for the point of the heart. The conventions for showing the orders of operation in diagrams have the arrow pointing under the chain stitch, but you are actually working behind the chain stitch to get to the double crochet just made.

purple-path-for-hook-andee-graves-m2h-designs

My hook goes under the front loop at the top of the stitch and under the top wrap of the stitch. The lighter weight purple yarn in the photo above shows the path I insert my hook thru.

insert-hook-into-top-of-st-andee-graves-m2h-designs

This image is the hook in place.

yo-pull-thru-all-loops-andee-graves-m2h-designs

Yarn over and pull thru all the loops of yarn, including the working loop on the hook.

point-sl-st-tightened-andee-graves-m2h-designs

Tighten the finished slip stitch.

finish-point-andee-graves-m2h-designs

Make the next 2 dc stitches in the same stitch of Round 1 as before, and continue following the stitch instructions for Round 2.

end-of-rnd-2-sl-st

This is a close-up of the stitch diagram for the end of Round 2.

completed-last-7-tr-andee-graves-m2h-designs

When you finish the last 7 treble crochet stitches you will need to anchor it with a slip stitch.

between-ch-n-st-andee-graves-m2h-designs

Work the ending slip stitch between the final dc stitch and starting chain of Round 1.

end-of-rnd-2-finished

Tighten the slip stitch to create a seamless finish to your heart.

As a little extra bonus today I am including the instructions for making a single crochet border around the heart.

sc-border-heart-andee-graves-m2h-designs

You can use this border to give a more finished look to a single heart or to connect 2 hearts together.

making-cardstock-heart-andee-graves-m2h-designs

For the heart above I cut out a heart shape from heavy card stock, using one of my hearts as a pattern to draw the heart shape. When I cut it out I trimmed the shape a bit smaller to leave room for the border stitches.

hearts-before-border-andee-graves-m2h-designs

I then sandwiched the cardstock heart between the yarn hearts while I crocheted the border. This makes the heart extra sturdy for hanging from a garland.

Instructions for Single Crochet Border

After finishing Round 2 of Crocheted Love Heart – Do Not Fasten Off, chain 1, starting with first Treble of Round 2 – (sc in next st, 2 sc next st) 4 times, sc in next 5 sts, 2 sc next st, ch 1 and slip st in top of last sc made, 2 sc next st, sc next 5 sts, (2 sc next st, sc next st) 4 times, slip st to first sc of round.

After finishing the border you can cut the yarn and weave in the end, or chain to the desired length to use as a hanging cord for the heart.

If you make your 2 hearts with a bulky yarn and appropriate sized hook your hearts will be a generous size and you can insert some stuffing before completing the border to make a sweet little pillow.

***********

I am going to spend part of my Valentines Day in my traditional celebration of consuming Dove Dark Chocolate hearts. I hope you all have a wonderful Valentines Day and that your life is full of love.

Vivianne Shawl

vivianne-shawl-andee-graves-m2h-designs-a2

This is my newest M2H Designs pattern the Vivianne Shawl. The name Vivianne means “full of life” and the colorful striping and sparkly beads make this a very lively shawl.

yarn-for-new-pwt-shawl

I used only 3 hanks of Berocco’s “Vintage” worsted weight yarn in different colors to create the uneven color changes. Originally I thought I would use 2 hanks of the dark blue, but I decided I wanted to have approximately the same amount of yarn in each color. Because the shawl is worked top down the rows get longer and the sections of color play out in pleasing proportions. I also mixed things up a little by working a stripe of the next color before ending the preceding color. This stripe has beads added using the “hoist-on” method for a bit more bling and liveliness.

Vivianne Shawl 3 - Andee Graves/M2H Designs

The final 2 border rows are continued in the last color and feature beads added to the stitches to create sparkly drape along the bottom edge of the shawl.

This pattern is available for purchase in my Ravelry Shop for $4.99. In addition to concise text instructions, the pattern contains stitch charts for the body of the shawl and the border, plus photo tutorials for adding the beads.