Saint Patrick’s Day is this coming Sunday and I decided to make up a little clover for all my lovely readers.
This quick little shamrock can be crocheted up in just a few minutes with about 4 yards of worsted weight yarn. I used Berroco’s Ultra Wool and a 5mm hook for the shamrocks shown above. You can sew or glue your shamrock onto a pin back to create a fun brooch to wear or sew the finished shamrock unto a hat, gloves, or scarf.
I have a PDF version available through my Ravelry shop that also includes a stitch chart. The PDF version is available for free in my Ravelry shop with coupon code 2024QSSPD through 11:30 p.m. Mountain Time Saturday, March 16, 2024. Just place the pattern in your cart and when checking out put the coupon code in the code spot.
3.5 oz/100 g, 219 yds/200 m (1.8 g/4 yds for 1 Shamrock)
Hook H / 5 mm or size needed to obtain consistent fabric
Gauge is not critical to this project; fabric needs to be consistent and tight. Shamrock can be worked with different weight of yarn, just adjust the size hook so you get the desired result.
Notions Yarn/tapestry needle, pin back if turning into brooch/pin
Special Stitches and Abbreviations
Adjustable Slip Knot: Make like a regular slip knot but use the beginning tail to form the working loop. Pulling on the beginning tail snugs the working loop on the shaft of the hook. If desired can use the magic circle method instead, just count your circle as the first chain stitch. Click here for my YouTube video if you need helpwith the Adjustable Slip Knot.
2 Extended Double crochet Cluster (2ExDcCL): [Yo, insert hook into indicated stitch, yo, pull up a loop, yo, pull through 1 loop, yo, pull through 2 loops] 2 times, yo, pull through remaining 3 loops on hook.
Pattern Notes
This shamrock is worked from the center out in 2 rounds, at the end of the second round you chain a length then work back towards the body of the shamrock to create the stem.
Pattern Instructions
Rnd 1: Make an adjustable slip knot, ch 2, 6 hdc in second ch from hook, join with a slip st to first hdc of round. (6 hdc)
Rnd 2: (Ch 4, 2ExDcCL, hdc, 2ExDcCL, ch 4, slip st) in first st, [slip st loosely in next st, (slip st, ch 4, 2ExDcCL, hdc, 2ExDcCL, ch 4, slip st) in next st] 2 times, slip st loosely in next st,
{Stem} ch 6, sc in back bump of second ch from hook, slip st loosely in back bump of each of next 4 chs, slip st to join to Rnd 1 between last and first hdc. Fasten off.
I used Vanna’s Choice with an I hook (5.5mm) for the brighter green Shamrock shown above, you can see that it came out a bit bigger than the shamrocks made with Berroco Ultra Wool.
Happy Saint Patrick’s Day to all my Irish and Irish Heritage readers.
I’ve been busy crocheting away on some designs I can’t share yet, but I wanted to be sure to let you know some other fun things coming up this Spring. I’m one of the Instructors for Interweave YarnFest in Loveland, Colorado this year!
Currently workshops are available at the Early Bird pricing through this Friday, February 10th. So hurry on over and pick your workshops now.
I’ll be teaching 4 workshops.
Stitch Chart Bootcamp – Crochet: Workshop is Thursday, April 13th, 9:00 a.m. – Noon.
Have you ever wondered exactly where the next stitch is supposed to go? You know that the stitch chart probably holds the answer to this question. You may have even referred to a chart in a crochet pattern that uses both text and chart, but are you ready to work from only the chart? A whole world of international patterns opens to you when you can decipher stitch charts, even if you don’t understand the written language that accompanies the chart. In this class, you will learn how to work solely from a stitch chart to crochet a lovely motif. You’ll learn what the symbols in the charts stand for, how they may change depending on the country of origin, and the skill to get results that please you when working from the charts alone. The class handout includes over 5 stitch chart patterns for you to practice with.
Needle Felting in 3D: Workshop is Thursday, April 13th, 1:30 p.m. – 4:30 p.m.
This is the workshop for you if you have ever wanted to learn how to create something three-dimensional out of wool! Needle felting is a great fiber art for creating sculptural pieces. It is a wonderful medium for making everything from toys to jewelry to art. The possibilities are endless. This session will be all about creating fun and engaging 3D characters and critters with confidence. Learn everything you need to use your felting needle safely and ergonomically. This class also covers the following: creating different shapes from loose fiber and joining them together to make an object that can stand up; using a “frame” to create the base of your three-dimensional pieces; making both “hard” and “soft” felt; and embellishing your sculpture with yarn, beads, and fabric. You will leave class with a full-color booklet of how-tos, your own felting needle, and a bag full of fiber. The class kit will have everything you need to practice in class. I’ll provide work surfaces for students to use during class as well.
Rollie Pollie Sheep – Needlefelting: Workshop is Friday, April 14th, 9:00 a.m. – Noon.
Don’t be Baaaashful! Ewe know you want to learn how to create this adorable cuddly round sheep. This little sheep is a perfect soft toy or decoration for a fiber loving friend. I originally designed my first rollie pollie sheep for a friend’s grandchild. In this workshop, you will be confident with using a variety of needle felting sculptural techniques to create your own lovable little sheep. This project will introduce creating a sphere base form, creating three-dimensional shapes on a base form, and embellishing your sculpture with curly mohair locks. We will also discuss modifications for making your sheep more toddler or baby friendly. Class kit contains everything you need to make one cuddly sheep. I’ll provide work surfaces to use during the class.
Heart Full of Love Pin – Needlefelting: Workshop is Friday, April 14th, 1:30 p.m. to 4:30 p.m.
Have you always wanted to try needle felting but you’ve been intimidated by the needles? This class is a great introduction to needle felting! You will learn how to add sculptural needle felting to a simple crocheted base, how to work safely on small projects and create dense durable felt. At the end of the class, you will have at least one little heart pin completed. You can wear your heart on your sleeve or your jacket collar, or give it away to someone you love. The class kit comes with enough supplies to make two heart pins, including a crocheted heart and the yarn to crochet your own little heart. Class handout will include instructions to crochet your own heart. I will also cover how to crochet the heart for students who are interested.
I hope you can join me for one or more of these fun workshops in beautiful Loveland.
I’m excited to share with you that I’m participating in the Christmas in July Make Along with Underground Crafter. Be sure to join the fun! 28 bloggers have teamed up to bring you a month full of free patterns to kick start the handmade holiday season — including crochet, knitting, sewing, and crafting projects. There’s something new to make every day in July. Each week will have a theme.
Week 1 (July 1-7): Babies, Kids, and Teens Week 2 (July 8-14): Women Week 3 (July 15-21): Gifts for Anyone Week 4 (July 22-28): Home Week 5 (July 29-31): Pets
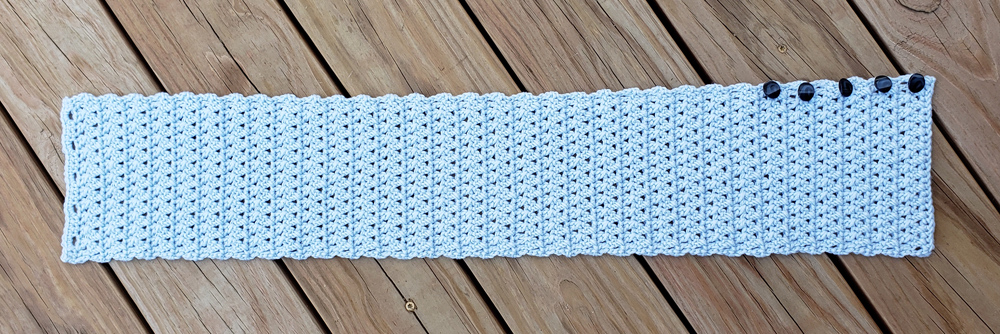
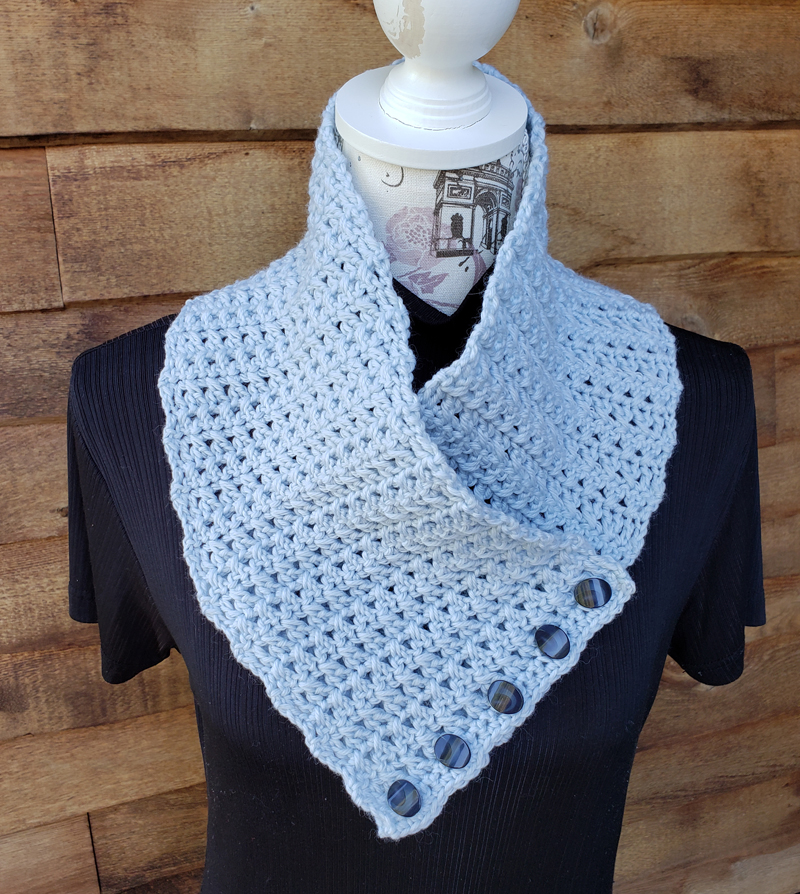
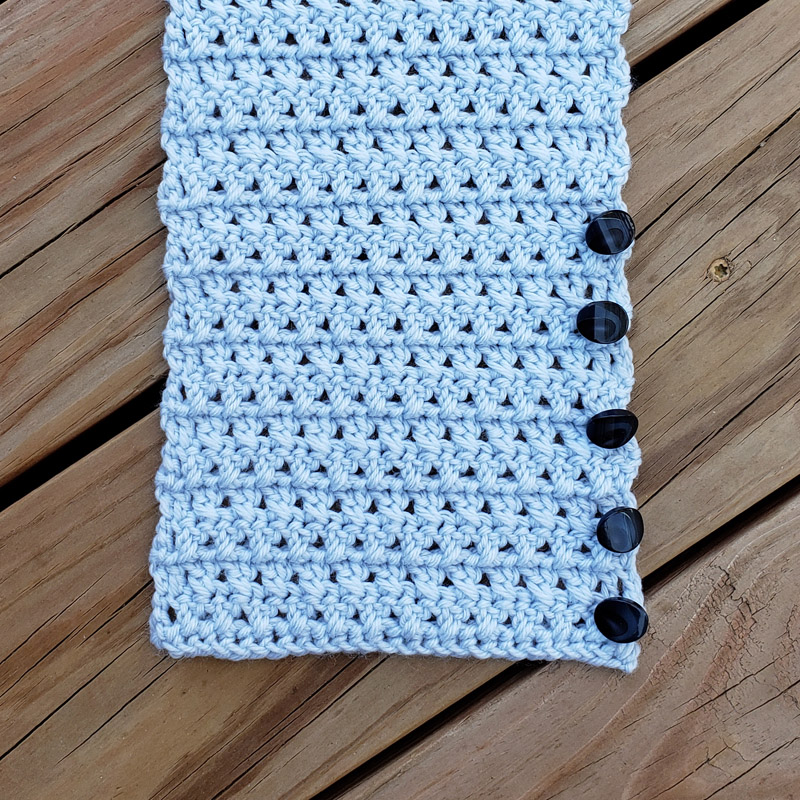
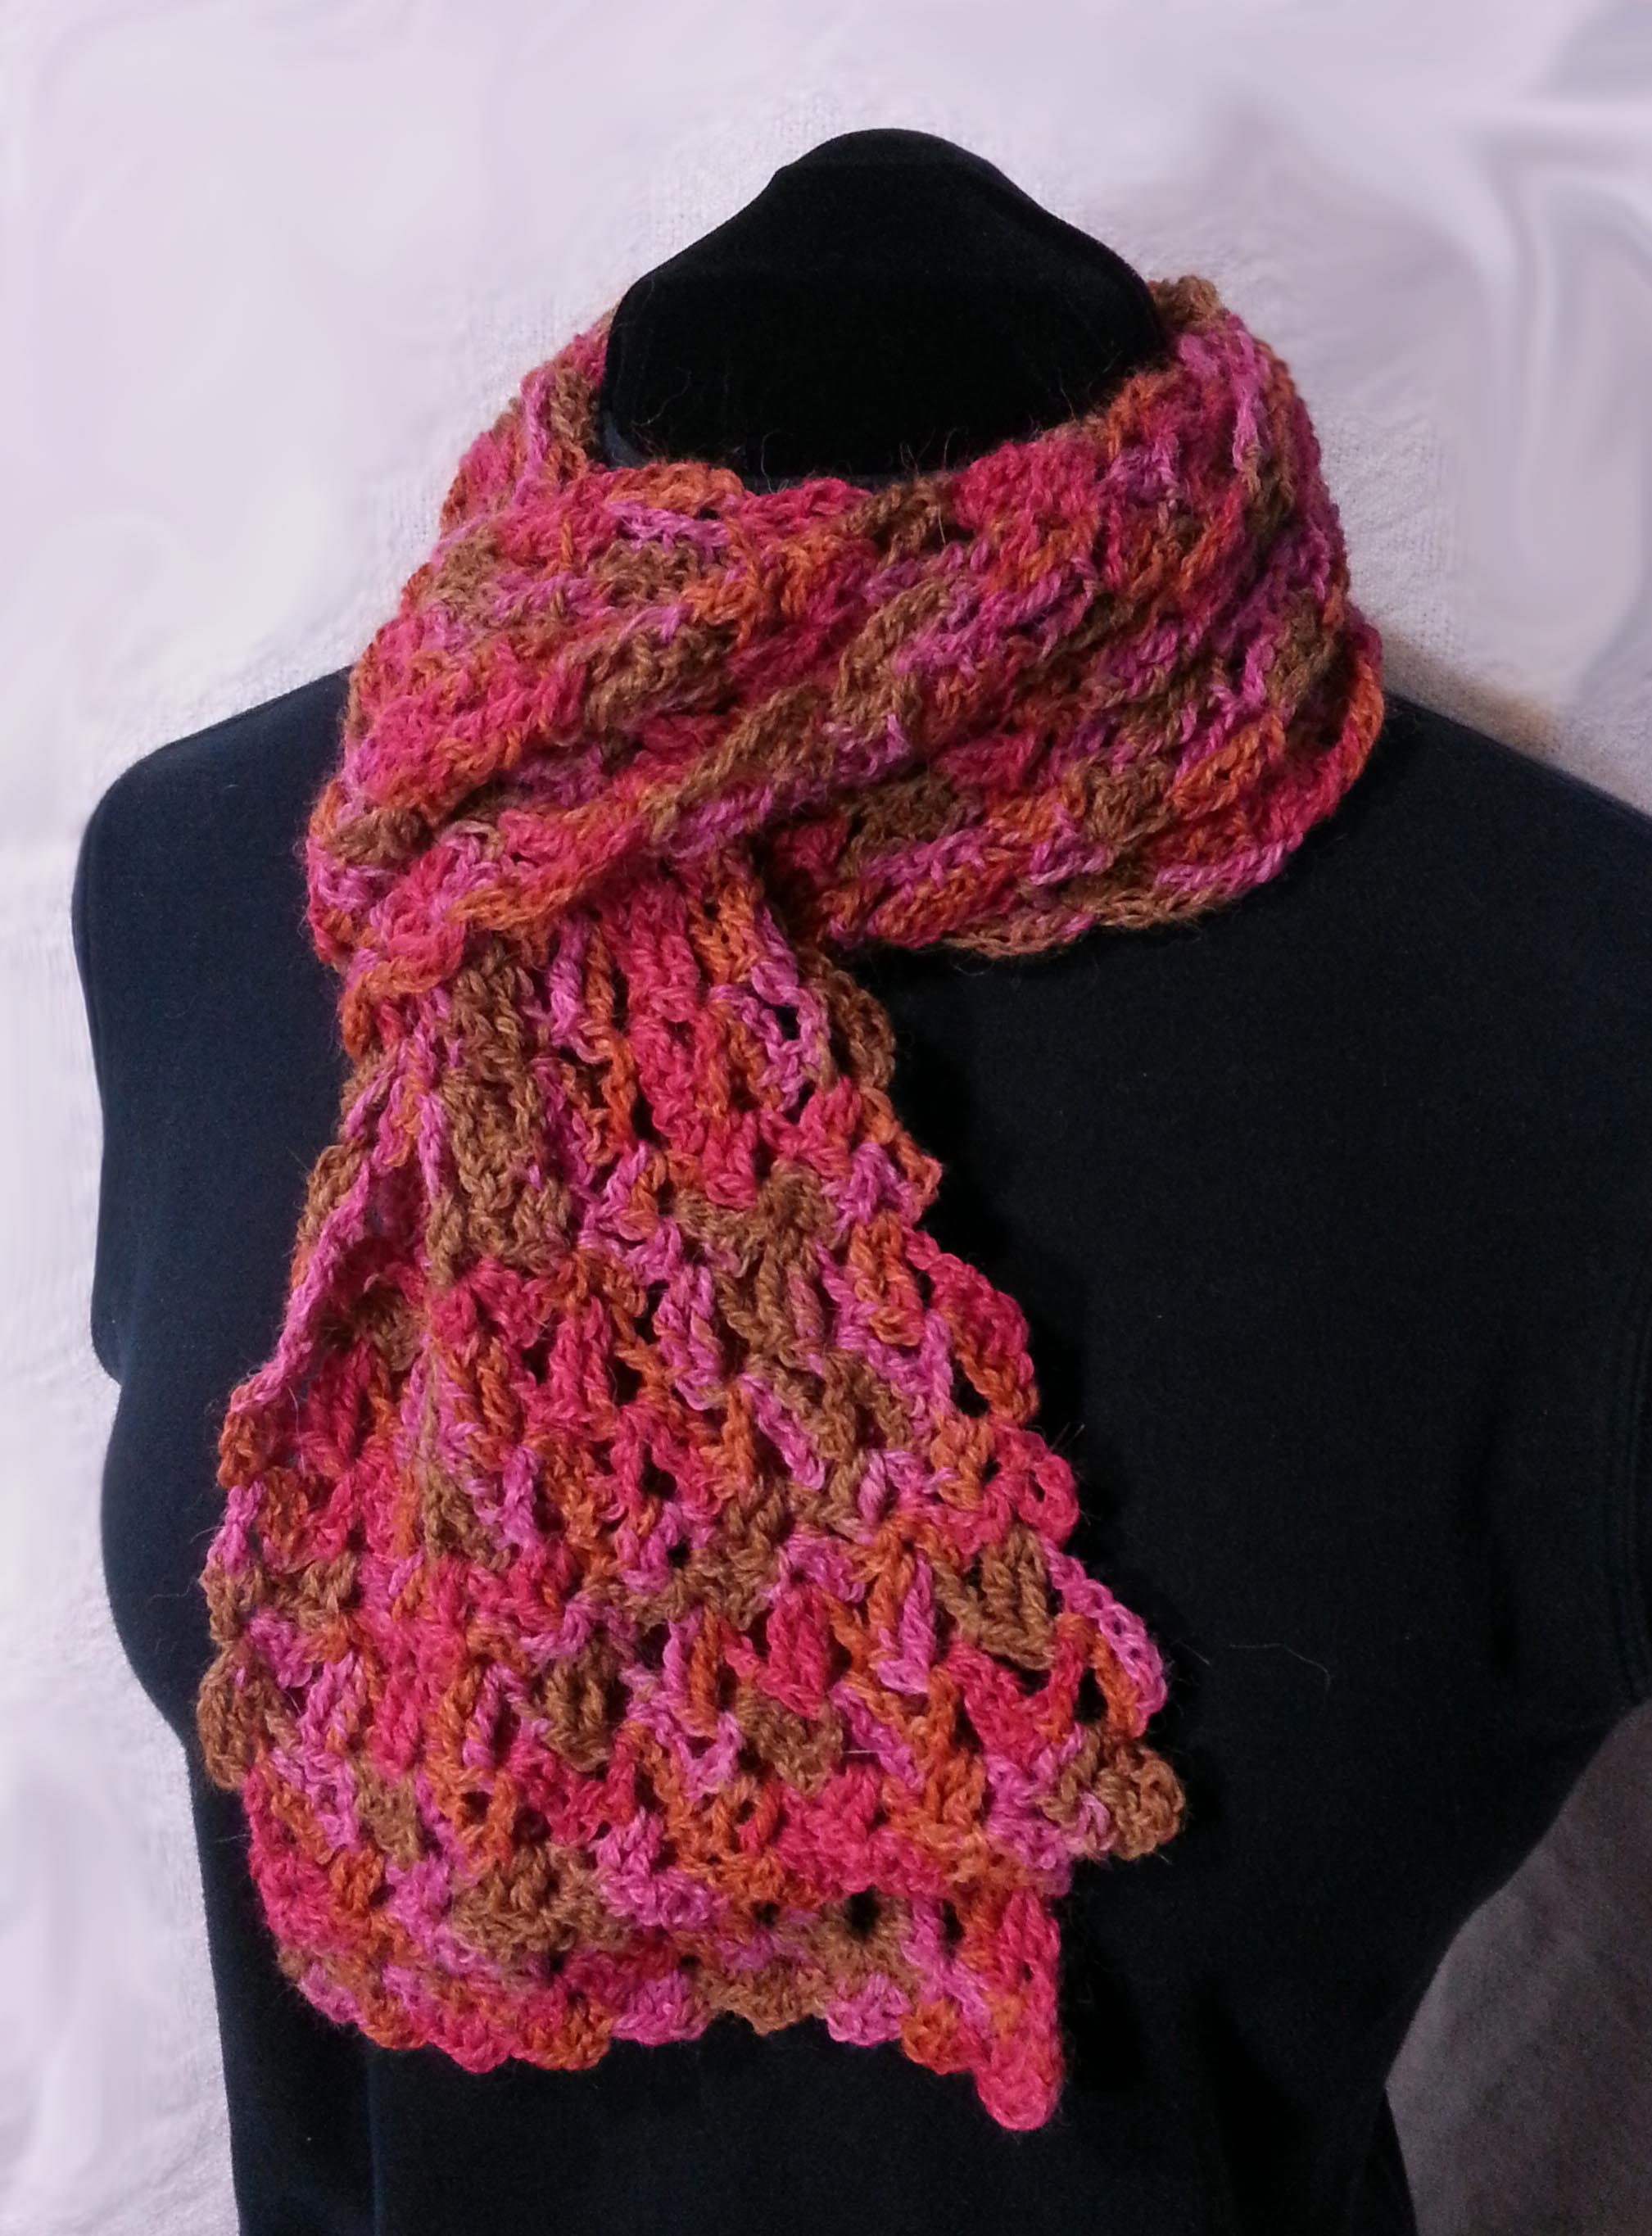
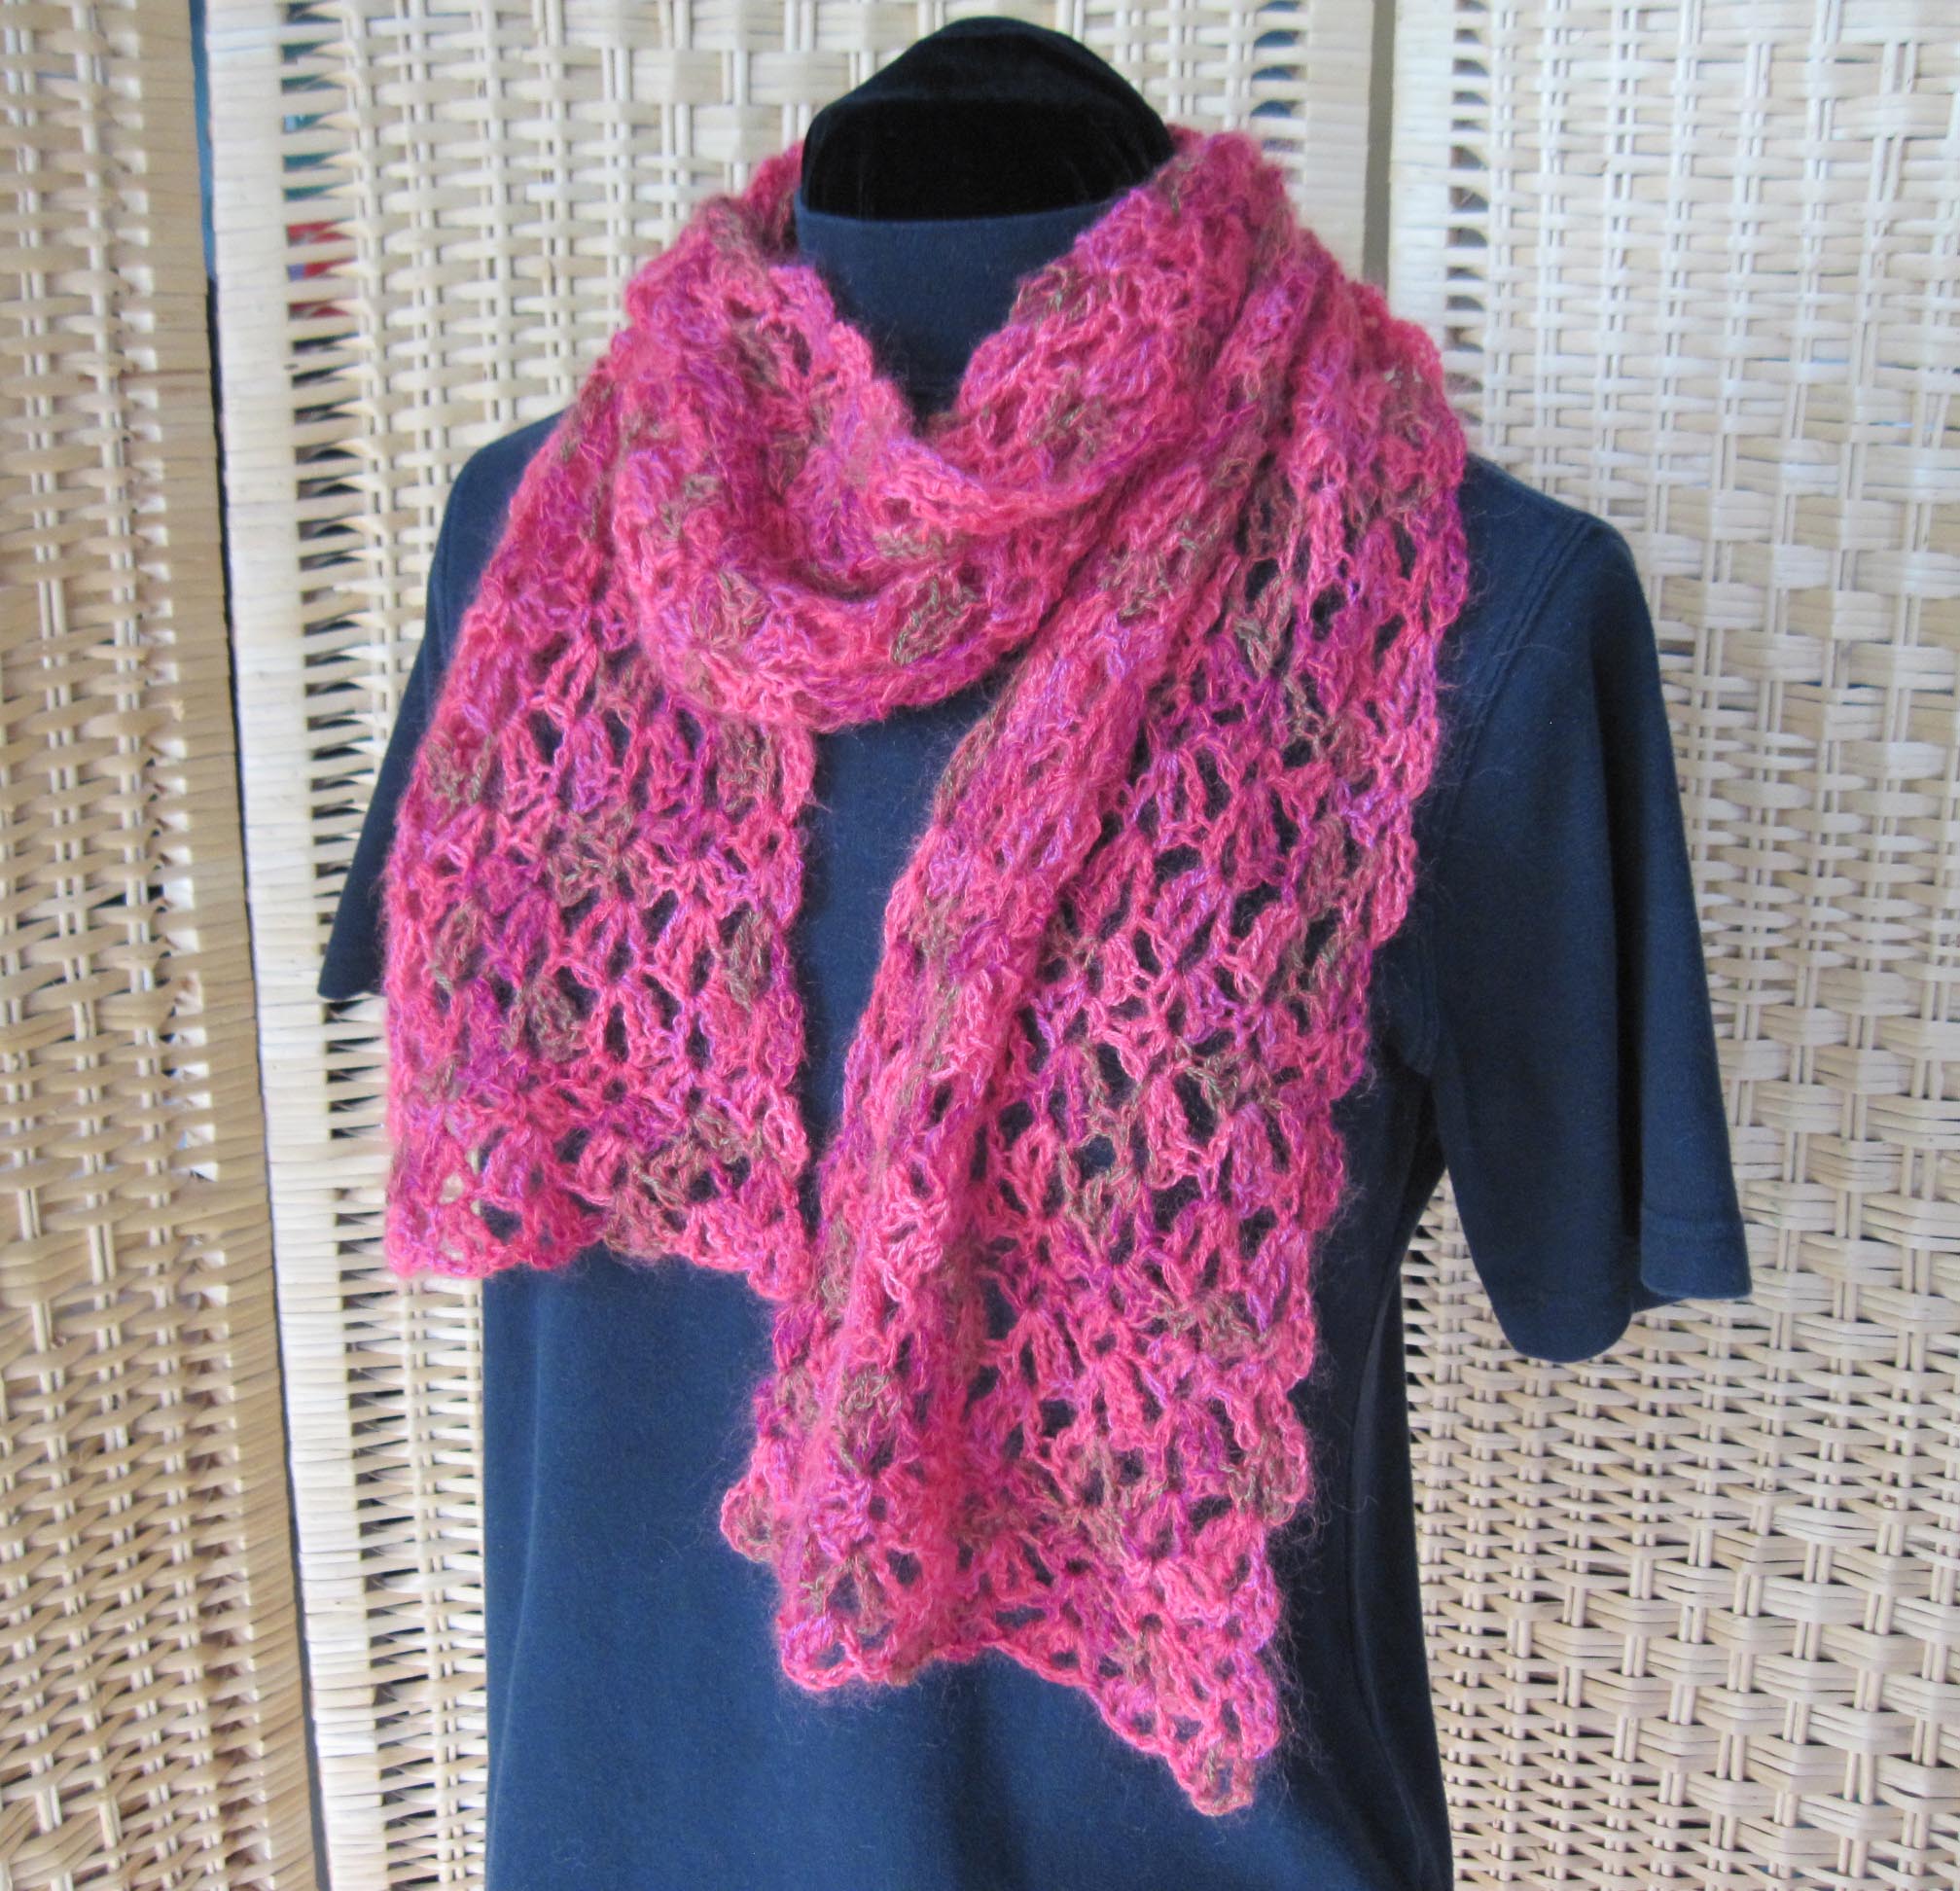
My Braided Ribs Neck Cozy pattern is a fun to crochet and quick gift for anyone on your gift making list. Just use an appropriate color for the person you are giving it to. As a neck cozy it uses approximately 200 yards of worsted weight yarn. Or add another skein of yarn to make it longer, leave off the button holes and you have a warm scarf.
Buttoned along front edge
You can style your finished cozy 2 different ways. 1) Bring the button end over the left shoulder and button along opposite end, or…
Overlapped ends and buttoned
2) Bring the button end over right shoulder and overlap ends to button.
Braided Ribs Neck Cozy by Andee Graves
Skill Level: Intermediate
Finished size: 6.75 inches (16.8 cm) wide x 30 inches (75 cm) long
Stitches used: Foundation Single Crochet (fsc), Chain (ch), Single Crochet (sc), Double Crochet (dc)
Materials:
Yarn – Berroco “Ultra Wool” worsted weight, 100% superwash wool, 219 yds/200 m, 3.5 oz/100 g
1 skein Color #3318
Hook – I-9 (5.5 mm) or size needed to obtain gauge
Notions – yarn/tapestry needle, 5 – 1/2” Buttons
Gauge: In X-stitch pattern 15 stitches and 8.25 rows = 4” Gauge is not critical, you want a soft fabric.
Special Stitches/Abbreviations:
X-st – Cross Stitch: Skip 1 st, dc in next st, working around the first dc made dc in the previous skipped st. if you need help making this stitch I have a tutorial on my blog post: The Secrets to Crocheting the X-stitch.
Pattern Notes:
All double crochet rows start with a modified turning chain. Turn and work a single crochet in first stitch, chain 2. Counts as first double crochet of the row.
Instructions
Row 1 (RS): Work 26 fsc.
Row 2: Turn, (sc, ch 2) in first st {counts as first dc here and thru-out pattern}, [X-st using next 2 sts] 12 times, dc in last st. (12 X-sts, 2 dc)
Row 3: Turn, (sc, ch 2) in first st, dc in next st, [X-st using next 2 sts] 11 times, dc in last 2 sts. (11 X-sts, 4 dc)
Rows 4 – 63: Alternate repeating Rows 2 and 3.
Row 64: Ch 1, turn, sc in first 2 sts, [ch 2, skip 2 sts, sc in next 3 sts] 4 times, ch 2, skip 2 sts, sc in last 2 sts.
Buttonholes created in Row 64 and 65.
Row 65: Ch 1, turn, sc in first 2 sts, [2 sc in next ch-2 sp, sc in next 3 sts] 4 times, 2 sc in next ch-2 sp, sc in last 2 sts. Fasten off. (26 sc)
Finishing
Button placement.
Gently Block and weave in ends. Sew buttons on Right side of fabric at beginning of neck cozy along righthand edge of fabric to align with buttonholes from Row 64.
I hope you enjoy this pattern, feel free to tag me @andee.graves on Instagram with photos of your finished projects. Make sure you check out all the other fun designs from the 28 other crafty bloggers thru the rest of July. We’ve also partnered with some of our favorite companies to get some great prizes for you, scroll on down for more information.
Learn more about participating designers, the schedule, and how to enter to win the prizes on Underground Crafter. The deadline for entering the giveaway is Wednesday, August 4, 2021 at 11:59 p.m. Eastern.
How To Join the 2021 Christmas in July Make Along
You can join in by crocheting, knitting, sewing, or making the projects as you have time.
Share your progress and post pictures of your finished projects. Tag your projects and posts #CIJMakeAlong2021 on all social media.
If you’d like to chat with other crafters, join the Underground Crafters Facebook group
By the end of the Make Along, you’ll have up to 31 awesome projects. Get ready for the handmade holiday season while having fun with us!
Visit Underground Crafter to learn more about the prizes, enter the giveaway, and to get links to each Christmas in July Make Along post as it is released.
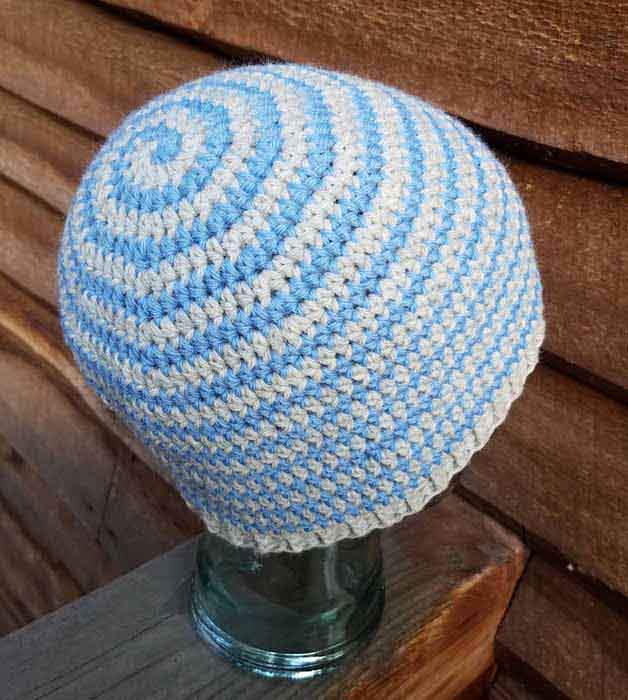
It has been super hot even here in Colorado, so I am looking for small projects to work on and hats are one of my favorites. I’m teaching a class next week “Spiraling Stripes Hat” that is a great way to add stripes to your hats without any seams. You can still register for this class until 8 a.m. Central time this Sunday, July 18, 2021.
I like the look of ribbed brims in knit hats, but since I crochet much faster than I knit, I wanted a version for when I was wielding my hook. After a lot of experimenting over the past 15 years I have settled on using “skinny” half double crochet post stitches as my all time favorite method. You will see this ribbing in a lot of my hat patterns (like the Spiraling Stripes Hat).
For those of you that have never worked post stitches, their name comes from the fact that they are worked around the “post” of a stitch instead of under the top 2 strands of a stitch. This gives them much more of a textured look and changes how the fabric behaves.
With a taller stitch like the double crochet it is quite easy to see the “post” of the stitch and to work around the center of this post when working post stitches. For a stitch like the Half Double or Single crochet that becomes a bit more fiddly to find.
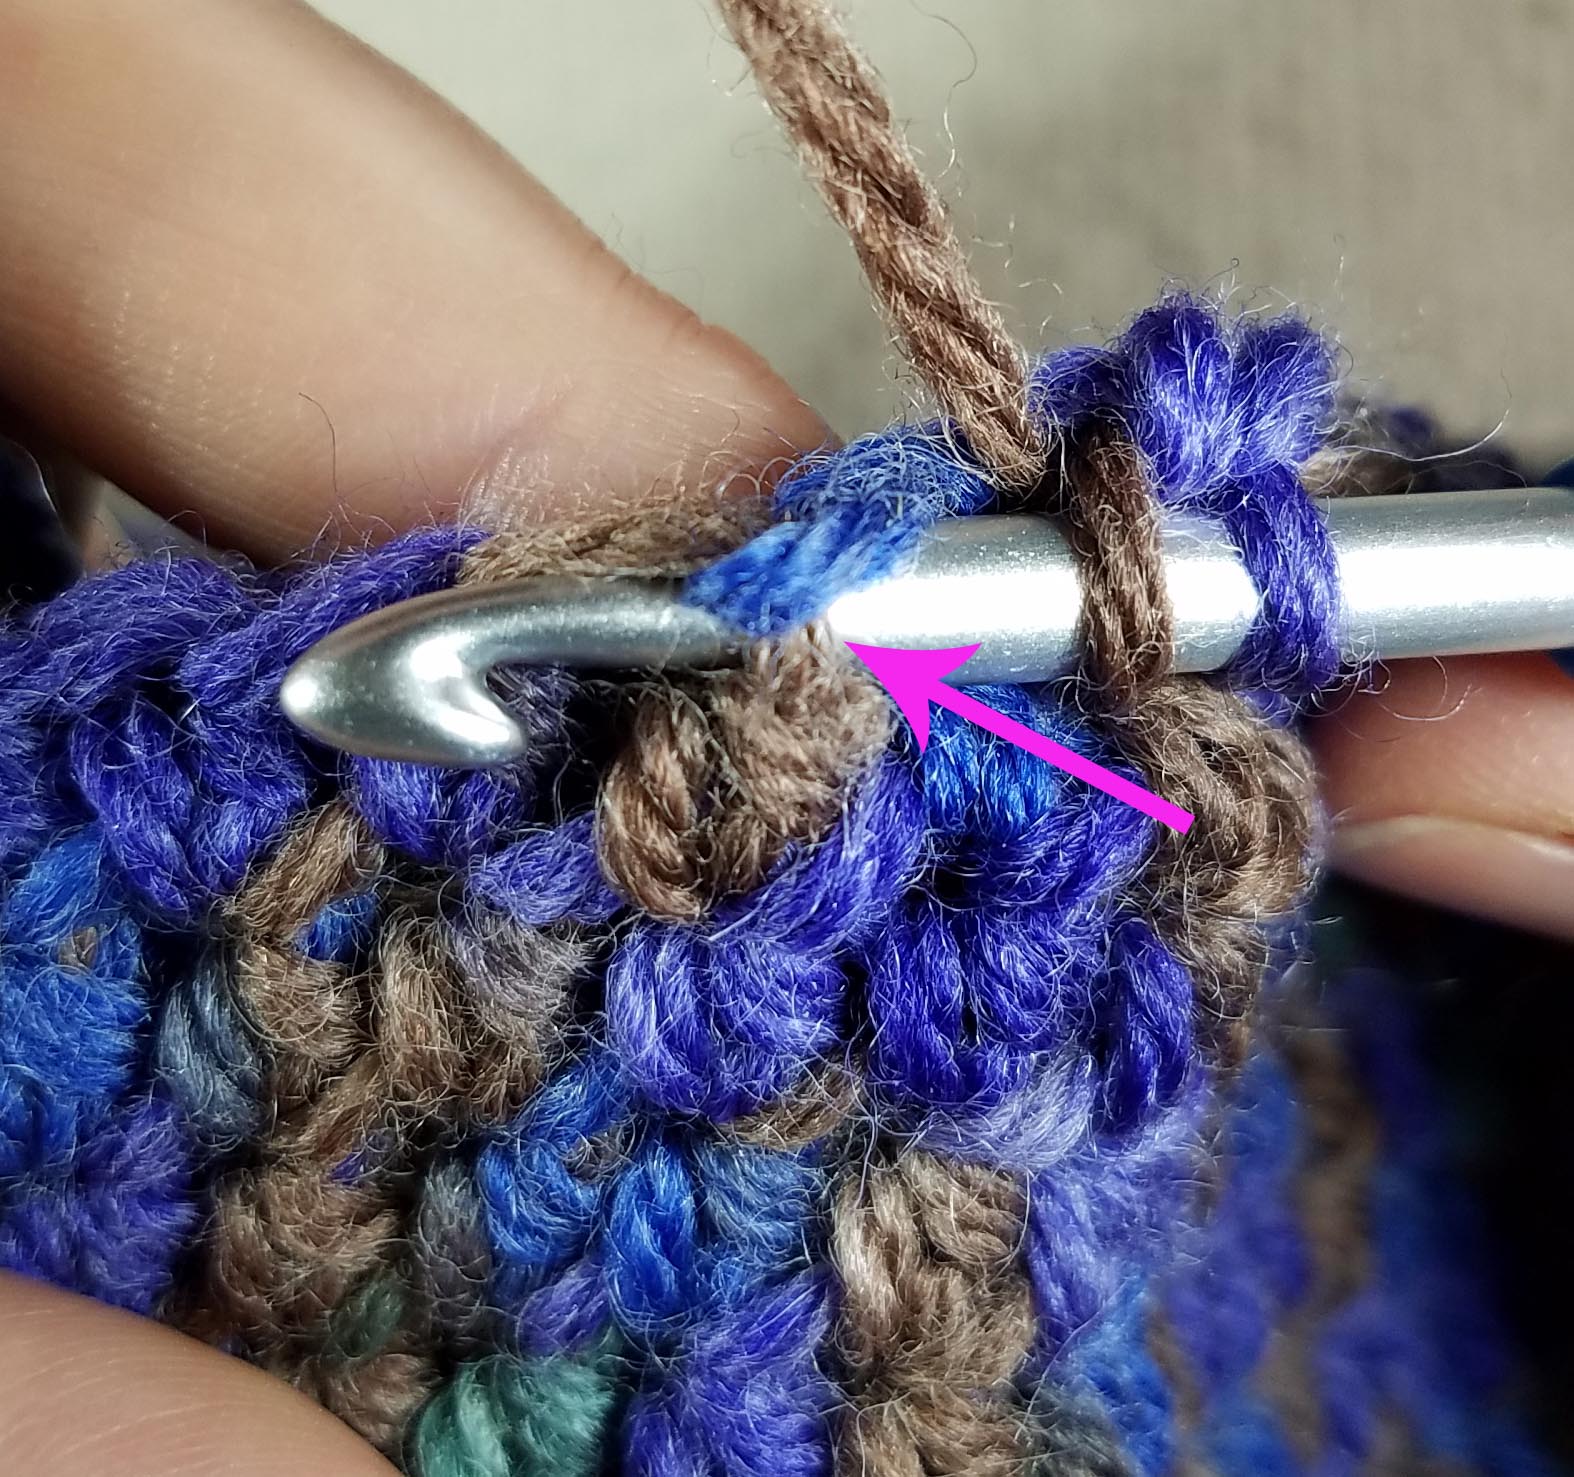
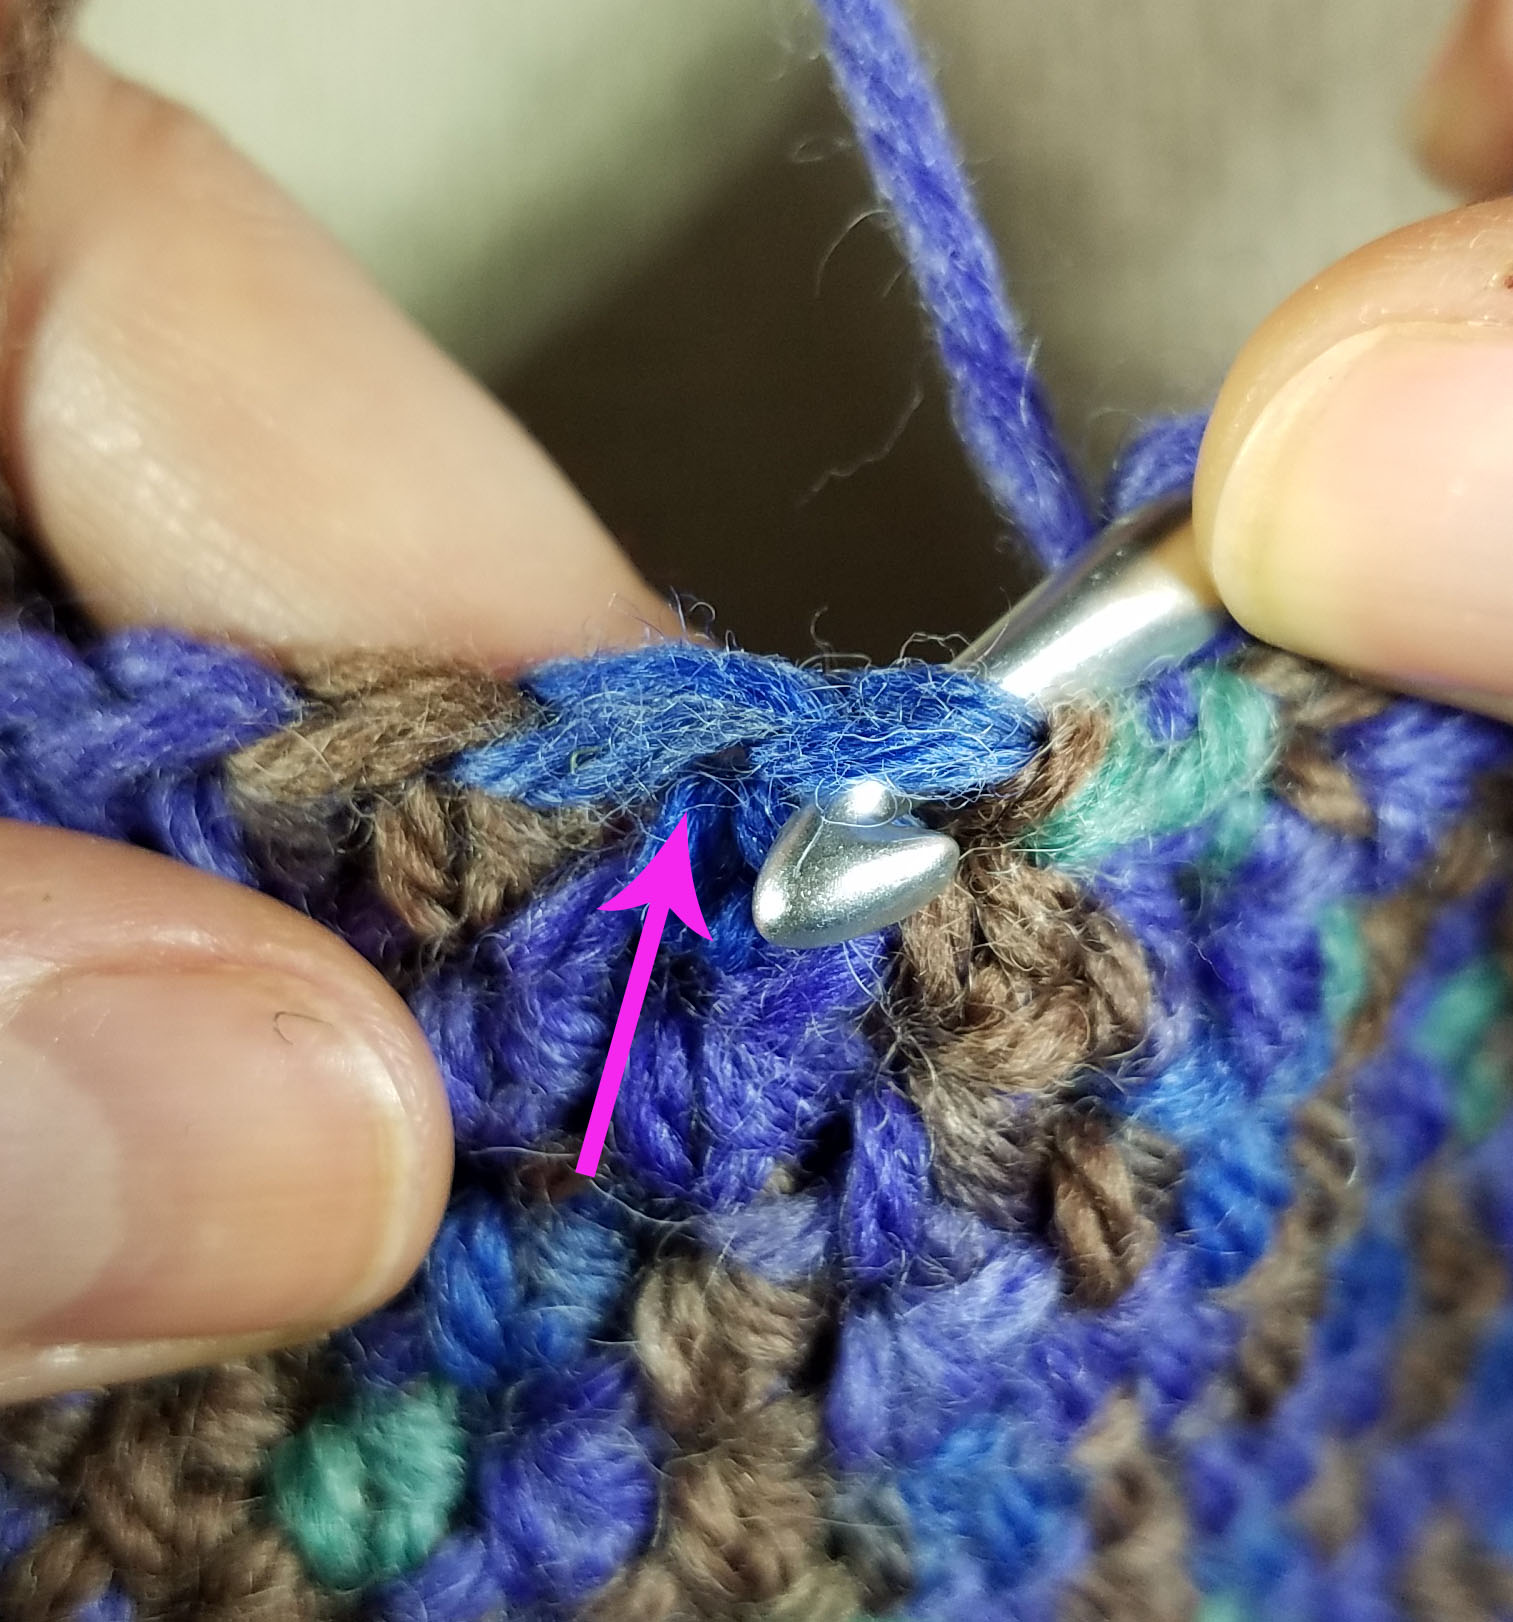
The first time I tried using post stitches for my ribbing I decided to do what I call “skinny” post stitches. Instead of working down into the stitch, I use the very top of the post just under the “v” that makes the top of the stitch (the bit of brown yarn the arrow is pointing to in the photograph above). This creates a slimmer looking stitch because the base of the post stitch isn’t stretched around the thickest part of the other stitch.
By the way this tutorial is showing the post stitches and finished work for right-handed crocheters. If you are left-handed and crochet with your hook in the left-hand, then reverse what I’m doing here.
For the ribbing affect I alternate my post stitches, so I needed an even number of stitches. I generally start with a FPhdc, and end the round with a BPhdc. The first round of ribbing is the trickiest.
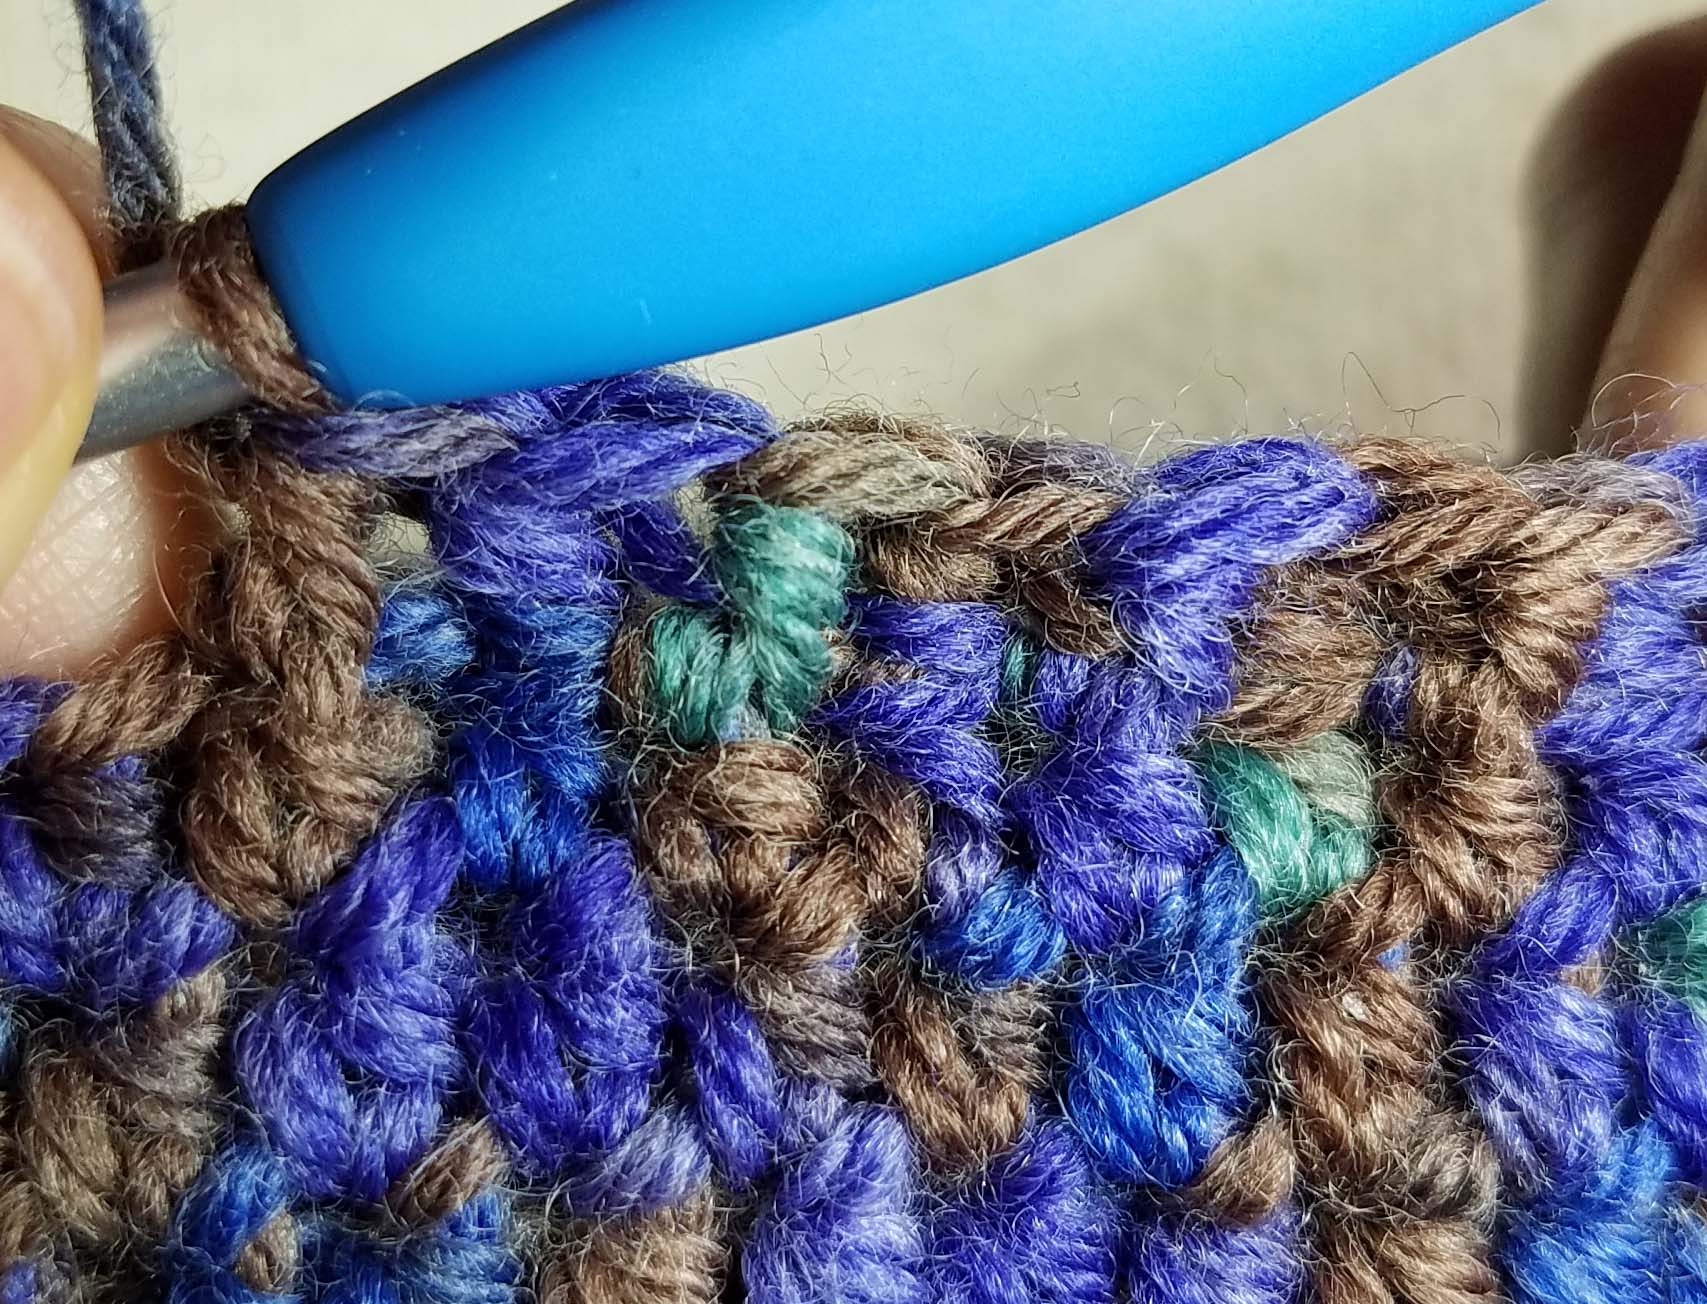
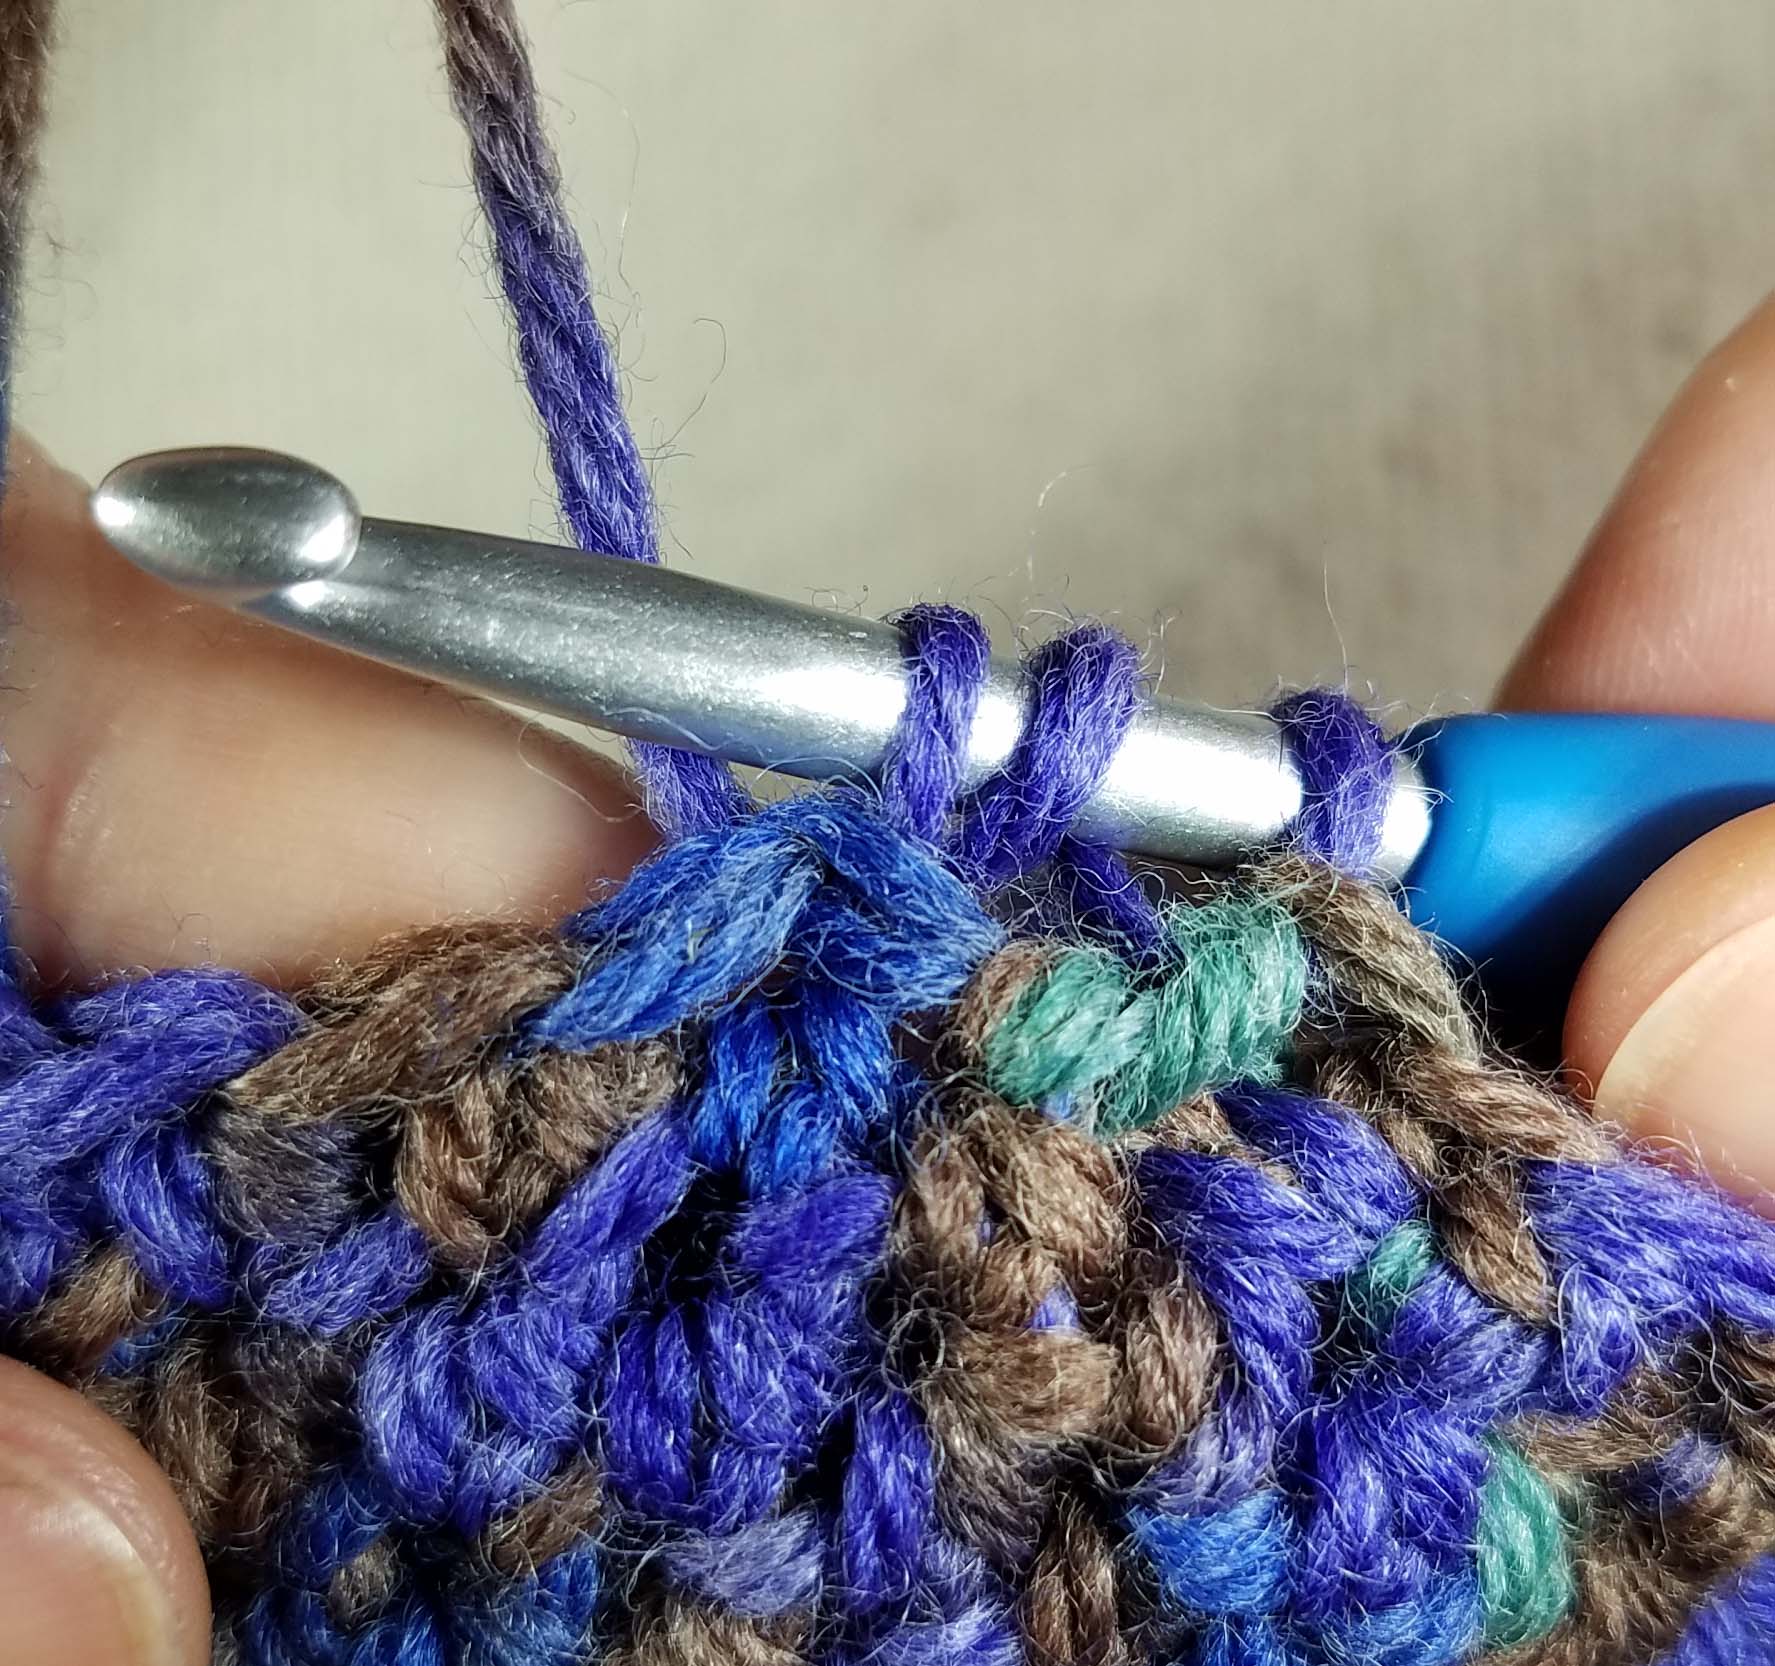
Once you have finished that round it just becomes a matter of working FP stitches into FP stitches and BP into BP. In the photo above you can see both the appearance of the ribbing from the front and back.
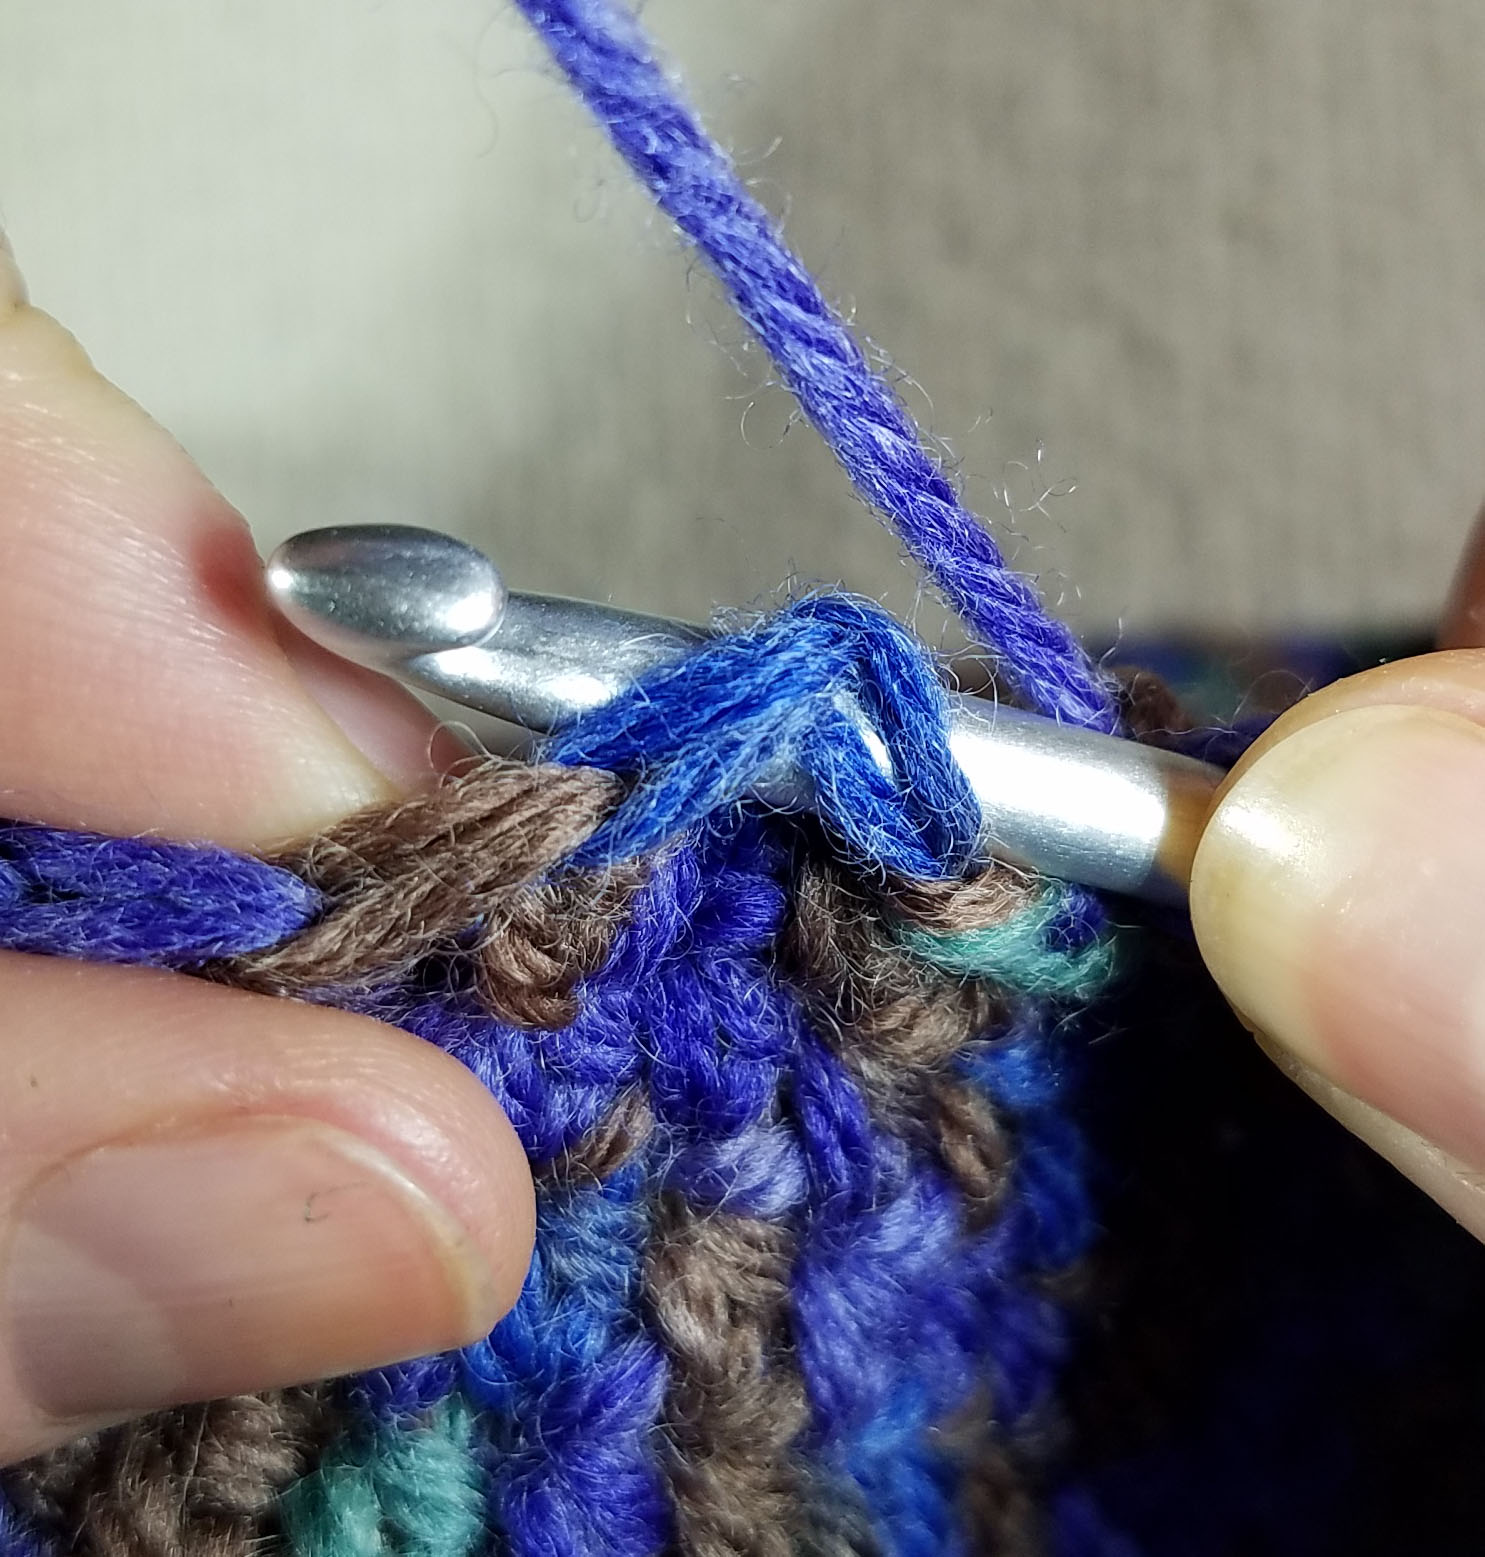
For a Front Post half double crochet (FPhdc): Insert the hook from front to back to the right of the post you want to work around, then bring the hook from the back to the front under the top of the stitch to the left of the post (indicated by arrow in photo above). Yarn over and pull up a loop thru all the stitches, yarn over and complete your hdc. The post of this new stitch will be sitting on the front of your fabric.
For a Back Post half double crochet (BPhdc): Insert the hook from back to front to the right of the post you want to work around, then bring the hook from the front to the back under the top of the stitch for the left of the post (indicated by arrow in photo above).
Yarn over and pull up a loop thru all the stitches, yarn over and complete your hdc. The post of this new stitch will be sitting on the back of your fabric.
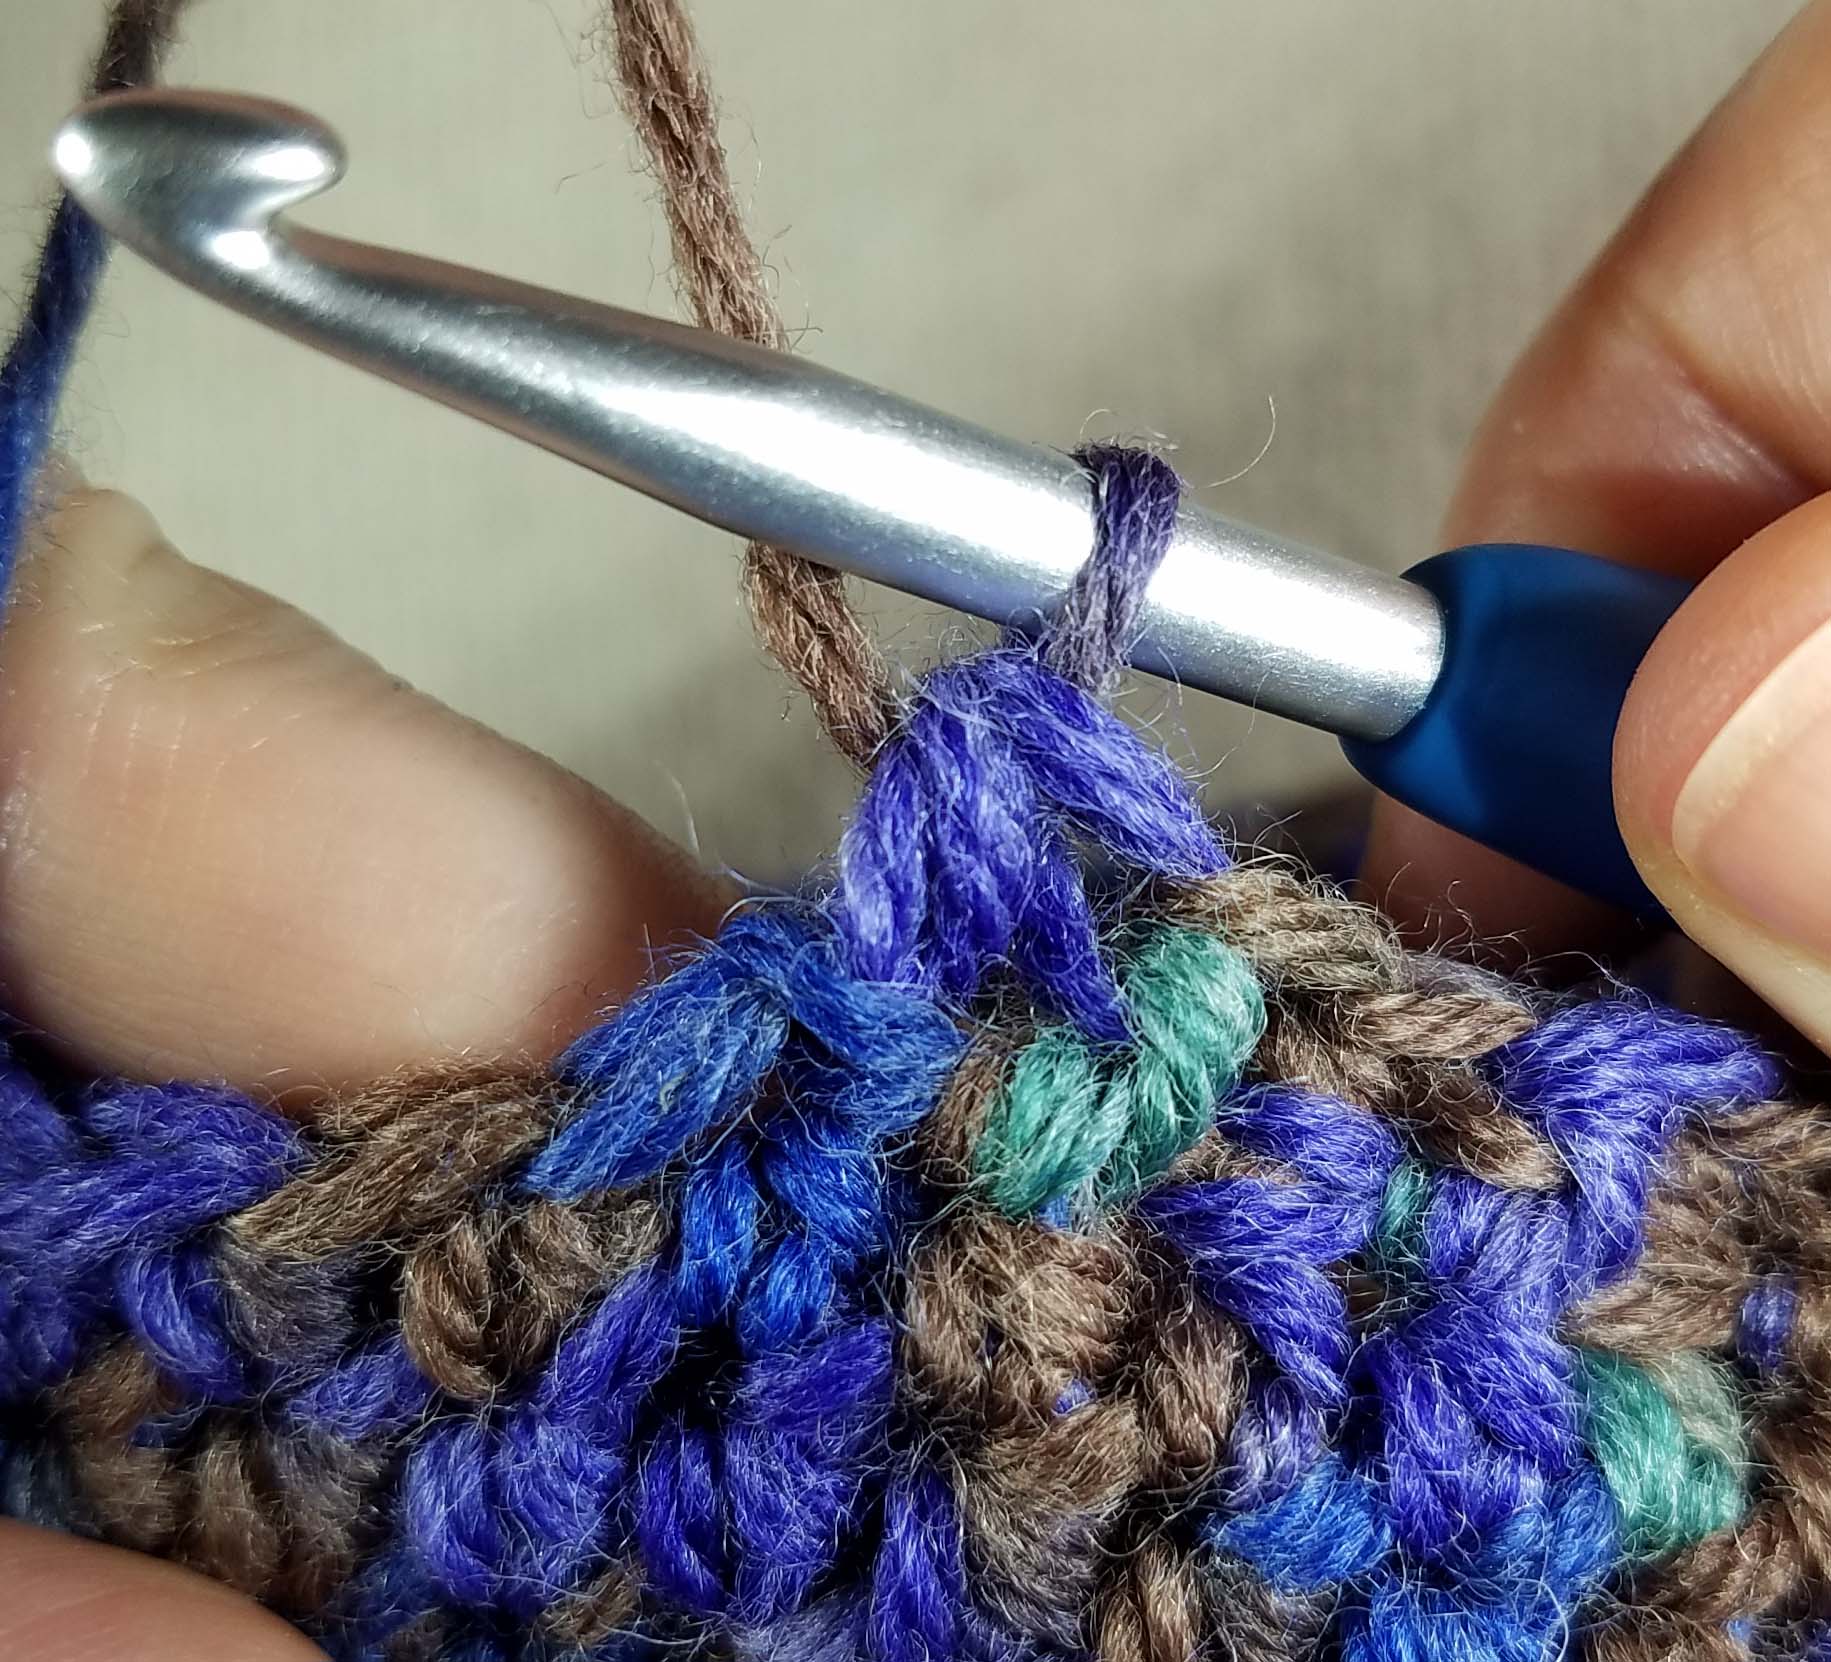
Finished Back Post Half Double Crochet
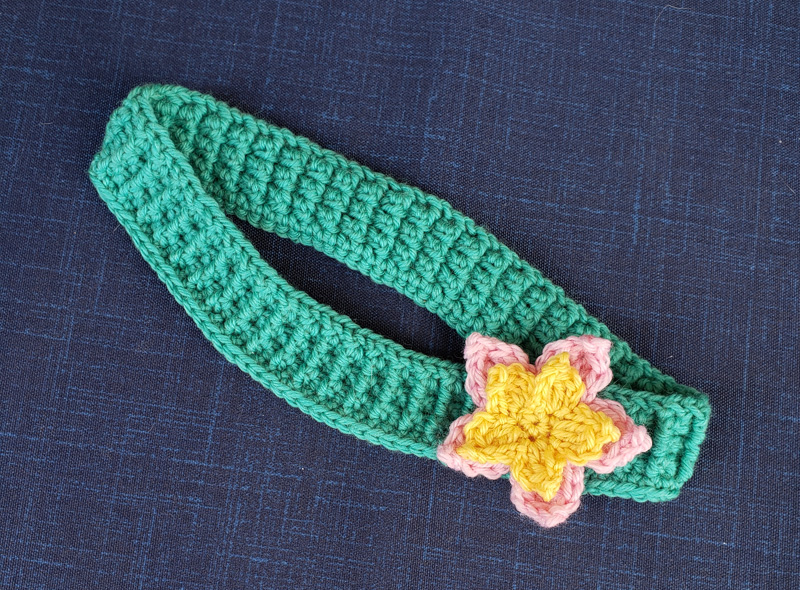
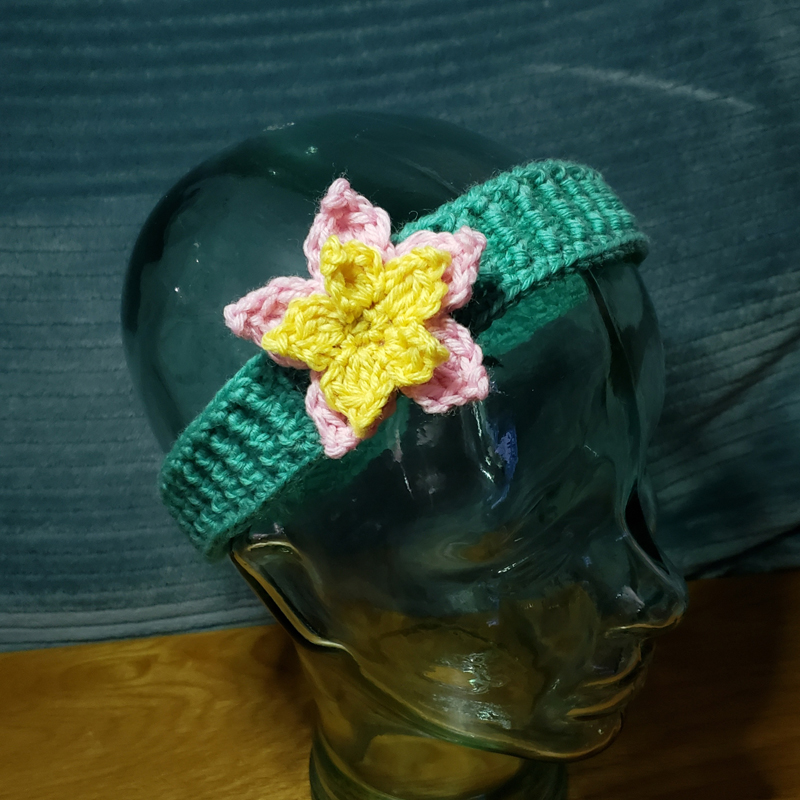
This is how I make my “skinny” front post and back post half double crochet stitches. You can modify this technique with any crochet stitch, but the half double crochet is my favorite. Practice working your skinny post stitches with this quick and easy headband pattern.
Summer Stretch Headband
Designed by Andee Graves
Skill level: Intermediate
Special Stitches
Materials:
Yarn – Berroco “Ultra Wool” worsted weight, 100% superwash wool, 219 yds/200 m, 3.5 oz/100 g
Color A – #3346, Color B – #3312, Color C – #3315
Hook – H (5 mm) or size needed to obtain gauge
Notions – yarn/tapestry needle
Gauge: 8 FSC = 2”
Special Stitches/Abbreviations:
fsc (Foundation Single Crochet)
FPhdc (Skinny Front Post Half Double Crochet) – The post stitch is worked under the top 2 strands of the stitch. YO, insert hook into top of previous st from front to back, then bring hook from back to front thru top of next st (this is working around post of st), YO, pull up a loop thru both st tops, YO, pull thru all 3 loops on hook.
BPhdc (Back Post Half Double Crochet) – The post stitch is worked under the top 2 strands of the stitch. YO, insert hook into top of previous st from back to front, then bring hook from front to back thru top of next st (this is working around post of st), YO, pull up a loop thru both st tops, YO, pull thru all 3 loops on hook.
Picot – ch 3, insert hook thru front loop and top side loop of indicated st, YO, slip st tightly.
Cl (2 dc cluster) – (YO, insert hook in indicated place, YO, pull up a loop, YO, pull thru 2 loops) 2 times, YO pull thru remaining loops on hook.
Exdc (Extended double crochet) – YO, insert hook in indicated place, YO, pull up a loop, YO, pull thru 1 loop, [YO, pull thru 2 loops] twice.
PM (Place Marker)
Pattern Notes:
Headband is worked in a 1×1 rib using skinny front and back post half double crochet stitches, then flower is worked in 2 parts and sewn to headband.
Instructions
Headband
Rnd 1: With Color A, crochet 96 fsc, without twisting join with a sl st in first fsc.(96 fsc)
Rnd 2: Ch 2, FPhdc around post of first st, [BPhdc around post of next st, FPhdc around post of next st] 47 times, BPhdc around post of last st and base of beginning ch-2, sl st to top of first FPhdc. (48 FPhdc, 48 BPhdc)
Rnds 3 & 4: Repeat Rnd 2.
Rnd 5: Ch 1, sc in next 96 sts around, sl st to first sc to join. Fasten off. (96 sc)
Use beginning tail to close gap at beginning of Rnd 1, weave in all loose ends.
Flower 1
Rnd 1: With Color B, ch 2, 5 sc in 2nd ch from hook, tighten center of circle, join with sl st to first sc of Rnd. [5 sc]
Rnd 2: Ch 3, Cl in same sc as join, picot in Cl, ch 3 [(sl st, ch 3, Cl) in next sc, picot in Cl, ch 3,] 4 times, sl st in first sc again. Fasten off.
Flower 2
Rnd 1: With Color C, ch 2, 10 sc in 2nd ch from hook, tighten center of circle, join with sl st to first sc of Rnd. [10 sc]
Rnd 2: Ch 1, sc in same sc as join, [ch 2, sc in next st, ch 1, sc in next st] 4 times, ch 2, sc in next st, ch 1, join with sl st to first sc of Rnd. [10 sc, 5 ch-1 sp, 5 ch-3 sp]
Rnd 3: Ch 1, [(sc, dc, Exdc, picot, Exdc, dc, sc) in ch-2 sp, skip next st, sl st in ch-1 sp, skip to next ch-2 sp,] 5 times, join with sl st to beginning sc of Rnd. Fasten off
Finishing
Weave in tails on flowers, then use remaining tails to sew Flower 1 to Flower 2, then both flowers on headband. Best spot to sew them is over joining seam. When weaving in ends follow the “columns” of your post stitches so you don’t lose the stretchiness of your ribbing.
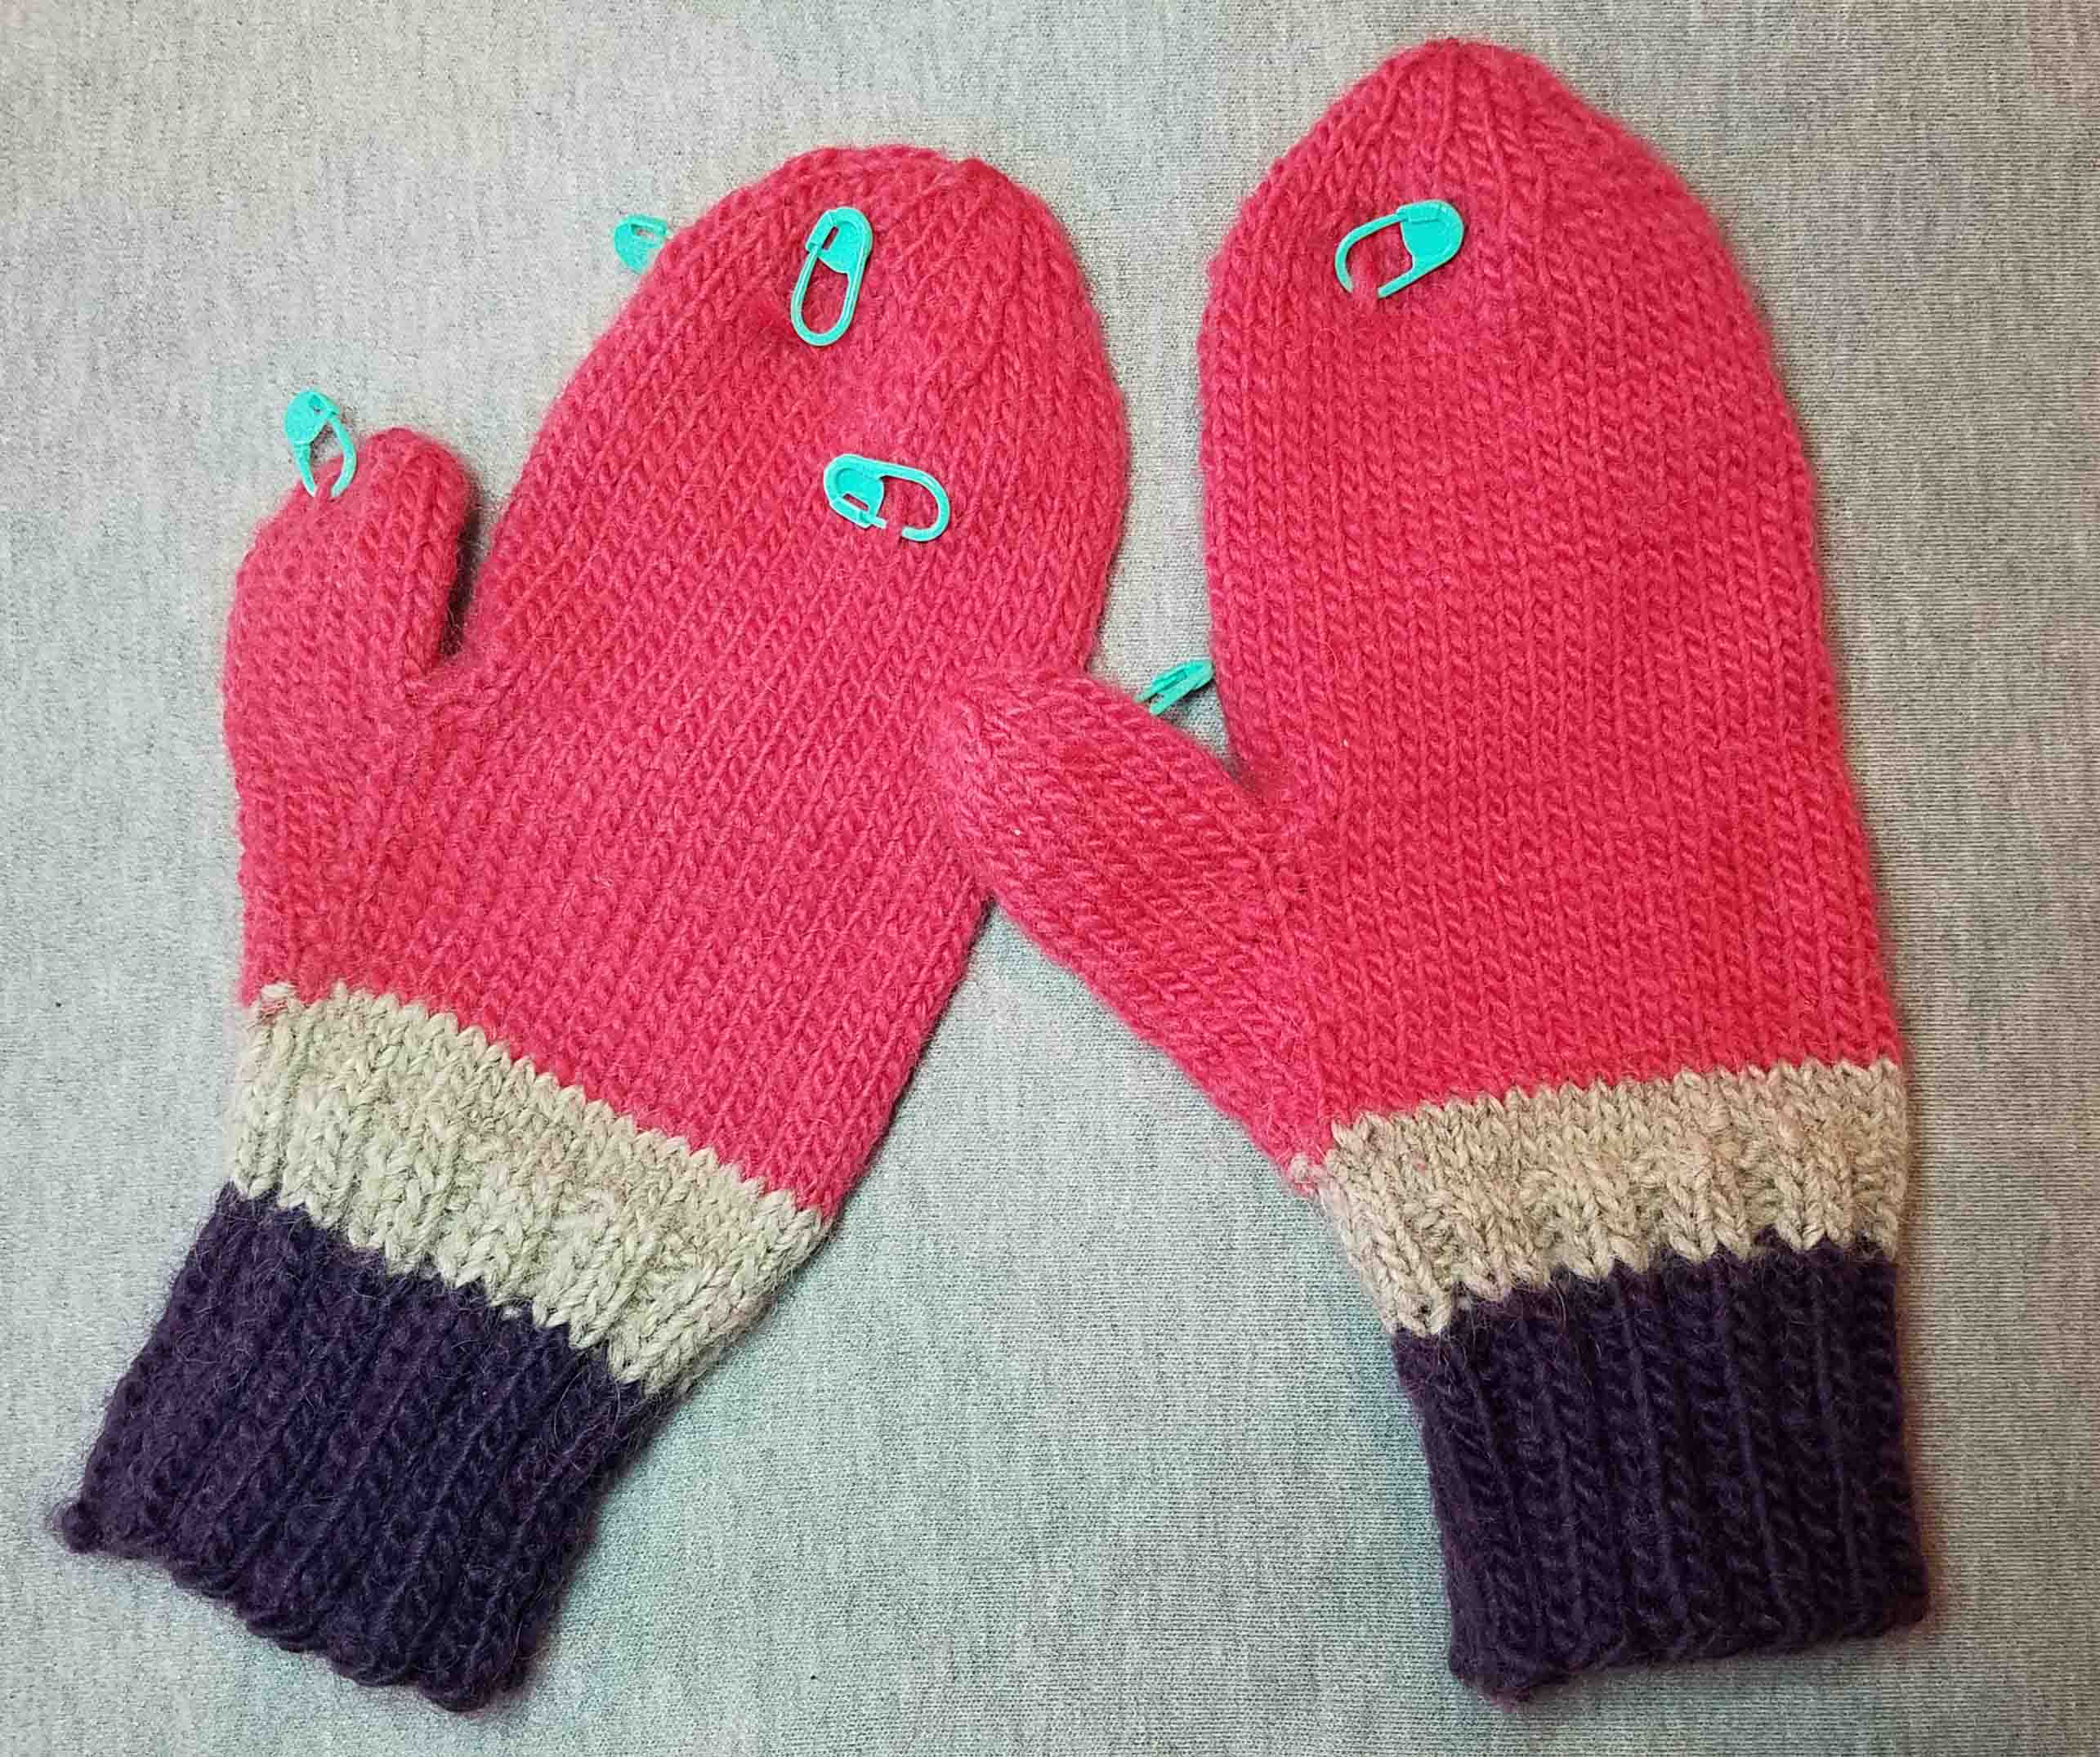
One of my least favorite things in crochet or knitting is dealing with the loose ends once a project is finished. Needle felting can be a big help in securing those ends though, especially if your project is worked using a wool blend yarn.
Recently one of my friends had an issue with some mittens she had knit. When weaving in ends she had some extra strands on the outside of her fabric. We looked at the mittens trying to figure out how she could weave in the ends. They were going to be super short and there was a good chance they would pop loose.
Needle-felting to the rescue! I grabbed my size 40 felting needle, my “egg” felting surface, and a small steel crochet hook (not shown).
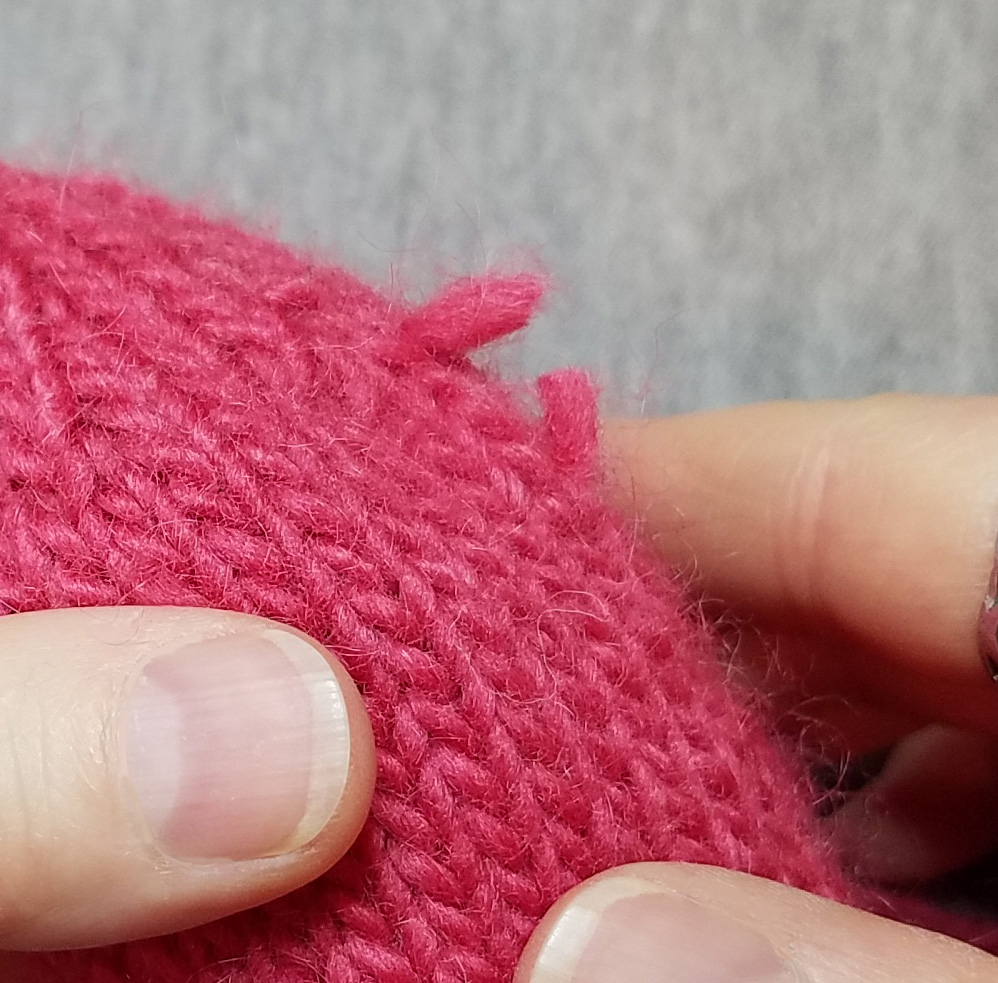
I cut the strand in the center, and had 2 short ends.
I then pulled the 2 loose ends to the wrong side of the fabric by inserting a small crochet hook in from the side.
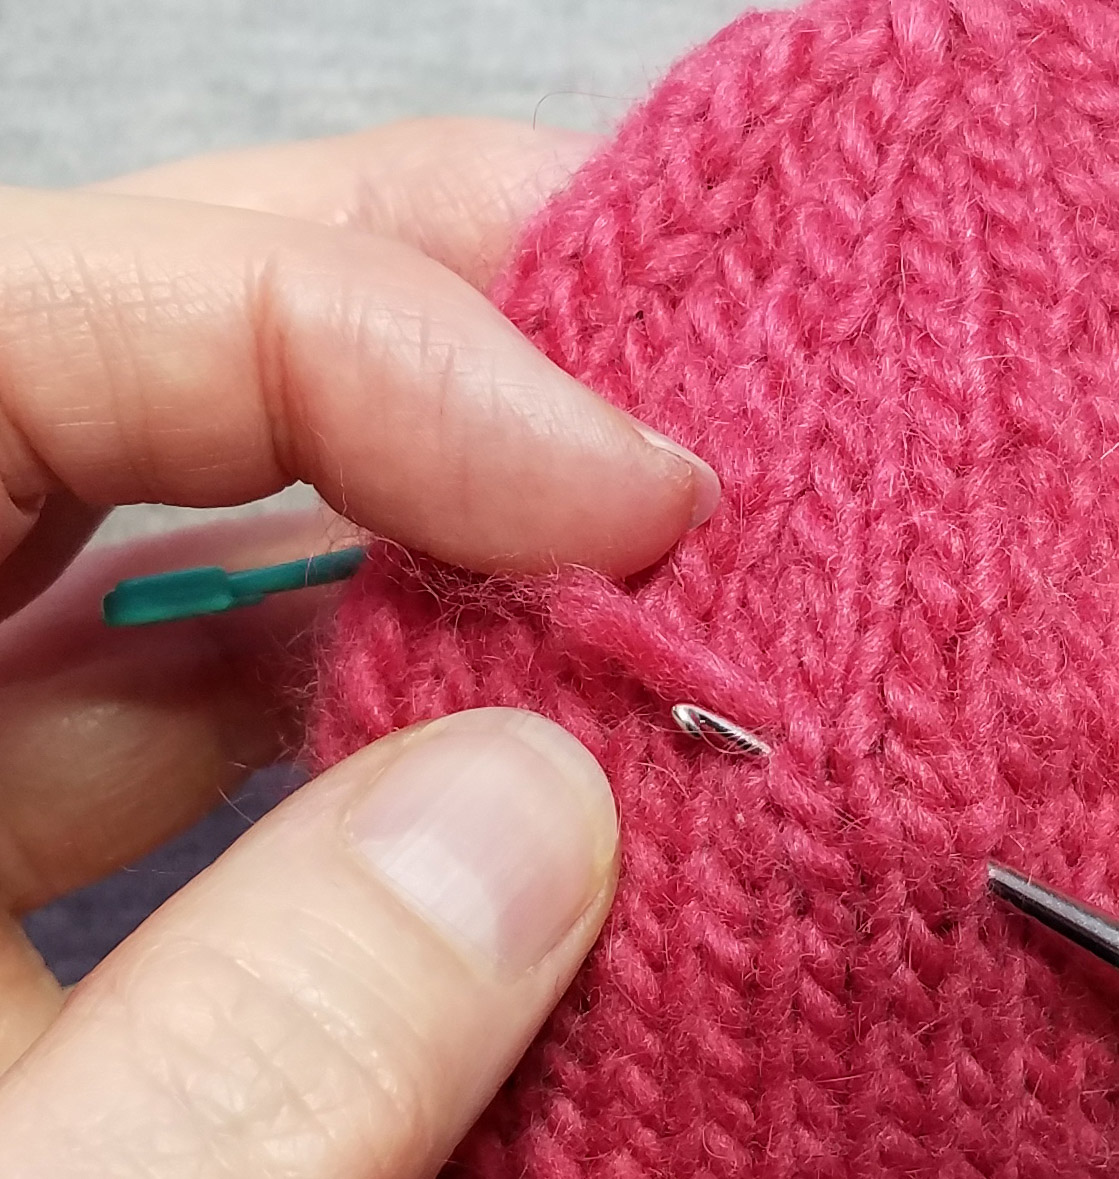
I turned the mitten inside out and gently pulled on the ends to be sure I didn’t have any excess yarn on outside of mitten. I inserted my felting surface behind the fabric and snugged the fabric where I would be needling tight to the surface.
I then gently needled the ends close to where they came thru the fabric. I checked the outside (right-side) of the fabric regularly to make sure my work wasn’t visible. I wanted to secure the ends but not decrease the stretch of the fabric. Once I was sure the ends were well secured I trimmed off any excess yarn.
You can use this same method with any knit or crochet project. Especially if the project is worked in a wool or other animal fiber yarn. Needle felting can secure other types of fiber, but you may want to test it out before relying on it for your final project.
Needle felting can even be a great way to secure the cut end of longer tails that have been woven in. Especially helpful on items that get a lot of use like hats, mittens, scarves and blankets.
For longer tails, weave in like you usually do, but before cutting the yarn use your felting needle to secure the end. Then cut close to the needle felted spot to remove excess yarn.
This post contains affiliate links. I may receive compensation (at no additional cost to you) if you make a purchase using these links.
One of my favorite tools is Clover’s Single Needle Felting Tool. It is much easier on my hand than just holding the plain needle. The ergonomic shaping also allows for more control of the needle while working. If you can’t find this tool locally it is available online at Amazon.com. Click on the photo below to go straight to it.
Paris, France is one of my favorite cities. I dreamt of visiting it for many years before I finally got to see it for real. When I went there for the very first time it was April.
The gardens were just beginning to show color, but the weather was occasionally rainy and gray. The colors of the gardens would be muted by the subdued light yet it was magical and wonderful for me.
It’s been years since I last visited, that is a very young me at the fountain in the Place de Concorde. This scarf design was inspired by the gardens of Paris and reminds of my happy visit there.
Paris Garden Scarf. My sample is worked using one ball of Classic Elite’s lovely Alpaca Sox. This is a 60% Alpaca/20% Wool/ 20% Nylon yarn that works up as a light fingering weight. The Nylon will help this scarf hold up to a lot of wear. I designed this to be crocheted with a larger than usual hook size to show off the soft halo of the yarn.
My original proto-type was made working with 2 strands of yarn at the same time. I used 1 ball of Classic Elite’s Silky Alpaca Lace (70% Alpaca/30% Silk) and 2 balls of Pirouette (67% Mohair/25% Bamboo/8% Nylon). Unfortunately the Pirouette yarn was discontinued. But I’m still very happy to wear my original scarf.
This is a great take-along project for more experienced crocheters, the stitches aren’t complicated, but they are interesting enough to keep you entertained. I found the second scarf took me only about 8 hours to work up.
If you are looking for a lovely lacy and warm scarf for a gift this one would be a good match. All 5 of my patterns released the past month were designed with gift-giving in mind. This is a great time of year to get started on those holiday gifts.
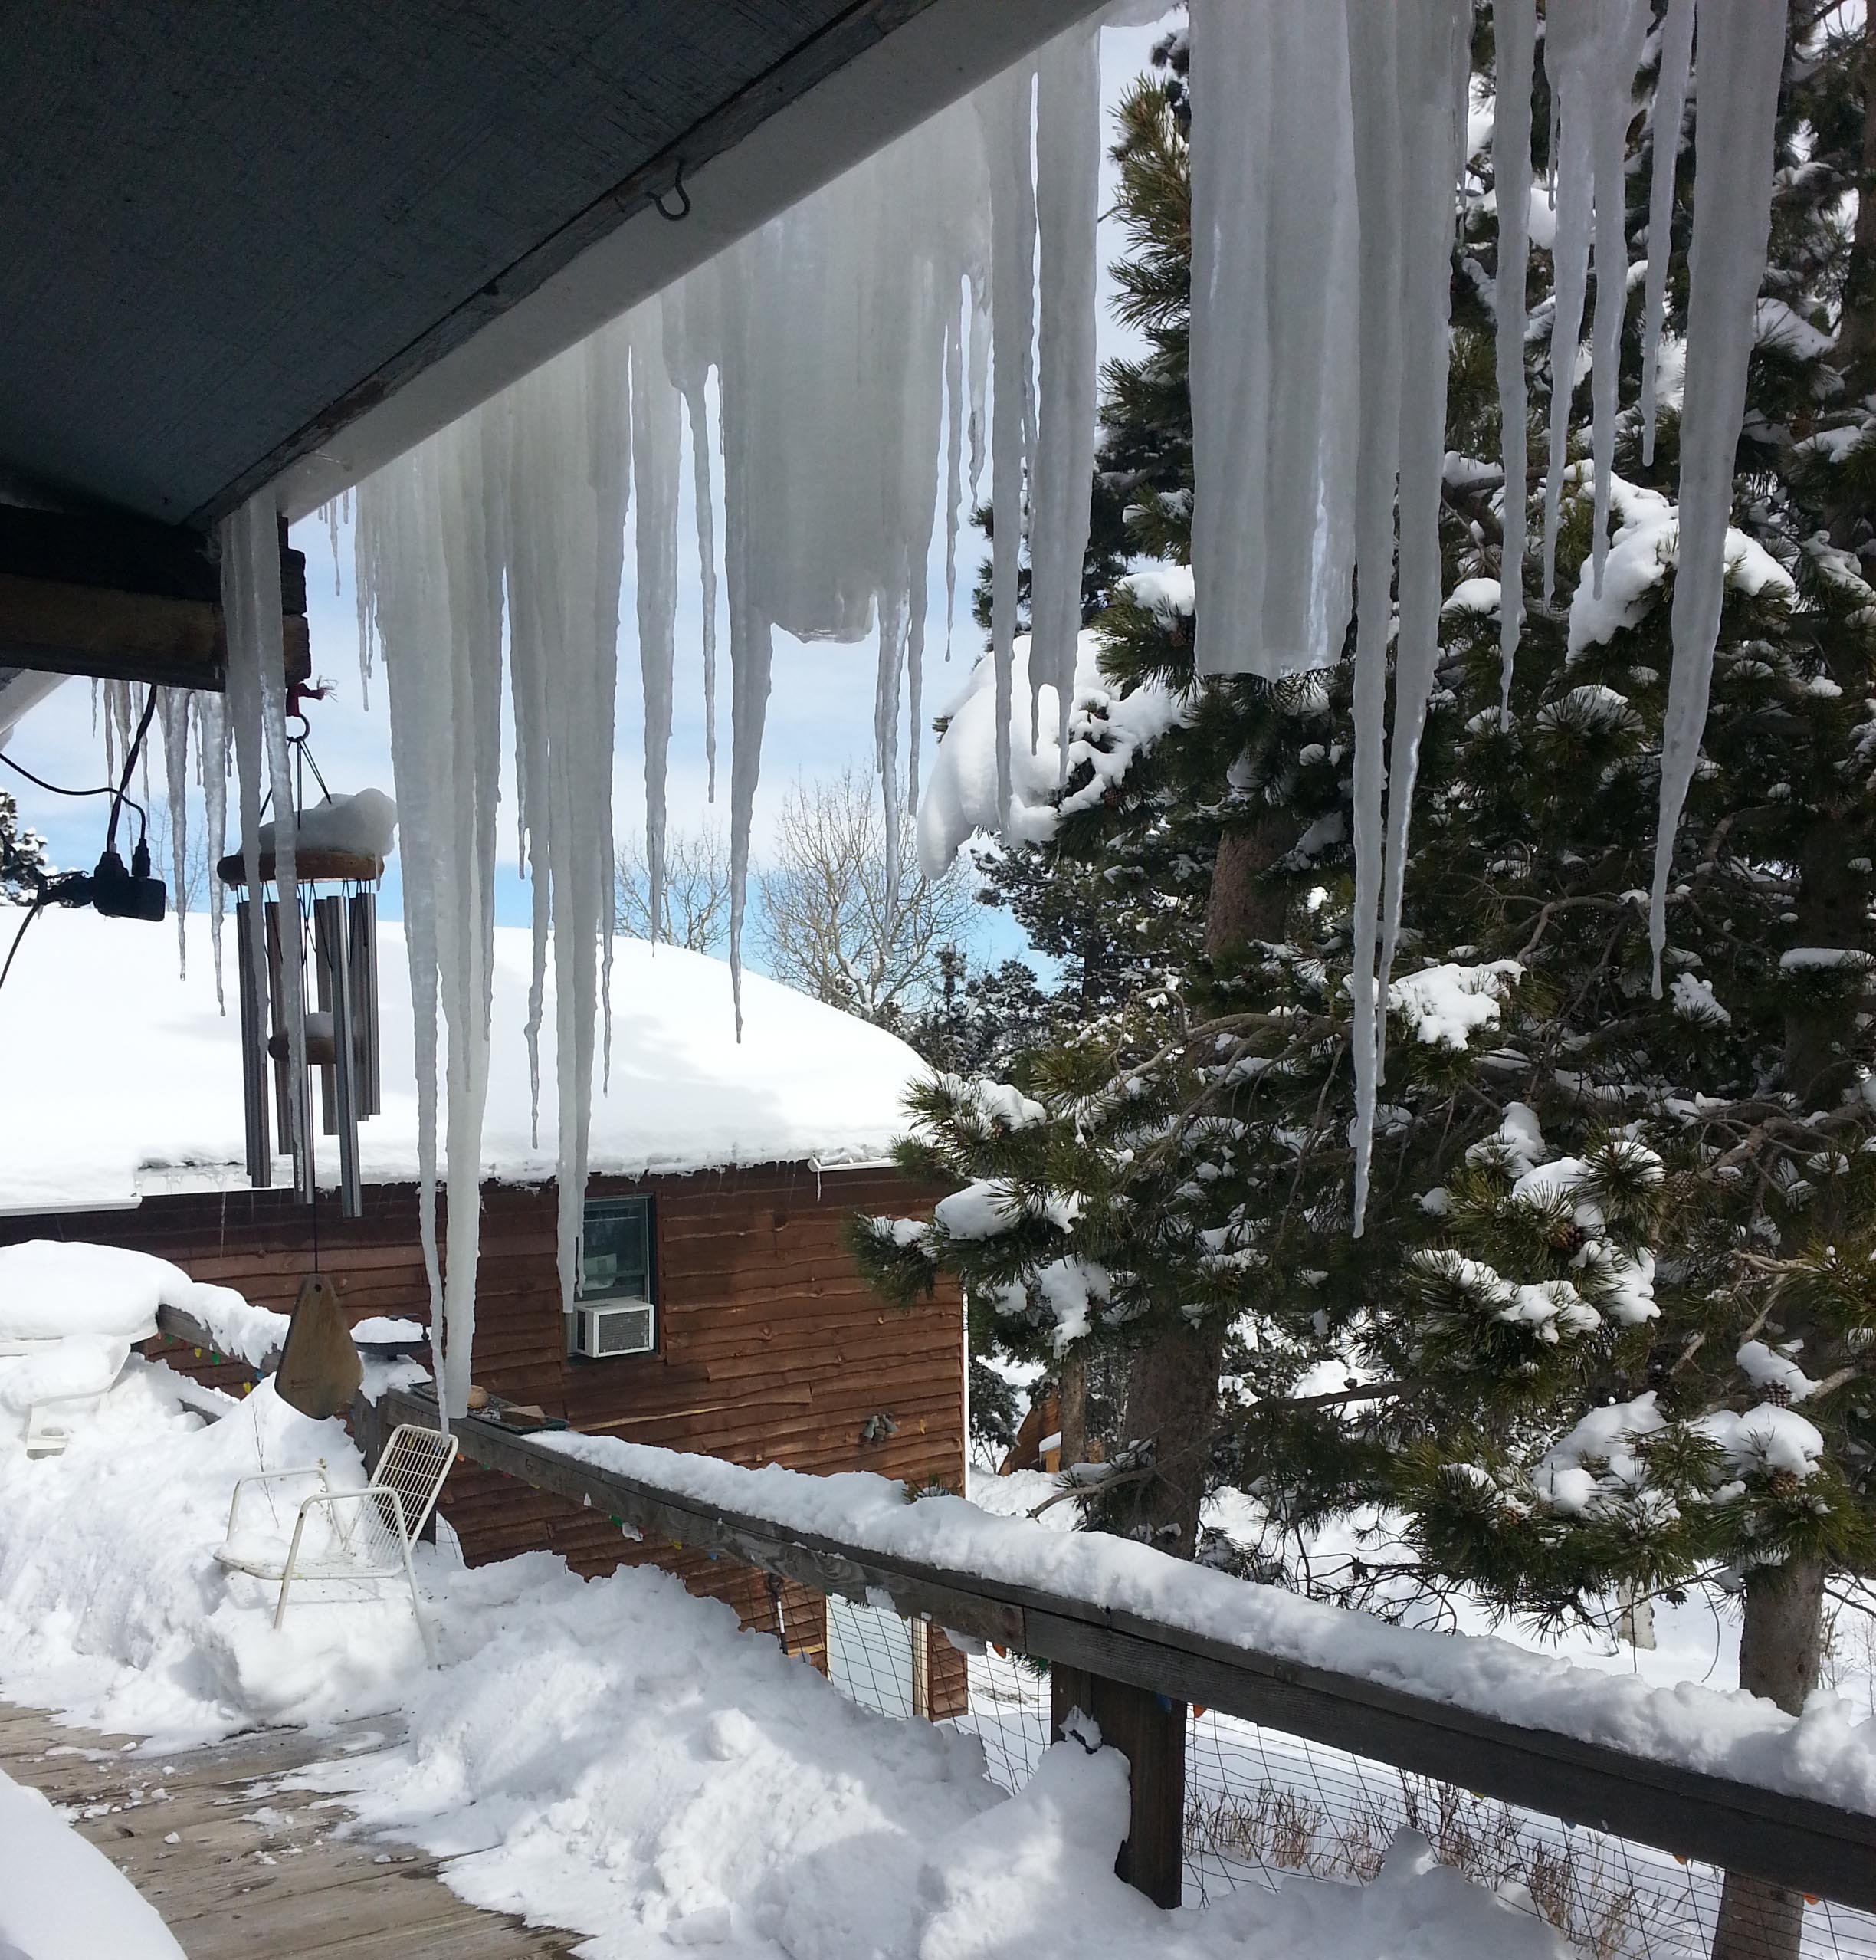
So February is over after today. I can never figure out why it seems like such a super short month, after all it’s only 2 days shorter than most of the other months. Though, once again, it went screaming by.
Tomorrow is March and National Crochet Month. I’m reminded of the saying, “March comes in like a lion and goes out like a lamb.” I’m really hoping there is some truth to that this year.
This is the scene outside my front door right now. It’s rather beautiful with the sunshine and blue sky, but the temperature is a balmy 17 degrees Fahrenheit.
I am definitely in the mood for crocheting warm accessories. As many of my readers know, my very favorite accessory to crochet is a hat. And in keeping with my goal to create “teaching” patterns I am pleased to announce I have published my first one.
This pattern was based off my Perfect Fit Crocheted Hat class that I have taught the last 2 years at Longmont Yarn Shoppe. I’ll actually be teaching this class at the shop again next weekend. But for those of you that are too far away to join me for a class, this pattern is a chance to be able to learn the skills for making hats that are exactly the size you want.
Perfect Fit Crocheted Hat
What I like the best about this pattern/lesson is that you can use the formula taught in it to use any size yarn or hook to create a hat that is just the right size. A great way to use up the bits and pieces of yarn you may have left in your stash, since I usually only need about 110 yards of worsted weight yarn to make a standard woman’s size hat, even less yardage is needed to make hats for children.
So celebrate some crochet this month with making a warm hat or 2 for yourself or others you care about. Hoping we will all be seeing a more “lamb” like March by the end of the month.
This past Saturday I attempted to learn how to knit continental style.
The Necessary Yarn
Now the word “Continental” inspires romantic visions of sophistication and elegance in my mind. This could possibly be due to the fact that I was raised in the wilds of Kansas. Continental knitting it turns out has nothing to do with elegance, at least not in my hands.
Knitting is not really my talent. I can sort of knit using the English style, where one “throws” the yarn. I generally need to have an illustrated knitting book open for prompting each step.
After a bit I am zipping along with basic knit and purl stitches (which is about the time I get in trouble with unintended increases or decreases). I have even been known to make a square that has a close resemblance to a flat four-sided object with 90 degree corners (sometimes by a judicious application of force to reshape the wonky).
I’ve been crocheting for nearly 40 years, so it has been a very long while since I was at the “just learning” stage. I am discovering in my knitting adventures that I am at the very beginning, in fact at times I wonder if I am in some twilight region that precedes the beginning.
Being I am a brave and adventurous soul I decided I wanted to get better at knitting. Many knitters, that also crochet, had promised me that knitting continental style is much easier to learn since you hold the yarn similar to crochet. This sounded good to me, though possibly I was simply delusional.
I made plans with a friend that I see at The Lamb Shoppe’s monthly Pajama Jam to teach me how to knit continental style. My ambitious idea being that I would make a hat for another friend’s soon to arrive baby.
I had packed a few sizes of needles from my meager stash of knitting accoutrement into my project bag for the evening. It was decided after a confab that I would use my Size 7 needles and worsted weight yarn knitted flat then seamed to construct the hat.
Being I did not have a yarn with me that would fit the bill, and was fortuitously in a yarn shop at the moment, it was time for yarn shopping. For once I did not dilly dally at this most wonderful of errands and quickly decided on Cascade 220 Superwash Paints in the lovely Tropical Seas colorway.
I then cast-on using my crochet hook (I was informed that what I was doing was considered a provisional cast-on, but it would work) and began to knit my first ever swatch continental style. It took a bit of time, but I eventually was working at a steady clip with knit stitches and accomplished a few rows of garter stitch.
Some of my friends at the table with me were highly entertained at my method of knitting. One went so far to say that I was crocheting my knitting. I replied that it was perfectly sensible that I would as I am a crochet designer. I was beginning to feel fairly happy with my knitting progress, when I was told it was time to learn to purl.
Hmmmm, another word with mental picture issues. In my mind (and experience) pearls are iridescent lovely gems, and though the word “purl” in knitting sounds similar this stitch is certainly no gem. When my helper told me that purling isn’t anything to be afraid of I knew I was in serious trouble.
My rows of knit stitch had only taken me about 40 minutes. 2 hours after I had started my first row of purling I finally finished it. Let’s just say now that my friend’s baby is likely to be in kindergarten before I get a hat knit (I may be whipping up a crochet one just in case).